Test application generation
Test applications can be generated from interface and component models. A test application generates on-the-fly test sequences of events based on the used model (interface or component) and sends these events to a system under test. An adapter is used as intermediary between the test application and the system under test. The adapter receives events from the test application and translates them to calls understandable by the system under test. It also receives the responses from the system under test and translates them to events understandable by the test application.
If the used interfaces contain triggers with parameters, replies and notifications with variables or any (*) value then one or more parameters file are required.
In order to generate a test application, add a task to the .prj file similarly to the following example:
import "Camera.interface"

Project Camera {

	Generate TestApplication {
        // For components, use "for component" instead
        Testapplication_ICamera for interface ICamera
	    {
            params: "ICamera.params"
	    }
	}
}
The params option is only required when the interface has commands/signals with input parameters and replies/notifications with variables or any (*) expression.
The above will generate the test application with a Graphical User Interface (GUI). Additionally, a command-line test application for integration with CI/CD pipelines can be generated. This is explained at the bottom of this page.
Path to adapter
The path to the executable file for the adapter can optionally be given in the generator task as follows:
Testapplication_ICamera for interface ICamera
        {
            params: "ICamera.params"
            adapter: "C:/ComMA/Adapter/bin/adapter.exe"
        }
Additionally, multiple adapters can be provided and mapped to one or more interfaces.
The path to the adapter has to be given with forward slashes or if backward slashes are used they have to be escaped in the following way: C:\\\\ComMA\\\\Adapter\\\\bin\\\\adapter.exe
Timeouts
In some cases the test application can receive events from the system under test, for example, a reply to a command or a notification.
The time for receiving such events can vary and is generally unknown in advance.
The user can specify how long the test application should wait for events before taking other actions or stopping.
See the timeouts option in the following example:
Testapplication_ICamera for interface ICamera
        {
            params: "ICamera.params"
            adapter: "C:/ComMA/Adapter/bin/adapter.exe"
            timeouts {stop when no events observed: 10.0 sec default: 0.2 sec}
        }
The first timeout value indicates how long the test application will wait for events before stopping in case no other actions are possible according to the model. The second timeout value (the default) indicates the waiting period if other actions are possible. When this timeout expires and no events are received from the system under test, the test application will take an action admitted by the model. Usually the first value is larger than the second one.
Multiple clients or servers on a single port
Test application can be generated from a component model. By default, the test application will have one client for each provided port and one server for each required port. The user can change this default behavior by defining the clients and servers for each port. It is also possible that each client or server has its own parameters file. This is illustrated in the following example .prj file.
Testapplication_Camera for component CameraComponent
        {
            params: "ICamera.params"

            adapter: "C:/ComMA/Adapter/bin/adapter.exe"

            client c1 ports controlPort default_params
            client c2 ports controlPort "ICamera1.params"

            server l ports lensPort "ILens.params"
        }
In this example, there will be two clients (named c1 and c2) for controlPort.
The first client will use the default parameters file given in the params section.
The second client will use the parameters file ICamera1.params.
There is also one server named l that will be used at the hypothetical required port lensPort.
It should be noted that if parameters are not required for a given port, 'default_params' still needs to be given.
If no clients or servers are specified for a given port, there will be no default client/server generated for it.
It is possible to use the same component name for both the client and server roles. Furthermore, a client component can be a client for more than one port, for example:
client c1 ports controlPort default_params servicePort "IService.params"See also the help page on the generation of a simulator for another example.
Generate and run test application
To generate the test application, run the .prj (right click on the .prj file → Run As → Run generators).
The client can be started by executing the generated .bat/.sh in the src-gen/testapplication folder.
Once the test application is started you will see a window like below:
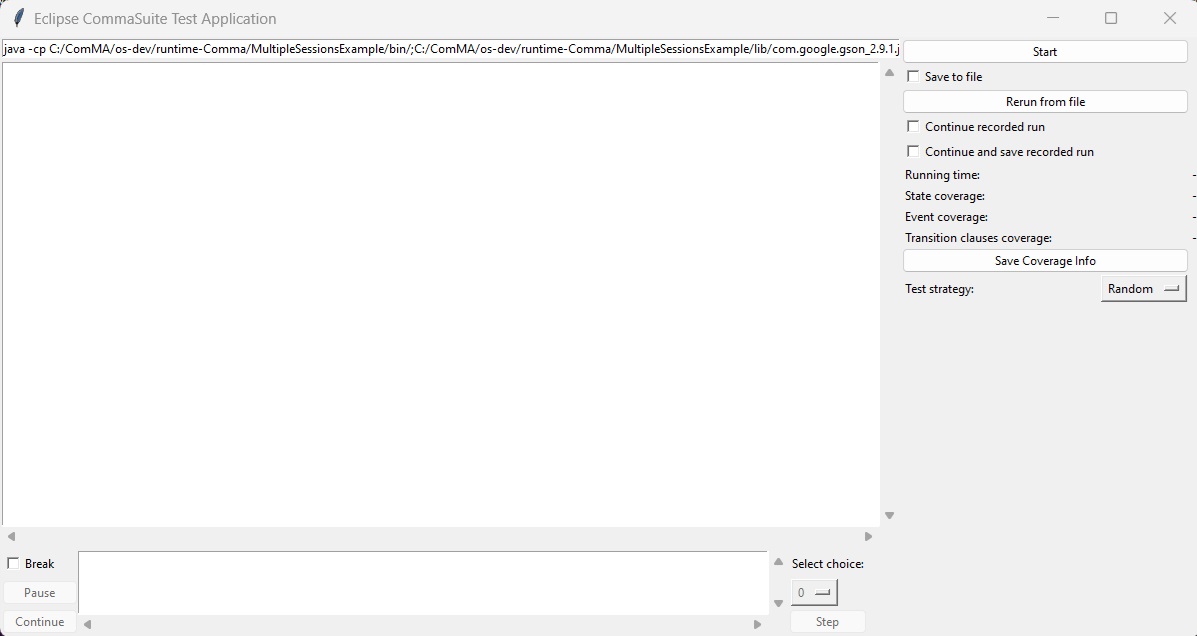
The path to the adapter will be filled in the field to the left
of the Start button.
Pressing this button will start the adapter and the test application. The label of the button
changes to Stop. The events sent to and received from the system under test are shown in the window. The test process can be stopped by
pressing the button Stop. The process may also stop of its own if no further events can be generated based on the model or if an error is detected.
It is also possible to select the strategy for generating test events. The default strategy is Random, which at each step selects randomly a test event among the set of possible ones. The strategy Joker aims at achieving higher transition coverage with less steps. If the parameters files contain scenarios, one of the strategies Scenarios Random or Scenarios Joker need to be selected.
Pressing Save Coverage Info creates files with information about the visited model states and the transitions that were traversed.
Details of the structure of transition coverage file can be found at the end of this page.
Apart from the basic Start/Stop functionality, the test application has the following options:
-
Saving an execution to a file. Selecting the check box
Save to filewill lead to serialization of the exchanged events in a file with extension.recording. -
A recording file can be used by pressing
Rerun from filebutton. This will show dialog window to load a recording file. -
Using a recording file comes with three alternative options.
Continue recorded runwill continue the run after replaying the events in the recording. The optionContinue and save recorded runwill save the run to a recording file. The optionMinimize recorded runremoves the cycles from a recording file. A cycle is a sequence of events that starts and ends in the same state. State is a collection of variables values and the current syntactical state of an interface. Every time a cycle is removed, a new file is saved that contains the recording without the found cycle. The files are located in the folder of the recording being minimized.
Break
A break statement can be added to recordings (at the and of a line) and to parameter files.
These break statements are used when the Break check box in the bottom part of the user interface has been selected.
Then the test application will stop when a statement with a break can be selected and the user interface presents the options for the next statement.
The user can select the next action, continue in step mode, or let the test application continue until the next statement with a break.
Behavior of the test application
The test application works as follows:
-
In case of an interface model, the test application selects commands and signals that are allowed at the current state of the interface model and sends them to the system under test via the adapter. The system under test may respond with reply or notifications. The test application checks if the received events are allowed in the current state and if the parameter values conform to the ones given in the model.
-
In case of a component model, the test application selects one of the allowed commands or signals on a provided port or one of the allowed reply or notifications on a required port. The chosen event is sent to the system under test. It in turn may respond with reply/notifications on a provided port or a command/signal on a required port. The received event is checked against the component model.
The adapter plays a crucial role in the described communication. It is usually implemented manually, the implementation reflects the specifics of the system under test.
The interaction between the test application and the adapter is as follows:
-
The test application starts the adapter, which in turn may need to initialize and start the system under test.
-
The test application and the adapter communicate via the standard input/output. The events are in JSON format following the structure described on the JSON events file page.
-
The adapter reads events from the standard input, translates the event and the parameter data (in JSON) to a call with parameter values specific to the system under test.
-
The adapter converts the input from the system under test to a JSON event and sends it to the test application.
The values in parameters files are used by the test application depending on the scenario:
-
In case of interface model, the parameters for commands and signals are used.
-
In case of component model, the parameters for commands and signals on provided ports are used as well as the parameters for replies and notifications on required ports.
Structure of transition coverage files
Transition coverage files contain comma-separated value data. For example:
Component,Port,Interface,Clause,SourceLine
c1,vmUserPort,IUser,C_AcceptUserCommands_0_InsertCoin()_0_0,18
c1,vmUserPort,IUser,C_AcceptUserCommands_4_OrderProduct()_1_0,56
c1,vmServicePort,IService,C_Operational_ias0.0_NonTriggered_0_0,11
Clauses in the transitions are identified by the following naming scheme. For easier tracing back to the original source file, the line number is given.
For transitions with a trigger:
C_<stateName>_<indexOfTransitionInState>_<TriggerName>_<indexOfClause>_0For transitions without a trigger:
C_<stateName>_<indexOfTransitionInState>_NonTriggered_<indexOfClause>_0
Observe 'NonTriggered' in the example.
The following example shows that the transition is defined in 'in all states' block (observe the 'ias' part).
C_<stateName>_ias<indexInAllStates>.<indexTransition>_<TriggerName>_<indexClause>_0Command-line test application
A command-line test application can be generated from interface and component models.
To generate a test application, add a task to the .prj file as shown in the following example:
import "Camera.interface"

Project Camera {

    Generate TestApplication {
        // For components, use "for component" instead
        Testapplication_ICamera for interface ICamera
        {
            params: "ICamera.params"
            command line tool
        }
    }
}
The command line tool option is necessary for generating the command-line test application in the src-gen/testapplication folder.
The command-line test application includes its own documentation, which is printed by executing the test application with the -h argument.