| Eclipse 3.2 - Library Example |
Library Example
Version 3.2 M5
This document describes the library example that illustrates some the the logical
model support that is being added in 3.2.
Setup
Here's what you need to do to setup Eclipse to use this example:
- Download and install Eclipse Milestone 5 (M5) from Eclipse.org
- Download and install EMF 2.1 from Eclipse.org
- Download the library example plugin from here.
These plugins are workspace projects so you will need to import them into
a workspace to work with them.
- The example depends on the org.eclipse.jface.examples.binding.emf
plugin which is included in the download but is also available from the :pserver:anonymous@dev.eclipse.org:/cvsroot/tools
repository in the org.eclipse.ve.sweet.internal/binding/org.eclipse.jface.examples.binding.emf
directory.
Performing Team>Updates
Be sure to turn on the Team>CVS>Work In Progress preference for performing
client side merges. Once this is one, all updates should result in a dialog
that previews any updates by showing the affected model objects.
Libraries, Books and Writers
The model is persisted in several types of files:
- *.library files which contain the name of a library and one or more book
copy records which reference a book and indicate the number of copies of the
book the libraries contain.
- *.books files which contain one or more books. Each book has several properties
(name, number of pages, etc.) as well as a reference to the book's author.
- *.writers files which contain one or more writers. Each writer has properties
(e.g. name) as well as references to one or more books that have been authored
by the writer.
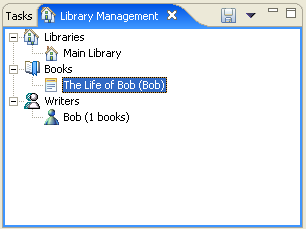
The following screen shot shows an example Library.

Here is the containment relationship of these model elements
- My.writers: contains "Bob"
- My.books: contains "The Life of Bob"
- mylib.library: contains copies of the "Life of Bob"
The model provider and related classes are found in the org.eclipse.team.examples.library.adapt
plugin.
Here are some example steps that illustrate how to create Libraries, Books
and Writers.
Part 1: Create a library and share it
- Open the Library Management View (Window/Show View>Libraries/Library
Management)
- Create a library
- From context menu of view, create a New/Library.
- Choose to create it in a new project.
- Enter the project name "libraries".
- Name the library
- Expand Libraries and select Library
- Open the Properties view (Window/Show View>Basic/Properties)
- Enter the name "Main Library"
- Click the view Save button
- Create a writer named "Bob"
- From context menu of view, create a New/Writers Catalog: "My.writer".
- Edit the new writer
- Expand Writers and select Writer
- In the Properties view, enter the name "Bob"
- Click the view Save button
- Create a book
- From context menu of view, create a New/Book Catalog: "My.books".
- Expand Books and select Writer
- In the Properties view, enter the title "The Life of Bob"
- Choose Bob as the author
- Enter values for the other fields
- Click the view Save button
- Add a book to the library
- From the context menu of "Main Library", choose Add Book Copy
- Expand "Main Library" and select Copy
- In the Properties view, select "The Life of Bob" as the book
- Enter 3 as the number of copies
- Click the view Save button
- Check Resource Mappings
- Select the writer "Bob" and choose "Show Resource Mappings"
- You will see the file"My.writers"
- Try it on the "Main Library"
- You will see the file"mylib.library"
- Share the project with a CVS repository and commit all the files
Part 2: Create a second library
- From context menu of view, create a New/Library.
- Choose NOT to create it in a new project.
- Select the project "libraries" and name the library file "Another.library".
- In the Properties view, name the library "Another Library"
- Create a new writers catalog and book catalog named "Anther.writers"
and "Another.books" respectively
- File in the fields for the writer and book
- Add a copy of the book to "Another Library"
- Save the view
- Commit "Another Library"
Part 3: Parallel Developement
- Start up a second workspace
- Load the libraries project in the second workspace
- Open the Library Management view
- Make a change to a Book (e.g. changes the number of pages)
- Choose Open from the context menu of the book
- Changes the number of pages in the editor and Save
- Select the book in the view and choose Team.Commit
- In the original workspace, select the book and choose update

