Developing JAXB Applications Using EclipseLink MOXy,
Release 2.7 |
|
This section demonstrates several ways to map simple Java values directly to XML text nodes.
Given the XML schema in Example 4-1, Figure 4-1 illustrates an XML direct mapping to an attribute in a corresponding XML document.
Example 4-1 Sample XML Schema
<?xml version="1.0" encoding="UTF-8"?>
<xsd:schema xmlns:xsd="http://www.w3.org/2001/XMLSchema">

   <xsd:element name="customer" type="customer-type"/>

   <xsd:complexType name="customer-type">
      <xsd:attribute name="id" type="xsd:integer"/>
   </xsd:complexType>

</xsd:schema>
Figure 4-1 XML Direct Mapping to an Attribute

Example 4-2 shows how to annotate your Java class to obtain this mapping with EclipseLink. All that is needed is the standard JAXB @XmlAttribute annotation.
Example 4-2 Using the @XmlAttribute Annotation
package example;

import javax.xml.bind.annotation.*;

@XmlRootElement
@XmlAccessorType(XmlAccessType.FIELD)
public class Customer {
   @XmlAttribute
   private Integer id;

   ...
}
Example 4-3 shows how to define your mapping information in EclipseLink's OXM metadata format.
This section describes using an XML direct mapping when doing the following:
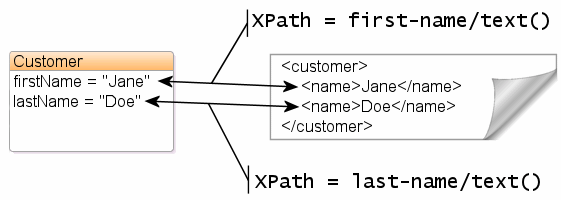
Given the XML schema in Example 4-4, Figure 4-2 illustrates an XML direct mapping to individual text nodes in a sequence in a corresponding XML document.
Example 4-4 Sample XML Schema
<?xml version="1.0" encoding="UTF-8"?>
<xsd:schema xmlns:xsd="http://www.w3.org/2001/XMLSchema">

   <xsd:element name="customer" type="customer-type"/>

   <xsd:complexType name="customer-type">
      <xsd:sequence>
         <xsd:element name="first-name" type="xsd:string"/>
         <xsd:element name="last-name" type="xsd:string"/>
      </xsd:sequence>
   </xsd:complexType>

</xsd:schema>
Figure 4-2 XML Direct Mapping to Individual Text Nodes

Example 4-1 shows how to annotate your Java class to obtain this mapping with EclipseLink. Here, the standard JAXB @XmlElement annotation is used, with a customized element name.
Example 4-5 Using the @XmlElement Annotation
package example;

import javax.xml.bind.annotation.*;

@XmlRootElement
@XmlAccessorType(XmlAccessType.FIELD)
public class Customer {
   @XmlElement(name="first-name")
   private String firstName;

   @XmlElement(name="last-name")
   private String lastName;

   ...
}
In Example 4-5, we have explicitly specified the XML element names for the mapped attributes. This is an optional configuration – without an explicit name set, the XML element will simply match the Java attribute name; we would see <firstName>Jane</firstName> in XML. For more information on JAXB name-binding algorithms, see "Appendix D: Binding XML Names to Java Identifiers" of the Java Architecture for XML Binding (JAXB) Specification (http://jcp.org/en/jsr/detail?id=222).
Example 4-6 shows how to define your mapping information in EclipseLink's OXM metadata format. To specify a custom element name, the name attribute is used.
Given the XML schema in Example 4-7, Figure 4-3 illustrates an XML direct mapping to a text node in a subelement in a corresponding XML document.
Example 4-7 Sample XML Schema
<?xml version="1.0" encoding="UTF-8"?>
<xsd:schema xmlns:xsd="http://www.w3.org/2001/XMLSchema">

   <xsd:element name="customer" type="customer-type"/>

   <xsd:complexType name="customer-type">
      <xsd:sequence>
         <xsd:element name="personal-info">
            <xsd:complexType>
               <xsd:sequence>
                  <xsd:element name="first-name" type="xsd:string"/>
                  <xsd:element name="last-name" type="xsd:string"/>
               <xsd:sequence>
            </xsd:complexType>
         </xsd:element>
      </xsd:sequence>
   </xsd:complexType>

</xsd:schema>
Figure 4-3 XML Direct Mapping to a Text Element in a Subnode

Example 4-8 shows how to annotate your Java class to obtain this mapping with EclipseLink. Here, because we are going beyond a simple element name customization and are actually introducing new XML structure, EclipseLink's @XmlPath annotation is used.
Example 4-8 Using the @XmlPath Annotation
package example;

import javax.xml.bind.annotation.*;
import org.eclipse.persistence.oxm.annotations.*;

@XmlRootElement
@XmlAccessorType(XmlAccessType.FIELD)
public class Customer {
   @XmlPath("personal-info/first-name/text()")
   private String firstName;

   @XmlPath("personal-info/last-name/text()")
   private String lastName;

   ...
}
Example 4-9 shows how to define your mapping information in EclipseLink's OXM metadata format. Here, the customized XML path is defined in the xml-path attribute.
Example 4-9 Using the xml-path Attribute
...
<java-type name="Customer">
   <xml-root-element name="customer"/>
   <java-attributes>
      <xml-element java-attribute="firstName" xml-path="personal-info/first-name/text()"/>
      <xml-element java-attribute="lastName" xml-path="personal-info/last-name/text()"/>
   </java-attributes>
</java-type>
...
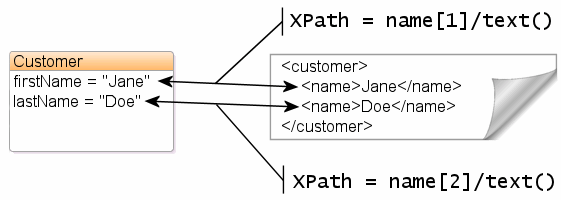
Given the XML schema in Example 4-10, Figure 4-4 illustrates an XML direct mapping to a text node by position in a corresponding XML document.
Example 4-10 Sample XML Schema
<?xml version="1.0" encoding="UTF-8"?>
<xsd:schema xmlns:xsd="http://www.w3.org/2001/XMLSchema">

   <xsd:element name="customer" type="customer-type"/>

   <xsd:complexType name="customer-type">
      <xsd:sequence>
         <xsd:element name="name" type="xsd:string" maxOccurs="2"/>
      </xsd:sequence>
   </xsd:complexType>

</xsd:schema>
Figure 4-4 XML Direct Mapping to a Text Node

Example 4-11 shows how to configure this mapping in Java. Again, for more complex XML path customization, EclipseLink's @XmlPath annotation is used.
Example 4-11 Using the @XmlPath Annotation
package example;

import javax.xml.bind.annotation.*;
import org.eclipse.persistence.oxm.annotations.*;

@XmlRootElement
@XmlAccessorType(XmlAccessType.FIELD)
public class Customer {
   @XmlPath("name[1]/text()")
   private String firstName;

   @XmlPath("name[2]/text()")
   private String lastName;

   ...
}
Example 4-12 shows how to define your mapping information in EclipseLink's OXM metadata format.
Given the XML schema in Example 4-13, Figure 4-5 illustrates an XML direct mapping to a simple text node in a corresponding XML document.
Example 4-13 Sample XML Schema
<?xml version="1.0" encoding="UTF-8"?>
<xsd:schema xmlns:xsd="http://www.w3.org/2001/XMLSchema">

   <xsd:element name="phone-number" type="xsd:string"/>

</xsd:schema>
Figure 4-5 XML Direct Mapping to a Simple Text Node

Example 4-14 shows how to annotate your Java class to obtain this mapping with EclipseLink. In this case, the @XmlValue annotation will be used.
Example 4-14 Using the @XmlValue Annotation
package example;

import javax.xml.bind.annotation.*;

@XmlRootElement(name="phone-number")
@XmlAccessorType(XmlAccessType.FIELD)
public class PhoneNumber {
   @XmlValue
   private String number;

   ...
}
Example 4-15 shows how to define your mapping information in EclipseLink's OXM metadata format.
In most cases, EclipseLink can determine the target format in the XML document. However, there are cases where you must specify which one of a number of possible targets EclipseLink should use. For example, a java.util.Calendar could be marshalled to a schema date, time, or dateTime node, or a byte[] could be marshalled to a schema hexBinary or base64Binary node.
The XML schema in Example 4-16 and Figure 4-6 an XML direct mapping from a Calendar object in Java to a date field in XML.
Example 4-16 Sample XML Schema
<?xml version="1.0" encoding="UTF-8"?>
<xsd:schema xmlns:xsd="http://www.w3.org/2001/XMLSchema">

   <xsd:element name="customer" type="customer-type"/>

   <xsd:complexType name="customer-type">
      <xsd:sequence>
         <xsd:element name="hire-date" type="xsd:date"/>
      </xsd:sequence>
   </xsd:complexType>

</xsd:schema>
Figure 4-6 XML Direct Mapping to a Specific Schema Type

Example 4-17 shows how to annotate your Java class to obtain this mapping with EclipseLink. Here, the @XmlSchemaType is used to specify the datatype that will appear in the marshalled XML.
Example 4-17 Using the @XmlSchemaType Annotation
package example;

import javax.xml.bind.annotation.*;

@XmlRootElement
@XmlAccessorType(XmlAccessType.FIELD)
public class Customer {
   @XmlElement(name="hire-date")
   @XmlSchemaType(name="date")
   private Calendar hireDate;

   ...
}
Example 4-18 shows how to define your mapping information in EclipseLink's OXM metadata format.
Example 4-18 Defining the Mapping
...
<java-type name="Customer">
   <xml-root-element name="customer"/>
   <java-attributes>
      <xml-element java-attribute="hireDate" name="hire-date">
         <xml-schema-type name="date"/>
      </xml-element>
   </java-attributes>
</java-type>
...
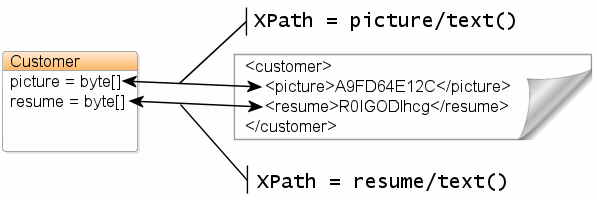
Example 4-19 and Figure 4-7 illustrate XML direct mappings to two different text nodes of different binary types.
Example 4-19 Sample XML Schema
<?xml version="1.0" encoding="UTF-8"?>
<xsd:schema xmlns:xsd="http://www.w3.org/2001/XMLSchema">

   <xsd:element name="customer" type="customer-type"/>

   <xsd:complexType name="customer-type">
      <xsd:sequence>
         <xsd:element name="resume" type="xsd:base64Binary"/>
         <xsd:element name="picture" type="xsd:hexBinary"/>
      </xsd:sequence>
   </xsd:complexType>

</xsd:schema>
Figure 4-7 XML Direct Mappings to Different Text Nodes of Different Binary Types

Example 4-20 shows how to annotate your Java class to obtain this mapping with EclipseLink. By default, JAXB will marshall byte[] to base64Binary, so nothing special is needed for the resume mapping. To map to a hexBinary field, the @XmlSchemaType annotation specifies the XML type, while @XmlJavaTypeAdapter specifies the adapter class that will be responsible for converting the value (in this case, the built-in JAXB HexBinaryAdapter).
Example 4-20 Using the @XmlSchemaType and @XmlJavaTypeAdapter Annotations
package example;

import javax.xml.bind.annotation.*;

@XmlRootElement
@XmlAccessorType(XmlAccessType.FIELD)
public class Customer {
   private byte[] resume;

   @XmlSchemaType(name="hexBinary")
   @XmlJavaTypeAdapter(HexBinaryAdapter.class)
   private byte[] picture;

   ...
}
Example 4-21 shows how to define your mapping information in EclipseLink's OXM metadata format.
Example 4-21 Defining the Mapping
...
<java-type name="Customer">
   <xml-root-element name="customer"/>
   <java-attributes>
      <xml-element java-attribute="resume"/>
      <xml-element java-attribute="picture">
         <xml-schema-type name="hexBinary"/>
         <xml-java-type-adapter value="javax.xml.bind.annotation.adapters.HexBinaryAdapter"/>
      </xml-element>
   </java-attributes>
</java-type>
...
If the type of a node is not defined in your XML schema, you can configure an XML direct mapping to use the xsi:type attribute to provide type information.
Given the XML schema in Example 4-22, Figure 4-8 illustrates a Java class that can be mapped to a corresponding XML document.
Example 4-22 Sample XML Schema
<?xml version="1.0" encoding="UTF-8"?>
<xsd:schema xmlns:xsd="http://www.w3.org/2001/XMLSchema">

   <xsd:element name="phone-number" type="phone-number-type"/>

   <xsd:complexType name="phone-number-type">
      <xsd:sequence>
         <xsd:element name="area-code" type="anySimpleType"/>
         <xsd:element name="number" type="anySimpleType"/>
      </xsd:sequence>
   </xsd:complexType>

</xsd:schema>
Figure 4-9 illustrates an XML direct mapping with a simple type translator in an XML document that conforms to the schema above.
Figure 4-9 XML Direct Mapping with Simple Type Translator

Example 4-23 shows how to annotate your Java class to obtain this mapping with EclipseLink.
Example 4-23 Sample Mapping
package example;

import javax.xml.bind.annotation.*;

@XmlRootElement(name="phone-number")
public class PhoneNumber {
   @XmlElement(name="area-code")
   private Object areaCode;

   private Object number;

   ...
}
Example 4-24 shows how to define your mapping information in EclipseLink's OXM metadata format.