Getting Started With Jetty
Introducing Jetty
What is Jetty?
Jetty is an open-source project providing an HTTP server, HTTP client, and javax.servlet container.
This guide is broken up in to five parts:
-
The first section emphasizes beginning to use Jetty. It provides information about what Jetty is and where you can download it, and where to find Jetty in repositories like Central Maven. It also provides a Quick Start guide on how to get Jetty up and running as well as an overview of how and what to configure in Jetty.
-
The second section of the guide deals with configuring Jetty at a more granular level. It explains how to use Jetty to deploy web applications, configure contexts and connects, and how to implement SSL and other security measures.
-
Administration of Jetty is the focus of the third section of the guide. From server startup to session management, logging, HTTP/2 support and Jetty optimization, these chapters will help administrators get the most out of their Jetty server instances. This section also covers configuring many of the most common servlet container features such as JNDI and JMX.
-
Aimed at advanced users of Jetty, the fourth section of the guide focuses on Jetty development. A large portion of this section is focused on using Jetty as an embedded server in existing applications. It contains several examples and how-to guides for making the most out of the Jetty framework. This section also includes a guide on using the Jetty Maven plugin as well as information on debugging Jetty.
-
The final section of the guide is a reference section. Included there are guides on Jetty architecture and Jetty XML syntax, alternate distributions of Jetty and even troubleshooting of common issues. There is also a chapter on getting involved in the Jetty community including information on how to contribute code and how to find help.
Feedback is always welcome! Additionally, if you are interested in how to contribute to the open source project there is a section on that as well!
What Version Do I Use?
Jetty 9 is the most recent version of Jetty and has a great many improvements over previous versions. This documentation which focuses on Jetty 9. While many people continue to use older versions of Jetty, we generally recommend using Jetty 9 as it represents the version of Jetty that we will actively maintain and improve over the next few years.
|
It is important that only stable releases are used in production environments. Versions that have been deprecated or are released as Milestones (M) or Release Candidates (RC) are not suitable for production as they may contain security flaws or incomplete/non-functioning feature sets. |
| Version | Year | Home | Min JVM | Protocols | Servlet | JSP | Status |
|---|---|---|---|---|---|---|---|
11 |
2020- |
Eclipse |
11 (2) |
HTTP/1.1 (RFC 7230), HTTP/2 (RFC 7540), WebSocket (RFC 6455, JSR 356), FastCGI, JakartaEE Namespace(1) |
5.0.0 |
3.0.0 |
Stable |
10 |
2019- |
Eclipse |
11 (2) |
HTTP/1.1 (RFC 7230), HTTP/2 (RFC 7540), WebSocket (RFC 6455, JSR 356), FastCGI |
4.0.1 |
2.2 |
Stable |
9.4 |
2016- |
Eclipse |
1.8 |
HTTP/1.1 (RFC 7230), HTTP/2 (RFC 7540), WebSocket (RFC 6455, JSR 356), FastCGI |
3.1 |
2.3 |
Stable |
9.3 |
2015- |
Eclipse |
1.8 (3) |
HTTP/1.1 (RFC 7230), HTTP/2 (RFC 7540), WebSocket (RFC 6455, JSR 356), FastCGI |
3.1 |
2.3 |
Deprecated / End of Life December 2020 |
9.2 |
2014-2018 |
Eclipse |
1.7 (3) |
HTTP/1.1 RFC2616, javax.websocket, SPDY v3 |
3.1 |
2.3 |
Deprecated / End of Life January 2018 |
9.1 |
2013-2014 |
Eclipse |
1.7 (3) |
HTTP/1.1 RFC2616 |
3.1 |
2.3 |
Deprecated / End of Life May 2014 |
9.0 |
2013-2013 |
Eclipse |
1.7 (3) |
HTTP/1.1 RFC2616 |
3.1-beta |
2.3 |
Deprecated / End of Life November 2013 |
8 |
2009-2014 |
Eclipse/Codehaus |
1.6 (3) |
HTTP/1.1 RFC2616, WebSocket RFC 6455, SPDY v3 |
3.0 |
2.2 |
Deprecated / End of Life November 2014 |
7 |
2008-2014 |
Eclipse/Codehaus |
1.5 |
HTTP/1.1 RFC2616, WebSocket RFC 6455, SPDY v3 |
2.5 |
2.1 |
Deprecated / End of Life November 2014 |
6 |
2006-2010 |
Codehaus |
1.4-1.5 |
HTTP/1.1 RFC2616 |
2.5 |
2.0 |
Deprecated / End of Life November 2010 |
5 |
2003-2009 |
Sourceforge |
1.2-1.5 |
HTTP/1.1 RFC2616 |
2.4 |
2.0 |
Antique |
4 |
2001-2006 |
Sourceforge |
1.2, J2ME |
HTTP/1.1 RFC2616 |
2.3 |
1.2 |
Ancient |
3 |
1999-2002 |
Sourceforge |
1.2 |
HTTP/1.1 RFC2068 |
2.2 |
1.1 |
Fossilized |
2 |
1998-2000 |
Mortbay |
1.1 |
HTTP/1.0 RFC1945 |
2.1 |
1.0 |
Legendary |
1 |
1995-1998 |
Mortbay |
1.0 |
HTTP/1.0 RFC1945 |
- |
- |
Mythical |
-
Due to Oracle’s ownership of the "Java" trademark, usage of the javax.* namespace has been restricted and the jakarta.* namespace was adopted by the Eclipse Foundation.
-
JPMS module support is optional
-
JDK9 and newer is not supported if using MultiRelease JAR Files, or Bytecode / Annotation scanning.
Jetty and Java EE Web Profile
Jetty implements aspects of the Java EE specification, primarily the Servlet Specification. Recent releases of the Java EE platform have introduced a Web Profile, recognizing that many developers need only a subset of the many technologies under the Java EE umbrella.
While Jetty itself does not ship all of the Web Profile technologies, Jetty architecture is such that you can plug in third party implementations to produce a container customized to your exact needs.
Java EE 7 Web Profile
In the forthcoming Java EE-7 specification, the Web Profile reflects updates in its component specifications and adds some new ones:
| JSR | Name | Included with jetty-9.1.x | Pluggable |
|---|---|---|---|
Servlet Specification API 3.1 |
Yes |
||
Java Server Faces 2.2 (JSF) |
No |
||
Java Server Pages 2.3/Java Expression Language 3.0 (JSP/EL) |
Yes |
Yes |
|
Java Standard Tag Library 1.2 (JSTL) |
Yes |
Yes |
|
Debugging Support for Other Languages 1.0 |
Yes (via JSP) |
Yes (via JSP) |
|
Contexts and Dependency Injection for the JavaEE Platform 1.1 (Web Beans) |
No |
Yes, Weld |
|
Dependency Injection for Java 1.0 |
No |
Yes as part of a CDI implementation, Weld |
|
Managed Beans 1.0 |
No |
Yes, as part of another technology |
|
Enterprise JavaBeans 3.2 Lite |
No |
||
Java Persistence 2.1 (JPA) |
No |
Yes, eg Hibernate |
|
Common Annotations for the Java Platform 1.2 |
Yes |
Partially (for non-core Servlet Spec annotations) |
|
Java Transaction API 1.2 (JTA) |
Yes |
Yes |
|
Bean Validation 1.1 |
No |
Yes as part of another technology eg JSF, or a stand-alone implementation such as Hiberate Validator |
|
Java API for RESTful Web Services 2.0 (JAX-RS) |
No |
||
Java API for Websocket 1.0 |
Yes |
No |
|
Java API for JSON Processing 1.0 (JSON-P) |
No |
Yes, eg JSON-P reference implementation |
|
Interceptors 1.2 |
No |
Yes as part of a CDI implementation |
Jetty EE 6 Web Profile
Here is the matrix of JSRs for Java EE 6 Web Profile, and how they relate to Jetty:
| JSR | Name | Included with jetty-9.0.x | Pluggable |
|---|---|---|---|
Servlet Specification API 3.0 |
Yes |
||
JavaServer Faces 2.0 (JSF) |
No |
||
JavaServer Pages 2.2/Java Expression Language 2.2 (JSP/EL) |
Yes |
Yes |
|
Java Standard Tag Library 1.2 (JSTL) |
Yes |
Yes |
|
Debugging Support for Other Languages 1.0 |
Yes (via JSP) |
Yes (via JSP) |
|
Contexts and Dependency Injection for the Java EE Platform 1.0 (Web Beans) |
No |
Yes, Weld or OpenWebBeans |
|
Dependency Injection for Java 1.0 |
No |
Yes as part of a CDI implementation, Weld |
|
Managed Beans 1.0 |
No |
Yes, as part of another technology. |
|
Enterprise JavaBeans 3.1 |
No |
Yes, OpenEJB |
|
Java Persistence 2.0 (JPA) |
No |
Yes, Hibernate |
|
Common Annotations for the Java Platform |
Yes |
Partially (for non-core Servlet Spec annotations) |
|
Java Transaction API (JTA) |
Yes |
Implementations are pluggable, such as Atomikos, JOTM, Jencks (Geronimo Transaction Manager) |
|
Bean Validation 1.0 |
No |
Yes as part of another technology (JSF), or a stand-alone implementation such as Hiberate Validator |
Finding Jetty in Maven
|
It is important that only stable releases are used in production environments. Versions that have been deprecated or are released as Milestones (M) or Release Candidates (RC) are not suitable for production as they may contain security flaws or incomplete/non-functioning feature sets. |
Maven Coordinates
Jetty has existed in Maven Central almost since its inception, though the coordinates have changed over the years.
When Jetty was based at SourceForge and then The Codehaus it was located under the groupId of org.mortbay.jetty.
With Jetty 7 the project moved to the Eclipse foundation and to a new groupId at that time to reflect its new home.
The top level Project Object Model (POM) for the Jetty project is located under the following coordinates.
<dependency>
  <groupId>org.eclipse.jetty</groupId>
  <artifactId>jetty-project</artifactId>
  <version>${project.version}</version>
</dependency>
Changelogs in Maven Central
The changes between versions of Jetty are tracked in a file called VERSIONS.txt, which is under source control and is generated on release. Those generated files are also uploaded into Maven Central during the release of the top level POM. You can find them as a classifier marked artifact.
<dependency>
  <groupId>org.eclipse.jetty</groupId>
  <artifactId>jetty-project</artifactId>
  <version>${project.version}</version>
  <classifier>version</classifier>
  <type>txt</type>
</dependency>
Using Jetty
You can use Jetty in many different ways ranging from embedding Jetty in applications, launching it from different build systems, from different JVM-based languages, or as a standalone distribution. This guide covers the latter, a standalone distribution suitable for deploying web applications.
Downloading Jetty
Downloading the Jetty Distribution
The standalone Jetty distribution is available for download from the Eclipse Foundation:
It is available in both zip and gzip formats; download the one most appropriate for your system.
When you download and unpack the binary, it is extracted into a directory called jetty-distribution-VERSION.
Put this directory in a convenient location.
The rest of the instructions in this documentation refer to this location as either $JETTY_HOME or as $(jetty.home).
|
It is important that only stable releases are used in production environments. Versions that have been deprecated or are released as Milestones (M) or Release Candidates (RC) are not suitable for production as they may contain security flaws or incomplete/non-functioning feature sets. |
Distribution Content
A summary of the distribution’s contents follows. The top-level directory contains:
| Location | Description |
|---|---|
license-eplv10-aslv20.html |
License file for Jetty |
README.txt |
Useful getting started information |
VERSION.txt |
Release information |
bin/ |
Utility shell scripts to help run Jetty on Unix systems |
demo-base/ |
A Jetty base directory to run a Jetty server with demonstration webapps |
etc/ |
Directory for Jetty XML configuration files |
lib/ |
All the JAR files necessary to run Jetty |
logs/ |
Directory for request logs |
modules/ |
Directory of module definitions |
notice.html |
License information and exceptions |
resources/ |
Directory containing additional resources for classpath, activated via configuration |
start.ini |
File containing the arguments that are added to the effective command line (modules, properties and XML configuration files) |
start.jar |
Jar that invokes Jetty (see also Running Jetty) |
webapps/ |
Directory containing webapps that run under the default configuration of Jetty |
Downloading the Jetty-Home Distribution
Jetty-Home is an alternate version of the distribution that contains only the necessary items to host a Jetty distribution. It is intended for advanced users who are already familiar with Jetty and want to download a smaller distribution package. Jetty-Home can be downloaded from the Maven Central repository:
Like the main Jetty distribution, Jetty-Home is available in both zip and gzip formats; download the one most appropriate for your system.
Notice that there are a number of other files with extensions of .sha or .md5 which are checksum files.
When you download and unpack the binary, it is extracted into a directory called jetty-home-VERSION.
Put this directory in a convenient location.
Distribution Content
A summary of the Jetty-Home’s distribution contents follows. The top-level directory contains:
| Location | Description |
|---|---|
license-eplv10-aslv20.html |
License file for Jetty |
VERSION.txt |
Release information |
etc/ |
Directory for Jetty XML configuration files |
lib/ |
All the JAR files necessary to run Jetty |
modules/ |
Directory of module definitions |
notice.html |
License information and exceptions |
start.jar |
Jar that invokes Jetty (see also Running Jetty) |
Running Jetty
Once you have a copy of the Jetty distribution downloaded, extract the zip or tar.gz file to a location where you have read and write access.
Jetty has no GUI (Graphical User Interface), so running the server and performing many configuration options is done from the command line.
Once you have access to your system’s command line, navigate to the directory where you unpacked your copy of the Jetty distribution. To start Jetty on the default port of 8080, run the following command:
$ java -jar start.jar
2017-09-20 15:45:11.986:INFO::main: Logging initialized @683ms to org.eclipse.jetty.util.log.StdErrLog
2017-09-20 15:45:12.197:WARN:oejs.HomeBaseWarning:main: This instance of Jetty is not running from a separate {jetty.base} directory, this is not recommended.  See documentation at https://www.eclipse.org/jetty/documentation/current/startup.html
2017-09-20 15:45:12.243:INFO:oejs.Server:main: {VERSION}
2017-09-20 15:45:12.266:INFO:oejdp.ScanningAppProvider:main: Deployment monitor [file:///installs/repository/jetty/webapps/] at interval 1
2017-09-20 15:45:12.298:INFO:oejs.AbstractConnector:main: Started ServerConnector@39c0f4a{HTTP/1.1,[http/1.1]}{0.0.0.0:8080}
2017-09-20 15:45:12.298:INFO:oejs.Server:main: Started @995ms
You can point a browser at this server at http://localhost:8080.
However, as there are no webapps deployed in the $JETTY_HOME directory, you will see a 404 error page served by Jetty.
To stop the server, press CTRL + c or CTRL + z in your terminal.
Note the HomeBaseWarning - it is not recommended to run Jetty from the $JETTY_HOME directory.
Instead, see how to create a Jetty Base below.
|
You will see examples throughout the documentation referencing |
Demo Base
Within the standard Jetty distribution there is the demo-base directory.
This is a fully-functioning Jetty Base (more on that later) complete with numerous web applications demonstrating different Jetty functionality.
Additionally, the demo-base demonstrates the recommended way to run a Jetty base in a directory separate from $JETTY_HOME:
$ cd demo-base/
$ java -jar ../start.jar
2017-09-20 16:23:03.563:INFO::main: Logging initialized @429ms to org.eclipse.jetty.util.log.StdErrLog
2017-09-20 16:23:03.802:WARN::main: demo test-realm is deployed. DO NOT USE IN PRODUCTION!
2017-09-20 16:23:03.804:INFO:oejs.Server:main: {VERSION}
2017-09-20 16:23:03.819:INFO:oejdp.ScanningAppProvider:main: Deployment monitor [file:///installs/repository/jetty/demo-base/webapps/] at interval 1
2017-09-20 16:23:04.098:INFO:oeja.AnnotationConfiguration:main: Scanning elapsed time=102ms
2017-09-20 16:23:04.103:WARN::main: async-rest webapp is deployed. DO NOT USE IN PRODUCTION!
2017-09-20 16:23:04.267:INFO:oejs.session:main: DefaultSessionIdManager workerName=node0
2017-09-20 16:23:04.267:INFO:oejs.session:main: No SessionScavenger set, using defaults
2017-09-20 16:23:04.268:INFO:oejs.session:main: Scavenging every 660000ms
2017-09-20 16:23:04.306:INFO:oejsh.ContextHandler:main: Started o.e.j.w.WebAppContext@371a67ec{/async-rest,[file:///private/var/folders/h6/yb_lbnnn11g0y1jjlvqg631h0000gn/T/jetty-0.0.0.0-8080-async-rest.war-_async-rest-any-5319296087878801290.dir/webapp/, jar:file:///private/var/folders/h6/yb_lbnnn11g0y1jjlvqg631h0000gn/T/jetty-0.0.0.0-8080-async-rest.war-_async-rest-any-5319296087878801290.dir/webapp/WEB-INF/lib/example-async-rest-jar-{VERSION}.jar!/META-INF/resources],AVAILABLE}{/async-rest.war}
2017-09-20 16:23:04.429:INFO:oeja.AnnotationConfiguration:main: Scanning elapsed time=53ms
2017-09-20 16:23:04.432:WARN::main: test webapp is deployed. DO NOT USE IN PRODUCTION!
2017-09-20 16:23:04.511:INFO:oejsh.ManagedAttributeListener:main: update PushFilter null->org.eclipse.jetty.servlets.PushCacheFilter@2362f559 on o.e.j.w.WebAppContext@35e2d654{/test,file:///private/var/folders/h6/yb_lbnnn11g0y1jjlvqg631h0000gn/T/jetty-0.0.0.0-8080-test.war-_test-any-6279588879522983394.dir/webapp/,STARTING}{/test.war}
2017-09-20 16:23:04.516:INFO:oejsh.ManagedAttributeListener:main: update QoSFilter null->org.eclipse.jetty.servlets.QoSFilter@7770f470 on o.e.j.w.WebAppContext@35e2d654{/test,file:///private/var/folders/h6/yb_lbnnn11g0y1jjlvqg631h0000gn/T/jetty-0.0.0.0-8080-test.war-_test-any-6279588879522983394.dir/webapp/,STARTING}{/test.war}
2017-09-20 16:23:04.519:WARN:oeju.DeprecationWarning:main: Using @Deprecated Class org.eclipse.jetty.servlets.MultiPartFilter
2017-09-20 16:23:04.549:INFO:oejsh.ContextHandler:main: Started o.e.j.w.WebAppContext@35e2d654{/test,file:///private/var/folders/h6/yb_lbnnn11g0y1jjlvqg631h0000gn/T/jetty-0.0.0.0-8080-test.war-_test-any-6279588879522983394.dir/webapp/,AVAILABLE}{/test.war}
2017-09-20 16:23:04.646:INFO:oeja.AnnotationConfiguration:main: Scanning elapsed time=12ms
2017-09-20 16:23:04.649:WARN::main: test-jndi webapp is deployed. DO NOT USE IN PRODUCTION!
2017-09-20 16:23:04.697:INFO:oejsh.ContextHandler:main: Started o.e.j.w.WebAppContext@561b6512{/test-jndi,file:///private/var/folders/h6/yb_lbnnn11g0y1jjlvqg631h0000gn/T/jetty-0.0.0.0-8080-test-jndi.war-_test-jndi-any-6023636263414992288.dir/webapp/,AVAILABLE}{/test-jndi.war}
2017-09-20 16:23:04.770:INFO:oeja.AnnotationConfiguration:main: Scanning elapsed time=40ms
2017-09-20 16:23:05.036:INFO:oejsh.ContextHandler:main: Started o.e.j.w.WebAppContext@2beee7ff{/proxy,file:///private/var/folders/h6/yb_lbnnn11g0y1jjlvqg631h0000gn/T/jetty-0.0.0.0-8080-javadoc-proxy.war-_javadoc-proxy-any-2758874759195597975.dir/webapp/,AVAILABLE}{/javadoc-proxy.war}
2017-09-20 16:23:05.072:INFO:oeja.AnnotationConfiguration:main: Scanning elapsed time=16ms
2017-09-20 16:23:05.074:WARN::main: test-jaas webapp is deployed. DO NOT USE IN PRODUCTION!
2017-09-20 16:23:05.098:INFO:oejsh.ContextHandler:main: Started o.e.j.w.WebAppContext@506ae4d4{/test-jaas,file:///private/var/folders/h6/yb_lbnnn11g0y1jjlvqg631h0000gn/T/jetty-0.0.0.0-8080-test-jaas.war-_test-jaas-any-8067423971450448377.dir/webapp/,AVAILABLE}{/test-jaas.war}
2017-09-20 16:23:05.182:INFO:oeja.AnnotationConfiguration:main: Scanning elapsed time=37ms
2017-09-20 16:23:05.184:WARN::main: test-spec webapp is deployed. DO NOT USE IN PRODUCTION!
2017-09-20 16:23:05.243:INFO:oejsh.ContextHandler:main: Started o.e.j.w.WebAppContext@45099dd3{/test-spec,[file:///private/var/folders/h6/yb_lbnnn11g0y1jjlvqg631h0000gn/T/jetty-0.0.0.0-8080-test-spec.war-_test-spec-any-1205866915335004234.dir/webapp/, jar:file:///private/var/folders/h6/yb_lbnnn11g0y1jjlvqg631h0000gn/T/jetty-0.0.0.0-8080-test-spec.war-_test-spec-any-1205866915335004234.dir/webapp/WEB-INF/lib/test-web-fragment-{VERSION}.jar!/META-INF/resources],AVAILABLE}{/test-spec.war}
2017-09-20 16:23:05.247:INFO:oejsh.ContextHandler:main: Started o.e.j.s.h.MovedContextHandler@3e08ff24{/oldContextPath,null,AVAILABLE}
2017-09-20 16:23:05.274:INFO:oeja.AnnotationConfiguration:main: Scanning elapsed time=18ms
2017-09-20 16:23:05.296:INFO:oejsh.ContextHandler:main: Started o.e.j.w.WebAppContext@5ddeb7cb{/,file:///installs/repository/jetty/demo-base/webapps/ROOT/,AVAILABLE}{/ROOT}
2017-09-20 16:23:05.326:INFO:oeja.AnnotationConfiguration:main: Scanning elapsed time=21ms
2017-09-20 16:23:05.352:INFO:oejsh.ContextHandler:main: Started o.e.j.w.WebAppContext@6b695b06{/doc,file:///installs/repository/jetty/demo-base/webapps/doc/,AVAILABLE}{/doc}
2017-09-20 16:23:05.370:INFO:oejs.AbstractConnector:main: Started ServerConnector@28cda624{HTTP/1.1,[http/1.1]}{0.0.0.0:8080}
2017-09-20 16:23:05.380:INFO:oejus.SslContextFactory:main: x509=X509@126253fd(jetty,h=[jetty.eclipse.org],w=[]) for SslContextFactory@57db2b13(file:///installs/repository/jetty/demo-base/etc/keystore,file:///installs/repository/jetty/demo-base/etc/keystore)
2017-09-20 16:23:05.381:INFO:oejus.SslContextFactory:main: x509=X509@475c9c31(mykey,h=[],w=[]) for SslContextFactory@57db2b13(file:///installs/repository/jetty/demo-base/etc/keystore,ffile:///installs/repository/jetty/demo-base/etc/keystore)
2017-09-20 16:23:05.523:INFO:oejs.AbstractConnector:main: Started ServerConnector@53f3bdbd{SSL,[ssl, http/1.1]}{0.0.0.0:8443}
2017-09-20 16:23:05.524:INFO:oejs.Server:main: Started @2390ms
You can visit this demo server by pointing a browser at http://localhost:8080, which will now show a welcome page and several demo/test web applications.
|
The demonstration web applications are not necessarily secure and should not be deployed in production web servers. |
You can see the configuration of the demo-base by using the following commands:
> cd $JETTY_HOME/demo-base/
> java -jar $JETTY_HOME/start.jar --list-modules
...

> java -jar $JETTY_HOME/start.jar --list-config
...
The --list-modules command will return a complete list of available and enabled modules for the server.
It will also display the location of the modules, how and in what order they are implemented, dependent modules, and associated jar files.
The --list-config command displays a trove of information about the server including the Java and Jetty environments, the configuration order, any JVM arguments or System Properties set, general server properties, a full listing of the Jetty server class path, and active Jetty XML files.
Common Jetty Configuration
Creating a new Jetty Base
The demo-base directory described earlier is an example of the jetty.base mechanism.
A Jetty base directory allows the configuration and web applications of a server instance to be stored separately from the Jetty distribution, so that upgrades can be done with minimal disruption.
Jetty’s default configuration is based on two properties:
- jetty.home
-
The property that defines the location of the Jetty distribution, its libs, default modules and default XML files (typically start.jar, lib, etc).
- jetty.base
-
The property that defines the location of a specific implementation of a Jetty server, its configuration, logs and web applications (typically start.d/*.ini files, logs and webapps).
|
Your Jetty Home directory should be treated as a standard of truth and remain unmodified or changed. Changes or additions to your configuration should take place in the Jetty Base directory. |
The jetty.home and jetty.base properties may be explicitly set on the command line, or they can be inferred from the environment if used with commands like:
> cd $JETTY_BASE
> java -jar $JETTY_HOME/start.jar
The following commands create a new base directory, enables both the HTTP connector and the web application deployer modules, and copies a demo webapp to be deployed:
> JETTY_BASE=/tmp/mybase
> mkdir $JETTY_BASE
> cd $JETTY_BASE
> java -jar $JETTY_HOME/start.jar

WARNING: Nothing to start, exiting ...

Usage: java -jar start.jar [options] [properties] [configs]
       java -jar start.jar --help  # for more information

> java -jar $JETTY_HOME/start.jar --create-startd
INFO : Base directory was modified
> java -jar $JETTY_HOME/start.jar --add-to-start=http,deploy

INFO: server          initialised (transitively) in ${jetty.base}/start.d/server.ini
INFO: http            initialised in ${jetty.base}/start.d/http.ini
INFO: security        initialised (transitively) in ${jetty.base}/start.d/security.ini
INFO: servlet         initialised (transitively) in ${jetty.base}/start.d/servlet.ini
INFO: webapp          initialised (transitively) in ${jetty.base}/start.d/webapp.ini
INFO: deploy          initialised in ${jetty.base}/start.d/deploy.ini
MKDIR: ${jetty.base}/webapps
INFO: Base directory was modified

> cp $JETTY_HOME/demo-base/webapps/async-rest.war webapps/ROOT.war
> java -jar $JETTY_HOME/start.jar

2015-06-04 11:10:16.286:INFO::main: Logging initialized @274ms
2015-06-04 11:10:16.440:INFO:oejs.Server:main: jetty-9.3.0.v20150601
2015-06-04 11:10:16.460:INFO:oejdp.ScanningAppProvider:main: Deployment monitor [file:///tmp/mybase/webapps/] at interval 1
2015-06-04 11:10:16.581:WARN::main: async-rest webapp is deployed. DO NOT USE IN PRODUCTION!
2015-06-04 11:10:16.589:INFO:oejw.StandardDescriptorProcessor:main: NO JSP Support for /, did not find org.eclipse.jetty.jsp.JettyJspServlet
2015-06-04 11:10:16.628:INFO:oejsh.ContextHandler:main: Started o.e.j.w.WebAppContext@1a407d53{/,[file:///tmp/jetty-0.0.0.0-8080-ROOT.war-_-any-4510228025526425427.dir/webapp/, jar:file:///tmp/jetty-0.0.0.0-8080-ROOT.war-_-any-4510228025526425427.dir/webapp/WEB-INF/lib/example-async-rest-jar-{VERSION}.jar!/META-INF/resources],AVAILABLE}{/ROOT.war}
2015-06-04 11:10:16.645:INFO:oejs.ServerConnector:main: Started ServerConnector@3abbfa04{HTTP/1.1,[http/1.1]}{0.0.0.0:8080}
2015-06-04 11:10:16.646:INFO:oejs.Server:main: Started @634ms
Changing the Jetty Port
You can configure Jetty to run on a different port by setting the jetty.http.port property on the command line:
> cd $JETTY_BASE
> java -jar $JETTY_HOME/start.jar jetty.http.port=8081
...
When the server starts, it will now run on port 8081.
It is important to note that setting properties on the command line will only take affect for that instance of the server.
To change the configuration so that the server will always start on the desired port, you will need to edit the start.d/http.ini
|
The configuration by properties works via the following chain:
For more information see the Quickstart Configuration Guide and Configuring Connectors. |
Adding SSL for HTTPS & HTTP2
Building on the example above, we can activate additional modules to add support HTTPS and HTTP2 for the server. To add HTTPS and HTTP2 connectors to a Jetty configuration, the modules can be activated by the following command:
> java -jar $JETTY_HOME/start.jar --add-to-start=https,http2

ALERT: There are enabled module(s) with licenses.
The following 1 module(s):
 + contains software not provided by the Eclipse Foundation!
 + contains software not covered by the Eclipse Public License!
 + has not been audited for compliance with its license

 Module: alpn-impl/alpn-8
  + ALPN is a hosted at github under the GPL v2 with ClassPath Exception.
  + ALPN replaces/modifies OpenJDK classes in the sun.security.ssl package.
  + http://github.com/jetty-project/jetty-alpn
  + http://openjdk.java.net/legal/gplv2+ce.html

Proceed (y/N)? y
INFO  : alpn-impl/alpn-1.8.0_92 dynamic dependency of alpn-impl/alpn-8
INFO  : alpn            transitively enabled, ini template available with --add-to-start=alpn
INFO  : alpn-impl/alpn-8 dynamic dependency of alpn
INFO  : http2           initialized in ${jetty.base}/start.d/http2.ini
INFO  : https           initialized in ${jetty.base}/start.d/https.ini
INFO  : ssl             transitively enabled, ini template available with --add-to-start=ssl
MKDIR : ${jetty.base}/lib/alpn
DOWNLD: https://repo1.maven.org/maven2/org/mortbay/jetty/alpn/alpn-boot/8.1.8.v20160420/alpn-boot-8.1.8.v20160420.jar to ${jetty.base}/lib/alpn/alpn-boot-8.1.8.v20160420.jar
MKDIR : ${jetty.base}/etc
COPY  : ${jetty.home}/modules/ssl/keystore to ${jetty.base}/etc/keystore
INFO  : Base directory was modified

> java -jar $JETTY_HOME/start.jar
[...]
2017-05-22 12:48:23.271:INFO:oejs.AbstractConnector:main: Started ServerConnector@134d0064{SSL,[ssl, alpn, h2, http/1.1]}{0.0.0.0:8443}
[...]
The --add-to-start command sets up the effective command line in the ini files to run an ssl connection that supports the HTTPS and HTTP2 protocols as follows:
-
transitively enabled the
sslmodule that configures an SSL connector (eg port, keystore etc.) by addingetc/jetty-ssl.xmlandetc/jetty-ssl-context.xmlto the effective command line. -
transitively enabled the
alpnmodule that configures protocol negotiation on the SSL connector by addingetc/jetty-alpn.xmlto the effective command line. -
creates
start.d/https.inithat configures the HTTPS protocol on the SSL connector by addingetc/jetty-https.xmlto the effective command line. -
creates
start.d/http2.inithat configures the HTTP/2 protocol on the SSL connector by addingetc/jetty-http2.xmlto the effective command line. -
checks for the existence of a
etc/keystorefile and if not present, downloads a demonstration keystore file.
Changing the Jetty HTTPS Port
You can configure the SSL connector to run on a different port by setting the jetty.ssl.port property on the command line:
> cd $JETTY_BASE
> java -jar $JETTY_HOME/start.jar jetty.ssl.port=8444
Alternatively, property values can be added to the effective command line built from the start.ini file or start.d/*.ini files, depending on your set up.
Please see the section on Start.ini vs. Start.d for more information.
More start.jar Options
The job of the start.jar is to interpret the command line, start.ini and start.d directory (and associated .ini files) to build a Java classpath and list of properties and configuration files to pass to the main class of the Jetty XML configuration mechanism.
The start.jar mechanism has many options which are documented in the Starting Jetty administration section and you can see them in summary by using the command:
> java -jar $JETTY_HOME/start.jar --helpDeploying Web Applications
Jetty server instances that configure the deploy module will have a web application deployer that hot deploys files found in the webapps directory.
Standard WAR files and Jetty configuration files that are placed in the webapps directory are hot deployed to the server with the following conventions:
-
A directory called
example/is deployed as a standard web application if it contains aWEB-INF/subdirectory, otherwise it is deployed as context of static content. The context path is/example(that is,http://localhost:8080/example/) unless the base name is ROOT (case insensitive), in which case the context path is /. If the directory name ends with ".d" it is ignored (but may be used by explicit configuration). -
A file called
example.waris deployed as a standard web application with the context path/example(that is,http://localhost:8080/example/). If the base name isROOT(case insensitive), the context path is/. Ifexample.warandexample/exist, only the WAR is deployed (which may use the directory as an unpack location). -
An XML file like
example.xmlis deployed as a context whose configuration is defined by the XML. The configuration itself must set the context path. Ifexample.xmlandexample.warexists, only the XML is deployed (which may use the WAR in its configuration).
If you have a standard web application, you can hot deploy it into Jetty by copying it into the webapps directory.
Jetty Demonstration Web Applications
The demo-base/webapps directory contains the following deployable and auxiliary files:
ROOT/-
A directory of static content that is deployed to the root context / due to it’s name. Contains the Jetty demo welcome page.
test.d-
A directory containing additional configuration files used by
test.xmlto inject extra configuration intotest.war. test.xml-
A context configuration file that configures and deploys
test.war.The additional configuration includes the context path as well as setting additional descriptors found in thetest.ddirectory. test.war-
The demonstration web application that is configured and deployed by
test.xml. async-rest.war-
A web application demonstration of asynchronous REST to eBay, automatically deployed to /async-rest based on the file name.
test-jaas.war-
A demonstration web application utilizing JAAS for authentication.
test-jaas.xml-
A context configuration file that configures
test-jaas.war. Additional configuration includes setting up the LoginService for authentication and authorization. test-jndi.war-
A demonstration web application showing the use of JNDI.
test-jndi.xml-
A context configuration file that configures
test-jndi.war. Additional configuration includes defining objects in the naming space that can be referenced from the webapp. test-spec.war-
A demonstration web application that shows the use of annotations, fragments,
ServletContainerInitializersand other Servlet Specification 3.0/3.1 features. test-spec.xml-
A context configuration file that configures
test-spec.war. Additional configuration includes setting up some objects in the naming space that can be referenced by annotations. javadoc-proxy.war-
A demonstration web application that uses a transparent proxy to serve the Jetty source Javadoc from the Eclipse Jetty website.
example-moved.xml-
A demonstration context configuration file that shows how to use the
MovedContextHandlerto redirect from one path to another.
An Introduction to Jetty Configuration
How to Configure Jetty
To understand Jetty configuration, you need to understand the "How" and the "What". This section covers how to configure Jetty in terms of what mechanisms exist to perform configuration. The next section gives an overview of the action components and fields that you can configure with these mechanisms.
Jetty POJO Configuration
The core components of Jetty are Plain Old Java Objects (POJOs) The process of configuring Jetty is mostly the process of instantiating, assembling and setting fields on the Jetty POJOs. This can be achieved by:
-
Writing Java code to directly instantiate and assemble Jetty objects. This is referred to as Embedding Jetty.
-
Using Jetty XML configuration, which is an Inversion of Control (IoC) framework, to instantiate and assemble Jetty objects as XML objects. The
etc/jetty.xmlfile is the main Jetty XML configuration file, but there are many otheretc/jetty-feature.xmlfiles included in the Jetty distribution. -
Using a third party IoC framework like Spring, to instantiate and assemble Jetty objects as Spring beans.
Because the main Jetty configuration is done by IoC, the Jetty API documentation is the ultimate configuration reference.
Jetty Start Configuration Files
The Jetty distribution uses the following configuration files to instantiate, inject and start server via the start.jar mechanism.
inifiles-
The Jetty Start mechanism uses the command line, the
$JETTY_BASE/start.iniand/or$JETTY_BASE/start.d/*.inifiles to create an effective command line of arguments. Arguments may be:-
Module activations in the form
--module=name -
Properties in the form of
name=value, used to parameterize Jetty IoC XML -
XML files in Jetty IoC (or Spring) XML format
-
A standard Java property file containing additional start properties
-
Other start.jar options (see
java -jar start.jar --help) -
Some JVM options in combination with
--exec, such as-Xbootclasspath.
-
|
It is the |
modfiles-
The
$JETTY_HOME/modules/*.modfiles contain the definition of modules that can be activated by--module=name. Eachmodfile defines:-
Module dependencies for ordering and activation
-
The libraries needed by the module to be added to the classpath
-
The XML files needed by the module to be added to the effective command line
-
Files needed by the activated module
-
A template
inifile to be used when activating the--add-to-start=nameoptionTypically module files are rarely edited and only then for significant structural changes. The
.modfiles are normally located in$JETTY_HOME/modules/, but extra or edited modules may be added to$JETTY_BASE/module. If module changes are required, it is best practice to copy the particular.modfile from$JETTY_HOME/modules/to$JETTY_BASE/modules/before being modified.
-
- XML files
-
XML files in Jetty IoC XML format or Spring IoC format are listed either on the command line, in
inifiles, or are added to the effective command line by a module definition. The XML files instantiate and inject the actual Java objects that comprise the server, connectors and contexts. Because Jetty IoC XML files use properties, most common configuration tasks can be accomplished without editing these XML files and can instead be achieved by editing the property in the correspondinginifiles. XML files are normally located in$JETTY_HOME/etc/, but extra or edited XML files may be added to$JETTY_BASE/etc/. Note If XML configuration changes are required, it is best practice to copy the XML file from$JETTY_HOME/etc/to$JETTY_BASE/etc/before being modified.
Below is an illustration of how the various Jetty configuration files (ini, mod and XML) are related:

A Closer Look
To put it simply: XML files are responsible for instantiating the Jetty POJOs that make up the server. They define properties which users can modify to meet the needs of their server. These XML files are broken up by type in the distribution so they can be consumed as a user/server needs them. For example, a server may need HTTP and HTTPS functionality, but opt out of using HTTP/2 and Websocket.
Module files allow users to enable and remove functionality quickly and easily from their server implementation.
They include a template of the different properties included in the associated XML file, as well as a pointer to the XML or JAR file(s) they are referencing.
When a module is activated these properties are added to a related ini file where users can configure them to meet their needs.
We will discuss modules in further detail in an upcoming chapter.
Ini files are where most users will spend the bulk of their time editing the configuration for their server. As mentioned, they contain properties which were defined in their associated XML files which in turn reference Jetty Java objcts.
This can be a bit overwhelming at first, so let’s look at an example - in this case the http module.
We will work backwards from an ini file to the associated module and then the XML file in question.
First up, the http.ini file.
If we take a look at it’s contents, we will see the following:
$ cat start.d/http.ini
# ---------------------------------------
# Module: http
# Enables a HTTP connector on the server.
# By default HTTP/1 is support, but HTTP2C can
# be added to the connector with the http2c module.
# ---------------------------------------
--module=http

### HTTP Connector Configuration

## Connector host/address to bind to
# jetty.http.host=0.0.0.0

## Connector port to listen on
# jetty.http.port=8080

## Connector idle timeout in milliseconds
# jetty.http.idleTimeout=30000

## Number of acceptors (-1 picks default based on number of cores)
# jetty.http.acceptors=-1

## Number of selectors (-1 picks default based on number of cores)
# jetty.http.selectors=-1

## ServerSocketChannel backlog (0 picks platform default)
# jetty.http.acceptQueueSize=0

## Thread priority delta to give to acceptor threads
# jetty.http.acceptorPriorityDelta=0

## Reserve threads for high priority tasks (-1 use a heuristic, 0 no reserved threads)
# jetty.http.reservedThreads=-1

## Connect Timeout in milliseconds
# jetty.http.connectTimeout=15000

## HTTP Compliance: RFC7230, RFC2616, LEGACY
# jetty.http.compliance=RFC7230
So what do we see?
We have a module name, the module activation (--module=http), as well as a description and what look like properties to configure.
Those will some scripting/coding experience might notice that most of the lines are commented out with # and you’d be correct.
When a module is enabled and an ini file is created, all of the properties you see here were set to these defaults - the server is already using the values shown
If you wanted to change one of the properties though, say jetty.http.port, you’d simply uncomment the line and change the value.
For example:
$ cat start.d/http.ini
# ---------------------------------------
# Module: http
# Enables a HTTP connector on the server.
# By default HTTP/1 is support, but HTTP2C can
# be added to the connector with the http2c module.
# ---------------------------------------
--module=http

### HTTP Connector Configuration

## Connector host/address to bind to
# jetty.http.host=0.0.0.0

## Connector port to listen on
jetty.http.port=1234
...
As seen before, these properties were populated in this ini file based on a related module.
Standard Jetty modules live in the Home of the Jetty Distribution in the aptly named modules directory.
So let’s take a quick look at the associated $JETTY_HOME/modules/http.mod file:
$ cat $JETTY_HOME/modules/http.mod
[description]
Enables a HTTP connector on the server.
By default HTTP/1 is support, but HTTP2C can
be added to the connector with the http2c module.

[tags]
connector
http

[depend]
server

[xml]
etc/jetty-http.xml

[ini-template]
### HTTP Connector Configuration

## Connector host/address to bind to
# jetty.http.host=0.0.0.0

## Connector port to listen on
# jetty.http.port=8080

## Connector idle timeout in milliseconds
# jetty.http.idleTimeout=30000
...
At first blush, it looks remarkable similar to the ini file we just looked at.
We still have a description and the properties we could edit, but now we also have several other sections.
These other sections will be looked at further in our chapter on modules, but for now it is worth noting the [xml] and [ini-template] sections.
As you could probably have puzzled out, the [ini-template] contains a template (go figure) for properties to be placed in the associated ini file when a module is activated.
The [xml] section refers to the file and location of the XML file these properties are based on.
It is important to note that not every module file will have the same sections, but most should look structurally the same.
Now that we know what XML file these properties relate to, we can navigate to it and have a look.
$ cat $JETTY_HOME/etc/jetty-http.xml
<?xml version="1.0"?>
<!DOCTYPE Configure PUBLIC "-//Jetty//Configure//EN" "http://www.eclipse.org/jetty/configure_9_3.dtd">

<!-- ============================================================= -->
<!-- Configure the Jetty Server instance with an ID "Server"       -->
<!-- by adding a HTTP connector.                                   -->
<!-- This configuration must be used in conjunction with jetty.xml -->
<!-- ============================================================= -->
<Configure id="Server" class="org.eclipse.jetty.server.Server">

  <!-- =========================================================== -->
  <!-- Add a HTTP Connector.                                       -->
  <!-- Configure an o.e.j.server.ServerConnector with a single     -->
  <!-- HttpConnectionFactory instance using the common httpConfig  -->
  <!-- instance defined in jetty.xml                               -->
  <!--                                                             -->
  <!-- Consult the javadoc of o.e.j.server.ServerConnector and     -->
  <!-- o.e.j.server.HttpConnectionFactory for all configuration    -->
  <!-- that may be set here.                                       -->
  <!-- =========================================================== -->
  <Call name="addConnector">
    <Arg>
      <New id="httpConnector" class="org.eclipse.jetty.server.ServerConnector">
        <Arg name="server"><Ref refid="Server" /></Arg>
        <Arg name="acceptors" type="int"><Property name="jetty.http.acceptors" deprecated="http.acceptors" default="-1"/></Arg>
        <Arg name="selectors" type="int"><Property name="jetty.http.selectors" deprecated="http.selectors" default="-1"/></Arg>
        <Arg name="factories">
          <Array type="org.eclipse.jetty.server.ConnectionFactory">
            <Item>
              <New class="org.eclipse.jetty.server.HttpConnectionFactory">
                <Arg name="config"><Ref refid="httpConfig" /></Arg>
                <Arg name="compliance"><Call class="org.eclipse.jetty.http.HttpCompliance" name="valueOf"><Arg><Property name="jetty.http.compliance" default="RFC7230"/></Arg></Call></Arg>
              </New>
            </Item>
          </Array>
        </Arg>
        <Set name="host"><Property name="jetty.http.host" deprecated="jetty.host" /></Set>
        <Set name="port"><Property name="jetty.http.port" deprecated="jetty.port" default="8080" /></Set>
        <Set name="idleTimeout"><Property name="jetty.http.idleTimeout" deprecated="http.timeout" default="30000"/></Set>
        <Set name="acceptorPriorityDelta"><Property name="jetty.http.acceptorPriorityDelta" deprecated="http.acceptorPriorityDelta" default="0"/></Set>
        <Set name="acceptQueueSize"><Property name="jetty.http.acceptQueueSize" deprecated="http.acceptQueueSize" default="0"/></Set>
        <Get name="SelectorManager">
          <Set name="connectTimeout"><Property name="jetty.http.connectTimeout" default="15000"/></Set>
          <Set name="reservedThreads"><Property name="jetty.http.reservedThreads" default="-2"/></Set>
        </Get>
      </New>
    </Arg>
  </Call>

</Configure>
Now we can see where those properties in our ini and module files came from.
In Jetty XML files, Jetty objects come to life; defined properties are set which link back to the jar libraries and run the server to a user’s specification.
|
It is important to remember that you should not modify the XML files in your |
Other Configuration Files
In addition to the configuration files described above, the configuration of the server can use the following file types:
- Context XML files
-
Any XML files in Jetty IoC XML format or Spring IoC format that is discovered in the
/webappsdirectory are used by the deploy module to instantiate and injectHttpContextinstances to create a specific context. These may be standard web applications or bespoke contexts created from special purpose handlers. - web.xml
-
The Servlet Specification defines the
web.xmldeployment descriptor that defines and configures the filters, servlets and resources a web application uses. The JettyWebAppContextcomponent uses this XML format to:-
Set up the default configuration of a web application context.
-
Interpret the application-specific configuration supplied with a web application in the
WEB-INF/web.xmlfile. -
Interpret descriptor fragments included in the
META-INFdirectory of Jar files withinWEB-INF/lib.Normally the
web.xmlfile for a web application is found in theWEB-INF/web.xmllocation within the war file/directory or asweb.xmlfragments with.jarfiles found inWEB-INF/lib. Jetty also supports multipleweb.xmlfiles so that a default descriptor may be applied beforeWEB-INF/web.xml(typically set toetc/webdefault.xmlby the deploy module) and an override descriptor may be applied afterWEB-INF/web.xml(typically set by a context XML file seetest.xml)
-
- Property Files
-
Standard Java property files are also used for Jetty configuration in several ways:
-
To parameterize Jetty IoC XML via the use of the
Propertyelement. -
To configure the default logging mechanism (
StdErrLog). Other logging frameworks can be utilized and also use property files (for example,log4j). -
As a simple database for login usernames and credentials.
-
Jetty IoC XML format
To understand the Jetty IoC XML format, consider the following example of an embedded Jetty server instantiated and configured in Java:
//
//  ========================================================================
//  Copyright (c) 1995-2022 Mort Bay Consulting Pty Ltd and others.
//  ------------------------------------------------------------------------
//  All rights reserved. This program and the accompanying materials
//  are made available under the terms of the Eclipse Public License v1.0
//  and Apache License v2.0 which accompanies this distribution.
//
//      The Eclipse Public License is available at
//      http://www.eclipse.org/legal/epl-v10.html
//
//      The Apache License v2.0 is available at
//      http://www.opensource.org/licenses/apache2.0.php
//
//  You may elect to redistribute this code under either of these licenses.
//  ========================================================================
//

package org.eclipse.jetty.embedded;

import org.eclipse.jetty.server.Connector;
import org.eclipse.jetty.server.Handler;
import org.eclipse.jetty.server.Server;
import org.eclipse.jetty.server.ServerConnector;
import org.eclipse.jetty.server.handler.DefaultHandler;
import org.eclipse.jetty.server.handler.HandlerCollection;
import org.eclipse.jetty.servlet.ServletContextHandler;

public class ExampleServer
{
    public static Server createServer(int port)
    {
        Server server = new Server();

        ServerConnector connector = new ServerConnector(server);
        connector.setPort(port);
        server.setConnectors(new Connector[]{connector});

        ServletContextHandler context = new ServletContextHandler();
        context.setContextPath("/");
        context.addServlet(HelloServlet.class, "/hello");
        context.addServlet(AsyncEchoServlet.class, "/echo/*");

        HandlerCollection handlers = new HandlerCollection();
        handlers.setHandlers(new Handler[]{context, new DefaultHandler()});
        server.setHandler(handlers);

        return server;
    }

    public static void main(String[] args) throws Exception
    {
        int port = ExampleUtil.getPort(args, "jetty.http.port", 8080);
        Server server = createServer(port);
        server.start();
        server.join();
    }
}
Jetty IoC XML format allows you to instantiate and configure the exact same server in XML without writing any java code:
<?xml version="1.0"?><!DOCTYPE Configure PUBLIC "-//Jetty//Configure//EN" "http://www.eclipse.org/jetty/configure_9_3.dtd">

<Configure id="ExampleServer" class="org.eclipse.jetty.server.Server">

  <Set name="connectors">
    <Array type="org.eclipse.jetty.server.Connector">
      <Item>
        <New class="org.eclipse.jetty.server.ServerConnector">
          <Arg><Ref refid="ExampleServer"/></Arg>
          <Set name="port">
            <Property name="http.port" default="8080" />
          </Set>
        </New>
      </Item>
    </Array>
  </Set>

  <New id="context" class="org.eclipse.jetty.servlet.ServletContextHandler">
    <Set name="contextPath">/hello</Set>
    <Call name="addServlet">
      <Arg>org.eclipse.jetty.embedded.HelloServlet</Arg>
      <Arg>/</Arg>
    </Call>
  </New>

  <Set name="handler">
    <New class="org.eclipse.jetty.server.handler.HandlerCollection">
      <Set name="handlers">
        <Array type="org.eclipse.jetty.server.Handler">
          <Item>
            <Ref refid="context" />
          </Item>
          <Item>
            <New class="org.eclipse.jetty.server.handler.DefaultHandler" />
          </Item>
        </Array>
      </Set>
    </New>
  </Set>
</Configure>
What to Configure in Jetty
This section gives an overview of the components of Jetty you typically configure using the mechanisms outlined in the previous section. Jetty Architecture describes the structure of a Jetty server, which is good background reading to understand configuration, and is vital if you want to change the structure of the server as set up by the default configurations in the Jetty distribution. However, for most purposes, configuration is a matter of identifying the correct configuration file and modifying existing configuration values.
Configuring the Server
The Server instance is the central coordination object of a Jetty server; it provides services and life cycle management for all other Jetty server components.
In the standard Jetty distribution, the core server configuration is in etc/jetty.xml file, but you can mix in other server configurations which can include:
- ThreadPool
-
The Server instance provides a ThreadPool instance that is the default Executor service other Jetty server components use. The prime configuration of the thread pool is the maximum and minimum size and is set in
start.iniorstart.d/threadpool.ini. - Handlers
-
A Jetty server can have only a single Handler instance to handle incoming HTTP requests. However a handler may be a container or wrapper of other handlers forming a tree of handlers that typically handle a request as a collaboration between the handlers from a branch of the tree from root to leaf. The default handler tree set up in the
etc/jetty.xmlfile is a Handler Collection containing a Context Handler Collection and the Default Handler. The Context Handler Collection selects the next handler by context path and is where deployed Context Handler and Web Application Contexts are added to the handler tree. The Default Handler handles any requests not already handled and generates the standard 404 page. Other configuration files may add handlers to this tree (for example,jetty-rewrite.xml,jetty-requestlog.xml) or configure components to hot deploy handlers (for example,jetty-deploy.xml). - Server Attributes
-
The server holds a generic attribute map of strings to objects so that other Jetty components can associate named objects with the server, and if the value objects implement the LifeCycle interface, they are started and stopped with the server. Typically server attributes hold server-wide default values.
- Server fields
-
The server also has some specific configuration fields that you set in
start.iniorstart.d/server.inifor controlling, among other things, the sending of dates and versions in HTTP responses. - Connectors
-
The server holds a collection of connectors that receive connections for HTTP and the other protocols that Jetty supports. The next section, Configuring Connectors describes configuration of the connectors themselves. For the server you can either set the collection of all connectors or add/remove individual connectors.
- Services
-
The server can hold additional service objects, sometimes as attributes, but often as aggregated LifeCycle beans. Examples of services are Login Services and DataSources, which you configure at the server level and then inject into the web applications that use them.
Configuring Connectors
A Jetty Server Connector is a network end point that accepts connections for one or more protocols which produce requests and/or messages for the Jetty server.
In the standard Jetty server distribution, several provided configuration files add connectors to the server for various protocols and combinations of protocols: http.ini, https.ini and jetty-http2.xml.
The configuration needed for connectors is typically:
- Port
-
The TCP/IP port on which the connector listens for connections is set using the the XML Property element which looks up the
jetty.http.port(orjetty.ssl.port) property, and if not found defaults to 8080 (or 8443 for TLS). - Host
-
You can configure a host either as a host name or IP address to identify a specific network interface on which to listen. If not set, or set to the value of 0.0.0.0, the connector listens on all local interfaces. The XML Property element is used to look up the host value from the
jetty.hostproperty. - Idle Timeout
-
The time in milliseconds that a connection can be idle before the connector takes action to close the connection.
- HTTP Configuration
-
Connector types that accept HTTP semantics (including HTTP, HTTPS and HTTP2) are configured with a
HttpConfigurationinstance that contains common HTTP configuration that is independent of the specific wire protocol used. Because these values are often common to multiple connector types, the standard Jetty Server distribution creates a singleHttpConfigurationin thejetty.xmlfile which is used via the XML Ref element in the specific connector files. - SSL Context Factory
-
The TLS connector types (HTTPS and HTTP2) configure an SSL Context Factory with the location of the server keystore and truststore for obtaining server certificates.
|
Virtual hosts are not configured on connectors. You must configure individual contexts with the virtual hosts to which they respond. |
|
Prior to Jetty 9, the type of the connector reflected both the protocol supported (HTTP, HTTPS, AJP, SPDY), and the nature of the implementation (NIO or BIO).
From Jetty 9 onwards there is only one prime Connector type ( |
Configuring Contexts
A Jetty context is a handler that groups other handlers under a context path together with associated resources and is roughly equivalent to the standard ServletContext API. A context may contain either standard Jetty handlers or a custom application handler.
|
The servlet specification defines a web application.
In Jetty a standard web application is a specialized context that uses a standard layout and |
Configuration values that are common to all contexts are:
- contextPath
-
The contextPath is a URL prefix that identifies which context a HTTP request is destined for. For example, if a context has a context path
/foo, it handles requests to/foo,/foo/index.html,/foo/bar/, and/foo/bar/image.pngbut it does not handle requests like/,/other/, or/favicon.ico. A context with a context path of / is called the root context.The context path can be set by default from the deployer (which uses the filename as the basis for the context path); or in code; or it can be set by a Jetty IoC XML that is either applied by the deployer or found in the
WEB-INF/jetty-web.xmlfile of a standard web app context. - virtualHost
-
A context may optionally have one or more virtual hosts set. Unlike the host set on a connector (which selects the network interface on which to listen), a virtual host does not set any network parameters. Instead a virtual host represents an alias assigned by a name service to an IP address, which may have many aliases. To determine which virtual host a request is intended for, the HTTP client (browser) includes in the request the name used to look up the network address. A context with a virtual host set only handles requests that have a matching virtual host in their request headers.
- classPath
-
A context may optionally have a classpath, so that any thread that executes a handler within the context has a thread context classloader set with the classpath. A standard web application has the classpath initialized by the
WEB-INF/libandWEB-INF/classesdirectory and has additional rules about delegating classloading to the parent classloader. All contexts may have additional classpath entries added. - attributes
-
Attributes are arbitrary named objects that are associated with a context and are frequently used to pass entities between a web application and its container. For example the attribute
javax.servlet.context.tempdiris used to pass the File instance that represents the assigned temporary directory for a web application. - resourceBase
-
The resource base is a directory (or collection of directories or URL) that contains the static resources for the context. These can be images and HTML files ready to serve or JSP source files ready to be compiled. In traditional web servers this value is often called the docroot.
Context Configuration by API
In an embedded server, you configure contexts by directly calling the ContextHandler API as in the following example:
//
//  ========================================================================
//  Copyright (c) 1995-2022 Mort Bay Consulting Pty Ltd and others.
//  ------------------------------------------------------------------------
//  All rights reserved. This program and the accompanying materials
//  are made available under the terms of the Eclipse Public License v1.0
//  and Apache License v2.0 which accompanies this distribution.
//
//      The Eclipse Public License is available at
//      http://www.eclipse.org/legal/epl-v10.html
//
//      The Apache License v2.0 is available at
//      http://www.opensource.org/licenses/apache2.0.php
//
//  You may elect to redistribute this code under either of these licenses.
//  ========================================================================
//

package org.eclipse.jetty.embedded;

import org.eclipse.jetty.server.Server;
import org.eclipse.jetty.server.handler.ContextHandler;

public class OneContext
{
    public static Server createServer(int port)
    {
        Server server = new Server(port);

        // Add a single handler on context "/hello"
        ContextHandler context = new ContextHandler();
        context.setContextPath("/hello");
        context.setHandler(new HelloHandler());

        // Can be accessed using http://localhost:8080/hello

        server.setHandler(context);
        return server;
    }

    public static void main(String[] args) throws Exception
    {
        int port = ExampleUtil.getPort(args, "jetty.http.port", 8080);
        Server server = createServer(port);

        // Start the server
        server.start();
        server.join();
    }
}
Context Configuration by IoC XML
You can create and configure a context entirely by IoC XML (either Jetty’s or Spring). The deployer discovers and hot deploys context IoC descriptors like the following which creates a context to serve the Javadoc from the Jetty distribution:
<?xml version="1.0" encoding="UTF-8"?>
<!DOCTYPE Configure PUBLIC
    "-//Jetty//Configure//EN"
    "https://eclipse.org/jetty/configure_9_3.dtd">

<!--
  Configure a custom context for serving javadoc as static resources
-->

<Configure class="org.eclipse.jetty.server.handler.ContextHandler">
  <Set name="contextPath">/javadoc</Set>
  <Set name="resourceBase"><SystemProperty name="jetty.home" default="."/>/javadoc/</Set>
  <Set name="handler">
    <New class="org.eclipse.jetty.server.handler.ResourceHandler">
      <Set name="welcomeFiles">
        <Array type="String">
          <Item>index.html</Item>
        </Array>
      </Set>
      <Set name="cacheControl">max-age=3600,public</Set>
    </New>
  </Set>
</Configure>
Configuring Web Applications
The servlet specification defines a web application, which when packaged as a zip is called WAR file (Web application ARchive). Jetty implements both WAR files and unpacked web applications as a specialized context that is configured by means of:
-
A standard layout which sets the location of the resourceBase (the root of the WAR) and initializes the classpath from jars found in
WEB-INF/liband classes found inWEB-INF/classes. -
The standard
WEB-INF/web.xmldeployment descriptor which is parsed to define and configure init parameters, filters, servlets, listeners, security constraints, welcome files and resources to be injected. -
A default
web.xmlformat deployment descriptor provided either by Jetty or in configuration configures the JSP servlet and the default servlet for handling static content. The standardweb.xmlmay override the defaultweb.xml. -
Annotations discovered on classes in Jars contained in
WEB-INF/libcan declare additional filters, servlets and listeners. -
Standard deployment descriptor fragments discovered in Jars contained in
WEB-INF/libcan declare additional init parameters, filters, servlets, listeners, security constraints, welcome files and resources to be injected. -
An optional
WEB-INF/jetty-web.xmlfile may contain Jetty IoC configuration to configure the Jetty specific APIs of the context and handlers.
Because these configuration mechanisms are contained within the WAR file (or unpacked web application), typically a web application contains much of its own configuration and deploying a WAR is often just a matter of dropping the WAR file in to the webapps directory that is scanned by the Jetty deployer.
If you need to configure something within a web application, often you do so by unpacking the WAR file and editing the web.xml and other configuration files.
However, both the servlet standard and some Jetty features allow for other configuration to be applied to a web application externally from the WAR:
-
Configured data sources and security realms in the server can be injected into a web application either explicitly or by name matching.
-
Jetty allows one or more override deployment descriptors, in
web.xmlformat, to be set on a context (via code or IoC XML) to amend the configuration set by the default and standardweb.xml. -
The normal Jetty Java API may be called by code or IoC XML to amend the configuration of a web application.
Setting the Context Path
The web application standard provides no configuration mechanism for a web application or WAR file to set its own contextPath.
By default the deployer uses conventions to set the context path:
If you deploy a WAR file called foobar.WAR, the context path is /foobar; if you deploy a WAR file called ROOT.WAR the context path is /.
However, it is often desirable to explicitly set the context path so that information (for example, version numbers) may be included in the filename of the WAR. Jetty allows the context Path of a WAR file to be set internally (by the WAR itself) or externally (by the deployer of the WAR).
To set the contextPath from within the WAR file, you can include a WEB-INF/jetty-web.xml file which contains IoC XML to set the context path:
<?xml version="1.0" encoding="UTF-8"?>
<!DOCTYPE Configure PUBLIC
    "-//Jetty//Configure//EN"
    "https://eclipse.org/jetty/configure_9_3.dtd">

<Configure class="org.eclipse.jetty.webapp.WebAppContext">
    <Set name="contextPath">/contextpath</Set>
</Configure>
Alternately, you can configure the classpath externally without the need to modify the WAR file itself. Instead of allowing the WAR file to be discovered by the deployer, an IoC XML file may be deployed that both sets the context path and declares the WAR file that it applies to:
<?xml version="1.0" encoding="UTF-8"?>
<!DOCTYPE Configure PUBLIC
    "-//Jetty//Configure//EN"
    "https://eclipse.org/jetty/configure_9_3.dtd">

<Configure class="org.eclipse.jetty.webapp.WebAppContext">
  <Set name="war"><SystemProperty name="jetty.home" default="."/>/webapps/test.war</Set>
  <Set name="contextPath">/test</Set>
</Configure>
An example of setting the context path is included with the Jetty distribution in $JETTY_HOME/webapps/test.xml.
Web Application Deployment
Jetty is capable of deploying a variety of Web Application formats.
This is accomplished via scans of the ${jetty.base}/webapps directory for contexts to deploy.
A Context can be any of the following:
-
A standard WAR file. (must in “.war”).
-
A directory containing an expanded WAR file. (must contain
{dir}/WEB-INF/web.xmlfile). -
A directory containing static content.
-
A XML descriptor in Jetty XML Syntax that configures a ContextHandler instance (Such as a WebAppContext).
The new WebAppProvider will attempt to avoid double deployments during the directory scan with the following heuristics:
-
Hidden files (starting with
".") are ignored -
Directories with names ending in
".d"are ignored -
If a directory and matching WAR file exist with the same base name (eg:
foo/andfoo.war), then the directory is assumed to be the unpacked WAR and only the WAR is deployed (which may reuse the unpacked directory) -
If a directory and matching XML file exists (eg:
foo/andfoo.xml), then the directory is assumed to be an unpacked WAR and only the XML is deployed (which may use the directory in its own configuration) -
If a WAR file and matching XML file exist (eg:
foo.warandfoo.xml), then the WAR is assumed to be configured by the XML and only the XML is deployed.
|
In prior versions of Jetty there was a separate ContextDeployer that provided XML-based deployment. As of Jetty 9 the ContextDeployer no longer exists and its functionality has been merged with the new WebAppProvider to avoid double deployment scenarios. |
Setting an Authentication Realm
The authentication method and realm name for a standard web application may be set in the web.xml deployment descriptor with elements like:
...
<login-config>
  <auth-method>BASIC</auth-method>
  <realm-name>Test Realm</realm-name>
</login-config>
...
This example declares that the BASIC authentication mechanism will be used with credentials validated against a realm called "Test Realm." However the standard does not describe how the realm itself is implemented or configured. In Jetty, there are several realm implementations (called LoginServices) and the simplest of these is the HashLoginService, which can read usernames and credentials from a Java properties file.
To configure an instance of HashLoginService that matches the "Test Realm" configured above, the following $JETTY_BASE/etc/test-realm.xml IoC XML file should be passed on the command line or set in start.ini or start.d/server.ini.
<?xml version="1.0"?><!DOCTYPE Configure PUBLIC "-//Jetty//Configure//EN" "http://www.eclipse.org/jetty/configure_9_3.dtd">
<Configure id="Server" class="org.eclipse.jetty.server.Server">
    <!-- =========================================================== -->
    <!-- Configure Authentication Login Service                      -->
    <!-- Realms may be configured for the entire server here, or     -->
    <!-- they can be configured for a specific web app in a context  -->
    <!-- configuration (see $(jetty.home)/webapps/test.xml for an    -->
    <!-- example).                                                   -->
    <!-- =========================================================== -->
    <Call name="addBean">
      <Arg>
        <New class="org.eclipse.jetty.security.HashLoginService">
          <Set name="name">Test Realm</Set>
          <Set name="config"><Property name="jetty.demo.realm" default="etc/realm.properties"/></Set>
          <Set name="hotReload">false</Set>
        </New>
      </Arg>
    </Call>

    <Get class="org.eclipse.jetty.util.log.Log" name="rootLogger">
      <Call name="warn"><Arg>demo test-realm is deployed. DO NOT USE IN PRODUCTION!</Arg></Call>
    </Get>
</Configure>
This creates and configures the LoginService as an aggregate bean on the server. When a web application is deployed that declares a realm called "Test Realm," the server beans are searched for a matching Login Service.
Jetty Configuration Guide
Deploying to Jetty
This chapter discusses various ways to deploy applications with Jetty. Topics range from deployment bindings to deploying third party products. It also includes information about the Deployment Manager and WebApp Provider.
Anatomy of a Web Application
The standard Jetty distribution is capable of deploying standard Servlet Spec Web Applications and Jetty internal ContextHandler deployment descriptors, or even a mix of the two.
Web Applications are deployable collections of dynamic (servlets, filters, jsps, etc..) and static content, support libraries, and descriptive metadata that are bound to a specific context path on Jetty.
Ultimately the format and layout are defined by the Servlet Spec, and the official Servlet Spec documentation should be consulted for a more detailed understanding of Web Application layout and structure; however, this will outline basics about how Jetty views these requirements.
Web Applications can be bundled into a single Web Archive (WAR file) or as a directory tree.
/WEB-INF/-
Special Servlet API defined directory used to store anything related to the Web Application that are not part of the public access of the Web Application. If there is content that is accessed by a Web Application internally, but that should also never be accessed directly by a web browser, this is the directory it would placed in.
/WEB-INF/web.xml-
Required deployment descriptor defining various behavior of the Web Application.
/WEB-INF/classes/-
Location for Web Application specific compiled java classes
/WEB-INF/lib/-
Directory for JAR files (libraries)
The Jetty internal WebAppClassloader will load classes from /WEB-INF/classes/ first, then from jar files found in /WEB-INF/lib/.
Automatic Web Application Deployment
The most basic technique for deploying Web Applications is to put a WAR file or Exploded WAR directory into the ${jetty.base}/webapps/ directory and let Jetty’s deployment scanner find it and deploy it under a Context path of the same name.
Only Web Applications that follow the Web Application Layout will be detected by Jetty and deployed this way.
The Context Path assigned to this automatic deployment is based the filename (or directory name) of the WAR.
| File or Directory Name | Assigned Context Path |
|---|---|
|
|
|
|
|
|
|
|
|
|
|
Configuring a Specific Web Application Deployment
Using the Automatic Web Application Deployment model is quick and easy, but sometimes you might need to tune certain deployment properties (for example, you want to deploy with a context path that is not based on the file name, or you want to define a special database connection pool just for this web application). You can use a Jetty Deployable Descriptor XML File to accomplish such tuning.
Jetty Deployable Descriptor XML File
Jetty supports deploying Web Applications via XML files which will build an instance of a ContextHandler that Jetty can then deploy.
Using Basic Descriptor Files
In a default Jetty installation, Jetty scans its $JETTY_HOME/webapps directory for context deployment descriptor files.
To deploy a web application using such a file, simply place the file in that directory.
The deployment descriptor file itself is an xml file that configures a WebAppContext class.
For a basic installation only two properties need configured:
- war
-
The filesystem path to the web application file (or directory)
- contextPath
-
The context path to use for the web application
For example, here is a descriptor file that deploys the file /opt/myapp/myapp.war to the context path /wiki:
<?xml version="1.0" encoding="UTF-8"?>
<!DOCTYPE Configure PUBLIC "-//Jetty//Configure//EN" "http://www.eclipse.org/jetty/configure_9_3.dtd">

<Configure class="org.eclipse.jetty.webapp.WebAppContext">
  <Set name="contextPath">/wiki</Set>
  <Set name="war">/opt/myapp/myapp.war</Set>
</Configure>
Both SystemProperty and Property elements can be used in the descriptor file.
For example, if the system property is set to myapp.home=/opt/myapp, the previous example can be rewritten as:
<?xml version="1.0" encoding="UTF-8"?>
<!DOCTYPE Configure PUBLIC "-//Jetty//Configure//EN" "http://www.eclipse.org/jetty/configure_9_3.dtd">

<Configure class="org.eclipse.jetty.webapp.WebAppContext">
  <Set name="contextPath">/wiki</Set>
  <Set name="war"><SystemProperty name="myapp.home"/>/myapp.war</Set>
</Configure>
If the home path for an application needs altered, only the system property needs changed. This is useful if the version of an app is frequently changed.
|
To ensure your |
Configuring Advanced Descriptor Files
Official documentation for the for the WebAppContext class lists all the properties that can be set.
Here are some examples that configure advanced options in the descriptor file.
This first example tells Jetty not to expand the WAR file when deploying it. This can help make it clear that users should not make changes to the temporary unpacked WAR because such changes do not persist, and therefore do not apply the next time the web application deploys.
<?xml version="1.0" encoding="UTF-8"?>
<!DOCTYPE Configure PUBLIC "-//Jetty//Configure//EN" "http://www.eclipse.org/jetty/configure_9_3.dtd">

<Configure class="org.eclipse.jetty.webapp.WebAppContext">
  <Set name="contextPath">/wiki</Set>
  <Set name="war"><SystemProperty name="myapp.home"/>/myapp.war</Set>
  <Set name="extractWAR">false</Set>
</Configure>
The next example retrieves the JavaEE Servlet context and sets an initialization parameter on it.
The setAttribute method can also be used to set a Servlet context attribute.
However, since the web.xml for the web application is processed after the deployment descriptor, the web.xml values overwrite identically named attributes from the deployment descriptor.
<?xml version="1.0" encoding="UTF-8"?>
<!DOCTYPE Configure PUBLIC "-//Jetty//Configure//EN" "http://www.eclipse.org/jetty/configure_9_3.dtd">

<Configure class="org.eclipse.jetty.webapp.WebAppContext">
  <Set name="contextPath">/wiki</Set>
  <Set name="war"><SystemProperty name="myapp.home"/>/myapp.war</Set>
  <Get name="ServletContext">
     <Call name="setInitParameter">
       <Arg>myapp.config</Arg>
       <Arg><SystemProperty name="myapp.home">/config/app-config.xml</Arg>
    </Call>
  </Get>
</Configure>
The following example sets a special web.xml override descriptor.
This descriptor is processed after the web application’s web.xml, so it may override identically named attributes.
This feature is useful when adding parameters or additional Servlet mappings without breaking open a packed WAR file.
<?xml version="1.0" encoding="UTF-8"?>
<!DOCTYPE Configure PUBLIC "-//Jetty//Configure//EN" "http://www.eclipse.org/jetty/configure_9_3.dtd">

<Configure class="org.eclipse.jetty.webapp.WebAppContext">
  <Set name="contextPath">/wiki</Set>
  <Set name="war"><SystemProperty name="myapp.home"/>/myapp.war</Set>
  <Set name="overrideDescriptor">/opt/myapp/overlay-web.xml</Set>
</Configure>
The next example configures not only the web application context, but also a database connection pool (see Datasource Examples) that the application can then use.
If the web.xml does not include a reference to this data source, an override descriptor mechanism (as shown in the previous example) can be used to include it.
<?xml version="1.0" encoding="UTF-8"?>
<!DOCTYPE Configure PUBLIC "-//Jetty//Configure//EN" "http://www.eclipse.org/jetty/configure_9_3.dtd">

<Configure class="org.eclipse.jetty.webapp.WebAppContext">
  <Set name="contextPath">/wiki</Set>
  <Set name="war"><SystemProperty name="myapp.home"/>/myapp.war</Set>

  <New id="DSTest" class="org.eclipse.jetty.plus.jndi.Resource">
    <Arg></Arg>
    <Arg>jdbc/DSTest</Arg>
    <Arg>
      <New class="org.apache.commons.dbcp.BasicDataSource">
        <Set name="driverClassName">org.some.Driver</Set>
        <Set name="url">jdbc.url</Set>
        <Set name="username">jdbc.user</Set>
        <Set name="password">jdbc.pass</Set>
      </New>
    </Arg>
  </New>
</Configure>
There are many other settings that can be changed in a WebAppContext.
The javadoc for WebAppContext is a good source of information.
Also see the documentation on avoiding zip file exceptions for a description of WebAppContext settings that determine such things as whether or not the war is automatically unpacked during deployment, or whether certain sections of a webapp are copied to a temporary location.
Deployment Processing of WebAppContexts
Web applications require a certain amount of processing before they can go into service: they may need to be unpacked, a special classloader created for their jar files, web.xml and web-fragment.xml descriptors processed, and classes scanned for annotations amongst other things.
As web applications have become more complex, Jetty has added ways to assist with customization by either broadening or lessening the amount of processing that is done at deployment time.
This section will examine this processing and it can be tailored to fit individual needs.
If instead you’re looking for information on how to configure a specific WebAppContext - such as its context path, whether it should be unpacked or not - then you can find that in the section entitled Configuring a Specific WebApp Deployment.
Configuration Classes
As a webapp is being deployed, a series of org.eclipse.jetty.webapp.Configuration classes are applied to it, each one performing a specific function. The ordering of these Configurations is significant as subsequent Configurations tend to build on information extracted or setup in foregoing Configurations. These are the default list, in order, of Configurations that are applied to each org.eclipse.jetty.webapp.WebAppContext:
Extracts war, orders jars and defines classpath |
|
Processes a WEB-INF/web.xml file |
|
Looks in container and webapp jars for META-INF/resources and META-INF/web-fragment.xml |
|
Processes all discovered META-INF/web-fragment.xml files |
|
Processes a WEB-INF/jetty-web.xml file |
Anatomy of a Configuration Class
A Configuration class is called 5 times in different phases of the WebAppContext’s lifecycle:
- preConfigure
-
As the
WebAppContextis starting up this phase is executed. TheConfigurationshould discover any of the resources it will need during the subsequent phases. - configure
-
This phase is where the work of the class is done, usually using the resources discovered during the
preConfigurephase. - postConfigure
-
This phase allows the
Configurationto clear down any resources that may have been created during the previous 2 phases that are not needed for the lifetime of theWebAppContext. - deconfigure
-
This phase occurs whenever a
WebAppContextis being stopped and allows the Configuration to undo any resources/metadata that it created. AWebAppContextshould be able to be cleanly start/stopped multiple times without resources being held. - destroy
-
This phase is called when a
WebAppContextis actually removed from service. For example, the war file associated with it is deleted from the $JETTY_HOME/webapps directory.
Each phase is called on each Configuration class in the order in which the Configuration class is listed.
Using the default Configuration classes as an example, preConfigure() will be called on WebInfConfiguration, WebXmlConfiguration, MetaInfConfiguration, FragmentConfiguration and then JettyWebXmlConfiguration.
The cycle begins again for the configure() phase and again for the postConfigure() phases.
The cycle is repeated in reverse order for the deconfigure() and eventually the destroy() phases.
Extending Container Support by Creating Extra Configurations
As shown, there is a default set of Configurations that support basic deployment of a webapp.
JavaEE features such as JNDI and advanced servlet spec features such as annotations have not been mentioned.
Jetty’s philosophy is to allow the user to tailor the container exactly to their needs.
If these features are not needed, then Jetty does not pay the price for them - an important consideration because features such as annotations require extensive and time-consuming scanning of WEB-INF/lib jars.
As modern webapps may have scores of these jars, it can be a source of significant deployment delay.
We will see in the section Other Configuration another helpful webapp facility that Jetty provides for cutting down the time spent analyzing jars.
Jetty makes use of the flexibility of Configurations to make JNDI and annotation support pluggable.
Firstly, lets look at how Configurations help enable JNDI.
Example: JNDI Configurations
JNDI lookups within web applications require the container to hookup resources defined in the container’s environment to that of the web application. To achieve that, we use 2 extra Configurations:
Creates |
|
Processes JNDI related aspects of |
These configurations must be added in exactly the order shown above and should be inserted immediately before the org.eclipse.jetty.webapp.JettyWebXmlConfiguration class in the list of configurations. To fully support JNDI additional configuration is required, full details of which can be found here.
Example: Annotation Configurations
We need just one extra Configuration class to help provide servlet annotation scanning:
Scan container and web app jars looking for @WebServlet, @WebFilter, @WebListener etc |
The above configuration class must be inserted immediately before the org.eclipse.jetty.webapp.JettyWebXmlConfiguration class in the list of configurations. To fully support annotations additional configuration is require, details of which can be found below.
How to Set the List of Configurations
You have a number of options for how to make Jetty use a different list of Configurations.
Setting the list directly on the WebAppContext
If you have only one webapp that you wish to affect, this may be the easiest option. You will, however, either need to have a context xml file that represents your web app, or you need to call the equivalent in code. Let’s see an example of how we would add in the Configurations for both JNDI and annotations:
<?xml version="1.0"?>
<!DOCTYPE Configure PUBLIC "-//Jetty//Configure//EN" "http://www.eclipse.org/jetty/configure_9_3.dtd">

<Configure class="org.eclipse.jetty.webapp.WebAppContext">

  <Set name="war"><SystemProperty name="jetty.base" default="."/>/webapps/my-cool-webapp</Set>

  <Set name="configurationClasses">
    <Array type="java.lang.String">
      <Item>org.eclipse.jetty.webapp.WebInfConfiguration</Item>
      <Item>org.eclipse.jetty.webapp.WebXmlConfiguration</Item>
      <Item>org.eclipse.jetty.webapp.MetaInfConfiguration</Item>
      <Item>org.eclipse.jetty.webapp.FragmentConfiguration</Item>
      <Item>org.eclipse.jetty.plus.webapp.EnvConfiguration</Item>
      <Item>org.eclipse.jetty.plus.webapp.PlusConfiguration</Item>
      <Item>org.eclipse.jetty.annotations.AnnotationConfiguration</Item>
      <Item>org.eclipse.jetty.webapp.JettyWebXmlConfiguration</Item>
    </Array>
  </Set>

</Configure>
Of course, you can also use this method to reduce the Configurations applied to a specific WebAppContext.
Setting the list for all webapps via the Deployer
If you use the deployer, you can set up the list of Configuration classes on the WebAppProvider.
They will then be applied to each WebAppContext deployed by the deployer:
<?xml version="1.0"?>
<!DOCTYPE Configure PUBLIC "-//Jetty//Configure//EN" "http://www.eclipse.org/jetty/configure_9_3.dtd">

<Configure id="Server" class="org.eclipse.jetty.server.Server">

  <Call name="addBean">
    <Arg>
      <New id="DeploymentManager" class="org.eclipse.jetty.deploy.DeploymentManager">
        <Set name="contexts">
          <Ref refid="Contexts" />
        </Set>
        <Call id="webappprovider" name="addAppProvider">
          <Arg>
            <New class="org.eclipse.jetty.deploy.providers.WebAppProvider">
              <Set name="monitoredDirName"><Property name="jetty.base" default="." />/webapps</Set>
              <Set name="configurationClasses">
                <Array type="java.lang.String">
                  <Item>org.eclipse.jetty.webapp.WebInfConfiguration</Item>
                  <Item>org.eclipse.jetty.webapp.WebXmlConfiguration</Item>
                  <Item>org.eclipse.jetty.webapp.MetaInfConfiguration</Item>
                  <Item>org.eclipse.jetty.webapp.FragmentConfiguration</Item>
                  <Item>org.eclipse.jetty.plus.webapp.EnvConfiguration</Item>
                  <Item>org.eclipse.jetty.plus.webapp.PlusConfiguration</Item>
                  <Item>org.eclipse.jetty.annotations.AnnotationConfiguration</Item>
                  <Item>org.eclipse.jetty.webapp.JettyWebXmlConfiguration</Item>
                </Array>
              </Set>
            </New>
          </Arg>
        </Call>
      </New>
    </Arg>
  </Call>
</Configure>
Adding or inserting to an existing list
Instead of having to enumerate the list in its entirety, you can simply nominate classes that you want to add, and indicate whereabouts in the list you want them inserted.
Let’s look at an example of using this method to add in Configuration support for JNDI - as usual you can either do this in an xml file, or via equivalent code.
This example uses an xml file, in fact it is the $JETTY_HOME/etc/jetty-plus.xml file from the Jetty distribution:
<?xml version="1.0"?>
<!DOCTYPE Configure PUBLIC "-//Jetty//Configure//EN" "http://www.eclipse.org/jetty/configure_9_3.dtd">

<Configure id="Server" class="org.eclipse.jetty.server.Server">

  <!-- =========================================================== -->
  <!-- Add plus Configuring classes to all webapps for this Server -->
  <!-- =========================================================== -->
  <Call class="org.eclipse.jetty.webapp.Configuration$ClassList" name="setServerDefault">
    <Arg><Ref refid="Server" /></Arg>
    <Call name="addAfter">
      <Arg name="afterClass">org.eclipse.jetty.webapp.FragmentConfiguration</Arg>
      <Arg>
        <Array type="String">
          <Item>org.eclipse.jetty.plus.webapp.EnvConfiguration</Item>
          <Item>org.eclipse.jetty.plus.webapp.PlusConfiguration</Item>
        </Array>
      </Arg>
    </Call>
  </Call>

</Configure>
The org.eclipse.jetty.webapp.Configuration.ClassList class provides these methods for insertion:
- addAfter
-
Inserts the supplied list of
Configurationclass names after the given Configuration class name. - addBefore
-
Inserts the supplied list of
Configurationclass names before the given Configuration class name.
Other Configuration
org.eclipse.jetty.server.webapp.ContainerIncludeJarPattern
This is a context attribute that can be set on an org.eclipse.jetty.webapp.WebAppContext to control which parts of the container’s classpath should be processed for things like annotations, META-INF/resources, META-INF/web-fragment.xml and tlds inside META-INF.
Normally, nothing from the container classpath will be included for processing.
However, sometimes you will need to include some.
For example, you may have some libraries that are shared amongst your webapps and thus you have put them into a $JETTY_HOME/lib directory.
The libraries contain annotations and therefore must be scanned.
The value of this attribute is a regexp that defines which jars and class directories from the container’s classpath should be examined.
Here’s an example from a context xml file (although as always, you could have accomplished the same in code), which would match any jar whose name starts with "foo-" or "bar-", or a directory named "classes":
<?xml version="1.0"?>
<!DOCTYPE Configure PUBLIC "-//Jetty//Configure//EN" "http://www.eclipse.org/jetty/configure_9_3.dtd">

<Configure class="org.eclipse.jetty.webapp.WebAppContext">

    <Call name="setAttribute">
      <Arg>org.eclipse.jetty.server.webapp.ContainerIncludeJarPattern</Arg>
      <Arg>.*/foo-[^/]*\.jar$|.*/bar-[^/]*\.jar$|.*/classes/.*</Arg>
    </Call>

</Configure>
Note that the order of the patterns defines the ordering of the scanning of the jars or class directories.
org.eclipse.jetty.server.webapp.WebInfIncludeJarPattern
Similarly to the previous context attribute, this attribute controls which jars are processed for things like annotations, META-INF/resources, META-INF/web-fragment.xml and tlds in META-INF.
However, this attribute controls which jars from the webapp’s classpath (usually WEB-INF/lib) are processed.
This can be particularly useful when you have dozens of jars in WEB-INF/lib, but you know that only a few need to be scanned.
Here’s an example in a xml file of a pattern that matches any jar that starts with spring-:
<?xml version="1.0"?>
<!DOCTYPE Configure PUBLIC "-//Jetty//Configure//EN" "http://www.eclipse.org/jetty/configure_9_3.dtd">

<Configure class="org.eclipse.jetty.webapp.WebAppContext">

    <Call name="setAttribute">
      <Arg>org.eclipse.jetty.server.webapp.WebInfIncludeJarPattern</Arg>
      <Arg>.*/spring-[^/]*\.jar$</Arg>
    </Call>

</Configure>
Note that the order of the patterns defines the ordering of the scanning of jar files.
Configuring Static Content Deployment
To serve purely static content, the Jetty Deployment Descriptor XML concepts and the internal ResourceHandler can be used.
Create a file called scratch.xml in the ${jetty.base}/webapps directory and paste the following file contents in it.
<?xml version="1.0" encoding="UTF-8"?>
<!DOCTYPE Configure PUBLIC "-//Jetty//Configure//EN" "http://www.eclipse.org/jetty/configure_9_3.dtd">
<Configure class="org.eclipse.jetty.server.handler.ContextHandler">
  <Set name="contextPath">/scratch</Set>
  <Set name="handler">
    <New class="org.eclipse.jetty.server.handler.ResourceHandler">
      <Set name="resourceBase">/home/scratch</Set>
      <Set name="directoriesListed">true</Set>
    </New>
  </Set>
</Configure>
This is a very basic setup for serving static files. For advanced static file serving, use the DefaultServlet.
Hot Deployment
Jetty allows for deploying an arbitrary context or web application by monitoring a directory for changes.
If a web application or a context descriptor is added to the directory, Jetty’s DeploymentManager (DM) deploys a new context.
If a context descriptor is touched or updated, the DM stops, reconfigures, and redeploys its context.
If a context is removed, the DM stops it and removes it from the server.
This behavior can be controlled by configuring WebAppProvider properties.
- monitoredDirName
-
The directory to scan for possible deployable Web Applications (or Deployment Descriptor XML files).
- scanInterval
-
Number of seconds between scans of the provided
monitoredDirName. A value of0disables the continuous hot deployment scan, Web Applications will be deployed on startup only.
The default location for this configuration is in the ${jetty.home}/etc/jetty-deploy.xml file.
To modify it as part of the Jetty distribution, first enable the deploy module.
Once it is enabled, you can edit these properties in either the $JETTY_BASE/start.d/deploy.ini or $JETTY_BASE/start.ini file, depending on how your implementation is configured.
<?xml version="1.0"?>
# ---------------------------------------
# Module: deploy
# Enables webapplication deployment from the webapps directory.
# ---------------------------------------
--module=deploy

# Monitored directory name (relative to $jetty.base)
# jetty.deploy.monitoredDir=webapps
# - OR -
# Monitored directory path (fully qualified)
# jetty.deploy.monitoredPath=/var/www/webapps

# Defaults Descriptor for all deployed webapps
# jetty.deploy.defaultsDescriptorPath=${jetty.base}/etc/webdefault.xml

# Monitored directory scan period (seconds)
# jetty.deploy.scanInterval=1

# Whether to extract *.war files
# jetty.deploy.extractWars=true
See Understanding the Default WebAppProvider for more configuration details.
See also Deployment Architecture for detailed conceptual information.
Deployment Architecture
Jetty is built around an extensible Deployment Manager architecture complete with formal LifeCycle for Web Applications going through it.
For Jetty to serve content (static or dynamic), a ContextHandler needs to be configured and added to Jetty in the appropriate location.
A pluggable DeploymentManager exists to make this process easier.
The Jetty distribution contains example DeploymentManager configurations to deploy WAR files found in a directory to Jetty, and to deploy Jetty context xml files into Jetty as well.
The DeploymentManager is the heart of the typical webapp deployment mechanism; it operates as a combination of an Application LifeCycle Graph, Application Providers that find and provide Applications into the Application LifeCycle Graph, and a set of bindings in the graph that control the deployment process.
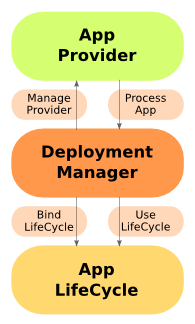
Application Providers
Before Jetty deploys an application, an AppProvider identifies the App and then provides it to the DeploymentManager.
The main AppProvider with the Jetty distribution is the WebAppProvider.
Application LifeCycle Graph
The core feature of the DeploymentManager is the Application LifeCycle Graph.
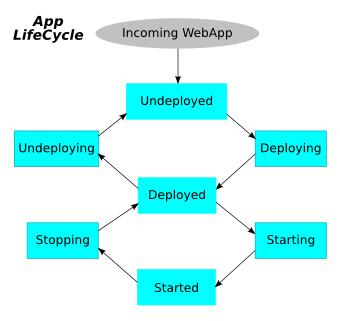
The nodes and edges of this graph are pre-defined in Jetty along the most common actions and states found. These nodes and edges are not hardcoded; they can be adjusted and added to depending on need (for example, any complex requirements for added workflow, approvals, staging, distribution, coordinated deploys for a cluster or cloud, etc.).
New applications enter this graph at the Undeployed node, and the java.lang.String DeploymentManager.requestAppGoal(App,String) method pushes them through the graph.
LifeCycle Bindings
A set of default AppLifeCycle.Bindings defines standard behavior, and handles deploying, starting, stopping, and undeploying applications.
If desired, custom AppLifeCycle.Bindings can be written and assigned anywhere on the Application LifeCycle graph.
Examples of new AppLifeCycle.Binding implementations that can be developed include:
-
Validating the incoming application.
-
Preventing the deployment of known forbidden applications.
-
Submitting the installation to an application auditing service in a corporate environment.
-
Distributing the application to other nodes in the cluster or cloud.
-
Emailing owner/admin of change of state of the application.
There are four default bindings:
-
StandardDeployer— Deploys the ContextHandler into Jetty in the appropriate place. -
StandardStarter— Sets the ContextHandler to started and start accepting incoming requests. -
StandardStopper— Stops the ContextHandler and stops accepting incoming requests. -
StandardUndeployer— Removes the ContextHandler from Jetty.
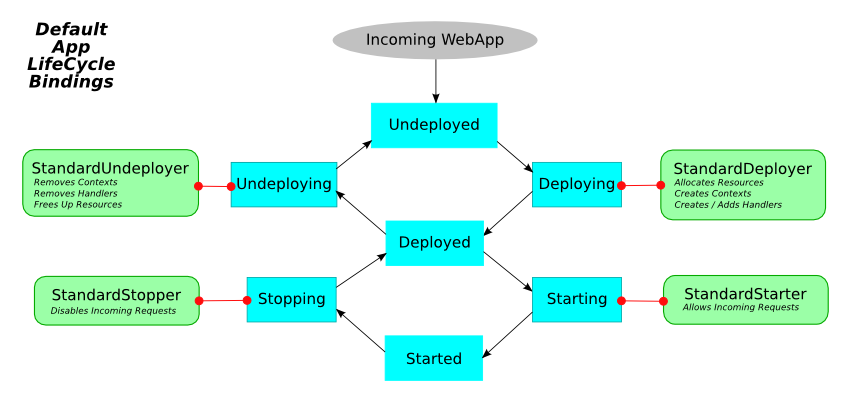
A fifth, non-standard binding, called DebugBinding, is also available for debugging reasons; it logs the various transitions through the Application LifeCycle.
Using GlobalWebappConfigBinding
In addition to the LifeCycle bindings discussed above, there is also the GlobalWebappConfigBinding which, when added to the DeploymentManager will apply an additional configuration XML file to each webapp that it deploys.
This can useful when setting server or system classes, or when defining override descriptors.
This configuration XML file will be in addition to any context XML file that exists for the webapp; it will be applied after any context XML files but before the webapp is started.
The format for the XML file is the same as any context XML file and can be used to same parameters for a webapp.
To use this binding, you can either modify the existing jetty-deploy.xml which comes with the Jetty distribution (be sure to copy it to your $JETTY_BASE/etc directory first), or by creating a new module file which calls to an additional XML file.
        <Call name="addLifeCycleBinding">
          <Arg>
            <New class="org.eclipse.jetty.deploy.bindings.GlobalWebappConfigBinding" >
              <Set name="jettyXml"><Property name="jetty.home" default="." />/etc/global-webapp-config.xml</Set>
            </New>
          </Arg>
        </Call>
Understanding the Default WebAppProvider
The WebAppProvider is used for the deployment of Web Applications packaged as WAR files, expanded as a directory, or declared in a Jetty Deployable Descriptor XML File. It supports hot (re)deployment.
The basic operation of the WebAppProvider is to periodically scan a directory for deployables.
In the standard Jetty Distribution, this is configured in the ${jetty.home}/etc/jetty-deploy.xml file.
<?xml version="1.0"?>
<!DOCTYPE Configure PUBLIC "-//Jetty//Configure//EN" "http://www.eclipse.org/jetty/configure_9_3.dtd">
<Configure id="Server" class="org.eclipse.jetty.server.Server">

  <Call name="addBean">
    <Arg>
      <New id="DeploymentManager" class="org.eclipse.jetty.deploy.DeploymentManager">
        <Set name="contexts">
          <Ref refid="Contexts" />
        </Set>
        <Call id="webappprovider" name="addAppProvider">
          <Arg>
            <New class="org.eclipse.jetty.deploy.providers.WebAppProvider">
              <Set name="monitoredDirName"><Property name="jetty.home" default="." />/webapps</Set>
              <Set name="defaultsDescriptor"><Property name="jetty.home" default="." />/etc/webdefault.xml</Set>
              <Set name="scanInterval">1</Set>
              <Set name="extractWars">true</Set>
            </New>
          </Arg>
        </Call>
      </New>
    </Arg>
  </Call>
</Configure>
The above configuration will create a DeploymentManager tracked as a Server LifeCycle Bean, with the following configuration.
- contexts
-
A passed in reference to the HandlerContainer into which the discovered webapps are deployed. This is normally a reference that points to the
id="Contexts"found in the${jetty.home}/etc/jetty.xmlfile, which itself is an instance ofContextHandlerCollection. - monitoredDirName
-
The file path or URL to the directory to scan for web applications.
Scanning follows these rules:
-
A base directory must exist.
-
Hidden Files (starting with
".") are ignored. -
Directories with names ending in
".d"are ignored. -
Common CVS directories
"CVS"and"CVSROOT"are ignored. -
Any
*.warfiles are considered automatic deployables. -
Any
*.xmlfiles are considered context descriptor deployables. -
In the special case where both a WAR file and XML file exists for same base name, the XML file is assumed to configure and reference the WAR file (see Configuring a Specific Web Application Deployment). Since jetty-9.2.7, if either the WAR file or its corresponding XML file changes, the webapp will be redeployed.
-
A directory is considered to be deployable.
-
In the special case where both a Directory and WAR file of the same name exists, the WAR file is assumed to be an automatic deployable.
-
In the special case where both a Directory and XML file of the same name exists, the XML file is assumed to configure and reference the Directory.
-
All other directories are subject to automatic deployment.
-
If automatic deployment is used, and the special filename
root.war/ROOT.waror directory nameroot/ROOTwill result in a deployment to the"/"context path.
-
- defaultsDescriptor
-
Specifies the default Servlet web descriptor to use for all Web Applications. The intent of this descriptor is to include common configuration for the Web Application before the Web Application’s own
/WEB-INF/web.xmlis applied. The${jetty.home}/etc/webdefault.xmlthat comes with the Jetty distribution controls the configuration of the JSP and Default servlets, along with MIME-types and other basic metadata. - scanInterval
-
The period in seconds between sweeps of the
monitoredDirNamefor changes: new contexts to deploy, changed contexts to redeploy, or removed contexts to undeploy. - extractWars
-
If parameter is true, any packed WAR or zip files are first extracted to a temporary directory before being deployed. This is advisable if there are uncompiled JSPs in the web apps.
- parentLoaderPriority
-
Parameter is a boolean that selects whether the standard Java parent first delegation is used or the servlet specification webapp classloading priority. The latter is the default.
Quickstart Webapps
The auto discovery features of the Servlet specification can make deployments slow and uncertain. Auto discovery of Web Application configuration can be useful during the development of a webapp as it allows new features and frameworks to be enabled simply by dropping in a jar file. However, for deployment, the need to scan the contents of many jars can have a significant impact of the start time of a webapp.
With the release of Jetty 9.2, a quickstart module was included which allows a webapp to be pre-scanned and preconfigured.
This means that all the scanning is done prior to deployment and all configuration is encoded into an effective web.xml, called WEB-INF/quickstart-web.xml, which can be inspected to understand what will be deployed before deploying.
Not only does the quickstart-web.xml contain all the discovered Servlets, Filters and Constraints, but it also encodes as context parameters all discovered:
-
ServletContainerInitializers
-
HandlesTypes classes
-
Taglib Descriptors
With the quickstart mechanism, Jetty is able to entirely bypass all scanning and discovery modes and start a webapp in a predictable and fast way. Tests have shown that webapps that took many seconds to scan and deploy can now be deployed in a few hundred milliseconds.
Setting up Quickstart
Prerequisites
Jetty Distribution
In a standard Jetty distribution the quickstart module can be configured with the following command:
$ java -jar $JETTY_HOME/start.jar --add-to-start=quickstartEmbedded
In a Maven project you add a dependency on the artifact jetty-quickstart.
<dependency>
    <groupId>org.eclipse.jetty</groupId>
    <artifactId>jetty-quickstart</artifactId>
    <version>{VERSION}</version>
</dependency>
Configuration
Webapps need to be instances of org.eclipse.jetty.quickstart.QuickStartWebApp rather than the normal org.eclipse.jetty.webapp.WebAppContext.
org.eclipse.jetty.quickstart.QuickStartWebApp instances offer the same setters as the familiar org.eclipse.jetty.webapp.WebAppContext, with the addition of:
- autoPreconfigure
-
(true/false). If true, the first time the webapp is run, the WEB-INF/quickstart-web.xml is generated BEFORE the webapp is deployed. Subsequent runs use the previously generated quickstart file.
- originAttribute
-
The name of an attribute to insert into the generated elements in quickstart-web.xml that gives the origin of the element. By default it is
origin. - generateOrigin
-
(true/false). By default it is
false. If true, the origin attribute will be inserted into each element in quickstart-web.xml. Note that origin attributes will also be generated if debug log level is enabled.
|
If you are using Spring-Boot you must set |
The origin is either a descriptor eg web.xml,web-fragment.xml,override-web.xml file, or an annotation eg @WebServlet. For xml validation each attribute must be unique, and therefore an integer counter is appended to each value. Some examples of elements with origin attribute information are:
<listener origin="DefaultsDescriptor(file:///path/to/distro/etc/webdefault.xml):21">
<listener origin="WebDescriptor(file:///path/to/base/webapps/test-spec/WEB-INF/web.xml):22">
<servlet-class origin="FragmentDescriptor(jar:file:///path/to/base/webapps/test-spec/WEB-INF/lib/test-web-fragment.jar!/META-INF/web-fragment.xml):23">
<servlet-class origin="@WebServlet(com.acme.test.TestServlet):24">
In XML
If a web application already has a context xml file, eg webapps/myapp.xml file, simply change the class in the Configure element.
Otherwise, create a context xml file with the following information (in addition to the usual setting of contextPath, war etc):
<?xml version="1.0" encoding="UTF-8"?>
<!DOCTYPE Configure PUBLIC "-//Jetty//Configure//EN" "http://www.eclipse.org/jetty/configure_9_3.dtd">
<Configure class="org.eclipse.jetty.quickstart.QuickStartWebApp">
  <Set name="autoPreconfigure">true</Set>
</Configure>
In Code
Create an instance of org.eclipse.jetty.quickstart.QuickStartWebApp rather than the normal org.eclipse.jetty.webapp.WebAppContext. You then use the QuickStartWebApp instance in exactly the same way that you would a WebAppContext.
Here’s a snippet:
    QuickStartWebApp webapp = new QuickStartWebApp();
    webapp.setAutoPreconfigure(true);
Pre-generating the quickstart-web.xml file
Rather than use the autoPreconfigure feature of the QuickStartWebApp - which lazily generates the quickstart-web.xml file - you can eagerly pre-generate it for an existing war by invoking as a main class org.eclipse.jetty.quickstart.PreconfigureQuickStartWar.
Note that you will need to provide all necessary jetty jars on the command line classpath.
This will unpack the war if necessary, and create the quickstart-web.xml before the first deployment:
$ java -cp [jetty classpath] org.eclipse.jetty.quickstart.PreconfigureQuickStartWar myapp.warRun the class with no arguments to see other runtime options.
Alternatively, you could use the Jetty Maven Plugin goal jetty:effective-web-xml: this will generate quickstart information, but print it to stderr.
The goal provides a configuration option to save the output to a file, which you can then copy into your webapp’s WEB-INF dir.
Note that as the Jetty Maven Plugin is a general tool for running webapps, it may have more jars on its classpath than are needed by your application, and thus may generate extra quickstart information: we recommend that you use this goal only as a quick guide to the type of information that quickstart generates.
Avoiding TLD Scans with precompiled JSPs
Of course precompiling JSPs is an excellent way to improve the start time of a web application.
As of Jetty 9.2 the Apache Jasper JSP implementation has been used and has been augmented to allow the TLD scan to be skipped.
This can be done by adding a context-param to the web.xml file (this is done automatically by the Jetty Maven JSPC plugin):
<context-param>
  <param-name>org.eclipse.jetty.jsp.precompiled</param-name>
  <param-value>true</param-value>
</context-param>
Bypassing start.jar
The Jetty start.jar mechanism is a very powerful and flexible mechanism for constructing a classpath and executing a configuration encoded in Jetty XML format.
However, this mechanism does take some time to build the classpath.
The start.jar mechanism can be bypassed by using the –dry-run option to generate and reuse a complete command line to start Jetty at a later time:
$ RUN=$(java -jar $JETTY_HOME/start.jar --dry-run)
$ eval $RUN
Note that --dry-run may create a properties file in the temp directory and include it on the generated command line.
If so, then a copy of the temporary properties file should be taken and the command line updated with it’s new persistent location.
Configuring Contexts
This chapter discusses various options for configuring Jetty contexts.
Setting a Context Path
The context path is the prefix of a URL path that is used to select the context(s) to which an incoming request is passed. Typically a URL in a Java servlet server is of the format http://hostname.com/contextPath/servletPath/pathInfo, where each of the path elements can be zero or more / separated elements.
If there is no context path, the context is referred to as the root context.
The root context must be configured as / but is reported as the empty string by the servlet API getContextPath() method.
How you set the context path depends on how you deploy the web application (or ContextHandler).
Using Embedded Deployment
If you run Jetty from code as an embedded server (see Embedding), setting the context path is a matter of calling the setContextPath method on the ContextHandler instance (or WebAppContext instance).
By naming convention
If a web application is deployed using the WebAppProvider of the DeploymentManager without an XML IoC file, then the name of the WAR file is used to set the context path:
-
If the WAR file is named myapp.war, then the context will be deployed with a context path of
/myapp -
If the WAR file is named ROOT.WAR (or any case insensitive variation), then the context will be deployed with a context path of
/ -
If the WAR file is named ROOT-foobar.war ( or any case insensitive variation), then the context will be deployed with a context path of
/and a virtual host of "foobar"
By Deployer configuration
If a web application is deployed using the WebAppProvider of the DeploymentManager with an XML IoC file to configure the context, then the setContextPath method can be called within that file.
For example:
<Configure class="org.eclipse.jetty.webapp.WebAppContext">
  <Set name="contextPath">/test</Set>
  ...
</Configure>
Embedding a WEB-INF/jetty-web.xml File
You can also set the context path for webapps by embedding a WEB-INF/jetty-web.xml file in the WAR, which uses the same XML IoC format as the deployer example above.
However this is not the preferred method as it requires the web application to be modified.
Configuring Virtual Hosts
A virtual host is an alternative name, registered in DNS, for an IP address such that multiple domain names will resolve to the same IP of a shared server instance. If the content to be served to the aliases names is different, then a virtual host needs to be configured for each deployed context to indicate which names a context will respond to.
Virtual hosts are set on a context by calling the setVirtualHosts or addVirtualHost method which can be done in several ways:
-
Using a context XML file in the webapps directory (see the example in test.xml in the Jetty distribution).
-
Creating a custom deployer with a binding to configure virtual hosts for all contexts found in the same
webappsdirectory. -
Using a
WEB-INF/jetty-web.xmlfile (now deprecated).
Virtual Host Names
Jetty supports the following styles of virtual host name:
- www.hostname.com
-
A fully qualified host name. It is important to list all variants as a site may receive traffic from both www.hostname.com and just hostname.com
- *.hostname.com
-
A wildcard qualified host which will match only one level of arbitrary names. *.foo.com will match www.foo.com and m.foo.com, but not www.other.foo.com
- 10.0.0.2
-
An IP address may be given as a virtual host name to indicate that a context should handle requests received on that server port that do not have a host name specified (HTTP/0.9 or HTTP/1.0).
- @ConnectorName
-
A connector name, which is not strictly a virtual host, but instead will only match requests that are received on connectors that have a matching name set with Connector.setName(String).
- www.√integral.com
-
Non-ASCII and IDN domain names can be set as virtual hosts using Puny Code equivalents that may be obtained from a Punycode/IDN converters. For example if the non-ASCII domain name
www.√integral.comis given to a browser, then it will make a request that uses the domain namewww.xn—integral-7g7d.com, which is the name that should be added as the virtual host name.
Example Virtual Host Configuration
Virtual hosts can be used with any context that is a subclass of ContextHandler. Lets look at an example where we configure a web application - represented by the WebAppContext class - with virtual hosts. You supply a list of IP addresses and names at which the web application is reachable, such as the following:
-
333.444.555.666 -
127.0.0.1 -
www.blah.com -
www.blah.net -
www.blah.org
Suppose you have a webapp called blah.war, that you want all of the above names and addresses to be served at path “/blah”.
Here’s how you would configure the virtual hosts with a context XML file:
<?xml version="1.0" encoding="UTF-8"?>
<!DOCTYPE Configure PUBLIC "-//Jetty//Configure//EN" "http://www.eclipse.org/jetty/configure_9_3.dtd">

<Configure class="org.eclipse.jetty.webapp.WebAppContext">
  <Set name="contextPath">/blah</Set>
  <Set name="war"><Property name="jetty.webapps"/>blah.war</Set>
  <Set name="virtualHosts">
    <Array type="java.lang.String">
      <Item>333.444.555.666</Item>
      <Item>127.0.0.1</Item>
      <Item>www.blah.com</Item>
      <Item>www.blah.net</Item>
      <Item>www.blah.org</Item>
    </Array>
  </Set>
</Configure>
Using Different Sets of Virtual Hosts to Select Different Contexts
You can configure different contexts to respond on different virtual hosts by supplying a specific list of virtual hosts for each one.
For example, suppose your imaginary machine has these DNS names:
-
www.blah.com -
www.blah.net -
www.blah.org -
www.other.com -
www.other.net -
www.other.org
Suppose also you have 2 webapps, one called blah.war that you would like served from the .blah. names, and one called other.war that you want served only from the .other. names.
Using the method of preparing contextXML files, one for each webapp yields the following:
For blah webapp:
<?xml version="1.0" encoding="UTF-8"?>
<!DOCTYPE Configure PUBLIC "-//Jetty//Configure//EN" "http://www.eclipse.org/jetty/configure_9_3.dtd">

<Configure class="org.eclipse.jetty.webapp.WebAppContext">
  <Set name="contextPath">/blah</Set>
  <Set name="war"><Property name="jetty.webapps"/>/blah.war</Set>
  <Set name="virtualHosts">
    <Array type="java.lang.String">
      <Item>www.blah.com</Item>
      <Item>www.blah.net</Item>
      <Item>www.blah.org</Item>
    </Array>
  </Set>
</Configure>
These URLs now resolve to the blah context (ie blah.war):
For other webapp:
<?xml version="1.0" encoding="UTF-8"?>
<!DOCTYPE Configure PUBLIC "-//Jetty//Configure//EN" "http://www.eclipse.org/jetty/configure_9_3.dtd">

<Configure class="org.eclipse.jetty.webapp.WebAppContext">
  <Set name="contextPath">/other</Set>
  <Set name="war"><Property name="jetty.webapps"/>/other.war</Set>
  <Set name="virtualHosts">
    <Array type="java.lang.String">
      <Item>www.other.com</Item>
      <Item>www.other.net</Item>
      <Item>www.other.org</Item>
    </Array>
  </Set>
</Configure>
These URLs now resolve to the other context (i.e. other.war):
Using Different Sets of Virtual Hosts to Select Different Contexts at the Same Context Path
In the previous section we setup 2 different contexts to be served from different virtual hosts at different context paths. However, there is no requirement that the context paths must be distinct: you may use the same context path for multiple contexts, and use virtual hosts to determine which one is served for a given request.
Consider an example where we have the same set of DNS names as before, and the same webapps blah.war and other.war. We still want blah.war to be served in response to hostnames of .blah., and we still want other.war to be served in response to .other. names.
However, we would likeall of our clients to use the "/" context path, no matter which context is being targeted.
In other words, we want all of the following URLs to map to blah.war:
Similarly, we want the following URLs to map to other.war:
To achieve this, we simply use the same context path of / for each of our webapps, while still applying our different set of virtual host names.
For foo webapp:
<?xml version="1.0" encoding="UTF-8"?>
<!DOCTYPE Configure PUBLIC "-//Jetty//Configure//EN" "http://www.eclipse.org/jetty/configure_9_3.dtd">

<Configure class="org.eclipse.jetty.webapp.WebAppContext">
  <Set name="contextPath">/</Set>
  <Set name="war"><Property name="jetty.webapps"/>/foo.war</Set>
  <Set name="virtualHosts">
    <Array type="java.lang.String">
      <Item>www.blah.com</Item>
      <Item>www.blah.net</Item>
      <Item>www.blah.org</Item>
    </Array>
  </Set>
</Configure>
For bar webapp:
<?xml version="1.0" encoding="UTF-8"?>
<!DOCTYPE Configure PUBLIC "-//Jetty//Configure//EN" "http://www.eclipse.org/jetty/configure_9_3.dtd">

<Configure class="org.eclipse.jetty.webapp.WebAppContext">
  <Set name="contextPath">/</Set>
  <Set name="war"><Property name="jetty.webapps"/>/bar.war</Set>
  <Set name="virtualHosts">
    <Array type="java.lang.String">
      <Item>www.other.com</Item>
      <Item>www.other.net</Item>
      <Item>www.other.org</Item>
    </Array>
  </Set>
</Configure>
Temporary Directories
Jetty itself has no temporary directories, but you can assign a directory for each web application, into which the WAR is unpacked, JSPs compiled on-the-fly, etc. If you do not assign a specific temporary directory, Jetty will create one as needed when your web application starts. Whether you set the location of the temporary directory - or you let Jetty create one for you - you also have a choice to either keep or delete the temporary directory when the web application stops.
The Default Temp Directory
By default, Jetty will create a temporary directory for each web application. The name of the directory will be of the form:
"jetty-"+host+"-"+port+"-"+resourceBase+"-_"+context+"-"+virtualhost+"-"+randomdigits+".dir"
For example:
jetty-0.0.0.0-8080-test.war-_test-any-8900275691885214790.dir
Where 0.0.0.0 is the host address, 8080 is the port, test.war is the resourceBase, test is the context path (with / converted to _), any is the virtual host, and randomdigits are a string of digits guaranteed to be unique.
Once the temp directory is created, it is retrievable as the value (as a File) of the context attribute javax.servlet.context.tempdir.
The location of the temp directory
By default, Jetty will create this directory inside the directory named by the java.io.tmpdir System property.
You can instruct Jetty to use a different parent directory by setting the context attribute org.eclipse.jetty.webapp.basetempdir to the name of the desired parent directory.
The directory named by this attribute must exist and be writeable.
As usual with Jetty, you can either set this attribute in a context xml file, or you can do it in code.
Here’s an example of setting it in an xml file:
<Configure class="org.eclipse.jetty.webapp.WebAppContext">

  <Set name="contextPath">/test</Set>
  <Set name="war">foo.war</Set>

  <Call name="setAttribute">
    <Arg>org.eclipse.jetty.webapp.basetempdir</Arg>
    <Arg>/home/my/foo</Arg>
  </Call>
</Configure>
The equivalent in code is:
WebAppContext context = new WebAppContext();
context.setContextPath("/test");
context.setWar("foo.war");
context.setAttribute("org.eclipse.jetty.webapp.basetempdir", "/tmp/foo");
Setting a Specific Temp Directory
There are several ways to use a particular directory as the temporary directory:
Call WebAppContext.setTempDirectory(String dir)
As before this can be accomplished with an XML file or directly in code. Here is an example of setting the temp directory in XML:
<Configure class="org.eclipse.jetty.webapp.WebAppContext">

  <Set name="contextPath">/test</Set>
  <Set name="war">foo.war</Set>

  <Set name="tempDirectory">/some/dir/foo</Set>
</Configure>
And here is an example of doing it with java code:
WebAppContext context = new WebAppContext();
context.setContextPath("/test");
context.setWar("foo.war");
context.setTempDirectory(new File("/some/dir/foo"));
Setting the javax.servlet.context.tempdir Context Attribute
You should set this context attribute with the name of directory you want to use as the temp directory. Again, you can do this in XML:
<Configure class="org.eclipse.jetty.webapp.WebAppContext">

  <Set name="contextPath">/test</Set>
  <Set name="war">foo.war</Set>

  <Call name="setAttribute">
    <Arg>javax.servlet.context.tempdir</Arg>
    <Arg>/some/dir/foo</Arg>
  </Call>

</Configure>
Or in java:
WebAppContext context = new WebAppContext();
context.setContextPath("/test");
context.setWar("foo.war");
context.setAttribute("javax.servlet.context.tempdir", "/some/dir/foo");
Once a temporary directory has been created by either of these methods, a file instance for it is set as the value of the javax.servlet.context.tempdir attribute of the web application.
|
Be wary of setting an explicit temp directory if you are likely to change the jars in WEB-INF/lib between redeployments. There is a JVM bug concerning caching of jar contents. |
Setting the Temp Directory on the Command Line
You can set the location of the temp directory on the command line when Jetty starts up in two ways. First is the most straightforward, simply add it to your command line when starting Jetty.
java -jar ../start.jar -Djava.io.tmpdir=/path/to/desired/directoryAlternately, this can be defined in a module.
The jvm module packaged with Jetty is set up to add additional JVM options.
After enabling the module (using the --add-to-start=jvm command), edit the jvm.ini file and add the location to the temporary directory.
You will also need verify the line including the --exec command is not commented out, as this is required for Jetty to start a new, forked JVM.
Below is an example of the standard jvm.ini file altered to include a reference to a temp directory.
# ---------------------------------------
# Module: jvm
# A noop module that creates an ini template useful for
# setting JVM arguments (eg -Xmx )
# ---------------------------------------
--module=jvm

## JVM Configuration
## If JVM args are include in an ini file then --exec is needed
## to start a new JVM from start.jar with the extra args.
##
## If you wish to avoid an extra JVM running, place JVM args
## on the normal command line and do not use --exec
--exec
# -Xmx2000m
# -Xmn512m
# -XX:+UseConcMarkSweepGC
# -XX:ParallelCMSThreads=2
# -XX:+CMSClassUnloadingEnabled
# -XX:+UseCMSCompactAtFullCollection
# -XX:CMSInitiatingOccupancyFraction=80
# -internal:gc
# -XX:+PrintGCDateStamps
# -XX:+PrintGCTimeStamps
# -XX:+PrintGCDetails
# -XX:+PrintTenuringDistribution
# -XX:+PrintCommandLineFlags
# -XX:+DisableExplicitGC
-Djava.io.tmpdir=/path/to/desired/directory
The "work" Directory
It is possible to create a directory named work in the $\{jetty.base} directory.
If such a directory is found, it is assumed you want to use it as the parent directory for all of the temporary directories of the webapps in $\{jetty.base}.
Moreover, as has historically been the case, these temp directories inside the work directory are not cleaned up when Jetty exits (or more correctly speaking, the temp directory corresponding to a context is not cleaned up when that context stops).
When a work directory is used, the algorithm for generating the name of the context-specific temp directories omits the random digit string.
This ensures the name of the directory remains consistent across context restarts.
Persisting the temp directory
Sometimes it is useful to keep the contents of the temporary directory between restarts of the web application. By default, Jetty will not persist the temp directory. To configure Jetty to keep it, use WebAppContext.setPersistTempDirectory(true).
|
Be aware that if you call |
Serving a WebApp from a Particular Port/Connector
Sometimes it is required to serve different web applications from different ports/connectors.
The simplest way to do this is to create multiple Server instances.
However, if contexts need to share resources (eg data sources, authentication), or if the mapping of ports to web applications is not cleanly divided, then the named connector mechanism can be used.
Creating Multiple Server Instances
Creating multiple server instances is a straight forward process that includes embedding Jetty code by creating multiples instances of the Server class and configuring them as needed.
This is also easy to achieve if you are configuring Jetty servers via XML.
The id field in the Configure element of jetty.xml files is used to identify the instance that the configuration applies to, so to run two instances of the Server, you can copy the jetty.xml, jetty-http.xml and other jetty configuration files used and change the "Server" id to a new name.
This can be done in the same style and layout as the existing jetty.xml files or the multiple XML files may be combined to a single file.
When creating new configurations for alternative server:
-
Change all
id="Server"to the new server name:
<Configure id="OtherServer" class="org.eclipse.jetty.server.Server">-
For all connectors for the new server change the
refidin the server argument:
<Arg name="server"><Ref refid="OtherServer" /></Arg>-
Make sure that any references to properties like
jetty.http.portare either renamed or replaced with absolute values. -
Make sure that any deployers
AppProvidersrefer to a different "webapps" directory so that a different set of applications are deployed.
Example Other Server XML
The following example creates another server instance and configures it with a connector and deployer:
<?xml version="1.0"?><!DOCTYPE Configure PUBLIC "-//Jetty//Configure//EN" "http://www.eclipse.org/jetty/configure_9_3.dtd">

<Configure id="OtherServer" class="org.eclipse.jetty.server.Server">
    <Set name="handler">
      <New id="Handlers" class="org.eclipse.jetty.server.handler.HandlerCollection">
        <Set name="handlers">
         <Array type="org.eclipse.jetty.server.Handler">
           <Item>
             <New id="OtherContexts" class="org.eclipse.jetty.server.handler.ContextHandlerCollection"/>
           </Item>
           <Item>
             <New class="org.eclipse.jetty.server.handler.DefaultHandler"/>
           </Item>
         </Array>
        </Set>
      </New>
    </Set>

  <Call name="addConnector">
    <Arg>
      <New class="org.eclipse.jetty.server.ServerConnector">
        <Arg name="server"><Ref refid="OtherServer" /></Arg>
        <Set name="port">8888</Set>
      </New>
    </Arg>
  </Call>

  <Call name="addBean">
    <Arg>
      <New id="DeploymentManager" class="org.eclipse.jetty.deploy.DeploymentManager">
        <Set name="contexts">
          <Ref refid="OtherContexts" />
        </Set>

        <Call id="webappprovider" name="addAppProvider">
          <Arg>
            <New class="org.eclipse.jetty.deploy.providers.WebAppProvider">
              <Set name="monitoredDirName"><Property name="jetty.base" default="." />/other-webapps</Set>
              <Set name="defaultsDescriptor"><Property name="jetty.home" default="." />/etc/webdefault.xml</Set>
              <Set name="extractWars">true</Set>
              <Set name="configurationManager">
                <New class="org.eclipse.jetty.deploy.PropertiesConfigurationManager"/>
              </Set>
            </New>
          </Arg>
        </Call>
      </New>
    </Arg>
  </Call>
</Configure>
To run the other server, add the extra configuration file(s) to the command line:
java -jar start.jar jetty-otherserver.xmlNamed Connectors
It is also possible to use an extension to the virtual host mechanism with named to connectors to make some web applications only accessible by specific connectors.
If a connector has a name "MyConnector" set using the setName method, then this can be referenced with the special virtual host name "@MyConnector".
Creating Custom Error Pages
The following sections describe several ways to create custom error pages in Jetty.
Defining error pages in web.xml
You can use the standard webapp configuration file located in webapp/WEB-INF/web.xml to map errors to specific URLs with the error-page element.
This element creates a mapping between the error-code or exception-type to the location of a resource in the web application.
-
error-code- an integer value -
exception-type- a fully qualified class name of a Java Exception type -
location- location of the resource in the webapp relative to the root of the web application. Value should start with/.
Error code example:
<error-page>
  <error-code>404</error-code>
  <location>/jspsnoop/ERROR/404</location>
</error-page>
Exception example:
<error-page>
  <exception-type>java.io.IOException</exception-type>
  <location>/jspsnoop/IOException</location>
</error-page>
The error page mappings created with the error-page element will redirect to a normal URL within the web application and will be handled as a normal request to that location and thus may be static content, a JSP or a filter and/or servlet. When handling a request generated by an error redirection, the following request attributes are set and are available to generate dynamic content:
- javax.servlet.error.exception
-
The exception instance that caused the error (or null).
- javax.servlet.error.exception_type
-
The class name of the exception instance that caused the error (or null).
- javax.servlet.error.message
-
The error message.
- javax.servlet.error.request_uri
-
The URI of the request with an error.
- javax.servlet.error.servlet_name
-
The Servlet name of the servlet that the request was dispatched to.
- javax.servlet.error.status_code
-
The status code of the error (e.g. 404, 500 etc.).
Configuring error pages context files
You can use context IoC XML files to configure the default error page mappings with more flexibility than is available with web.xml, specifically with the support of error code ranges.
Context files are normally located in ${jetty.base}/webapps/ (see DeployerManager for more details) and an example of more flexible error page mapping is below:
<?xml version="1.0" encoding="UTF-8"?>
<!DOCTYPE Configure PUBLIC "-//Jetty//Configure//EN" "http://www.eclipse.org/jetty/configure_9_3.dtd">

<Configure class="org.eclipse.jetty.webapp.WebAppContext">
  <Set name="contextPath">/test</Set>
  <Set name="war">
    <SystemProperty name="jetty.base" default="."/>/webapps/test
  </Set>

  <!-- by Code -->
  <Get name="errorHandler">
    <Call name="addErrorPage">
      <Arg type="int">404</Arg>
      <Arg type="String">/jspsnoop/ERROR/404</Arg>
    </Call>
  </Get>

  <!-- by Exception -->
  <Get name="errorHandler">
    <Call name="addErrorPage">
      <Arg>
        <Call class="java.lang.Class" name="forName">
          <Arg type="String">java.io.IOException</Arg>
        </Call>
      </Arg>
      <Arg type="String">/jspsnoop/IOException</Arg>
    </Call>
  </Get>

  <!-- by Code Range -->
  <Get name="errorHandler">
    <Call name="addErrorPage">
      <Arg type="int">500</Arg>
      <Arg type="int">599</Arg>
      <Arg type="String">/dump/errorCodeRangeMapping</Arg>
    </Call>
  </Get>
</Configure>
Custom ErrorHandler class
If no error page mapping is defined, or if the error page resource itself has an error, then the error page will be generated by an instance of ErrorHandler configured either the Context or the Server.
An ErrorHandler may extend the ErrorHandler class and may totally replace the handle method to generate an error page, or it can implement some or all of the following methods to partially modify the error pages:
void handle(String target, Request baseRequest, HttpServletRequest request, HttpServletResponse response) throws IOException
void handleErrorPage(HttpServletRequest request, Writer writer, int code, String message) throws IOException
void writeErrorPage(HttpServletRequest request, Writer writer, int code, String message, boolean showStacks) throws IOException
void writeErrorPageHead(HttpServletRequest request, Writer writer, int code, String message) throws IOException
void writeErrorPageBody(HttpServletRequest request, Writer writer, int code, String message, boolean showStacks) throws IOException
void writeErrorPageMessage(HttpServletRequest request, Writer writer, int code, String message, String uri) throws IOException
void writeErrorPageStacks(HttpServletRequest request, Writer writer) throws IOException
An ErrorHandler instance may be set on a Context by calling the ContextHandler.setErrorHandler method. This can be done by embedded code or via context IoC XML.
For example:
<Configure class="org.eclipse.jetty.server.handler.ContextHandler">
  ...
  <Set name="errorHandler">
    <New class="com.acme.handler.MyErrorHandler"/>
  </Set>
  ...
</Configure>
An ErrorHandler instance may be set on the entire server by setting it as a dependent bean on the Server instance.
This can be done by calling Server.addBean(Object) via embedded code or in jetty.xml IoC XML:
<Configure id="Server" class="org.eclipse.jetty.server.Server">
  ...
  <Call name="addBean">
    <Arg>
      <New class="com.acme.handler.MyErrorHandler"/>
    </Arg>
  </Call>
  ...
</Configure>
Server level 404 error
It is possible to get a 'page not found' when a request is made to the server for a resource that is outside of any registered contexts. As an example, you have a domain name pointing to your public server IP, yet no context is registered with Jetty to serve pages for that domain. As a consequence, the server, by default, gives a listing of all contexts running on the server.
One of the quickest ways to avoid this behavior is to create a catch all context.
Create a "root" web app mapped to the "/" URI, and use the index.html redirect to whatever place with a header directive.
Setting Max Form Size
Jetty limits the amount of data that can post back from a browser or other client to the server. This helps protect the server against denial of service attacks by malicious clients sending huge amounts of data. The default maximum size Jetty permits is 200000 bytes. You can change this default for a particular webapp, for all webapps on a particular Server instance, or all webapps within the same JVM.
For a Single Webapp
The method to invoke is: ContextHandler.setMaxFormContentSize(int maxSize);
This can be done either in a context XML deployment descriptor external to the webapp, or in a jetty-web.xml file in the webapp’s WEB-INF directory.
In either case the syntax of the XML file is the same:
<Configure class="org.eclipse.jetty.webapp.WebAppContext">
  <!-- - - - - - - - - - - - - - - - - - - - - - - - - - - - - - - - - -->
  <!-- Max Form Size                                                   -->
  <!-- - - - - - - - - - - - - - - - - - - - - - - - - - - - - - - - - -->
  <Set name="maxFormContentSize">200000</Set>
</Configure>
For All Apps on a Server
Set an attribute in jetty.xml on the Server instance for which you want to modify the maximum form content size:
<Configure class="org.eclipse.jetty.server.Server">
  <Call name="setAttribute">
    <Arg>org.eclipse.jetty.server.Request.maxFormContentSize</Arg>
    <Arg>200000</Arg>
  </Call>
</Configure>|
It is important to remember that you should not modify the XML files in your |
For All Apps in the JVM
Use the system property org.eclipse.jetty.server.Request.maxFormContentSize.
This can be set on the command line or in the $JETTY_BASE\start.ini or any $JETTY_BASE\start.d\*.ini module ini file.
Using $JETTY_BASE\start.d\server.ini as an example:
# ---------------------------------------
# Module: server
# Enables the core Jetty server on the classpath.
# ---------------------------------------
--module=server

### Common HTTP configuration
## Scheme to use to build URIs for secure redirects
# jetty.httpConfig.secureScheme=https

...

-Dorg.eclipse.jetty.server.Request.maxFormContentSize=200000
Configuring Jetty Connectors
This chapter discusses various options for configuring Jetty connectors.
Connector Configuration Overview
Connectors are the mechanism through which Jetty accepts network connections for various protocols. Configuring a connector is a combination of configuring the following:
-
Network parameters on the connector itself (for example: the listening port).
-
Services the connector uses (for example: executors, schedulers).
-
Connection factories that instantiate and configure the protocol for an accepted connection.
Typically connectors require very little configuration aside from setting the listening port, and enabling X-Forwarded-For customization when applicable.
Additional settings, including construction your own constructor Jetty XML files, are for expert configuration only.
Enabling Connectors
Out of the box, Jetty provides several modules for enabling different types of connectors, from HTTP to HTTPS, HTTP/2, and others.
If you startup Jetty with the --list-modules=connector command, you can see a list of all available connector modules:
[mybase]$ java -jar $JETTY_HOME/start.jar --list-modules=connector

Available Modules:
==================
tags: [connector]

Modules for tag 'connector':
----------------------------

     Module: acceptratelimit
           : Enable a server wide accept rate limit
       Tags: connector
     Depend: server
        XML: etc/jetty-acceptratelimit.xml

     Module: connectionlimit
           : Enable a server wide connection limit
       Tags: connector
     Depend: server
        XML: etc/jetty-connectionlimit.xml

     Module: http
           : Enables a HTTP connector on the server.
           : By default HTTP/1 is support, but HTTP2C can
           : be added to the connector with the http2c module.
       Tags: connector, http
     Depend: server
        XML: etc/jetty-http.xml

     Module: http-forwarded
           : Adds a forwarded request customizer to the HTTP Connector
           : to process forwarded-for style headers from a proxy.
       Tags: connector
     Depend: http
        XML: etc/jetty-http-forwarded.xml

     Module: http2
           : Enables HTTP2 protocol support on the TLS(SSL) Connector,
           : using the ALPN extension to select which protocol to use.
       Tags: connector, http2, http, ssl
     Depend: ssl, alpn
        LIB: lib/http2/*.jar
        XML: etc/jetty-http2.xml

     Module: http2c
           : Enables the HTTP2C protocol on the HTTP Connector
           : The connector will accept both HTTP/1 and HTTP/2 connections.
       Tags: connector, http2, http
     Depend: http
        LIB: lib/http2/*.jar
        XML: etc/jetty-http2c.xml

     Module: https
           : Adds HTTPS protocol support to the TLS(SSL) Connector
       Tags: connector, https, http, ssl
     Depend: ssl
   Optional: http-forwarded, http2
        XML: etc/jetty-https.xml

     Module: proxy-protocol-ssl
           : Enables the Proxy Protocol on the TLS(SSL) Connector.
           : http://www.haproxy.org/download/1.5/doc/proxy-protocol.txt
           : This allows a Proxy operating in TCP mode to transport
           : details of the proxied connection to the server.
           : Both V1 and V2 versions of the protocol are supported.
       Tags: connector, ssl
     Depend: ssl
        XML: etc/jetty-proxy-protocol-ssl.xml

     Module: ssl
           : Enables a TLS(SSL) Connector on the server.
           : This may be used for HTTPS and/or HTTP2 by enabling
           : the associated support modules.
       Tags: connector, ssl
     Depend: server
        XML: etc/jetty-ssl.xml
        XML: etc/jetty-ssl-context.xml

     Module: unixsocket
           : Enables a Unix Domain Socket Connector that can receive
           : requests from a local proxy and/or SSL offloader (eg haproxy) in either
           : HTTP or TCP mode.  Unix Domain Sockets are more efficient than
           : localhost TCP/IP connections  as they reduce data copies, avoid
           : needless fragmentation and have better dispatch behaviours.
           : When enabled with corresponding support modules, the connector can
           : accept HTTP, HTTPS or HTTP2C traffic.
       Tags: connector
     Depend: server
        LIB: lib/jetty-unixsocket-${jetty.version}.jar
        LIB: lib/jnr/*.jar
        XML: etc/jetty-unixsocket.xml

     Module: unixsocket-forwarded
           : Adds a forwarded request customizer to the HTTP configuration used
           : by the Unix Domain Socket connector, for use when behind a proxy operating
           : in HTTP mode that adds forwarded-for style HTTP headers. Typically this
           : is an alternate to the Proxy Protocol used mostly for TCP mode.
       Tags: connector
     Depend: unixsocket-http
        XML: etc/jetty-unixsocket-forwarded.xml

     Module: unixsocket-http
           : Adds a HTTP protocol support to the Unix Domain Socket connector.
           : It should be used when a proxy is forwarding either HTTP or decrypted
           : HTTPS traffic to the connector and may be used with the
           : unix-socket-http2c modules to upgrade to HTTP/2.
       Tags: connector, http
     Depend: unixsocket
        XML: etc/jetty-unixsocket-http.xml

     Module: unixsocket-http2c
           : Adds a HTTP2C connetion factory to the Unix Domain Socket Connector
           : It can be used when either the proxy forwards direct
           : HTTP/2C (unecrypted) or decrypted HTTP/2 traffic.
       Tags: connector, http2
     Depend: unixsocket-http
        LIB: lib/http2/*.jar
        XML: etc/jetty-unixsocket-http2c.xml

     Module: unixsocket-proxy-protocol
           : Enables the proxy protocol on the Unix Domain Socket Connector
           : http://www.haproxy.org/download/1.5/doc/proxy-protocol.txt
           : This allows information about the proxied connection to be
           : efficiently forwarded as the connection is accepted.
           : Both V1 and V2 versions of the protocol are supported and any
           : SSL properties may be interpreted by the unixsocket-secure
           : module to indicate secure HTTPS traffic. Typically this
           : is an alternate to the forwarded module.
       Tags: connector
     Depend: unixsocket
        XML: etc/jetty-unixsocket-proxy-protocol.xml

     Module: unixsocket-secure
           : Enable a secure request customizer on the HTTP Configuration
           : used by the Unix Domain Socket Connector.
           : This looks for a secure scheme transported either by the
           : unixsocket-forwarded, unixsocket-proxy-protocol or in a
           : HTTP2 request.
       Tags: connector
     Depend: unixsocket-http
        XML: etc/jetty-unixsocket-secure.xml
...
To enable a connector, simply activate the associated module.
Below is an example of activating both the http and https modules in a fresh Jetty base using the start.d directory:
[mybase] java -jar $JETTY_HOME/start.jar --create-startd
MKDIR : ${jetty.base}/start.d
INFO  : Base directory was modified

[mybase] java -jar $JETTY_HOME/start.jar --add-to-start=http,https
INFO  : server          transitively enabled, ini template available with --add-to-start=server
INFO  : http            initialized in ${jetty.base}/start.d/http.ini
INFO  : https           initialized in ${jetty.base}/start.d/https.ini
INFO  : ssl             transitively enabled, ini template available with --add-to-start=ssl
MKDIR : ${jetty.base}/etc
COPY  : ${jetty.home}/modules/ssl/keystore to ${jetty.base}/etc/keystore
INFO  : Base directory was modified
[mybase] tree
.
├── etc
│   └── keystore
└── start.d
    ├── http.ini
    └── https.ini
When the http and https modules were activated, so too were any modules they were dependent on, in this case server and ssl, as well as any dependencies for those modules, such as the etc and ketystore directories for ssl.
At this point the server has been configured with connectors for both HTTP and HTTPS and can be started:
[mybase] java -jar $JETTY_HOME/start.jar
2017-08-31 10:19:58.855:INFO::main: Logging initialized @372ms to org.eclipse.jetty.util.log.StdErrLog
2017-08-31 10:19:59.076:INFO:oejs.Server:main: jetty-9.4.6.v20170531
2017-08-31 10:19:59.125:INFO:oejs.AbstractConnector:main: Started ServerConnector@421e98e0{HTTP/1.1,[http/1.1]}{0.0.0.0:8080}
2017-08-31 10:19:59.150:INFO:oejus.SslContextFactory:main: x509=X509@5315b42e(jetty,h=[jetty.eclipse.org],w=[]) for SslContextFactory@2ef9b8bc(file:///Users/staff/installs/repository/jetty-distribution-{VERSION}/mybase/etc/keystore,file:///Users/staff/installs/repository/jetty-distribution-{VERSION}/mybase/etc/keystore)
2017-08-31 10:19:59.151:INFO:oejus.SslContextFactory:main: x509=X509@5d624da6(mykey,h=[],w=[]) for SslContextFactory@2ef9b8bc(file:///Users/staff/installs/repository/jetty-distribution-{VERSION}/mybase/etc/keystore,file:///Users/staff/installs/repository/jetty-distribution-{VERSION}/mybase/etc/keystore)
2017-08-31 10:19:59.273:INFO:oejs.AbstractConnector:main: Started ServerConnector@2b98378d{SSL,[ssl, http/1.1]}{0.0.0.0:8443}
2017-08-31 10:19:59.274:INFO:oejs.Server:main: Started @791ms
When modules are enabled, they are loaded with several default options.
These can be changed by editing the associated module ini file in the start.d directory (or the associated lines in server.ini if your implementation does not use start.d).
For example, if we examine the http.ini file in our start.d directory created above, we will see the following settings:
# ---------------------------------------
# Module: http
# Enables a HTTP connector on the server.
# By default HTTP/1 is support, but HTTP2C can
# be added to the connector with the http2c module.
# ---------------------------------------
--module=http

### HTTP Connector Configuration

## Connector host/address to bind to
# jetty.http.host=0.0.0.0

## Connector port to listen on
# jetty.http.port=8080

## Connector idle timeout in milliseconds
# jetty.http.idleTimeout=30000

## Number of acceptors (-1 picks default based on number of cores)
# jetty.http.acceptors=-1

## Number of selectors (-1 picks default based on number of cores)
# jetty.http.selectors=-1

## ServerSocketChannel backlog (0 picks platform default)
# jetty.http.acceptQueueSize=0

## Thread priority delta to give to acceptor threads
# jetty.http.acceptorPriorityDelta=0

## HTTP Compliance: RFC7230, RFC2616, LEGACY
# jetty.http.compliance=RFC7230
To make a change to these settings, uncomment the line (by removing the #) and change the property to the desired value. For example, if you wanted to change the HTTP port to 5231, you would edit the line as follows:
...
## Connector port to listen on
jetty.http.port=5231
...
Now when the server is started, HTTP connections will enter on port 5231:
[mybase] java -jar ../start.jar
2017-08-31 10:31:32.955:INFO::main: Logging initialized @366ms to org.eclipse.jetty.util.log.StdErrLog
2017-08-31 10:31:33.109:INFO:oejs.Server:main: jetty-9.4.6.v20170531
2017-08-31 10:31:33.146:INFO:oejs.AbstractConnector:main: Started ServerConnector@2ef9b8bc{HTTP/1.1,[http/1.1]}{0.0.0.0:5231}
...
2017-08-31 10:31:33.263:INFO:oejs.Server:main: Started @675ms
Every module has their own set of configuration options, and reviewing them all is recommended. For additional information on the module system, please refer to our documentation on Startup Modules.
|
Editing these module files is the recommended way to edit the configuration of your server. Making changes to the associated Jetty XML file for connectors is not recommended, and is for advanced users only. If you do wish to edit Jetty XML, please see our section on managing Jetty Home and Jetty Base to ensure your Jetty Home remains a standard of truth for your implementation. |
Limiting Connections
Jetty also provides the means by which to limit connections to the server and/or contexts. This is provided by two different modules in the distribution.
connectionlimit-
Applies a limit to the number of connections. If this limit is exceeded, new connections are suspended for the time specified (in milliseconds).
acceptratelimit-
Limits the rate at which new connections are accepted. If this limit is exceeded, new connections are suspended for the time specified (in milliseconds).
As with the modules listed above, these can be enabled by adding --add-to-start=<module-name> to the command line.
Advanced Configuration
Jetty primarily uses a single connector type called ServerConnector.
Prior to Jetty 9, the type of the connector specified both the protocol and the implementation used; for example, selector-based non blocking I/O vs blocking I/O, or SSL connector vs non-SSL connector.
Jetty 9 has a single selector-based non-blocking I/O connector, and a collection of ConnectionFactories now configure the protocol on the connector.
The standard Jetty distribution comes with the following Jetty XML files that create and configure connectors; you should examine them as you read this section:
jetty-http.xml-
Instantiates a
ServerConnectorthat accepts HTTP connections (that may be upgraded to WebSocket connections). jetty-ssl.xml-
Instantiates a
ServerConnectorthat accepts SSL/TLS connections. On it’s own, this connector is not functional and requires one or more of the following files to also be configured to addConnectionFactoriesto make the connector functional. jetty-https.xml-
Adds a
HttpConnectionFactoryto theServerConnectorconfigured byjetty-ssl.xmlwhich combine to provide support for HTTPS. jetty-http-forwarded.xml-
Adds a
ForwardedRequestCustomizerto the HTTP Connector to process forwarded-for style headers from a proxy. jetty-http2.xml-
Adds a
Http2ServerConnectionFactoryto theServerConnectorconfigured byjetty-ssl.xmlto support the http2 protocol. jetty-alpn.xml-
Adds an
ALPNServerConnectionFactoryto theServerConnectorconfigured byjetty-ssl.xmlwhich allows the one SSL connector to support multiple protocols with the ALPN extension used to select the protocol to be used for each connection.
Constructing a ServerConnector
The services a ServerConnector instance uses are set by constructor injection and once instantiated cannot be changed.
Many of the services may be defaulted with null or 0 values so that a reasonable default is used, thus for most purposes only the Server and the connection factories need to be passed to the connector constructor. In Jetty XML (that is, in jetty-http.xml) you can do this by:
<New class="org.eclipse.jetty.server.ServerConnector">
  <Arg name="server"><Ref refid="Server" /></Arg>
  <Arg name="factories">
    <Array type="org.eclipse.jetty.server.ConnectionFactory">
      <!-- insert one or more factories here -->
    </Array>
  </Arg>
  <!-- set connector fields here -->
</New>
You can see the other arguments that can be passed when constructing a ServerConnector in the Javadoc.
Typically the defaults are sufficient for almost all deployments.
Network Settings
You can configure connector network settings by calling setters on the connector before it is started. For example, you can set the port with the Jetty XML:
<New class="org.eclipse.jetty.server.ServerConnector">
  <Arg name="server"><Ref refid="Server" /></Arg>
  <Arg name="factories"><!-- insert one or more factories here --></Arg>

  <Set name="port">8080</Set>
</New>
Values in Jetty XML can also be parameterized so that they may be passed from property files or set on the command line.
Thus typically the port is set within Jetty XML, but uses the Property element to be customizable:
<New class="org.eclipse.jetty.server.ServerConnector">
  <Arg name="server"><Ref refid="Server" /></Arg>
  <Arg name="factories"><!-- insert one or more factories here --></Arg>

  <Set name="port"><Property name="jetty.http.port" default="8080"/></Set>
</New>
The network settings available for configuration on the ServerConnector include:
| Field | Description |
|---|---|
host |
The network interface this connector binds to as an IP address or a hostname. If null or 0.0.0.0, bind to all interfaces. |
port |
The configured port for the connector or 0 a random available port may be used (selected port available via |
idleTimeout |
The time in milliseconds that the connection can be idle before it is closed. |
defaultProtocol |
The name of the default protocol used to select a |
stopTimeout |
The time in milliseconds to wait before gently stopping a connector. |
acceptQueueSize |
The size of the pending connection backlog. The exact interpretation is JVM and operating system specific and you can ignore it. Higher values allow more connections to wait pending an acceptor thread. Because the exact interpretation is deployment dependent, it is best to keep this value as the default unless there is a specific connection issue for a specific OS that you need to address. |
reuseAddress |
Allow the server socket to be rebound even if in TIME_WAIT. For servers it is typically OK to leave this as the default true. |
HTTP Configuration
The HttpConfiguration class holds the configuration for HttpChannels, which you can create 1:1 with each HTTP connection or 1:n on a multiplexed HTTP/2 connection.
Thus a HttpConfiguration object is injected into both the HTTP and HTTP/2 connection factories.
To avoid duplicate configuration, the standard Jetty distribution creates the common HttpConfiguration instance in jetty.xml, which is a Ref element then used in jetty-http.xml, jetty-https.xml and in jetty-http2.xml.
A typical configuration of HttpConfiguration is:
<New id="httpConfig" class="org.eclipse.jetty.server.HttpConfiguration">
  <Set name="secureScheme">https</Set>
  <Set name="securePort"><Property name="jetty.ssl.port" default="8443" /></Set>
  <Set name="outputBufferSize">32768</Set>
  <Set name="requestHeaderSize">8192</Set>
  <Set name="responseHeaderSize">8192</Set>
</New>
This example HttpConfiguration may be used by reference to the ID “httpConfig”:
<Call name="addConnector">
  <Arg>
    <New class="org.eclipse.jetty.server.ServerConnector">
      <Arg name="server"><Ref refid="Server" /></Arg>
      <Arg name="factories">
        <Array type="org.eclipse.jetty.server.ConnectionFactory">
          <Item>
            <New class="org.eclipse.jetty.server.HttpConnectionFactory">
              <Arg name="config"><Ref refid="httpConfig" /></Arg>
            </New>
          </Item>
        </Array>
      </Arg>
      <!-- ... -->
    </New>
  </Arg>
</Call>
This same httpConfig is referenced by the SecuredRedirectHandler when redirecting secure requests.
Please note that if your httpConfig does not include a secureScheme or securePort or there is no HttpConfiguration present these types of secured requests will be returned a 403 error.
For SSL-based connectors (in jetty-https.xml and jetty-http2.xml), the common “httpConfig” instance is used as the basis to create an SSL specific configuration with ID “sslHttpConfig”:
<New id="sslHttpConfig" class="org.eclipse.jetty.server.HttpConfiguration">
  <Arg><Ref refid="httpConfig"/></Arg>
  <Call name="addCustomizer">
    <Arg><New class="org.eclipse.jetty.server.SecureRequestCustomizer"/></Arg>
  </Call>
</New>
This adds a SecureRequestCustomizer which adds SSL Session IDs and certificate information as request attributes.
SSL Context Configuration
The SSL/TLS connectors for HTTPS and HTTP/2 require a certificate to establish a secure connection.
Jetty holds certificates in standard JVM keystores and are configured as keystore and truststores on a SslContextFactory.Server instance that is injected into an SslConnectionFactory instance.
An example using the keystore distributed with Jetty (containing a self signed test certificate) is in jetty-https.xml.
Read more about SSL keystores in Configuring SSL.
Proxy / Load Balancer Connection Configuration
Often a Connector needs to be configured to accept connections from an intermediary such as a Reverse Proxy and/or Load Balancer deployed in front of the server. In such environments, the TCP/IP connection terminating on the server does not originate from the client, but from the intermediary, so that the Remote IP and port number can be reported incorrectly in logs and in some circumstances the incorrect server address and port may be used.
Thus Intermediaries typically implement one of several de facto standards to communicate to the server information about the original client connection terminating on the intermediary.
Jetty supports the X-Forwarded-For header and the Proxy Protocol mechanisms as described below.
|
The XML files in the Jetty distribution contain commented out examples of both the |
X-Forward-for Configuration
The X-Forwarded-for header and associated headers are a de facto standard where intermediaries add HTTP headers to each request they forward to describe the originating connection.
These headers can be interpreted by an instance of ForwardedRequestCustomizer which can be added to a HttpConfiguration as follows:
<New id="httpConfig" class="org.eclipse.jetty.server.HttpConfiguration">
  <Set name="outputBufferSize">32768</Set>
  <Set name="requestHeaderSize">8192</Set>
  <Set name="responseHeaderSize">8192</Set>

  <Call name="addCustomizer">
    <Arg><New class="org.eclipse.jetty.server.ForwardedRequestCustomizer"/></Arg>
  </Call>
</New>
Proxy Protocol
The Proxy Protocol is the de facto standard created by HAProxy and used by environments such as Amazon Elastic Cloud.
This mechanism is independent of any protocol, so it can be used for HTTP2, TLS etc.
The information about the client connection is sent as a small data frame on each newly established connection.
In Jetty, this protocol can be handled by the ProxyConnectionFactory which parses the data frame and then instantiates the next ConnectionFactory on the connection with an end point that has been customized with the data obtained about the original client connection.
The connection factory can be added to any ServerConnector and should be the first ConnectionFactory.
An example of adding the factory to a HTTP connector is shown below:
<Call name="addConnector">
  <Arg>
    <New class="org.eclipse.jetty.server.ServerConnector">
      <Arg name="server"><Ref refid="Server" /></Arg>
      <Arg name="factories">
        <Array type="org.eclipse.jetty.server.ConnectionFactory">
          <Item>
            <New class="org.eclipse.jetty.server.ProxyConnectionFactory"/>
          </Item>
          <Item>
            <New class="org.eclipse.jetty.server.HttpConnectionFactory">
              <Arg name="config"><Ref refid="httpConfig" /></Arg>
            </New>
          </Item>
        </Array>
      </Arg>
      <Set name="host"><Property name="jetty.host" /></Set>
      <Set name="port"><Property name="jetty.http.port" default="80" /></Set>
    </New>
  </Arg>
</Call>
Configuring SSL/TLS
This document provides an overview of how to configure SSL and TLS for Jetty.
Configuring Jetty for SSL
To configure Jetty for SSL, complete the tasks in the following sections:
TLS and SSL versions
Which browser/OS supports which protocols can be found on Wikipedia.
-
TLS v1.2: The protocol which should be used wherever possible. All CBC based ciphers are supported since Java 7, the new GCM modes are supported since Java 8.
Older Protocols
TLS v1.0, v1.1 and SSL v3 are no longer supported by default. If your Jetty implementation requires these protocols for legacy support, they can be enabled manually.
|
Once TLS v1.3 is released, there will be no workaround available for TLS v1.0 or v1.1. Plans for TLS v1.3 include banning ciphers with known vulnerabilities from being present at any level. It is recommended to upgrade any clients using these ciphers as soon as possible or face being locked into a outdated version of Jetty, Java or even OS. |
By default, Jetty excludes these ciphers in the SslContextFactory.
You can re-enable these by re-declaring the ciphers you want excluded in code:
SslContextFactory.Server sslContextFactory = new SslContextFactory.Server();
sslContextFactory.setExcludeCipherSuites("^.*_(MD5|SHA|SHA1)$");
If, after making these changes, you still have issues using these ciphers they are likely being blocked at the JVM level.
Locate the $JAVA_HOME/jre/lib/security/ directory for the java.security file and examine it for any configuration that is excluding ciphers or algorithms (depending on the version of the JVM you are using the nomenclature may be different).
Understanding Certificates and Keys
Configuring SSL can be a confusing experience of keys, certificates, protocols and formats, thus it helps to have a reasonable understanding of the basics. The following links provide some good starting points:
-
Certificates:
-
Keytool:
-
Other tools:
-
OpenSSL:
OpenSSL vs. Keytool
For testing, the keytool utility bundled with the JDK provides the simplest way to generate the key and certificate you need.
You can also use the OpenSSL tools to generate keys and certificates, or to convert those that you have used with Apache or other servers. Since Apache and other servers commonly use the OpenSSL tool suite to generate and manipulate keys and certificates, you might already have some keys and certificates created by OpenSSL, or you might also prefer the formats OpenSSL produces.
If you want the option of using the same certificate with Jetty or a web server such as Apache not written in Java, you might prefer to generate your private key and certificate with OpenSSL.
Generating Key Pairs and Certificates
The simplest way to generate keys and certificates is to use the keytool application that comes with the JDK, as it generates keys and certificates directly into the keystore.
See Generating Keys and Certificates with JDK’s keytool.
If you already have keys and certificates, see Loading Keys and Certificates to load them into a JSSE keystore. This section also applies if you have a renewal certificate to replace one that is expiring.
The examples below generate only basic keys and certificates. You should read the full manuals of the tools you are using if you want to specify:
-
The key size
-
The certificate expiration date
-
Alternate security providers
Generating Keys and Certificates with JDK’s keytool
The following command generates a key pair and certificate directly into file keystore:
$ keytool -keystore keystore -alias jetty -genkey -keyalg RSA|
The DSA key algorithm certificate produces an error after loading several pages. In a browser, it displays a message "Could not establish an encrypted connection because certificate presented by localhost as an invalid signature." The solution is to use RSA for the key algorithm. |
This command prompts for information about the certificate and for passwords to protect both the keystore and the keys within it. The only mandatory response is to provide the fully qualified host name of the server at the "first and last name" prompt. For example:
$ keytool -keystore keystore -alias jetty -genkey -keyalg RSA -sigalg SHA256withRSA
 Enter keystore password:  password
 What is your first and last name?
   [Unknown]:  jetty.eclipse.org
 What is the name of your organizational unit?
   [Unknown]:  Jetty
 What is the name of your organization?
   [Unknown]:  Mort Bay Consulting Pty. Ltd.
 What is the name of your City or Locality?
   [Unknown]:
 What is the name of your State or Province?
   [Unknown]:
 What is the two-letter country code for this unit?
   [Unknown]:
 Is CN=jetty.eclipse.org, OU=Jetty, O=Mort Bay Consulting Pty. Ltd.,
 L=Unknown, ST=Unknown, C=Unknown correct?
   [no]:  yes

 Enter key password for <jetty>
         (RETURN if same as keystore password):
 $
You now have the minimal requirements to run an SSL connection and could proceed directly to configure an SSL connector. However, the browser will not trust the certificate you have generated, and prompts the user to this effect. While what you have at this point is often sufficient for testing, most public sites need a trusted certificate, which is demonstrated in the section generating a CSR with keytool.
If you want to use only a self signed certificate for some kind of internal admin panel add -validity <days> to the keytool call above, otherwise your certificate is only valid for one month.
If you are using Java 8 or later, then you may also use the SAN extension to set one or more names that the certificate applies to:
$ keytool -keystore keystore -alias jetty -genkey -keyalg RSA -sigalg SHA256withRSA -ext 'SAN=dns:jetty.eclipse.org,dns:*.jetty.org'
 ...
Generating Keys and Certificates with OpenSSL
The following command generates a key pair in the file jetty.key:
$ openssl genrsa -aes128 -out jetty.keyYou might also want to use the -rand file argument to provide an arbitrary file that helps seed the random number generator.
The following command generates a certificate for the key into the file jetty.crt:
$ openssl req -new -x509 -newkey rsa:2048 -sha256 -key jetty.key -out jetty.crtAdding -sha256 ensures to get a certificate with the now recommended SHA-256 signature algorithm. For the those with heightened security in mind, add -b4096 to get a 4069 bit key.
The next command prompts for information about the certificate and for passwords to protect both the keystore and the keys within it. The only mandatory response is to provide the fully qualified host name of the server at the "Common Name" prompt. For example:
$ openssl genrsa -aes128 -out jetty.key
Generating RSA private key, 2048 bit long modulus
..............+++
......................................................................+++
e is 65537 (0x10001)
Enter pass phrase for jetty.key:
Verifying - Enter pass phrase for jetty.key:

$ openssl req -new -x509 -newkey rsa:2048 -sha256 -key jetty.key -out jetty.crt
Enter pass phrase for jetty.key:
You are about to be asked to enter information that will be incorporated into your certificate request.
What you are about to enter is what is called a Distinguished Name or a DN.
There are quite a few fields but you can leave some blank.
For some fields there will be a default value.
If you enter '.', the field will be left blank.

Country Name (2 letter code) [AU]:
State or Province Name (full name) [Some-State]:
Locality Name (eg, city) []:
Organization Name (eg, company) [Internet Widgits Pty Ltd]:Mort Bay Consulting Pty. Ltd.
Organizational Unit Name (eg, section) []:Jetty
Common Name (e.g. server FQDN or YOUR name) []:jetty.eclipse.org
Email Address []:

$
You now have the minimal requirements to run an SSL connection and could proceed directly to Loading Keys and Certificates to load these keys and certificates into a JSSE keystore. However the browser will not trust the certificate you have generated, and prompts the user to this effect. While what you have at this point is often sufficient for testing, most public sites need a trusted certificate, which is demonstrated in the section, Generating a CSR from OpenSSL to obtain a certificate.
Using Keys and Certificates from Other Sources
If you have keys and certificates from other sources, you can proceed directly to Loading Keys and Certificates.
Requesting a Trusted Certificate
The keys and certificates generated with JDK’s keytool and OpenSSL are sufficient to run an SSL connector.
However the browser will not trust the certificate you have generated, and it will prompt the user to this effect.
To obtain a certificate that most common browsers will trust, you need to request a well-known certificate authority (CA) to sign your key/certificate. Such trusted CAs include: AddTrust, Entrust, GeoTrust, RSA Data Security, Thawte, VISA, ValiCert, Verisign, and beTRUSTed, among others. Each CA has its own instructions (look for JSSE or OpenSSL sections), but all involve a step that generates a certificate signing request (CSR).
Generating a CSR with keytool
The following command generates the file jetty.csr using keytool for a key/cert already in the keystore:
$ keytool -certreq -alias jetty -keystore keystore -file jetty.csrGenerating a CSR from OpenSSL
The following command generates the file jetty.csr using OpenSSL for a key in the file jetty.key:
$ openssl req -new -key jetty.key -out jetty.csrNotice that this command uses only the existing key from jetty.key file, and not a certificate in jetty.crt as generated with OpenSSL.
You need to enter the details for the certificate again.
Loading Keys and Certificates
Once a CA has sent you a certificate, or if you generated your own certificate without keytool, you need to load it into a JSSE keystore.
|
You need both the private key and the certificate in the JSSE keystore.
You should load the certificate into the keystore used to generate the CSR with |
Loading Certificates with keytool
You can use keytool to load a certificate in PEM form directly into a keystore.
The PEM format is a text encoding of certificates; it is produced by OpenSSL, and is returned by some CAs.
An example PEM file is:
jetty.crt
-----BEGIN CERTIFICATE-----
MIICSDCCAfKgAwIBAgIBADANBgkqhkiG9w0BAQQFADBUMSYwJAYDVQQKEx1Nb3J0
IEJheSBDb25zdWx0aW5nIFB0eS4gTHRkLjEOMAwGA1UECxMFSmV0dHkxGjAYBgNV
BAMTEWpldHR5Lm1vcnRiYXkub3JnMB4XDTAzMDQwNjEzMTk1MFoXDTAzMDUwNjEz
MTk1MFowVDEmMCQGA1UEChMdTW9ydCBCYXkgQ29uc3VsdGluZyBQdHkuIEx0ZC4x
DjAMBgNVBAsTBUpldHR5MRowGAYDVQQDExFqZXR0eS5tb3J0YmF5Lm9yZzBcMA0G
CSqGSIb3DQEBAQUAA0sAMEgCQQC5V4oZeVdhdhHqa9L2/ZnKySPWUqqy81riNfAJ
7uALW0kEv/LtlG34dOOcVVt/PK8/bU4dlolnJx1SpiMZbKsFAgMBAAGjga4wgasw
HQYDVR0OBBYEFFV1gbB1XRvUx1UofmifQJS/MCYwMHwGA1UdIwR1MHOAFFV1gbB1
XRvUx1UofmifQJS/MCYwoVikVjBUMSYwJAYDVQQKEx1Nb3J0IEJheSBDb25zdWx0
aW5nIFB0eS4gTHRkLjEOMAwGA1UECxMFSmV0dHkxGjAYBgNVBAMTEWpldHR5Lm1v
cnRiYXkub3JnggEAMAwGA1UdEwQFMAMBAf8wDQYJKoZIhvcNAQEEBQADQQA6NkaV
OtXzP4ayzBcgK/qSCmF44jdcARmrXhiXUcXzjxsLjSJeYPJojhUdC2LQKy+p4ki8
Rcz6oCRvCGCe5kDB
-----END CERTIFICATE-----
The following command loads a PEM encoded certificate in the jetty.crt file into a JSSE keystore:
$ keytool -keystore keystore -import -alias jetty -file jetty.crt -trustcacertsIf the certificate you receive from the CA is not in a format that keytool understands, you can use the openssl command to convert formats:
$ openssl x509 -in jetty.der -inform DER -outform PEM -out jetty.crtLoading Keys and Certificates via PKCS12
If you have a key and certificate in separate files, you need to combine them into a PKCS12 format file to load into a new keystore. The certificate can be one you generated yourself or one returned from a CA in response to your CSR.
The following OpenSSL command combines the keys in jetty.key and the certificate in the jetty.crt file into the jetty.pkcs12 file:
$ openssl pkcs12 -inkey jetty.key -in jetty.crt -export -out jetty.pkcs12If you have a chain of certificates, because your CA is an intermediary, build the PKCS12 file as follows:
$ cat example.crt intermediate.crt [intermediate2.crt] ... rootCA.crt > cert-chain.txt
$ openssl pkcs12 -export -inkey example.key -in cert-chain.txt -out example.pkcs12|
The order of certificates must be from server to rootCA, as per RFC2246 section 7.4.2. |
OpenSSL asks for an export password.
A non-empty password is required to make the next step work.
Load the resulting PKCS12 file into a JSSE keystore with keytool:
$ keytool -importkeystore -srckeystore jetty.pkcs12 -srcstoretype PKCS12 -destkeystore keystoreRenewing Certificates
If you are updating your configuration to use a newer certificate, as when the old one is expiring, just load the newer certificate as described in the section, Loading Keys and Certificates. If you imported the key and certificate originally using the PKCS12 method, use an alias of "1" rather than "jetty", because that is the alias the PKCS12 process enters into the keystore.
Layout of keystore and truststore
The keystore only contains the server’s private key and certificate.
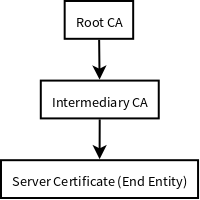
├── PrivateKeyEntry
│   ├── PrivateKey
│   ├── Certificate chain
│   │   ├── Server certificate (end entity)
│   │   ├── Intermediary CA certificate
│   │   └── Root CA certificate
├── TrustedCertEntry
│   └── Intermediary CA certificate
└── TrustedCertEntry
    └── Root CA certificate
|
Both the |
$ cd $JETTY_BASE
$ keytool -list -keystore etc/keystore -storetype jks -storepass '' -v

Keystore type: JKS
Keystore provider: SUN

Your keystore contains 3 entries

Alias name: *.example.com
Creation date: Sep 20, 2016
Entry type: PrivateKeyEntry
Certificate chain length: 3
Certificate[1]:
Owner: CN=*.example.com, OU=Web Servers, O="Example.com Co.,Ltd.", C=CN
Issuer: CN="Example.com Co.,Ltd. ETP CA", OU=CA Center, O="Example.com Co.,Ltd.", C=CN
Serial number: b63af619ff0b4c368735113ba5db8997
Valid from: Mon Sep 12 15:09:49 CST 2016 until: Wed Sep 12 15:09:49 CST 2018
Certificate fingerprints:
	 MD5:  D9:26:CC:27:77:9D:26:FE:67:4C:BE:FF:E3:95:1E:97
	 SHA1: AF:DC:D2:65:6A:33:42:E3:81:9E:4D:19:0D:22:20:C7:6F:2F:11:D0
	 SHA256: 43:E8:21:5D:C6:FB:A0:7D:5D:7B:9C:8B:8D:E9:4B:52:BF:50:0D:90:4F:61:C2:18:9E:89:AA:4C:C2:93:BD:32
	 Signature algorithm name: SHA256withRSA
	 Version: 3

Extensions:

#1: ObjectId: 2.5.29.35 Criticality=false
AuthorityKeyIdentifier [
KeyIdentifier [
0000: 44 9B AD 31 E7 FE CA D5   5A 8E 17 55 F9 F0 1D 6B  D..1....Z..U...k
0010: F5 A5 8F C1                                        ....
]
]

#2: ObjectId: 2.5.29.19 Criticality=true
BasicConstraints:[
  CA:false
  PathLen: undefined
]

#3: ObjectId: 2.5.29.37 Criticality=true
ExtendedKeyUsages [
  serverAuth
  clientAuth
]

#4: ObjectId: 2.5.29.15 Criticality=true
KeyUsage [
  DigitalSignature
  Key_Encipherment
  Data_Encipherment
]

#5: ObjectId: 2.5.29.14 Criticality=false
SubjectKeyIdentifier [
KeyIdentifier [
0000: 7D 26 36 73 61 5E 08 94   AD 25 13 46 DB DB 95 25  .&6sa^...%.F...%
0010: BF 82 5A CA                                        ..Z.
]
]

Certificate[2]:
Owner: CN="Example.com Co.,Ltd. ETP CA", OU=CA Center, O="Example.com Co.,Ltd.", C=CN
Issuer: CN="Example.com Co.,Ltd. Root CA", OU=CA Center, O="Example.com Co.,Ltd.", C=CN
Serial number: f6e7b86f6fdb467f9498fb599310198f
Valid from: Wed Nov 18 00:00:00 CST 2015 until: Sun Nov 18 00:00:00 CST 2035
Certificate fingerprints:
	 MD5:  ED:A3:91:57:D8:B8:6E:B1:01:58:55:5C:33:14:F5:99
	 SHA1: D9:A4:93:9D:A6:F8:A3:F9:FD:85:51:E2:C5:2E:0B:EE:80:E7:D0:22
	 SHA256: BF:54:7A:F6:CA:0C:FA:EF:93:B6:6B:6E:2E:D7:44:A8:40:00:EC:69:3A:2C:CC:9A:F7:FE:8E:6F:C0:FA:22:38
	 Signature algorithm name: SHA256withRSA
	 Version: 3

Extensions:

#1: ObjectId: 2.5.29.35 Criticality=false
AuthorityKeyIdentifier [
KeyIdentifier [
0000: A6 BD 5F B3 E8 7D 74 3D   20 44 66 1A 16 3B 1B DF  .._...t= Df..;..
0010: E6 E6 04 46                                        ...F
]
]

#2: ObjectId: 2.5.29.19 Criticality=true
BasicConstraints:[
  CA:true
  PathLen:2147483647
]

#3: ObjectId: 2.5.29.15 Criticality=true
KeyUsage [
  Key_CertSign
  Crl_Sign
]

#4: ObjectId: 2.5.29.14 Criticality=false
SubjectKeyIdentifier [
KeyIdentifier [
0000: 44 9B AD 31 E7 FE CA D5   5A 8E 17 55 F9 F0 1D 6B  D..1....Z..U...k
0010: F5 A5 8F C1                                        ....
]
]

Certificate[3]:
Owner: CN="Example.com Co.,Ltd. Root CA", OU=CA Center, O="Example.com Co.,Ltd.", C=CN
Issuer: CN="Example.com Co.,Ltd. Root CA", OU=CA Center, O="Example.com Co.,Ltd.", C=CN
Serial number: f0a45bc9972c458cbeae3f723055f1ac
Valid from: Wed Nov 18 00:00:00 CST 2015 until: Sun Nov 18 00:00:00 CST 2114
Certificate fingerprints:
	 MD5:  50:61:62:22:71:60:F7:69:2E:27:42:6B:62:31:82:79
	 SHA1: 7A:6D:A6:48:B1:43:03:3B:EA:A0:29:2F:19:65:9C:9B:0E:B1:03:1A
	 SHA256: 05:3B:9C:5B:8E:18:61:61:D1:9C:AA:0E:8C:B1:EA:44:C2:6E:67:5D:96:30:EC:8C:F6:6F:E1:EC:AD:00:60:F1
	 Signature algorithm name: SHA256withRSA
	 Version: 3

Extensions:

#1: ObjectId: 2.5.29.35 Criticality=false
AuthorityKeyIdentifier [
KeyIdentifier [
0000: A6 BD 5F B3 E8 7D 74 3D   20 44 66 1A 16 3B 1B DF  .._...t= Df..;..
0010: E6 E6 04 46                                        ...F
]
]

#2: ObjectId: 2.5.29.19 Criticality=true
BasicConstraints:[
  CA:true
  PathLen:2147483647
]

#3: ObjectId: 2.5.29.15 Criticality=true
KeyUsage [
  Key_CertSign
  Crl_Sign
]

#4: ObjectId: 2.5.29.14 Criticality=false
SubjectKeyIdentifier [
KeyIdentifier [
0000: A6 BD 5F B3 E8 7D 74 3D   20 44 66 1A 16 3B 1B DF  .._...t= Df..;..
0010: E6 E6 04 46                                        ...F
]
]


*******************************************
*******************************************


Alias name: example.com co.,ltd. etp ca
Creation date: Sep 20, 2016
Entry type: trustedCertEntry

Owner: CN="Example.com Co.,Ltd. ETP CA", OU=CA Center, O="Example.com Co.,Ltd.", C=CN
Issuer: CN="Example.com Co.,Ltd. Root CA", OU=CA Center, O="Example.com Co.,Ltd.", C=CN
Serial number: f6e7b86f6fdb467f9498fb599310198f
Valid from: Wed Nov 18 00:00:00 CST 2015 until: Sun Nov 18 00:00:00 CST 2035
Certificate fingerprints:
	 MD5:  ED:A3:91:57:D8:B8:6E:B1:01:58:55:5C:33:14:F5:99
	 SHA1: D9:A4:93:9D:A6:F8:A3:F9:FD:85:51:E2:C5:2E:0B:EE:80:E7:D0:22
	 SHA256: BF:54:7A:F6:CA:0C:FA:EF:93:B6:6B:6E:2E:D7:44:A8:40:00:EC:69:3A:2C:CC:9A:F7:FE:8E:6F:C0:FA:22:38
	 Signature algorithm name: SHA256withRSA
	 Version: 3

Extensions:

#1: ObjectId: 2.5.29.35 Criticality=false
AuthorityKeyIdentifier [
KeyIdentifier [
0000: A6 BD 5F B3 E8 7D 74 3D   20 44 66 1A 16 3B 1B DF  .._...t= Df..;..
0010: E6 E6 04 46                                        ...F
]
]

#2: ObjectId: 2.5.29.19 Criticality=true
BasicConstraints:[
  CA:true
  PathLen:2147483647
]

#3: ObjectId: 2.5.29.15 Criticality=true
KeyUsage [
  Key_CertSign
  Crl_Sign
]

#4: ObjectId: 2.5.29.14 Criticality=false
SubjectKeyIdentifier [
KeyIdentifier [
0000: 44 9B AD 31 E7 FE CA D5   5A 8E 17 55 F9 F0 1D 6B  D..1....Z..U...k
0010: F5 A5 8F C1                                        ....
]
]


*******************************************
*******************************************


Alias name: example.com co.,ltd. root ca
Creation date: Sep 20, 2016
Entry type: trustedCertEntry

Owner: CN="Example.com Co.,Ltd. Root CA", OU=CA Center, O="Example.com Co.,Ltd.", C=CN
Issuer: CN="Example.com Co.,Ltd. Root CA", OU=CA Center, O="Example.com Co.,Ltd.", C=CN
Serial number: f0a45bc9972c458cbeae3f723055f1ac
Valid from: Wed Nov 18 00:00:00 CST 2015 until: Sun Nov 18 00:00:00 CST 2114
Certificate fingerprints:
	 MD5:  50:61:62:22:71:60:F7:69:2E:27:42:6B:62:31:82:79
	 SHA1: 7A:6D:A6:48:B1:43:03:3B:EA:A0:29:2F:19:65:9C:9B:0E:B1:03:1A
	 SHA256: 05:3B:9C:5B:8E:18:61:61:D1:9C:AA:0E:8C:B1:EA:44:C2:6E:67:5D:96:30:EC:8C:F6:6F:E1:EC:AD:00:60:F1
	 Signature algorithm name: SHA256withRSA
	 Version: 3

Extensions:

#1: ObjectId: 2.5.29.35 Criticality=false
AuthorityKeyIdentifier [
KeyIdentifier [
0000: A6 BD 5F B3 E8 7D 74 3D   20 44 66 1A 16 3B 1B DF  .._...t= Df..;..
0010: E6 E6 04 46                                        ...F
]
]

#2: ObjectId: 2.5.29.19 Criticality=true
BasicConstraints:[
  CA:true
  PathLen:2147483647
]

#3: ObjectId: 2.5.29.15 Criticality=true
KeyUsage [
  Key_CertSign
  Crl_Sign
]

#4: ObjectId: 2.5.29.14 Criticality=false
SubjectKeyIdentifier [
KeyIdentifier [
0000: A6 BD 5F B3 E8 7D 74 3D   20 44 66 1A 16 3B 1B DF  .._...t= Df..;..
0010: E6 E6 04 46                                        ...F
]
]


*******************************************
*******************************************
In addition, you can split $JETTY/etc/keystore as two files.
One is $JETTY/etc/keystore which only contains the server’s private key and certificate,
the other is $JETTY/etc/truststore which contains intermediary CA and root CA.
$JETTY/etc/keystore└── PrivateKeyEntry ├── PrivateKey └── Certificate chain └── Server certificate (end entity)
$JETTY/etc/truststore├── TrustedCertEntry │ └── Intermediary CA certificate └── TrustedCertEntry └── Root CA certificate
Configuring the Jetty SslContextFactory
The generated SSL certificates from above are held in the key store are configured in an instance of SslContextFactory.Server object.
The SslContextFactory is responsible for:
-
Creating the Java
SslEngineused by Jetty’s Connectors and Jetty’s Clients (HTTP/1, HTTP/2, and WebSocket). -
Managing Keystore Access
-
Managing Truststore Access
-
Managing Protocol selection via Excludes / Includes list
-
Managing Cipher Suite selection via Excludes / Includes list
-
Managing order of Ciphers offered (important for TLS/1.2 and HTTP/2 support)
-
SSL Session Caching options
-
Certificate Revocation Lists and Distribution Points (CRLDP)
-
OCSP Support
-
Client Authentication Support
For Jetty Connectors, the configured SslContextFactory.Server is injected into a specific ServerConnector SslConnectionFactory.
For Jetty Clients, the various constructors support using a configured SslContextFactory.Client.
While the SslContextFactory can operate without a keystore (this mode is most suitable for the various Jetty Clients) it is best practice to at least configure the keystore being used.
- setKeyStorePath
-
The configured keystore to use for all SSL/TLS in configured Jetty Connector (or Client).
|
As a keystore is vital security information, it can be desirable to locate the file in a directory with very restricted access. |
- setKeyStorePassword
-
The keystore password may be set here in plain text, or as some measure of protection from casual observation, it may be obfuscated using the Password class.
- setTrustStorePath
-
This is used if validating client certificates and is typically set to the same path as the keystore.
- setKeyManagerPassword
-
The password that is passed to the
KeyManagerFactory.init(…). If there is nokeymanagerpassword, then thekeystorepasswordis used instead. If there is notrustmanagerset, then the keystore is used as the trust store and thekeystorepasswordis used as the truststore password. - setExcludeCipherSuites / setIncludeCipherSuites
-
This allows for the customization of the selected Cipher Suites that will be used by SSL/TLS.
- setExcludeProtocols / setIncludeProtocols
-
This allows for the customization of the selected Protocols that will be used by SSL/TLS.
|
When working with Includes / Excludes, it is important to know that Excludes will always win. The selection process is to process the JVM list of available Cipher Suites or Protocols against the include list, then remove the excluded ones. Be aware that each Include / Exclude list has a Set method (replace the list) or Add method (append the list). |
|
The keystore and truststore passwords may also be set using the system properties: |
Conscrypt SSL
Jetty includes support for Google’s Conscrypt SSL, which is built on their fork of OpenSSL, BoringSSL.
Implementing Conscrypt for the server or client is very straightforward process - simply instantiate an instance of Conscrypt’s OpenSSLProvider and set Conscrypt as a provider for Jetty’s SslContextFactory:
...
Security.addProvider(new OpenSSLProvider());
...
SslContextFactory.Server sslContextFactory = new SslContextFactory.Server();
sslContextFactory.setKeyStorePath("path/to/keystore");
sslContextFactory.setKeyStorePassword("CleverKeyStorePassword");
sslContextFactory.setKeyManagerPassword("OBF:VerySecretManagerPassword");
sslContextFactory.setProvider("Conscrypt");
...
If you are using the Jetty Distribution, please see the section on enabling the Conscrypt SSL module.
If you are using Conscrypt with Java 8, you must exclude TLSv1.3 protocol as it is now enabled per default with Conscrypt 2.0.0 but not supported by Java 8.
Configuring SNI
From Java 8, the JVM contains support for the Server Name Indicator (SNI) extension, which allows an SSL connection handshake to indicate one or more DNS names that it applies to.
To support this, the SslContextFactory is used.
The SslContextFactory will look for multiple X509 certificates within the keystore, each of which may have multiple DNS names (including wildcards) associated with the Subject Alternate Name extension.
When using the SslContextFactory, the correct certificate is automatically selected if the SNI extension is present in the handshake.
Disabling/Enabling Specific Cipher Suites
New cipher suites are always being developed to stay ahead of attacks. It’s only a matter of time before the best of suites is exploited though, and making sure your server is up-to-date in this regard is paramount for any implementation. As an example, to avoid the BEAST attack it is necessary to configure a specific set of cipher suites. This can either be done via SslContext.setIncludeCipherSuites(java.lang.String…) or viaSslContext.setExcludeCipherSuites(java.lang.String…).
It’s crucial that you use the exact names of the cipher suites as used/known by the JDK.
You can get them by obtaining an instance of SSLEngine and call getSupportedCipherSuites().
Tools like ssllabs.com might report slightly different names which will be ignored.
|
It is important to stay up-to-date with the latest supported cipher suites. Be sure to consult Oracle’s JRE and JDK Cryptographic Roadmap frequently for recent and upcoming changes to supported ciphers. |
|
It’s recommended to install the Java Cryptography Extension (JCE) Unlimited Strength policy files in your JRE to get full strength ciphers such as AES-256.
The files can be found on the Java download page.
Just overwrite the two present JAR files in |
Both setIncludeCipherSuites and setExcludeCipherSuites can be fed by the exact cipher suite name used in the JDK or by using regular expressions.
If you have a need to adjust the Includes or Excludes, then this is best done with a custom XML that configures the SslContextFactory to suit your needs.
|
Jetty does allow users to enable weak/deprecated cipher suites (or even no cipher suites at all). By default, if you have these suites enabled warning messages will appear in the server logs. |
To do this, first create a new ${jetty.base}/etc/tweak-ssl.xml file (this can be any name, just avoid prefixing it with "jetty-").
<!DOCTYPE Configure PUBLIC "-//Jetty//Configure//EN"
          "http://www.eclipse.org/jetty/configure_9_3.dtd">
<!-- Tweak SsslContextFactory Includes / Excludes -->
<Configure id="sslContextFactory" class="org.eclipse.jetty.util.ssl.SslContextFactory$Server">
  <!-- Mitigate SLOTH Attack -->
  <Call name="addExcludeCipherSuites">
    <Arg>
      <Array type="String">
        <Item>.*_RSA_.*SHA1$</Item>
        <Item>.*_RSA_.*SHA$</Item>
        <Item>.*_RSA_.*MD5$</Item>
      </Array>
    </Arg>
  </Call>
</Configure>
This new XML will configure the id sslContextFactory further (this id is first created by the ssl module and its associated ${jetty.home}/etc/jetty-ssl-context.xml).
You can do anything you want with the SslContextFactory in use by the Jetty Distribution from this tweaked XML.
To make sure that your ${jetty.base} uses this new XML, add it to the end of your ${jetty.base}/start.ini or ${jetty.base}/start.d/server.ini.
$ cd /path/to/mybase
$ ls -l
drwxrwxr-x.  2 user group  4096 Feb  2 11:47 etc/
-rw-rw-r--.  1 user group  4259 Feb  2 11:47 start.ini
$ tail start.ini
# Module: https
--module=https
etc/tweak-ssl.xml
$|
The default |
|
You can enable the |
Additional Include / Exclude examples:
Example: Include all ciphers which support Forward Secrecy using regex:
  <!-- Enable Forward Secrecy Ciphers.
       Note: this replaces the default Include Cipher list -->
  <Set name="IncludeCipherSuites">
    <Array type="String">
      <Item>TLS_DHE_RSA.*</Item>
      <Item>TLS_ECDHE.*</Item>
    </Array>
</Set>Example: Exclude all old, insecure or anonymous cipher suites:
  <!-- Eliminate Old / Insecure / Anonymous Ciphers -->
  <Call name="addExcludeCipherSuites">
    <Arg>
      <Array type="String">
        <Item>.*NULL.*</Item>
        <Item>.*RC4.*</Item>
        <Item>.*MD5.*</Item>
        <Item>.*DES.*</Item>
        <Item>.*DSS.*</Item>
      </Array>
    </Arg>
</Call>Example: Since 2014 SSLv3 is considered insecure and should be disabled.
  <!-- Eliminate Insecure Protocols -->
  <Call name="addExcludeProtocols">
    <Arg>
     <Array type="java.lang.String">
       <Item>SSL</Item>
       <Item>SSLv2</Item>
       <Item>SSLv2Hello</Item>
       <Item>SSLv3</Item>
     </Array>
    </Arg>
</Call>|
Note that disabling SSLv3 prevents very old browsers like Internet Explorer 6 on Windows XP from connecting. |
Example: TLS renegotiation could be disabled too to prevent an attack based on this feature.
<Set name="renegotiationAllowed">FALSE</Set>You can view what cipher suites are enabled and disabled by performing a server dump.
To perform a server dump upon server startup, add jetty.server.dumpAfterStart=true to the command line when starting the server.
You can also dump the server when shutting down the server instance by adding jetty.server.dumpBeforeStop.
Specifically, you will want to look for the SslConnectionFactory portion of the dump.
[my-base]$ java -jar ${JETTY_HOME}/start.jar jetty.server.dumpAfterStart=true

...
|   += SslConnectionFactory@18be83e4{SSL->http/1.1} - STARTED
|   |   += SslContextFactory@42530531(null,null) trustAll=false
|   |       +- Protocol Selections
|   |       |   +- Enabled (size=3)
|   |       |   |   +- TLSv1
|   |       |   |   +- TLSv1.1
|   |       |   |   +- TLSv1.2
|   |       |   +- Disabled (size=2)
|   |       |       +- SSLv2Hello - ConfigExcluded:'SSLv2Hello'
|   |       |       +- SSLv3 - JreDisabled:java.security, ConfigExcluded:'SSLv3'
|   |       +- Cipher Suite Selections
|   |           +- Enabled (size=15)
|   |           |   +- TLS_DHE_DSS_WITH_AES_128_CBC_SHA256
|   |           |   +- TLS_DHE_DSS_WITH_AES_128_GCM_SHA256
|   |           |   +- TLS_DHE_RSA_WITH_AES_128_CBC_SHA256
|   |           |   +- TLS_DHE_RSA_WITH_AES_128_GCM_SHA256
|   |           |   +- TLS_ECDHE_ECDSA_WITH_AES_128_CBC_SHA256
|   |           |   +- TLS_ECDHE_ECDSA_WITH_AES_128_GCM_SHA256
|   |           |   +- TLS_ECDHE_RSA_WITH_AES_128_CBC_SHA256
|   |           |   +- TLS_ECDHE_RSA_WITH_AES_128_GCM_SHA256
|   |           |   +- TLS_ECDH_ECDSA_WITH_AES_128_CBC_SHA256
|   |           |   +- TLS_ECDH_ECDSA_WITH_AES_128_GCM_SHA256
|   |           |   +- TLS_ECDH_RSA_WITH_AES_128_CBC_SHA256
|   |           |   +- TLS_ECDH_RSA_WITH_AES_128_GCM_SHA256
|   |           |   +- TLS_EMPTY_RENEGOTIATION_INFO_SCSV
|   |           |   +- TLS_RSA_WITH_AES_128_CBC_SHA256
|   |           |   +- TLS_RSA_WITH_AES_128_GCM_SHA256
|   |           +- Disabled (size=42)
|   |               +- SSL_DHE_DSS_EXPORT_WITH_DES40_CBC_SHA - JreDisabled:java.security, ConfigExcluded:'^.*_(MD5|SHA|SHA1)$'
|   |               +- SSL_DHE_DSS_WITH_3DES_EDE_CBC_SHA - ConfigExcluded:'^.*_(MD5|SHA|SHA1)$'
|   |               +- SSL_DHE_DSS_WITH_DES_CBC_SHA - JreDisabled:java.security, ConfigExcluded:'^.*_(MD5|SHA|SHA1)$'
|   |               +- SSL_DHE_RSA_EXPORT_WITH_DES40_CBC_SHA - JreDisabled:java.security, ConfigExcluded:'^.*_(MD5|SHA|SHA1)$'
|   |               +- SSL_DHE_RSA_WITH_3DES_EDE_CBC_SHA - ConfigExcluded:'^.*_(MD5|SHA|SHA1)$'
|   |               +- SSL_DHE_RSA_WITH_DES_CBC_SHA - JreDisabled:java.security, ConfigExcluded:'^.*_(MD5|SHA|SHA1)$'
|   |               +- SSL_DH_anon_EXPORT_WITH_DES40_CBC_SHA - JreDisabled:java.security, ConfigExcluded:'^.*_(MD5|SHA|SHA1)$'
|   |               +- SSL_DH_anon_WITH_3DES_EDE_CBC_SHA - JreDisabled:java.security, ConfigExcluded:'^.*_(MD5|SHA|SHA1)$'
|   |               +- SSL_DH_anon_WITH_DES_CBC_SHA - JreDisabled:java.security, ConfigExcluded:'^.*_(MD5|SHA|SHA1)$'
|   |               +- SSL_RSA_EXPORT_WITH_DES40_CBC_SHA - JreDisabled:java.security, ConfigExcluded:'^.*_(MD5|SHA|SHA1)$'
|   |               +- SSL_RSA_WITH_3DES_EDE_CBC_SHA - ConfigExcluded:'^.*_(MD5|SHA|SHA1)$'
|   |               +- SSL_RSA_WITH_DES_CBC_SHA - JreDisabled:java.security, ConfigExcluded:'^.*_(MD5|SHA|SHA1)$'
|   |               +- SSL_RSA_WITH_NULL_MD5 - JreDisabled:java.security, ConfigExcluded:'^.*_(MD5|SHA|SHA1)$'
|   |               +- SSL_RSA_WITH_NULL_SHA - JreDisabled:java.security, ConfigExcluded:'^.*_(MD5|SHA|SHA1)$'
|   |               +- TLS_DHE_DSS_WITH_AES_128_CBC_SHA - ConfigExcluded:'^.*_(MD5|SHA|SHA1)$'
|   |               +- TLS_DHE_RSA_WITH_AES_128_CBC_SHA - ConfigExcluded:'^.*_(MD5|SHA|SHA1)$'
|   |               +- TLS_DH_anon_WITH_AES_128_CBC_SHA - JreDisabled:java.security, ConfigExcluded:'^.*_(MD5|SHA|SHA1)$'
|   |               +- TLS_DH_anon_WITH_AES_128_CBC_SHA256 - JreDisabled:java.security
|   |               +- TLS_DH_anon_WITH_AES_128_GCM_SHA256 - JreDisabled:java.security
|   |               +- TLS_ECDHE_ECDSA_WITH_3DES_EDE_CBC_SHA - ConfigExcluded:'^.*_(MD5|SHA|SHA1)$'
|   |               +- TLS_ECDHE_ECDSA_WITH_AES_128_CBC_SHA - ConfigExcluded:'^.*_(MD5|SHA|SHA1)$'
|   |               +- TLS_ECDHE_ECDSA_WITH_NULL_SHA - JreDisabled:java.security, ConfigExcluded:'^.*_(MD5|SHA|SHA1)$'
|   |               +- TLS_ECDHE_RSA_WITH_3DES_EDE_CBC_SHA - ConfigExcluded:'^.*_(MD5|SHA|SHA1)$'
|   |               +- TLS_ECDHE_RSA_WITH_AES_128_CBC_SHA - ConfigExcluded:'^.*_(MD5|SHA|SHA1)$'
|   |               +- TLS_ECDHE_RSA_WITH_NULL_SHA - JreDisabled:java.security, ConfigExcluded:'^.*_(MD5|SHA|SHA1)$'
|   |               +- TLS_ECDH_ECDSA_WITH_3DES_EDE_CBC_SHA - ConfigExcluded:'^.*_(MD5|SHA|SHA1)$'
|   |               +- TLS_ECDH_ECDSA_WITH_AES_128_CBC_SHA - ConfigExcluded:'^.*_(MD5|SHA|SHA1)$'
|   |               +- TLS_ECDH_ECDSA_WITH_NULL_SHA - JreDisabled:java.security, ConfigExcluded:'^.*_(MD5|SHA|SHA1)$'
|   |               +- TLS_ECDH_RSA_WITH_3DES_EDE_CBC_SHA - ConfigExcluded:'^.*_(MD5|SHA|SHA1)$'
|   |               +- TLS_ECDH_RSA_WITH_AES_128_CBC_SHA - ConfigExcluded:'^.*_(MD5|SHA|SHA1)$'
|   |               +- TLS_ECDH_RSA_WITH_NULL_SHA - JreDisabled:java.security, ConfigExcluded:'^.*_(MD5|SHA|SHA1)$'
|   |               +- TLS_ECDH_anon_WITH_3DES_EDE_CBC_SHA - JreDisabled:java.security, ConfigExcluded:'^.*_(MD5|SHA|SHA1)$'
|   |               +- TLS_ECDH_anon_WITH_AES_128_CBC_SHA - JreDisabled:java.security, ConfigExcluded:'^.*_(MD5|SHA|SHA1)$'
|   |               +- TLS_ECDH_anon_WITH_NULL_SHA - JreDisabled:java.security, ConfigExcluded:'^.*_(MD5|SHA|SHA1)$'
|   |               +- TLS_KRB5_EXPORT_WITH_DES_CBC_40_MD5 - JreDisabled:java.security, ConfigExcluded:'^.*_(MD5|SHA|SHA1)$'
|   |               +- TLS_KRB5_EXPORT_WITH_DES_CBC_40_SHA - JreDisabled:java.security, ConfigExcluded:'^.*_(MD5|SHA|SHA1)$'
|   |               +- TLS_KRB5_WITH_3DES_EDE_CBC_MD5 - JreDisabled:java.security, ConfigExcluded:'^.*_(MD5|SHA|SHA1)$'
|   |               +- TLS_KRB5_WITH_3DES_EDE_CBC_SHA - JreDisabled:java.security, ConfigExcluded:'^.*_(MD5|SHA|SHA1)$'
|   |               +- TLS_KRB5_WITH_DES_CBC_MD5 - JreDisabled:java.security, ConfigExcluded:'^.*_(MD5|SHA|SHA1)$'
|   |               +- TLS_KRB5_WITH_DES_CBC_SHA - JreDisabled:java.security, ConfigExcluded:'^.*_(MD5|SHA|SHA1)$'
|   |               +- TLS_RSA_WITH_AES_128_CBC_SHA - ConfigExcluded:'^.*_(MD5|SHA|SHA1)$'
|   |               +- TLS_RSA_WITH_NULL_SHA256 - JreDisabled:java.security
...
In the example above you can see both the enabled/disabled protocols and included/excluded cipher suites. For disabled or excluded protocols and ciphers, the reason they are disabled is given - either due to JVM restrictions, configuration or both. As a reminder, when configuring your includes/excludes, excludes always win.
Dumps can be configured as part of the jetty.xml configuration for your server.
Please see the documentation on the Jetty Dump Tool for more information.
SslContextFactory KeyStore Reload
Jetty can be configured to monitor the directory of the KeyStore file specified in the SslContextFactory, and reload the SslContextFactory if any changes are detected to the KeyStore file.
If changes need to be done to other file such as the TrustStore file, this must be done before the change to the Keystore
file which will then trigger the SslContextFactory reload.
With the Jetty distribution this feature can be used by simply activating the ssl-reload startup module.
For embedded usage the KeyStoreScanner should be created given the SslContextFactory and added as a bean on the Server.
SSL in the Jetty Distribution
When making use of the Jetty Distribution, enabling SSL support is as easy as activating the appropriate module. Jetty supports both the default JSSE provider and the Conscrypt provider as SSL implementations.
Default JSSE SSL Configuration
For the default SSL support, simply activate the ssl module:
$ cd /path/to/mybase
$ java -jar ${JETTY_HOME}/start.jar --add-to-startd=ssl
INFO : server          initialised (transitively) in ${jetty.base}/start.d/server.ini
INFO : ssl             initialised in ${jetty.base}/start.d/ssl.ini
INFO : Base directory was modified
$ tree
.
├── etc
│   └── keystore
└── start.d
    ├── server.ini
    └── ssl.ini
When you open start.d/ssl.ini, you will see several commented properties ready for use when configuring SslContextFactory basics.
To highlight some of the more commonly used properties:
- jetty.ssl.host
-
Configures which interfaces the SSL/TLS Connector should listen on.
- jetty.ssl.port
-
Configures which port the SSL/TLS Connector should listen on.
- jetty.httpConfig.securePort
-
If a webapp needs to redirect to a secure version of the same resource, then this is the port reported back on the response
locationline (having this be separate is useful if you have something sitting in front of Jetty, such as a Load Balancer or proxy). - jetty.sslContext.keyStorePath
-
Sets the location of the
keystorethat you configured with your certificates. - jetty.sslContext.keyStorePassword
-
Sets the Password for the
keystore.
Conscrypt SSL Configuration
Enabling Conscrypt SSL is just as easy as default SSL - enable both the conscrypt and ssl modules:
$ cd ${JETTY_HOME}
$ java -jar ../start.jar --add-to-start=ssl,conscrypt

ALERT: There are enabled module(s) with licenses.
The following 1 module(s):
 + contains software not provided by the Eclipse Foundation!
 + contains software not covered by the Eclipse Public License!
 + has not been audited for compliance with its license

 Module: conscrypt
  + Conscrypt is distributed under the Apache Licence 2.0
  + https://github.com/google/conscrypt/blob/master/LICENSE

Proceed (y/N)? y
INFO  : server          transitively enabled, ini template available with --add-to-start=server
INFO  : conscrypt       initialized in ${jetty.base}/start.d/conscrypt.ini
INFO  : ssl             initialized in ${jetty.base}/start.d/ssl.ini
MKDIR : ${jetty.base}/lib/conscrypt
DOWNLD: https://repo1.maven.org/maven2/org/conscrypt/conscrypt-openjdk-uber/1.0.0.RC11/conscrypt-openjdk-uber-1.0.0.RC11.jar to ${jetty.base}/lib/conscrypt/conscrypt-uber-1.0.0.RC11.jar
MKDIR : ${jetty.base}/etc
COPY  : ${jetty.home}/modules/conscrypt/conscrypt.xml to ${jetty.base}/etc/conscrypt.xml
COPY  : ${jetty.home}/modules/ssl/keystore to ${jetty.base}/etc/keystore
INFO  : Base directory was modified
No additional Conscrypt configuration is needed.
SSL-specific parameters, like keyStorePath and keyStorePassword can still configured as in the example above, making use of the ${JETTY_BASE}/start.d/ssl.ini file.
Client Certificate Authentication
To enable client certificate authentication in the Jetty Distribution, you need to enable the both the ssl and https modules.
$ cd /path/to/mybase
$ java -jar /path/to/jetty-dist/start.jar --add-to-startd=ssl,https# Module: ssl
--module=ssl
jetty.ssl.host=0.0.0.0
jetty.ssl.port=8583
jetty.sslContext.keyStorePath=etc/keystore
jetty.sslContext.trustStorePath=etc/truststore
jetty.sslContext.keyStorePassword=OBF:
jetty.sslContext.keyManagerPassword=OBF:
jetty.sslContext.trustStorePassword=OBF:
# Enable client certificate authentication.
jetty.sslContext.needClientAuth=true# Module: https
--module=httpsConfiguring Security
Authentication and Authorization
There are two aspects to securing a web application(or context) within the Jetty server:
- Authentication
-
The web application can be configured with a mechanism to determine the identity of the user. This is configured by a mix of standard declarations and jetty specific mechanisms and is covered in this section.
- Authorization
-
Once the identify of the user is known (or not known), the web application can be configured via standard descriptors with security constraints that declare what resources that user may access.
Configuring an Authentication mechanism
Jetty server supports several standard authentication mechanisms: BASIC; DIGEST; FORM; CLIENT-CERT; and other mechanisms can be plugged in using the extensible JASPI or SPNEGO mechanisms.
Internally, configuring an authentication mechanism is done by setting an instance of a the Authenticator interface onto the SecurityHandler of the context, but in most cases it is done by declaring a <login-config> element in the standard web.xml descriptor or via annotations.
Below is an example taken from the jetty-test-webapp web.xml that configures BASIC authentication:
  <login-config>
    <auth-method>BASIC</auth-method>
    <realm-name>Test Realm</realm-name>
  </login-config>
The jetty-test-webapp web.xml also includes commented out examples of other DIGEST and FORM configuration:
  <login-config>
    <auth-method>FORM</auth-method>
    <realm-name>Test Realm</realm-name>
    <form-login-config>
       <form-login-page>/logon.html?param=test</form-login-page>
       <form-error-page>/logonError.html?param=test</form-error-page>
    </form-login-config>
  </login-config>
With FORM Authentication, you must also configure URLs of pages to generate a login form and handle errors. Below is a simple HTML form from the test webapp logon.html:
<HTML>
<H1>FORM Authentication demo</H1>
<form method="POST" action="j_security_check">
<table border="0" cellspacing="2" cellpadding="1">
<tr>
  <td>Username:</td>
  <td><input size="12" value="" name="j_username" maxlength="25" type="text"></td>
</tr>
<tr>
  <td>Password:</td>
  <td><input size="12" value="" name="j_password" maxlength="25" type="password"></td>
</tr>
<tr>
  <td colspan="2" align="center">
    <input name="submit" type="submit" value="Login">
  </td>
</tr>
</table>
</form>
</HTML>
The Authentication mechanism declared for a context / web application defines how the server obtain authentication credentials from the client, but it does not define how the server checks if those credentials are valid. To check credentials, the server and/or context also need to be configured with a LoginService instance, which may be matched by the declared realm-name.
Security Realms
Security realms allow you to secure your web applications against unauthorized access. Protection is based on authentication that identifies who is requesting access to the webapp and access control that restricts what can be accessed and how it is accessed within the webapp.
A webapp statically declares its security requirements in its web.xml file.
Authentication is controlled by the <login-config> element.
Access controls are specified by <security-constraint> and <security-role-ref> elements.
When a request is received for a protected resource, the web container checks if the user performing the request is authenticated, and if the user has a role assignment that permits access to the requested resource.
The Servlet Specification does not address how the static security information in the WEB-INF/web.xml file is mapped to the runtime environment of the container.
For Jetty, the LoginService performs this function.
A LoginService has a unique name, and gives access to information about a set of users.
Each user has authentication information (e.g. a password) and a set of roles associated with him/herself.
You may configure one or many different LoginServices depending on your needs. A single realm would indicate that you wish to share common security information across all of your web applications. Distinct realms allow you to partition your security information webapp by webapp.
When a request to a web application requires authentication or authorization, Jetty will use the <realm-name> sub-element inside <login-config> element in the web.xml file to perform an exact match to a LoginService.
Scoping Security Realms
A LoginService has a unique name, and is composed of a set of users.
Each user has authentication information (for example, a password) and a set of roles associated with him/herself.
You can configure one or many different realms depending on your needs.
-
Configure a single LoginService to share common security information across all of your web applications.
-
Configure distinct LoginServices to partition your security information webapp by webapp.
Globally Scoped
A LoginService is available to all web applications on a Server instance if you add it as a bean to the Server.
Such a definition would go into an xml file in your ${jetty.base}/etc directory, e.g. ${jetty.base}/etc/my-realm.xml and you would add this xml file to the execution path via start.ini or start.d (you may want to review the material in the Starting Jetty chapter).
Here’s an example of an xml file that defines an in-memory type of LoginService called the HashLoginService:
<Configure id="Server" class="org.eclipse.jetty.server.Server">
  <Call name="addBean">
    <Arg>
      <New class="org.eclipse.jetty.security.HashLoginService">
        <Set name="name">Test Realm</Set>
        <Set name="config"><SystemProperty name="jetty.home" default="."/>/etc/realm.properties</Set>
        <Set name="hotReload">true</Set>
      </New>
    </Arg>
  </Call>
</Configure>
If you define more than one LoginService on a Server, you will need to specify which one you want used for each context.
You can do that by telling the context the name of the LoginService, or passing it the LoginService instance.
Here’s an example of doing both of these, using a context xml file:
<Configure class="org.eclipse.jetty.webapp.WebAppContext">
 <Get name="securityHandler">
   <!-- Either: -->
   <Set name="loginService">
     <New class="org.eclipse.jetty.security.HashLoginService">
           <Set name="name">Test Realm</Set>
     </New>
   </Set>

   <!-- or if you defined a LoginService called "Test Realm" in jetty.xml : -->
   <Set name="realmName">Test Realm</Set>

 </Get>
Per-Webapp Scoped
Alternatively, you can define a LoginService for just a single web application.
Here’s how to define the same HashLoginService, but inside a context xml file:
<Configure class="org.eclipse.jetty.webapp.WebAppContext">
  <Set name="contextPath">/test</Set>
  <Set name="war"><SystemProperty name="jetty.home" default="."/>/webapps/test</Set>
  <Get name="securityHandler">
    <Set name="loginService">
      <New class="org.eclipse.jetty.security.HashLoginService">
            <Set name="name">Test Realm</Set>
            <Set name="config"><SystemProperty name="jetty.home" default="."/>/etc/realm.properties</Set>
      </New>
    </Set>
  </Get>
</Configure>
Jetty provides a number of different LoginService types which can be seen in the next section.
Configuring a LoginService
A LoginService instance is required by each context/webapp that has a authentication mechanism, which is used to check the validity of the username and credentials collected by the authentication mechanism. Jetty provides the following implementations of LoginService:
- HashLoginService
-
A user realm that is backed by a hash map that is filled either programatically or from a Java properties file.
- JDBCLoginService
-
Uses a JDBC connection to an SQL database for authentication
- DataSourceLoginService
-
Uses a JNDI defined DataSource for authentication
- JAASLoginService
-
Uses a JAAS provider for authentication; see the section on JAAS support for more information
- SpnegoLoginService
-
SPNEGO Authentication; see the section on SPNEGO support for more information.
An instance of a LoginService can be matched to a context/webapp by:
-
A
LoginServiceinstance may be set directly on theSecurityHandlerinstance via embedded code or IoC XML -
Matching the realm-name defined in web.xml with the name of a
LoginServiceinstance that has been added to the Server instance as a dependent bean -
If only a single
LoginServiceinstance has been set on the Server then it is used as the login service for the context
HashLoginService
The HashLoginService is a simple and efficient login service that loads usernames, credentials and roles from a Java properties file in the format:
username: password[,rolename ...]Where:
- username
-
is the user’s unique identity
- password
-
is the user’s (possibly obfuscated or MD5 encrypted) password;
- rolename
-
is a role of the user
For example:
admin: CRYPT:ad1ks..kc.1Ug,server-administrator,content-administrator,admin
other: OBF:1xmk1w261u9r1w1c1xmq
guest: guest,read-only
You configure the HashLoginService with a name and a reference to the location of the properties file:
<Item>
<New class="org.eclipse.jetty.security.HashLoginService">
  <Set name="name">Test Realm</Set>
  <Set name="config"><SystemProperty name="jetty.home" default="."/>/etc/realm.properties</Set>
</New>
</Item>
You can also configure it to reload the configuration file when changes to it are detected.
<New class="org.eclipse.jetty.security.HashLoginService">
    <Set name="name">Test Realm</Set>
    <Set name="config"><SystemProperty name="jetty.home" default="."/>/etc/realm.properties</Set>
    <Set name="hotReload">true</Set>
    <Call name="start"></Call>
  </New>
JDBCLoginService
In this implementation, authentication and role information is stored in a database accessed via JDBC. A properties file defines the JDBC connection and database table information. Here is an example of a properties file for this realm implementation:
jdbcdriver = org.gjt.mm.mysql.Driver
url = jdbc:mysql://localhost/jetty
username = jetty
password = jetty
usertable = users
usertablekey = id
usertableuserfield = username
usertablepasswordfield = pwd
roletable = roles
roletablekey = id
roletablerolefield = role
userroletable = user_roles
userroletableuserkey = user_id
userroletablerolekey = role_id
cachetime = 300
The format of the database tables is (pseudo-sql):
users
(
  id integer PRIMARY KEY,
  username varchar(100) NOT NULL UNIQUE KEY,
  pwd varchar(50) NOT NULL
);
user_roles
(
  user_id integer NOT NULL,
  role_id integer NOT NULL,
  UNIQUE KEY (user_id, role_id),
  INDEX(user_id)
);
roles
(
  id integer PRIMARY KEY,
  role varchar(100) NOT NULL UNIQUE KEY
);
Where:
-
users is a table containing one entry for every user consisting of:
- id
-
the unique identity of a user
- user
-
the name of the user
- pwd
-
the user’s password (possibly obfuscated or MD5 encrypted)
-
user-roles is a table containing one row for every role granted to a user:
- user_id
-
the unique identity of the user
- role_id
-
the role for a user
-
roles is a a table containing one role for every role in the system:
- id
-
the unique identifier of a role
- role
-
a human-readable name for a role
If you want to use obfuscated, MD5 hashed or encrypted passwords the pwd column of the users table must be large enough to hold the obfuscated, hashed or encrypted password text plus the appropriate prefix.
You define a JDBCLoginService with the name of the realm and the location of the properties file describing the database:
<New class="org.eclipse.jetty.security.JDBCLoginService">
  <Set name="name">Test JDBC Realm</Set>
  <Set name="config">etc/jdbcRealm.properties</Set>
</New>
Authorization
As far as the Servlet Specification is concerned, authorization is based on roles.
As we have seen, a LoginService associates a user with a set of roles.
When a user requests a resource that is access protected, the LoginService will be asked to authenticate the user if they are not already, and then asked to confirm if that user possesses one of the roles permitted access to the resource.
Until Servlet 3.1, role-based authorization could define:
-
Access granted to a set of named roles:
<security-constraint>
  <web-resource-collection>
    <web-resource-name>Foo Admin Data</web-resource-name>
    <url-pattern>/foo/admin/*</url-pattern>
  </web-resource-collection>
  <auth-constraint>
    <role-name>admin</role-name>
    <role-name>manager</role-name>
  </auth-constraint>
</security-constraint>-
Access totally forbidden, regardless of role:
<security-constraint>
  <web-resource-collection>
    <web-resource-name>Foo Protected Data</web-resource-name>
    <url-pattern>/foo/protected/*</url-pattern>
  </web-resource-collection>
  <auth-constraint>
  </auth-constraint>
</security-constraint>-
Access granted to a user in any of the roles defined in the effective
web.xml. This is indicated by the special value of*for the<role-name>of a<auth-constraint>in the<security-constraint>:
<security-constraint>
  <web-resource-collection>
    <web-resource-name>Foo Role Data</web-resource-name>
    <url-pattern>/foo/role/*</url-pattern>
  </web-resource-collection>
  <auth-constraint>
    <role-name>*</role-name>
  </auth-constraint>
</security-constraint>
Servlet 3.1 introduced an additional authorization:
-
Access granted to any user who is authenticated, regardless of roles. This is indicated by the special value of
**for the<role-name>of a<auth-constraint>in the<security-constraint>:
<security-constraint>
  <web-resource-collection>
    <web-resource-name>Foo Authenticated Data</web-resource-name>
    <url-pattern>/foo/authenticated/*</url-pattern>
  </web-resource-collection>
  <auth-constraint>
    <role-name>**</role-name>
  </auth-constraint>
</security-constraint>
Additionally, when configuring your security constraints you can protect various HTTP methods as well, such as PUT, GET, POST, HEAD or DELETE.
This is done by adding the method you want to protect as a <http-method> in the <web-resource-collection>.
You can then define roles that should be able to perform these protected methods in an <auth-constraint>:
<security-constraint>
  <web-resource-collection>
    <web-resource-name>Foo Authenticated Data</web-resource-name>
    <url-pattern>/foo/authenticated/*</url-pattern>
    <http-method>DELETE</http-method>
    <http-method>POST</http-method>
  </web-resource-collection>
  <auth-constraint>
    <role-name>admin</role-name>
  </auth-constraint>
</security-constraint>
In the above example, only users with an admin role will be able to perform DELETE or POST methods.
Configuring Authorization with Context XML Files
While the examples above show configuration of Authorization in a web.xml file, they can also be configured as part of the link#context xml file for a web application.
This is especially helpful if authorization needs change over time and need updated without re-packaging the whole web app.
To do this, we add a section for security constraints into the context xml file for our web app as part of the securityHandler.
In the example below, a HashLoginService is defined with authorization being granted too foo/* paths to users with the admin and manager roles.
<Configure id="testWebapp" class="org.eclipse.jetty.webapp.WebAppContext">
  <Get name="securityHandler">
    <Set name="realmName">Test Realm</Set>
    <Set name="authMethod">BASIC</Set>
    <Call name="addConstraintMapping">
      <Arg>
         <New class="org.eclipse.jetty.security.ConstraintMapping">
            <Set name="pathSpec">/foo/*</Set>
            <Set name="constraint">
              <New class="org.eclipse.jetty.util.security.Constraint">
                  <Set name="name">Foo Auth</Set>
                  <Set name="authenticate">true</Set>
                  <Set name="roles">
                    <Array type="java.lang.String">
                      <Item>admin</Item>
                      <Item>manager</Item>
                    </Array>
                  </Set>
              </New>
            </Set>
         </New>
      </Arg>
    </Call>
    <Set name="loginService">
      <New class="org.eclipse.jetty.security.HashLoginService">
        <Set name="name">Test Realm</Set>
        <Set name="config">/src/tmp/small-security-test/realm.properties</Set>
      </New>
    </Set>
  </Get>
</Configure>
If roles changed in the future, administrators could easily change this context xml file without having to edit the contents of the web app at all.
Authentication and Authorization with Embedded Jetty
In addition to the distribution, security can be defined as part of an embedded implementation as well.
Below is an example which, like the one above, sets up a server with a HashLoginService and adds security constraints to restrict access based on roles.
//
//  ========================================================================
//  Copyright (c) 1995-2022 Mort Bay Consulting Pty Ltd and others.
//  ------------------------------------------------------------------------
//  All rights reserved. This program and the accompanying materials
//  are made available under the terms of the Eclipse Public License v1.0
//  and Apache License v2.0 which accompanies this distribution.
//
//      The Eclipse Public License is available at
//      http://www.eclipse.org/legal/epl-v10.html
//
//      The Apache License v2.0 is available at
//      http://www.opensource.org/licenses/apache2.0.php
//
//  You may elect to redistribute this code under either of these licenses.
//  ========================================================================
//

package org.eclipse.jetty.embedded;

import java.io.FileNotFoundException;
import java.net.URL;
import java.util.Collections;

import org.eclipse.jetty.security.ConstraintMapping;
import org.eclipse.jetty.security.ConstraintSecurityHandler;
import org.eclipse.jetty.security.HashLoginService;
import org.eclipse.jetty.security.LoginService;
import org.eclipse.jetty.security.authentication.BasicAuthenticator;
import org.eclipse.jetty.server.Server;
import org.eclipse.jetty.util.security.Constraint;

public class SecuredHelloHandler
{
    public static Server createServer(int port) throws FileNotFoundException
    {
        // Create a basic jetty server object that will listen on port 8080.
        // Note that if you set this to port 0 then a randomly available port
        // will be assigned that you can either look in the logs for the port,
        // or programmatically obtain it for use in test cases.
        Server server = new Server(port);

        // Since this example is for our test webapp, we need to setup a
        // LoginService so this shows how to create a very simple hashmap based
        // one. The name of the LoginService needs to correspond to what is
        // configured a webapp's web.xml and since it has a lifecycle of its own
        // we register it as a bean with the Jetty server object so it can be
        // started and stopped according to the lifecycle of the server itself.
        // In this example the name can be whatever you like since we are not
        // dealing with webapp realms.
        String realmResourceName = "etc/realm.properties";
        ClassLoader classLoader = SecuredHelloHandler.class.getClassLoader();
        URL realmProps = classLoader.getResource(realmResourceName);
        if (realmProps == null)
            throw new FileNotFoundException("Unable to find " + realmResourceName);

        LoginService loginService = new HashLoginService("MyRealm",
            realmProps.toExternalForm());
        server.addBean(loginService);

        // A security handler is a jetty handler that secures content behind a
        // particular portion of a url space. The ConstraintSecurityHandler is a
        // more specialized handler that allows matching of urls to different
        // constraints. The server sets this as the first handler in the chain,
        // effectively applying these constraints to all subsequent handlers in
        // the chain.
        ConstraintSecurityHandler security = new ConstraintSecurityHandler();
        server.setHandler(security);

        // This constraint requires authentication and in addition that an
        // authenticated user be a member of a given set of roles for
        // authorization purposes.
        Constraint constraint = new Constraint();
        constraint.setName("auth");
        constraint.setAuthenticate(true);
        constraint.setRoles(new String[]{"user", "admin"});

        // Binds a url pattern with the previously created constraint. The roles
        // for this constraint mapping are mined from the Constraint itself
        // although methods exist to declare and bind roles separately as well.
        ConstraintMapping mapping = new ConstraintMapping();
        mapping.setPathSpec("/*");
        mapping.setConstraint(constraint);

        // First you see the constraint mapping being applied to the handler as
        // a singleton list, however you can passing in as many security
        // constraint mappings as you like so long as they follow the mapping
        // requirements of the servlet api. Next we set a BasicAuthenticator
        // instance which is the object that actually checks the credentials
        // followed by the LoginService which is the store of known users, etc.
        security.setConstraintMappings(Collections.singletonList(mapping));
        security.setAuthenticator(new BasicAuthenticator());
        security.setLoginService(loginService);

        // The Hello Handler is the handler we are securing so we create one,
        // and then set it as the handler on the
        // security handler to complain the simple handler chain.
        HelloHandler hh = new HelloHandler();

        // chain the hello handler into the security handler
        security.setHandler(hh);

        return server;
    }

    public static void main(String[] args) throws Exception
    {
        int port = ExampleUtil.getPort(args, "jetty.http.port", 8080);
        Server server = createServer(port);

        // Start things up!
        server.start();

        // The use of server.join() the will make the current thread join and
        // wait until the server is done executing.
        server.join();
    }
}
Limiting Form Content
Form content sent to the server is processed by Jetty into a map of parameters to be used by the web application. This can be vulnerable to denial of service (DOS) attacks since significant memory and CPU can be consumed if a malicious clients sends very large form content or large number of form keys. Thus Jetty limits the amount of data and keys that can be in a form posted to Jetty.
The default maximum size Jetty permits is 200000 bytes and 1000 keys. You can change this default for a particular webapp or for all webapps on a particular Server instance.
Configuring Default Form Limits via System Properties
There exists 2 system properties that will adjust the default maximum form sizes.
-
org.eclipse.jetty.server.Request.maxFormKeys- the maximum number of Form Keys allowed -
org.eclipse.jetty.server.Request.maxFormContentSize- the maximum size of Form Content allowed
Used from command line as such:
$ java -Dorg.eclipse.jetty.server.Request.maxFormKeys=200 -jar ...

$ java -Dorg.eclipse.jetty.server.Request.maxFormContentSize=400000 -jar ...
Or via Java code (make sure you do this before you instantiate any ContextHandler, ServletContextHandler, or WebAppContext)
System.setProperty(ContextHandler.MAX_FORM_KEYS_KEY, "200");
System.setProperty(ContextHandler.MAX_FORM_CONTENT_SIZE_KEY, "400000");
Configuring Form Limits for a Webapp
To configure the form limits for a single web application, the context handler (or webappContext) instance must be configured using the following methods:
ContextHandler.setMaxFormContentSize(int maxSizeInBytes);
ContextHandler.setMaxFormKeys(int formKeys);
These methods may be called directly when embedding Jetty, but more commonly are configured from a context XML file or WEB-INF/jetty-web.xml file:
<Configure class="org.eclipse.jetty.webapp.WebAppContext">

  ...

  <Set name="maxFormContentSize">200000</Set>
  <Set name="maxFormKeys">200</Set>
</Configure>
Aliased Files and Symbolic links
Web applications will often serve static content from the file system provided by the operating system running underneath the JVM. However, because file systems often implement multiple aliased names for the same file, then security constraints and other servlet URI space mappings may inadvertently be bypassed by aliases.
A key example of this is case insensitivity and 8.3 filenames implemented by the Windows file system.
If a file within a web application called /mysecretfile.txt is protected by a security constraint on the URI /mysecretfile.txt, then a request to /MySecretFile.TXT will not match the URI constraint because URIs are case sensitive, but the Windows file system will report that a file does exist at that name and it will be served despite the security constraint.
Less well known than case insensitivity is that Windows files systems also support 8.3 filenames for compatibility with legacy programs.
Thus a request to a URI like /MYSECR~1.TXT will again not match the security constraint, but will be reported as an existing file by the file system and served.
There are many examples of aliases, not just on Windows:
-
NTFS Alternate stream names like
c:\test\file.txt::$DATA:name -
OpenVMS support file versionig so that
/mysecret.txt;Nrefers to version N of/mysecret.txtand is essentially an alias. -
The clearcase software configuration management system provides a file system where
@@in a file name is an alias to a specific version. -
The Unix files system supports
/./foo.txtas and alias for/foo.txt -
Many JVM implementations incorrectly assume the null character is a string terminator, so that a file name resulting from
/foobar.txt%00is an alias for/foobar.txt -
Unix symbolic links and hard links are a form of aliases that allow the same file or directory to have multiple names.
In addition, it is not just URI security constraints that can be bypassed. For example the mapping of the URI pattern *.jsp to the JSP
Servlet may be bypassed by an a request to an alias like /foobar.jsp%00, thus rather than execute the JSP, the source code of the JSP is returned by the file system.
Good Security Practise
Part of the problem with aliases is that the standard web application security model is to allow all requests except the ones that are specifically denied by security constraints. A best practice for security is to deny all requests and to permit only those that are specifically identified as allowable. While it is possible to design web application security constraints in this style, it can be difficult in all circumstances and it is not the default. T hus it is important for Jetty to be able to detect and deny requests to aliased static content.
Alias detection
It is impossible for Jetty to know of all the aliases that may be implemented by the file system running beneath it, thus it does not attempt to make any specific checks for any know aliases.
Instead Jetty detects aliases by using the canonical path of a file.
If a file resource handled by jetty has a canonical name that differs from the name used to request the resource, then Jetty determines that the resource is an aliased request and it will not be returned by the ServletContext.getResource(String) method (or similar) and thus will not be served as static content nor used as the basis of a JSP.
This if Jetty is running on a Windows operating system, then a file called /MySecret.TXT will have a canonical name that exactly matches that case.
So while a request to /mysecret.txt or /MYSECR~1.TXT will result in a File Resource that matches the file, the different canonical name will indicate that those requests are aliases and they will not be served as static content and instead a 404 response returned.
Unfortunately this approach denies all aliases, including symbolic links, which can be useful in assembling complex web applications.
Serving Aliases and Symbolic Links
Not all aliases are bad nor should be seen as attempts to subvert security constraints.
Specifically, symbolic links can be very useful when assembling complex web applications.
As such, Jetty contexts support an extensible AliasCheck mechanism to allow aliases resources to be inspected and conditionally served.
In this way, "good" aliases can be detected and served.
Jetty provides several utility implementations of the AliasCheck interface as nested classes with ContextHandler:
- ApproveAliases
-
Approve all aliases (Use with caution!).
- AllowSymLinkAliasChecker
-
Approve Aliases using the java-7
Files.readSymbolicLink(path)andPath.toRealPath(…)APIs to check that aliases are valid symbolic links.
|
By default, Jetty serves aliased files for implementations running on UNIX as Contexts are created with both the |
An application is free to implement its own Alias checking.
Alias Checkers can be installed in a context via the following XML used in a context deployer file or WEB-INF/jetty-web.xml:
  <!-- Allow symbolic links  -->
  <Call name="addAliasCheck">
    <Arg><New class="org.eclipse.jetty.server.handler.AllowSymLinkAliasChecker"/></Arg>
  </Call>
Secure Password Obfuscation
There are many places where you might want to use and store a password, for example for the SSL connectors and user passwords in realms.
Passwords can be stored in clear text, obfuscated, checksummed or encrypted in order of increasing security.
The choice of method to secure a password depends on where you are using the password.
In some cases, such as keystore passwords and DIGEST authentication, the system must retrieve the original password, which requires the obfuscation method.
The drawback of the obfuscation algorithm is that it protects passwords from casual viewing only.
When the stored password is compared to one a user enters, the handling code can apply the same algorithm that secures the stored password to the user input and compare results, making password authentication more secure.
The class org.eclipse.jetty.util.security.Password can be used to generate all varieties of passwords.
Run it without arguments to see usage instructions:
$ java -cp lib/jetty-util-{VERSION}.jar org.eclipse.jetty.util.security.Password

Usage - java org.eclipse.jetty.util.security.Password [<user>] <password>
If the password is ?, the user will be prompted for the password
For example, to generate a secured version of the password password for the user username:
$ java -cp ../lib/jetty-util-{VERSION}.jar org.eclipse.jetty.util.security.Password username password
2017-12-13 11:19:27.928:INFO::main: Logging initialized @95ms to org.eclipse.jetty.util.log.StdErrLog
password
OBF:1v2j1uum1xtv1zej1zer1xtn1uvk1v1v
MD5:5f4dcc3b5aa765d61d8327deb882cf99
CRYPT:usjRS48E8ZADM
If using a external tool to create/verify the MD5 hash (such as md5sum or md5), be sure to verify a carriage return (CR) or new line is not added.
For example:
//With a CR included
$ echo password | md5sum
286755fad04869ca523320acce0dc6a4 *-

//Using the `-n` option to exclude a new line from being added.
$ echo -n password | md5sum
5f4dcc3b5aa765d61d8327deb882cf99 *-|
When using the |
$ java -cp ../lib/jetty-util-9.4.7.v20170914.jar org.eclipse.jetty.util.security.Password username username:realm:password
2017-12-13 11:34:33.263:INFO::main: Logging initialized @97ms to org.eclipse.jetty.util.log.StdErrLog
username:realm:password
OBF:1w281yf41v1x1z7e1xmi1v1p1tvv1v901c3j1x8k1ugo1ri71uh21x8a1c3j1v9m1tv71v2p1xms1z7o1v2h1yf21w1a
MD5:66999343281b2624585fd58cc9d36dfc
CRYPT:usulxZfApLefk

$ echo -n username:realm:password | md5sum
66999343281b2624585fd58cc9d36dfc *-
You can now cut and paste whichever secure version you choose into your configuration file or Java code.
For example, the last line below shows how you would implement the encrypted password generated above into the properties file for a LoginService:
admin: CRYPT:ad1ks..kc.1Ug,server-administrator,content-administrator,admin
other: OBF:1xmk1w261u9r1w1c1xmq
guest: guest,read-only
me:CRYPT:me/ks90E221EY|
Don’t forget to also copy the OBF:, MD5: or CRYPT: prefix on the generated password. It will not be usable by Jetty without it. |
You can also use obfuscated passwords in Jetty xml files where a plain text password is required. Here’s an example setting the password for a JDBC Datasource with obfuscation:
  <New id="DSTest" class="org.eclipse.jetty.plus.jndi.Resource">
     <Arg></Arg>
     <Arg>jdbc/DSTest</Arg>
     <Arg>
       <New class="com.jolbox.bonecp.BoneCPDataSource">
         <Set name="driverClass">com.mysql.jdbc.Driver</Set>
         <Set name="jdbcUrl">jdbc:mysql://localhost:3306/foo</Set>
         <Set name="username">dbuser</Set>
         <Set name="password">
            <Call class="org.eclipse.jetty.util.security.Password" name="deobfuscate">
                  <Arg>OBF:1ri71v1r1v2n1ri71shq1ri71shs1ri71v1r1v2n1ri7</Arg>
            </Call>
         </Set>
         <Set name="minConnectionsPerPartition">5</Set>
         <Set name="maxConnectionsPerPartition">50</Set>
         <Set name="acquireIncrement">5</Set>
         <Set name="idleConnectionTestPeriod">30</Set>
      </New>
    </Arg>
  </New>
Setting Port 80 Access for a Non-Root User
On Unix-based systems, port 80 is protected; typically only the superuser root can open it. For security reasons, it is not desirable to run the server as root.
This page presents several options to access port 80 as a non-root user, including using ipchains, iptables, Jetty’s SetUID feature, xinetd, and the Solaris 10 User Rights Management Framework.
Using ipchains
On some Linux systems you can use the ipchains REDIRECT mechanism to redirect from one port to another inside the kernel (if ipchains is not available, then iptables usually is):
# /sbin/ipchains -I input --proto TCP --dport 80 -j REDIRECT 8080This command instructs the system as follows: "Insert into the kernel’s packet filtering the following as the first rule to check on incoming packets: if the protocol is TCP and the destination port is 80, redirect the packet to port 8080".
Be aware that your kernel must be compiled with support for ipchains (virtually all stock kernels are).
You must also have the ipchains command-line utility installed.
You can run this command at any time, preferably just once, since it inserts another copy of the rule every time you run it.
Using iptables
On many Linux systems you can use the iptables REDIRECT mechanism to redirect from one port to another inside the kernel (if iptables is not available, then usually ipchains is).
You need to add something like the following to the startup scripts or your firewall rules:
# /sbin/iptables -t nat -I PREROUTING -p tcp --dport 80 -j REDIRECT --to-port 8080The underlying model of iptables is different from ipchains, so the forwarding normally happens only to packets originating outside of the server itself.
You also need to allow incoming packets to port 8080 if you use iptables as a local firewall.
Be careful to place rules like this one early in your input chain. Such rules must precede any rule that accepts the packet, otherwise the redirection won’t occur. You can insert as many rules as required if your server needs to listen on multiple ports, as for HTTPS.
Configuring Jetty’s SetUID Feature
SetUID is a technique that uses Unix-like file system access rights to allow users to run an executable that would otherwise require higher privileges.
Jetty’s SetUID module allows you to run Jetty as a normal user even when you need to run Jetty on port 80 or 443.
To use it with the Jetty distribution:
-
Ensure that you have the
http.mod(and https.mod if you are using SSL) modules enabled for the base you are using. Thehttp.modis enabled by default in the distribution, while the https.mod is only enabled in the demo-base directory. -
Ensure that you have changed the http port to 80 (and changed the https port to 443 if you are using SSL).
-
Enable the
setuid.modmodule:# java -jar start.jar --add-to-start=setuidThe --add-to-start command will enable the setuid module for this and all subsequent executions of jetty. There are other ways to enable the module, such as for a single execution. For more information on the alternatives see the section on Managing Startup Modules.
-
Edit the configuration for the
setuidmodule to substitute theuseridandgroupidof the user to switch to after starting. If your server instance has a${jetty.base/start.d}directory, this configuration is in thestart.d/setuid.inifile instead. Otherwise. this configuration is in the${jetty.base}start.inifile.
Below are the lines to configure:
jetty.startServerAsPrivileged=false
jetty.username=foo
jetty.groupname=bar
jetty.umask=002|
As well as opening the connectors as |
-
A native code library is required to perform user switching. This code is hosted as part of the Jetty ToolChain project and is released independently from Jetty itself. You can find the source code in the eclipse/jetty.toolchain/jetty-setuid project. Build it locally, which will produce a native library appropriate for the operating system:
# mvn clean installIf you built on a linux machine you will find the native library in
jetty-setuid/libsetuid-linux/target/libsetuid-linux.so. If you built on a different operating system you will find the library in a different subdirectory, with the name containing the name of the operating system. You may want copy this file into your Jetty distribution’s lib directory. -
Start Jetty as the
rootuser in your base directory, providing the location of the native library to Java. Below is an example of how to do it from the command line, assuming you are in the demo-base directory:# sudo java -Djava.library.path=libsetuid-linux -jar $JETTY_HOME/start.jar
Using the Solaris 10 User Rights Management Framework
Solaris 10 provides a User Rights Management framework that can permit users and processes superuser-like abilities:
usermod -K defaultpriv=basic,net_privaddr myselfNow the myself user can bind to port 80.
Refer to the Solaris 10 and Solaris 11 Security Services documentation for more information.
JAAS Support
JAAS implements a Java version of the standard Pluggable Authentication Module (PAM) framework.
JAAS can be used for two purposes:
-
for authentication of users, to reliably and securely determine who is currently executing Java code, regardless of whether the code is running as an application, an applet, a bean, or a servlet
-
for authorization of users to ensure they have the access control rights (permissions) required to do the actions performed
JAAS authentication is performed in a pluggable fashion.
This permits applications to remain independent from underlying authentication technologies.
New or updated authentication technologies can be plugged under an application without requiring modifications to the application itself.
Applications enable the authentication process by instantiating a LoginContext object, which in turn references a configuration to determine the authentication technology(ies), or LoginModule(s), to be used in performing the authentication.
Typical LoginModules may prompt for and verify a username and password.
Others may read and verify a voice or fingerprint sample.
See Java Authentication and Authorization Service (JAAS) Reference Guide for more information about JAAS.
Jetty and JAAS
Many application servers support JAAS as a means of bringing greater flexibility to the declarative security models of the J2EE (now known as the JavaEE) specification. Jetty support for JAAS provides greater alternatives for servlet security, and increases the portability of web applications.
The JAAS support aims to dictate as little as possible whilst providing a sufficiently flexible infrastructure to allow users to drop in their own custom LoginModules.
Configuration
Using JAAS with Jetty is very simply a matter of declaring a org.eclipse.jetty.jaas.JAASLoginService, creating a JAAS login module configuration file and specifying it on the Jetty run line.
Let’s look at an example.
Step 1
Configure a Jetty org.eclipse.jetty.jaas.JAASLoginService to match the <realm-name> in your web.xml file. For example, if the web.xml contains a realm called "Test JAAS Realm" like so:
<login-config>
  <auth-method>FORM</auth-method>
  <realm-name>Test JAAS Realm</realm-name>
  <form-login-config>
    <form-login-page>/login/login</form-login-page>
    <form-error-page>/login/error</form-error-page>
  </form-login-config>
</login-config>
then you need to create a JAASLoginService with the matching realm name of "Test JAAS Realm":
<New class="org.eclipse.jetty.jaas.JAASLoginService">
  <Set name="Name">Test JAAS Realm</Set>
  <Set name="LoginModuleName">xyz</Set>
</New>
The LoginModuleName must match the name of your LoginModule as declared in your login module configuration file (see Step 2).
|
The name of the realm-name that you declare in |
You can declare your JAASLoginService in a couple of different ways:
-
If you have more than one webapp that you would like to use the same security infrastructure, then you can declare your
JAASLoginServicein a top-level Jetty xml file as a bean that is added to theorg.eclipse.jetty.server.Server. An example:<Configure id="Server" class="org.eclipse.jetty.server.Server"> <Call name="addBean"> <Arg> <New class="org.eclipse.jetty.jaas.JAASLoginService"> <Set name="name">Test JAAS Realm</Set> <Set name="LoginModuleName">xyz</Set> </New> </Arg> </Call> </Configure> -
Alternatively, you can use a
JAASLoginServicewith just a specific webapp by creating a context xml file for the webapp, and specifying theJAASLoginServicein it:<Configure class="org.eclipse.jetty.webapp.WebAppContext"> <Set name="securityHandler"> <New class="org.eclipse.jetty.security.ConstraintSecurityHandler"> <Set name="loginService"> <New class="org.eclipse.jetty.jaas.JAASLoginService"> <Set name="name">Test JAAS Realm</Set> <Set name="loginModuleName">xyz</Set> </New> </Set> </New> </Set> </Configure>
Step 2
Set up your LoginModule in a configuration file, following the syntax rules :
xyz {
       com.acme.SomeLoginModule required debug=true;
};|
It is imperative that the application name on the first line is exactly the same as the |
You may find it convenient to name this configuration file as etc/login.conf because, as we will see below, some of the wiring up for JAAS has been done for you.
Step 3
You now need to invoke Jetty with support for JAAS. There are 2 aspects to this:
-
adding JAAS-related jars to the Jetty container classpath
-
setting the System property
java.security.auth.login.config
To accomplish the above, use the Jetty startup modules mechanism to add the JAAS module:
java -jar start.jar --add-to-start=jaas|
The top level of the distribution does not have the JAAS module enabled by default.
However, there are several demo webapps - including a JAAS webapp - available in the |
Now you will have a file named start.d/jaas.ini, which contains:
--module=jaas
jaas.login.conf=etc/login.conf
The jaas.login.conf property refers to the location of your LoginModule configuration file that you established in Step 2.
If you called it etc/login.conf, then your work is done. Otherwise, change the value of the jaas.login.conf property to be the location of your LoginModule configuration file.
Jetty will automatically use this property to set the value of the System property java.security.auth.login.config.
A Closer Look at JAASLoginService
To allow the greatest degree of flexibility in using JAAS with web applications, the JAASLoginService supports a couple of configuration options.
Note that you don’t ordinarily need to set these explicitly, as Jetty has defaults which will work in 99% of cases.
However, should you need to, you can configure:
-
a CallbackHandler (Default:
org.eclipse.jetty.jaas.callback.DefaultCallbackHandler) -
a list of classnames for the Principal implementation that equate to a user role (Default:
org.eclipse.jetty.jaas.JAASRole)
Here’s an example of setting each of these (to their default values):
<New class="org.eclipse.jetty.jaas.JAASLoginService">
  <Set name="Name">Test JAAS Realm</Set>
  <Set name="LoginModuleName">xyz</Set>
  <Set name="CallbackHandlerClass">
       org.eclipse.jetty.jaas.callback.DefaultCallbackHandler
  </Set>
  <Set name="roleClassNames">
    <Array type="java.lang.String">
      <Item>org.eclipse.jetty.jaas.JAASRole</Item>
    </Array>
  </Set>
</New>
CallbackHandler
A CallbackHandler is responsible for interfacing with the user to obtain usernames and credentials to be authenticated.
Jetty ships with the org.eclipse.jetty.jaas.DefaultCallbackHandler which interfaces the information contained in the request to the Callbacks that are requested by LoginModules.
You can replace this default with your own implementation if you have specific requirements not covered by the default.
Role Principal Implementation Class
When LoginModules authenticate a user, they usually also gather all of the roles that a user has and place them inside the JAAS Subject.
As LoginModules are free to use their own implementation of the JAAS Principal to put into the Subject, Jetty needs to know which Principals represent the user and which represent his/her roles when performing authorization checks on <security-constraint>. The example LoginModules that ship with Jetty all use the org.eclipse.jetty.jaas.JAASRole class. However, if you have plugged in other LoginModules, you must configure the classnames of their role Principal implementations.
Sample LoginModules
|
Passwords can be stored in clear text, obfuscated or checksummed.
The class |
JDBCLoginModule
The JDBCLoginModule stores user passwords and roles in a database that are accessed via JDBC calls.
You can configure the JDBC connection information, as well as the names of the table and columns storing the username and credential, and the names of the table and columns storing the roles.
Here is an example login module configuration file entry for it using an HSQLDB driver:
jdbc {
      org.eclipse.jetty.jaas.spi.JDBCLoginModule required
      debug="true"
      dbUrl="jdbc:hsqldb:."
      dbUserName="sa"
      dbDriver="org.hsqldb.jdbcDriver"
      userTable="myusers"
      userField="myuser"
      credentialField="mypassword"
      userRoleTable="myuserroles"
      userRoleUserField="myuser"
      userRoleRoleField="myrole";
      };
There is no particular schema required for the database tables storing the authentication and role information.
The properties userTable, userField, credentialField, userRoleTable, userRoleUserField, userRoleRoleField configure the names of the tables and the columns within them that are used to format the following queries:
  select <credentialField> from <userTable>
          where <userField> =?
  select <userRoleRoleField> from <userRoleTable>
          where <userRoleUserField> =?
Credential and role information is lazily read from the database when a previously unauthenticated user requests authentication. Note that this information is only cached for the length of the authenticated session. When the user logs out or the session expires, the information is flushed from memory.
Note that passwords can be stored in the database in plain text or encoded formats - see the note on "Passwords/Credentials" above.
DataSourceLoginModule
Similar to the JDBCLoginModule, but this LoginModule uses a DataSource to connect to the database instead of a JDBC driver. The DataSource is obtained by performing a JNDI lookup on java:comp/env/${dnJNDIName}.
A sample login module configuration using this method:
ds {
     org.eclipse.jetty.jaas.spi.DataSourceLoginModule required
     debug="true"
     dbJNDIName="ds"
     userTable="myusers"
     userField="myuser"
     credentialField="mypassword"
     userRoleTable="myuserroles"
     userRoleUserField="myuser"
     userRoleRoleField="myrole";
    };
PropertyFileLoginModule
With this login module implementation, the authentication and role information is read from a property file.
props {
        org.eclipse.jetty.jaas.spi.PropertyFileLoginModule required
        debug="true"
        file="/somewhere/somefile.props";
      };
The file parameter is the location of a properties file of the same format as the etc/realm.properties example file.
The format is:
<username>: <password>[,<rolename> ...]Here’s an example:
fred: OBF:1xmk1w261u9r1w1c1xmq,user,admin
harry: changeme,user,developer
tom: MD5:164c88b302622e17050af52c89945d44,user
dick: CRYPT:adpexzg3FUZAk,admin
The contents of the file are fully read in and cached in memory the first time a user requests authentication.
LdapLoginModule
Here’s an example:
ldaploginmodule {
   org.eclipse.jetty.jaas.spi.LdapLoginModule required
   debug="true"
   contextFactory="com.sun.jndi.ldap.LdapCtxFactory"
   hostname="ldap.example.com"
   port="389"
   bindDn="cn=Directory Manager"
   bindPassword="directory"
   authenticationMethod="simple"
   forceBindingLogin="false"
   userBaseDn="ou=people,dc=alcatel"
   userRdnAttribute="uid"
   userIdAttribute="uid"
   userPasswordAttribute="userPassword"
   userObjectClass="inetOrgPerson"
   roleBaseDn="ou=groups,dc=example,dc=com"
   roleNameAttribute="cn"
   roleMemberAttribute="uniqueMember"
   roleObjectClass="groupOfUniqueNames";
   };
Writing your Own LoginModule
If you want to implement your own custom LoginModule, there are two classes to be familiar with: org.eclipse.jetty.jaas.spi.AbstractLoginModule and org.eclipse.jetty.jaas.spi.UserInfo.
The org.eclipse.jetty.jaas.spi.AbstractLoginModule implements all of the javax.security.auth.spi.LoginModule methods.
All you need to do is to implement the getUserInfo method to return a org.eclipse.jetty.jaas.UserInfo instance which encapsulates the username, password and role names (note: as java.lang.Strings) for a user.
The AbstractLoginModule does not support any caching, so if you want to cache UserInfo (eg as does the org.eclipse.jetty.jaas.spi.PropertyFileLoginModule) then you must provide this yourself.
Other Goodies
ServletRequestCallback
This callback gives you access to the ServletRequest that is involved in the authentication, and thus to other features like the current Session. This callback can be configured in your custom LoginModule implementation. Note that none of the LoginModule implementations provided with Jetty currently use this callback.
RequestParameterCallback
As all servlet containers intercept and process a form submission with action j_security_check, it is usually not possible to insert any extra input fields onto a login form with which to perform authentication: you may only pass j_username and j_password.
For those rare occasions when this is not good enough, and you require more information from the user in order to authenticate them, you can use the JAAS callback handler org.eclipse.jetty.jaas.callback.RequestParameterCallback.
This callback gives you access to all parameters that were passed in the form submission.
To use it, in the login() method of your custom login module, add the RequestParameterCallback to the list of callback handlers the login module uses, tell it which params you are interested in, and then get the value of the parameter back.
Here is an example:
public class FooLoginModule extends AbstractLoginModule
{
     public boolean login()
        throws LoginException
     {

        Callback[] callbacks = new Callback[3];
        callbacks[0] = new NameCallback();
        callbacks[1] = new ObjectCallback();

        //as an example, look for a param named "extrainfo" in the request
        //use one RequestParameterCallback() instance for each param you want to access
        callbacks[2] = new RequestParameterCallback ();
        ((RequestParameterCallback)callbacks[2]).setParameterName ("extrainfo");


        callbackHandler.handle(callbacks);
        String userName = ((NameCallback)callbacks[0]).getName();
        Object pwd = ((ObjectCallback)callbacks[1]).getObject();
        List paramValues = ((RequestParameterCallback)callbacks[2]).getParameterValues();

        //use the userName, pwd and the value(s) of the parameter named "extrainfo" to
        //authenticate the user

     }
}
Example JAAS WebApp
An example webapp using JAAS can be found in the Jetty GitHub repository:
SPNEGO Support
Simple and Protected GSSAPI Negotiation Mechanism (SPNEGO) is a way for users to be seamlessly authenticated when running on a Windows or Active Directory based network. Jetty supports this type of authentication and authorization through the JDK (which has been enabled since the later versions of Java 6 and 7). Also important to note is that this is an incredibly fragile setup where everything needs to be configured just right for things to work, otherwise it can fail in fun and exciting, not to mention obscure, ways.
There is a substantial amount of configuration and testing required to enable this feature as well as knowledge and access to central systems on a Windows network such as the Active Domain Controller and the ability to create and maintain service users.
Configuring Jetty and SPNEGO
To run with SPNEGO enabled the following command line options are required:
-Djava.security.krb5.conf=/path/to/jetty/etc/krb5.ini \
-Djava.security.auth.login.config=/path/to/jetty/etc/spnego.conf \
-Djavax.security.auth.useSubjectCredsOnly=false
For debugging the SPNEGO authentication the following options are very helpful:
-Dorg.eclipse.jetty.LEVEL=debug \
-Dsun.security.spnego.debug=all
SPNEGO Authentication must be enabled in the webapp in the following way. The name of the role will be different for your network.
 <security-constraint>
   <web-resource-collection>
     <web-resource-name>Secure Area</web-resource-name>
     <url-pattern>/secure/me/*</url-pattern>
   </web-resource-collection>
   <auth-constraint>
     <!-- this is the domain that the user is a member of -->
     <role-name>MORTBAY.ORG</role-name>
   </auth-constraint>
 </security-constraint>
 <login-config>
   <auth-method>SPNEGO</auth-method>
   <realm-name>Test Realm</realm-name>
   <!-- optionally to add custom error page -->
   <spnego-login-config>
     <spnego-error-page>/loginError.html?param=foo</spnego-error-page>
   </spnego-login-config>
 </login-config>
A corresponding UserRealm needs to be created either programmatically if embedded, via the jetty.xml or in a context file for the webapp.
This is what the configuration within a Jetty xml file would look like.
  <Call name="addBean">
     <Arg>
       <New class="org.eclipse.jetty.security.SpnegoLoginService">
         <Set name="name">Test Realm</Set>
         <Set name="config"><Property name="jetty.home" default="."/>/etc/spnego.properties</Set>
       </New>
     </Arg>
   </Call>
This is what the configuration within a context xml file would look like.
 <Get name="securityHandler">
   <Set name="loginService">
     <New class="org.eclipse.jetty.security.SpnegoLoginService">
       <Set name="name">Test Realm</Set>
       <Set name="config">
        <SystemProperty name="jetty.home" default="."/>/etc/spnego.properties
      </Set>
     </New>
   </Set>
   <Set name="checkWelcomeFiles">true</Set>
 </Get>
There are a number of important configuration files with S3pnego that are required. The default values for these configuration files from this
test example are found in the /etc folder of the Jetty distribution.
- spnego.properties
-
configures the user realm with runtime properties
- krb5.ini
-
configures the underlying kerberos setup
- spnego.conf
-
configures the glue between gssapi and kerberos
It is important to note that the keytab file referenced in the krb5.ini and the spnego.conf files needs to contain the keytab for the targetName for the http server.
To do this use a process similar to this:
On the Windows Active Domain Controller run:
$ setspn -A HTTP/linux.mortbay.org ADUserTo create the keytab file use the following process:
$ ktpass -out c:\dir\krb5.keytab -princ HTTP/linux.mortbay.org@MORTBAY.ORG -mapUser ADUser -mapOp set -pass ADUserPWD -crypto RC4-HMAC-NT -pType KRB5_NT_PRINCIPALThis step will give you the keytab file which should then be copied to the machine running the http server and referenced from the configuration files.
For our testing we put the keytab into the /etc directory of Jetty and referenced it from there.
Configuring Firefox
The follows steps have been required to inform Firefox that it should use a negotiation dialog to authenticate.
-
Browse to about:config and agree to the warnings
-
Search through to find the 'network' settings
-
Set
network.negotiate-auth.delegation-uristo http://,https:// -
Set
network.negotiate-auth.trusted-uristo http://,https://
Configuring Internet Explorer
The follows steps have been required to inform Internet Explorer that it should use a negotiation dialog to authenticate.
-
Tools → Options → Security → Local Intranet → Sites (everything should be checked here)
-
Tools → Options → Security → Local Intranet → Sites → Advanced (add url to server (
http://and/orhttps://— use the hostname, not the IP) -
Tools → Options → Security → Local Intranet → Sites → Advanced → Close
-
Tools → Options → Security → Local Intranet → Sites → Ok
-
Tools → Options → Advanced → Security (in the checkbox list)
-
Locate and select
Enable Integrated Windows Authentication -
Tools → Options → Advanced → Security → Ok
-
Close IE then reopen and browse to your SPNEGO protected resource
You must use hostname and not the IP. If you use the IP it will default to NTLM authentication. The following conditions must be true for SPNEGO authentication to work:
-
You must be within the Intranet Zone of the network
-
Access the server using a Hostname rather than IP
-
Integrated Windows Authentication in IE is enabled and/or the host is trusted in Firefox
-
The server is not local to the browser; it can’t be running on localhost
-
The client’s Kerberos system is authenticated to a domain controller
OpenID Support
External Setup
Registering an App with OpenID Provider
You must register the app with an OpenID Provider such as Google or Amazon.
This will give you a Client ID and Client Secret.
Once set up you must also register all the possible URI’s for your webapp with the path /j_security_check so that the OpenId Provider will allow redirection back to the webapp.
These may look like
Distribution Configuration
OpenID Provider Configuration
To enable OpenID support, you first need to activate the openid module in your implementation.
java -jar {JETTY_HOME}/start.jar --add-to-start=openidTo configure OpenID Authentication with Jetty you will need to specify the OpenID Provider’s issuer identifier (case sensitive URL using the https scheme) and the OAuth 2.0 Client ID and Client Secret.
If the OpenID Provider does not allow metadata discovery you will also need to specify the token endpoint and authorization endpoint of the OpenID Provider.
These can be set as properties in the start.ini or start.d/openid.ini files.
WebApp Specific Configuration in web.xml
The web.xml file needs some specific configuration to use OpenID.
There must be a login-config element with an auth-method value of OPENID, and a realm-name value of the exact URL string used to set the OpenID Provider.
To set the error page, an init param is set at "org.eclipse.jetty.security.openid.error_page", its value should be a path relative to the webapp where authentication errors should be redirected.
Example:
<login-config>
  <auth-method>OPENID</auth-method>
  <realm-name>https://accounts.google.com</realm-name>
</login-config>
<context-param>
  <param-name>org.eclipse.jetty.security.openid.error_page</param-name>
  <param-value>/error</param-value>
</context-param>
Embedded Configuration
Define the OpenIdConfiguration for a specific OpenID Provider.
If the OpenID Provider allows metadata discovery then you can use.
OpenIdConfiguration openIdConfig = new OpenIdConfiguration(ISSUER, CLIENT_ID, CLIENT_SECRET);Otherwise you can manually enter the necessary information:
OpenIdConfiguration openIdConfig = new OpenIdConfiguration(ISSUER, TOKEN_ENDPOINT, AUTH_ENDPOINT, CLIENT_ID, CLIENT_SECRET);Configuring a LoginService and Authenticator.
// Configure a LoginService with the OpenID configuration.
OpenIdLoginService loginService = new OpenIdLoginService(openIdConfig);
securityHandler.setLoginService(loginService);

// Configure an Authenticator with errors to be redirected to the "/error" path.
OpenIdAuthenticator authenticator = new OpenIdAuthenticator(openIdConfig, "/error");
securityHandler.setAuthenticator(authenticator);
An IdentityService will be automatically created for the SecurityHandler if a realm name is set, otherwise you will need to manually set an IdentityService on the SecurityHandler.
// Set realm name of SecurityHandler to be the URL of the OpenID provider.
securityHandler.setRealmName(ISSUER);
// Set an IdentityService on the SecurityHandler.
securityHandler.setIdentityService(new DefaultIdentityService());Usage
Claims and Access Token
Claims about the user can be found using attributes on the session attribute "org.eclipse.jetty.security.openid.claims", and the full response containing the OAuth 2.0 Access Token can be found with the session attribute "org.eclipse.jetty.security.openid.response".
Example:
Map<String, Object> claims = (Map)request.getSession().getAttribute("org.eclipse.jetty.security.openid.claims");
String userId = claims.get("sub");

Map<String, Object> response = (Map)request.getSession().getAttribute("org.eclipse.jetty.security.openid.response");
String accessToken = response.get("access_token");
Scopes
The OpenID scope is always used but additional scopes can be requested which can give you additional resources or privileges.
For the Google OpenID Provider it can be useful to request the scopes profile and email which will give you additional user claims.
Additional scopes can be requested through the start.ini or start.d/openid.ini files, or with OpenIdConfiguration.addScopes(…); in embedded code.
Roles
If security roles are required they can be configured through a wrapped LoginService which is deferred to for role information by the OpenIdLoginService.
This can be configured in XML through etc/openid-baseloginservice.xml in the Distribution, or in embedded code using the constructor for the OpenIdLoginService.
LoginService wrappedLoginService = ...; // Optional LoginService for Roles
LoginService loginService = new OpenIdLoginService(openIdConfig, wrappedLoginService);
When using authorization roles, the setting authenticateNewUsers becomes significant.
If set to true users not found by the wrapped LoginService will still be authenticated but will have no roles.
If set to false those users will be not be allowed to authenticate and are redirected to the error page.
This setting is configured through the property jetty.openid.authenticateNewUsers in the start.ini or start.d/openid.ini file, or with OpenIdLoginService.setAuthenticateNewUsers(…); in embedded code.
Configuring JSP Support
Configuring JSP
This document provides information about configuring Java Server Pages (JSP) for Jetty.
Which JSP Implementation
Jetty uses Jasper from Apache as the default JSP container implementation.
By default the Jetty distribution enables the JSP module, and by default, this module is set to Apache Jasper.
# DO NOT EDIT - See: https://www.eclipse.org/jetty/documentation/current/startup-modules.html

[description]
Enables JSP for all webapplications deployed on the server.

[depend]
servlet
annotations
apache-jsp
Note that the availability of some JSP features may depend on which JSP container implementation you are using. Note also that it may not be possible to precompile your JSPs with one container and deploy to the other.
JSPs and Embedding
If you have an embedded setup for your webapp and wish to use JSPs, you will need to ensure that a JSP engine is correctly initialized.
For Apache, a Servlet Specification 3.1 style ServletContainerInitializer is used to accomplish this. You will need to ensure that this ServletContainerInitializer is run by jetty. Perhaps the easiest way to do this is to enable annotations processing so that Jetty automatically discovers and runs it. The Embedded Examples section includes a worked code example of how to do this.
Alternatively, you can manually wire in the appropriate ServletContainerInitializer as shown in the embedded-jetty-jsp example on GitHub, in which case you will not need the jetty-annotations jar on your classpath, nor include the AnnotationConfiguration in the list of configuration classes.
Precompiling JSPs
You can either follow the instructions on precompilation provided by Apache, or if you are using Maven for your builds, you can use the jetty-jspc-maven plugin to do it for you.
If you have precompiled your JSPs, and have customized the output package prefix (which is org.apache.jsp by default), you should configure your webapp context to tell Jetty about this custom package name.
You can do this using a servlet context init-param called org.eclipse.jetty.servlet.jspPackagePrefix.
For example, suppose you have precompiled your JSPs with the custom package prefix of com.acme, then you would add the following lines to your web.xml file:
  <context-param>
    <param-name>org.eclipse.jetty.servlet.jspPackagePrefix</param-name>
    <param-value>com.acme</param-value>
</context-param>|
Both Jetty Maven plugins - jetty-jspc-maven-plugin and the jetty-maven-plugin - will only use Apache Jasper. |
Apache JSP Container
By default, the Apache JSP container will look for the Eclipse Java Compiler (jdt).
The Jetty distribution ships a copy of this in {$jetty.home}/lib/apache-jsp.
If you wish to use a different compiler, you will need to configure the compilerClassName init-param on the JspServlet with the name of the class.
| init param | Description | Default | webdefault.xml |
|---|---|---|---|
classpath |
|
- |
- |
classdebuginfo |
Include debugging info in class file. |
TRUE |
- |
checkInterval |
Interval in seconds between background recompile checks. Only relevant if ` development=false`. |
0 |
- |
development |
|
TRUE |
- |
displaySourceFragment |
Should a source fragment be included in exception messages |
TRUE |
- |
errorOnUseBeanInvalidClassAttribute |
Should Jasper issue an error when the value of the class attribute in an useBean action is not a valid bean class |
TRUE |
- |
fork |
Should Ant fork its Java compiles of JSP pages? |
TRUE |
FALSE |
keepgenerated |
Do you want to keep the generated Java files around? |
TRUE |
- |
trimSpaces |
Should white spaces between directives or actions be trimmed? |
FALSE |
- |
enablePooling |
Determines whether tag handler pooling is enabled. |
TRUE |
- |
engineOptionsClass |
Allows specifying the Options class used to configure Jasper. If not present, the default EmbeddedServletOptions will be used. |
- |
- |
mappedFile |
Support for mapped Files. Generates a servlet that has a print statement per line of the JSP file |
TRUE |
- |
suppressSmap |
Generation of SMAP info for JSR45 debugging. |
FALSE |
- |
dumpSmap |
Dump SMAP JSR45 info to a file. |
FALSE |
- |
genStrAsCharArray |
Option for generating Strings. |
FALSE |
- |
ieClassId |
The class-id value to be sent to Internet Explorer when using <jsp:plugin> tags. |
clsid:8AD9C840-044E-11D1-B3E9-00805F499D93 |
- |
maxLoadedJsps |
The maximum number of JSPs that will be loaded for a web application. If more than this number of JSPs are loaded, the least recently used JSPs will be unloaded so that the number of JSPs loaded at any one time does not exceed this limit. A value of zero or less indicates no limit. |
-1 |
- |
jspIdleTimeout |
The amount of time in seconds a JSP can be idle before it is unloaded. A value of zero or less indicates never unload. |
-1 |
- |
scratchDir |
Directory where servlets are generated. |
- |
- |
compilerClassName |
If not set, defaults to the Eclipse jdt compiler. |
- |
- |
compiler |
Used if the Eclipse jdt compiler cannot be found on the classpath. It is the classname of a compiler that Ant should invoke. |
- |
- |
compilerTargetVM |
Target vm to compile for. |
1.7 |
- |
compilerSourceVM |
Sets source compliance level for the jdt compiler. |
1.7 |
- |
javaEncoding |
Pass through the encoding to use for the compilation. |
UTF8 |
- |
modificationTestInterval |
If |
4 |
- |
xpoweredBy |
Generate an X-Powered-By response header. |
FALSE |
FALSE |
recompileOnFail |
If a JSP compilation fails should the modificationTestInterval be ignored and the next access trigger a re-compilation attempt? Used in development mode only and is disabled by default as compilation may be expensive and could lead to excessive resource usage. |
- |
- |
Configuration
The JSP engine has many configuration parameters.
Some parameters affect only precompilation, and some affect runtime recompilation checking.
Parameters also differ among the various versions of the JSP engine.
This page lists the configuration parameters, their meanings, and their default settings.
Set all parameters on the org.apache.jasper.servlet.JspServlet instance defined in the webdefault.xml file.
|
Be careful: for all of these parameters, if the value you set doesn’t take effect, try using all lower case instead of camel case, or capitalizing only some of the words in the name, as JSP is inconsistent in its parameter naming strategy. |
Modifying Configuration
Overriding webdefault.xml
You can make a copy of the {$jetty.home}/etc/webdefault.xml that ships with Jetty, apply your changes, and use it instead of the shipped version. The example below shows how to do this when using the Jetty Maven plugin.
  <plugin>
    <groupId>org.eclipse.jetty</groupId>
    <artifactId>jetty-maven-plugin</artifactId>
    <configuration>
      <webApp>
        <defaultsDescriptor>src/main/resources/webdefault.xml</defaultsDescriptor>
      </webApp>
  </plugin>
If you are using the Jetty distribution, and you want to change the JSP settings for just one or a few of your webapps, copy the {$jetty.home}/etc/webdefault.xml file somewhere, modify it, and then use a context xml file to set this file as the defaultsDescriptor for your webapp. Here’s a snippet:
 <Configure class="org.eclipse.jetty.webapp.WebAppContext">
   <Set name="contextPath">/foo</Set>
   <Set name="war"><Property name="jetty.home" default="."/>/webapps/foobar.war</Set>
   <Set name="defaultsDescriptor">/home/smith/dev/webdefault.xml</Set>
 </Configure>
If you want to change the JSP settings for all webapps, edit the {$jetty.home}/etc/webdefaults.xml file directly instead.
Configuring the JSP Servlet in web.xml
Another option is to add an entry for the JSPServlet to the WEB-INF/web.xml file of your webapp and change or add init-params.
You may also add (but not remove) servlet-mappings.
You can use the entry in {$jetty.home}/etc/webdefault.xml as a starting point.
 <servlet id="jsp">
     <servlet-name>jsp</servlet-name>
     <servlet-class>org.eclipse.jetty.jsp.JettyJspServlet</servlet-class>
     <init-param>
         <param-name>logVerbosityLevel</param-name>
         <param-value>DEBUG</param-value>
     </init-param>
     <init-param>
         <param-name>fork</param-name>
         <param-value>>false</param-value>
     </init-param>
     <init-param>
         <param-name>keepgenerated</param-name>
         <param-value>>true</param-value>
     </init-param>
     ...

     <load-on-startup>0</load-on-startup>
   </servlet>

   <servlet-mapping>
     <servlet-name>jsp</servlet-name>
     <url-pattern>*.jsp</url-pattern>
     <url-pattern>*.jspf</url-pattern>
     <url-pattern>*.jspx</url-pattern>
     <url-pattern>*.xsp</url-pattern>
     <url-pattern>*.JSP</url-pattern>
     <url-pattern>*.JSPF</url-pattern>
     <url-pattern>*.JSPX</url-pattern>
     <url-pattern>*.XSP</url-pattern>
   </servlet-mapping>

   <servlet id="my-servlet">
     <servlet-name>myServlet</servlet-name>
     <servlet-class>com.acme.servlet.MyServlet</servlet-class>
      ...
Configuring Async Support
By default, Jetty does not enable async support for the JSP servlet.
Configuring the JSP servlet for async is relatively easy - simply define the async-supported parameter as true in either your webdefault.xml or the web.xml for a specific context.
<servlet id="jsp">
  <servlet-name>jsp</servlet-name>
  <async-supported>true</async-supported>
</servlet>
Using JSTL Taglibs
The JavaServer Pages Standlard Tag Library (JSTL) is part of the Jetty distribution and is automatically put on the classpath when you select your flavour of JSP. It is also automatically on the classpath for the Jetty Maven plugin, which uses the Apache JSP engine.
Embedding
If you are using Jetty in an embedded scenario, and you need to use JSTL, then you must ensure that the JSTL jars are included on the container’s classpath - that is the classpath that is the parent of the webapp’s classpath. This is a restriction that arises from the JavaEE specification.
Apache JSP
You will need to put the jars that are present in the {$jetty.home}/lib/apache-jstl directory onto the container’s classpath.
The Apache JSP engine will find the JSTL tag definitions inside these jars during startup.
As an efficiency enhancement, you can have jetty examine the JSTL jars to find the tags, and pre-feed them into the Apache JSP engine. This is more efficient, because jetty will only scan the jars you tell it to, whereas the Apache JSP engine will scan every jar, which can be time-consuming in applications with a lot of jars on the container classpath.
To take advantage of this efficiency enhancement, set up the org.eclipse.jetty.server.webapp.ContainerIncludeJarPattern to include a pattern that will match the names of the JSTL jars. The Embedded Examples section includes a worked code example of how to do this. Below is a snippet from the example:
webapp.setAttribute("org.eclipse.jetty.server.webapp.ContainerIncludeJarPattern",".*/[^/]*taglibs.*\\.jar$");Using JSF Taglibs
The following sections provide information about using JSF TagLibs with Jetty Standalone and the Jetty Maven Plugin.
Using JSF Taglibs with Jetty Distribution
If you want to use JSF with your webapp, you need to copy the JSF implementation Jar (whichever Jar contains the META-INF/*.tld files from your chosen JSF implementation) into Jetty’s shared container lib directory.
You can either put them into the lib directory for Apache {$jetty.home}/lib/apache-jsp or put them into {$jetty.home}/lib/ext.
Using JSF Taglibs with Jetty Maven Plugin
You should make your JSF jars dependencies of the plugin and not the webapp itself. For example:
   <plugin>
    <groupId>org.eclipse.jetty</groupId>
    <artifactId>jetty-maven-plugin</artifactId>
    <configuration>
       <webApp>
         <contextPath>/${artifactId}</contextPath>
       </webApp>
       <scanIntervalSeconds>5</scanIntervalSeconds>
    </configuration>
    <dependencies>
      <dependency>
        <groupId>com.sun.faces</groupId>
        <artifactId>jsf-api</artifactId>
        <version>2.0.8</version>
      </dependency>
      <dependency>
        <groupId>com.sun.faces</groupId>
        <artifactId>jsf-impl</artifactId>
        <version>2.0.8</version>
     </dependency>
    </dependencies>
  </plugin>
Jetty Administration Guide
Starting Jetty
Startup Overview
The start.jar bootstrap manages the startup of standalone Jetty.
It is responsible for:
- Building the classpath
-
The
start.jarbootstrap builds a classpath for all the required Jetty features and their dependencies. It builds the classpath using either the--liboption tostart.jarto add an individual classpath entry, or with the--moduleoption that includes all the libs and their dependencies for a module (a named Jetty feature). - Instantiating the Server Components
-
The server and its components are instantiated using either Jetty IoC XML or Spring. The Jetty server is a collection of POJOs for the server, connectors, session managers and others. These are instantiated, injected, and wired up together in XML files, commonly one per module/feature, that are passed as arguments to
start.jar. - Resolving Server Filesystem Locations
-
The
start.jarmechanism resolves canonical locations for the${jetty.home}and the${jetty.base}directories. The${jetty.home}directory is the location of the standard distribution of Jetty. The${jetty.base}directory is the location of the local server customization and configurations. + If you want to modify the Jetty distribution, base and home can be the same directory. Separating the base and home directories allows the distribution to remain unmodified, with all customizations in the base directory, and thus simplifies subsequent server version upgrades. - Parameterizing the Server Configuration
-
XML files primarily determine the server configuration. Many of these files are parameterized to allow simple injection of host names, ports, passwords and more. The
start.jarmechanism allows you to set parameters on the command line or in properties files.
To achieve these start up mechanisms, the start.jar uses:
- Command line arguments
-
You can configure the entire server with command line arguments that specify libraries, properties and XML files. However in practice the INI and modules mechanisms (below) reduce the verbosity of the command line.
- INI files
-
The
start.jarmechanism uses the contents of the${jetty.base}/start.iniand${jetty.base}/start.d/*.inifiles with each line equivalent to astart.jarcommand line argument. This means that either a globalstart.inifile or multiplestart.d/feature.inifiles control the configuration of the server.
|
It is important to chose either |
- Modules
-
Instead of explicitly listing all the libraries, properties and XML files for a feature, the
start.jarmechanism allows you to create modules. A module is defined in amodules/.modfile, including the libraries, dependencies, XML, and template INI files for a Jetty feature. Thus you can use a single--module=namecommand line option as the equivalent of specifying--lib=location,feature.xmlorname=valuearguments for a feature and all its dependencies. Modules also use their dependencies to control the ordering of libraries and XML files. There are several module files included with the Jetty distribution that cover the most common server features, such as HTTP, HTTPS, SSL, Logging, Annotations…etc. These module files should *only be edited if you are making structural changes to the way the feature will perform. For more information, refer to the section on managing startup modules later in this chapter. - XML Files
-
XML files in either Jetty IoC or Spring format instantiate the actual POJO components of the server. This includes all major components such as connectors, keystores, session managers, and data sources. Typically there are one or more XML files per module, and these are defined and activated in the corresponding module.
Startup Example
The simplest way to start Jetty is via the start.jar mechanism using the following Java command line:
[user]$ cd jetty-distribution-{VERSION}
[jetty-distribution-{VERSION}]$ java -jar start.jar --module=http jetty.http.port=8080
This command uses the start.jar mechanism to bootstrap the classpath, properties, and XML files with the metadata obtained from the http module.
Specifically the http module is defined in the ${jetty.home}/modules/http.mod file, and includes the following:
[jetty-distribution-{VERSION}]$ cat modules/http.mod
[depend]
server

[xml]
etc/jetty-http.xml

[ini-template]
jetty.http.port=8080
http.timeout=30000
The http module declares that http depends on the server module, uses the jetty-http.xml file, and can be parameterized with jetty.http.port and http.timeout parameters.
The INI-template section is not actually used by the command above, so the jetty.http.port must still be defined on the command line.
Following the server dependency, the ${jetty.home}/modules/server.mod file includes:
[jetty-distribution-{VERSION}]$ cat modules/server.mod
[lib]
lib/servlet-api-3.1.jar
lib/jetty-http-${jetty.version}.jar
lib/jetty-server-${jetty.version}.jar
lib/jetty-xml-${jetty.version}.jar
lib/jetty-util-${jetty.version}.jar
lib/jetty-io-${jetty.version}.jar

[xml]
etc/jetty.xml

[ini-template]
threads.min=10
threads.max=200
The server module declares the libraries the server needs and to use jetty.xml file.
The combined metadata of the http and server modules results in start.jar generating the effective Java command line required to start Jetty.
Another way to see this is by asking Jetty what its configuration looks like by appending --list-config to the command line:
[jetty-distribution-{VERSION}]$ java -jar start.jar --module=http jetty.http.port=9099 --list-config

Java Environment:
-----------------
 java.home=/user/lib/jvm/jdk-7u21-x64/jre
 java.vm.vendor=Oracle Corporation
 java.vm.version=23.25-b01
 java.vm.name=Java HotSpot(TM) 64-Bit Server VM
 java.vm.info=mixed mode
 java.runtime.name=Java(TM) SE Runtime Environment
 java.runtime.version=1.7.0_25-b15
 java.io.tmpdir=/tmp

Jetty Environment:
-----------------
 jetty.home=/opt/jetty/jetty-distribution-{VERSION}
 jetty.base=/opt/jetty/jetty-distribution-{VERSION}
 jetty.version={VERSION}

JVM Arguments:
--------------
 (no jvm args specified)

System Properties:
------------------
 jetty.home = /opt/jetty/jetty-distribution-{VERSION}
 jetty.base = /opt/jetty/jetty-distribution-{VERSION}

Properties:
-----------
 jetty.http.port = 9099

Jetty Server Classpath:
-----------------------
Version Information on 7 entries in the classpath.
Note: order presented here is how they would appear on the classpath.
      changes to the --module=name command line options will be reflected here.
 0:                    3.1.0 | ${jetty.home}/lib/servlet-api-3.1.jar
 1:                  3.1.RC0 | ${jetty.home}/lib/jetty-schemas-3.1.jar
 2:               {VERSION} | ${jetty.home}/lib/jetty-http-{VERSION}.jar
 3:               {VERSION} | ${jetty.home}/lib/jetty-server-{VERSION}.jar
 4:               {VERSION} | ${jetty.home}/lib/jetty-xml-{VERSION}.jar
 5:               {VERSION} | ${jetty.home}/lib/jetty-util-{VERSION}.jar
 6:               {VERSION} | ${jetty.home}/lib/jetty-io-{VERSION}.jar

Jetty Active XMLs:
------------------
 ${jetty.home}/etc/jetty.xml
 ${jetty.home}/etc/jetty-http.xml
This represents the entirety of the configuration that is applied to start Jetty.
If you don’t want to use the start.jar bootstrap, you can start Jetty using a traditional Java command line.
The following is the equivalent Java command line for what the start.jar bootstrap above performs.
[user]$ cd jetty-distribution-{VERSION}
[jetty-distribution-{VERSION}]$ echo jetty.http.port=8080 > /tmp/jetty.properties
[jetty-distribution-{VERSION}]$ export JETTY_HOME=`pwd`
[jetty-distribution-{VERSION}]$ export JETTY_BASE=`pwd`
[jetty-distribution-{VERSION}]$ export JETTY_VERSION="${project.version}"
[jetty-distribution-{VERSION}]$ java -Djetty.home=$JETTY_HOME \
-Djetty.base=$JETTY_BASE \
-cp \
 $JETTY_HOME/lib/servlet-api-3.1.jar\
:$JETTY_HOME/lib/jetty-schemas-3.1.jar\
:$JETTY_HOME/lib/jetty-http-$JETTY_VERSION.jar\
:$JETTY_HOME/lib/jetty-server-$JETTY_VERSION.jar \
:$JETTY_HOME/lib/jetty-xml-$JETTY_VERSION.jar\
:$JETTY_HOME/lib/jetty-util-$JETTY_VERSION.jar\
:$JETTY_HOME/lib/jetty-io-$JETTY_VERSION.jar\
org.eclipse.jetty.xml.XmlConfiguration \
/tmp/jetty.properties \
$JETTY_HOME/etc/jetty.xml \
$JETTY_HOME/etc/jetty-http.xml
The Java command line sets up the classpath with the core Jetty jars and the servlet API, executes the XmlConfiguration class and passes it some XML files that define the server and an HTTP connector running on the port defined in the jetty.properties file.
You can further simplify the startup of this server by using the INI template defined by the modules to create a start.ini file with the command:
[user]$ cd jetty-distribution-{VERSION}
[jetty-distribution-{VERSION}]$ mkdir example-base
[example-base]$ cd example-base
[example-base]$ ls -la
total 8
drwxrwxr-x  2 user webgroup 4096 Oct  4 11:49 ./
drwxrwxr-x 12 user webgroup 4096 Oct  4 11:49 ../

[example-base]$ java -jar $JETTY_HOME/start.jar --add-to-start=http

WARNING: http            initialised in ${jetty.base}/start.ini (appended)
WARNING: http            enabled in     ${jetty.base}/start.ini
WARNING: server          initialised in ${jetty.base}/start.ini (appended)
WARNING: server          enabled in     ${jetty.base}/start.ini

[example-base]$ ls -la
total 12
drwxrwxr-x  2 user webgroup 4096 Oct  4 11:55 ./
drwxrwxr-x 12 user webgroup 4096 Oct  4 11:49 ../
-rw-rw-r--  1 user webgroup  250 Oct  4 11:55 start.ini
Once complete, you can edit the start.ini file to modify any parameters and you can run the server with the simple command:
[example-base]$ java -jar $JETTY_HOME/start.jarUsing start.jar
The most basic way of starting the Jetty standalone server is to execute the start.jar, which is a bootstrap for starting Jetty with the configuration you want.
[jetty-distribution-{VERSION}]$ java -jar start.jar
2013-09-23 11:27:06.654:INFO:oejs.Server:main: jetty-{VERSION}
...
Jetty is a highly modularized web server container. Very little is mandatory and required, and most components are optional; you enable or disable them according to the needs of your environment.
At its most basic, you configure Jetty from two elements:
-
A set of libraries and directories that make up the server classpath.
-
A set of Jetty XML configuration files (IoC style) that establish how to build the Jetty server and its components.
Instead of editing these directly, Jetty 9.1 introduced more options on how to configure Jetty (these are merely syntactic sugar that eventually resolve into the two basic configuration components).
Jetty Startup Features include:
-
A separation of the Jetty distribution binaries in
${jetty.home}and the environment specific configurations (and binaries) found in${jetty.base}(detailed in Managing Jetty Base and Jetty Home.) -
You can enable a set of libraries and XML configuration files via the newly introduced module system.
-
All of the pre-built XML configuration files shipped in Jetty are now parameterized with properties that you can specify in your
${jetty.base}/start.ini(demonstrated in Quick Start Configuration).
These are powerful new features, made to support a variety of styles of configuring Jetty, from a simple property based configuration, to handling multiple installations on a server, to customized stacks of technology on top of Jetty, and even the classic, custom XML configurations of old.
For example, if you use the ${jetty.base} concepts properly, you can upgrade the Jetty distribution without having to remake your entire tree of modifications to Jetty.
Simply separate out your specific modifications to the ${jetty.base}, and in the future, just upgrade your ${jetty.home} directory with a new Jetty distribution.
Executing start.jar
When executed start.jar performs the following actions:
-
Loads and parses all INIs found in
${jetty.base}/start.d/*.inias command line arguments. -
Loads and parses
${jetty.base}/start.inias command line arguments.-
Please see Start.ini vs. Start.d for more information on the difference between these.
-
-
Parses actual command line arguments used to execute
start.jaritself. -
Resolves any XML configuration files, modules, and libraries using base vs. home resolution steps:
-
Checks whether file exists as relative reference to
${jetty.base}. -
Checks whether file exists as relative reference to
${jetty.home}. -
Uses default behavior of
java.io.File(Relative toSystem.getProperty("user.dir") and then as absolute file system path).
-
-
Loads any dependent modules (merges XXNK, library, and properties results with active command line).
-
Builds out server classpath.
-
Determines run mode as one of:
-
Shows informational command line options and exit.
-
Executes Jetty normally, waits for Jetty to stop.
-
Executes a forked JVM to run Jetty in, waits for forked JVM to exit.
-
start.jar Command Line Options
Command Line Options
- --help
-
Obtains the current list of command line options and some basic usage help.
- --version
-
Shows the list of server classpath entries, and prints version information found for each entry.
- --list-classpath
-
Similar to --version, shows the server classpath.
- --list-config
-
Lists the resolved configuration that will start Jetty.
-
Java environment
-
Jetty environment
-
JVM arguments
-
Properties
-
Server classpath
-
Server XML configuration files
-
- --dry-run
-
Print the command line that the start.jar generates, then exit. This may be used to generate command lines when the start.ini includes -X or -D arguments:
$ java -jar start.jar --dry-run > jetty.sh
$ . jetty.sh
- --dry-run=<parts>
-
Print specific parts of the command line. The parts are a comma separated list of:
-
"java" - the JVM to run
-
"opts" - the JVM options (eg -D and -X flags)
-
"path" - the JVM class path or JPMS modules options
-
"main" - the main class to run
-
"args" - the arguments passed to the main class
-
It is possible to decompose the start command:
$ OPTS=$(java -jar start.jar --dry-run=opts,path)
$ MAIN=$(java -jar start.jar --dry-run=main)
$ ARGS=$(java -jar start.jar --dry-run=args)
$ java $OPTS -Dextra=opt $MAIN $ARGS extra=arg
Alternatively to create an args file for java:
$ java -jar start.jar --dry-run=opts,path,main,args > /tmp/args
$ java @/tmp/args
- --exec
-
Forces the start to use a forked instance of java to run Jetty. Some modules include
--execin order to set java command line options. Some start options, such as--jpmsalso imply--exec - --exec-properties=<filename>
-
Assign a fixed name to the file used to transfer properties to the sub process. This allows the generated properties file to be saved and reused. Without this option, a temporary file is used.
- --commands=<filename>
-
Instructs
start.jarto use each line of the specified file as arguments on the command line.
Debug and Start Logging
- --debug
-
Enables debugging output of the startup procedure.
Note: This does not set up debug logging for Jetty itself. For information on logging, please see the section on Configuring Jetty Logging.]
- --start-log-file=<filename>
-
Sends all startup output to the filename specified. Filename is relative to
${jetty.base}. This is useful for capturing startup issues where the Jetty-specific logger has not yet kicked in due to a possible startup configuration error.
Module Management
- --list-modules
-
Lists all the modules defined by the system. Looks for module files using the normal
${jetty.base}and${jetty.home}resolution logic. Also lists enabled state based on information present on the command line, and all active startup INI files. - --list-modules=<tag>(,<tag>)*
-
List modules by tag. Use '*' for all tags. Prefix a tag with '-' to exclude the tag. The special tag "internal" is always excluded unless it is explicitly included.
- --list-all-modules
-
List all modules.
- --module=<name>,(<name>)*
-
Enables one or more modules by name (use
--list-modulesto see the list of available modules). This enables all transitive (dependent) modules from the module system as well. If you use this from the shell command line, it is considered a temporary effect, useful for testing out a scenario. If you want this module to always be enabled, add this command to your${jetty.base}/start.ini. - --add-to-start=<name>,(<name>)*
-
Enables a module by appending lines to the
${jetty.base}/start.inifile. The lines that are added are provided by the module-defined INI templates. Note: Transitive modules are also appended. If a module contains an .ini template with properties, you can also edit these properties when activating the module. To do this, simply list the property and its value after the-add-to-startcommand, such as in the following example:$ java -jar start.jar --add-to-start=http jetty.http.port=8379 jetty.http.host=1.2.3.4Doing this will uncomment the property in the associated .ini file and set it to the value specified.
- --update-ini
-
Used to update a specified property or properties that exist in an existing .ini file. Jetty scans the command line,
${jetty.base}and${jetty.home}for .ini files that have the specified property and update it accordingly.$ java -jar ../start.jar --update-ini jetty.http.port=8417 ConfigSource <command-line> ConfigSource ${jetty.base} INFO : http property updated jetty.http.port=8417 INFO : http updated ${jetty.base}/start.d/http.ini ConfigSource ${jetty.home} - --create-startd
-
Creates a
${jetty.base}/start.d/directory. If a${jetty.base}/start.inifile already exists, it is copied to the${jetty.base}/start.ddirectory.
|
With respect to |
- --write-module-graph=<filename>
-
Advanced feature: Creates a graphviz dot file of the module graph as it exists for the active
${jetty.base}.# generate module.dot $ java -jar start.jar --module=websocket --write-module-graph=modules.dot # post process to a PNG file $ dot -Tpng -o modules.png modules.dotSee graphviz.org for details on how to post-process this dotty file into the output best suited for your needs.
- --create-files
-
Create any missing files that are required by initialized modules. This may download a file from the network if the module provides a URL.
- --skip-file-validation=<modulename>(,<modulename)*
-
Disable the [files] section validation of content in the
${jetty.base}directory for a specific module. Useful for modules that have downloadable content that is being overridden with alternatives in the${jetty.base}`directory.
|
This advanced option is for administrators that fully understand the configuration of their |
- --approve-all-licenses
-
Approve all license questions. Useful for enabling modules from a script that does not require user interaction.
Startup / Shutdown Command Line
- --stop
-
Sends a stop signal to the running Jetty instance.
Note: The server must have been started with various stop properties for this to work.
- STOP.PORT=<number>
-
The port to use to stop the running Jetty server. This is an internal port, opened on localhost, used solely for stopping the running Jetty server. Choose a port that you do not use to serve web traffic.
Required for
--stopto function. - STOP.KEY=<alphanumeric>
-
The passphrase defined to stop the server.
Required for
--stopto function. - STOP.WAIT=<number>
-
The time (in seconds) to wait for confirmation that the running Jetty server has stopped. If not specified, the stopper waits indefinitely for the server to stop.
If the time specified elapses, without a confirmation of server stop, then the
--stopcommand exits with a non-zero return code.
You can configure a port number for Jetty to listen on for a stop command, so you are able to stop it from a different terminal.
This requires the use of a "secret" key, to prevent malicious or accidental termination.
Use the STOP.PORT and STOP.KEY (or -DSTOP.PORT= and -DSTOP.KEY=, respectively, which will set these as system parameters) parameters as arguments to the start.jar:
> java -jar ${JETTY_HOME}/start.jar STOP.PORT=1234 STOP.KEY=secretpasswordThen, to stop Jetty from a different terminal, you need to supply this port and key information.
You can either use a copy of the Jetty distribution, the jetty-maven-plugin, the jetty-ant plugin, or a custom class to accomplish this.
Here’s how to use the Jetty distribution, leveraging start.jar, to perform a stop:
> java -jar start.jar STOP.PORT=8181 STOP.KEY=abc123 --stop|
To perform a graceful shutdown of Jetty, the |
Advanced Commands
- --lib=<classpath>
-
Add arbitrary classpath entries to the the server classpath.
- --include-jetty-dir=<path>
-
Include an extra Jetty directory to use as a source for configuration details. This directory behaves similarly to
${jetty.base}but sits at a layer between${jetty.base}and${jetty.home}. This allows for some complex hierarchies of configuration details. - --download=<http-uri>|<location>
-
If the file does not exist at the given location, download it from the given http URI. Note: location is always relative to
${jetty.base}. You might need to escape the pipe "\|" to use this on some environments. - maven.repo.uri=[url]
-
The url to use to download Maven dependencies. Default is https://repo1.maven.org/maven2/.
Shaded Start.jar
If you have a need for a shaded version of start.jar (such as for Gradle), you can achieve this via a Maven dependency.
<dependency>
    <groupId>org.eclipse.jetty</groupId>
    <artifactId>jetty-start</artifactId>
    <version>{VERSION}</version>
    <classifier>shaded</classifier>
</dependency>
Start.jar without exec or forking.
Some Jetty modules include the --exec option so that java command line options can be set.
Also some start.jar options (eg. --jpms) include an implicit --exec.
To start jetty without forking a new JVM instance from the start JVM, the --dry-run option can be used to generate a command line:
$ CMD=$(java -jar start.jar --dry-run)
$ $CMD
It is possible to decompose the start command so that it can be modified:
$ OPTS=$(java -jar start.jar --dry-run=opts,path)
$ MAIN=$(java -jar start.jar --dry-run=main)
$ ARGS=$(java -jar start.jar --dry-run=args)
$ java $OPTS -Dextra=opt $MAIN $ARGS extra=arg
Alternatively to create an args file for java:
$ java -jar start.jar --dry-run=opts,path,main,args > /tmp/args
$ java @/tmp/args
Managing Jetty Base and Jetty Home
Instead of managing multiple Jetty implementations out of several different distribution locations, it is possible to maintain a separation between the binary installation of the standalone Jetty (known as ${jetty.home}), and the customizations for your specific environment(s) (known as ${jetty.base}).
In addition to easy management of multiple server instances, is allows for quick, drop-in upgrades of Jetty.
There should always only be one Jetty Home (per version of Jetty), but there can be multiple Jetty Base directories that reference it.
- Jetty Base
-
-
Also known as the
${jetty.base}property. -
This is the location for your configurations and customizations to the Jetty distribution.
-
- Jetty Home
-
-
Also known as the
${jetty.home}property. -
This is the location for the Jetty distribution binaries, default XML IoC configurations, and default module definitions.
-
|
Jetty Home should always be treated as a standard of truth. All configuration modifications, changes and additions should be made in the appropriate Jetty Base directory. |
Potential configuration is resolved from these 2 directory locations. When Jetty starts up in processes configuration from them as follows:
- Check Jetty Base First
-
If the referenced configuration exists, relative to the defined Jetty base, it is used.
- Check Jetty Home Second
-
If the referenced configuration exists, relative to the defined Jetty home, it is used.
- Use java.io.File(String pathname) Logic
-
Lastly, use the reference as a
java.io.File(String pathname)reference, following the default resolution rules outlined by that constructor. In brief, the reference will be used as-is, be it relative (to current working directory, aka $\{user.dir}) or absolute path, or even network reference (such as on Windows and use of UNC paths).
For more details on how startup with start.jar works, see Using start.jar: Executing
Demo-Base in the Jetty Distribution
The Jetty Distribution comes with an example ${jetty.base} which enables the various demonstration webapps and server configurations.
[jetty-distribution-{VERSION}]$ ls -la

total 496
drwxrwxr-x 11 user group   4096 Oct  8 15:23 ./
drwxr-xr-x 14 user group   4096 Oct  8 13:04 ../
drwxrwxr-x  2 user group   4096 Oct  8 06:54 bin/
drwxrwxr-x  6 user group   4096 Oct  8 06:54 demo-base/
drwxrwxr-x  2 user group   4096 Oct 11 15:14 etc/
drwxrwxr-x 11 user group   4096 Oct  8 06:54 lib/
-rw-rw-r--  1 user group  30012 Sep 30 19:55 license-eplv10-aslv20.html
drwxrwxr-x  2 user group   4096 Oct  8 06:54 logs/
drwxrwxr-x  2 user group   4096 Oct  8 06:54 modules/
-rw-rw-r--  1 user group   6262 Sep 30 19:55 notice.html
-rw-rw-r--  1 user group   1249 Sep 30 19:55 README.TXT
drwxrwxr-x  2 user group   4096 Oct  8 06:54 resources/
drwxrwxr-x  2 user group   4096 Oct  8 06:54 start.d/
-rw-rw-r--  1 user group   1780 Sep 30 19:55 start.ini
-rw-rw-r--  1 user group  71921 Sep 30 19:55 start.jar
-rw-rw-r--  1 user group 336468 Sep 30 19:55 VERSION.txt
drwxrwxr-x  2 user group   4096 Oct  8 06:54 webapps/

[jetty-distribution-{VERSION}]$ cd demo-base
[demo-base]$ java -jar $JETTY_HOME/start.jar

2013-10-16 09:08:47.800:WARN::main: demo test-realm is deployed. DO NOT USE IN PRODUCTION!
2013-10-16 09:08:47.802:INFO:oejs.Server:main: jetty-{VERSION}
2013-10-16 09:08:47.817:INFO:oejdp.ScanningAppProvider:main: Deployment monitor [file:/home/user/jetty-distribution-{VERSION}/demo-base/webapps/] at interval 1
2013-10-16 09:08:48.072:WARN::main: async-rest webapp is deployed. DO NOT USE IN PRODUCTION!
...
If you want to see what the Jetty base looks like without executing Jetty, you can simply list the configuration by using the --list-config command.
[demo-base]$ java -jar $JETTY_HOME/start.jar --list-config

Java Environment:
-----------------
 java.home=/usr/lib/jvm/jdk-7u21-x64/jre
 java.vm.vendor = Oracle Corporation
 java.vm.version = 25.92-b14
 java.vm.name = Java HotSpot(TM) 64-Bit Server VM
 java.vm.info = mixed mode
 java.runtime.name = Java(TM) SE Runtime Environment
 java.runtime.version = 1.8.0_92-b14
 java.io.tmpdir = /var/folders/h6/yb_lbnnn11g0y1jjlvqg631h0000gn/T/
 user.dir = /home/user/jetty-distribution-{VERSION}
 user.language = en
 user.country = US

Jetty Environment:
-----------------
 jetty.home=/home/user/jetty-distribution-{VERSION}
 jetty.tag.version = master
 jetty.base=/home/user/jetty-distribution-{VERSION}/demo-base
 jetty.version={VERSION}

 Config Search Order:
 --------------------
  <command-line>
  ${jetty.base} -> /home/user/jetty-distribution-{VERSION}/demo-base
  ${jetty.home} -> /home/user/Desktop/jetty-distribution-{VERSION}

JVM Arguments:
--------------
 (no jvm args specified)

System Properties:
------------------
 jetty.base = /home/user/jetty-distribution-{VERSION}/demo-base
 jetty.home = /home/user/jetty-distribution-{VERSION}

Properties:
-----------
 demo.realm = etc/realm.properties
 https.port = 8443
 https.timeout = 30000
 jaas.login.conf = etc/login.conf
 jetty.dump.start = false
 jetty.dump.stop = false
 jetty.keymanager.password = OBF:1u2u1wml1z7s1z7a1wnl1u2g
 jetty.keystore = etc/keystore
 jetty.keystore.password = OBF:1vny1zlo1x8e1vnw1vn61x8g1zlu1vn4
 jetty.http.port = 8080
 jetty.secure.port = 8443
 jetty.truststore = etc/keystore
 jetty.truststore.password = OBF:1vny1zlo1x8e1vnw1vn61x8g1zlu1vn4
 org.eclipse.jetty.websocket.jsr356 = false
 threads.max = 200
 threads.min = 10
 threads.timeout = 60000

Jetty Server Classpath:
-----------------------
Version Information on 42 entries in the classpath.
Note: order presented here is how they would appear on the classpath.
      changes to the --module=name command line options will be reflected here.
 0:          {VERSION} | ${jetty.home}/lib/jetty-client-{VERSION}.jar
 1:      1.4.1.v201005082020 | ${jetty.base}/lib/ext/javax.mail.glassfish-1.4.1.v201005082020.jar
 2:          {VERSION} | ${jetty.base}/lib/ext/test-mock-resources-{VERSION}.jar
 3:                    (dir) | ${jetty.home}/resources
 4:                    3.1.0 | ${jetty.home}/lib/servlet-api-3.1.jar
 5:                  3.1.RC0 | ${jetty.home}/lib/jetty-schemas-3.1.jar
 6:          {VERSION} | ${jetty.home}/lib/jetty-http-{VERSION}.jar
 7:          {VERSION} | ${jetty.home}/lib/jetty-continuation-{VERSION}.jar
 8:          {VERSION} | ${jetty.home}/lib/jetty-server-{VERSION}.jar
 9:          {VERSION} | ${jetty.home}/lib/jetty-xml-{VERSION}.jar
10:          {VERSION} | ${jetty.home}/lib/jetty-util-{VERSION}.jar
11:          {VERSION} | ${jetty.home}/lib/jetty-io-{VERSION}.jar
12:          {VERSION} | ${jetty.home}/lib/jetty-jaas-{VERSION}.jar
13:          {VERSION} | ${jetty.home}/lib/jetty-jndi-{VERSION}.jar
14:      1.1.0.v201105071233 | ${jetty.home}/lib/jndi/javax.activation-1.1.0.v201105071233.jar
15:      1.4.1.v201005082020 | ${jetty.home}/lib/jndi/javax.mail.glassfish-1.4.1.v201005082020.jar
16:                      1.3 | ${jetty.home}/lib/jndi/javax.transaction-api-1.3.jar
17:          {VERSION} | ${jetty.home}/lib/jetty-rewrite-{VERSION}.jar
18:          {VERSION} | ${jetty.home}/lib/jetty-security-{VERSION}.jar
19:          {VERSION} | ${jetty.home}/lib/jetty-servlet-{VERSION}.jar
20:                    3.0.0 | ${jetty.home}/lib/jsp/javax.el-3.0.0.jar
21:      1.2.0.v201105211821 | ${jetty.home}/lib/jsp/javax.servlet.jsp.jstl-1.2.0.v201105211821.jar
22:                    2.3.2 | ${jetty.home}/lib/jsp/javax.servlet.jsp-2.3.2.jar
23:                    2.3.1 | ${jetty.home}/lib/jsp/javax.servlet.jsp-api-2.3.1.jar
24:                    2.3.3 | ${jetty.home}/lib/jsp/jetty-jsp-jdt-2.3.3.jar
25:      1.2.0.v201112081803 | ${jetty.home}/lib/jsp/org.apache.taglibs.standard.glassfish-1.2.0.v201112081803.jar
26:   3.8.2.v20130121-145325 | ${jetty.home}/lib/jsp/org.eclipse.jdt.core-3.8.2.v20130121.jar
27:          {VERSION} | ${jetty.home}/lib/jetty-plus-{VERSION}.jar
28:          {VERSION} | ${jetty.home}/lib/jetty-webapp-{VERSION}.jar
29:          {VERSION} | ${jetty.home}/lib/jetty-annotations-{VERSION}.jar
30:                      4.1 | ${jetty.home}/lib/annotations/asm-4.1.jar
31:                      4.1 | ${jetty.home}/lib/annotations/asm-commons-4.1.jar
32:                      1.2 | ${jetty.home}/lib/annotations/javax.annotation-api-1.2.jar
33:          {VERSION} | ${jetty.home}/lib/jetty-deploy-{VERSION}.jar
34:                      1.0 | ${jetty.home}/lib/websocket/javax.websocket-api-1.0.jar
35:          {VERSION} | ${jetty.home}/lib/websocket/javax-websocket-client-impl-{VERSION}.jar
36:          {VERSION} | ${jetty.home}/lib/websocket/javax-websocket-server-impl-{VERSION}.jar
37:          {VERSION} | ${jetty.home}/lib/websocket/websocket-api-{VERSION}.jar
38:          {VERSION} | ${jetty.home}/lib/websocket/websocket-client-{VERSION}.jar
39:          {VERSION} | ${jetty.home}/lib/websocket/websocket-common-{VERSION}.jar
40:          {VERSION} | ${jetty.home}/lib/websocket/websocket-server-{VERSION}.jar
41:          {VERSION} | ${jetty.home}/lib/websocket/websocket-servlet-{VERSION}.jar

Jetty Active XMLs:
------------------
 ${jetty.home}/etc/jetty.xml
 ${jetty.home}/etc/jetty-webapp.xml
 ${jetty.home}/etc/jetty-plus.xml
 ${jetty.home}/etc/jetty-annotations.xml
 ${jetty.home}/etc/jetty-deploy.xml
 ${jetty.home}/etc/jetty-http.xml
 ${jetty.home}/etc/jetty-ssl.xml
 ${jetty.home}/etc/jetty-ssl-context.xml
 ${jetty.home}/etc/jetty-https.xml
 ${jetty.home}/etc/jetty-jaas.xml
 ${jetty.home}/etc/jetty-rewrite.xml
 ${jetty.base}/etc/demo-rewrite-rules.xml
 ${jetty.base}/etc/test-realm.xml
The --list-config command line option displays what the configuration will look like when starting Jetty.
This includes information on the Java environment to the system properties, the classpath and the Active Jetty IoC XML used to build up the Jetty server configuration.
Of note, is that the output will make it known where the configuration elements came from, be it in either in ${jetty.home} or ${jetty.base}.
If you look at the ${jetty.base}/start.ini you will see a layout similar to below.
[my-base]$ cat start.ini

# Enable security via jaas, and configure it
--module=jaas
jaas.login.conf=etc/login.conf

# Enable rewrite examples
--module=rewrite
etc/demo-rewrite-rules.xml

# Websocket chat examples needs websocket enabled
# Don't start for all contexts (set to true in test.xml context)
org.eclipse.jetty.websocket.jsr356=false
--module=websocket

# Create and configure the test realm
etc/test-realm.xml
demo.realm=etc/realm.properties

# Initialize module server
--module=server
threads.min=10
threads.max=200
threads.timeout=60000
jetty.dump.start=false
jetty.dump.stop=false

--module=deploy
--module=jsp
--module=ext
--module=resources
--module=client
--module=annotations
In this example, ${jetty.base}/start.ini is the main startup configuration entry point for Jetty.
You will see that we are enabling a few modules for Jetty, specifying some properties, and also referencing some Jetty IoC XML files (namely the etc/demo-rewrite-rules.xml and etc/test-realm.xml files)
When Jetty’s start.jar resolves the entries in the start.ini, it will follow the resolution rules above.
For example, the reference to etc/demo-rewrite-rules.xml was found in ${jetty.base}/etc/demo-rewrite-rules.xml.
Declaring Jetty Base
The Jetty distribution’s start.jar is the component that manages the behavior of this separation.
The Jetty start.jar and XML files always assume that both ${jetty.home} and ${jetty.base} are defined when starting Jetty.
You can opt to manually define the ${jetty.home} and ${jetty.base} directories, such as this:
[jetty-distribution-{VERSION}]$ pwd
/home/user/jetty-distribution-{VERSION}

[jetty-distribution-{VERSION}]$ java -jar start.jar \
    jetty.home=/home/user/jetty-distribution-{VERSION} \
    jetty.base=/home/user/my-base

2013-10-16 09:08:47.802:INFO:oejs.Server:main: jetty-{VERSION}
2013-10-16 09:08:47.817:INFO:oejdp.ScanningAppProvider:main: Deployment monitor [file:/home/user/my-base/webapps/] at interval 1
...
Alternately, you can declare one directory and let the other one be discovered.
The following example uses default discovery of ${jetty.home} by using the parent directory of wherever start.jar itself is, and a manual declaration of ${jetty.base}.
[jetty-distribution-{VERSION}]$ pwd
/home/user/jetty-distribution-{VERSION}

[jetty-distribution-{VERSION}]$ java -jar start.jar jetty.base=/home/user/my-base

2013-10-16 09:08:47.802:INFO:oejs.Server:main: jetty-{VERSION}
2013-10-16 09:08:47.817:INFO:oejdp.ScanningAppProvider:main: Deployment monitor [file:/home/user/my-base/webapps/] at interval 1
...
But Jetty recommends that you always start Jetty from the directory that is your ${jetty.base} and starting Jetty by referencing
the start.jar in your {$jetty.home} remotely.
The following demonstrates this by allowing default discovery of ${jetty.home} via locating the start.jar, and using the user.dir System Property for ${jetty.base}.
[jetty-distribution-{VERSION}]$ pwd
/home/user/jetty-distribution-{VERSION}

[jetty-distribution-{VERSION}]$ cd /home/user/my-base
[my-base]$ java -jar /home/user/jetty-distribution-{VERSION}/start.jar

2013-10-16 09:08:47.802:INFO:oejs.Server:main: jetty-{VERSION}
2013-10-16 09:08:47.817:INFO:oejdp.ScanningAppProvider:main: Deployment monitor [file:/home/user/my-base/webapps/] at interval 1
...|
Be aware of the |
Managing Server Classpath
Jetty Server Classpath is determined by a combination of factors.
- The java.class.path System Property
-
If you start Jetty with a JVM specified classpath, then Jetty will use the java.class.path System Property to populate the initial classpath.
- Module specified Libraries
-
The module system declares various libraries that are required for that module to operate. These module defined libraries are added to the Jetty Server classpath when any module is activated with library declarations.
- Command Line Libraries
-
The command line option
--lib=<path>can be used as a final means to add arbitrary entries to the Jetty Server classpath.
Of special note, there are 2 structural modules defined to ease some of this for you.
- --module=ext
-
The
extmodule will enable thelib/ext/*.jarlogic. + If this module is activated, then all jar files found in the lib/ext/ paths will be automatically added to the Jetty Server Classpath. - --module=resources
-
The
resourcesmodule will add theresources/directory the classpath. + If you have 3rd party libraries that lookup resources from the classpath, put your files in here. + Logging libraries often have classpath lookup of their configuration files (eg:log4j.properties,log4j.xml,logging.properties, andlogback.xml), so this would be the ideal setup for this sort of configuration demand.
|
Both the |
Interrogating the Server Classpath
The Jetty start.jar has the ability to resolve the classpath from the command line, modules and configuration, and to list the classpath entries it will use to start jetty.
The --list-classpath command line option is used as such.
(Demonstrated with the demo-base from the Jetty Distribution)
[demo-base]$ java -jar $JETTY_HOME/start.jar --list-classpath

Jetty Server Classpath:
-----------------------
Version Information on 42 entries in the classpath.
Note: order presented here is how they would appear on the classpath.
      changes to the --module=name command line options will be reflected here.
 0:               {VERSION} | ${jetty.home}/lib/jetty-client-{VERSION}.jar
 1:      1.4.1.v201005082020 | ${jetty.base}/lib/ext/javax.mail.glassfish-1.4.1.v201005082020.jar
 2:               {VERSION} | ${jetty.base}/lib/ext/test-mock-resources-{VERSION}.jar
 3:                    (dir) | ${jetty.home}/resources
 4:                    3.1.0 | ${jetty.home}/lib/servlet-api-3.1.jar
 5:                  3.1.RC0 | ${jetty.home}/lib/jetty-schemas-3.1.jar
 6:               {VERSION} | ${jetty.home}/lib/jetty-http-{VERSION}.jar
 7:               {VERSION} | ${jetty.home}/lib/jetty-continuation-{VERSION}.jar
 8:               {VERSION} | ${jetty.home}/lib/jetty-server-{VERSION}.jar
 9:               {VERSION} | ${jetty.home}/lib/jetty-xml-{VERSION}.jar
10:               {VERSION} | ${jetty.home}/lib/jetty-util-{VERSION}.jar
11:               {VERSION} | ${jetty.home}/lib/jetty-io-{VERSION}.jar
12:               {VERSION} | ${jetty.home}/lib/jetty-jaas-{VERSION}.jar
13:               {VERSION} | ${jetty.home}/lib/jetty-jndi-{VERSION}.jar
14:      1.1.0.v201105071233 | ${jetty.home}/lib/jndi/javax.activation-1.1.0.v201105071233.jar
15:      1.4.1.v201005082020 | ${jetty.home}/lib/jndi/javax.mail.glassfish-1.4.1.v201005082020.jar
16:                      1.3 | ${jetty.home}/lib/jndi/javax.transaction-api-1.3.jar
17:               {VERSION} | ${jetty.home}/lib/jetty-rewrite-{VERSION}.jar
18:               {VERSION} | ${jetty.home}/lib/jetty-security-{VERSION}.jar
19:               {VERSION} | ${jetty.home}/lib/jetty-servlet-{VERSION}.jar
20:                    3.0.0 | ${jetty.home}/lib/jsp/javax.el-3.0.0.jar
21:      1.2.0.v201105211821 | ${jetty.home}/lib/jsp/javax.servlet.jsp.jstl-1.2.0.v201105211821.jar
22:                    2.3.2 | ${jetty.home}/lib/jsp/javax.servlet.jsp-2.3.2.jar
23:                    2.3.1 | ${jetty.home}/lib/jsp/javax.servlet.jsp-api-2.3.1.jar
24:                    2.3.3 | ${jetty.home}/lib/jsp/jetty-jsp-jdt-2.3.3.jar
25:      1.2.0.v201112081803 | ${jetty.home}/lib/jsp/org.apache.taglibs.standard.glassfish-1.2.0.v201112081803.jar
26:   3.8.2.v20130121-145325 | ${jetty.home}/lib/jsp/org.eclipse.jdt.core-3.8.2.v20130121.jar
27:               {VERSION} | ${jetty.home}/lib/jetty-plus-{VERSION}.jar
28:               {VERSION} | ${jetty.home}/lib/jetty-webapp-{VERSION}.jar
29:               {VERSION} | ${jetty.home}/lib/jetty-annotations-{VERSION}.jar
30:                      4.1 | ${jetty.home}/lib/annotations/asm-4.1.jar
31:                      4.1 | ${jetty.home}/lib/annotations/asm-commons-4.1.jar
32:                      1.2 | ${jetty.home}/lib/annotations/javax.annotation-api-1.2.jar
33:               {VERSION} | ${jetty.home}/lib/jetty-deploy-{VERSION}.jar
34:                      1.0 | ${jetty.home}/lib/websocket/javax.websocket-api-1.0.jar
35:               {VERSION} | ${jetty.home}/lib/websocket/javax-websocket-client-impl-{VERSION}.jar
36:               {VERSION} | ${jetty.home}/lib/websocket/javax-websocket-server-impl-{VERSION}.jar
37:               {VERSION} | ${jetty.home}/lib/websocket/websocket-api-{VERSION}.jar
38:               {VERSION} | ${jetty.home}/lib/websocket/websocket-client-{VERSION}.jar
39:               {VERSION} | ${jetty.home}/lib/websocket/websocket-common-{VERSION}.jar
40:               {VERSION} | ${jetty.home}/lib/websocket/websocket-server-{VERSION}.jar
41:               {VERSION} | ${jetty.home}/lib/websocket/websocket-servlet-{VERSION}.jar
Of note is that an attempt is made to list the internally declared version of each artifact on the Server Classpath, which can potentially help when diagnosing classpath issues.
Managing Startup Modules
The standard Jetty Distribution ships with several modules defined in ${jetty.home}/modules/.
Modules interact with Jetty XML files to configure options and parameters for the server and are the primary configuration method for Jetty distributions.
Modules allow flexibility for implementations and their plug-and-play nature makes adding or removing server functionality virtually painless.
Enabling Modules
|
The default distribution has a co-mingled |
Enabling a module is a simple process: simply add the --add-to-start=<module-name1>,<module-name2>,…etc. syntax on the command line.
Doing this will enable the specified module and any dependent modules.
An example of this with a new, empty, base directory:
If we try to start the Jetty server with no configuration or modules enabled, it will promptly exit:
[jetty]$ mkdir mybase
[jetty]$ cd mybase
[mybase]$ ls -la
total 0
drwxr-xr-x   2 staff  staff   68 Jul 12 17:29 .
drwxr-xr-x  20 staff  staff  680 Jul 12 17:29 ..

[mybase]$ java -jar $JETTY_HOME/start.jar
WARNING: Nothing to start, exiting ...

Usage: java -jar start.jar [options] [properties] [configs]
       java -jar start.jar --help  # for more information
By using the --list-config parameter to our startup command, we can see that there are no modules enabled and no Jetty XML files are active:
[mybase]$ java -jar $JETTY_HOME/start.jar --list-config

Java Environment:
-----------------
 java.home = /Library/Java/JavaVirtualMachines/jdk1.8.0_92.jdk/Contents/Home/jre
 java.vm.vendor = Oracle Corporation
 java.vm.version = 25.92-b14
 java.vm.name = Java HotSpot(TM) 64-Bit Server VM
 java.vm.info = mixed mode
 java.runtime.name = Java(TM) SE Runtime Environment
 java.runtime.version = 1.8.0_92-b14
 java.io.tmpdir = /var/folders/h6/yb_lbnnn11g0y1jjlvqg631h0000gn/T/
 user.dir = /Users/staff/installs/repository/jetty-distribution-{VERSION}/mybase
 user.language = en
 user.country = US

Jetty Environment:
-----------------
 jetty.version = {VERSION}
 jetty.tag.version = master
 jetty.home = /Users/staff/installs/repository/jetty-distribution-{VERSION}
 jetty.base = /Users/staff/installs/repository/jetty-distribution-{VERSION}/mybase

Config Search Order:
--------------------
 <command-line>
 ${jetty.base} -> /Users/staff/installs/repository/jetty-distribution-{VERSION}/mybase
 ${jetty.home} -> /Users/staff/installs/repository/jetty-distribution-{VERSION}


JVM Arguments:
--------------
 (no jvm args specified)

System Properties:
------------------
 (no system properties specified)

Properties:
-----------
 java.version = 1.8.0_92

Jetty Server Classpath:
-----------------------
No classpath entries and/or version information available show.

Jetty Active XMLs:
------------------
 (no xml files specified)
Let’s try adding some basic support for webapps, with automatic deploy (hot deploy), and a single basic HTTP/1.1 connector.
[mybase]$ java -jar $JETTY_HOME/start.jar --add-to-start=http,webapp,deploy
INFO  : webapp          initialized in ${jetty.base}/start.ini
INFO  : server          transitively enabled, ini template available with --add-to-start=server
INFO  : security        transitively enabled
INFO  : servlet         transitively enabled
INFO  : http            initialized in ${jetty.base}/start.ini
INFO  : deploy          initialized in ${jetty.base}/start.ini
MKDIR : ${jetty.base}/webapps
INFO  : Base directory was modified
This creates the webapps directory in our mybase directory and appended the start.ini file with the ini template arguments from the associated module files.
Additionally, where needed, Jetty enabled any module dependencies.
Now that we have added some modules to our server, let’s run --list-config again to review our new configuration.
[mybase]$ java -jar $JETTY_HOME/start.jar --list-config

Java Environment:
-----------------
 java.home = /Library/Java/JavaVirtualMachines/jdk1.8.0_92.jdk/Contents/Home/jre
 java.vm.vendor = Oracle Corporation
 java.vm.version = 25.92-b14
 java.vm.name = Java HotSpot(TM) 64-Bit Server VM
 java.vm.info = mixed mode
 java.runtime.name = Java(TM) SE Runtime Environment
 java.runtime.version = 1.8.0_92-b14
 java.io.tmpdir = /var/folders/h6/yb_lbnnn11g0y1jjlvqg631h0000gn/T/
 user.dir = /Users/staff/installs/repository/jetty-distribution-{VERSION}/mybase
 user.language = en
 user.country = US

Jetty Environment:
-----------------
 jetty.version = {VERSION}
 jetty.tag.version = master
 jetty.home = /Users/staff/installs/repository/jetty-distribution-{VERSION}
 jetty.base = /Users/staff/installs/repository/jetty-distribution-{VERSION}/mybase

Config Search Order:
--------------------
 <command-line>
 ${jetty.base} -> /Users/staff/installs/repository/jetty-distribution-{VERSION}/mybase
 ${jetty.home} -> /Users/staff/installs/repository/jetty-distribution-{VERSION}


JVM Arguments:
--------------
 (no jvm args specified)

System Properties:
------------------
 (no system properties specified)

Properties:
-----------
 java.version = 1.8.0_92

Jetty Server Classpath:
-----------------------
Version Information on 11 entries in the classpath.
Note: order presented here is how they would appear on the classpath.
      changes to the --module=name command line options will be reflected here.
 0:                    3.1.0 | ${jetty.home}/lib/servlet-api-3.1.jar
 1:                 3.1.0.M0 | ${jetty.home}/lib/jetty-schemas-3.1.jar
 2:           {VERSION} | ${jetty.home}/lib/jetty-http-{VERSION}.jar
 3:           {VERSION} | ${jetty.home}/lib/jetty-server-{VERSION}.jar
 4:           {VERSION} | ${jetty.home}/lib/jetty-xml-{VERSION}.jar
 5:           {VERSION} | ${jetty.home}/lib/jetty-util-{VERSION}.jar
 6:           {VERSION} | ${jetty.home}/lib/jetty-io-{VERSION}.jar
 7:           {VERSION} | ${jetty.home}/lib/jetty-security-{VERSION}.jar
 8:           {VERSION} | ${jetty.home}/lib/jetty-servlet-{VERSION}.jar
 9:           {VERSION} | ${jetty.home}/lib/jetty-webapp-{VERSION}.jar
10:           {VERSION} | ${jetty.home}/lib/jetty-deploy-{VERSION}.jar

Jetty Active XMLs:
------------------
${jetty.home}/etc/jetty.xml
${jetty.home}/etc/jetty-webapp.xml
${jetty.home}/etc/jetty-deploy.xml
${jetty.home}/etc/jetty-http.xml
You now have a configured and functional server, albeit with no webapps deployed.
At this point you can place a webapp (war file) in the mybase/webapps/ directory and and start Jetty.
Start.ini vs. Start.d
In the above example, when a module is activated the contents of that module file are added in ${jetty.base}/start.ini.
As additional modules are added, their contents are appended to this file.
This can be beneficial if you want all of your module configurations in a single file, but for large server instances with lots of modules it can pose a challenge to quickly find and make changes or to remove a module.
As an alternative to a single start.ini file you can opt to house modules in a ${jetty.base}/start.d directory.
Modules activated when a start.d directory exists will be stored as a single file per module.
Below is an example of a fresh ${jetty.base} that will create a start.d directory and activate several modules.
[jetty.home]$ mkdir mybase
[jetty.home]$ cd mybase/
[mybase]$ java -jar ../start.jar --create-startd
INFO : Base directory was modified
[mybase]$ ls -all
total 0
drwxr-xr-x   3 staff  staff  102 Aug 29 15:16 .
drwxr-xr-x@ 26 staff  staff  884 Aug 29 15:16 ..
drwxr-xr-x   6 staff  staff  204 Aug 29 15:19 start.d

[mybase]$ java -jar ../start.jar --add-to-start=server,client,webapp,websocket
INFO : webapp          initialised in ${jetty.base}/start.d/webapp.ini
INFO : server          initialised in ${jetty.base}/start.d/server.ini
INFO : websocket       initialised in ${jetty.base}/start.d/websocket.ini
INFO : client          initialised in ${jetty.base}/start.d/client.ini
INFO : Base directory was modified
[mybase]$ cd start.d/
[mybase]$ ls -all
total 32
drwxr-xr-x  6 staff  staff   204 Aug 29 15:19 .
drwxr-xr-x  3 staff  staff   102 Aug 29 15:16 ..
-rw-r--r--  1 staff  staff   175 Aug 29 15:19 client.ini
-rw-r--r--  1 staff  staff  2250 Aug 29 15:19 server.ini
-rw-r--r--  1 staff  staff   265 Aug 29 15:19 webapp.ini
-rw-r--r--  1 staff  staff   177 Aug 29 15:19 websocket.ini
In the example, we first create a new ${jetty.base} and then create the start.d directory with the --create-startd command.
Next, we use the --add-to-start command which activates the modules and creates their respective ini files in the start.d directory.
If you have an existing start.ini file but would like to use the start.d structure for additional modules, you can use the --create-startd command as well.
Doing this will create the start.d directory and copy your existing start.ini file in to it.
Any new modules added to the server will have their own <module name>.ini file created in the start.d directory.
[mybase]$ java -jar ../start.jar --add-to-start=server,client,webapp,websocket
INFO : webapp          initialised in ${jetty.base}/start.ini
INFO : server          initialised in ${jetty.base}/start.ini
INFO : websocket       initialised in ${jetty.base}/start.ini
INFO : client          initialised in ${jetty.base}/start.ini
INFO : Base directory was modified

[mybase]$ java -jar ../start.jar --create-startd
INFO : Base directory was modified
[mybase]$ tree
.
└── start.d
    └── start.ini

[mybase]$ java -jar ../start.jar --add-to-start=ssl
INFO : ssl             initialised in ${jetty.base}/start.d/ssl.ini
INFO : Base directory was modified
[mybase]$ tree
.
├── etc
│   └── keystore
└── start.d
    ├── ssl.ini
└── start.ini|
It is not recommended to use both a |
Configuring Modules
Once a module has been enabled for the server, it can be further configured to meet your needs.
This is done by editing the associated ini file for the module.
If your server setup is using a centralized ini configuration, you will edit the ${jetty.base}/server.ini file.
If you have elected to manage each module within it’s own ini file, you can find these files in the ${jetty.base}/start.d directory.
|
It is important that you do not modify the module files in the |
When a module is activated, a number of properties are set by default. To view these defaults, open up the associated ini file. Listed in the ini file is the associated module file and any properties that can be set.
Below is an example of the requestlog.ini file:
# ---------------------------------------
# Module: requestlog
--module=requestlog

## Logging directory (relative to $jetty.base)
# jetty.requestlog.dir=logs

## File path
# jetty.requestlog.filePath=${jetty.requestlog.dir}/yyyy_mm_dd.request.log

## Date format for rollovered files (uses SimpleDateFormat syntax)
# jetty.requestlog.filenameDateFormat=yyyy_MM_dd

## How many days to retain old log files
# jetty.requestlog.retainDays=90

## Whether to append to existing file
# jetty.requestlog.append=true

## Whether to use the extended log output
# jetty.requestlog.extended=true

## Whether to log http cookie information
# jetty.requestlog.cookies=true

## Timezone of the log entries
# jetty.requestlog.timezone=GMT

## Whether to log LogLatency
# jetty.requestlog.loglatency=false
The first lines name the module file being called (located in {$jetty.home/modules}).
Subsequent lines list properties that can be changed as well as a description for each property.
To edit a property, first un-comment the line by deleting the # at the start of the line, then make the change after = sign (such as changing a true value to false).
Disabling Modules
Disabling a module is an easy process.
To disable a module, comment out the --module= line in the associated ini file.
Deleting the ini file associated with module is another option, but may not be practical in all situations.
Listing Available and Active Modules
To see which modules are available, use the --list-modules command line argument.
This command will also show you which modules are enabled.
Modules are sorted by the value in the [tags] section of the associated .mod file.
If there are multiple entries in the [tags] section, it sorts by the first tag in the list.
|
By default, the |
Here’s an example of the --list-modules command:
[mybase]$ java -jar ../start.jar --list-modules

Available Modules:
==================
tags: [-internal]

Modules for tag '*':
--------------------

     Module: alpn
           : Enables the ALPN (Application Layer Protocol Negotiation) TLS extension.
     Depend: ssl, alpn-impl
        LIB: lib/jetty-alpn-client-${jetty.version}.jar
        LIB: lib/jetty-alpn-server-${jetty.version}.jar
        XML: etc/jetty-alpn.xml

     Module: alpn-impl
           : Selects an ALPN (Application Layer Protocol Negotiation) implementation by java version.
     Depend: alpn-impl/alpn-${java.version.platform}

     Module: annotations
           : Enables Annotation scanning for deployed webapplications.
     Depend: plus
        LIB: lib/jetty-annotations-${jetty.version}.jar
        LIB: lib/annotations/*.jar
        XML: etc/jetty-annotations.xml
    Enabled: ${jetty.base}\start.d\annotations.ini

     Module: apache-jsp
           : Enables use of the apache implementation of JSP
        LIB: lib/apache-jsp/*.jar
    Enabled: transitive provider of apache-jsp for jsp

     Module: apache-jstl
           : Enables the apache version of JSTL
        LIB: lib/apache-jstl/*.jar
    Enabled: transitive provider of apache-jstl for jstl

     Module: cdi2
           : Jetty setup to support Weld/CDI2 with WELD inside the webapp
     Depend: deploy
        XML: etc/cdi2/jetty-cdi2.xml

     Module: client
           : Adds the Jetty HTTP client to the server classpath.
        LIB: lib/jetty-client-${jetty.version}.jar
    Enabled: ${jetty.base}\start.d\client.ini

     Module: continuation
           : Enables support for Continuation style asynchronous
           : Servlets.  Now deprecated in favour of Servlet 3.1
           : API
        LIB: lib/jetty-continuation-${jetty.version}.jar
    Enabled: ${jetty.base}\start.d\continuation.ini

     Module: deploy
           : Enables webapplication deployment from the webapps directory.
     Depend: webapp
        LIB: lib/jetty-deploy-${jetty.version}.jar
        XML: etc/jetty-deploy.xml
    Enabled: ${jetty.base}\start.d\deploy.ini

     Module: fcgi
           : Adds the FastCGI implementation to the classpath.
     Depend: servlet, client
        LIB: lib/jetty-proxy-${jetty.version}.jar
        LIB: lib/fcgi/*.jar

     Module: flight-recorder
     Depend: server
        JVM: -XX:+UnlockCommercialFeatures
        JVM: -XX:+FlightRecorder

     Module: global-webapp-common
           : Enables Deployer to apply common configuration to all webapp deployments
     Depend: deploy
        XML: etc/global-webapp-common.xml

     Module: hazelcast-embedded-sessions
     Depend: annotations, webapp
        LIB: lib/hazelcast/*.jar
        XML: etc/sessions/hazelcast/default.xml

     Module: hazelcast-remote-sessions
     Depend: annotations, webapp
        LIB: lib/hazelcast/*.jar
        XML: etc/sessions/hazelcast/remote.xml

     Module: home-base-warning
           : Generates a warning that server has been run from $JETTY_HOME
           : rather than from a $JETTY_BASE.
        XML: etc/home-base-warning.xml

     Module: jaas
           : Enable JAAS for deployed webapplications.
     Depend: server
        LIB: lib/jetty-jaas-${jetty.version}.jar
        XML: etc/jetty-jaas.xml
    Enabled: ${jetty.base}\start.d\demo.ini

     Module: jaspi
           : Enable JASPI authentication for deployed webapplications.
     Depend: security
        LIB: lib/jetty-jaspi-${jetty.version}.jar
        LIB: lib/jaspi/*.jar

     Module: jmx
           : Enables JMX instrumentation for server beans and
           : enables JMX agent.
     Depend: server
        LIB: lib/jetty-jmx-${jetty.version}.jar
        XML: etc/jetty-jmx.xml

     Module: jmx-remote
           : Enables remote RMI access to JMX
     Depend: jmx
        XML: etc/jetty-jmx-remote.xml

     Module: jndi
           : Adds the Jetty JNDI implementation to the classpath.
     Depend: server, mail
        LIB: lib/jetty-jndi-${jetty.version}.jar
        LIB: lib/jndi/*.jar
    Enabled: ${jetty.base}\start.d\jndi.ini

     Module: jsp
           : Enables JSP for all webapplications deployed on the server.
     Depend: servlet, annotations, apache-jsp
    Enabled: ${jetty.base}\start.d\jsp.ini

     Module: jstl
           : Enables JSTL for all webapplications deployed on the server
     Depend: jsp, apache-jstl
    Enabled: ${jetty.base}\start.d\jstl.ini

     Module: jvm
           : A noop module that creates an ini template useful for
           : setting JVM arguments (eg -Xmx )

     Module: lowresources
           : Enables a low resource monitor on the server
           : that can take actions if threads and/or connections
           : cross configured threshholds.
     Depend: server
        XML: etc/jetty-lowresources.xml

     Module: mail
           : Adds the javax.mail implementation to the classpath.
        LIB: lib/mail/*.jar
    Enabled: transitive provider of mail for jndi

     Module: plus
           : Enables JNDI and resource injection for webapplications
           : and other servlet 3.x features not supported in the core
           : jetty webapps module.
     Depend: server, security, jndi, webapp, transactions
        LIB: lib/jetty-plus-${jetty.version}.jar
        XML: etc/jetty-plus.xml
    Enabled: transitive provider of plus for annotations

     Module: proxy
           : Enable the Jetty Proxy, that allows the server to act
           : as a non-transparent proxy for browsers.
     Depend: servlet, client
        LIB: lib/jetty-proxy-${jetty.version}.jar
        XML: etc/jetty-proxy.xml

     Module: proxy-protocol
           : Enables the Proxy Protocol on the HTTP Connector.
           : http://www.haproxy.org/download/1.5/doc/proxy-protocol.txt
           : This allows a proxy operating in TCP mode to
           : transport details of the proxied connection to
           : the server.
           : Both V1 and V2 versions of the protocol are supported.
     Depend: http
        XML: etc/jetty-proxy-protocol.xml

     Module: quickstart
           : Enables the Jetty Quickstart module for rapid
           : deployment of preconfigured webapplications.
     Depend: server, plus, annotations
        LIB: lib/jetty-quickstart-${jetty.version}.jar

     Module: rewrite
           : Enables the jetty-rewrite handler.  Specific rewrite
           : rules must be added to either to etc/jetty-rewrite.xml or a custom xml/module
     Depend: server
        LIB: lib/jetty-rewrite-${jetty.version}.jar
        XML: etc/jetty-rewrite.xml
    Enabled: ${jetty.base}\start.d\demo.ini

     Module: rewrite-compactpath
           : Add a rule to the rewrite module to compact paths so that double slashes
           : in the path are treated as a single slash.
     Depend: rewrite
        XML: etc/rewrite-compactpath.xml

     Module: rewrite-customizer [rewrite]
           : Enables a rewrite Rules container as a request customizer on
           : the servers default HttpConfiguration instance
     Depend: server
        LIB: lib/jetty-rewrite-${jetty.version}.jar
        XML: etc/jetty-rewrite-customizer.xml

     Module: security
           : Adds servlet standard security handling to the classpath.
     Depend: server
        LIB: lib/jetty-security-${jetty.version}.jar
    Enabled: transitive provider of security for webapp
    Enabled: transitive provider of security for plus

     Module: server
           : Enables the core Jetty server on the classpath.
     Depend: threadpool
   Optional: jvm, ext, resources, logging
        LIB: lib/servlet-api-3.1.jar
        LIB: lib/jetty-schemas-3.1.jar
        LIB: lib/jetty-http-${jetty.version}.jar
        LIB: lib/jetty-server-${jetty.version}.jar
        LIB: lib/jetty-xml-${jetty.version}.jar
        LIB: lib/jetty-util-${jetty.version}.jar
        LIB: lib/jetty-io-${jetty.version}.jar
        XML: etc/jetty.xml
    Enabled: ${jetty.base}\start.d\server.ini

     Module: servlet
           : Enables standard Servlet handling.
     Depend: server
        LIB: lib/jetty-servlet-${jetty.version}.jar
    Enabled: transitive provider of servlet for webapp
    Enabled: transitive provider of servlet for servlets
    Enabled: transitive provider of servlet for jsp

     Module: servlets
           : Puts a collection of jetty utility servlets and filters
           : on the server classpath (CGI, CrossOriginFilter, DosFilter,
           : MultiPartFilter, PushCacheFilter, QoSFilter, etc.) for
           : use by all webapplications.
     Depend: servlet
        LIB: lib/jetty-servlets-${jetty.version}.jar
    Enabled: ${jetty.base}\start.d\servlets.ini

     Module: setuid
           : Enables the unix setUID configuration so that the server
           : may be started as root to open privileged ports/files before
           : changing to a restricted user (eg jetty).
     Depend: server
        LIB: lib/setuid/jetty-setuid-java-1.0.3.jar
        XML: etc/jetty-setuid.xml

     Module: spring
           : Enable spring configuration processing so all jetty style
           : xml files can optionally be written as spring beans
     Depend: server
        LIB: lib/spring/*.jar

     Module: stop
           : This module causes jetty to stop immediately after starting. This is good for testing configuration and/or precompiling quickstart webapps
        XML: etc/jetty-stop.xml

     Module: threadpool
           : Enables the Server thread pool.
        XML: etc/jetty-threadpool.xml
    Enabled: ${jetty.base}\start.d\threadpool.ini

     Module: transactions
           : Puts javax.transaction api on the classpath
        LIB: lib/transactions/*.jar
    Enabled: transitive provider of transactions for plus

     Module: webapp
           : Adds support for servlet specification webapplication to the server
           : classpath.  Without this, only Jetty specific handlers may be deployed.
     Depend: servlet, security
        LIB: lib/jetty-webapp-${jetty.version}.jar
        XML: etc/jetty-webapp.xml
    Enabled: transitive provider of webapp for plus
    Enabled: transitive provider of webapp for deploy

     Module: websocket
           : Enable websockets for deployed web applications
     Depend: client, annotations
        LIB: lib/websocket/*.jar
    Enabled: ${jetty.base}\start.d\demo.ini

Modules for tag '3rdparty':
---------------------------

     Module: conscrypt [alpn-impl]
           : Installs the Conscrypt JSSE provider
       Tags: 3rdparty
     Depend: ssl
        LIB: lib/conscrypt/**.jar
        LIB: lib/jetty-alpn-conscrypt-server-${jetty.version}.jar
        XML: etc/conscrypt.xml

     Module: gcloud
           : Control GCloud API classpath
       Tags: 3rdparty, gcloud
        LIB: lib/gcloud/*.jar

     Module: gcloud-datastore
           : Enables GCloud Datastore API and implementation
       Tags: 3rdparty, gcloud
     Depend: gcloud, jcl-slf4j, jul-impl

     Module: hawtio
           : Deploys the Hawtio console as a webapplication.
       Tags: 3rdparty
     Depend: stats, deploy, jmx
        XML: etc/hawtio.xml

     Module: jamon
           : Deploys the JAMon webapplication
       Tags: 3rdparty
     Depend: stats, deploy, jmx, jsp
        LIB: lib/jamon/**.jar
        XML: etc/jamon.xml

     Module: jminix
           : Deploys the Jminix JMX Console within the server
       Tags: 3rdparty
     Depend: stats, jmx, jcl-api, jcl-impl
        LIB: lib/jminix/**.jar
        XML: etc/jminix.xml

     Module: jolokia
           : Deploys the Jolokia console as a web application.
       Tags: 3rdparty
     Depend: stats, deploy, jmx
        XML: etc/jolokia.xml

Modules for tag 'classpath':
----------------------------

     Module: ext
           : Adds all jar files discovered in $JETTY_HOME/lib/ext
           : and $JETTY_BASE/lib/ext to the servers classpath.
       Tags: classpath
        LIB: lib/ext/**.jar
    Enabled: ${jetty.base}\start.d\ext.ini

     Module: resources
           : Adds the $JETTY_HOME/resources and/or $JETTY_BASE/resources
           : directory to the server classpath. Useful for configuration
           : property files (eg jetty-logging.properties)
       Tags: classpath
        LIB: resources/
    Enabled: ${jetty.base}\start.d\resources.ini

Modules for tag 'connector':
----------------------------

     Module: acceptratelimit
           : Enable a server wide accept rate limit
       Tags: connector
     Depend: server
        XML: etc/jetty-acceptratelimit.xml

     Module: connectionlimit
           : Enable a server wide connection limit
       Tags: connector
     Depend: server
        XML: etc/jetty-connectionlimit.xml

     Module: http
           : Enables a HTTP connector on the server.
           : By default HTTP/1 is support, but HTTP2C can
           : be added to the connector with the http2c module.
       Tags: connector, http
     Depend: server
        XML: etc/jetty-http.xml
    Enabled: ${jetty.base}\start.d\http.ini

     Module: http-forwarded
           : Adds a forwarded request customizer to the HTTP Connector
           : to process forwarded-for style headers from a proxy.
       Tags: connector
     Depend: http
        XML: etc/jetty-http-forwarded.xml

     Module: http2
           : Enables HTTP2 protocol support on the TLS(SSL) Connector,
           : using the ALPN extension to select which protocol to use.
       Tags: connector, http2, http, ssl
     Depend: ssl, alpn
        LIB: lib/http2/*.jar
        XML: etc/jetty-http2.xml

     Module: http2c
           : Enables the HTTP2C protocol on the HTTP Connector
           : The connector will accept both HTTP/1 and HTTP/2 connections.
       Tags: connector, http2, http
     Depend: http
        LIB: lib/http2/*.jar
        XML: etc/jetty-http2c.xml

     Module: https
           : Adds HTTPS protocol support to the TLS(SSL) Connector
       Tags: connector, https, http, ssl
     Depend: ssl
   Optional: http-forwarded, http2
        XML: etc/jetty-https.xml
    Enabled: ${jetty.base}\start.d\https.ini

     Module: proxy-protocol-ssl
           : Enables the Proxy Protocol on the TLS(SSL) Connector.
           : http://www.haproxy.org/download/1.5/doc/proxy-protocol.txt
           : This allows a Proxy operating in TCP mode to transport
           : details of the proxied connection to the server.
           : Both V1 and V2 versions of the protocol are supported.
       Tags: connector, ssl
     Depend: ssl
        XML: etc/jetty-proxy-protocol-ssl.xml

     Module: ssl
           : Enables a TLS(SSL) Connector on the server.
           : This may be used for HTTPS and/or HTTP2 by enabling
           : the associated support modules.
       Tags: connector, ssl
     Depend: server
        XML: etc/jetty-ssl.xml
        XML: etc/jetty-ssl-context.xml
    Enabled: transitive provider of ssl for https

     Module: unixsocket
           : Enables a Unix Domain Socket Connector that can receive
           : requests from a local proxy and/or SSL offloader (eg haproxy) in either
           : HTTP or TCP mode.  Unix Domain Sockets are more efficient than
           : localhost TCP/IP connections  as they reduce data copies, avoid
           : needless fragmentation and have better dispatch behaviours.
           : When enabled with corresponding support modules, the connector can
           : accept HTTP, HTTPS or HTTP2C traffic.
       Tags: connector
     Depend: server
        LIB: lib/jetty-unixsocket-${jetty.version}.jar
        LIB: lib/jnr/*.jar
        XML: etc/jetty-unixsocket.xml

     Module: unixsocket-forwarded
           : Adds a forwarded request customizer to the HTTP configuration used
           : by the Unix Domain Socket connector, for use when behind a proxy operating
           : in HTTP mode that adds forwarded-for style HTTP headers. Typically this
           : is an alternate to the Proxy Protocol used mostly for TCP mode.
       Tags: connector
     Depend: unixsocket-http
        XML: etc/jetty-unixsocket-forwarded.xml

     Module: unixsocket-http
           : Adds a HTTP protocol support to the Unix Domain Socket connector.
           : It should be used when a proxy is forwarding either HTTP or decrypted
           : HTTPS traffic to the connector and may be used with the
           : unix-socket-http2c modules to upgrade to HTTP/2.
       Tags: connector, http
     Depend: unixsocket
        XML: etc/jetty-unixsocket-http.xml

     Module: unixsocket-http2c
           : Adds a HTTP2C connetion factory to the Unix Domain Socket Connector
           : It can be used when either the proxy forwards direct
           : HTTP/2C (unecrypted) or decrypted HTTP/2 traffic.
       Tags: connector, http2
     Depend: unixsocket-http
        LIB: lib/http2/*.jar
        XML: etc/jetty-unixsocket-http2c.xml

     Module: unixsocket-proxy-protocol
           : Enables the proxy protocol on the Unix Domain Socket Connector
           : http://www.haproxy.org/download/1.5/doc/proxy-protocol.txt
           : This allows information about the proxied connection to be
           : efficiently forwarded as the connection is accepted.
           : Both V1 and V2 versions of the protocol are supported and any
           : SSL properties may be interpreted by the unixsocket-secure
           : module to indicate secure HTTPS traffic. Typically this
           : is an alternate to the forwarded module.
       Tags: connector
     Depend: unixsocket
        XML: etc/jetty-unixsocket-proxy-protocol.xml

     Module: unixsocket-secure
           : Enable a secure request customizer on the HTTP Configuration
           : used by the Unix Domain Socket Connector.
           : This looks for a secure scheme transported either by the
           : unixsocket-forwarded, unixsocket-proxy-protocol or in a
           : HTTP2 request.
       Tags: connector
     Depend: unixsocket-http
        XML: etc/jetty-unixsocket-secure.xml

Modules for tag 'debug':
------------------------

     Module: debug
           : Enables the DebugListener to generate additional
           : logging regarding detailed request handling events.
           : Renames threads to include request URI.
       Tags: debug
     Depend: deploy
        XML: etc/jetty-debug.xml

     Module: debuglog
           : Deprecated Debug Log using the DebugHandle.
           : Replaced with the debug module.
       Tags: debug
     Depend: server
        XML: etc/jetty-debuglog.xml

Modules for tag 'handler':
--------------------------

     Module: gzip
           : Enable GzipHandler for dynamic gzip compression
           : for the entire server.
       Tags: handler
     Depend: server
        XML: etc/jetty-gzip.xml

     Module: ipaccess
           : Enable the ipaccess handler to apply a white/black list
           : control of the remote IP of requests.
       Tags: handler
     Depend: server
        XML: etc/jetty-ipaccess.xml

     Module: stats
           : Enable detailed statistics collection for the server,
           : available via JMX.
       Tags: handler
     Depend: server
        XML: etc/jetty-stats.xml

     Module: threadlimit
       Tags: handler
     Depend: server
        XML: etc/jetty-threadlimit.xml

Modules for tag 'logging':
--------------------------

     Module: console-capture
           : Redirects JVMs console stderr and stdout to a log file,
           : including output from Jetty's default StdErrLog logging.
       Tags: logging
        LIB: resources/
        XML: etc/console-capture.xml

     Module: logging-jetty [logging]
           : Configure jetty logging mechanism.
           : Provides a ${jetty.base}/resources/jetty-logging.properties.
       Tags: logging
     Depend: resources

     Module: logging-jul [logging]
           : Configure jetty logging to use Java Util Logging (jul)
           : SLF4J is used as the core logging mechanism.
       Tags: logging
     Depend: slf4j-jul, jul-impl
        JVM: -Dorg.eclipse.jetty.util.log.class?=org.eclipse.jetty.util.log.Slf4jLog

     Module: logging-log4j [logging]
           : Configure jetty logging to use Log4j Logging
           : SLF4J is used as the core logging mechanism.
       Tags: logging
     Depend: slf4j-log4j, log4j-impl
        JVM: -Dorg.eclipse.jetty.util.log.class?=org.eclipse.jetty.util.log.Slf4jLog

     Module: logging-log4j2 [logging]
           : Configure jetty logging to use log4j version 2
           : SLF4J is used as the core logging mechanism.
       Tags: logging
     Depend: slf4j-log4j2, log4j2-impl
        JVM: -Dorg.eclipse.jetty.util.log.class?=org.eclipse.jetty.util.log.Slf4jLog

     Module: logging-logback [logging]
           : Configure jetty logging to use Logback Logging.
           : SLF4J is used as the core logging mechanism.
       Tags: logging
     Depend: slf4j-logback, logback-impl
        JVM: -Dorg.eclipse.jetty.util.log.class?=org.eclipse.jetty.util.log.Slf4jLog

     Module: logging-slf4j [logging]
           : Configure jetty logging to use slf4j.
           : Any slf4j-impl implementation is used
       Tags: logging
     Depend: slf4j-api, slf4j-impl
        JVM: -Dorg.eclipse.jetty.util.log.class?=org.eclipse.jetty.util.log.Slf4jLog

Modules for tag 'requestlog':
-----------------------------

     Module: logback-access [requestlog]
           : Enables logback request log.
       Tags: requestlog, logging, logback
     Depend: server, logback-impl, resources
        LIB: lib/logback/logback-access-${logback.version}.jar
        XML: etc/jetty-logback-access.xml

     Module: requestlog
           : Enables a NCSA style request log.
       Tags: requestlog
     Depend: server
        XML: etc/jetty-requestlog.xml

Modules for tag 'session':
--------------------------

     Module: session-cache-hash [session-cache]
           : Enable first level session cache in ConcurrentHashMap.
           : If not enabled, sessions will use a HashSessionCache by default, so enabling
           : via this module is only needed if the configuration properties need to be
           : changed.
       Tags: session
     Depend: sessions
        XML: etc/sessions/session-cache-hash.xml

     Module: session-cache-null [session-cache]
           : A trivial SessionCache that does not actually cache sessions.
       Tags: session
     Depend: sessions
        XML: etc/sessions/session-cache-null.xml

     Module: session-store-cache
           : Enables caching of SessionData in front of a SessionDataStore.
       Tags: session
     Depend: session-store, sessions/session-data-cache/${session-data-cache}
        XML: etc/sessions/session-data-cache/session-caching-store.xml

     Module: session-store-file [session-store]
           : Enables session persistent storage in files.
       Tags: session
     Depend: sessions
        XML: etc/sessions/file/session-store.xml

     Module: session-store-gcloud [session-store]
           : Enables GCloudDatastore session management.
       Tags: session, gcloud
     Depend: gcloud-datastore, annotations, webapp, sessions
        LIB: lib/jetty-gcloud-session-manager-${jetty.version}.jar
        XML: etc/sessions/gcloud/session-store.xml

     Module: session-store-hazelcast-embedded [session-store]
           : Enables session data store in an embedded Hazelcast Map
       Tags: session
     Depend: sessions
        LIB: lib/jetty-hazelcast-${jetty.version}.jar
        LIB: lib/hazelcast/*.jar
        XML: etc/sessions/hazelcast/default.xml

     Module: session-store-hazelcast-remote [session-store]
           : Enables session data store in a remote Hazelcast Map
       Tags: session
     Depend: sessions
        LIB: lib/jetty-hazelcast-${jetty.version}.jar
        LIB: lib/hazelcast/*.jar
        XML: etc/sessions/hazelcast/remote.xml

     Module: session-store-infinispan-embedded [session-store-infnispan-embedded, session-store]
           : Enables session data store in a local Infinispan cache
       Tags: session
     Depend: sessions
        LIB: lib/jetty-infinispan-${jetty.version}.jar
        LIB: lib/infinispan/*.jar
        XML: etc/sessions/infinispan/default.xml

     Module: session-store-infinispan-embedded-910 [session-store-infinispan-embedded, session-store]
           : Enables session data store in a local Infinispan cache
       Tags: session
     Depend: sessions
        LIB: lib/jetty-infinispan-${jetty.version}.jar
        LIB: lib/infinispan/*.jar
        XML: etc/sessions/infinispan/default.xml

     Module: session-store-infinispan-remote [session-store]
           : Enables session data store in a remote Infinispan cache
       Tags: session
     Depend: sessions
        LIB: lib/jetty-infinispan-${jetty.version}.jar
        LIB: lib/infinispan/*.jar
        XML: etc/sessions/infinispan/remote.xml

     Module: session-store-infinispan-remote-910 [session-store-infinispan-remote, session-store]
           : Enables session data store in a remote Infinispan cache
       Tags: session
     Depend: sessions
        LIB: lib/jetty-infinispan-${jetty.version}.jar
        LIB: lib/infinispan/*.jar
        XML: etc/sessions/infinispan/remote.xml

     Module: session-store-jdbc [session-store]
           : Enables JDBC persistent/distributed session storage.
       Tags: session
     Depend: sessions, sessions/jdbc/${db-connection-type}
        XML: etc/sessions/jdbc/session-store.xml

     Module: session-store-mongo [session-store]
           : Enables NoSql session management with a MongoDB driver.
       Tags: session
     Depend: sessions, sessions/mongo/${connection-type}
        LIB: lib/jetty-nosql-${jetty.version}.jar
        LIB: lib/nosql/*.jar

     Module: sessions
           : The session management. By enabling this module, it allows
           : session management to be configured via the ini templates
           : created or by enabling other session-cache or session-store
           : modules.  Without this module enabled, the server may still
           : use sessions, but their management cannot be configured.
       Tags: session
     Depend: server
        XML: etc/sessions/id-manager.xml
Searching Modules
Since the introduction of the module system, many new modules have been added.
As a result, looking at the module list as a whole can be somewhat overwhelming.
To narrow down which modules you would like to choose from, you can search by values listed under the [tags] section.
Note that when you search this way, all modules that include your criteria in it’s [tags] section, including internal modules, will be shown.
To filter out internal modules when searching a specific module tag, simply add -internal to the command line.
For example, if you wanted to look at only the logging modules (excluding the internal implementation modules), you would use --list-modules=logging,-internal.
[mybase]$ java -jar $JETTY_HOME/start.jar --list-modules=logging,-internal

Available Modules:
==================
tags: [logging, -internal]

Modules for tag 'logging':
--------------------------

     Module: console-capture
           : Redirects JVMs console stderr and stdout to a log file,
           : including output from Jetty's default StdErrLog logging.
       Tags: logging
        LIB: resources/
        XML: etc/console-capture.xml

     Module: logging-jcl [logging]
           : Configure jetty logging to use Java Commons Logging (jcl)
           : SLF4J is used as the core logging mechanism.
       Tags: logging
     Depend: jcl-impl, slf4j-jcl
        JVM: -Dorg.eclipse.jetty.util.log.class=org.eclipse.jetty.util.log.Slf4jLog

     Module: logging-jetty [logging]
           : Configure jetty logging mechanism.
           : Provides a ${jetty.base}/resources/jetty-logging.properties.
       Tags: logging
     Depend: console-capture, resources

     Module: logging-jul [logging]
           : Configure jetty logging to use Java Util Logging (jul)
           : SLF4J is used as the core logging mechanism.
       Tags: logging
     Depend: jul-impl, slf4j-jul
        JVM: -Dorg.eclipse.jetty.util.log.class=org.eclipse.jetty.util.log.Slf4jLog

     Module: logging-log4j [logging]
           : Configure jetty logging to use Log4j Logging
           : SLF4J is used as the core logging mechanism.
       Tags: logging
     Depend: log4j-impl, slf4j-log4j
        JVM: -Dorg.eclipse.jetty.util.log.class=org.eclipse.jetty.util.log.Slf4jLog

     Module: logging-log4j2 [logging]
           : Configure jetty logging to use log4j version 2
           : SLF4J is used as the core logging mechanism.
       Tags: logging
     Depend: slf4j-log4j2, log4j2-impl
        JVM: -Dorg.eclipse.jetty.util.log.class=org.eclipse.jetty.util.log.Slf4jLog

     Module: logging-logback [logging]
           : Configure jetty logging to use Logback Logging.
           : SLF4J is used as the core logging mechanism.
       Tags: logging
     Depend: logback-impl, slf4j-logback
        JVM: -Dorg.eclipse.jetty.util.log.class=org.eclipse.jetty.util.log.Slf4jLog

     Module: logging-slf4j [logging]
           : Configure jetty logging to use slf4j.
           : Any slf4j-impl implementation is used
       Tags: logging
     Depend: slf4j-api, slf4j-impl
        JVM: -Dorg.eclipse.jetty.util.log.class=org.eclipse.jetty.util.log.Slf4jLog

Modules for tag 'requestlog':
-----------------------------

     Module: logback-access [requestlog]
           : Enables logback request log.
       Tags: requestlog, logging, logback
     Depend: server, logback-core, resources
        LIB: lib/logback/logback-access-${logback.version}.jar
        XML: etc/jetty-logback-access.xml
Custom Modules
In addition to the modules that come packaged with the Jetty distribution, users are able to create and define their own custom modules for use with their Jetty implementation. Custom modules can be used for a number of reasons - they can extend features in Jetty, add new features, manage additional libraries available to the server…etc.
At the heart of a Jetty module is the {name}.mod file itself.
A jetty .mod file defines the following:
|
It is important to note that when creating your own module, none of these sections are required - simply use those which are applicable to your implementation. |
- Module Description -
[description] -
The description of the module. This will be showing when viewing the
.modfile itself or using the--list-modulescommand. - List of Dependent Modules -
[depend] -
All modules can declare that they depend on other modules with the
[depend]section. The list of dependencies is used to transitively resolve other modules that are deemed to be required based on the modules that you activate. The order of modules defined in the graph of active modules is used to determine various execution order for configuration, such as Jetty IoC XML configurations, and to resolve conflicting property declarations.- Optional Modules -
[optional] -
Of note: there is a special section
[optional]used to describe structurally dependent modules that are not technically required, but might be of use to your specific configuration.
- Optional Modules -
- List of Libraries -
[lib] -
Modules can optionally declare that they have libraries that they need to function properly. The
[lib]section declares a set of pathnames that follow the Jetty Base and Jetty Home path resolution rules. - List of Jetty IoC XML Configurations -
[xml] -
A Module can optionally declare a list of Jetty IoC XML configurations used to wire up the functionality that this module defines. The
[xml]section declares a set of pathnames that follow the Jetty Base and Jetty Home path resolution rules. Ideally, all XML files are parameterized to accept properties to configure the various elements of the standard configuration. Allowing for a simplified configuration of Jetty for the vast majority of deployments. The execution order of the Jetty IoC XML configurations is determined by the graph of active module dependencies resolved via the[depend]sections. If the default XML is not sufficient to satisfy your needs, you can override this XML by making your own in the${jetty.base}/etc/directory, with the same name. The resolution steps for Jetty Base and Jetty Home will ensure that your copy from${jetty.base}will be picked up over the default one in${jetty.home}. - List of Module Tags -
[tags] -
For ease of sorting, modules can be assigned tags. When using the
--list-modulescommand, modules will be groups by the first tag that exists in this section. Modules can also be listed specifically by these tags using--list-modules=<tag name>on the command line. - Ini Variables -
[ini] -
The
[ini]section is used to add or change server parameters at startup. The[ini]section can also include a the path of a file or several files which should be made available to the server only. This is helpful when you want to control what jars are available to deployed webapps. - Jetty INI Template -
[ini-template] -
Each module can optionally declare a startup ini template that is used to insert/append/inject sample configuration elements into the
start.iniorstart.d/*.inifiles when using the--add-to-start=<name>command line argument instart.jar. Commonly used to present some of the parameterized property options from the Jetty IoC XML configuration files also referenced in the same module. - Required Files and Directories -
[files] -
If the activation of a module requires some paths to exist, the
[files]section defines them. There are 2 modes of operation of the entries in this section.- Ensure Directory Exists
-
If you add a pathname that ends in
"/"(slash), such as"webapps/", then that directory will be created if it does not yet exist in${jetty.base}/<pathname>(eg:"webapps/"will result in${jetty.base}/webapps/being created). - Download File
-
There is a special syntax to allow you to download a file into a specific location if it doesn’t exist yet:
<url>:<pathname>. Currently, the<url>must be ahttp://scheme URL (please let us know if you need more schemes supported). The<pathname>portion follows the Jetty Base and Jetty Home path resolution rules. Example:http://repo.corp.com/maven/corp-security-policy-1.0.jar:lib/corp-security-policy.jarThis will check for the existence oflib/corp-security-policy.jar, and if it doesn’t exist, it will download the jar file fromhttp://repo.corp.com/maven/corp-security-policy-1.0.jar
- Licenses -
[license] -
If you are implementing a software/technology that has a license, it’s text can be placed here. When a user attempts to activate the module they will be asked if they accept the license agreement. If a user does not accept the license agreement, the module will not be activated.
- Additional Startup Commands -
[exec] -
The
[exec]section is used to define additional parameters specific to the module. These commands are added to the server startup. - JPMS Module-Path Definitions -
[jpms] -
The
[jpms]section is used to add JPMS modules to the module-path for startup when using the--jpmscommand.
Module Properties
Properties are used to parameterize:
-
XML files using the
<Property name="pname"/>element -
Module files using the
${pname}syntax
Properties and System Properties may be set on the command line, in a ini file or in a [ini] section of a module using the following syntax.
name=value-
Set a property that can be expanded in XML files with the <Property> element.
name+=value-
Append value to an existing property value.
name+=,value-
Append value to an existing property value, using a comma separator if needed.
name?=value-
Set a property only if it is not already set.
If any of the previous formats is preceded by -D, then a system property is set as well as a start property.
Location of Modules
Jetty comes with dozens of modules as part of the distribution package.
By default these are located in the ${JETTY_HOME}/modules directory.
These modules should not be modified.
In the unlikely circumstance you need to make changes to a stock module, copy it to your ${JETTY_BASE} in a modules directory.
Custom modules should also be maintained separately as part of the ${JETTY_BASE}/modules directory, though you can optionally place them in ${JETTY_HOME}/modules for convenience if you have several {$JETTY_BASE} locations in your implementation.
Creating Custom Modules
As shown above, there are several options that can be utilized when creating custom module files. This may seem daunting, but the good news is that creating custom modules is actually quite easy.
For example, here is a look at the http.mod file which defines parameters for enabling HTTP features for the server:
# DO NOT EDIT - See: https://www.eclipse.org/jetty/documentation/current/startup-modules.html

[description]
Enables an HTTP connector on the server.
By default HTTP/1 is support, but HTTP2C can
be added to the connector with the http2c module.

[tags]
connector
http

[depend]
server

[xml]
etc/jetty-http.xml

[ini-template]
### HTTP Connector Configuration

## Connector host/address to bind to
# jetty.http.host=0.0.0.0

## Connector port to listen on
# jetty.http.port=8080

## Connector idle timeout in milliseconds
# jetty.http.idleTimeout=30000

## Number of acceptors (-1 picks default based on number of cores)
# jetty.http.acceptors=-1

## Number of selectors (-1 picks default based on number of cores)
# jetty.http.selectors=-1

## ServerSocketChannel backlog (0 picks platform default)
# jetty.http.acceptQueueSize=0

## Thread priority delta to give to acceptor threads
# jetty.http.acceptorPriorityDelta=0

## The requested maximum length of the queue of incoming connections.
# jetty.http.acceptQueueSize=0

## Enable/disable the SO_REUSEADDR socket option.
# jetty.http.reuseAddress=true

## Enable/disable TCP_NODELAY on accepted sockets.
# jetty.http.acceptedTcpNoDelay=true

## The SO_RCVBUF option to set on accepted sockets. A value of -1 indicates that it is left to its default value.
# jetty.http.acceptedReceiveBufferSize=-1

## The SO_SNDBUF option to set on accepted sockets. A value of -1 indicates that it is left to its default value.
# jetty.http.acceptedSendBufferSize=-1

## Connect Timeout in milliseconds
# jetty.http.connectTimeout=15000

## HTTP Compliance: RFC7230, RFC7230_LEGACY, RFC2616, RFC2616_LEGACY, LEGACY or CUSTOMn
# jetty.http.compliance=RFC7230_LEGACY
You’ll notice that the http.mod file only includes a handful of the possible sections available - [description], [tags], [depend], [xml], and [ini-template].
When configuring your own modules, you are free to pick and choose what you include.
As an example, below is a module file that defines a custom XML and lib, and activates a number of additional modules. A module like this could be used to enable a set of standard modules and resources for a new JETTY_BASE without having to define them all manually.
[description]
Enables the standard set of modules and resources for ACME Corp servers.

[tags]
core

[depend]
server
client
http
http2
jsp
console-capture
requestlog
stats
gzip
deploy
jmx

[files]
basehome:modules/acme/acme.xml|etc/acme.xml

[lib]
lib/acme/ACMECustom.jar
Activating this module will activate all the dependent modules, create any required directories and copy in any required files:
java -jar ../start.jar --add-to-start=acme
ALERT: There are enabled module(s) with licenses.
The following 1 module(s):
+ contains software not provided by the Eclipse Foundation!
+ contains software not covered by the Eclipse Public License!
+ has not been audited for compliance with its license
Module: alpn-impl/alpn-8
+ ALPN is a hosted at github under the GPL v2 with ClassPath Exception.
+ ALPN replaces/modifies OpenJDK classes in the sun.security.ssl package.
+ http://github.com/jetty-project/jetty-alpn
+ http://openjdk.java.net/legal/gplv2+ce.html
Proceed (y/N)? y
INFO : webapp transitively enabled, ini template available with --add-to-start=webapp
INFO : server transitively enabled, ini template available with --add-to-start=server
INFO : requestlog transitively enabled, ini template available with --add-to-start=requestlog
INFO : alpn transitively enabled, ini template available with --add-to-start=alpn
INFO : jsp transitively enabled
INFO : servlet transitively enabled
INFO : alpn-impl/alpn-8 dynamic dependency of alpn
INFO : annotations transitively enabled
INFO : gzip transitively enabled, ini template available with --add-to-start=gzip
INFO : ssl transitively enabled, ini template available with --add-to-start=ssl
INFO : plus transitively enabled
INFO : deploy transitively enabled, ini template available with --add-to-start=deploy
INFO : alpn-impl/alpn-1.8.0_92 dynamic dependency of alpn-impl/alpn-8
INFO : security transitively enabled
INFO : jmx transitively enabled
INFO : apache-jsp transitively enabled
INFO : stats transitively enabled, ini template available with --add-to-start=stats
INFO : acme initialized in ${jetty.base}/start.d/acme.ini
INFO : jndi transitively enabled
INFO : console-capture transitively enabled, ini template available with --add-to-start=console-capture
INFO : client transitively enabled
INFO : http transitively enabled, ini template available with --add-to-start=http
INFO : http2 transitively enabled, ini template available with --add-to-start=http2
MKDIR : ${jetty.base}/logs
MKDIR : ${jetty.base}/lib
MKDIR : ${jetty.base}/lib/alpn
MKDIR : ${jetty.base}/etc
COPY : ${jetty.home}/modules/ssl/keystore to ${jetty.base}/etc/keystore
MKDIR : ${jetty.base}/webapps
DOWNLD: https://repo1.maven.org/maven2/org/mortbay/jetty/alpn/alpn-boot/8.1.8.v20160420/alpn-boot-8.1.8.v20160420.jar to ${jetty.base}/lib/alpn/alpn-boot-8.1.8.v20160420.jar
COPY : ${jetty.home}/modules/acme/acme.xml to ${jetty.base}/etc/acme.xml
INFO : Base directory was modifiedDependencies
When dependent modules are enabled, they are done so transitively by default.
This means that any ini files for dependent modules are not created in the ${JETTY_BASE}/start.d directory (or added to ${JETTY_BASE}/start.ini) and are as such not configurable.
For Jetty to create/add the ini-template parameters to start.d or start.ini the associated module must be enabled explicitly.
For example, if I activate the http module, it will be enabled, and the server module will be enabled transitively:
$ java -jar ../start.jar --add-to-start=http
INFO : server transitively enabled, ini template available with --add-to-start=server
INFO : http initialized in ${jetty.base}/start.d/http.ini
INFO : Base directory was modifiedYou’ll notice that Jetty informs you of what modules were enabled, and where there associated ini files are located (when applicable).
It also tells the user what command they would need to run to enable any missing or desired ini files for the selected modules, in this case --add-to-start=server.
$ java -jar ../start.jar --add-to-start=server
INFO : server initialized in ${jetty.base}/start.d/server.ini
INFO : Base directory was modified|
It is important to keep in mind that when activating a dependency, Jetty does not just go one layer down. If a dependent module also has dependencies they too will be enabled. |
Managing XML Based Startup Configuration
When you see XML files on the command line for startup of Jetty, they are always part of the Jetty IoC Configuration mechanism.
Internally, Jetty uses these XML files to build up Jetty with the features that you wan to use.
The module mechanism present in Jetty determines the load order of the XML files.
The Jetty Base and Jetty Home resolution logic also applies, which allows you to override a XML file declared by a module with your XML by simply having the same named XML in your ${jetty.base}/etc directory location.
Startup a Unix Service using jetty.sh
The standalone Jetty distribution ships with a bin/jetty.sh script that can be used by various Unix distros (including OSX) to manage Jetty as a startup service.
This script is suitable for setting up Jetty as a service in Unix.
Quick-Start a Jetty Service
The minimum steps to get Jetty to run as a Service include:
[/opt/jetty]# tar -zxf /home/user/downloads/jetty-distribution-{VERSION}.tar.gz
[/opt/jetty]# cd jetty-distribution-{VERSION}/
[/opt/jetty/jetty-distribution-{VERSION}]# ls
bin lib modules resources start.jar
demo-base license-eplv10-aslv20.html notice.html start.d VERSION.txt
etc logs README.TXT start.ini webapps
[/opt/jetty/jetty-distribution-{VERSION}]# cp bin/jetty.sh /etc/init.d/jetty
[/opt/jetty/jetty-distribution-{VERSION}]# echo JETTY_HOME=`pwd` > /etc/default/jetty
[/opt/jetty/jetty-distribution-{VERSION}]# cat /etc/default/jetty
JETTY_HOME=/opt/jetty/jetty-distribution-{VERSION}
[/opt/jetty/jetty-distribution-{VERSION}]# service jetty start
Starting Jetty: OK Wed Nov 20 10:26:53 MST 2013From this demonstration we can see that Jetty started successfully as a Unix Service from the /opt/jetty/jetty-distribution-9.4.54.v20240208 directory.
This configuration works well but it is running Jetty as the root user.
Practical Setup of a Jetty Service
There are various ways this can be accomplished, mostly depending on your Unix environment (and possibly corporate policies).
The techniques outlined here assume an installation on Linux (demonstrated on Ubuntu 12.04.3 LTS).
Prepare some empty directories to work with.
# mkdir -p /opt/jetty
# mkdir -p /opt/web/mybase
# mkdir -p /opt/jetty/tempThe directory purposes are as follows:
- /opt/jetty
-
Where the Jetty Distribution will be unpacked into
- /opt/web/mybase
-
Where your specific set of webapps will be located, including all of the configuration required of the server to make them operational.
- /opt/jetty/temp
-
This is the temporary directory assigned to Java by the Service Layer (this is what Java sees as the
java.io.tmpdirSystem Property).This is intentionally kept separate from the standard temp directory of
/tmp, as this location doubles as the Servlet Spec work directory. It is our experience that the standard temp directory is often managed by various cleanup scripts that wreak havoc on a long running Jetty server.
Jetty 9.3 requires Java 8 (or greater) to run. Make sure you have it installed.
# apt-get install openjdk-8-jdkOr download Java 8 from: http://www.oracle.com/technetwork/java/javase/downloads/index.html
# java -version
java version "1.6.0_27"
OpenJDK Runtime Environment (IcedTea6 1.12.6) (6b27-1.12.6-1ubuntu0.12.04.2)
OpenJDK 64-Bit Server VM (build 20.0-b12, mixed mode)
# update-alternatives --list java
/usr/lib/jvm/java-6-openjdk-amd64/jre/bin/java
/usr/lib/jvm/java-7-openjdk-amd64/jre/bin/java
# update-alternatives --config java
There are 2 choices for the alternative java (providing /usr/bin/java).
Selection Path Priority Status
------------------------------------------------------------
* 0 /usr/lib/jvm/java-6-openjdk-amd64/jre/bin/java 1061 auto mode
1 /usr/lib/jvm/java-6-openjdk-amd64/jre/bin/java 1061 manual mode
2 /usr/lib/jvm/java-7-openjdk-amd64/jre/bin/java 1051 manual mode
Press enter to keep the current choice[*], or type selection number: 2
update-alternatives: using /usr/lib/jvm/java-7-openjdk-amd64/jre/bin/java to provide /usr/bin/java (java) in manual mode.
# java -version
java version "1.7.0_25"
OpenJDK Runtime Environment (IcedTea 2.3.10) (7u25-2.3.10-1ubuntu0.12.04.2)
OpenJDK 64-Bit Server VM (build 23.7-b01, mixed mode)It is recommended that you create a user to specifically run Jetty. This user should have the minimum set of privileges needed to run Jetty.
# useradd --user-group --shell /bin/false --home-dir /opt/jetty/temp jettyThis will create a user called jetty, belonging to the group called jetty, with no shell access (aka /bin/false), and home directory at /opt/jetty/temp.
Download a copy of the Jetty distribution from the Official Eclipse Download Site
Unpack it into place.
[/opt/jetty]# tar -zxf /home/user/Downloads/jetty-distribution-{VERSION}.tar.gz
[/opt/jetty]# ls -F
jetty-distribution-{VERSION}/
[/opt/jetty]# mkdir /opt/jetty/tempIt might seem strange or undesirable to unpack the first portion of the jetty-distribution directory name too.
But starting with Jetty 9 the split between ${jetty.home} and ${jetty.base} allows for easier upgrades of Jetty itself while isolating your webapp specific configuration.
For more information on the Jetty home and base concepts see the section on managing a Jetty installation earlier in this Chapter.
The /opt/jetty/temp directory is created as a durable place for Jetty to use for temp and working directories.
Many Unix systems will periodically clean out the /tmp directory, this behavior is undesired in a Servlet container and has been known to cause problems.
This durable directory at /opt/jetty/temp solves for that behavior.
The directory at /opt/web/mybase is going to be a ${jetty.base}, so lets configure it to hold your webapp and its configuration.
|
In past versions of Jetty, you would configure / modify / add to the |
# cd /opt/web/mybase/
[/opt/web/mybase]# ls
[/opt/web/mybase]# java -jar /opt/jetty/jetty-distribution-{VERSION}/start.jar \
--add-to-start=deploy,http,console-capture
INFO : webapp transitively enabled, ini template available with --add-to-start=webapp
INFO : server transitively enabled, ini template available with --add-to-start=server
INFO : security transitively enabled
INFO : servlet transitively enabled
INFO : console-capture initialized in ${jetty.base}/start.ini
INFO : http initialized in ${jetty.base}/start.ini
INFO : deploy initialized in ${jetty.base}/start.ini
MKDIR : ${jetty.base}/logs
MKDIR : ${jetty.base}/webapps
INFO : Base directory was modified
[/opt/web/mybase]# ls -F
start.ini webapps/At this point you have configured your /opt/web/mybase to enable the following modules:
- deploy
-
This is the module that will perform deployment of web applications (WAR files or exploded directories), or Jetty IoC XML context deployables, from the
/opt/web/mybase/webappsdirectory. - http
-
This sets up a single Connector that listens for basic HTTP requests.
See the created
start.inifor configuring this connector. - console-capture
-
When running Jetty as a service it is very important to have logging enabled. This module will enable the basic STDOUT and STDERR capture logging to the
/opt/web/mybase/logs/directory.
Additionally, the webapp, server, security and servlet modules were enabled as they are dependencies for other modules.
See Using start.jar for more details and options on setting up and configuring a ${jetty.base} directory.
Copy your war file into place.
# cp /home/user/projects/mywebsite.war /opt/web/mybase/webapps/Most service installations will want Jetty to run on port 80, now is the opportunity to change this from the default value of 8080 to 80.
Edit the /opt/web/mybase/start.ini and change the jetty.http.port value.
# grep jetty.http.port /opt/web/mybase/start.ini
jetty.port=80Change the permissions on the Jetty distribution and webapp directories so that the user you created can access it.
# chown --recursive jetty /opt/jetty
# chown --recursive jetty /opt/web/mybaseNext we need to make the Unix System aware that we have a new Jetty Service that can be managed by the standard service calls.
# cp /opt/jetty/jetty-distribution-{VERSION}/bin/jetty.sh /etc/init.d/jetty
# echo "JETTY_HOME=/opt/jetty/jetty-distribution-{VERSION}" > /etc/default/jetty
# echo "JETTY_BASE=/opt/web/mybase" >> /etc/default/jetty
# echo "JETTY_USER=jetty" >> /etc/default/jetty
# echo "TMPDIR=/opt/jetty/temp" >> /etc/default/jettyTest out the configuration:
# service jetty status
Checking arguments to Jetty:
START_INI = /opt/web/mybase/start.ini
JETTY_HOME = /opt/jetty/jetty-distribution-{VERSION}
JETTY_BASE = /opt/web/mybase
JETTY_CONF = /opt/jetty/jetty-distribution-{VERSION}/etc/jetty.conf
JETTY_PID = /var/run/jetty.pid
JETTY_START = /opt/jetty/jetty-distribution-{VERSION}/start.jar
CLASSPATH =
JAVA = /usr/bin/java
JAVA_OPTIONS = -Djetty.state=/opt/web/mybase/jetty.state
-Djetty.logs=/opt/web/mybase/logs
-Djetty.home=/opt/jetty/jetty-distribution-{VERSION}
-Djetty.base=/opt/web/mybase
-Djava.io.tmpdir=/opt/jetty/temp
JETTY_ARGS = console-capture.xml jetty-started.xml
RUN_CMD = /usr/bin/java
-Djetty.state=/opt/web/mybase/jetty.state
-Djetty.logs=/opt/web/mybase/logs
-Djetty.home=/opt/jetty/jetty-distribution-{VERSION}
-Djetty.base=/opt/web/mybase
-Djava.io.tmpdir=/opt/jetty/temp
-jar /opt/jetty/jetty-distribution-{VERSION}/start.jar
console-capture.xml
jetty-started.xmlYou now have a configured ${jetty.base} in /opt/web/mybase and a ${jetty.home} in /opt/jetty/jetty-distribution-9.4.54.v20240208, along with the service level files necessary to start the service.
Test the service to make sure it starts up and runs successfully.
# service jetty start
Starting Jetty: OK Wed Nov 20 12:35:28 MST 2013
# service jetty check
..(snip)..
Jetty running pid=2958
[/opt/web/mybase]# ps u 2958
USER PID %CPU %MEM VSZ RSS TTY STAT START TIME COMMAND
jetty 2958 5.3 0.1 11179176 53984 ? Sl 12:46 0:00 /usr/bin/java -Djetty...You should now have your server running.
Startup via Windows Service
There are no components that ship with the Jetty Distribution to make it a formal Windows Service.
However, we recommend the use of Apache ProcRun’s Daemon.
The techniques outlined here are based on Windows 7 (64-bit), using JDK 8 (64-bit), running on an Intel i7 architecture machine.
Prepare some empty directories to work with.
C:\> mkdir opt
C:\> cd opt
C:\opt> mkdir jetty
C:\opt> mkdir logs
C:\opt> mkdir myappbase
C:\opt> mkdir temp
C:\opt> dir
Volume in drive C has no label.
Volume Serial Number is DEAD-BEEF
Directory of C:\opt
11/21/2013 04:06 PM <DIR> .
11/21/2013 04:06 PM <DIR> ..
11/21/2013 04:06 PM <DIR> jetty
11/21/2013 04:06 PM <DIR> logs
11/21/2013 04:06 PM <DIR> myappbase
11/21/2013 04:06 PM <DIR> temp
0 File(s) 0 bytesThe directory purposes are as follows:
- C:\opt
-
Where the service layer utilities, scripts, and binaries will eventually be.
- C:\opt\logs
-
Where the logs for the service layer will put its own logs.
Typically you will see the audit logs (install/update/delete), StdOutput, and StdError logs here.
- C:\opt\jetty
-
Where the Jetty Distribution will be unpacked into.
- C:\opt\myappbase
-
Where your specific set of webapps will be located, including all of the configuration required of the server to make them operational.
- C:\opt\temp
-
This is the temporary directory assigned to Java by the Service Layer (this is what Java sees as the
java.io.tmpdirSystem Property).This is intentionally kept separate from the standard temp directories of Windows, as this location doubles as the Servlet Spec work directory.
Or download Java 8 from: http://www.oracle.com/technetwork/java/javase/downloads/index.html
C:\opt>java -version
java version "1.7.0_45"
Java(TM) SE Runtime Environment (build 1.7.0_45-b18)
Java HotSpot(TM) 64-Bit Server VM (build 24.45-b08, mixed mode)Download a copy of the ZIP distribution from the Official Eclipse Download Site
Extract the contents of the jetty-distribution-9.4.54.v20240208 directory to C:\opt\jetty
Once complete, the contents of the C:\opt\jetty directory should look like this:
C:\opt\jetty>dir
Volume in drive C has no label.
Volume Serial Number is C8CF-820B
Directory of C:\opt\jetty
11/21/2013 12:13 PM <DIR> .
11/21/2013 12:13 PM <DIR> ..
11/21/2013 12:13 PM <DIR> bin
11/21/2013 12:13 PM <DIR> demo-base
11/21/2013 12:13 PM <DIR> etc
11/21/2013 12:13 PM <DIR> lib
11/21/2013 12:13 PM 30,012 license-eplv10-aslv20.html
11/21/2013 12:13 PM <DIR> logs
11/21/2013 12:13 PM <DIR> modules
11/21/2013 12:13 PM 6,262 notice.html
11/21/2013 12:13 PM 1,249 README.TXT
11/21/2013 12:13 PM <DIR> resources
11/21/2013 12:13 PM <DIR> start.d
11/21/2013 12:13 PM 2,126 start.ini
11/21/2013 12:13 PM 72,226 start.jar
11/21/2013 12:13 PM 341,784 VERSION.txt
11/21/2013 12:13 PM <DIR> webapps
6 File(s) 453,659 bytes
11 Dir(s) 306,711,420,928 bytes freeDownload a copy of the Apache ProcRun native binaries.
You should have downloaded a file named commons-daemon-1.0.15-bin-windows.zip (the version might be different).
Open the ZIP file and extract the prunmgr.exe and prunsrv.exe files into the C:\opt directory.
Make sure to get the right version of prunsrv.exe for your environment.
The ZIP file has both 32 bit and 64 bit versions of this file.
Once you are complete, the contents of C:\opt directory should look like this:
C:\opt> dir
Volume in drive C has no label.
Volume Serial Number is DEAD-BEEF
Directory of C:\opt
11/21/2013 04:06 PM <DIR> .
11/21/2013 04:06 PM <DIR> ..
11/21/2013 04:06 PM <DIR> jetty
11/21/2013 04:06 PM <DIR> logs
11/21/2013 04:06 PM <DIR> myappbase
11/21/2013 04:06 PM <DIR> temp
11/21/2013 04:11 PM 104,448 prunmgr.exe
11/21/2013 04:11 PM 80,896 prunsrv.exe
2 File(s) 185,344 bytesNow it’s time to setup your new ${jetty.base} directory to have all of your WebApps and the configurations that they need.
We’ll start by specifying which modules we want to use (this will create a start.ini file and also create a few empty directories for you)
C:\opt\myappbase>java -jar ..\jetty\start.jar --add-to-start=deploy,http,console-capture
WARNING: deploy initialised in ${jetty.base}\start.ini (appended)
WARNING: deploy enabled in ${jetty.base}\start.ini
MKDIR: ${jetty.base}\webapps
WARNING: server initialised in ${jetty.base}\start.ini (appended)
WARNING: server enabled in ${jetty.base}\start.ini
WARNING: http initialised in ${jetty.base}\start.ini (appended)
WARNING: http enabled in ${jetty.base}\start.ini
WARNING: server enabled in ${jetty.base}\start.ini
WARNING: logging initialised in ${jetty.base}\start.ini (appended)
WARNING: logging enabled in ${jetty.base}\start.ini
MKDIR: ${jetty.base}\logs
C:\opt\myappbase>dir
Volume in drive C has no label.
Volume Serial Number is C8CF-820B
Directory of C:\opt\myappbase
11/21/2013 12:49 PM <DIR> .
11/21/2013 12:49 PM <DIR> ..
11/21/2013 12:49 PM <DIR> logs
11/21/2013 12:49 PM 1,355 start.ini
11/21/2013 12:49 PM <DIR> webapps
1 File(s) 1,355 bytes
4 Dir(s) 306,711,064,576 bytes freeAt this point you have configured your C:\opt\myappbase to enable the following modules:
- deploy
-
This is the module that will perform deployment of web applications (WAR files or exploded directories), or Jetty IoC XML context deployables, from the
C:\opt\myappbase\webappsdirectory. - http
-
This sets up a single Connector that listens for basic HTTP requests.
See the created
start.inifor configuring this connector. - logging
-
When running Jetty as a service it is very important to have logging enabled. This module will enable the basic STDOUT and STDERR capture logging to the
C:\opt\myappbase\logsdirectory.
See the section on Using start.jar for more details and options on setting up and configuring a ${jetty.base} directory.
At this point you merely have to copy your WAR files into the {$jetty.base}/webapps directory.
C:\opt\myappbase> copy C:\projects\mywebsite.war webapps\At this point you should have your directories, Java, the Jetty distribution, and your webapp specifics setup and ready for operation.
We will use the Apache ProcRun’s prunsrv.exe to install a Jetty Service.
The basic command line syntax is outlined in the link above.
A example install-jetty-service.bat is provided here as an example, based on the above directories.
@echo off
set SERVICE_NAME=JettyService
set JETTY_HOME=C:\opt\jetty
set JETTY_BASE=C:\opt\myappbase
set STOPKEY=secret
set STOPPORT=50001
set PR_INSTALL=C:\opt\prunsrv.exe
@REM Service Log Configuration
set PR_LOGPREFIX=%SERVICE_NAME%
set PR_LOGPATH=C:\opt\logs
set PR_STDOUTPUT=auto
set PR_STDERROR=auto
set PR_LOGLEVEL=Debug
@REM Path to Java Installation
set JAVA_HOME=C:\Program Files\Java\jdk1.7.0_45
set PR_JVM=%JAVA_HOME%\jre\bin\server\jvm.dll
set PR_CLASSPATH=%JETTY_HOME%\start.jar;%JAVA_HOME%\lib\tools.jar
@REM JVM Configuration
set PR_JVMMS=128
set PR_JVMMX=512
set PR_JVMSS=4000
set PR_JVMOPTIONS=-Duser.dir="%JETTY_BASE%";-Djava.io.tmpdir="C:\opt\temp";-Djetty.home="%JETTY_HOME%";-Djetty.base="%JETTY_BASE%"
@REM Startup Configuration
set JETTY_START_CLASS=org.eclipse.jetty.start.Main
set PR_STARTUP=auto
set PR_STARTMODE=java
set PR_STARTCLASS=%JETTY_START_CLASS%
set PR_STARTPARAMS=STOP.KEY="%STOPKEY%";STOP.PORT=%STOPPORT%
@REM Shutdown Configuration
set PR_STOPMODE=java
set PR_STOPCLASS=%JETTY_START_CLASS%
set PR_STOPPARAMS=--stop;STOP.KEY="%STOPKEY%";STOP.PORT=%STOPPORT%;STOP.WAIT=10
"%PR_INSTALL%" //IS/%SERVICE_NAME% ^
--DisplayName="%SERVICE_NAME%" ^
--Install="%PR_INSTALL%" ^
--Startup="%PR_STARTUP%" ^
--LogPath="%PR_LOGPATH%" ^
--LogPrefix="%PR_LOGPREFIX%" ^
--LogLevel="%PR_LOGLEVEL%" ^
--StdOutput="%PR_STDOUTPUT%" ^
--StdError="%PR_STDERROR%" ^
--JavaHome="%JAVA_HOME%" ^
--Jvm="%PR_JVM%" ^
--JvmMs="%PR_JVMMS%" ^
--JvmMx="%PR_JVMMX%" ^
--JvmSs="%PR_JVMSS%" ^
--JvmOptions=%PR_JVMOPTIONS% ^
--Classpath="%PR_CLASSPATH%" ^
--StartMode="%PR_STARTMODE%" ^
--StartClass="%JETTY_START_CLASS%" ^
--StartParams="%PR_STARTPARAMS%" ^
--StopMode="%PR_STOPMODE%" ^
--StopClass="%PR_STOPCLASS%" ^
--StopParams="%PR_STOPPARAMS%"
if not errorlevel 1 goto installed
echo Failed to install "%SERVICE_NAME%" service. Refer to log in %PR_LOGPATH%
goto end
:installed
echo The Service "%SERVICE_NAME%" has been installed
:endConfiguration’s of note in this batch file:
- SERVICE_NAME
-
This is the name of the service that Windows sees. The name in the Services window will show this name.
- STOPKEY
-
This is the secret key (password) for the ShutdownMonitor, used to issue a formal command to stop the server.
- STOPPORT
-
The port that the Shutdown Monitor listens on for the stop command.
If you have multiple Jetty servers on the same machine, this port will need to be different for each Service.
Once you have run prunsrv.exe //IS/<service-name> (done for you in the above batch file) to install the service, you can use the standard Windows utilities to manage (start/stop/restart) the Jetty service.
Open the Service View and start your service.
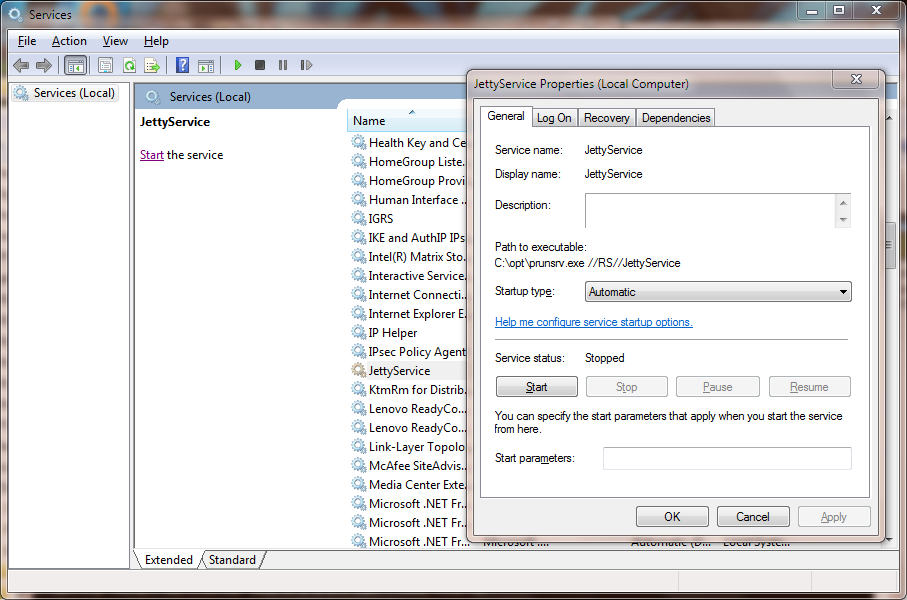
Startup using the Java Platform Module System (JPMS)
Jetty modules also act as automatic JPMS modules via the Automatic-Module-Name attribute in the jar’s MANIFEST.MF file.
This makes possible to run Jetty from the module-path, rather than the class-path.
We recommend using JDK 11 or greater due to the fact that JDK 11 removed all the "enterprise" modules from the JDK, and therefore it guarantees a more stable platform to base your application’s dependencies on. The classes in these "enterprise" modules were bundled with JDK 8, and present in "enterprise" modules in JDK 9 and JDK 10. With JDK 11, these "enterprise" classes are either not available in the JDK (because their corresponding module was removed), or they are present in a different module.
Because some of these "enterprise" classes are required by Jetty or by applications running in Jetty, it is better to use a stable source for those classes - in this case by using JDK 11 or greater, and explicitly referencing the "enterprise" classes as dependencies, rather than assuming they are bundled with the JDK.
Starting Jetty on the module-path
To start Jetty on the module-path rather than the class-path, it is enough to add the --jpms option to the command line, for example:
$ mkdir my-jetty-base
$ cd my-jetty-base
$ java -jar $JETTY_HOME/start.jar --add-to-start=http
INFO : server transitively enabled, ini template available with --add-to-start=server
INFO : http initialized in ${jetty.base}/start.ini
INFO : threadpool transitively enabled, ini template available with --add-to-start=threadpool
INFO : Base directory was modified
$ java -jar $JETTY_HOME/start.jar --jpmsThe example above creates a Jetty base directory and enables the http module using the --add-to-start command.
The server then starts Jetty on the module-path using the --jpms option.
[NOTE] When running on the module-path using the `--jpms` option, the Jetty start mechanism will fork a second JVM passing it the right JVM options to run on the module-path. You will have two JVMs running: one that runs `start.jar` and one that runs Jetty on the module-path.
If you are interested in the details of how the command line to run Jetty on the module-path looks like, you can add the --dry-run option:
$ java -jar $JETTY_HOME/start.jar --jpms --dry-runThis will give an output looking something like this (broken in sections for clarity):
/opt/openjdk-11+28/bin/java
--module-path /opt/jetty/lib/servlet-api-3.1.jar:/opt/jetty/lib/jetty-schemas-3.1.jar:/opt/jetty/lib/jetty-http-9.4.13-SNAPSHOT.jar:...
--patch-module servlet.api=/opt/jetty/lib/jetty-schemas-3.1.jar
--module org.eclipse.jetty.xml/org.eclipse.jetty.xml.XmlConfiguration /opt/jetty/etc/jetty-threadpool.xml /opt/jetty/etc/jetty.xml ...The --module-path option specifies the list of Jetty jars.
This list depends on the Jetty modules that have been enabled via the --add-to-start command.
The --patch-module option is necessary for Servlet and JSP Containers to find XML DTDs and XML Schemas required to validate the various XML files present in web applications (such as web.xml and others).
The --module option tells the JVM to run main class XmlConfiguration from the org.eclipse.jetty.xml module, with the given XML files as program arguments.
When the JVM starts, module org.eclipse.jetty.xml is added to the set of JPMS root modules; all other Jetty modules, being automatic, will be resolved and added to the module graph.
JAR files that are not modules, such as servlet-api-3.1.jar, are on the module-path and therefore will be made automatic modules by the JVM (hence the derived module name servlet.api for this jar, referenced by the --patch-module command line option above).
Advanced JPMS Configuration
Web applications may need additional services from the Servlet Container, such as JDBC DataSource references or JTA UserTransaction references.
For example, for JDBC it is typical to store, in JNDI, a reference to the connection pool’s DataSource (such as com.zaxxer.hikari.HikariDataSource) or a reference directly to the JDBC driver’s DataSource (com.mysql.jdbc.jdbc2.optional.MysqlDataSource).
Jetty needs to be able to instantiate those classes and therefore needs to be able to load those classes and all their super-classes, among which includes javax.sql.DataSource.
When Jetty runs on the class-path, this is easily achieved by using a custom module:
[description]
MySQL module
[lib]
lib/mysql/mysql-connector-java-*.jarHowever, when running on the module-path, things are quite different.
Class javax.sql.DataSource is in a JDK bundled module named java.sql, which is not automatic (it’s a proper JPMS module) and it is not in the root modules set.
Because it is not an automatic module, it is not added to the module graph, and therefore needs to be added explicitly using the JVM command line --add-modules.
To add the JPMS module java.sql to the module graph, you need to modify your custom module in the following way, using our mysql.mod as an example:
[description]
MySQL module
[lib]
lib/mysql/mysql-connector-java-*.jar
[jpms]
add-modules: java.sqlThe new [jpms] section is only used when Jetty is started on the module-path via the --jpms command line option.
Assuming that mysql-connector-java-.jar is a non JPMS modular jar, or an automatic JPMS modular jar, the Jetty start mechanism will add mysql-connector-java-.jar to the module-path, and will add the JVM command line option --add-modules java.sql.
If mysql-connector-java-*.jar were a proper JPMS modular jar with name (for example) com.mysql.jdbc, then it would need to be explicitly added to the module graph, in this way:
[description]
MySQL module
[lib]
lib/mysql/mysql-connector-java-*.jar
[jpms]
add-modules: com.mysql.jdbcThe JPMS module java.sql does not need to be explicitly added because it would be a dependency of the com.mysql.jdbc module and therefore automatically added to the module graph.
The [jpms] section has the following format:
[jpms]
add-modules: <module name>(,<module name>)*
patch-module: <module>=<file>(:<file>)*
add-opens: <module>/<package>=<target-module>(,<target-module>)*
add-exports: <module>/<package>=<target-module>(,<target-module>)*
add-reads: <module>=<target-module>(,<target-module>)*Alternative way to start Jetty on the module-path
The section above uses the --jpms command line option to start Jetty on the module-path.
An alternative way of achieving the same result is to use a Jetty module, $JETTY_BASE/modules/jpms.mod,
that specifies that you want to run using JPMS (and possibly add some JPMS specific configuration).
[ini]
--jpms
[jpms]
# Additional JPMS configuration.The [ini] section is equivalent to passing the --jpms option to the command line.
The [jpms] section (see also the advanced JPMS configuration section)
allows you specify additional JPMS configuration.
$ mkdir jetty-base-jpms
$ cd jetty-base-jpms
$ mkdir modules
# Copy the jpms.mod file above into the $JETTY_BASE/modules/ directory.
$ cp /tmp/jpms.mod modules/
# Add both the http and the jpms modules.
$ java -jar $JETTY_HOME/start.jar --add-to-start=http,jpms
# Jetty will start on the module-path.
$ java -jar $JETTY_HOME/start.jarSession Management
Sessions are a concept within the Servlet api which allow requests to store and retrieve information across the time a user spends in an application. Choosing the correct session manager implementation is an important consideration for every application as each can fit and perform optimally in different situations. If you need a simple in-memory session manager that can persist to disk then session management using the local file system can be a good place to start. If you need a session manager that can work in a clustered scenario with multiple instances of Jetty, then the JDBC session manager can be an excellent option. Jetty also offers more niche session managers that leverage backends such as MongoDB, Inifinispan, or even Google’s Cloud Data Store.
Session Architecture
Changes in Session Architecture
The architecture of Session Management Jetty changed significantly in Jetty 9.4. These changes have resulted in Sessions not only being easier to configure but making them much more pluggable for various technologies.
In previous versions of Jetty, users were required to configure a separate SessionIdManager for each kind of session clustering technology being implemented (JDBC, MongoDB..etc.).
In Jetty 9.4, there is now a single SessionIdManager implementation which works across all types of session clustering technologies.
Likewise, prior to Jetty 9.4 there were several different instances of the SessionManager class.
Instead of a single SessionManager though, it has been done away with entirely, with most of it’s functionality moved to the SesssionHandler class.
Additionally, Jetty 9.4 introduced the concepts of a SessionCache and an associated SessionDataStore (both explained below).
Finally, Session scavenging has been re-worked.
Where previously each SessionManager instance would periodically scan the in-memory (or clustered) sessions for expired sessions, there is now a single generic scavenger thread which instructs the SessionHandler to clean up expired sessions.
Session expiration has been changed to use a much more efficient timer-based mechanism that avoids constant iteration over all current sessions in memory by the scavenger.
Session Architecture Hierarchy
Each Jetty instance has a singular SessionIdManager to handle all session requests, regardless of clustering technology.
For each context on the server there is one (1) SessionCache which contains all of the Session objects for the given context.
The benefit of the SessionCache is to ensure that simultaneous requests accessing the same Session Id in the same context always operate on the same Session object.
The SessionCache implementation supplied with the Jetty distribution does just that: keeps Session objects in memory so that they can be shared between simultaneous requests.
However, it is possible to provide your own implementation that never shares Session objects should you require it.
Where the SessionCache handles Session information, Session data is stored in a SessionDataStore that is specific to the clustering technology being implemented.
There is only one (1) SessionDataStore per SessionCache.
Visually the session architecture can be represented like this:

Configuring Sessions in the Jetty Distribution
Configuring session management involves selecting a module for the desired type of session caching behavior, and a module for the type of session persistence.
Jetty provides two different session caches: the DefaultSessionCache which holds sessions in memory, and the NullSessionCache which does not.
There is more information on both of these types of session caching and the circumstances which would lead you to select one or the other in the Session Components section, and more information on the configuration options of each in the L1 Session Cache section.
For session persistence, Jetty provides a number of different implementations from which to choose including non-persistence, local file storage, clustered technologies such as JDBC, MongoDB, Inifinispan, Google Cloud Datastore, and Hazelcast.
Depending on your persistence technology, to enhance performance, you may want to use an L2 cache for session data, in which case Jetty provides the memcached L2 session data cache.
Session Components
SessionIdManager
There is a maximum of one (1) SessionIdManager per Jetty Server instance.
Its purpose is to generate fresh, unique session ids and to coordinate the re-use of session ids amongst co-operating contexts.
Unlike in previous versions of Jetty, the SessionIdManager is agnostic with respect to the type of clustering technology chosen.
Jetty provides a default implementation - the DefaultSessionIdManager - which should meet the needs of most users.
If you do not explicitly enable one of the session modules or otherwise configure a SessionIdManager, the DefaultSessionIdManager will be used.
If the DefaultSessionIdManager does not meet your needs, you can extend the org.eclipse.jetty.server.session.AbstractSessionIdManager or do a fresh implementation of the org.eclipse.jetty.server.session.SessionIdManager interface.
See Configuring the SessionIdManager and HouseKeeper for details on configuration.
HouseKeeper
There is a maximum of one (1) HouseKeeper per SessionIdManager.
Its purpose is to periodically poll the SessionHandlers to clean out expired sessions.
By default the HouseKeeper will poll the SessionHandlers every 10 mins to find and delete expired sessions, although this interval is configurable.
See Configuring the SessionIdManager and HouseKeeper for details on configuration.
SessionCache
There is one (1) SessionCache per context.
Its purpose is to provide an L1 cache of Session objects.
Having a working set of Session objects in memory allows multiple simultaneous requests for the same session to share the same Session object.
Jetty provides two (2) SessionCache implementations: the DefaultSessionCache and the NullSessionCache.
The DefaultSessionCache retains Session objects in memory in a cache and has a number of configuration options to control cache behavior.
It is the default that is used if no other SessionCache has been configured.
It is suitable for non-clustered and clustered deployments with a sticky load balancer, as well as clustered deployments with a non-sticky load balancer, with some caveats.
The NullSessionCache does not actually cache any objects: each request uses a fresh Session object.
It is suitable for clustered deployments without a sticky load balancer and non-clustered deployments when purely minimal support for sessions is needed.
SessionCaches always write out a Session to the SessionDataStore whenever the last request for the Session exits.
They can also be configured to do an immediate, eager write of a freshly created session. This can be useful if you are likely to experience multiple, near simultaneous requests referencing the same session, e.g. with HTTP/2 and you don’t have a sticky load balancer. Alternatively, if the eager write is not done, application paths which create and then invalidate a session within a single request never incur the cost of writing to persistent storage.
Additionally, if the EVICT_ON_INACTIVITY eviction policy is in use, you can configure the DefaultSessionCache to force a write of the Session to the SessionDataStore just before the Session is evicted.
See the L1 Session Cache for more information.
SessionDataStore
There is one (1) SessionDataStore per context.
Its purpose is to handle all persistence related operations on sessions.
The common characteristics for all SessionDataStores are whether or not they support passivation, and the length of the grace period.
Supporting passivation means that session data is serialized. Some persistence mechanisms serialize, such as JDBC, GCloud Datastore etc, whereas others may store an object in shared memory, e.g. Infinispan, when configured with a local cache.
Whether or not a clustering technology entails passivation controls whether or not the session passivation/activation listeners will be called.
The grace period is an interval, configured in seconds, that attempts to deal with the non-transactional nature of sessions with regard to finding sessions that have expired.
Due to the lack of transactionality, in a clustered configuration, even with a sticky load balancer, it is always possible that a Session is live on a node but has not yet been updated in the persistent store.
When SessionDataStores search their persistent store to find sessions that have expired, they typically perform a few sequential searches:
-
The first verifies the expiration of a list of candidate session ids suggested by the SessionCache
-
The second finds sessions in the store that have expired which were last live on the current node
-
The third finds sessions that expired a "while" ago, irrespective of on which node they were last used: the definition of "a while" is based on the grace period.
Jetty instantiates the trivial NullSessionDataStore - which does not persist sessions - as the default.
The distribution provides a number of alternative SessionDataStore implementations such as FileSessionDataStore, GCloudSessionDataStore, JDBCSessionDataStore, MongoSessionDataStore, InfinispanSessionDataStore, HazelcastSessionDataStore.
CachingSessionDataStore
The CachingSessionDataStore is a special type of SessionDataStore that inserts an L2 cache of Session data - the SessionDataMap - in front of a delegate SessionDataStore.
The SessionDataMap is preferentially consulted before the actual SessionDataStore on reads.
This can improve the performance of slow stores.
Jetty provides one implementation of the this L2 cache based on Memcached, the MemcachedSessionDataMap.
See the L2 SessionData Cachefor additional information.
The SessionIdManager and the Housekeeper
Default Settings
By default, Jetty will instantiate a single instance of the DefaultSessionIdManager and HouseKeeper at startup with default settings.
The default settings are:
- DefaultSessionIdManager: worker name
-
This uniquely identifies the jetty server instance within a cluster. It is set from the value of the
JETTY_WORKER_INSTANCEenvironment variable, ornode0if the environment value is not set. If you have more than one Jetty instance, it is crucial that you explicitly configure the worker name on each Jetty instance (see below for how to configure). - HouseKeeper: scavenge interval
-
This is the period in seconds between runs of the session scavenger, and by default is set to the equivalent of 10 minutes. As a rule of thumb, you should ensure that the scavenge interval is shorter than the
maxInactiveIntervalof your sessions to ensure that they are promptly scavenged. See below for instructions on how to configure this.
Configuration
To change the default values, use the module system to enable the sessions module.
This will enable the $jetty.home/etc/sessions/id-manager.xml file and generate a $jetty.base/start.d/sessions.ini file.
The id-manager.xml file instantiates a single DefaultSessionIdManager and HouseKeeper and configures them using the properties from the sessions.ini file.
Edit the ini file to change the properties to easily customize the DefaultSessionIdManager and HouseKeeper:
- jetty.sessionIdManager.workerName
-
By default it is
node1. This uniquely identifies the Jetty server instance within a cluster. If you have more than one Jetty instance, it is crucial that you configure the worker name differently on each jetty instance. - jetty.sessionScavengeInterval.seconds
-
This is the period in seconds between runs of the session scavenger. By default it will run every 600 secs (ie 10 mins). As a rule of thumb, you should ensure that the scavenge interval is shorter than the maxInactiveInterval of your sessions to ensure that they are promptly scavenged.
The L1 Session Cache
The DefaultSessionCache
In the absence of any explicit configuration, Jetty will instantiate an instance of the DefaultSessionCache per context.
If you wish to change any of the default values, you need to enable the session-cache-hash module.
Once the session-cache-hash module has been enabled, you can view a list of all the configurable values by opening start.d/session-cache-hash.ini:
--module=session-cache-hash
#jetty.session.evictionPolicy=-1
#jetty.session.saveOnInactiveEvict=false
#jetty.session.saveOnCreate=false
#jetty.session.removeUnloadableSessions=false
#jetty.session.flushOnResponseCommit=false- jetty.session.evictionPolicy
-
Integer. Controls whether session objects that are held in memory are subject to eviction from the memory cache. Evicting sessions can reduce the memory footprint of the cache. Eviction is usually used in conjunction with a
SessionDataStorethat persists sessions. Values are:-
-1 : sessions are never evicted from the cache
-
0 : sessions are evicted from the cache as soon as the last active request for it finishes
-
>= 1 : any positive number is the time in seconds after which a session that is in the cache but has not experienced any activity will be evicted
-
|
If you are not using a |
- jetty.session.saveOnInactiveEvict
-
Boolean, default
false. Controls whether a session will be saved to theSessionDataStorejust prior to its eviction. - jetty.session.saveOnCreate
-
Boolean, default
false. Controls whether a session that is newly created will be immediately saved to theSessionDataStoreor lazily saved as the last request for the session exits. - jetty.session.removeUnloadableSessions
-
Boolean, default
false. Controls whether a session that cannot be restored - for example because it is corrupted - from theSessionDataStoreis deleted by theSessionDataStore. - jetty.session.flushOnResponseCommit
-
Boolean, default
false. If true, if a session is "dirty" - ie its attributes have changed - it will be written to the backing store as the response is about to commit. This ensures that all subsequent requests whether to the same or different node will see the updated session data. If false, a dirty session will only be written to the backing store when the last simultaneous request for it leaves the session.
For more general information on the uses of these configuration properties, see Session Components.
The NullSessionCache
The NullSessionCache is a trivial implementation of the SessionCache that does not cache any session information.
You may need to use it if your clustering setup does not have a sticky load balancer, or if you want absolutely minimal support for sessions.
If you use this in conjunction with the NullSessionDataStore, then sessions will neither be retained in memory nor persisted.
To enable the NullSessionCache, enable the sesssion-cache-null module.
Configuration options are:
- jetty.session.saveOnCreate
-
Boolean, default
false. Controls whether a session that is newly created will be immediately saved to theSessionDataStoreor lazily saved as the last request for the session exits. - jetty.session.removeUnloadableSessions
-
Boolean, default
false. Controls whether a session that cannot be restored - for example because it is corrupted - from theSessionDataStoreis deleted by theSessionDataStore. - jetty.session.flushOnResponseCommit
-
Boolean, default
false. If true, if a session is "dirty" - ie its attributes have changed - it will be written to the backing store as the response is about to commit. This ensures that all subsequent requests whether to the same or different node will see the updated session data. If false, a dirty session will only be written to the backing store when the last simultaneous request for it leaves the session.
For more general information on the uses of these configuration properties, see Session Components.
Non-Persistent Sessions
Non-clustered, non-persistent, in-memory-only is the default style of session management.
In previous versions of Jetty this was referred to as "hash" sessions, as they were stored in a HashMap in memory.
This is delivered by a combination of the DefaultSessionCache (to keep sessions in memory) and a NullSessionDataStore (to avoid session persistence).
If you do nothing, Jetty will instantiate one of each of these objects for each context at startup time using hard-coded defaults.
To explicitly set up non-persisted sessions using modules, use both the session-cache-hash and the session-store-null modules.
Enabling the modules allows you to configure behavior - see the L1 Session Cache for detailed information on configuration options for the DefaultSessionCache.
The NullSessionDataStore has no customizable options.
Persistent Sessions: File System
Note: Persisting sessions to the local file system should not be used in a clustered environment.
Enabling File System Sessions
When using the Jetty distribution, you will first need to enable the session-store-file module for your Jetty base using the --add-to-start argument on the command line.
$ java -jar ../start.jar --create-startd
INFO : Base directory was modified
$ java -jar ../start.jar --add-to-start=session-store-file
INFO : server transitively enabled, ini template available with --add-to-start=server
INFO : sessions transitively enabled, ini template available with --add-to-start=sessions
INFO : session-store-file initialized in ${jetty.base}/start.d/session-store-file.ini
MKDIR : ${jetty.base}/sessions
INFO : Base directory was modifiedDoing this enables the File System Session module and any dependent modules or files needed for it to run on the server.
The example above is using a fresh ${jetty.base} with nothing else enabled.
When the --add-to-start argument was added to the command line, it enabled the the session-store-file module as well as the sessions and server modules, which are required for the File System session management to operate.
Additionally a ${jetty.base}/sessions directory was created.
By default Session files will be saved to this directory.
In addition to adding these modules to the classpath of the server, several ini configuration files were added to the ${jetty.base}/start.d directory.
|
Session data is now only loaded when requested.
Previous functionality such as |
Configuring File System Session Properties
Opening start.d/session-store-file.ini will show a list of all the configurable options for the file system session module:
# ---------------------------------------
# Module: session-store-file
# Enables session persistent storage in files.
# ---------------------------------------
--module=session-store-file
jetty.session.file.storeDir=${jetty.base}/sessions
#jetty.session.file.deleteUnrestorableFiles=false
#jetty.session.savePeriod.seconds=0- jetty.session.storeDir
-
This defines the location for storage of Session files.
- jetty.session.file.deleteUnrestorableFiles
-
Boolean. If set to true, unreadable files will be deleted: this is useful to prevent repeated logging of the same error when the scavenger periodically (re-) attempts to load the corrupted information for a session in order to expire it.
- jetty.session.savePeriod.seconds=0
-
By default whenever the last concurrent request leaves a session, that session is always persisted via the
SessionDataStore, even if the only thing that changed on the session is its updated last access time. A non-zero value means that theSessionDataStorewill skip persisting the session if only the access time changed, and it has been less thansavePeriodseconds since the last time the session was written.Configuring
savePeriodis useful if your persistence technology is very slow/costly for writes. In a clustered environment, there is a risk of the last access time of the session being out-of-date in the shared store for up tosavePeriodseconds. This allows the possibility that a node may prematurely expire the session, even though it is in use by another node. Thorough consideration of themaxIdleTimeof the session when setting thesavePeriodis imperative - there is no point in setting asavePeriodthat is larger than themaxIdleTime.
Persistent Sessions: JDBC
Enabling JDBC Sessions
When using the Jetty distribution, you will first need to enable the session-store-jdbc module for your Jetty base using the --add-to-start argument on the command line.
$ java -jar ../start.jar --create-startd
INFO : Base directory was modified
$ java -jar ../start.jar --add-to-start=session-store-jdbc
INFO : server transitively enabled, ini template available with --add-to-start=server
INFO : sessions transitively enabled, ini template available with --add-to-start=sessions
INFO : sessions/jdbc/datasource dynamic dependency of session-store-jdbc
INFO : session-store-jdbc initialized in ${jetty.base}/start.d/session-store-jdbc.ini
INFO : Base directory was modifiedDoing this enables the JDBC Session module and any dependent modules or files needed for it to run on the server.
The example above is using a fresh ${jetty.base} with nothing else enabled.
When the --add-to-start argument was added to the command line, it enabled the the session-store-jdbc module as well as the sessions and server modules, which are required for JDBC session management to operate.
In addition to adding these modules to the classpath of the server, several ini configuration files were added to the ${jetty.base}/start.d directory.
Configuring JDBC Session Properties
Opening the start.d/session-store-jdbc.ini will show a list of all the configurable options for the JDBC module:
# ---------------------------------------
# Module: session-store-jdbc
# Enables JDBC persistent/distributed session storage.
# ---------------------------------------
--module=session-store-jdbc
##
##JDBC Session properties
##
#jetty.session.gracePeriod.seconds=3600
## Connection type:Datasource
db-connection-type=datasource
#jetty.session.jdbc.datasourceName=/jdbc/sessions
## Connection type:driver
#db-connection-type=driver
#jetty.session.jdbc.driverClass=
#jetty.session.jdbc.driverUrl=
## Session table schema
#jetty.session.jdbc.schema.accessTimeColumn=accessTime
#jetty.session.jdbc.schema.contextPathColumn=contextPath
#jetty.session.jdbc.schema.cookieTimeColumn=cookieTime
#jetty.session.jdbc.schema.createTimeColumn=createTime
#jetty.session.jdbc.schema.expiryTimeColumn=expiryTime
#jetty.session.jdbc.schema.lastAccessTimeColumn=lastAccessTime
#jetty.session.jdbc.schema.lastSavedTimeColumn=lastSavedTime
#jetty.session.jdbc.schema.idColumn=sessionId
#jetty.session.jdbc.schema.lastNodeColumn=lastNode
#jetty.session.jdbc.schema.virtualHostColumn=virtualHost
#jetty.session.jdbc.schema.maxIntervalColumn=maxInterval
#jetty.session.jdbc.schema.mapColumn=map
#jetty.session.jdbc.schema.table=JettySessions
# Optional name of the schema used to identify where the session table is defined in the database:
# "" - empty string, no schema name
# "INFERRED" - special string meaning infer from the current db connection
# name - a string defined by the user
#jetty.session.jdbc.schema.schemaName
# Optional name of the catalog used to identify where the session table is defined in the database:
# "" - empty string, no catalog name
# "INFERRED" - special string meaning infer from the current db connection
# name - a string defined by the user
#jetty.session.jdbc.schema.catalogName- jetty.session.gracePeriod.seconds
-
Amount of time, in seconds, to wait for other nodes to be checked to verify an expired session is in fact expired throughout the cluster before closing it.
- jetty.session.savePeriod.seconds=0
-
By default whenever the last concurrent request leaves a session, that session is always persisted via the
SessionDataStore, even if the only thing that changed on the session is its updated last access time. A non-zero value means that theSessionDataStorewill skip persisting the session if only the access time changed, and it has been less thansavePeriodseconds since the last time the session was written.Configuring
savePeriodis useful if your persistence technology is very slow/costly for writes. In a clustered environment, there is a risk of the last access time of the session being out-of-date in the shared store for up tosavePeriodseconds. This allows the possibility that a node may prematurely expire the session, even though it is in use by another node. Thorough consideration of themaxIdleTimeof the session when setting thesavePeriodis imperative - there is no point in setting asavePeriodthat is larger than themaxIdleTime. - db-connection-type
-
Set to either
datasourceordriverdepending on the type of connection being used. - jetty.session.jdbc.datasourceName
-
Name of the remote datasource.
- jetty.session.jdbc.driverClass
-
Name of the JDBC driver that controls access to the remote database, such as
com.mysql.jdbc.Driver - jetty.session.jdbc.driverUrl
-
Url of the database which includes the driver type, host name and port, service name and any specific attributes unique to the database, such as a username. As an example, here is a mysql connection with the username appended:
jdbc:mysql://127.0.0.1:3306/sessions?user=sessionsadmin.
The jetty.session.jdbc.schema.* values represent the names of the table and columns in the JDBC database used to store sessions and can be changed to suit your environment.
There are also two special, optional properties: jetty.session.jdbc.schema.schemaName and jetty.session.jdbc.schema.catalogName.
The exact meaning of these two properties is dependent on your database vendor, but can broadly be described as further scoping for the session table name.
See https://en.wikipedia.org/wiki/Database_schema and https://en.wikipedia.org/wiki/Database_catalog.
These extra scoping names can come into play at startup time when jetty determines if the session table already exists, or otherwise creates it on-the-fly.
If you have employed either of these concepts when you pre-created the session table, or you want to ensure that jetty uses them when it auto-creates the session table, then you have two options: either set them explicitly, or let jetty infer them from a database connection (obtained using either a Datasource or Driver according to the db-connection-type you have configured).
To set them explicitly, uncomment and supply appropriate values for the jetty.session.jdbc.schema.schemaName and/or jetty.session.jdbc.schema.catalogName properties.
To allow jetty to infer them from a database connection, use the special string INFERRED instead.
If you leave them blank or commented out, then the sessions table will not be scoped by schema or catalog name.
Persistent Sessions: MongoDB
Enabling MongoDB Sessions
When using the Jetty distribution, you will first need to enable the session-store-mongo module for your Jetty base using the --add-to-start argument on the command line.
$ java -jar ../start.jar --create-startd
INFO : Base directory was modified
$ java -jar ../start.jar --add-to-start=session-store-mongo
ALERT: There are enabled module(s) with licenses.
The following 1 module(s):
+ contains software not provided by the Eclipse Foundation!
+ contains software not covered by the Eclipse Public License!
+ has not been audited for compliance with its license
Module: session-store-mongo
+ The java driver for the MongoDB document-based database system is hosted on GitHub and released under the Apache 2.0 license.
+ http://www.mongodb.org/
+ http://www.apache.org/licenses/LICENSE-2.0.html
Proceed (y/N)? y
INFO : server transitively enabled, ini template available with --add-to-start=server
INFO : sessions transitively enabled, ini template available with --add-to-start=sessions
INFO : session-store-mongo initialized in ${jetty.base}/start.d/session-store-mongo.ini
INFO : sessions/mongo/address dynamic dependency of session-store-mongo
MKDIR : ${jetty.base}/lib/nosql
DOWNLD: https://repo1.maven.org/maven2/org/mongodb/mongo-java-driver/2.13.2/mongo-java-driver-2.13.2.jar to ${jetty.base}/lib/nosql/mongo-java-driver-2.13.2.jar
INFO : Base directory was modifiedDoing this enables the MongoDB Session module and any dependent modules or files needed for it to run on the server.
The example above is using a fresh ${jetty.base} with nothing else enabled.
Because MongoDB is not a technology provided by the Eclipse Foundation, users are prompted to assent to the licenses of the external vendor (Apache in this case).
When the --add-to-start argument was added to the command line, it enabled the the session-store-mongo module as well as the sessions and server modules, which are required for MongoDB session management to operate..
It also downloaded the needed Mongo-specific jar file and created a directory named ${jetty.base}/lib/nosql/ to house it.
In addition to adding these modules to the classpath of the server, several ini configuration files were added to the ${jetty.base}/start.d directory.
|
If you have updated versions of the jar files automatically downloaded by Jetty, you can place them in the associated |
Configuring MongoDB Session Properties
Opening the start.d/session-store-mongo.ini will show a list of all the configurable options for the MongoDB module:
# ---------------------------------------
# Module: session-store-mongo
# Enables NoSql session management with a MongoDB driver.
# ---------------------------------------
--module=session-store-mongo
#jetty.session.mongo.dbName=HttpSessions
#jetty.session.mongo.collectionName=jettySessions
#jetty.session.gracePeriod.seconds=3600
#jetty.session.savePeriod.seconds=0
connection-type=address
#jetty.session.mongo.host=localhost
#jetty.session.mongo.port=27017
#connection-type=uri
#jetty.session.mongo.connectionString=mongodb://localhost- jetty.session.gracePeriod.seconds
-
Amount of time, in seconds, to wait for other nodes to be checked to verify an expired session is in fact expired throughout the cluster before closing it.
- jetty.session.savePeriod.seconds=0
-
By default whenever the last concurrent request leaves a session, that session is always persisted via the
SessionDataStore, even if the only thing that changed on the session is its updated last access time. A non-zero value means that theSessionDataStorewill skip persisting the session if only the access time changed, and it has been less thansavePeriodseconds since the last time the session was written.Configuring
savePeriodis useful if your persistence technology is very slow/costly for writes. In a clustered environment, there is a risk of the last access time of the session being out-of-date in the shared store for up tosavePeriodseconds. This allows the possibility that a node may prematurely expire the session, even though it is in use by another node. Thorough consideration of themaxIdleTimeof the session when setting thesavePeriodis imperative - there is no point in setting asavePeriodthat is larger than themaxIdleTime. - jetty.session.mongo.dbName
-
Name of the database in Mongo used to store the Session collection.
- jetty.session.mongo.collectionName
-
Name of the collection in Mongo used to keep all of the Sessions.
- jetty.session.gracePeriod.seconds
-
Amount of time, in seconds, to wait for other nodes to be checked to verify an expired session is in fact expired throughout the cluster before closing it.
- connection-type=address
-
Used when utilizing a direct connection to the Mongo server.
- jetty.session.mongo.host
-
Host name or address for the remote Mongo instance.
- jetty.session.mongo.port
-
Port number for the remote Mongo instance.
- connection-type=uri
-
Used when utilizing MongoURI for secured connections.
- jetty.session.mongo.connectionString
-
The string defining the MongoURI value, such as
mongodb://[username:password@]host1[:port1][,host2[:port2],…[,hostN[:portN]]][/[database][?options]]. More information on how to format the MongoURI string can be found in the official documentation for mongo.You will only use one
connection-typeat a time,addressoruri. If both are utilized in yoursession-store-mongo.ini, only the lastconnection-typeconfigured in the file will be used. By default, theconnection-typeofaddressis used.
Persistent Sessions: Inifinspan
Enabling Infinispan Sessions
When using the Jetty distribution, you will first need to enable the session-store-infinispan-remote module for your Jetty base using the --add-to-start argument on the command line.
$ java -jar ../start.jar --create-startd
INFO : Base directory was modified
$ java -jar ../start.jar --add-to-start=session-store-infinispan-remote
ALERT: There are enabled module(s) with licenses.
The following 1 module(s):
+ contains software not provided by the Eclipse Foundation!
+ contains software not covered by the Eclipse Public License!
+ has not been audited for compliance with its license
Module: session-store-infinispan-remote
+ Infinispan is an open source project hosted on Github and released under the Apache 2.0 license.
+ http://infinispan.org/
+ http://www.apache.org/licenses/LICENSE-2.0.html
Proceed (y/N)? y
INFO : server transitively enabled, ini template available with --add-to-start=server
INFO : sessions transitively enabled, ini template available with --add-to-start=sessions
INFO : session-store-infinispan-remote initialized in ${jetty.base}/start.d/session-store-infinispan-remote.ini
MKDIR : ${jetty.base}/lib/infinispan
DOWNLD: https://repo1.maven.org/maven2/org/infinispan/infinispan-remote-it/9.4.8.Final/infinispan-remote-it-9.4.8.Final.jar to ${jetty.base}/lib/infinispan/infinispan-remote-it-9.4.8.Final.jar
MKDIR : ${jetty.base}/resources
COPY : ${jetty.home}/modules/session-store-infinispan-remote/resources/hotrod-client.properties to ${jetty.base}/resources/hotrod-client.properties
INFO : Base directory was modifiedDoing this enables the remote Infinispan Session module and any dependent modules or files needed for it to run on the server.
The example above is using a fresh ${jetty.base} with nothing else enabled.
Because Infinispan is not a technology provided by the Eclipse Foundation, users are prompted to assent to the licenses of the external vendor (Apache in this case).
When the --add-to-start argument was added to the command line, it enabled the the session-store-infinispan-remote module as well as the sessions and server modules, which are required for Infinispan session management to operate.
It also downloaded the needed Infinispan-specific jar files and created a directory named ${jetty.base}/lib/infinispan/ to house them.
In addition to adding these modules to the classpath of the server it also added several ini configuration files to the ${jetty.base}/start.d directory.
|
If you have updated versions of the jar files automatically downloaded by Jetty, you can place them in the associated |
Configuring Inifinspan Remote Properties
Opening the start.d/session-store-infinispan-remote.ini will show a list of all the configurable options for the JDBC module:
# ---------------------------------------
# Module: session-store-infinispan-remote
# Enables session data store in a remote Infinispan cache
# ---------------------------------------
--module=session-store-infinispan-remote
#jetty.session.infinispan.remoteCacheName=sessions
#jetty.session.infinispan.idleTimeout.seconds=0
#jetty.session.gracePeriod.seconds=3600
#jetty.session.savePeriod.seconds=0- jetty.session.infinispan.remoteCacheName
-
Name of the cache in Infinispan where sessions will be stored.
- jetty.session.infinispan.idleTimeout.seconds
-
Amount of time, in seconds, that a session entry in infinispan can be idle (ie not read or written) before infinispan will delete its entry. Usually, you do not want to set a value for this, as you want jetty to handle all session expiration (and call any SessionListeners). However, if there is the possibility that sessions can be left in infinispan but no longer referenced by any jetty node (so called "zombie" or "orphan" sessions), then you might want to use this feature. You should make sure that the number of seconds you specify is sufficiently large to avoid the situation where a session is still being referenced by jetty, but is rarely accessed and thus deleted by infinispan. Alternatively, you can enable the
infinispan-remote-querymodule, which will allow jetty to search the infinispan session cache to proactively find and properly (ie calling any SessionListeners) scavenge defunct sessions. - jetty.session.gracePeriod.seconds
-
Amount of time, in seconds, to wait for other nodes to be checked to verify an expired session is in fact expired throughout the cluster before closing it.
- jetty.session.savePeriod.seconds=0
-
By default whenever the last concurrent request leaves a session, that session is always persisted via the
SessionDataStore, even if the only thing that changed on the session is its updated last access time. A non-zero value means that theSessionDataStorewill skip persisting the session if only the access time changed, and it has been less thansavePeriodseconds since the last time the session was written.
|
Configuring |
Configuring the Remote Infinispan Query Module
Enabling this module allows jetty to search infinispan for expired sessions that are no longer being referenced by any jetty node.
Note that this is an additional module, to be used in conjuction with the session-store-infinispan-remote module.
java -jar ../start.jar --add-to-start=infinispan-remote-queryThere are no configuration properties associated with this module.
Configuring Embedded Inifinspan Clustering
During testing, it can be helpful to run an in-process instance of Infinispan.
To enable this you will first need to enable the session-store-infinispan-embedded module for your Jetty base using the --add-to-start argument on the command line.
|
If you are running Jetty with JDK 9 or greater, enable |
java -jar ../start.jar --add-to-start=session-store-infinispan-embedded
ALERT: There are enabled module(s) with licenses.
The following 1 module(s):
+ contains software not provided by the Eclipse Foundation!
+ contains software not covered by the Eclipse Public License!
+ has not been audited for compliance with its license
Module: session-store-infinispan-embedded
+ Infinispan is an open source project hosted on Github and released under the Apache 2.0 license.
+ http://infinispan.org/
+ http://www.apache.org/licenses/LICENSE-2.0.html
Proceed (y/N)? y
INFO : server initialised (transitively) in ${jetty.base}/start.d/server.ini
INFO : sessions initialised (transitively) in ${jetty.base}/start.d/sessions.ini
INFO : session-store-infinispan-embedded initialised in ${jetty.base}/start.d/session-store-infinispan-embedded.ini
DOWNLOAD: https://repo1.maven.org/maven2/org/infinispan/infinispan-embedded-it/9.4.8.Final/infinispan-embedded-it-9.4.8.Final.jar to ${jetty.base}/lib/infinispan/infinispan-embedded-it-9.4.8.Final.jar
INFO : Base directory was modifiedDoing this enables the embedded Infinispan Session module and any dependent modules or files needed for it to run on the server.
The example above is using a fresh ${jetty.base} with nothing else enabled.
Because Infinispan is not a technology provided by the Eclipse Foundation, users are prompted to assent to the licenses of the external vendor (Apache in this case).
When the --add-to-start argument was added to the command line, it enabled the the session-store-infinispan-embedded module as well as the sessions and server modules, which are required for Infinispan session management to operate.
It also downloaded the needed Infinispan-specific jar files and created a directory named ${jetty.base}/lib/infinispan/ to house them.
In addition to adding these modules to the classpath of the server it also added several ini configuration files to the ${jetty.base}/start.d directory.
Configuring Inifinspan Embedded Properties
Opening the start.d/session-store-infinispan-remote.ini will show a list of all the configurable options for the JDBC module:
# ---------------------------------------
# Module: session-store-infinispan-embedded
# Enables session data store in a local Infinispan cache
# ---------------------------------------
--module=session-store-infinispan-embedded
#jetty.session.gracePeriod.seconds=3600
#jetty.session.savePeriod.seconds=0- jetty.session.gracePeriod.seconds
-
Amount of time, in seconds, to wait for other nodes to be checked to verify an expired session is in fact expired throughout the cluster before closing it.
- jetty.session.savePeriod.seconds=0
-
By default whenever the last concurrent request leaves a session, that session is always persisted via the
SessionDataStore, even if the only thing that changed on the session is its updated last access time. A non-zero value means that theSessionDataStorewill skip persisting the session if only the access time changed, and it has been less thansavePeriodseconds since the last time the session was written.Configuring
savePeriodis useful if your persistence technology is very slow/costly for writes. In a clustered environment, there is a risk of the last access time of the session being out-of-date in the shared store for up tosavePeriodseconds. This allows the possibility that a node may prematurely expire the session, even though it is in use by another node. Thorough consideration of themaxIdleTimeof the session when setting thesavePeriodis imperative - there is no point in setting asavePeriodthat is larger than themaxIdleTime.==== Configuring Inifinspan Embedded Query
Similarly to the session-store-infinispan-remote module, the session-store-infinispan-embedded module has an adjunct module infinispan-embedded-query, which when enabled, will allow jetty to detect and properly scavenge defunct sessions stranded in infinispan.
java -jar ../start.jar --add-to-start=infinispan-embedded-queryThere are no configuration properties associated with this module.
Converting session format for jetty-9.4.13
From jetty-9.4.13 onwards, we have changed the format of the serialized session when using a remote cache (ie using hotrod). Prior to release 9.4.13 we used the default Infinispan serialization, however this was not able to store sufficient information to allow jetty to properly deserialize session attributes in all circumstances. See issue https://github.com/jetty/jetty.project/issues/2919 for more background.
We have provided a conversion program which will convert any sessions stored in Infinispan to the new format.
|
We recommend that you backup your stored sessions before running the conversion program. |
How to use the converter:
java -cp servlet-api-3.1.jar:jetty-util-9.4.13.jar:jetty-server-9.4.13.jar:infinispan-remote-9.1.0.Final.jar:jetty-infinispan-9.4.13.jar:[other classpath] org.eclipse.jetty.session.infinispan.InfinispanSessionLegacyConverter
Usage: InfinispanSessionLegacyConverter [-Dhost=127.0.0.1] [-Dverbose=true|false] <cache-name> [check]- The classpath
-
Must contain the servlet-api, jetty-util, jetty-server, jetty-infinispan and infinispan-remote jars. If your sessions contain attributes that use application classes, you will also need to also put those classes onto the classpath. If your session has been authenticated, you may also need to include the jetty-security and jetty-http jars on the classpath.
- Parameters
-
When used with no arguments the usage message is printed. When used with the
cache-nameparameter the conversion is performed. When used with bothcache-nameandcheckparameters, sessions are checked for whether or not they are converted.- -Dhost
-
you can optionally provide a system property with the address of your remote Infinispan server. Defaults to the localhost.
- -Dverbose
-
defaults to false. If true, prints more comprehensive stacktrace information about failures. Useful to diagnose why a session is not converted.
- cache-name
-
the name of the remote cache containing your sessions. This is mandatory.
- check
-
the optional check command will verify sessions have been converted. Use it after doing the conversion.
To perform the conversion, run the InfinispanSessionLegacyConverter with just the cache-name, and optionally the host system property.
The following command will attempt to convert all sessions in the cached named my-remote-cache on the machine myhost, ensuring that application classes in the /my/custom/classes directory are on the classpath:
java -cp servlet-api-3.1.jar:jetty-util-9.4.13.jar:jetty-server-9.4.13.jar:infinispan-remote-9.1.0.Final.jar:jetty-infinispan-9.4.13.jar:/my/custom/classes org.eclipse.jetty.session.infinispan.InfinispanSessionLegacyConverter -Dhost=myhost my-remote-cacheIf the converter fails to convert a session, an error message and stacktrace will be printed and the conversion will abort. The failed session should be untouched, however it is prudent to take a backup of your cache before attempting the conversion.
Persistent Sessions: Hazelcast
Enabling Hazelcast Sessions
When using the Jetty distribution, you will first need to enable the session-store-hazelcast-remote module for your Jetty base using the --add-to-start argument on the command line.
$ java -jar ../start.jar --create-startd
MKDIR : ${jetty.base}/start.d
INFO : Base directory was modified
$ java -jar ../start.jar --add-to-start=session-store-hazelcast-remote
ALERT: There are enabled module(s) with licenses.
The following 1 module(s):
+ contains software not provided by the Eclipse Foundation!
+ contains software not covered by the Eclipse Public License!
+ has not been audited for compliance with its license
Module: session-store-hazelcast-remote
+ Hazelcast is an open source project hosted on Github and released under the Apache 2.0 license.
+ https://hazelcast.org/
+ http://www.apache.org/licenses/LICENSE-2.0.html
Proceed (y/N)? y
INFO : server transitively enabled, ini template available with --add-to-start=server
INFO : sessions transitively enabled, ini template available with --add-to-start=sessions
INFO : session-store-hazelcast-remote initialized in ${jetty.base}/start.d/session-store-hazelcast-remote.ini
MKDIR : /Users/admin/mvn-repo/com/hazelcast/hazelcast/3.8.2
DOWNLD: https://repo1.maven.org/maven2/com/hazelcast/hazelcast/3.8.2/hazelcast-3.8.2.jar to /Users/admin/mvn-repo/com/hazelcast/hazelcast/3.8.2/hazelcast-3.8.2.jar
MKDIR : ${jetty.base}/lib/hazelcast
COPY : /Users/admin/mvn-repo/com/hazelcast/hazelcast/3.8.2/hazelcast-3.8.2.jar to ${jetty.base}/lib/hazelcast/hazelcast-3.8.2.jar
COPY : /Users/admin/mvn-repo/com/hazelcast/hazelcast-client/3.8.2/hazelcast-client-3.8.2.jar to ${jetty.base}/lib/hazelcast/hazelcast-client-3.8.2.jar
INFO : Base directory was modifiedDoing this enables the remote Hazelcast Session module and any dependent modules or files needed for it to run on the server.
The example above is using a fresh ${jetty.base} with nothing else enabled.
Because Hazelcast is not a technology provided by the Eclipse Foundation, users are prompted to assent to the licenses of the external vendor (Apache in this case).
When the --add-to-start argument was added to the command line, it enabled the the session-store-hazelcast-remote module as well as the sessions and server modules, which are required for Hazelcast session management to operate.
It also downloaded the needed Hazelcast-specific jar files and created a directory named ${jetty.base}/lib/hazelcast/ to house them.
In addition to adding these modules to the classpath of the server it also added several ini configuration files to the ${jetty.base}/start.d directory.
|
If you have updated versions of the jar files automatically downloaded by Jetty, you can place them in the associated |
Configuring Hazelcast Remote Properties
Opening the start.d/session-store-hazelcast-remote.ini will show a list of all the configurable options for the Hazelcast module:
# ---------------------------------------
# Module: session-store-hazelcast-remote
# Enables session data store in a remote Hazelcast Map
# ---------------------------------------
--module=session-store-hazelcast-remote
#jetty.session.hazelcast.mapName=jetty_sessions
#jetty.session.hazelcast.onlyClient=true
#jetty.session.hazelcast.configurationLocation=
jetty.session.hazelcast.scavengeZombies=false
#jetty.session.gracePeriod.seconds=3600
#jetty.session.savePeriod.seconds=0- jetty.session.hazelcast.mapName
-
Name of the Map in Hazelcast where sessions will be stored.
- jetty.session.hazelcast.onlyClient
-
Hazelcast instance will be configured in client mode
- jetty.session.hazelcast.configurationLocation
-
Path to an an Hazelcast xml configuration file
- jetty.session.hazelcast.scavengeZombies
-
True/False.
Falseby default. Iftrue, jetty will use hazelcast queries to find sessions that are no longer being used on any jetty node and whose expiry time has passed. If you enable this option, and your session stores attributes that reference classes from inside your webapp, or jetty classes, you will need to ensure that these classes are available on each of your hazelcast instances. - jetty.session.gracePeriod.seconds
-
Amount of time, in seconds, to wait for other nodes to be checked to verify an expired session is in fact expired throughout the cluster before closing it.
- jetty.session.savePeriod.seconds=0
-
By default whenever the last concurrent request leaves a session, that session is always persisted via the
SessionDataStore, even if the only thing that changed on the session is its updated last access time. A non-zero value means that theSessionDataStorewill skip persisting the session if only the access time changed, and it has been less thansavePeriodseconds since the last time the session was written.Configuring
savePeriodis useful if your persistence technology is very slow/costly for writes. In a clustered environment, there is a risk of the last access time of the session being out-of-date in the shared store for up tosavePeriodseconds. This allows the possibility that a node may prematurely expire the session, even though it is in use by another node. Thorough consideration of themaxIdleTimeof the session when setting thesavePeriodis imperative - there is no point in setting asavePeriodthat is larger than themaxIdleTime.Be aware using the
scavengeZombiesoption that if your session attributes contain classes from inside your webapp (or jetty classes) then you will need to put these classes onto the classpath of all of your hazelcast instances.==== Configuring Embedded Hazelcast Clustering
During testing, it can be helpful to run an in-process instance of Hazelcast.
To enable this you will first need to enable the session-store-hazelcast-embedded module for your Jetty base using the --add-to-start argument on the command line.
$ java -jar ../start.jar --create-startd
MKDIR : ${jetty.base}/start.d
INFO : Base directory was modified
$ java -jar ../start.jar --add-to-start=session-store-hazelcast-embedded
ALERT: There are enabled module(s) with licenses.
The following 1 module(s):
+ contains software not provided by the Eclipse Foundation!
+ contains software not covered by the Eclipse Public License!
+ has not been audited for compliance with its license
Module: session-store-hazelcast-embedded
+ Hazelcast is an open source project hosted on Github and released under the Apache 2.0 license.
+ https://hazelcast.org/
+ http://www.apache.org/licenses/LICENSE-2.0.html
Proceed (y/N)? y
INFO : server transitively enabled, ini template available with --add-to-start=server
INFO : sessions transitively enabled, ini template available with --add-to-start=sessions
INFO : session-store-hazelcast-embedded initialized in ${jetty.base}/start.d/session-store-hazelcast-embedded.ini
MKDIR : /Users/admin/mvn-repo/com/hazelcast/hazelcast/3.8.2
DOWNLD: https://repo1.maven.org/maven2/com/hazelcast/hazelcast/3.8.2/hazelcast-3.8.2.jar to /Users/admin/mvn-repo/com/hazelcast/hazelcast/3.8.2/hazelcast-3.8.2.jar
MKDIR : ${jetty.base}/lib/hazelcast
COPY : /Users/admin/mvn-repo/com/hazelcast/hazelcast/3.8.2/hazelcast-3.8.2.jar to ${jetty.base}/lib/hazelcast/hazelcast-3.8.2.jar
COPY : /Users/admin/mvn-repo/com/hazelcast/hazelcast-client/3.8.2/hazelcast-client-3.8.2.jar to ${jetty.base}/lib/hazelcast/hazelcast-client-3.8.2.jarDoing this enables the embedded Hazelcast Session module and any dependent modules or files needed for it to run on the server.
The example above is using a fresh ${jetty.base} with nothing else enabled.
Because Hazelcast is not a technology provided by the Eclipse Foundation, users are prompted to assent to the licenses of the external vendor (Apache in this case).
When the --add-to-start argument was added to the command line, it enabled the the session-store-hazelcast-embedded module as well as the sessions and server modules, which are required for Hazelcast session management to operate.
It also downloaded the needed Hazelcast-specific jar files and created a directory named ${jetty.base}/lib/hazelcast/ to house them.
In addition to adding these modules to the classpath of the server it also added several ini configuration files to the ${jetty.base}/start.d directory.
Configuring Hazelcast Embedded Properties
Opening the start.d/start.d/session-store-hazelcast-embedded.ini will show a list of all the configurable options for the Hazelcast module:
# ---------------------------------------
# Module: session-store-hazelcast-embedded
# Enables session data store in an embedded Hazelcast Map
# ---------------------------------------
--module=session-store-hazelcast-embedded
#jetty.session.hazelcast.mapName=jetty_sessions
#jetty.session.hazelcast.configurationLocation=
jetty.session.hazelcast.scavengeZombies=false
#jetty.session.gracePeriod.seconds=3600
#jetty.session.savePeriod.seconds=0- jetty.session.hazelcast.mapName
-
Name of the Map in Hazelcast where sessions will be stored.
- jetty.session.hazelcast.configurationLocation
-
Path to an an Hazelcast xml configuration file
- jetty.session.hazelcast.scavengeZombies
-
True/False.
Falseby default. Iftrue, jetty will use hazelcast queries to find sessions that are no longer being used on any jetty node and whose expiry time has passed. If you enable this option, and your sessions contain attributes that reference classes from inside your webapp (or jetty classes) you will need to ensure that these classes are available on each of your hazelcast instances. - jetty.session.gracePeriod.seconds
-
Amount of time, in seconds, to wait for other nodes to be checked to verify an expired session is in fact expired throughout the cluster before closing it.
- jetty.session.savePeriod.seconds=0
-
By default whenever the last concurrent request leaves a session, that session is always persisted via the
SessionDataStore, even if the only thing that changed on the session is its updated last access time. A non-zero value means that theSessionDataStorewill skip persisting the session if only the access time changed, and it has been less thansavePeriodseconds since the last time the session was written.Configuring
savePeriodis useful if your persistence technology is very slow/costly for writes. In a clustered environment, there is a risk of the last access time of the session being out-of-date in the shared store for up tosavePeriodseconds. This allows the possibility that a node may prematurely expire the session, even though it is in use by another node. Thorough consideration of themaxIdleTimeof the session when setting thesavePeriodis imperative - there is no point in setting asavePeriodthat is larger than themaxIdleTime.Be aware using the
scavengeZombiesoption that if your session attributes contain classes from inside your webapp (or jetty classes) then you will need to put these classes onto the classpath of all of your hazelcast instances. In the cast of embedded hazelcast, as it is started before your webapp, it will NOT have access to your webapp’s classes - you will need to extract these classes and put them onto the jetty server’s classpath.
Persistent Sessions: Google Cloud DataStore
Preparation
You will first need to create a project and enable the Google Cloud api: https://cloud.google.com/docs/authentication#preparation. Take note of the project id that you create in this step as you need to supply it in later steps.
Communicating with GCloudDataStore
When running Jetty outside of google infrastructure
Before running Jetty, you will need to choose one of the following methods to set up the local environment to enable remote GCloud DataStore communications.
-
Using the GCloud SDK:
-
Ensure you have the GCloud SDK installed: https://cloud.google.com/sdk/?hl=en.
-
Use the GCloud tool to set up the project you created in the preparation step:
gcloud config set project PROJECT_ID -
Use the GCloud tool to authenticate a google account associated with the project created in the preparation step:
gcloud auth login ACCOUNT
-
-
Using environment variables
-
Define the environment variable
GCLOUD_PROJECTwith the project id you created in the preparation step. -
Generate a JSON service account key and then define the environment variable
GOOGLE_APPLICATION_CREDENTIALS=/path/to/my/key.json
-
When Running Jetty Inside of Google Infrastructure
The Google deployment tools will automatically configure the project and authentication information for you.
Configuring Indexes for Session Data
Using some special, composite indexes can speed up session search operations, although it may make write operations slower.
By default, indexes will not be used.
In order to use them, you will need to manually upload a file that defines the indexes.
This file is named index.yaml and you can find it in your distribution in ${jetty.base}/etc/sessions/gcloud/index.yaml.
Follow the instructions here to upload the pre-generated index.yaml file.
Communicating with the GCloudDataStore Emulator
To enable communication using the GCloud Emulator:
-
Ensure you have the GCloud SDK installed: https://cloud.google.com/sdk/?hl=en
-
Follow the instructions here on how to start the GCloud datastore emulator, and how to propagate the environment variables that it creates to the terminal in which you run Jetty.
Enabling the Google Cloud DataStore Module
When using the Jetty distribution, you will first need to enable the session-store-gcloud module for your Jetty base using the --add-to-start argument on the command line.
$ java -jar ../start.jar --create-startd
INFO : Base directory was modified
$ java -jar ../start.jar --add-to-start=session-store-gcloud
ALERT: There are enabled module(s) with licenses.
The following 2 module(s):
+ contains software not provided by the Eclipse Foundation!
+ contains software not covered by the Eclipse Public License!
+ has not been audited for compliance with its license
Module: gcloud
+ GCloudDatastore is an open source project hosted on Github and released under the Apache 2.0 license.
+ https://github.com/GoogleCloudPlatform/gcloud-java
+ http://www.apache.org/licenses/LICENSE-2.0.html
Module: slf4j-api
+ SLF4J is distributed under the MIT License.
+ Copyright (c) 2004-2013 QOS.ch
+ All rights reserved.
+ Permission is hereby granted, free of charge, to any person obtaining
+ a copy of this software and associated documentation files (the
+ "Software"), to deal in the Software without restriction, including
+ without limitation the rights to use, copy, modify, merge, publish,
+ distribute, sublicense, and/or sell copies of the Software, and to
+ permit persons to whom the Software is furnished to do so, subject to
+ the following conditions:
+ The above copyright notice and this permission notice shall be
+ included in all copies or substantial portions of the Software.
+ THE SOFTWARE IS PROVIDED "AS IS", WITHOUT WARRANTY OF ANY KIND,
+ EXPRESS OR IMPLIED, INCLUDING BUT NOT LIMITED TO THE WARRANTIES OF
+ MERCHANTABILITY, FITNESS FOR A PARTICULAR PURPOSE AND
+ NONINFRINGEMENT. IN NO EVENT SHALL THE AUTHORS OR COPYRIGHT HOLDERS BE
+ LIABLE FOR ANY CLAIM, DAMAGES OR OTHER LIABILITY, WHETHER IN AN ACTION
+ OF CONTRACT, TORT OR OTHERWISE, ARISING FROM, OUT OF OR IN CONNECTION
+ WITH THE SOFTWARE OR THE USE OR OTHER DEALINGS IN THE SOFTWARE.
Proceed (y/N)? y
INFO : webapp transitively enabled, ini template available with --add-to-start=webapp
INFO : jul-impl transitively enabled
INFO : server transitively enabled, ini template available with --add-to-start=server
INFO : sessions transitively enabled, ini template available with --add-to-start=sessions
INFO : servlet transitively enabled
INFO : gcloud transitively enabled, ini template available with --add-to-start=gcloud
INFO : annotations transitively enabled
INFO : plus transitively enabled
INFO : slf4j-api transitively enabled
INFO : security transitively enabled
INFO : gcloud-datastore transitively enabled
INFO : jcl-slf4j transitively enabled
INFO : session-store-gcloud initialized in ${jetty.base}/start.d/session-store-gcloud.ini
INFO : jndi transitively enabled
MKDIR : ${jetty.base}/etc
COPY : ${jetty.home}/modules/jul-impl/etc/java-util-logging.properties to ${jetty.base}/etc/java-util-logging.properties
MKDIR : ${jetty.base}/lib/slf4j
DOWNLD: https://repo1.maven.org/maven2/org/slf4j/slf4j-api/1.7.21/slf4j-api-1.7.21.jar to ${jetty.base}/lib/slf4j/slf4j-api-1.7.21.jar
MKDIR : ${jetty.base}/lib/gcloud
COPY : /Users/admin/.m2/repository/aopalliance/aopalliance/1.0/aopalliance-1.0.jar to ${jetty.base}/lib/gcloud/aopalliance-1.0.jar
COPY : /Users/admin/.m2/repository/com/fasterxml/jackson/core/jackson-core/2.1.3/jackson-core-2.1.3.jar to ${jetty.base}/lib/gcloud/jackson-core-2.1.3.jar
COPY : /Users/admin/.m2/repository/com/google/api-client/google-api-client-appengine/1.21.0/google-api-client-appengine-1.21.0.jar to ${jetty.base}/lib/gcloud/google-api-client-appengine-1.21.0.jar
COPY : /Users/admin/.m2/repository/com/google/api-client/google-api-client/1.20.0/google-api-client-1.20.0.jar to ${jetty.base}/lib/gcloud/google-api-client-1.20.0.jar
COPY : /Users/admin/.m2/repository/com/google/api-client/google-api-client-servlet/1.21.0/google-api-client-servlet-1.21.0.jar to ${jetty.base}/lib/gcloud/google-api-client-servlet-1.21.0.jar
DOWNLD: https://repo1.maven.org/maven2/com/google/api/gax/0.0.21/gax-0.0.21.jar to ${jetty.base}/lib/gcloud/gax-0.0.21.jar
COPY : /Users/admin/.m2/repository/com/google/api/grpc/grpc-google-common-protos/0.1.0/grpc-google-common-protos-0.1.0.jar to ${jetty.base}/lib/gcloud/grpc-google-common-protos-0.1.0.jar
COPY : /Users/admin/.m2/repository/com/google/api/grpc/grpc-google-iam-v1/0.1.0/grpc-google-iam-v1-0.1.0.jar to ${jetty.base}/lib/gcloud/grpc-google-iam-v1-0.1.0.jar
COPY : /Users/admin/.m2/repository/com/google/auth/google-auth-library-credentials/0.3.1/google-auth-library-credentials-0.3.1.jar to ${jetty.base}/lib/gcloud/google-auth-library-credentials-0.3.1.jar
COPY : /Users/admin/.m2/repository/com/google/auth/google-auth-library-oauth2-http/0.3.1/google-auth-library-oauth2-http-0.3.1.jar to ${jetty.base}/lib/gcloud/google-auth-library-oauth2-http-0.3.1.jar
DOWNLD: https://repo1.maven.org/maven2/com/google/auto/value/auto-value/1.2/auto-value-1.2.jar to ${jetty.base}/lib/gcloud/auto-value-1.2.jar
DOWNLD: https://repo1.maven.org/maven2/com/google/cloud/datastore/datastore-v1-proto-client/1.3.0/datastore-v1-proto-client-1.3.0.jar to ${jetty.base}/lib/gcloud/datastore-v1-proto-client-1.3.0.jar
DOWNLD: https://repo1.maven.org/maven2/com/google/cloud/datastore/datastore-v1-protos/1.3.0/datastore-v1-protos-1.3.0.jar to ${jetty.base}/lib/gcloud/datastore-v1-protos-1.3.0.jar
DOWNLD: https://repo1.maven.org/maven2/com/google/cloud/google-cloud-core/0.5.1/google-cloud-core-0.5.1.jar to ${jetty.base}/lib/gcloud/google-cloud-core-0.5.0.jar
DOWNLD: https://repo1.maven.org/maven2/com/google/cloud/google-cloud-datastore/0.5.1/google-cloud-datastore-0.5.1.jar to ${jetty.base}/lib/gcloud/google-cloud-datastore-0.5.1.jar
COPY : /Users/admin/.m2/repository/com/google/code/findbugs/jsr305/1.3.9/jsr305-1.3.9.jar to ${jetty.base}/lib/gcloud/jsr305-1.3.9.jar
COPY : /Users/admin/.m2/repository/com/google/code/gson/gson/2.3/gson-2.3.jar to ${jetty.base}/lib/gcloud/gson-2.3.jar
COPY : /Users/admin/.m2/repository/com/google/guava/guava/19.0/guava-19.0.jar to ${jetty.base}/lib/gcloud/guava-19.0.jar
COPY : /Users/admin/.m2/repository/com/google/http-client/google-http-client-appengine/1.21.0/google-http-client-appengine-1.21.0.jar to ${jetty.base}/lib/gcloud/google-http-client-appengine-1.21.0.jar
COPY : /Users/admin/.m2/repository/com/google/http-client/google-http-client-jackson2/1.19.0/google-http-client-jackson2-1.19.0.jar to ${jetty.base}/lib/gcloud/google-http-client-jackson2-1.19.0.jar
COPY : /Users/admin/.m2/repository/com/google/http-client/google-http-client-jackson/1.21.0/google-http-client-jackson-1.21.0.jar to ${jetty.base}/lib/gcloud/google-http-client-jackson-1.21.0.jar
COPY : /Users/admin/.m2/repository/com/google/http-client/google-http-client/1.21.0/google-http-client-1.21.0.jar to ${jetty.base}/lib/gcloud/google-http-client-1.21.0.jar
COPY : /Users/admin/.m2/repository/com/google/http-client/google-http-client-jdo/1.21.0/google-http-client-jdo-1.21.0.jar to ${jetty.base}/lib/gcloud/google-http-client-jdo-1.21.0.jar
COPY : /Users/admin/.m2/repository/com/google/http-client/google-http-client-protobuf/1.20.0/google-http-client-protobuf-1.20.0.jar to ${jetty.base}/lib/gcloud/google-http-client-protobuf-1.20.0.jar
COPY : /Users/admin/.m2/repository/com/google/inject/guice/4.0/guice-4.0.jar to ${jetty.base}/lib/gcloud/guice-4.0.jar
COPY : /Users/admin/.m2/repository/com/google/oauth-client/google-oauth-client-appengine/1.21.0/google-oauth-client-appengine-1.21.0.jar to ${jetty.base}/lib/gcloud/google-oauth-client-appengine-1.21.0.jar
COPY : /Users/admin/.m2/repository/com/google/oauth-client/google-oauth-client/1.21.0/google-oauth-client-1.21.0.jar to ${jetty.base}/lib/gcloud/google-oauth-client-1.21.0.jar
COPY : /Users/admin/.m2/repository/com/google/oauth-client/google-oauth-client-servlet/1.21.0/google-oauth-client-servlet-1.21.0.jar to ${jetty.base}/lib/gcloud/google-oauth-client-servlet-1.21.0.jar
COPY : /Users/admin/.m2/repository/com/google/protobuf/protobuf-java/3.0.0/protobuf-java-3.0.0.jar to ${jetty.base}/lib/gcloud/protobuf-java-3.0.0.jar
COPY : /Users/admin/.m2/repository/com/google/protobuf/protobuf-java-util/3.0.0/protobuf-java-util-3.0.0.jar to ${jetty.base}/lib/gcloud/protobuf-java-util-3.0.0.jar
COPY : /Users/admin/.m2/repository/commons-codec/commons-codec/1.3/commons-codec-1.3.jar to ${jetty.base}/lib/gcloud/commons-codec-1.3.jar
COPY : /Users/admin/.m2/repository/io/grpc/grpc-context/1.0.1/grpc-context-1.0.1.jar to ${jetty.base}/lib/gcloud/grpc-context-1.0.1.jar
COPY : /Users/admin/.m2/repository/io/grpc/grpc-core/1.0.1/grpc-core-1.0.1.jar to ${jetty.base}/lib/gcloud/grpc-core-1.0.1.jar
COPY : /Users/admin/.m2/repository/io/grpc/grpc-protobuf/1.0.1/grpc-protobuf-1.0.1.jar to ${jetty.base}/lib/gcloud/grpc-protobuf-1.0.1.jar
COPY : /Users/admin/.m2/repository/io/grpc/grpc-protobuf-lite/1.0.1/grpc-protobuf-lite-1.0.1.jar to ${jetty.base}/lib/gcloud/grpc-protobuf-lite-1.0.1.jar
COPY : /Users/admin/.m2/repository/javax/inject/javax.inject/1/javax.inject-1.jar to ${jetty.base}/lib/gcloud/javax.inject-1.jar
COPY : /Users/admin/.m2/repository/javax/jdo/jdo2-api/2.3-eb/jdo2-api-2.3-eb.jar to ${jetty.base}/lib/gcloud/jdo2-api-2.3-eb.jar
COPY : /Users/admin/.m2/repository/javax/transaction/transaction-api/1.1/transaction-api-1.1.jar to ${jetty.base}/lib/gcloud/transaction-api-1.1.jar
COPY : /Users/admin/.m2/repository/joda-time/joda-time/2.9.2/joda-time-2.9.2.jar to ${jetty.base}/lib/gcloud/joda-time-2.9.2.jar
COPY : /Users/admin/.m2/repository/org/apache/httpcomponents/httpclient/4.0.1/httpclient-4.0.1.jar to ${jetty.base}/lib/gcloud/httpclient-4.0.1.jar
COPY : /Users/admin/.m2/repository/org/apache/httpcomponents/httpcore/4.0.1/httpcore-4.0.1.jar to ${jetty.base}/lib/gcloud/httpcore-4.0.1.jar
COPY : /Users/admin/.m2/repository/org/codehaus/jackson/jackson-core-asl/1.9.11/jackson-core-asl-1.9.11.jar to ${jetty.base}/lib/gcloud/jackson-core-asl-1.9.11.jar
COPY : /Users/admin/.m2/repository/org/json/json/20151123/json-20151123.jar to ${jetty.base}/lib/gcloud/json-20151123.jar
DOWNLD: https://repo1.maven.org/maven2/org/slf4j/jcl-over-slf4j/1.7.21/jcl-over-slf4j-1.7.21.jar to ${jetty.base}/lib/slf4j/jcl-over-slf4j-1.7.21.jar
COPY : ${jetty.home}/modules/gcloud/index.yaml to ${jetty.base}/etc/index.yaml
INFO : Base directory was modified
ERROR : Module jcl-slf4j requires a module providing slf4j-impl from one of [slf4j-simple-impl, slf4j-logback, slf4j-jul, slf4j-log4j2, slf4j-log4j]
ERROR : Unsatisfied module dependencies: jcl-slf4j
Usage: java -jar $JETTY_HOME/start.jar [options] [properties] [configs]
java -jar $JETTY_HOME/start.jar --help # for more informationDoing this enables the GCloud Session module and any dependent session modules or files needed for it to run on the server.
The example above is using a fresh ${jetty.base} with nothing else enabled.
Because the Google Cloud DataStore is not a technology provided by the Eclipse Foundation, users are prompted to assent to the licenses of the external vendor (Apache in this case).
You will notice, however, that the above output presented a warning: GCloud requires certain Java Commons Logging features to work correctly.
GCloud has a dependency on Java Commons Logging, and by default Jetty will route this through SLF4J.
Enabling the GCloud Sessions module will also enable the jcl-slf4j module, which sends JCL logging information to SLF4J.
It does not, however, configure a SLF4J implementation for the users.
As such, you will also need to enable one of the SLF4J implementation modules listed.
In this example, we will enable the slf4j-simple-impl module to provide a SLF4J implementation.
$ java -jar ../start.jar --add-to-start=slf4j-simple-impl
INFO : slf4j-simple-impl initialized in ${jetty.base}/start.d/slf4j-simple-impl.ini
INFO : resources transitively enabled
DOWNLD: https://repo1.maven.org/maven2/org/slf4j/slf4j-simple/1.7.21/slf4j-simple-1.7.21.jar to ${jetty.base}/lib/slf4j/slf4j-simple-1.7.21.jar
MKDIR : ${jetty.base}/resources
COPY : ${jetty.home}/modules/slf4j-simple-impl/resources/simplelogger.properties to ${jetty.base}/resources/simplelogger.properties
INFO : Base directory was modifiedWhen the --add-to-start argument was added to the command line the first time, it enabled the the session-store-gcloud module as well as several others, such as as server, sessions, webapp and others which are required for GCloud session management to operate; the slf4j-simple-impl and its dependent modules were added when the the command was run the second time.
In addition to adding these modules to the classpath of the server it also added the respective configuration files to the ${jetty.base}start.d directory.
|
If you have updated versions of the jar files automatically downloaded by Jetty, you can place them in the associated |
Configuring GCloud Session Properties
Opening the start.d/session-store-gcloud.ini will display a list of all the configurable properties for the Google Cloud DataStore module:
# ---------------------------------------
# Module: session-store-gcloud
# Enables GCloudDatastore session management.
# ---------------------------------------
--module=session-store-gcloud
## GCloudDatastore Session config
#jetty.session.gracePeriod.seconds=3600
#jetty.session.savePeriod.seconds=0
#jetty.session.gcloud.maxRetries=5
#jetty.session.gcloud.backoffMs=1000
#jetty.session.gcloud.namespace=
#jetty.session.gcloud.model.kind=GCloudSession
#jetty.session.gcloud.model.id=id
#jetty.session.gcloud.model.contextPath=contextPath
#jetty.session.gcloud.model.vhost=vhost
#jetty.session.gcloud.model.accessed=accessed
#jetty.session.gcloud.model.lastAccessed=lastAccessed
#jetty.session.gcloud.model.createTime=createTime
#jetty.session.gcloud.model.cookieSetTime=cookieSetTime
#jetty.session.gcloud.model.lastNode=lastNode
#jetty.session.gcloud.model.expiry=expiry
#jetty.session.gcloud.model.maxInactive=maxInactive
#jetty.session.gcloud.model.attributes=attributes- jetty.session.gracePeriod.seconds
-
Amount of time, in seconds, to wait for other nodes to be checked to verify an expired session is in fact expired throughout the cluster before closing it.
- jetty.session.savePeriod.seconds=0
-
By default whenever the last concurrent request leaves a session, that session is always persisted via the
SessionDataStore, even if the only thing that changed on the session is its updated last access time. A non-zero value means that theSessionDataStorewill skip persisting the session if only the access time changed, and it has been less thansavePeriodseconds since the last time the session was written.Configuring
savePeriodis useful if your persistence technology is very slow/costly for writes. In a clustered environment, there is a risk of the last access time of the session being out-of-date in the shared store for up tosavePeriodseconds. This allows the possibility that a node may prematurely expire the session, even though it is in use by another node. Thorough consideration of themaxIdleTimeof the session when setting thesavePeriodis imperative - there is no point in setting asavePeriodthat is larger than themaxIdleTime. - jetty.session.gcloud.maxRetries
-
Maxmium number of tries to connect to GCloud DataStore to write sessions.
- jetty.session.gcloud.backoffMs
-
Amount of time, in milliseconds, between attempts to connect to the GCloud DataStore to write sessions.
- jetty.session.gcloud.namespace
-
Optional. Sets the namespace for GCloud Datastore to use. If set, partitions the visibility of session data between webapps, which is helpful for multi-tenant deployments. More information can be found here.
The other values listed are simply the names of properties that represent stored session data, and can be changed if needed.
Persistent Sessions: The L2 Session Data Cache
If your chosen persistence technology is slow, it can be helpful to locally cache the session data.
The CachingSessionDataStore is a special type of SessionDataStore that locally caches session data, which makes reads faster. It writes-through to your chosen type of SessionDataStore when session data changes.
MemcachedSessionDataMap
The MemcachedSessionDataMap uses memcached to perform caching.
To enable it with the Jetty distribution, enable the session-store-cache module, along with your chosen session-store-xxxx module, and optionally the session-cache-hash or session-cache-null modules.
After enabling, the $jetty.base/start.d/session-store-cache.ini file will be generated:
--module=session-store-cache
## Session Data Cache type: xmemcached
session-data-cache=xmemcached
#jetty.session.memcached.host=localhost
#jetty.session.memcached.port=11211
#jetty.session.memcached.expirySec=
#jetty.session.memcached.heartbeats=trueThe configuration properties are:
- jetty.session.memcached.host
-
Default value is
localhost. This is the host on which the memcached server resides. - jetty.session.memcached.port
-
Default value is
11211. This is the port on which the memcached server is listening. - jetty.session.memcached.expirySec
-
Default value
0. This is the length of time in seconds that an item can remain in the memcached cache, where 0 indicates indefinitely. - jetty.session.memcached.heartbeats
-
Default value
true. Whether or not the memcached system should generate heartbeats.
Session Use Cases
Clustering with a Sticky Load Balancer
Preferably, your cluster will utilize a sticky load balancer.
This will route requests for the same Session to the same Jetty instance.
In this case, the DefaultSessionCache can be used to keep in-use Session objects in memory.
You can fine-tune the cache by controlling how long Session objects remain in memory with the eviction policy settings.
If you have a large number of Sessions or very large Session objects, then you may want to manage your memory allocation by controlling the amount of time Session objects spend in the cache.
The EVICT_ON_SESSION_EXIT eviction policy will remove a Session object from the cache as soon as the last simultaneous request referencing it exits.
Alternatively, the EVICT_ON_INACTIVITY policy will remove a Session object from the cache after a configurable amount of time has passed without a request referencing it.
If your Sessions are very long lived and infrequently referenced, you might use the EVICT_ON_INACTIVITY_POLICY to control the size of the cache.
If your Sessions are small, or relatively few or stable in number or they are read-mostly, then you might select the NEVER_EVICT policy.
With this policy, Session objects will remain in the cache until they either expire or are explicitly invalidated.
If you have a high likelihood of simultaneous requests for the same session object, then the EVICT_ON_SESSION_EXIT policy will ensure the Session object stays in the cache as long as it is needed.
Clustering Without a Sticky Load Balancer
Without a sticky load balancer requests for the same session may arrive on any node in the cluster.
This means it is likely that the copy of the Session object in any SessionCache is likely to be out-of-date, as the Session was probably last accessed on a different node.
In this case, your choices are to use either the NullSessionCache or to de-tune the DefaultSessionCache.
If you use the NullSessionCache all Session object caching is avoided.
This means that every time a request references a session it must be brought in from persistent storage.
It also means that there can be no sharing of Session objects for multiple requests for the same session: each will have their own Session object.
Furthermore, the outcome of session writes are indeterminate because the Servlet Specification does not mandate ACID transactions for sessions.
If you use the DefaultSessionCache, there is a risk that the caches on some nodes will contain out-of-date Session information as simultaneous requests for the same session are scattered over the cluster.
To mitigate this somewhat you can use the EVICT_ON_SESSION_EXIT eviction policy: this will ensure that the Session is removed from the cache as soon as the last simultaneous request for it exits.
Again, due to the lack of Session transactionality, the ordering outcome of write operations cannot be guaranteed.
As the Session is cached while at least one request is accessing it, it is possible for multiple simultaneous requests to share the same Session object.
Handling corrupted or unloadable session data
For various reasons it might not be possible for the SessionDataStore to re-read a stored session.
One scenario is that the session stores a serialized object in it’s attributes, and after a redeployment there in an incompatible class change.
Using the setter SessionCache.setRemoveUnloadableSessions(true) will allow the SessionDataStore to delete the unreadable session from persistent storage.
This can be useful from preventing the scavenger from continually generating errors on the same expired, but un-restorable, session.
Configuring Sessions via Jetty XML
With the provided session modules, there is no need to configure a context xml or jetty-web.xml file for sessions.
That said, if a user wishes to configure sessions this way, it is possible using Jetty IoC XML format.
Below is an example of how you could configure a the FileSessionDataStore, but the same concept would apply to any of the *SessionDataStores discussed in this chapter:
<Configure class="org.eclipse.jetty.webapp.WebAppContext">
<Call id="sh" name="getSessionHandler">
<Set name="sessionCache">
<New class="org.eclipse.jetty.server.session.DefaultSessionCache">
<Arg><Ref id="sh"/></Arg>
<Set name="sessionDataStore">
<New class="org.eclipse.jetty.server.session.FileSessionDataStore">
<Set name="storeDir">/tmp/sessions</Set>
</New>
</Set>
</New>
</Set>
</Call>
</Configure>The example above functions in either a jetty-web.xml file or a context xml descriptor file.
|
If you explicitly configure the |
Jetty Logging
This chapter discusses various options for configuring logging.
Configuring Jetty Logging
Jetty provides logging via its own org.eclipse.jetty.util.log.Logger layer, and does not natively use any existing Java logging framework.
All logging events, produced via the Jetty logging layer, have a name, a level, and a message.
The name is a FQCN (fully qualified class name) similar to how all existing Java logging frameworks operate.
Jetty logging, however, has a slightly different set of levels that it uses internally:
- WARN
-
For events serious enough to inform and log, but not fatal.
- INFO
-
Informational events.
- DEBUG
-
Debugging events (very noisy).
- IGNORE
-
Exception events that you can safely ignore, but useful for some people. You might see this level as DEBUG under some Java logging framework configurations, where it retains the ignore phrase somewhere in the logging.
|
Jetty logging produces no FATAL or SEVERE events. |
Selecting the Log Framework
Configure the Jetty logging layer via the org.eclipse.jetty.util.log.Log class, following these rules.
-
Load Properties
-
First from a Classpath Resource called
jetty-logging.properties(if found). -
Then from the
System.getProperties().
-
-
Determine the log implementation.
-
If property
org.eclipse.jetty.util.log.classis defined, load the class it defines as the logger implementation from the serverclasspath. -
If the class
org.slf4j.Loggerexists in server classpath, the Jetty implementation becomesorg.eclipse.jetty.util.log.Slf4jLog. -
If no logger implementation is specified, default to
org.eclipse.jetty.util.log.StdErrLog.
-
You can create your own custom logging by providing an implementation of the Jetty Logger API. For an example of a custom logger, see JavaUtilLog.java.
The jetty-logging.properties file
By default, the internal Jetty Logging discovery mechanism will load logging specific properties from a classpath resource called jetty-logging.properties and then initialize the Logging from a combination of properties found in that file, along with any System Properties.
A typical jetty-logging.properties file will include at least the declaration of which logging implementation you want to use by defining a value for the org.eclipse.jetty.util.log.class property.
Examples for various logging frameworks can be found later in this documentation.
-
Default Logging with Jetty’s StdErrLog
-
Using Logback via SLF4J
Default Logging with Jetty’s StdErrLog
StdErrLog Configuration
If you do nothing to configure a separate logging framework, Jetty will default to using an internal org.eclipse.jetty.util.log.StdErrLog implementation.
This will output all logging events to STDERR (aka System.err).
Simply use Jetty and StdErrLog-based logging is output to the console.
Included in the Jetty distribution is a logging module named console-capture that is capable of performing simple capturing of all STDOUT (System.out) and STDERR (System.err) output to a file that is rotated daily.
To enable this feature, simply activate the console-capture module on the command line:
[my-base]$ java -jar ../start.jar --add-to-start=console-capture
INFO : console-capture initialized in ${jetty.base}/start.d/console-capture.ini
MKDIR : ${jetty.base}/logs
INFO : Base directory was modified
[my-base]$ tree
.
├── logs
└── start.d
└── console-capture.iniThe default configuration for logging output will create a file ${jetty.base}/logs/yyyy_mm_dd.stderrout.log which allows configuration of the output directory by setting the jetty.logs property.
|
By default, logs are not set to be appended, meaning a the log file is wiped clean upon sever restart.
You can change this setting by editing the |
Just enabling the console-capture will simply output the values of STDERR and STDOUT to a log file.
To customize the log further, a module named logging-jetty is available to provides a default properties file to configure.
As with console-capture, you activate the logging-jetty on the command line.
[my-base]$ java -jar ../start.jar --add-to-start=logging-jetty
INFO : logging-jetty initialized in ${jetty.base}/start.d/logging-jetty.ini
INFO : resources transitively enabled
MKDIR : ${jetty.base}/resources
COPY : ${jetty.home}/modules/logging-jetty/resources/jetty-logging.properties to ${jetty.base}/resources/jetty-logging.properties
INFO : Base directory was modified
[my-base]$ tree
.
├── logs
├── resources
│ └── jetty-logging.properties
└── start.d
├── console-capture.ini
└── logging-jetty.iniOnce activated, you can find the properties file at ${jetty.base}/resources/jetty-logging.properties.
By default, the following parameters are defined.
To change them, un-comment the line and substitute your naming scheme and configuration choices.
## Force jetty logging implementation
#org.eclipse.jetty.util.log.class=org.eclipse.jetty.util.log.StdErrLog
## Set logging levels from: ALL, DEBUG, INFO, WARN, OFF
#org.eclipse.jetty.LEVEL=INFO
#com.example.LEVEL=INFO
## Hide stacks traces in logs?
#com.example.STACKS=false
## Show the source file of a log location?
#com.example.SOURCE=falseThere are a number of properties that can be defined in the configuration that will affect the behavior of StdErr logging with console-capture.
<name>.LEVEL=<level>-
Sets the logging level for all loggers within the
namespecified to the level, which can be (in increasing order of restriction)ALL,DEBUG,INFO,WARN,OFF. The name (or hierarchy) can be a specific fully qualified class or a package namespace. For example,org.eclipse.jetty.http.LEVEL=DEBUGis a package namespace approach to turn all loggers in the Jetty HTTP package to DEBUG level, andorg.eclipse.jetty.io.ChanelEndPoint.LEVEL=ALLturns on all logging events for the specific class, includingDEBUG,INFO,WARN(and even special internally ignored exception classes). If more than one system property specifies a logging level, the most specific one applies. <name>.SOURCE=<boolean>-
Named Logger specific, attempts to print the Java source file name and line number from where the logging event originated. Name must be a fully qualified class name (this configurable does not support package name hierarchy). Default is false. Be aware that this is a slow operation and has an impact on performance.
<name>.STACKS=<boolean>-
Named Logger specific, controls the display of stacktraces. Name must be a fully qualified class name (this configurable does not support package name hierarchy). Default is true.
org.eclipse.jetty.util.log.stderr.SOURCE=<boolean>-
Special Global Configuration. Attempts to print the Java source file name and line number from where the logging event originated. Default is false.
org.eclipse.jetty.util.log.stderr.LONG=<boolean>-
Special Global Configuration. When true, outputs logging events to
STDERRusing long form, fully qualified class names. When false, uses abbreviated package names. Default is false.-
Example when set to false:
2016-10-21 15:31:01.248:INFO::main: Logging initialized @332ms to org.eclipse.jetty.util.log.StdErrLog 2016-10-21 15:31:01.370:INFO:oejs.Server:main: jetty-9.4.0-SNAPSHOT 2016-10-21 15:31:01.400:INFO:oejs.AbstractConnector:main: Started ServerConnector@2c330fbc{HTTP/1.1,[http/1.1]}{0.0.0.0:8080} 2016-10-21 15:31:01.400:INFO:oejs.Server:main: Started @485ms-
Example when set to true:
2016-10-21 15:31:35.020:INFO::main: Logging initialized @340ms to org.eclipse.jetty.util.log.StdErrLog 2016-10-21 15:31:35.144:INFO:org.eclipse.jetty.server.Server:main: jetty-9.4.0-SNAPSHOT 2016-10-21 15:31:35.174:INFO:org.eclipse.jetty.server.AbstractConnector:main: Started ServerConnector@edf4efb{HTTP/1.1,[http/1.1]}{0.0.0.0:8080} 2016-10-21 15:31:35.175:INFO:org.eclipse.jetty.server.Server:main: Started @495ms -
Deprecated Parameters
These parameters existed in prior versions of Jetty, and are no longer supported. They are included here for historical (and search engine) reasons.
org.eclipse.jetty.util.log.DEBUG-
Formerly used to enable DEBUG level logging on any logger used within Jetty (not just Jetty’s own logger).
-
Replaced with using the logger implementation specific configuration and level filtering.
-
org.eclipse.jetty.util.log.stderr.DEBUG-
Formerly used to enable DEBUG level logging on the internal Jetty
StdErrLogimplementation.-
Replaced with level specific equivalent. Example:
org.eclipse.jetty.LEVEL=DEBUG
-
DEBUG-
Ancient debugging flag that turned on all debugging, even non-logging debugging.
-
Jetty no longer uses because many third party libraries employ this overly simple property name, which would generate far too much console output.
-
Configuring Jetty Request Logs
Request logs are a record of the requests that the server has processed. There is one entry per request received, and commonly in the standard NCSA format, so you can use tools like Webalizer to analyze them conveniently.
Constructing a Request Log Entry
A standard request log entry includes the client IP address, date, method, URL, result, size, referrer, user agent and latency. For example:
123.4.5.6 - - [20/Jul/2016:10:16:17 +0000] "GET /jetty/tut/XmlConfiguration.html HTTP/1.1" 200 76793 "http://localhost:8080/jetty/tut/logging.html" "Mozilla/5.0 (X11; U; Linux i686; en-US; rv:1.6) Gecko/20040614 Firefox/0.8" 342
Implementing a Request Log
Jetty provides an implementation called NCSARequestLog which supports the NCSA format in files that will roll over on a daily basis.
The Logback Project offers another implementation of a RequestLog interface, providing rich and powerful HTTP-access log functionality.
If neither of these options meets your needs, you can implement a custom request logger by implementing Jetty’s RequestLog.java interface and plugging it in similar to the NCSARequestLog, as shown below.
Configuring the Request Log module
To enable the Request Log module for the entire server via the Jetty distribution, it first needs to be enabled on the command line:
$ java -jar ../start.jar --add-to-start=requestlog
INFO: requestlog initialised in ${jetty.base}/start.d/requestlog.ini
MKDIR: ${jetty.base}/logs
INFO: Base directory was modifiedThe above command will add a new requestlog.ini file to your {$jetty.base}/start.d directory.
|
By default, request logs are not set to be appended, meaning a the log file is wiped clean upon sever restart.
You can change this setting by editing the |
The equivalent code for embedded usages of Jetty is:
NCSARequestLog requestLog = new NCSARequestLog("/var/logs/jetty/jetty-yyyy_mm_dd.request.log");
requestLog.setAppend(true);
requestLog.setExtended(false);
requestLog.setLogTimeZone("GMT");
requestLog.setLogLatency(true);
requestLog.setRetainDays("90");
server.setRequestLog(requestLog);This configures a request log in {$jetty.home}/logs with filenames including the date.
Existing log files are appended to and the extended NCSA format is used in the GMT time zone.
The above configuration enables Log Latency, which is the amount of time it took the server to handle the request. This value is measured in milliseconds and is appended to the the log file for each request.
You can also customize the number of days you wish to keep request logs.
By default, log files are kept for 90 days before being deleted.
The value for retainDays (xml) or setRetainDays (Java) should be configured as 1 + n days.
For example, if you wanted to keep the logs for the current day and the day prior you would set the retainDays (or setRetainDays) value to 2.
Introducing RequestLog.Writer
The concept of a RequestLog.Writer, introduced in Jetty 9.4.15, manages the writing to a log the string generated by the RequestLog.
This allows the CustomRequestLog to match the functionality of other RequestLogger implementations by plugging in any RequestLog.Writer and a custom format string.
Jetty currently has implementations of RequestLog.Writer, RequestLogWriter, AsyncRequestLogWriter, and Slf4jRequestLogWriter.
So, the way to create an asynchronous RequestLog using the extended NCSA format has been changed from:
new AsyncNcsaRequestLog(filename)
to:
new CustomRequestLog(new AsyncRequestLogWriter(filename), CustomRequestLog.EXTENDED_NCSA_FORMAT)
Additionally, there are now two settings for the log timezone to be configured.
There is the configuration for logging the request time, which is set in the timeZone parameter in the %t format code of the string, given in the format %{format|timeZone|locale}t.
The other timeZone parameter relates to the generation of the log file name (both at creation and roll over).
This is configured in the requestlog module file, or can be used as a setter on RequestLogWriter via XML.
Both timezones are set to GMT by default.
Configuring a Separate Request Log For a Web Application
To configure a separate request log for specific a web application, add the following to the context XML file.
<Configure class="org.eclipse.jetty.webapp.WebAppContext">
...
<Call name="insertHandler">
<Arg>
<New id="RequestLog" class="org.eclipse.jetty.server.handler.RequestLogHandler">
<Set name="requestLog">
<New id="RequestLogImpl" class="org.eclipse.jetty.server.NCSARequestLog">
<Set name="filename"><Property name="jetty.logs" default="./logs"/>/test-yyyy_mm_dd.request.log</Set>
<Set name="filenameDateFormat">yyyy_MM_dd</Set>
<Set name="LogTimeZone">GMT</Set>
<Set name="retainDays">90</Set>
<Set name="append">true</Set>
<Set name="LogLatency">true</Set>
</New>
</Set>
</New>
</Arg>
</Call>
...
</Configure>Jetty Logging Integrations (SLF4J, Log4j, Logback, JCL, JUL)
Jetty provides support for several logging frameworks including SLF4J, Java Commons Logging (JCL), Java Util Logging (JUL), Log4j (including version 2), and Logback. This page includes examples of how to enable the associated modules for these different frameworks. These modules are designed to capture container/server logs; request logs and application logs need to be configured separately. Please note that enabling these modules provides typical and basic functionality for each framework; advanced implementations may require their own modules or additional configuration.
Enabling these frameworks in the Jetty distribution is as easy as activating any other module, by adding --add-to-start=<module name> to the start command for your server, such as:
[my-base]$ java -jar ../start.jar --add-to-start=logging-jetty
INFO : logging-jetty initialized in ${jetty.base}/start.d/logging-jetty.ini
INFO : resources transitively enabled
MKDIR : ${jetty.base}/resources
COPY : ${jetty.home}/modules/logging-jetty/resources/jetty-logging.properties to ${jetty.base}/resources/jetty-logging.properties
INFO : Base directory was modifiedAs noted above, Jetty supports a wide array of logging technologies. If a particular logging framework requires additional jar files, Jetty will automatically download these as part of enabling the associated module and any dependent modules will be transitively enabled.
A list of the base Jetty logging modules by running java -jar <path-to-jetty.home>/start.jar --list-modules=logging,-internal.
- logging-jcl
-
Configures Jetty logging to use Java Commons Logging (JCL), using SLF4J as a binding.
- logging-jetty
-
Standard Jetty logging that captures
System.errandSystem.outoutput. - logging-jul
-
Configures Jetty logging to use Java Util Logging (JUL), using SLF4J as a binding.
- logging-log4j
-
Configures Jetty logging to use Log4j as the logging implementation, using SLF4J as a binding.
- logging-log4j2
-
Configures Jetty logging to use Log4j2 as the logging implementation, using SLF4J as a binding.
- logging-logback
-
Configures Jetty logging to use Logback as the logging implementation, using SLF4J as a binding.
- logging-slf4j
-
Configures Jetty logging to use SLF4J and provides a
slf4j-implwhich can be used by other logging frameworks. If no other logging is configured,slf4j-simpleis used.
You can view a list of all the Jetty logging modules by running java -jar <path-to-jetty.home>/start.jar --list-modules=logging.
This will display all logging modules, including implementation and binding modules.
All these modules (with the exception of logging-jetty) arrange for the Jetty private logging API to be routed to the named technology to actually be logged.
For example, enabling the logging-log4j module will do several things:
-
it enables an internal Log4j API module so that any container code that uses Log4j will find the API.
-
it enables an internal Log4j Implementation so that any container code that uses the Log4j API will also use a Log4j implementation to handle the logs (and all the normal Log4j configuration mechanisms etc.)
-
it enables the internal
slf4j-log4jlogging binding so that any container code that uses the SLF4j API to also use the Log4j implementation via the Log4j API. -
it configures the Jetty logging API to use the SLF4J API, which is then bound to Log4j.
So, after enabling logging-log4j, within the server container there are 3 logging APIs available: Jetty, SLF4J and Log4J.
But there is only a single logging implementation - Log4j; the 3 APIs act only as facades over the Log4j implementation.
Note that you can add additional APIs to this configuration.
For example, enabling the internal module jcl-slf4j would add in a Java Commons Logging facade that also would use the Log4j implementation via the SLF4J binding.
Most other top level logging modules work in the same way: logging-jcl, logging-jul, logging-slf4j, logging-log4j2 and logging-logback all bind their implementation via SLF4J.
Logging with SLF4J
Jetty uses the SLF4J api as a binding to provide logging information to additional frameworks such as Log4j or Logback.
It can also be used on it’s own to provide simple server logging.
To enable the SLF4J framework, you need to activate the logging-slf4j module.
[my-base]$ java -jar ../start.jar --add-to-start=logging-slf4j
ALERT: There are enabled module(s) with licenses.
The following 1 module(s):
+ contains software not provided by the Eclipse Foundation!
+ contains software not covered by the Eclipse Public License!
+ has not been audited for compliance with its license
Module: slf4j-api
+ SLF4J is distributed under the MIT License.
+ Copyright (c) 2004-2013 QOS.ch
+ All rights reserved.
+ Permission is hereby granted, free of charge, to any person obtaining
+ a copy of this software and associated documentation files (the
+ "Software"), to deal in the Software without restriction, including
+ without limitation the rights to use, copy, modify, merge, publish,
+ distribute, sublicense, and/or sell copies of the Software, and to
+ permit persons to whom the Software is furnished to do so, subject to
+ the following conditions:
+ The above copyright notice and this permission notice shall be
+ included in all copies or substantial portions of the Software.
+ THE SOFTWARE IS PROVIDED "AS IS", WITHOUT WARRANTY OF ANY KIND,
+ EXPRESS OR IMPLIED, INCLUDING BUT NOT LIMITED TO THE WARRANTIES OF
+ MERCHANTABILITY, FITNESS FOR A PARTICULAR PURPOSE AND
+ NONINFRINGEMENT. IN NO EVENT SHALL THE AUTHORS OR COPYRIGHT HOLDERS BE
+ LIABLE FOR ANY CLAIM, DAMAGES OR OTHER LIABILITY, WHETHER IN AN ACTION
+ OF CONTRACT, TORT OR OTHERWISE, ARISING FROM, OUT OF OR IN CONNECTION
+ WITH THE SOFTWARE OR THE USE OR OTHER DEALINGS IN THE SOFTWARE.
Proceed (y/N)? y
INFO : slf4j-api transitively enabled
INFO : logging-slf4j initialized in ${jetty.base}/start.d/logging-slf4j.ini
MKDIR : ${jetty.base}/lib/slf4j
DOWNLD: https://repo1.maven.org/maven2/org/slf4j/slf4j-api/1.7.21/slf4j-api-1.7.21.jar to ${jetty.base}/lib/slf4j/slf4j-api-1.7.21.jar
INFO : Base directory was modified
ERROR : Module logging-slf4j requires a module providing slf4j-impl from one of [slf4j-simple-impl, slf4j-logback, slf4j-jul, slf4j-log4j2, slf4j-log4j]
ERROR : Unsatisfied module dependencies: logging-slf4j
Usage: java -jar $JETTY_HOME/start.jar [options] [properties] [configs]
java -jar $JETTY_HOME/start.jar --help # for more informationAs you probably noticed, the system gives an ERROR when trying to enable the logging-slf4j on it’s own.
The logging-slf4j module itself provides the SLF4J api, but as SLF4J is often used as a binding for other logging frameworks does not by default provide an implementation.
To enable the simple SLF4J implementation, we will also need to activate the slf4j-simple-impl module.
[my-base]$ java -jar ../start.jar --add-to-start=slf4j-simple-impl
INFO : slf4j-simple-impl initialized in ${jetty.base}/start.d/slf4j-simple-impl.ini
INFO : resources transitively enabled
DOWNLD: https://repo1.maven.org/maven2/org/slf4j/slf4j-simple/1.7.21/slf4j-simple-1.7.21.jar to ${jetty.base}/lib/slf4j/slf4j-simple-1.7.21.jar
MKDIR : ${jetty.base}/resources
COPY : ${jetty.home}/modules/slf4j-simple-impl/resources/simplelogger.properties to ${jetty.base}/resources/simplelogger.properties
INFO : Base directory was modified
[my-base]$ tree
.
├── lib
│ └── slf4j
│ ├── slf4j-api-1.7.21.jar
│ └── slf4j-simple-1.7.21.jar
├── resources
│ └── simplelogger.properties
└── start.d
├── logging-slf4j.ini
└── slf4j-simple-impl.iniJetty is now configured to log using the SLF4J framework.
A standard SLF4J properties file is located in ${jetty.base}/resources/simplelogger.properties.
Logging with Log4j and Log4j2
It is possible to have the Jetty Server logging configured so that Log4j or Log4j2 controls the output of logging events produced by Jetty.
This is accomplished by configuring Jetty for logging to Apache Log4j via Slf4j and the Slf4j binding layer for Log4j.
Implementation of Log4j can be done by enabling the logging-log4j module.
[my-base]$ java -jar ../start.jar --add-to-start=logging-log4j
ALERT: There are enabled module(s) with licenses.
The following 2 module(s):
+ contains software not provided by the Eclipse Foundation!
+ contains software not covered by the Eclipse Public License!
+ has not been audited for compliance with its license
Module: log4j-impl
+ Log4j is released under the Apache 2.0 license.
+ http://www.apache.org/licenses/LICENSE-2.0.html
Module: slf4j-api
+ SLF4J is distributed under the MIT License.
+ Copyright (c) 2004-2013 QOS.ch
+ All rights reserved.
+ Permission is hereby granted, free of charge, to any person obtaining
+ a copy of this software and associated documentation files (the
+ "Software"), to deal in the Software without restriction, including
+ without limitation the rights to use, copy, modify, merge, publish,
+ distribute, sublicense, and/or sell copies of the Software, and to
+ permit persons to whom the Software is furnished to do so, subject to
+ the following conditions:
+ The above copyright notice and this permission notice shall be
+ included in all copies or substantial portions of the Software.
+ THE SOFTWARE IS PROVIDED "AS IS", WITHOUT WARRANTY OF ANY KIND,
+ EXPRESS OR IMPLIED, INCLUDING BUT NOT LIMITED TO THE WARRANTIES OF
+ MERCHANTABILITY, FITNESS FOR A PARTICULAR PURPOSE AND
+ NONINFRINGEMENT. IN NO EVENT SHALL THE AUTHORS OR COPYRIGHT HOLDERS BE
+ LIABLE FOR ANY CLAIM, DAMAGES OR OTHER LIABILITY, WHETHER IN AN ACTION
+ OF CONTRACT, TORT OR OTHERWISE, ARISING FROM, OUT OF OR IN CONNECTION
+ WITH THE SOFTWARE OR THE USE OR OTHER DEALINGS IN THE SOFTWARE.
Proceed (y/N)? y
INFO : slf4j-api transitively enabled
INFO : log4j-impl transitively enabled
INFO : resources transitively enabled
INFO : slf4j-log4j transitively enabled
INFO : logging-log4j initialized in ${jetty.base}/start.d/logging-log4j.ini
MKDIR : ${jetty.base}/lib/slf4j
DOWNLD: https://repo1.maven.org/maven2/org/slf4j/slf4j-api/1.7.21/slf4j-api-1.7.21.jar to ${jetty.base}/lib/slf4j/slf4j-api-1.7.21.jar
MKDIR : ${jetty.base}/lib/log4j
COPY : /Users/admin/.m2/repository/log4j/log4j/1.2.17/log4j-1.2.17.jar to ${jetty.base}/lib/log4j/log4j-1.2.17.jar
MKDIR : ${jetty.base}/resources
COPY : ${jetty.home}/modules/log4j-impl/resources/log4j.xml to ${jetty.base}/resources/log4j.xml
DOWNLD: https://repo1.maven.org/maven2/org/slf4j/slf4j-log4j12/1.7.21/slf4j-log4j12-1.7.21.jar to ${jetty.base}/lib/slf4j/slf4j-log4j12-1.7.21.jar
INFO : Base directory was modified
[my-base]$ tree
.
├── lib
│ ├── log4j
│ │ └── log4j-1.2.17.jar
│ └── slf4j
│ ├── slf4j-api-1.7.21.jar
│ └── slf4j-log4j12-1.7.21.jar
├── resources
│ └── log4j.xml
└── start.d
└── logging-log4j.iniJetty is now configured to log using the Log4j framework.
A standard Log4j configuration file is located in ${jetty.base}/resources/log4j.xml.
Or, to set up Log4j2, enable the logging-log4j2 module.
[my-base]$ java -jar ../start.jar --add-to-start=logging-log4j2
ALERT: There are enabled module(s) with licenses.
The following 2 module(s):
+ contains software not provided by the Eclipse Foundation!
+ contains software not covered by the Eclipse Public License!
+ has not been audited for compliance with its license
Module: log4j2-api
+ Log4j is released under the Apache 2.0 license.
+ http://www.apache.org/licenses/LICENSE-2.0.html
Module: slf4j-api
+ SLF4J is distributed under the MIT License.
+ Copyright (c) 2004-2013 QOS.ch
+ All rights reserved.
+ Permission is hereby granted, free of charge, to any person obtaining
+ a copy of this software and associated documentation files (the
+ "Software"), to deal in the Software without restriction, including
+ without limitation the rights to use, copy, modify, merge, publish,
+ distribute, sublicense, and/or sell copies of the Software, and to
+ permit persons to whom the Software is furnished to do so, subject to
+ the following conditions:
+ The above copyright notice and this permission notice shall be
+ included in all copies or substantial portions of the Software.
+ THE SOFTWARE IS PROVIDED "AS IS", WITHOUT WARRANTY OF ANY KIND,
+ EXPRESS OR IMPLIED, INCLUDING BUT NOT LIMITED TO THE WARRANTIES OF
+ MERCHANTABILITY, FITNESS FOR A PARTICULAR PURPOSE AND
+ NONINFRINGEMENT. IN NO EVENT SHALL THE AUTHORS OR COPYRIGHT HOLDERS BE
+ LIABLE FOR ANY CLAIM, DAMAGES OR OTHER LIABILITY, WHETHER IN AN ACTION
+ OF CONTRACT, TORT OR OTHERWISE, ARISING FROM, OUT OF OR IN CONNECTION
+ WITH THE SOFTWARE OR THE USE OR OTHER DEALINGS IN THE SOFTWARE.
Proceed (y/N)? y
INFO : slf4j-api transitively enabled
INFO : logging-log4j2 initialized in ${jetty.base}/start.d/logging-log4j2.ini
INFO : log4j2-api transitively enabled
INFO : resources transitively enabled
INFO : slf4j-log4j2 transitively enabled
INFO : log4j2-impl transitively enabled
MKDIR : ${jetty.base}/lib/slf4j
DOWNLD: https://repo1.maven.org/maven2/org/slf4j/slf4j-api/1.7.21/slf4j-api-1.7.21.jar to ${jetty.base}/lib/slf4j/slf4j-api-1.7.21.jar
MKDIR : ${jetty.base}/lib/log4j2
DOWNLD: https://repo1.maven.org/maven2/org/apache/logging/log4j/log4j-api/2.6.1/log4j-api-2.6.1.jar to ${jetty.base}/lib/log4j2/log4j-api-2.6.1.jar
MKDIR : ${jetty.base}/resources
DOWNLD: https://repo1.maven.org/maven2/org/apache/logging/log4j/log4j-slf4j-impl/2.6.1/log4j-slf4j-impl-2.6.1.jar to ${jetty.base}/lib/log4j2/log4j-slf4j-impl-2.6.1.jar
DOWNLD: https://repo1.maven.org/maven2/org/apache/logging/log4j/log4j-core/2.6.1/log4j-core-2.6.1.jar to ${jetty.base}/lib/log4j2/log4j-core-2.6.1.jar
COPY : ${jetty.home}/modules/log4j2-impl/resources/log4j2.xml to ${jetty.base}/resources/log4j2.xml
INFO : Base directory was modified
[my-base]$ tree
.
├── lib
│ ├── log4j2
│ │ ├── log4j-api-2.6.1.jar
│ │ ├── log4j-core-2.6.1.jar
│ │ └── log4j-slf4j-impl-2.6.1.jar
│ └── slf4j
│ └── slf4j-api-1.7.21.jar
├── resources
│ └── log4j2.xml
└── start.d
└── logging-log4j2.iniAt this point Jetty is configured so that the Jetty server itself will log using Log4j2, using the Log4j2 configuration found in {$jetty.base}/resources/log4j2.xml.
Logging with Logback
It is possible to have the Jetty Server logging configured so that Logback controls the output of logging events produced by Jetty.
This is accomplished by configuring Jetty for logging to Logback, which uses Slf4j and the Logback Implementation for Slf4j.
To set up Jetty logging via Logback, enable the logging-logback module.
[my-base]$ java -jar ../start.jar --add-to-start=logging-logback
ALERT: There are enabled module(s) with licenses.
The following 2 module(s):
+ contains software not provided by the Eclipse Foundation!
+ contains software not covered by the Eclipse Public License!
+ has not been audited for compliance with its license
Module: logback-impl
+ Logback: the reliable, generic, fast and flexible logging framework.
+ Copyright (C) 1999-2012, QOS.ch. All rights reserved.
+ This program and the accompanying materials are dual-licensed under
+ either:
+ the terms of the Eclipse Public License v1.0
+ as published by the Eclipse Foundation:
+ http://www.eclipse.org/legal/epl-v10.html
+ or (per the licensee's choosing) under
+ the terms of the GNU Lesser General Public License version 2.1
+ as published by the Free Software Foundation:
+ http://www.gnu.org/licenses/old-licenses/lgpl-2.1.html
Module: slf4j-api
+ SLF4J is distributed under the MIT License.
+ Copyright (c) 2004-2013 QOS.ch
+ All rights reserved.
+ Permission is hereby granted, free of charge, to any person obtaining
+ a copy of this software and associated documentation files (the
+ "Software"), to deal in the Software without restriction, including
+ without limitation the rights to use, copy, modify, merge, publish,
+ distribute, sublicense, and/or sell copies of the Software, and to
+ permit persons to whom the Software is furnished to do so, subject to
+ the following conditions:
+ The above copyright notice and this permission notice shall be
+ included in all copies or substantial portions of the Software.
+ THE SOFTWARE IS PROVIDED "AS IS", WITHOUT WARRANTY OF ANY KIND,
+ EXPRESS OR IMPLIED, INCLUDING BUT NOT LIMITED TO THE WARRANTIES OF
+ MERCHANTABILITY, FITNESS FOR A PARTICULAR PURPOSE AND
+ NONINFRINGEMENT. IN NO EVENT SHALL THE AUTHORS OR COPYRIGHT HOLDERS BE
+ LIABLE FOR ANY CLAIM, DAMAGES OR OTHER LIABILITY, WHETHER IN AN ACTION
+ OF CONTRACT, TORT OR OTHERWISE, ARISING FROM, OUT OF OR IN CONNECTION
+ WITH THE SOFTWARE OR THE USE OR OTHER DEALINGS IN THE SOFTWARE.
Proceed (y/N)? y
INFO : slf4j-api transitively enabled
INFO : logback-impl transitively enabled
INFO : slf4j-logback transitively enabled
INFO : logging-logback initialized in ${jetty.base}/start.d/logging-logback.ini
INFO : resources transitively enabled
MKDIR : ${jetty.base}/lib/slf4j
DOWNLD: https://repo1.maven.org/maven2/org/slf4j/slf4j-api/1.7.21/slf4j-api-1.7.21.jar to ${jetty.base}/lib/slf4j/slf4j-api-1.7.21.jar
MKDIR : ${jetty.base}/lib/logback
DOWNLD: https://repo1.maven.org/maven2/ch/qos/logback/logback-core/1.1.7/logback-core-1.1.7.jar to ${jetty.base}/lib/logback/logback-core-1.1.7.jar
MKDIR : ${jetty.base}/resources
COPY : ${jetty.home}/modules/logback-impl/resources/logback.xml to ${jetty.base}/resources/logback.xml
DOWNLD: https://repo1.maven.org/maven2/ch/qos/logback/logback-classic/1.1.7/logback-classic-1.1.7.jar to ${jetty.base}/lib/logback/logback-classic-1.1.7.jar
INFO : Base directory was modified
[my-base]$ tree
.
├── lib
│ ├── logback
│ │ ├── logback-classic-1.1.7.jar
│ │ └── logback-core-1.1.7.jar
│ └── slf4j
│ └── slf4j-api-1.7.21.jar
├── resources
│ └── logback.xml
└── start.d
└── logging-logback.iniAt this point Jetty is configured so that the Jetty server itself will log using Logback, using the Logback configuration found in {$jetty.base}/resources/logback.xml.
Logging with Java Util Logging
Java Util Logging with SLF4J
It is possible to have the Jetty Server logging configured so that java.util.logging controls the output of logging events produced by Jetty.
This example demonstrates how to configuring Jetty for logging to java.util.logging via SLF4J as a binding layer.
[my-base]$ java -jar ../start.jar --add-to-start=logging-jul
ALERT: There are enabled module(s) with licenses.
The following 1 module(s):
+ contains software not provided by the Eclipse Foundation!
+ contains software not covered by the Eclipse Public License!
+ has not been audited for compliance with its license
Module: slf4j-api
+ SLF4J is distributed under the MIT License.
+ Copyright (c) 2004-2013 QOS.ch
+ All rights reserved.
+ Permission is hereby granted, free of charge, to any person obtaining
+ a copy of this software and associated documentation files (the
+ "Software"), to deal in the Software without restriction, including
+ without limitation the rights to use, copy, modify, merge, publish,
+ distribute, sublicense, and/or sell copies of the Software, and to
+ permit persons to whom the Software is furnished to do so, subject to
+ the following conditions:
+ The above copyright notice and this permission notice shall be
+ included in all copies or substantial portions of the Software.
+ THE SOFTWARE IS PROVIDED "AS IS", WITHOUT WARRANTY OF ANY KIND,
+ EXPRESS OR IMPLIED, INCLUDING BUT NOT LIMITED TO THE WARRANTIES OF
+ MERCHANTABILITY, FITNESS FOR A PARTICULAR PURPOSE AND
+ NONINFRINGEMENT. IN NO EVENT SHALL THE AUTHORS OR COPYRIGHT HOLDERS BE
+ LIABLE FOR ANY CLAIM, DAMAGES OR OTHER LIABILITY, WHETHER IN AN ACTION
+ OF CONTRACT, TORT OR OTHERWISE, ARISING FROM, OUT OF OR IN CONNECTION
+ WITH THE SOFTWARE OR THE USE OR OTHER DEALINGS IN THE SOFTWARE.
Proceed (y/N)? y
INFO : jul-impl transitively enabled
INFO : slf4j-api transitively enabled
INFO : slf4j-jul transitively enabled
INFO : logging-jul initialized in ${jetty.base}/start.d/logging-jul.ini
INFO : resources transitively enabled
MKDIR : ${jetty.base}/etc
COPY : ${jetty.home}/modules/jul-impl/etc/java-util-logging.properties to ${jetty.base}/etc/java-util-logging.properties
MKDIR : ${jetty.base}/lib/slf4j
DOWNLD: https://repo1.maven.org/maven2/org/slf4j/slf4j-api/1.7.21/slf4j-api-1.7.21.jar to ${jetty.base}/lib/slf4j/slf4j-api-1.7.21.jar
DOWNLD: https://repo1.maven.org/maven2/org/slf4j/slf4j-jdk14/1.7.21/slf4j-jdk14-1.7.21.jar to ${jetty.base}/lib/slf4j/slf4j-jdk14-1.7.21.jar
INFO : Base directory was modified
[my-base]$ tree
.
├── etc
│ └── java-util-logging.properties
├── lib
│ └── slf4j
│ ├── slf4j-api-1.7.21.jar
│ └── slf4j-jdk14-1.7.21.jar
└── start.d
└── logging-jul.iniJetty is now configured to log using the JUL framework.
A standard JUL properties file is located in ${jetty.base}/etc/java-util-logging.properties.
Capturing Console Output
By default, enabling the above modules will output log information to the console.
Included in the distribution is the console-capture module, which can be used in lieu of additional configuration to the selected logging module to capture this output to a logs directory in your ${jetty.base}.
To enable this functionality, activate the console-capture module.
[my-base]$ java -jar ../start.jar --add-to-start=console-capture
INFO : console-capture initialized in ${jetty.base}/start.d/console-capture.ini
MKDIR : ${jetty.base}/logs
INFO : Base directory was modified
[my-base]$ tree
.
├── logs
└── start.d
└── console-capture.iniAs an example, here is the output from Logback before using the console-capture module:
[my-base]$ java -jar ../start.jar
419 [main] INFO org.eclipse.jetty.util.log - Logging initialized @508ms to org.eclipse.jetty.util.log.Slf4jLog
540 [main] INFO org.eclipse.jetty.server.Server - jetty-9.4.0-SNAPSHOT
575 [main] INFO o.e.jetty.server.AbstractConnector - Started ServerConnector@3c0ecd4b{HTTP/1.1,[http/1.1]}{0.0.0.0:8080}
575 [main] INFO org.eclipse.jetty.server.Server - Started @668msAfter enabling console-capture, the output is as follows, which displays the location the log is being saved to:
[my-base]$ java -jar ../start.jar
151 [main] INFO org.eclipse.jetty.util.log - Logging initialized @238ms to org.eclipse.jetty.util.log.Slf4jLog
196 [main] INFO org.eclipse.jetty.util.log - Console stderr/stdout captured to /installs/jetty-distribution/mybase/logs/2016_10_21.jetty.logCentralized Logging using Logback
The term Centralized Logging refers to a forced logging configuration for the Jetty Server and all web applications that are deployed on the server. It routes all logging events from the web applications to a single configuration on the Server side.
The example below shows how to accomplish this with Jetty and Slf4j, using Logback to manage the final writing of logs to disk.
|
This mechanism forces all webapps to use the server’s configuration for logging, something that isn’t 100% appropriate for all webapps. An example would be having Jenkins-CI deployed as an webapp, if you force its logging configuration to the server side, you lose the ability on Jenkins-CI to see the logs from the various builds (as now those logs are actually going to the main server log). |
This configuration is essentially the multiple logger configuration with added configuration to the deployers to force a WebAppClassLoader change to use the server classpath over the webapps classpath for the logger specific classes.
The technique used by this configuration is to provide an AppLifeCycle.Binding against the `"deploying"`node that modifies the WebAppContext.getSystemClasspathPattern().add(String) for the common logging classes. See org.eclipse.jetty.logging.CentralizedWebAppLoggingBinding for actual implementation.
A convenient replacement logging module has been created to bootstrap your ${jetty.base} directory for capturing all Jetty server logging from multiple logging frameworks into a single logging output file managed by Logback.
[mybase]$ curl -O https://repo1.maven.org/maven2/org/eclipse/jetty/jetty-webapp-logging/9.4.27/jetty-webapp-logging-9.4.27-config.jar
% Total % Received % Xferd Average Speed Time Time Time Current
Dload Upload Total Spent Left Speed
100 3402 100 3402 0 0 15823 0 --:--:-- --:--:-- --:--:-- 15750
[mybase]$ jar -xf jetty-webapp-logging-9.4.27-config.jar
[mybase]$ java -jar /opt/jetty-hom/start.jar --create-startd --add-to-start=centralized-webapp-logging
ALERT: There are enabled module(s) with licenses.
The following 2 module(s):
+ contains software not provided by the Eclipse Foundation!
+ contains software not covered by the Eclipse Public License!
+ has not been audited for compliance with its license
Module: logback-impl
+ Logback: the reliable, generic, fast and flexible logging framework.
+ Copyright (C) 1999-2012, QOS.ch. All rights reserved.
+ This program and the accompanying materials are dual-licensed under
+ either:
+ the terms of the Eclipse Public License v1.0
+ as published by the Eclipse Foundation:
+ http://www.eclipse.org/legal/epl-v10.html
+ or (per the licensee's choosing) under
+ the terms of the GNU Lesser General Public License version 2.1
+ as published by the Free Software Foundation:
+ http://www.gnu.org/licenses/old-licenses/lgpl-2.1.html
Module: slf4j-api
+ SLF4J is distributed under the MIT License.
+ Copyright (c) 2004-2013 QOS.ch
+ All rights reserved.
+ Permission is hereby granted, free of charge, to any person obtaining
+ a copy of this software and associated documentation files (the
+ "Software"), to deal in the Software without restriction, including
+ without limitation the rights to use, copy, modify, merge, publish,
+ distribute, sublicense, and/or sell copies of the Software, and to
+ permit persons to whom the Software is furnished to do so, subject to
+ the following conditions:
+ The above copyright notice and this permission notice shall be
+ included in all copies or substantial portions of the Software.
+ THE SOFTWARE IS PROVIDED "AS IS", WITHOUT WARRANTY OF ANY KIND,
+ EXPRESS OR IMPLIED, INCLUDING BUT NOT LIMITED TO THE WARRANTIES OF
+ MERCHANTABILITY, FITNESS FOR A PARTICULAR PURPOSE AND
+ NONINFRINGEMENT. IN NO EVENT SHALL THE AUTHORS OR COPYRIGHT HOLDERS BE
+ LIABLE FOR ANY CLAIM, DAMAGES OR OTHER LIABILITY, WHETHER IN AN ACTION
+ OF CONTRACT, TORT OR OTHERWISE, ARISING FROM, OUT OF OR IN CONNECTION
+ WITH THE SOFTWARE OR THE USE OR OTHER DEALINGS IN THE SOFTWARE.
Proceed (y/N)? y
INFO : slf4j-api transitively enabled
INFO : log4j-over-slf4j transitively enabled
INFO : jcl-slf4j transitively enabled
INFO : logback-impl transitively enabled
INFO : jul-slf4j transitively enabled
INFO : slf4j-logback transitively enabled
INFO : centralized-webapp-logging initialized in ${jetty.base}/start.d/centralized-webapp-logging.ini
INFO : logging-logback transitively enabled
INFO : resources transitively enabled
MKDIR : ${jetty.base}/lib/slf4j
DOWNLD: https://repo1.maven.org/maven2/org/slf4j/slf4j-api/1.7.25/slf4j-api-1.7.25.jar to ${jetty.base}/lib/slf4j/slf4j-api-1.7.25.jar
MKDIR : ${jetty.base}/lib/logging
DOWNLD: https://repo1.maven.org/maven2/org/slf4j/log4j-over-slf4j/1.7.25/log4j-over-slf4j-1.7.25.jar to ${jetty.base}/lib/logging/log4j-over-slf4j-1.7.25.jar
DOWNLD: https://repo1.maven.org/maven2/org/slf4j/jcl-over-slf4j/1.7.25/jcl-over-slf4j-1.7.25.jar to ${jetty.base}/lib/slf4j/jcl-over-slf4j-1.7.25.jar
MKDIR : ${jetty.base}/lib/logback
DOWNLD: https://repo1.maven.org/maven2/ch/qos/logback/logback-core/1.2.3/logback-core-1.2.3.jar to ${jetty.base}/lib/logback/logback-core-1.2.3.jar
DOWNLD: https://repo1.maven.org/maven2/org/slf4j/jul-to-slf4j/1.7.25/jul-to-slf4j-1.7.25.jar to ${jetty.base}/lib/slf4j/jul-to-slf4j-1.7.25.jar
COPY : ${jetty.home}/modules/jul-slf4j/etc/java-util-logging.properties to ${jetty.base}/etc/java-util-logging.properties
DOWNLD: https://repo1.maven.org/maven2/ch/qos/logback/logback-classic/1.2.3/logback-classic-1.2.3.jar to ${jetty.base}/lib/logback/logback-classic-1.2.3.jar
MKDIR : ${jetty.base}/logs
DOWNLD: https://repo1.maven.org/maven2/org/eclipse/jetty/jetty-webapp-logging/9.4.27/jetty-webapp-logging-9.4.27.jar to ${jetty.base}/lib/logging/jetty-webapp-logging-9.4.27.jar
INFO : Base directory was modified
$This replacement centralized-webapp-logging.mod performs a number of tasks.
-
mybaseis a${jetty.base}directory. -
The jetty-distribution is unpacked (and untouched) into
/opt/jetty-dist/and becomes the${jetty.home}directory for this demonstration. -
The
curlcommand downloads the replacement config overlay for the${jetty.base}/modules/directory to use. -
The
start.jar --add-to-start=centralized-webapp-loggingcommand performs a number of steps to make the centralized-webapp-logging module available to the${jetty.base}configuration.-
A new
${jetty.base}/start.d/centralized-webapp-logging.iniconfiguration was created. -
Required
${jetty.base}directories are created:${jetty.base}/logsand${jetty.base}/resources. -
Required logging libraries are downloaded (if not present already) to the
${jetty.base}/lib/logging/directory:-
slf4j-api.jar- API jar for Slf4j (used by most of the rest of the jars) -
log4j-over-slf4j.jar- Slf4j jar that captures all log4j emitted logging events -
jul-to-slf4j.jar- Slf4j jar that captures all java.util.logging events -
jcl-over-slf4j.jar- Slf4j jar that captures all commons-logging events -
logback-classic.jar- the Slf4j adapter jar that routes all of the captured logging events to logback itself. -
logback-core.jar- the logback implementation jar, that handles all of the filtering and output of the logging events.
-
-
Required webapp-logging library is downloaded (if not present already) to the
${jetty.base}/lib/webapp-logging/directory:-
jetty-webapp-logging.jar- the Jetty side deployment manger app-lifecycle bindings for modifying theWebAppClassloadersof deployed webapps.
-
-
At this point the Jetty mybase is configured so that the jetty server itself will log using slf4j, and all other logging events from other Jetty Server components (such as database drivers, security layers, jsp, mail, and other 3rd party server components) are routed to logback for filtering and output.
All webapps deployed via the DeploymentManager have their WebAppClassLoader modified to use server side classes and configuration for all logging implementations.
The server classpath can be verified by using the start.jar --list-config command.
In essence, Jetty is now configured to emit its own logging events to slf4j, and various slf4j bridge jars are acting on behalf of log4j, java.util.logging, and commons-logging, routing all of the logging events to logback
(a slf4j implementation) for routing (to console, file, etc…).
Jetty Server Dump
The dump feature in Jetty provides a snapshot of the bean containment tree of the main Jetty components together with a summary of their configuration. This includes threadpool, connectors, contexts, webapplications, servlets and so forth.
Configuring the Jetty Server Dump
You can request that Jetty do a dump immediately after starting and just before stopping by calling the appropriate setters on the Server instance.
For embedded usage this can be used by calling the setters directly.
server.setDumpAfterStart(true);
server.setDumpBeforeStop(true);Standalone Jetty uses two properties to control this behaviour which are referenced in jetty.xml to call these setters.
These properties are jetty.server.dumpAfterStart and jetty.server.dumpBeforeStop.
These can be temporarily enabled by supplying these properties as command line arguments,
or they can be enabled via the server.ini file (see An Introduction to Jetty Configuration).
java -jar $JETTY_HOME/start.jar jetty.server.dumpAfterStart=true jetty.server.dumpBeforeStop=trueExtra ThreadPool Information
To get maximum detail from the QueuedThreadPool in the dump, you need to setDetailDump(true) on any instances of QueuedThreadPool you are using.
This extra detail in the detailed dump consists of full stack traces for every running thread, and a list of queued jobs waiting to be run.
For embedded usage this can be used by calling the setters directly.
threadPool.setDetailedDump(true);For standalone jetty you can enable the threadpool module and configure the jetty.threadPool.detailedDump property.
See Managing Startup Modules for information on how to enable a module.
This same property can also be set via the command line the same as the server dump property.
Using the Dump Feature via JMX
The dump method is on the Server instance and many of its nested components (Handlers, Connectors, and so forth).
Dumps may be obtained by calling these methods either in code or via JMX (see Using JMX with Jetty).
The Server MBean has a dump() method, which dumps everything, plus a dumpStdErr() operation that dumps to StdErr rather than replying to JConsole.
Explanation of the Dump Key
-
+- beanis a java POJO that is contained by the parent object as a bean added with the addBean method. -
+= managedis a bean that is also a LifeCycle that is started and stopped with the parent object. -
+~ unmanagedis a bean that is also a LifeCycle that is started and stopped with the parent object. It is typically shared with other objects (hence its children are not dumped). -
+? autois a bean that has been added to an unstarted parent. If it is a LifeCycle that is not started when the parent is started, then it is started and becomes a managed bean, otherwise it becomes either unmanaged or just a bean. -
+: iterableis an object that is contained within an iterable field of the parent (eg a list, set etc). -
+] arrayis an object that is contained within an array field of the parent. -
+@ mapis an object that is contained within an map field of the parent. -
+> undefinedis an object that is contained within the parent by an undefined relationship.
Jetty Server Dump Example
This is a dump of the OneServletContext embedded example with extra threadpool information:
Server@59906517{STARTED}[9.4.32-SNAPSHOT] - STARTED
+= QueuedThreadPool[qtp488044861]@1d16f93d{STARTED,8<=8<=200,i=2,r=4,q=0}[ReservedThreadExecutor@16267862{s=2/4,p=0}] - STARTED
| += ReservedThreadExecutor@16267862{s=2/4,p=0} - STARTED
| +> threads size=8
| | +> qtp488044861-13 RUNNABLE tid=13 prio=5 SELECTING
| | +> qtp488044861-15-acceptor-0@296e0338-ServerConnector@1e6d1014{HTTP/1.1, (http/1.1)}{0.0.0.0:8080} RUNNABLE tid=15 prio=3 ACCEPTING
| | +> qtp488044861-17 TIMED_WAITING tid=17 prio=5 RESERVED
| | +> qtp488044861-19 RUNNABLE tid=19 prio=5
| | | +> app//org.eclipse.jetty.http.pathmap.PathMappings.getMatch(PathMappings.java:130)
| | | +> app//org.eclipse.jetty.servlet.ServletHandler.getMappedServlet(ServletHandler.java:591)
| | | +> app//org.eclipse.jetty.servlet.ServletHandler.doScope(ServletHandler.java:474)
| | | +> app//org.eclipse.jetty.server.session.SessionHandler.doScope(SessionHandler.java:1582)
| | | +> app//org.eclipse.jetty.server.handler.ScopedHandler.nextScope(ScopedHandler.java:186)
| | | +> app//org.eclipse.jetty.server.handler.ContextHandler.doScope(ContextHandler.java:1349)
| | | +> app//org.eclipse.jetty.server.handler.ScopedHandler.handle(ScopedHandler.java:141)
| | | +> app//org.eclipse.jetty.server.handler.HandlerWrapper.handle(HandlerWrapper.java:127)
| | | +> app//org.eclipse.jetty.server.Server.handle(Server.java:516)
| | | +> app//org.eclipse.jetty.server.HttpChannel.lambda$handle$1(HttpChannel.java:383)
| | | +> app//org.eclipse.jetty.server.HttpChannel$$Lambda$102/0x000000010016d440.dispatch(Unknown Source)
| | | +> app//org.eclipse.jetty.server.HttpChannel.dispatch(HttpChannel.java:556)
| | | +> app//org.eclipse.jetty.server.HttpChannel.handle(HttpChannel.java:375)
| | | +> app//org.eclipse.jetty.server.HttpConnection.onFillable(HttpConnection.java:273)
| | | +> app//org.eclipse.jetty.io.AbstractConnection$ReadCallback.succeeded(AbstractConnection.java:311)
| | | +> app//org.eclipse.jetty.io.FillInterest.fillable(FillInterest.java:105)
| | | +> app//org.eclipse.jetty.io.ChannelEndPoint$1.run(ChannelEndPoint.java:104)
| | | +> app//org.eclipse.jetty.util.thread.strategy.EatWhatYouKill.runTask(EatWhatYouKill.java:336)
| | | +> app//org.eclipse.jetty.util.thread.strategy.EatWhatYouKill.doProduce(EatWhatYouKill.java:313)
| | | +> app//org.eclipse.jetty.util.thread.strategy.EatWhatYouKill.tryProduce(EatWhatYouKill.java:171)
| | | +> app//org.eclipse.jetty.util.thread.strategy.EatWhatYouKill.run(EatWhatYouKill.java:129)
| | | +> app//org.eclipse.jetty.util.thread.ReservedThreadExecutor$ReservedThread.run(ReservedThreadExecutor.java:375)
| | | +> app//org.eclipse.jetty.util.thread.QueuedThreadPool.runJob(QueuedThreadPool.java:773)
| | | +> app//org.eclipse.jetty.util.thread.QueuedThreadPool$Runner.run(QueuedThreadPool.java:905)
| | | +> java.base@11.0.5/java.lang.Thread.run(Thread.java:834)
| | +> qtp488044861-16 TIMED_WAITING tid=16 prio=5 RESERVED
| | +> qtp488044861-21 RUNNABLE tid=21 prio=5 SELECTING
| | +> qtp488044861-18 TIMED_WAITING tid=18 prio=5 IDLE
| | +> qtp488044861-14 TIMED_WAITING tid=14 prio=5 IDLE
| +> jobs size=0
+= ServerConnector@1e6d1014{HTTP/1.1, (http/1.1)}{0.0.0.0:8080} - STARTED
| +~ Server@59906517{STARTED}[9.4.32-SNAPSHOT] - STARTED
| +~ QueuedThreadPool[qtp488044861]@1d16f93d{STARTED,8<=8<=200,i=2,r=4,q=0}[ReservedThreadExecutor@16267862{s=2/4,p=0}] - STARTED
| += ScheduledExecutorScheduler@453da22c{STARTED} - STARTED
| | +> java.base@11.0.5/jdk.internal.misc.Unsafe.park(Native Method)
| | +> java.base@11.0.5/java.util.concurrent.locks.LockSupport.parkNanos(LockSupport.java:234)
| | +> java.base@11.0.5/java.util.concurrent.locks.AbstractQueuedSynchronizer$ConditionObject.awaitNanos(AbstractQueuedSynchronizer.java:2123)
| | +> java.base@11.0.5/java.util.concurrent.ScheduledThreadPoolExecutor$DelayedWorkQueue.take(ScheduledThreadPoolExecutor.java:1182)
| | +> java.base@11.0.5/java.util.concurrent.ScheduledThreadPoolExecutor$DelayedWorkQueue.take(ScheduledThreadPoolExecutor.java:899)
| | +> java.base@11.0.5/java.util.concurrent.ThreadPoolExecutor.getTask(ThreadPoolExecutor.java:1054)
| | +> java.base@11.0.5/java.util.concurrent.ThreadPoolExecutor.runWorker(ThreadPoolExecutor.java:1114)
| | +> java.base@11.0.5/java.util.concurrent.ThreadPoolExecutor$Worker.run(ThreadPoolExecutor.java:628)
| | +> java.base@11.0.5/java.lang.Thread.run(Thread.java:834)
| +- org.eclipse.jetty.io.ArrayByteBufferPool@71248c21
| += HttpConnectionFactory@3fd7a715[HTTP/1.1] - STARTED
| | +- HttpConfiguration@442675e1{32768/8192,8192/8192,https://:0,[]}
| | +> customizers size=0
| | +> formEncodedMethods size=2
| | | +> POST
| | | +> PUT
| | +> outputBufferSize=32768
| | +> outputAggregationSize=8192
| | +> requestHeaderSize=8192
| | +> responseHeaderSize=8192
| | +> headerCacheSize=1024
| | +> secureScheme=https
| | +> securePort=0
| | +> idleTimeout=-1
| | +> blockingTimeout=-1
| | +> sendDateHeader=true
| | +> sendServerVersion=true
| | +> sendXPoweredBy=false
| | +> delayDispatchUntilContent=true
| | +> persistentConnectionsEnabled=true
| | +> maxErrorDispatches=10
| | +> minRequestDataRate=0
| | +> minResponseDataRate=0
| | +> cookieCompliance=RFC6265
| | +> setRequestCookieCompliance=RFC6265
| | +> notifyRemoteAsyncErrors=true
| | +> relativeRedirectAllowed=false
| += SelectorManager@ServerConnector@1e6d1014{HTTP/1.1, (http/1.1)}{0.0.0.0:8080} - STARTED
| | += ManagedSelector@38364841{STARTED} id=0 keys=0 selected=0 updates=0 - STARTED
| | | += EatWhatYouKill@28c4711c/SelectorProducer@59717824/PRODUCING/p=false/QueuedThreadPool[qtp488044861]@1d16f93d{STARTED,8<=8<=200,i=2,r=4,q=0}[ReservedThreadExecutor@16267862{s=2/4,p=0}][pc=0,pic=0,pec=0,epc=0]@2020-09-04T10:57:20.077669+10:00 - STARTED
| | | | +- SelectorProducer@59717824
| | | | +~ QueuedThreadPool[qtp488044861]@1d16f93d{STARTED,8<=8<=200,i=2,r=4,q=0}[ReservedThreadExecutor@16267862{s=2/4,p=0}] - STARTED
| | | +> updates @ 2020-09-04T10:57:20.058489+10:00 size=0
| | | +> keys @ 2020-09-04T10:57:20.061714+10:00 size=0
| | += ManagedSelector@146044d7{STARTED} id=1 keys=1 selected=0 updates=0 - STARTED
| | += EatWhatYouKill@1e9e725a/SelectorProducer@15d9bc04/PRODUCING/p=false/QueuedThreadPool[qtp488044861]@1d16f93d{STARTED,8<=8<=200,i=2,r=4,q=0}[ReservedThreadExecutor@16267862{s=2/4,p=0}][pc=0,pic=0,pec=1,epc=14]@2020-09-04T10:57:20.082696+10:00 - STARTED
| | | +- SelectorProducer@15d9bc04
| | | +~ QueuedThreadPool[qtp488044861]@1d16f93d{STARTED,8<=8<=200,i=2,r=4,q=0}[ReservedThreadExecutor@16267862{s=2/4,p=0}] - STARTED
| | +> updates @ 2020-09-04T10:57:20.078661+10:00 size=0
| | +> keys @ 2020-09-04T10:57:20.082035+10:00 size=1
| | +> SelectionKey@74bb45ed{i=0}->SocketChannelEndPoint@569ef11f{l=/127.0.0.1:8080,r=/127.0.0.1:58702,OPEN,fill=-,flush=-,to=3/30000}{io=0/0,kio=0,kro=1}->HttpConnection@25b03990[p=HttpParser{s=CONTENT,0 of -1},g=HttpGenerator@218fb9fe{s=START}]=>HttpChannelOverHttp@648d33ab{s=HttpChannelState@717b7e16{s=HANDLING rs=BLOCKING os=OPEN is=IDLE awp=false se=false i=true al=0},r=54,c=false/false,a=HANDLING,uri=//localhost:8080/,age=4}
| +- sun.nio.ch.ServerSocketChannelImpl[/0:0:0:0:0:0:0:0:8080]
| +- qtp488044861-15-acceptor-0@296e0338-ServerConnector@1e6d1014{HTTP/1.1, (http/1.1)}{0.0.0.0:8080}
+= AttributeContainerMap@473b46c3{size=0} - STARTED
+= o.e.j.s.ServletContextHandler@3ffcd140{/,file:///tmp/,AVAILABLE} - STARTED
| += org.eclipse.jetty.server.session.SessionHandler1089504328==dftMaxIdleSec=-1 - STARTED
| | += ServletHandler@516be40f{STARTED} - STARTED
| | | +> listeners ServletHandler@516be40f{STARTED} size=2
| | | | +> ListenerHolder@3c0a50da{STARTED}: org.eclipse.jetty.embedded.OneServletContext$InitListener - STARTED
| | | | +> ListenerHolder@646be2c3{STARTED}: org.eclipse.jetty.embedded.OneServletContext$RequestListener - STARTED
| | | +> filters ServletHandler@516be40f{STARTED} size=2
| | | | +> org.eclipse.jetty.embedded.OneServletContext$TestFilter-e874448@e874448==org.eclipse.jetty.embedded.OneServletContext$TestFilter,inst=true,async=true - STARTED
| | | | | +> org.eclipse.jetty.embedded.OneServletContext$TestFilter@797badd3
| | | | +> org.eclipse.jetty.embedded.OneServletContext$TestFilter-60285225@60285225==org.eclipse.jetty.embedded.OneServletContext$TestFilter,inst=true,async=true - STARTED
| | | | +> org.eclipse.jetty.embedded.OneServletContext$TestFilter@77be656f
| | | +> filterMappings ServletHandler@516be40f{STARTED} size=2
| | | | +> [/test/*]/[]/[REQUEST]=>org.eclipse.jetty.embedded.OneServletContext$TestFilter-e874448
| | | | +> [*.test]/[]/[ASYNC, REQUEST]=>org.eclipse.jetty.embedded.OneServletContext$TestFilter-60285225
| | | +> servlets ServletHandler@516be40f{STARTED} size=3
| | | | +> org.eclipse.jetty.embedded.HelloServlet-58c1670b@d20bf05b==org.eclipse.jetty.embedded.HelloServlet,jsp=null,order=-1,inst=false,async=true - STARTED
| | | | | +> class org.eclipse.jetty.embedded.HelloServlet
| | | | +> debug@5b09653==org.eclipse.jetty.embedded.DumpServlet,jsp=null,order=-1,inst=false,async=true - STARTED
| | | | | +> class org.eclipse.jetty.embedded.DumpServlet
| | | | +> org.eclipse.jetty.servlet.DefaultServlet-6b9651f3@8eb381d1==org.eclipse.jetty.servlet.DefaultServlet,jsp=null,order=-1,inst=true,async=true - STARTED
| | | | +> org.eclipse.jetty.servlet.DefaultServlet@78a2da20
| | | +> servletMappings ServletHandler@516be40f{STARTED} size=4
| | | +> [/hello/*]=>org.eclipse.jetty.embedded.HelloServlet-58c1670b
| | | +> [/dump/*]=>debug
| | | +> [*.dump]=>debug
| | | +> [/]=>org.eclipse.jetty.servlet.DefaultServlet-6b9651f3
| | += org.eclipse.jetty.server.session.DefaultSessionCache@dd3b207[evict=-1,removeUnloadable=false,saveOnCreate=false,saveOnInactiveEvict=false] - STARTED
| | | += org.eclipse.jetty.server.session.NullSessionDataStore@551bdc27[passivating=false,graceSec=3600] - STARTED
| | +~ DefaultSessionIdManager@58fdd99{STARTED}[worker=node0] - STARTED
| +> No ClassLoader
| +> eventListeners o.e.j.s.ServletContextHandler@3ffcd140{/,file:///tmp/,AVAILABLE} size=2
| | +> org.eclipse.jetty.embedded.OneServletContext$InitListener@6b1274d2
| | +> org.eclipse.jetty.embedded.OneServletContext$RequestListener@7bc1a03d
| +> handler attributes o.e.j.s.ServletContextHandler@3ffcd140{/,file:///tmp/,AVAILABLE} size=1
| | +> org.eclipse.jetty.server.Executor=QueuedThreadPool[qtp488044861]@1d16f93d{STARTED,8<=8<=200,i=2,r=4,q=0}[ReservedThreadExecutor@16267862{s=2/4,p=0}]
| +> context attributes o.e.j.s.ServletContextHandler@3ffcd140{/,file:///tmp/,AVAILABLE} size=2
| | +> org.eclipse.jetty.util.DecoratedObjectFactory=org.eclipse.jetty.util.DecoratedObjectFactory[decorators=1]
| | +> X-Init=true
| +> initparams o.e.j.s.ServletContextHandler@3ffcd140{/,file:///tmp/,AVAILABLE} size=0
+= ErrorHandler@ba8d91c{STARTED} - STARTED
+= DefaultSessionIdManager@58fdd99{STARTED}[worker=node0] - STARTED
| += HouseKeeper@60438a68{STARTED}[interval=660000, ownscheduler=true] - STARTED
+> jdk.internal.loader.ClassLoaders$AppClassLoader@2c13da15
+> jdk.internal.loader.ClassLoaders$PlatformClassLoader@7364985f
key: +- bean, += managed, +~ unmanaged, +? auto, +: iterable, +] array, +@ map, +> undefined
Configuring JNDI
Jetty supports java:comp/env lookups in webapps.
This is an optional feature for which some configuration is required.
Quick Setup
If you are using the standard distribution of Jetty, you must enable the JNDI module to obtain Jetty’s JNDI implementation, and the plus module which provides classes for interacting with JNDI.
As the plus module depends on the JNDI module, you only need to enable the plus module to enable both.
Assuming you have Jetty installed in /opt/jetty, and you have made a jetty base in /opt/jetty/my-base, do:
cd /opt/jetty
cd my-base
java -jar $JETTY_HOME/start.jar --add-to-start=plusYou can now start Jetty and use JNDI within your webapps. See Using JNDI for information on how to add entries to the JNDI environment that Jetty can look up within webapps.
If you have extra jars associated with your JNDI resources, for example a database driver jar, and you haven’t made a custom module for it, you can put the jars into your {$jetty base}ext/ directory.
You will then need to enable the ext module to ensure the jars in the ext/ directory are on the classpath.
Assuming you have Jetty installed in /opt/jetty, and you have made a jetty base in /opt/jetty/my-base, do:
cd /opt/jetty
cd my-base
java -jar $JETTY_HOME/start.jar --add-to-start=extWorking with Jetty JNDI
Defining the web.xml
You can configure naming resources to reference in a web.xml file and access from within the java:comp/env naming environment of the webapp during execution.
Specifically, you can configure support for the following web.xml elements:
<env-entry/>
<resource-ref/>
<resource-env-ref/>Configuring env-entries shows you how to set up overrides for env-entry elements in web.xml, while Configuring resource-refs and resource-env-refs discusses how to configure support resources such as javax.sql.DataSource.
You can also plug a JTA javax.transaction.UserTransaction implementation into Jetty so that webapps can look up java:comp/UserTransaction to obtain a distributed transaction manager: see Configuring XA Transactions.
Declaring Resources
You must declare the objects you want bound into the Jetty environment so that you can then hook into your webapp via env-entry, resource-ref and resource-env-refs in web.xml.
You create these bindings by using declarations of the following types:
org.eclipse.jetty.plus.jndi.EnvEntry-
For
env-entrytype of entries org.eclipse.jetty.plus.jndi.Resource-
For all other type of resources
org.eclipse.jetty.plus.jndi.Transaction-
For a JTA manager
org.eclipse.jetty.plus.jndi.Link-
For the link between a
web.xmlresource name and a naming entry
Declarations of each of these types follow the same general pattern:
<New class="org.eclipse.jetty.plus.jndi.xxxx">
<Arg><!-- scope --></Arg>
<Arg><!-- name --></Arg>
<Arg><!-- value --></Arg>
</New>You can place these declarations into three different files, depending on your needs and the scope of the resources being declared.
Deciding Where to Declare Resources
You can define naming resources in three places:
- jetty.xml
-
Naming resources defined in a
jetty.xmlfile are scoped at either the JVM level or the Server level. The classes for the resource must be visible at the Jetty container level. If the classes for the resource only exist inside your webapp, you must declare it in aWEB-INF/jetty-env.xmlfile. - WEB-INF/jetty-env.xml
-
Naming resources in a
WEB-INF/jetty-env.xmlfile are scoped to the web app in which the file resides. While you can enter JVM or Server scopes if you choose, we do not recommend doing so. The resources defined here may use classes from inside your webapp. This is a Jetty-specific mechanism. - Context xml file
-
Entries in a context xml file should be scoped at the level of the webapp to which they apply, although you can supply a less strict scoping level of Server or JVM if you choose. As with resources declared in a
jetty.xmlfile, classes associated with the resource must be visible on the container’s classpath.
Scope of Resource Names
Naming resources within Jetty belong to one of three different scopes, in increasing order of restrictiveness:
- JVM scope
-
The name is unique across the JVM instance, and is visible to all application code. You represent this scope by a
nullfirst parameter to the resource declaration. For example:<New id="cf" class="org.eclipse.jetty.plus.jndi.Resource"> <Arg></Arg> <!-- empty arg --> <Arg>jms/connectionFactory</Arg> <Arg> <New class="org.apache.activemq.ActiveMQConnectionFactory"> <Arg>vm://localhost?broker.persistent=false</Arg> </New> </Arg> </New> - Server scope
-
The name is unique to a Server instance, and is only visible to code associated with that instance. You represent this scope by referencing the Server instance as the first parameter to the resource declaration. For example:
<Configure id="Server" class="org.eclipse.jetty.Server"> <New id="cf" class="org.eclipse.jetty.plus.jndi.Resource"> <Arg><Ref refid="Server"/></Arg> <!-- reference to Server instance --> <Arg>jms/connectionFactory</Arg> <Arg> <New class="org.apache.activemq.ActiveMQConnectionFactory"> <Arg>vm://localhost?broker.persistent=false</Arg> </New> </Arg> </New> </Configure> - Webapp scope
-
The name is unique to the WebAppContext instance, and is only visible to code associated with that instance. You represent this scope by referencing the
WebAppContextinstance as the first parameter to the resource declaration. For example:<Configure id='wac' class="org.eclipse.jetty.webapp.WebAppContext"> <New id="cf" class="org.eclipse.jetty.plus.jndi.Resource"> <Arg><Ref refid='wac'/></Arg> <!-- reference to WebAppContext --> <Arg>jms/connectionFactory</Arg> <Arg> <New class="org.apache.activemq.ActiveMQConnectionFactory"> <Arg>vm://localhost?broker.persistent=false</Arg> </New> </Arg> </New> </Configure>
What Can Be Bound as a Resource?
You can bind four types of objects into a Jetty JNDI reference:
-
An ordinary POJO instance.
-
A javax.naming.Reference instance.
-
An object instance that implements the javax.naming.Referenceable interface.
-
A link between a name as referenced in
web.xmland as referenced in the Jetty environment.
Configuring JNDI
Configuring JNDI env-entries
Sometimes it is useful to pass configuration information to a webapp at runtime that you either cannot or cannot conveniently code into a web.xml env-entry.
In such cases, you can use the org.eclipse.jetty.plus.jndi.EnvEntry class, and even override an entry of the same name in web.xml.
<New class="org.eclipse.jetty.plus.jndi.EnvEntry">
<Arg></Arg>
<Arg>mySpecialValue</Arg>
<Arg type="java.lang.Integer">4000</Arg>
<Arg type="boolean">true</Arg>
</New>This example defines a virtual env-entry called mySpecialValue with value 4000 that is scoped to the JVM.
It is put into JNDI at java:comp/env/mySpecialValue for every web app deployed.
Moreover, the boolean argument indicates that this value overrides an env-entry of the same name in web.xml.
If you don’t want to override, omit this argument, or set it to false.
The Servlet Specification allows binding only the following object types to an env-entry:
-
java.lang.String
-
java.lang.Integer
-
java.lang.Float
-
java.lang.Double
-
java.lang.Long
-
java.lang.Short
-
java.lang.Character
-
java.lang.Byte
-
java.lang.Boolean
That being said, Jetty is a little more flexible and allows you to also bind custom POJOs, javax.naming.References and javax.naming.Referenceables.
Be aware that if you take advantage of this feature, your web application is not portable.
To use the env-entry configured above, use code in your servlet/filter/etc., such as:
import javax.naming.InitialContext;
public class MyClass {
public void myMethod() {
InitialContext ic = new InitialContext();
Integer mySpecialValue = (Integer)ic.lookup("java:comp/env/mySpecialValue");
...
}
}Configuring resource-refs and resource-env-refs
You can configure any type of resource that you want to refer to in a web.xml file as a resource-ref or resource-env-ref, using the org.eclipse.jetty.plus.jndi.Resource type of naming entry.
You provide the scope, the name of the object (relative to java:comp/env) and a POJO instance or a javax.naming.Reference instance or javax.naming.Referenceable instance.
The J2EE Specification recommends storing DataSources in java:comp/env/jdbc, JMS connection factories under java:comp/env/jms, JavaMail connection factories under java:comp/env/mail and URL connection factories under java:comp/env/url.
For example:
| Resource Type | Name in jetty.xml |
Environment Lookup |
|---|---|---|
javax.sql.DataSource |
jdbc/myDB |
java:comp/env/jdbc/myDB |
javax.jms.QueueConnectionFactory |
jms/myQueue |
java:comp/env/jms/myQueue |
javax.mail.Session |
mail/myMailService |
java:comp/env/mail/myMailService |
Configuring DataSources
Here is an example of configuring a javax.sql.DataSource.
Jetty can use any DataSource implementation available on its classpath.
In this example, the DataSource is from the Derby relational database, but you can use any implementation of a javax.sql.DataSource.
This example configures it as scoped to a web app with the id of wac:
<Configure id='wac' class="org.eclipse.jetty.webapp.WebAppContext">
<New id="myds" class="org.eclipse.jetty.plus.jndi.Resource">
<Arg><Ref refid="wac"/></Arg>
<Arg>jdbc/myds</Arg>
<Arg>
<New class="org.apache.derby.jdbc.EmbeddedDataSource">
<Set name="DatabaseName">test</Set>
<Set name="createDatabase">create</Set>
</New>
</Arg>
</New>
</Configure>The code above creates an instance of org.apache.derby.jdbc.EmbeddedDataSource, calls the two setter methods setDatabaseName("test"), and setCreateDatabase("create"), and binds it into the JNDI scope for the web app.
If you do not have the appropriate resource-ref set up in your web.xml, it is available from application lookups as java:comp/env/jdbc/myds.
Here’s an example web.xml declaration for the datasource above:
<resource-ref>
<res-ref-name>jdbc/myds</res-ref-name>
<res-type>javax.sql.DataSource</res-type>
<res-auth>Container</res-auth>
</resource-ref>To look up your DataSource in your servlet/filter/etc.:
import javax.naming.InitialContext;
import javax.sql.DataSource;
public class MyClass {
public void myMethod() {
InitialContext ic = new InitialContext();
DataSource myDS = (DataSource)ic.lookup("java:comp/env/jdbc/myds");
...
}
}|
Careful! When configuring Resources, ensure that the type of object you configure matches the type of object you expect to look up in |
For more examples of datasource configurations, see Datasource Examples.
Configuring JMS Queues, Topics and ConnectionFactories
Jetty can bind any implementation of the JMS destinations and connection factories. You just need to ensure the implementation Jars are available on Jetty’s classpath. Here is an example of binding an ActiveMQ in-JVM connection factory:
<Configure id='wac' class="org.eclipse.jetty.webapp.WebAppContext">
<New id="cf" class="org.eclipse.jetty.plus.jndi.Resource">
<Arg><Ref refid='wac'/></Arg>
<Arg>jms/connectionFactory</Arg>
<Arg>
<New class="org.apache.activemq.ActiveMQConnectionFactory">
<Arg>vm://localhost?broker.persistent=false</Arg>
</New>
</Arg>
</New>
</Configure>The entry in web.xml would be:
<resource-ref>
<res-ref-name>jms/connectionFactory</res-ref-name>
<res-type>javax.jms.ConnectionFactory</res-type>
<res-auth>Container</res-auth>
</resource-ref>TODO: put in an example of a QUEUE from progress demo
Configuring Mail
Jetty also provides infrastructure for access to javax.mail.Sessions from within an application:
<Configure id='wac' class="org.eclipse.jetty.webapp.WebAppContext">
<New id="mail" class="org.eclipse.jetty.plus.jndi.Resource">
<Arg><Ref refid="wac"/></Arg>
<Arg>mail/Session</Arg>
<Arg>
<New class="org.eclipse.jetty.jndi.factories.MailSessionReference">
<Set name="user">fred</Set>
<Set name="password">OBF:1xmk1w261z0f1w1c1xmq</Set>
<Set name="properties">
<New class="java.util.Properties">
<Put name="mail.smtp.host">XXX</Put>
<Put name="mail.from">me@me</Put>
<Put name="mail.debug">true</Put>
</New>
</Set>
</New>
</Arg>
</New>
</Configure>This setup creates an instance of the org.eclipse.jetty.jndi.factories.MailSessionReference class, calls it’s setter methods to set up the authentication for the mail system, and populates a set of Properties, setting them on the MailSessionReference instance.
The result is that an application can look up java:comp/env/mail/Session at runtime and obtain access to a javax.mail.Session that has the necessary configuration to permit it to send email via SMTP.
|
You can set the password to be plain text, or use Jetty’s Secure Password Obfuscation (OBF:) mechanism to make the config file a little more secure from prying eyes. Remember that you cannot use the other Jetty encryption mechanisms of MD5 and Crypt because they do not allow you to recover the original password, which the mail system requires. |
Configuring XA Transactions
If you want to perform distributed transactions with your resources, you need a transaction manager that supports the JTA interfaces, and that you can look up as java:comp/UserTransaction in your webapp.
Jetty does not ship with one as standard, but you can plug in the one you prefer.
You can configure a transaction manager using the JNDI Transaction object in a Jetty config file.
The following example configures the Atomikos transaction manager:
<New id="tx" class="org.eclipse.jetty.plus.jndi.Transaction">
<Arg>
<New class="com.atomikos.icatch.jta.J2eeUserTransaction"/>
</Arg>
</New>Configuring Links
Generally, the name you set for your Resource should be the same name you use for it in web.xml.
For example:
In a context xml file:
<Configure id='wac' class="org.eclipse.jetty.webapp.WebAppContext">
<New id="myds" class="org.eclipse.jetty.plus.jndi.Resource">
<Arg><Ref refid="wac"/></Arg>
<Arg>jdbc/mydatasource</Arg>
<Arg>
<New class="org.apache.derby.jdbc.EmbeddedDataSource">
<Set name="DatabaseName">test</Set>
<Set name="createDatabase">create</Set>
</New>
</Arg>
</New>
</Configure>In a web.xml file:
<resource-ref>
<res-ref-name>jdbc/mydatasource</res-ref-name>
<res-type>javax.sql.DataSource</res-type>
<res-auth>Container</res-auth>
<injection-target>
<injection-target-class>com.acme.JNDITest</injection-target-class>
<injection-target-name>myDatasource</injection-target-name>
</injection-target>
</resource-ref>However, you can refer to it in web.xml by a different name, and link it to the name in your org.eclipse.jetty.plus.jndi.Resource by using an org.eclipse.jetty.plus.jndi.Link.
For the example above, you can refer to the jdbc/mydatasource resource as jdbc/mydatasource1 as follows:
In a context xml file declare jdbc/mydatasource:
<Configure id='wac' class="org.eclipse.jetty.webapp.WebAppContext">
<New id="myds" class="org.eclipse.jetty.plus.jndi.Resource">
<Arg><Ref refid="wac"/></Arg>
<Arg>jdbc/mydatasource</Arg>
<Arg>
<New class="org.apache.derby.jdbc.EmbeddedDataSource">
<Set name="DatabaseName">test</Set>
<Set name="createDatabase">create</Set>
</New>
</Arg>
</New>
</Configure>Then in a WEB-INF/jetty-env.xml file, link the name jdbc/mydatasource to the name you want to reference it as in
web.xml, which in this case is jdbc/mydatasource1:
<New id="map1" class="org.eclipse.jetty.plus.jndi.Link">
<Arg><Ref refid='wac'/></Arg>
<Arg>jdbc/mydatasource1</Arg> <!-- name in web.xml -->
<Arg>jdbc/mydatasource</Arg> <!-- name in container environment -->
</New>Now you can refer to jdbc/mydatasource1 in the web.xml like this:
<resource-ref>
<res-ref-name>jdbc/mydatasource1</res-ref-name>
<res-type>javax.sql.DataSource</res-type>
<res-auth>Container</res-auth>
<injection-target>
<injection-target-class>com.acme.JNDITest</injection-target-class>
<injection-target-name>myDatasource</injection-target-name>
</injection-target>
</resource-ref>This can be useful when you cannot change a JNDI resource directly in the web.xml but need to link it to a specific resource in your deployment environment.
Using JNDI with Jetty Embedded
Setting up the Classpath
In addition to the jars that you require for your application, and the jars needed for core Jetty, you will need to place the following jars onto your classpath:
jetty-jndi.jar jetty-plus.jar
If you are using transactions, you will also need the javax.transaction api.
You can obtain this jar here.
If you wish to use mail, you will also need the javax.mail api and implementation which you can download here.
Note that this jar also requires the javax.activation classes, which is available at this link.
Example Code
Here is an example class that sets up some JNDI entries and deploys a webapp that references these JNDI entries in code. We’ll use some mocked up classes for the transaction manager and the DataSource in this example for simplicity:
import java.util.Properties;
import org.eclipse.jetty.server.Server;
import org.eclipse.jetty.webapp.WebAppContext;
/**
* ServerWithJNDI
*
*
*/
public class ServerWithJNDI
{
public static void main(String[] args) throws Exception
{
//Create the server
Server server = new Server(8080);
//Enable parsing of jndi-related parts of web.xml and jetty-env.xml
org.eclipse.jetty.webapp.Configuration.ClassList classlist = org.eclipse.jetty.webapp.Configuration.ClassList.setServerDefault(server);
classlist.addAfter("org.eclipse.jetty.webapp.FragmentConfiguration", "org.eclipse.jetty.plus.webapp.EnvConfiguration", "org.eclipse.jetty.plus.webapp.PlusConfiguration");
//Create a WebApp
WebAppContext webapp = new WebAppContext();
webapp.setContextPath("/");
webapp.setWar("./my-foo-webapp.war");
server.setHandler(webapp);
//Register new transaction manager in JNDI
//At runtime, the webapp accesses this as java:comp/UserTransaction
org.eclipse.jetty.plus.jndi.Transaction transactionMgr = new org.eclipse.jetty.plus.jndi.Transaction(new com.acme.MockUserTransaction());
//Define an env entry with Server scope.
//At runtime, the webapp accesses this as java:comp/env/woggle
//This is equivalent to putting an env-entry in web.xml:
//<env-entry>
// <env-entry-name>woggle</env-entry-name>
// <env-entry-type>java.lang.Integer</env-entry-type>
// <env-entry-value>4000</env-entry-value>
//</env-entry>
org.eclipse.jetty.plus.jndi.EnvEntry woggle = new org.eclipse.jetty.plus.jndi.EnvEntry(server, "woggle", new Integer(4000), false);
//Define an env entry with webapp scope.
//At runtime, the webapp accesses this as java:comp/env/wiggle
//This is equivalent to putting a web.xml entry in web.xml:
//<env-entry>
// <env-entry-name>wiggle</env-entry-name>
// <env-entry-value>100</env-entry-value>
// <env-entry-type>java.lang.Double</env-entry-type>
//</env-entry>
//Note that the last arg of "true" means that this definition for "wiggle" would override an entry of the
//same name in web.xml
org.eclipse.jetty.plus.jndi.EnvEntry wiggle = new org.eclipse.jetty.plus.jndi.EnvEntry(webapp, "wiggle", new Double(100), true);
//Register a reference to a mail service scoped to the webapp.
//This must be linked to the webapp by an entry in web.xml:
// <resource-ref>
// <res-ref-name>mail/Session</res-ref-name>
// <res-type>javax.mail.Session</res-type>
// <res-auth>Container</res-auth>
// </resource-ref>
//At runtime the webapp accesses this as java:comp/env/mail/Session
org.eclipse.jetty.jndi.factories.MailSessionReference mailref = new org.eclipse.jetty.jndi.factories.MailSessionReference();
mailref.setUser("CHANGE-ME");
mailref.setPassword("CHANGE-ME");
Properties props = new Properties();
props.put("mail.smtp.auth", "false");
props.put("mail.smtp.host","CHANGE-ME");
props.put("mail.from","CHANGE-ME");
props.put("mail.debug", "false");
mailref.setProperties(props);
org.eclipse.jetty.plus.jndi.Resource xxxmail = new org.eclipse.jetty.plus.jndi.Resource(webapp, "mail/Session", mailref);
// Register a mock DataSource scoped to the webapp
//This must be linked to the webapp via an entry in web.xml:
//<resource-ref>
// <res-ref-name>jdbc/mydatasource</res-ref-name>
// <res-type>javax.sql.DataSource</res-type>
// <res-auth>Container</res-auth>
//</resource-ref>
//At runtime the webapp accesses this as java:comp/env/jdbc/mydatasource
org.eclipse.jetty.plus.jndi.Resource mydatasource = new org.eclipse.jetty.plus.jndi.Resource(webapp, "jdbc/mydatasource",
new com.acme.MockDataSource());
server.start();
server.join();
}
}Datasource Examples
Here are examples of configuring a JNDI datasource for various databases.
|
Read Configuring DataSources in Configuring JNDI for more information about configuring datasources. |
All of these examples correspond to a resource-ref in web.xml.
<resource-ref>
<description>My DataSource Reference</description>
<res-ref-name>jdbc/DSTest</res-ref-name>
<res-type>javax.sql.DataSource</res-type>
<res-auth>Container</res-auth>
</resource-ref>These examples assume that all of the datasources are declared at the JVM scope, but you can use other scopes if desired.
You can configure all JNDI resources in a jetty.xml file, a WEB-INF/jetty-env.xml file, or a context XML file.
See the section Deciding Where to Declare Resources for more information.
|
You must provide Jetty with the libraries necessary to instantiate the datasource you have configured by putting the corresponding Jar in |
Pooling DataSources
Pooling datasources enables connection pooling, which lets you reuse an existing connection instead of creating a new connection to the database. This is highly efficient in terms of memory allocation and speed of the request to the database. We highly recommend this option for production environments.
The following is a list of the pooled datasource examples we have worked with in the past:
HikariCP
Connection pooling, available at HikariCP Download. All configuration options for HikariCP are described here: HikariCP documentation.
<New id="DSTest" class="org.eclipse.jetty.plus.jndi.Resource">
<Arg></Arg>
<Arg>jdbc/DSTest</Arg>
<Arg>
<New class="com.zaxxer.hikari.HikariDataSource">
<Arg>
<New class="com.zaxxer.hikari.HikariConfig">
<Set name="minimumPoolSize">5</Set>
<Set name="maximumPoolSize">20</Set>
<Set name="dataSourceClassName">com.mysql.jdbc.jdbc2.optional.MysqlDataSource</Set>
<Set name="username">jdbc.user</Set>
<Set name="password">jdbc.pass</Set>
<Call name="addDataSourceProperty">
<Arg>url</Arg>
<Arg>jdbc.url</Arg>
</Call>
</New>
</Arg>
</New>
</Arg>
</New>BoneCP
Connection pooling, available at BoneCP Download. All configuration options for BoneCP are described here: BoneCP API.
<New id="DSTest" class="org.eclipse.jetty.plus.jndi.Resource">
<Arg></Arg>
<Arg>jdbc/DSTest</Arg>
<Arg>
<New class="com.jolbox.bonecp.BoneCPDataSource">
<Set name="driverClass">com.mysql.jdbc.Driver</Set>
<Set name="jdbcUrl">jdbc.url</Set>
<Set name="username">jdbc.user</Set>
<Set name="password">jdbc.pass</Set>
<Set name="minConnectionsPerPartition">5</Set>
<Set name="maxConnectionsPerPartition">50</Set>
<Set name="acquireIncrement">5</Set>
<Set name="idleConnectionTestPeriod">30</Set>
</New>
</Arg>
</New>c3p0
Connection pooling, available at c3p0 Jar.
<New id="DSTest" class="org.eclipse.jetty.plus.jndi.Resource">
<Arg></Arg>
<Arg>jdbc/DSTest</Arg>
<Arg>
<New class="com.mchange.v2.c3p0.ComboPooledDataSource">
<Set name="driverClass">org.some.Driver</Set>
<Set name="jdbcUrl">jdbc.url</Set>
<Set name="user">jdbc.user</Set>
<Set name="password">jdbc.pass</Set>
</New>
</Arg>
</New>DBCP
Connection pooling, available at dbcp Jar.
<New id="DSTest" class="org.eclipse.jetty.plus.jndi.Resource">
<Arg></Arg>
<Arg>jdbc/DSTest</Arg>
<Arg>
<New class="org.apache.commons.dbcp.BasicDataSource">
<Set name="driverClassName">org.some.Driver</Set>
<Set name="url">jdbc.url</Set>
<Set name="username">jdbc.user</Set>
<Set name="password">jdbc.pass</Set>
</New>
</New>
</Arg>
</New>Atomikos 3.3.2+
Connection pooling + XA transactions.
<New id="DSTest" class="org.eclipse.jetty.plus.jndi.Resource">
<Arg></Arg>
<Arg>jdbc/DSTest</Arg>
<Arg>
<New class="com.atomikos.jdbc.AtomikosDataSourceBean">
<Set name="minPoolSize">2</Set>
<Set name="maxPoolSize">50</Set>
<Set name="xaDataSourceClassName">com.mysql.jdbc.jdbc2.optional.MysqlXADataSource</Set>
<Set name="UniqueResourceName">DSTest</Set>
<Get name="xaProperties">
<Call name="setProperty">
<Arg>url</Arg>
<Arg>jdbc:mysql://localhost:3306/databasename</Arg>
</Call>
<Call name="setProperty">
<Arg>user</Arg>
<Arg>some_username</Arg>
</Call>
<Call name="setProperty">
<Arg>password</Arg>
<Arg>some_password</Arg>
</Call>
</Get>
</New>
</Arg>
</New>MySQL
Implements javax.sql.DataSource and javax.sql.ConnectionPoolDataSource.
<New id="DSTest" class="org.eclipse.jetty.plus.jndi.Resource">
<Arg></Arg>
<Arg>jdbc/DSTest</Arg>
<Arg>
<New class="com.mysql.jdbc.jdbc2.optional.MysqlConnectionPoolDataSource">
<Set name="Url">jdbc:mysql://localhost:3306/databasename</Set>
<Set name="User">user</Set>
<Set name="Password">pass</Set>
</New>
</Arg>
</New>PostgreSQL
Implements javax.sql.ConnectionPoolDataSource.
<New id="DSTest" class="org.eclipse.jetty.plus.jndi.Resource">
<Arg></Arg>
<Arg>jdbc/DSTest</Arg>
<Arg>
<New class="org.postgresql.ds.PGConnectionPoolDataSource">
<Set name="User">user</Set>
<Set name="Password">pass</Set>
<Set name="DatabaseName">dbname</Set>
<Set name="ServerName">localhost</Set>
<Set name="PortNumber">5432</Set>
</New>
</Arg>
</New>DB2
Implements javax.sql.ConnectionPoolDataSource.
<New id="DSTest" class="org.eclipse.jetty.plus.jndi.Resource">
<Arg></Arg>
<Arg>jdbc/DSTest</Arg>
<Arg>
<New class="com.ibm.db2.jcc.DB2ConnectionPoolDataSource">
<Set name="DatabaseName">dbname</Set>
<Set name="User">user</Set>
<Set name="Password">pass</Set>
<Set name="ServerName">servername</Set>
<Set name="PortNumber">50000</Set>
</New>
</Arg>
</New>Non-pooling DataSources
If you are deploying in a production environment, we highly recommend using a Pooling DataSource. Since that is not always an option we have a handful of examples for non-pooling datasources listed here as well.
The following is a list of the non-pooled datasource examples:
SQL Server 2000
Implements javax.sql.DataSource and javax.sql.ConnectionPoolDataSource.
<New id="DSTest" class="org.eclipse.jetty.plus.jndi.Resource">
<Arg></Arg>
<Arg>jdbc/DSTest</Arg>
<Arg>
<New class="net.sourceforge.jtds.jdbcx.JtdsDataSource">
<Set name="User">user</Set>
<Set name="Password">pass</Set>
<Set name="DatabaseName">dbname</Set>
<Set name="ServerName">localhost</Set>
<Set name="PortNumber">1433</Set>
</New>
</Arg>
</New>Oracle 9i/10g
Implements javax.sql.DataSource and javax.sql.ConnectionPoolDataSource.
<New id="DSTest" class="org.eclipse.jetty.plus.jndi.Resource">
<Arg></Arg>
<Arg>jdbc/DSTest</Arg>
<Arg>
<New class="oracle.jdbc.pool.OracleDataSource">
<Set name="DriverType">thin</Set>
<Set name="URL">jdbc:oracle:thin:@fmsswdb1:10017:otcd</Set>
<Set name="User">xxxx</Set>
<Set name="Password">xxxx</Set>
<Set name="connectionCachingEnabled">true</Set>
<Set name="connectionCacheProperties">
<New class="java.util.Properties">
<Call name="setProperty">
<Arg>MinLimit</Arg>
<Arg>5</Arg>
</Call>
<!-- put the other properties in here too -->
</New>
</Set>
</New>
</Arg>
</New>For more information, refer to: Oracle Database JDBC documentation.
PostgreSQL
Implements javax.sql.DataSource.
<New id="DSTest" class="org.eclipse.jetty.plus.jndi.Resource">
<Arg></Arg>
<Arg>jdbc/DSTest</Arg>
<Arg>
<New class="org.postgresql.ds.PGSimpleDataSource">
<Set name="User">user</Set>
<Set name="Password">pass</Set>
<Set name="DatabaseName">dbname</Set>
<Set name="ServerName">localhost</Set>
<Set name="PortNumber">5432</Set>
</New>
</Arg>
</New>Sybase
Implements javax.sql.DataSource.
<New id="DSTest" class="org.eclipse.jetty.plus.jndi.Resource">
<Arg></Arg>
<Arg>jdbc/DSTest</Arg>
<Arg>
<New class="com.sybase.jdbc2.jdbc.SybDataSource">
<Set name="DatabaseName">dbname</Set>
<Set name="User">user</Set>
<Set name="Password">pass</Set>
<Set name="ServerName">servername</Set>
<Set name="PortNumber">5000</Set>
</New>
</Arg>
</New>DB2
Implements javax.sql.DataSource.
<New id="DSTest" class="org.eclipse.jetty.plus.jndi.Resource">
<Arg></Arg>
<Arg>jdbc/DSTest</Arg>
<Arg>
<New class="com.ibm.db2.jcc.DB2SimpleDataSource">
<Set name="DatabaseName">dbname</Set>
<Set name="User">user</Set>
<Set name="Password">pass</Set>
<Set name="ServerName">servername</Set>
<Set name="PortNumber">50000</Set>
</New>
</Arg>
</New>Annotations
Jetty supports the servlet specification annotations. It is not enable by default, so the following sections show you how to enable it, and how to use them.
Quick Setup
Jetty Distribution
If you are using the jetty distribution, then annotations are enabled by default. The annotations module and its transitive dependencies are responsible for making annotation processing available.
Note that annotations that relate to JNDI, such as @Resource and @Resources are enabled via the JNDI module, which is a transitive dependency on the annotations module.
Jetty Maven Plugin
Annotations and JNDI are pre-enabled for the Maven plugin.
Embedding
To use annotations in an embedded scenario, you will need to include the jetty-annotations jar and all its dependencies onto your classpath.
You will also need to include the org.eclipse.jetty.annotations.AnnotationConfiguration class into the list of Configuration classes applied to the org.eclipse.jetty.webapp.WebAppContext class representing your webapp.
Below is an example application that sets up the standard test-spec.war webapp from the distribution in embedded fashion.
It can also be found in the Jetty GitHub repository on the examples/embedded page as ServerWithAnnotations.java.
Note that the test-spec.war uses not only annotations, but also JNDI, so this example also enables their processing (via the org.eclipse.jetty.plus.webapp.EnvConfiguration, org.eclipse.jetty.plus.webapp.PlusConfiguration and their related jars).
//
// ========================================================================
// Copyright (c) 1995-2022 Mort Bay Consulting Pty Ltd and others.
// ------------------------------------------------------------------------
// All rights reserved. This program and the accompanying materials
// are made available under the terms of the Eclipse Public License v1.0
// and Apache License v2.0 which accompanies this distribution.
//
// The Eclipse Public License is available at
// http://www.eclipse.org/legal/epl-v10.html
//
// The Apache License v2.0 is available at
// http://www.opensource.org/licenses/apache2.0.php
//
// You may elect to redistribute this code under either of these licenses.
// ========================================================================
//
package org.eclipse.jetty.embedded;
import java.io.File;
import java.io.FileNotFoundException;
import java.net.URL;
import javax.naming.NamingException;
import org.eclipse.jetty.plus.jndi.EnvEntry;
import org.eclipse.jetty.plus.jndi.NamingDump;
import org.eclipse.jetty.plus.jndi.Resource;
import org.eclipse.jetty.plus.jndi.Transaction;
import org.eclipse.jetty.security.HashLoginService;
import org.eclipse.jetty.server.Server;
import org.eclipse.jetty.webapp.Configuration;
import org.eclipse.jetty.webapp.WebAppContext;
/**
* ServerWithAnnotations
*/
public class ServerWithAnnotations
{
public static Server createServer(int port) throws NamingException, FileNotFoundException
{
// Create the server
Server server = new Server(port);
// Enable parsing of jndi-related parts of web.xml and jetty-env.xml
Configuration.ClassList classlist = Configuration.ClassList
.setServerDefault(server);
classlist.addAfter("org.eclipse.jetty.webapp.FragmentConfiguration",
"org.eclipse.jetty.plus.webapp.EnvConfiguration",
"org.eclipse.jetty.plus.webapp.PlusConfiguration");
classlist.addBefore(
"org.eclipse.jetty.webapp.JettyWebXmlConfiguration",
"org.eclipse.jetty.annotations.AnnotationConfiguration");
// Create a WebApp
WebAppContext webapp = new WebAppContext();
webapp.setContextPath("/");
File warFile = JettyDistribution.resolve("demo-base/webapps/test-spec.war").toFile();
webapp.setWar(warFile.getAbsolutePath());
webapp.setAttribute(
"org.eclipse.jetty.server.webapp.ContainerIncludeJarPattern",
".*/javax.servlet-[^/]*\\.jar$|.*/servlet-api-[^/]*\\.jar$");
server.setHandler(webapp);
// Register new transaction manager in JNDI
// At runtime, the webapp accesses this as java:comp/UserTransaction
new Transaction(new com.acme.MockUserTransaction());
// Define an env entry with webapp scope.
// THIS ENTRY IS OVERRIDDEN BY THE ENTRY IN jetty-env.xml
new EnvEntry(webapp, "maxAmount", 100d, true);
// Register a mock DataSource scoped to the webapp
new Resource(server, "jdbc/mydatasource", new com.acme.MockDataSource());
// Add JNDI context to server for dump
server.addBean(new NamingDump());
// Configure a LoginService
String realmResourceName = "etc/realm.properties";
ClassLoader classLoader = ServerWithAnnotations.class.getClassLoader();
URL realmProps = classLoader.getResource(realmResourceName);
if (realmProps == null)
throw new FileNotFoundException("Unable to find " + realmResourceName);
HashLoginService loginService = new HashLoginService();
loginService.setName("Test Realm");
loginService.setConfig(realmProps.toExternalForm());
server.addBean(loginService);
return server;
}
public static void main(String[] args) throws Exception
{
int port = ExampleUtil.getPort(args, "jetty.http.port", 8080);
Server server = createServer(port);
server.start();
server.dumpStdErr();
server.join();
}
}Working with Annotations
Which Annotations Are Supported
Jetty supports interpretation and application of the following annotations:
-
@Resource
-
@Resources
-
@PostConstruct
-
@PreDestroy
-
@DeclaredRoles
-
@RunAs
-
@MultipartConfig
-
@WebServlet
-
@WebFilter
-
@WebListener
-
@WebInitParam
-
@ServletSecurity, @HttpConstraint, @HttpMethodConstraint
-
@HandlesTypes (on ServletContainerInitializers)
Discovered vs Introspected Annotations
Some types of annotation can be placed on any class, not necessarily just those with which the container interacts directly.
These type of annotations are referred to as "discovered" to indicate that the container must take proactive action to go out and find them.
The other type of annotation is call "introspected", meaning that they occur on classes with which the container interacts during their lifecycle (e.g. javax.servlet.Servlet, javax.servlet.Filter, …etc.), and hence can be found by simple inspection of the class at that point.
Some examples of discovered annotations are:
-
@WebServlet
-
@WebFilter
-
@WebListener
Some examples of introspected annotations are:
-
@PostConstruct
-
@PreDestroy
-
@Resource
Which Jar Files Are Scanned For Discovered Annotations
The web.xml file can contain the attribute metadata-complete.
If this is set to true, then no scanning of discoverable annotations takes place.
However, scanning of classes may still occur because of javax.servlet.ServletContainerInitializers.
Classes implementing this interface are found by Jetty using the javax.util.ServiceLoader mechanism, and if one is present and it includes the @HandlesTypes annotation, then Jetty must scan the class hierarchy of the web application.
This may be very time-consuming if you have many jars in the container’s path or in the webapp’s WEB-INF/lib.
If scanning is to take place - because either metadata-complete is false or missing, or because there are one or more javax.servlet.ServletContainerIntializers with @HandlesTypes - then Jetty must consider both the container’s classpath and the webapp’s classpath.
By default, Jetty will not scan any classes that are on the container’s classpath.
If you need to cause jars and classes that are on the container’s classpath to be scanned, then you can use the org.eclipse.jetty.server.webapp.ContainerIncludeJarPattern context attribute to specify a pattern for jars and directories from the container’s classpath to scan.
By default Jetty will scan allclasses from WEB-INF/classes and all jars from WEB-INF/lib according to the order, if any, established by absolute or relative ordering clauses in web.xml.
If your webapp contains many jar files, you can significantly speed up deployment by omitting them from scanning.
To do this, use the org.eclipse.jetty.server.webapp.WebInfIncludeJarPattern context attribute to define the patterns of jars that you specifically want to be scanned.
Note that if you have configured an extraClasspath for the webapp, then it participates in the scanning process too. Any classes dirs are treated the same for scanning purposes as if they were in WEB-INF/classes and jars are treated as if they were in WEB-INF/lib.
See also the next section on ServletContainerInitializers if you need to control the order in which they are applied.
Multi-threaded Annotation Scanning
If annotation scanning is to be performed, by default Jetty will do it in a multi-threaded manner in order to complete it in the minimum amount of time.
If for some reason you don’t want multi-threaded scanning, you can configure Jetty to revert to single-threaded scanning. There are several ways to configure this:
-
Set the context attribute
org.eclipse.jetty.annotations.multiThreadedtofalse -
Set the Server attribute
org.eclipse.jetty.annotations.multiThreadedtofalse -
Set the System property
org.eclipse.jetty.annotations.multiThreadedtofalse
Method 1 will only affect the current webapp. Method 2 will affect all webapps deployed to the same Server instance. Method 3 will affect all webapps deployed in the same JVM.
By default, Jetty will wait a maximum of 60 seconds for all of the scanning threads to complete. You can set this to a higher or lower number of seconds by doing one of the following:
-
Set the context attribute
org.eclipse.jetty.annotations.maxWait -
Set the Server attribute
org.eclipse.jetty.annotations.maxWait -
Set the System property
org.eclipse.jetty.annotations.maxWait
Method 1 will only affect the current webapp. Method 2 will affect all webapps deployed to the same Server instance. Method 3 will affect all webapps deployed in the same JVM.
ServletContainerInitializers
The javax.servlet.ServletContainerInitializer class can exist in: the container’s classpath, the webapp’s WEB-INF/classes directory, the webapp’s WEB-INF/lib jars, or any external extraClasspath that you have configured on the webapp.
The Servlet Specification does not define any order in which a ServletContainerInitializer must be called when the webapp starts.
By default Jetty will call them in the following order:
-
ServletContainerInitializers from the container’s classpath
-
ServletContainerInitializers from WEB-INF/classes
-
ServletContainerInitializers from WEB-INF/lib jars in the order established in web.xml, or in the order that the SCI is returned by the javax.util.ServiceLoader if there is no ordering
As is the case with annotation scanning, the extraClasspath is fully considered for ServletContainerInitializer callbacks. ServletContainerInitializer derived from a classes directory on the extraClasspath and jars from an extraClasspath for the webapp are called in step 2 and 3, respectively.
|
As of Jetty-9.4.4, unless the |
Controlling the order of ServletContainerInitializer invocation
If you need ServletContainerInitializer classes called in a specific order that is different from that outlined above, you can use the context attribute org.eclipse.jetty.containerInitializerOrder.
Set them to a list of comma separated class names of ServletContainerInitializers in the order that you want them applied.
You may optionally use the wildcard character "" *once in the list.
It will match all ServletContainerInitializer classed not explicitly named in the list.
Here is an example, setting the context attribute in code (although you can also do the same in xml):
WebAppContext context = new WebAppContext();
context.setAttribute("org.eclipse.jetty.containerInitializerOrder",
"org.eclipse.jetty.websocket.jsr356.server.deploy.WebSocketServerContainerInitializer, com.acme.Foo.MySCI, *");In this example, we ensure that the WebSocketServerContainerInitializer is the very first ServletContainerInitializer that is called, followed by MySCI and then any other ServletContainerInitializer instances that were discovered but not yet called.
Excluding ServletContainerInitializers
By default, as according to the Servlet Specification, all ServletContainerInitializer that are discovered are invoked (see above for how to control the invocation order).
Sometimes, depending on your requirements, you may need to prevent some being called at all.
In this case, you can define the org.eclipse.jetty.containerInitializerExclusionPattern context attribute.
This is a regular expression that defines patterns of classnames that you want to exclude.
Here’s an example, setting the context attribute in code, although you may do exactly the same in xml:
WebAppContext context = new WebAppContext();
context.setAttribute("org.eclipse.jetty.containerInitializerExclusionPattern",
"com.acme.*|com.corp.SlowContainerInitializer");In this example we exclude all ServletContainerInitializer instances in the com.acme package, and the SlowContainerInitializer.
It is possible to use exclusion and ordering together to control ServletContainerInitializer invocation - the exclusions will be applied before the ordering.
Using Annotations with Jetty Embedded
Setting up the Classpath
You will need to place the following Jetty jar files onto the classpath of your application. You can obtain them from the Jetty distribution, or the Maven repository:
jetty-plus.jar jetty-annotations.jar
You will also need the asm jar, which you can obtain from this link.
Example
Here’s an example application that sets up a Jetty server, performs some setup to ensure that annotations are scanned, and then deploys a webapp that uses annotations. This example also uses the @Resource annotation which involves JNDI, so we would also add the necessary JNDI jars to the classpath. The example also adds in the configuration classes that are responsible for JNDI (see line 19).
The code is as follows:
import org.eclipse.jetty.security.HashLoginService;
import org.eclipse.jetty.server.Server;
import org.eclipse.jetty.webapp.WebAppContext;
/**
* ServerWithAnnotations
*
*
*/
public class ServerWithAnnotations
{
public static final void main(String args[]) throws Exception
{
//Create the server
Server server = new Server(8080);
//Enable parsing of jndi-related parts of web.xml and jetty-env.xml
org.eclipse.jetty.webapp.Configuration.ClassList classlist = org.eclipse.jetty.webapp.Configuration.ClassList.setServerDefault(server);
classlist.addAfter("org.eclipse.jetty.webapp.FragmentConfiguration", "org.eclipse.jetty.plus.webapp.EnvConfiguration", "org.eclipse.jetty.plus.webapp.PlusConfiguration");
classlist.addBefore("org.eclipse.jetty.webapp.JettyWebXmlConfiguration", "org.eclipse.jetty.annotations.AnnotationConfiguration");
//Create a WebApp
WebAppContext webapp = new WebAppContext();
webapp.setContextPath("/");
webapp.setWar("../../tests/test-webapps/test-servlet-spec/test-spec-webapp/target/test-spec-webapp-9.0.4-SNAPSHOT.war");
server.setHandler(webapp);
//Register new transaction manager in JNDI
//At runtime, the webapp accesses this as java:comp/UserTransaction
org.eclipse.jetty.plus.jndi.Transaction transactionMgr = new org.eclipse.jetty.plus.jndi.Transaction(new com.acme.MockUserTransaction());
//Define an env entry with webapp scope.
org.eclipse.jetty.plus.jndi.EnvEntry maxAmount = new org.eclipse.jetty.plus.jndi.EnvEntry (webapp, "maxAmount", new Double(100), true);
// Register a mock DataSource scoped to the webapp
org.eclipse.jetty.plus.jndi.Resource mydatasource = new org.eclipse.jetty.plus.jndi.Resource(webapp, "jdbc/mydatasource", new com.acme.MockDataSource());
// Configure a LoginService
HashLoginService loginService = new HashLoginService();
loginService.setName("Test Realm");
loginService.setConfig("src/test/resources/realm.properties");
server.addBean(loginService);
server.start();
server.join();
}
}On line 19 the configuration classes responsible for setting up JNDI and java:comp/env are added.
On line 20 we add in the configuration class that ensures annotations are inspected.
On lines 30, 33 and 37 JNDI resources that we will be able to reference with @Resource annotations are configured.
With the setup above, a servlet that uses annotations and Jetty will honour the annotations when the webapp is deployed can be created:
import javax.annotation.security.DeclareRoles;
import javax.annotation.security.RunAs;
import javax.servlet.ServletConfig;
import javax.servlet.ServletException;
import javax.servlet.ServletOutputStream;
import javax.servlet.annotation.WebInitParam;
import javax.servlet.annotation.WebServlet;
import javax.servlet.http.HttpServlet;
import javax.servlet.http.HttpServletRequest;
import javax.servlet.http.HttpServletResponse;
import javax.sql.DataSource;
import javax.transaction.UserTransaction;
/**
* AnnotationTest
*
* Use servlet 3.0 annotations from within Jetty.
*
* Also uses servlet 2.5 resource injection and lifecycle callbacks
*/
@RunAs("special")
@WebServlet(urlPatterns = {"/","/test/*"}, name="AnnotationTest", initParams={@WebInitParam(name="fromAnnotation", value="xyz")})
@DeclareRoles({"user","client"})
public class AnnotationTest extends HttpServlet
{
private DataSource myDS;
@Resource(mappedName="UserTransaction")
private UserTransaction myUserTransaction;
@Resource(mappedName="maxAmount")
private Double maxAmount;
@Resource(mappedName="jdbc/mydatasource")
public void setMyDatasource(DataSource ds)
{
myDS=ds;
}
@PostConstruct
private void myPostConstructMethod ()
{
System.err.println("PostConstruct called");
}
@PreDestroy
private void myPreDestroyMethod()
{
System.err.println("PreDestroy called");
}
public void init(ServletConfig config) throws ServletException
{
super.init(config);
}
public void doPost(HttpServletRequest request, HttpServletResponse response) throws ServletException, IOException
{
doGet(request, response);
}
public void doGet(HttpServletRequest request, HttpServletResponse response) throws ServletException, IOException
{
try
{
response.setContentType("text/html");
ServletOutputStream out = response.getOutputStream();
out.println("<html>");
out.println("<body>");
out.println("<h1>Results</h1>");
out.println(myDS.toString());
out.println("<br/>");
out.println(maxAmount.toString());
out.println("</body>");
out.println("</html>");
out.flush();
}
catch (Exception e)
{
throw new ServletException(e);
}
}
}Java Management Extensions (JMX)
The Java Management Extensions (JMX) API is a standard API for managing and monitoring resources such as applications, devices, services, and the Java virtual machine.
Typical uses of the JMX technology include:
-
Consulting and changing application configuration
-
Accumulating and making available statistics about application behavior
-
Notifying of state changes and erroneous conditions
The JMX API includes remote access, so a remote management program can interact with a running application for these purposes.
Using JMX with Jetty
Jetty’s architecture is based on POJO components (see Jetty Architecture).
These components are organized in a tree and each component may have a lifecycle that spans the Server lifetime, or a web application lifetime, or even shorter lifetimes such as that of a TCP connection.
Every time a component is added or removed from the component tree, an event is emitted, and Container.Listener implementations can listen to those events and perform additional actions.
One such Container.Listener is MBeanContainer that uses ObjectMBean to create an MBean from an arbitrary POJO, and register/unregister the MBean to/from the platform MBeanServer.
Jetty components are annotated with Jetty JMX Annotations and provide specific JMX details so that ObjectMBean can build a more precise representation of the JMX metadata associated with the component POJO.
Therefore, when a component is added to the component tree, MBeanContainer is notified, it creates the MBean from the component POJO and registers it to the MBeanServer.
Similarly, when a component is removed from the tree, MBeanContainer is notified, and unregisters the MBean from the MBeanServer.
The Jetty MBeans can be accessed via any JMX console such as Java Mission Control (JMC), VisualVM, JConsole or others.
Configuring JMX
This guide describes the various ways to initialize and configure the Jetty JMX integration.
Configuring the Jetty JMX integration only registers the Jetty MBeans into the platform MBeanServer, and therefore the MBeans can only be accessed locally (from the same machine), not from remote machines.
This means that this configuration is enough for development, where you have easy access (with graphical user interface) to the machine where Jetty runs, but it is typically not enough when the machine Jetty where runs is remote, or only accessible via SSH or otherwise without graphical user interface support. In these cases, you have to enable JMX Remote Access.
Standalone Jetty Server
JMX is not enabled by default in the Jetty distribution.
To enable JMX in the Jetty distribution run the following, where {$jetty.home} is the directory where you have the Jetty distribution installed, and ${jetty.base} is the directory where you have your Jetty configuration (see the documentation for Jetty base vs. home examples):
$ cd ${jetty.base}
$ java -jar {$jetty.home}/start.jar --add-to-start=jmxRunning the above command will append the available configurable elements of the jmx module to the {$jetty.base}/start.ini file, or create the ${jetty.base}/start.d/jmx.ini file.
Embedded Jetty Server
When running Jetty embedded into an application, create and configure an MBeanContainer instance as follows:
Server server = new Server();
// Setup JMX.
MBeanContainer mbeanContainer = new MBeanContainer(ManagementFactory.getPlatformMBeanServer());
server.addBean(mbeanContainer);
// Export the loggers as MBeans.
server.addBean(Log.getLog());Because logging is initialized prior to the MBeanContainer (even before the Server itself), it is necessary to register the logger manually via server.addBean() so that the loggers may show up in the JMX tree as MBeans.
Using the Jetty Maven Plugin with JMX
If you are using the Jetty Maven plugin you should copy the ${jetty.home}/etc/jetty-jmx.xml file into your webapp project somewhere, such as src/main/config/etc/, then add a <jettyXml> element to the <configuration> element of the Jetty Maven Plugin:
<plugin>
<groupid>org.eclipse.jetty</groupid>
<artifactid>jetty-maven-plugin</artifactid>
<version>{VERSION}</version>
<configuration>
<scanintervalseconds>10</scanintervalseconds>
<jettyXml>src/main/config/etc/jetty-jmx.xml</jettyXml>
</configuration>
</plugin>Using JConsole or Java Mission Control to Access Jetty MBeans
The simplest way to access the MBeans that Jetty publishes is to use Java Mission Control (JMC) or JConsole.
Both these tools can connect to local or remote JVMs to display the MBeans.
For local access, you just need to start JConsole or JMC and then choose from their user interface the local JVM you want to connect to.
For remote access, you need first to enable JMX Remote Access in Jetty.
Enabling JMX Remote Access
There are two ways of enabling remote connectivity so that JConsole or JMC can connect to the remote JVM to visualize MBeans.
-
Use the
com.sun.management.jmxremotesystem property on the command line. Unfortunately, this solution does not work well with firewalls and is not flexible. -
Use Jetty’s
jmx-remotemodule or - equivalently - theConnectorServerclass.
ConnectorServer will use by default RMI to allow connection from remote clients,
and it is a wrapper around the standard JDK class JMXConnectorServer, which is the class that provides remote access to JMX clients.
Connecting to the remote JVM is a two step process:
-
First, the client will connect to the RMI registry to download the RMI stub for the
JMXConnectorServer; this RMI stub contains the IP address and port to connect to the RMI server, i.e. the remoteJMXConnectorServer. -
Second, the client uses the RMI stub to connect to the RMI server (i.e. the remote
JMXConnectorServer) typically on an address and port that may be different from the RMI registry address and port.
The configuration for the RMI registry and the RMI server is specified by a JMXServiceURL.
The string format of an RMI JMXServiceURL is:
service:jmx:rmi://<rmi_server_host>:<rmi_server_port>/jndi/rmi://<rmi_registry_host>:<rmi_registry_port>/jmxrmiDefault values are:
rmi_server_host = localhost
rmi_server_port = 1099
rmi_registry_host = localhost
rmi_registry_port = 1099With the default configuration, only clients that are local to the server machine can connect to the RMI registry and RMI server - this is done for security reasons. With this configuration it would still be possible to access the MBeans from remote using a SSH tunnel.
By specifying an appropriate JMXServiceURL, you can fine tune the network interfaces the RMI registry and the RMI server bind to, and the ports that the RMI registry and the RMI server listen to.
The RMI server and RMI registry hosts and ports can be the same (as in the default configuration) because RMI is able to multiplex traffic arriving to a port to multiple RMI objects.
If you need to allow JMX remote access through a firewall, you must open both the RMI registry and the RMI server ports.
Examples:
service:jmx:rmi:///jndi/rmi:///jmxrmi
rmi_server_host = local host address
rmi_server_port = randomly chosen
rmi_registry_host = local host address
rmi_registry_port = 1099
service:jmx:rmi://0.0.0.0:1099/jndi/rmi://0.0.0.0:1099/jmxrmi
rmi_server_host = any address
rmi_server_port = 1099
rmi_registry_host = any address
rmi_registry_port = 1099
service:jmx:rmi://localhost:1100/jndi/rmi://localhost:1099/jmxrmi
rmi_server_host = loopback address
rmi_server_port = 1100
rmi_registry_host = loopback address
rmi_registry_port = 1099|
When To control the IP address stored in the RMI stub you need to set the system property |
Enabling JMX Remote Access in Standalone Jetty Server
Similarly to enabling JMX in a standalone Jetty server, you enable the jmx-remote module:
$ cd ${jetty.base}
$ java -jar {$jetty.home}/start.jar --add-to-start=jmx-remoteEnabling JMX Remote Access in Embedded Jetty
When running Jetty embedded into an application, create and configure a ConnectorServer:
Server server = new Server();
// Setup JMX
MBeanContainer mbeanContainer = new MBeanContainer(ManagementFactory.getPlatformMBeanServer());
server.addBean(mbeanContainer);
// Setup ConnectorServer
JMXServiceURL jmxURL = new JMXServiceURL("rmi", null, 1999, "/jndi/rmi:///jmxrmi");
ConnectorServer jmxServer = new ConnectorServer(jmxURL, "org.eclipse.jetty.jmx:name=rmiconnectorserver");
server.addBean(jmxServer);The JMXServiceURL above specifies that the RMI server binds to the wildcard address on port 1999, while the RMI registry binds to the wildcard address on port 1099 (the default RMI registry port).
JMX Remote Access Authorization
The standard JMXConnectorServer provides several options to authorize access.
To authorize access to the JMXConnectorServer you can use this configuration, where the jmx.password and jmx.access files have the format specified in the blog entry above:
<New id="ConnectorServer" class="org.eclipse.jetty.jmx.ConnectorServer">
<Arg>
<New class="javax.management.remote.JMXServiceURL">
<Arg type="java.lang.String">rmi</Arg>
<Arg type="java.lang.String" />
<Arg type="java.lang.Integer">1099</Arg>
<Arg type="java.lang.String">/jndi/rmi:///jmxrmi</Arg>
</New>
</Arg>
<Arg>
<Map>
<Entry>
<Item>jmx.remote.x.access.file</Item>
<Item>
<New class="java.lang.String"><Arg><Property name="jetty.base" default="." />/resources/jmx.access</Arg></New>
</Item>
</Entry>
<Entry>
<Item>jmx.remote.x.password.file</Item>
<Item>
<New class="java.lang.String"><Arg><Property name="jetty.base" default="." />/resources/jmx.password</Arg></New>
</Item>
</Entry>
</Map>
</Arg>
<Arg>org.eclipse.jetty.jmx:name=rmiconnectorserver</Arg>
<Call name="start" />
</New>Similarly, in code:
JMXServiceURL jmxURL = new JMXServiceURL("rmi", null, 1099, "/jndi/rmi:///jmxrmi");
Map<String, Object> env = new HashMap<>();
env.put("jmx.remote.x.access.file", "resources/jmx.access");
env.put("jmx.remote.x.password.file", "resources/jmx.password");
ConnectorServer jmxServer = new ConnectorServer(jmxURL, env, "org.eclipse.jetty.jmx:name=rmiconnectorserver");
jmxServer.start();Calling ConnectorServer.start() may be explicit as in the examples above, or can be skipped when adding the ConnectorServer as a bean to the Server, so that starting the Server will also start the ConnectorServer.
Securing JMX Remote Access with TLS
The JMX communication via RMI happens by default in clear-text.
It is possible to configure the ConnectorServer with a SslContextFactory so that the JMX communication via RMI is encrypted:
<New id="ConnectorServer" class="org.eclipse.jetty.jmx.ConnectorServer">
<Arg>
<New class="javax.management.remote.JMXServiceURL">
<Arg type="java.lang.String">rmi</Arg>
<Arg type="java.lang.String" />
<Arg type="java.lang.Integer">1099</Arg>
<Arg type="java.lang.String">/jndi/rmi:///jmxrmi</Arg>
</New>
</Arg>
<Arg />
<Arg>org.eclipse.jetty.jmx:name=rmiconnectorserver</Arg>
<Arg><Ref refid="sslContextFactory" /></Arg>
</New>Similarly, in code:
SslContextFactory.Server sslContextFactory = new SslContextFactory.Server();
sslContextFactory.setKeyStorePath("/path/to/keystore");
sslContextFactory.setKeyStorePassword("secret");
JMXServiceURL jmxURL = new JMXServiceURL("rmi", null, 1099, "/jndi/rmi:///jmxrmi");
ConnectorServer jmxServer = new ConnectorServer(jmxURL, null, "org.eclipse.jetty.jmx:name=rmiconnectorserver", sslContextFactory);It is possible to use the same SslContextFactory used to configure the Jetty ServerConnector that supports TLS for the HTTP protocol.
This is used in the XML example above: the SslContextFactory configured for the TLS ServerConnector is registered with an id of sslContextFactory which is referenced in the XML via the Ref element.
The keystore must contain a valid certificate signed by a Certification Authority.
The RMI mechanic is the usual one: the RMI client (typically a monitoring console) will connect first to the RMI registry (using TLS), download the RMI server stub that contains the address and port of the RMI server to connect to, then connect to the RMI server (using TLS).
This also mean that if the RMI registry and the RMI server are on different hosts, the RMI client must have available the cryptographic material to validate both hosts.
Having certificates signed by a Certification Authority simplifies by a lot the configuration needed to get the JMX communication over TLS working properly.
If that is not the case (for example the certificate is self-signed), then you need to specify the required system properties that allow RMI (especially when acting as an RMI client) to retrieve the cryptographic material necessary to establish the TLS connection.
For example, trying to connect using the JDK standard JMXConnector with both the RMI server and the RMI registry to domain.com:
// System properties necessary for an RMI client to trust a self-signed certificate.
System.setProperty("javax.net.ssl.trustStore", "/path/to/trustStore");
System.setProperty("javax.net.ssl.trustStorePassword", "secret");
JMXServiceURL jmxURL = new JMXServiceURL("service:jmx:rmi:///jndi/rmi://domain.com:1100/jmxrmi")
Map<String, Object> clientEnv = new HashMap<>();
// Required to connect to the RMI registry via TLS.
clientEnv.put(ConnectorServer.RMI_REGISTRY_CLIENT_SOCKET_FACTORY_ATTRIBUTE, new SslRMIClientSocketFactory());
try (JMXConnector client = JMXConnectorFactory.connect(jmxURL, clientEnv))
{
Set<ObjectName> names = client.getMBeanServerConnection().queryNames(null, null);
}Similarly, to launch JMC:
$ jmc -vmargs -Djavax.net.ssl.trustStore=/path/to/trustStore -Djavax.net.ssl.trustStorePassword=secretNote that these system properties are required when launching the ConnectorServer too, on the server, because it acts as an RMI client with respect to the RMI registry.
JMX Remote Access with Port Forwarding via SSH Tunnel
You can access JMX MBeans on a remote machine when the RMI ports are not open, for example because of firewall policies, but you have SSH access to the machine using local port forwarding via a SSH tunnel.
In this case you want to configure the ConnectorServer with a JMXServiceURL that binds the RMI server and the RMI registry to the loopback interface only: service:jmx:rmi://localhost:1099/jndi/rmi://localhost:1099/jmxrmi.
Then you setup the local port forwarding with the SSH tunnel:
$ ssh -L 1099:localhost:1099 <user>@<machine_host>Now you can use JConsole or JMC to connect to localhost:1099 on your local computer.
The traffic will be forwarded to machine_host and when there, SSH will forward the traffic to localhost:1099, which is exactly where the ConnectorServer listens.
When you configure ConnectorServer in this way, you must set the system property -Djava.rmi.server.hostname=localhost, on the server.
This is required because when the RMI server is exported, its address and port are stored in the RMI stub. You want the address in the RMI stub to be localhost so that when the RMI stub is downloaded to the remote client, the RMI communication will go through the SSH tunnel.
Jetty JMX Annotations
When the jetty-jmx libraries are present on startup and the wiring is enabled for exposing Jetty MBeans to JMX, there are three annotations that govern when and how MBeans are created and exposed.
Annotation Introspection
When JMX is configured and enabled in Jetty, any time an object is registered with the Server it is introspected as a potential MBean to be exposed.
This introspection proceeds as follows assuming the class is named com.acme.Foo:
-
All influences for
com.acme.Foodetermined. These include each class in the chain of super classes, and by convention each of these classes following a form ofcom.acme.jmx.FooMBean. All super classes and their corresponding MBean representations are then used in the next step. -
Each potential influencing class is checked for the
@ManagedObjectannotation. Should this annotation exist at any point in the chain of influencers then an MBran is created with the description of the version@ManagedObjectdiscovered. -
Once a MBean has been created for an object then each potential influencing object is introspected for
@ManagedAttributeand@ManagedOperationannotations and the corresponding type is exposed to the MBean.
The convention of looking for @ManagedObject annotations on .jmx.ClassMBean allows for a normal POJOs to be wrapped in an MBean without itself without requiring it being marked up with annotations.
Since the POJO is passed to these wrapped derived Mbean instances and is an internal variable then the MBean can be used to better expose a set of attributes and operations that may not have been anticipated when the original object was created.
@ManagedObject
The @ManagedObject annotation is used on a class at the top level to indicate that it should be exposed as an MBean.
It has only one attribute to it which is used as the description of the MBean.
Should multiple @ManagedObject annotations be found in the chain of influence then the first description is used.
The list of attributes available are:
- value
-
The description of the Managed Object.
@ManagedAttribute
The @ManagedAttribute annotation is used to indicate that a given method exposes a JMX attribute.
This annotation is placed always on the reader method of a given attribute.
Unless it is marked as read-only in the configuration of the annotation a corresponding setter is looked for following normal naming conventions.
For example if this annotation is on a method called getFoo() then a method called setFoo() would be looked for and if found wired automatically into the JMX attribute.
The list of attributes available are:
- value
-
The description of the Managed Attribute.
- name
-
The name of the Managed Attribute.
- proxied
-
Value is true if the corresponding MBean for this object contains the method of this JMX attribute in question.
- readonly
-
By default this value is false which means that a corresponding setter will be looked for an wired into the attribute should one be found. Setting this to true make the JMX attribute read only.
- setter
-
This attribute can be used when the corresponding setter for a JMX attribute follows a non-standard naming convention and it should still be exposed as the setter for the attribute.
@ManagedOperation
The @ManagedOperation annotation is used to indicate that a given method should be considered a JMX operation.
The list of attributes available are:
- value
-
The description of the Managed Operation.
- impact
-
The impact of an operation. By default this value is "UNKNOWN" and acceptable values are "ACTION", "INFO", "ACTION_INFO" and should be used according to their definitions with JMX.
- proxied
-
Value is true if the corresponding MBean for this object contains the method of this JMX operation in question.
@Name
A fourth annotation is often used in conjunction with the JMX annotations mentioned above. This annotation is used to describe variables in method signatures so that when rendered into tools like JConsole it is clear what the parameters are. For example:
The list of attributes available are:
- value
-
The name of the parameter.
- description
-
The description of the parameter.
Example
The following is an example of each of the annotations mentioned above in practice.
package com.acme;
import org.eclipse.jetty.util.annotation.ManagedAttribute;
import org.eclipse.jetty.util.annotation.ManagedObject;
import org.eclipse.jetty.util.annotation.ManagedOperation;
import org.eclipse.jetty.util.annotation.Name;
@ManagedObject("Test MBean Annotations")
public class Derived extends Base implements Signature
{
String fname="Full Name";
@ManagedAttribute(value="The full name of something", name="fname")
public String getFullName()
{
return fname;
}
public void setFullName(String name)
{
fname=name;
}
@ManagedOperation("Doodle something")
public void doodle(@Name(value="doodle", description="A description of the argument") String doodle)
{
System.err.println("doodle "+doodle);
}
}Managing Jetty with JConsole and JMC
JConsole and the Java Mission Control (JMX) are graphical tools; they allow you to remotely manage and monitor your server and web application status using JMX. When following the instructions given below, please also ensure that you make any necessary changes to any anti-virus software you may be using which may prevent JConsole or JMC from running.
Starting Jetty Standalone
The simplest way to enable support is to add the JMX-Remote support module to your {$jetty.base}.
[mybase]$ java /opt/jetty-dist/start.jar --add-to-start=jmx-remote, jmx
INFO: jmx-remote initialised in ${jetty.base}/start.ini
INFO: jmx initialised in ${jetty.base}/start.iniThen open the {$jetty.base}/start.ini (or {$jetty.base}/start.d/jmx-remote.ini) file and edit the properties to suit your needs:
#
# Initialize module jmx-remote
#
--module=jmx-remote
## JMX Configuration
## Enable for an open port accessible by remote machines
jetty.jmxrmihost=localhost
jetty.jmxrmiport=1099Monitoring Jetty with JConsole
To monitor Jetty’s server status with JConsole, start Jetty and then start JConsole by typing jconsole on the command line.
Connecting to your server process
After you start Jetty, you will see a dialog box in JConsole with a list of running processes to which you can connect. It should look something like so:
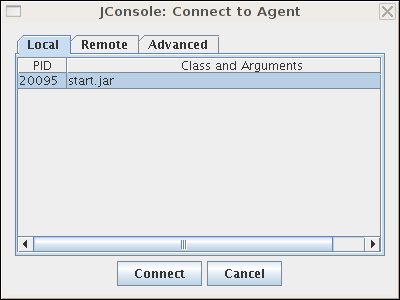
|
If you don’t see your Jetty process in the list of processes you can connect to, quickly switch tabs, or close and reopen a new "New Connection" dialog window. This forces JConsole to refresh the list, and recognize your newly-started Jetty process. |
Select the start.jar entry and click the "Connect" button. A new JConsole window opens:
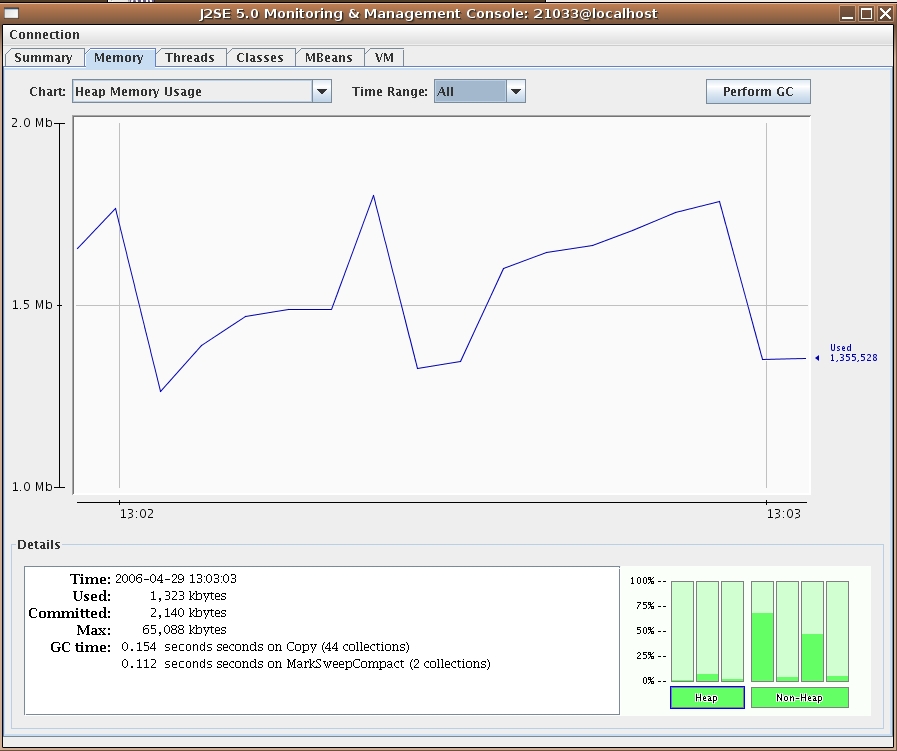
From this window you can monitor memory usage, thread usage, classloading and VM statistics. You can also perform operations such as a manual garbage collect. JConsole is an extremely powerful and useful tool.
Managing Jetty Objects with JConsole
The MBean tab of JConsole allows access to managed objects within the Java application, including MBeans the JVM provides. If you also want to interact with the Jetty JMX implementation via JConsole, you need to start Jetty JMX in a form that JConsole can access. See Using JMX with Jetty for more information.
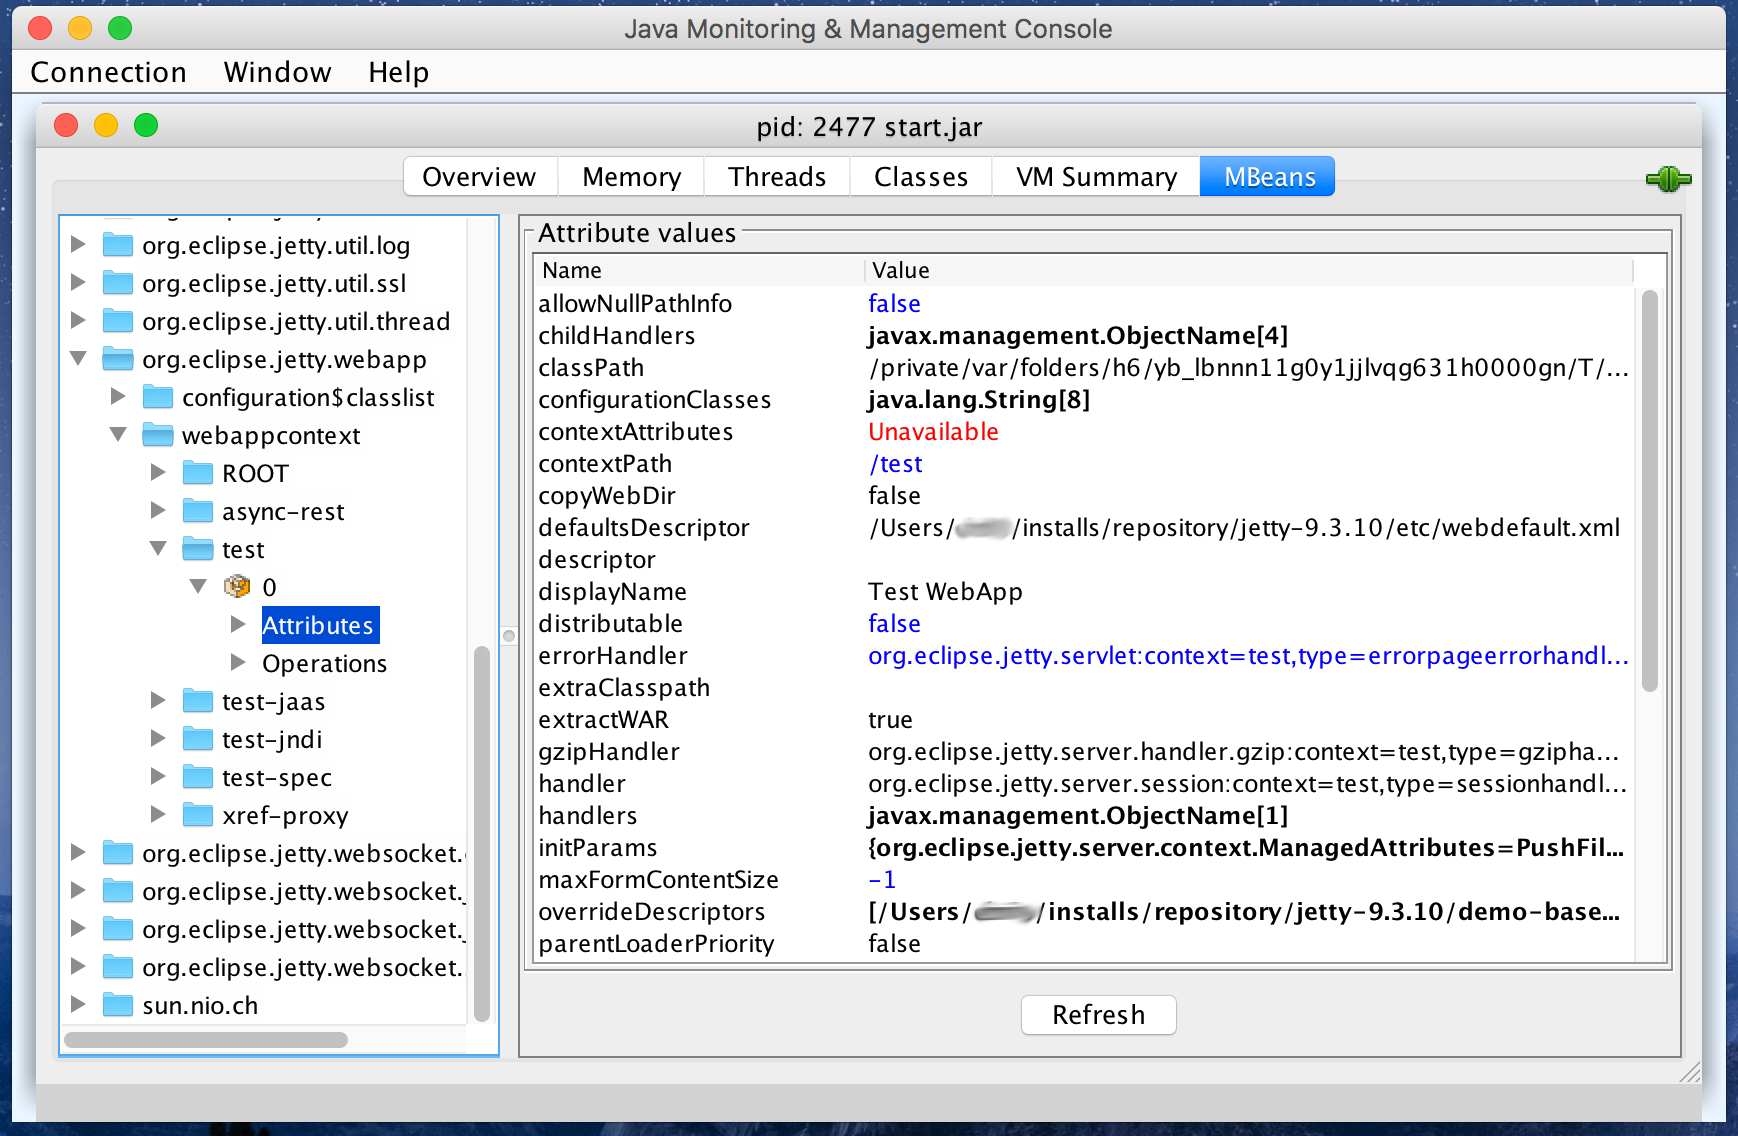
Monitoring Jetty with JMC
To monitor Jetty’s server status with JMC, start Jetty and then start JMC by typing jmc on the command line.
Connecting to your server process
After you start Jetty, you will see a dialog box in JMC with a list of running processes to which you can connect. It should look something like so:
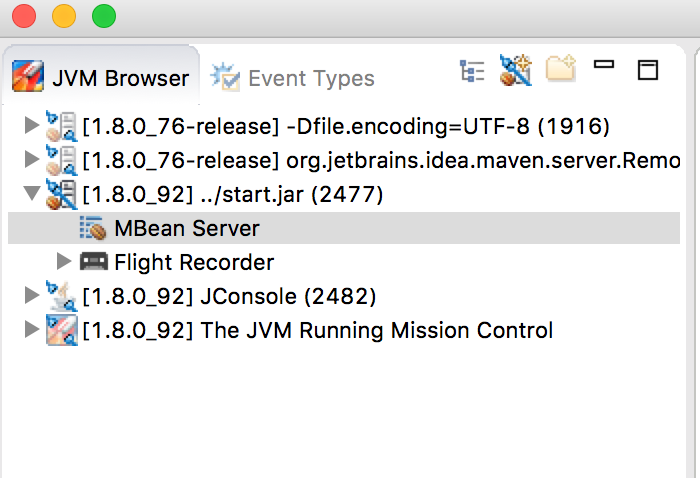
|
If you don’t see your Jetty process in the list of processes you can connect to, quickly switch tabs, or close and reopen a new "New Connection" dialog window. This forces JMC to refresh the list, and recognize your newly-started Jetty process. |
Double-click the start.jar entry or right-click the start.jar entry and select "Start JMX Console". A new JMC window opens on the right:

From this window you can monitor memory usage, thread usage, classloading and VM statistics. You can also perform operations such as a manual garbage collect. JMC is an extremely powerful and useful tool.
Managing Jetty Objects with JConsole
The MBean tab of JMC allows access to managed objects within the Java application, including MBeans the JVM provides. If you also want to interact with the Jetty JMX implementation via JMC, you need to start Jetty JMX in a form that JMC can access. See Using JMX with Jetty for more information.
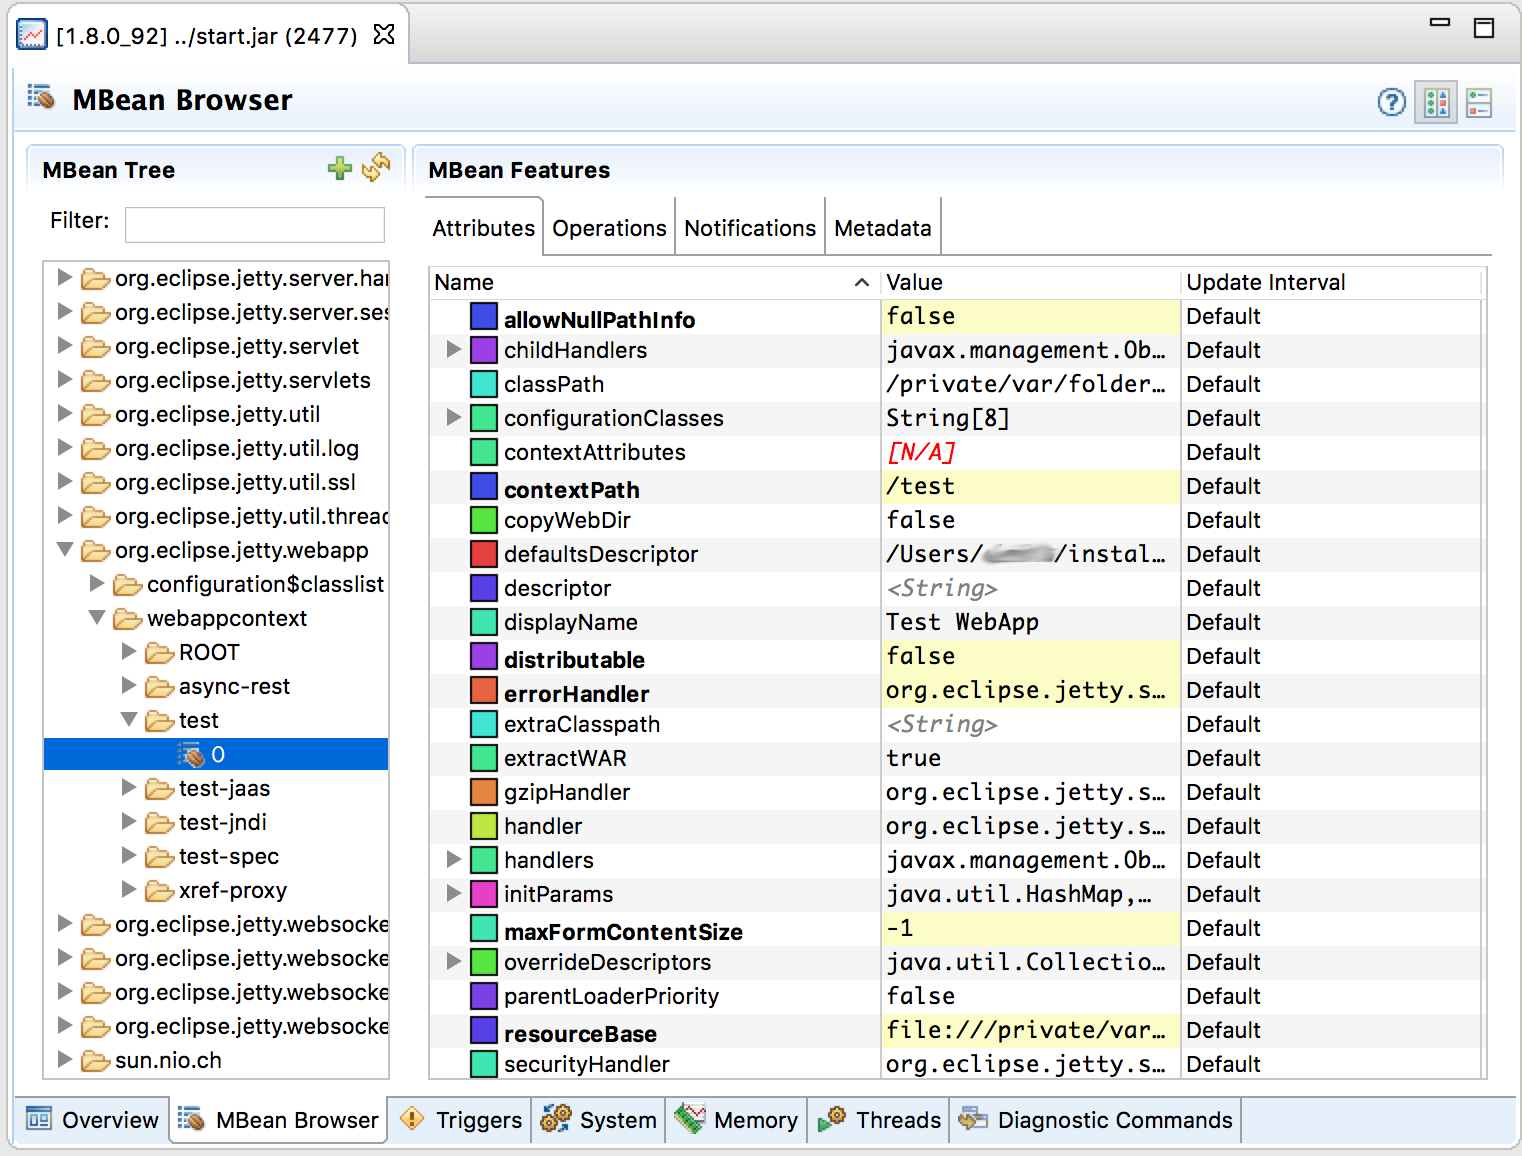
Application Layer Protocol Negotiation (ALPN)
The development of new web protocols such as HTTP/2 raised the need of protocol negotiation within a Transport Layer Security (TLS) handshake. A protocol negotiation called ALPN (Application Layer Protocol Negotiation - RFC7301) has been defined to accomplish this.
ALPN has now replaced the older (and now fully deprecated) NPN in the general Web as of 2016.
For those browsers that support HTTP/2, they all now support ALPN. Starting with Jetty 9.3.0, only ALPN is supported by Jetty.
Introducing ALPN
Application Layer Protocol Negotiation (ALPN) is a TLS extension that allows client and server to negotiate the application protocol that they will use to communicate within the encryption provided by TLS.
Any protocol can be negotiated by ALPN within a TLS connection; the protocols that are most commonly negotiated are HTTP/2 and HTTP/1.1.
Browsers only support HTTP/2 over TLS by negotiating the HTTP/2 protocol via ALPN. You need to configure the server to support TLS and ALPN if you want browsers to use the HTTP/2 protocol, otherwise they will default to HTTP/1.1.
In the Jetty project, ALPN is used in two artifacts: jetty-alpn-client and jetty-alpn-server, respectively for the client and for the server.
When using Jetty as a standalone server via the Jetty distribution, the jetty-alpn-server artifact is automatically included in the server classpath by the Jetty module system.
When using Jetty embedded, the jetty-alpn-client and jetty-alpn-server artifacts must be included in the classpath, respectively for client and server use cases.
The ALPN implementation is provided to these two artifacts with the following options:
-
For Java 8 only, a provider based on a pure Java implementation (no native code)
-
For Java 8 up to
1.8.0_242included, this provider uses modified OpenJDK classes and requires the-Xbootclasspath/p:option on command line -
For Java 8 from
1.8.0_252included and later, this provider uses the standard OpenJDK ALPN APIs introduced in Java 9 (see below) that have been backported to1.8.0_252and does not require the-Xbootclasspath/p:option on command line
-
-
For Java 8 or later, a provider based on the Conscrypt security provider
-
Works with JDK 8 or later and provides improved performance
-
Binds to the OpenSSL native library shipped by Conscrypt and is therefore only available on the platforms supported by Conscrypt
-
-
For Java 9 or later, a provider based on the standard OpenJDK ALPN APIs
-
Works with JDK 9 or later, pure Java implementation (no native code)
-
Lower performance than Conscrypt
-
Each provider above provides an ALPN service implementation; Jetty uses the ServiceLoader mechanism to load these service implementations.
At least one valid provider must be present in the server classpath.
For example, using JDK 8 with the JDK 9 ALPN provider is an invalid combination.
The absence of valid implementations is an error at startup (see also the troubleshooting section).
There may be multiple ALPN service providers in the server classpath.
When a new connection is created, an SSLEngine instance is associated to it; each SSLEngine is passed all service implementations, until one accepts it.
It is therefore possible to have multiple providers active at the same time, for example the JDK 9 provider and the Conscrypt provider, and at runtime the correct one will be chosen by the Jetty runtime.
ALPN and OpenJDK 8
When using JDKs based on OpenJDK 8 (for JDK 9 see here), and you do not or
cannot use Conscrypt, the ALPN implementation is provided by the
jetty-alpn-openjdk8-client or jetty-alpn-openjdk8-server artifacts.
For Java 8 versions up to 1.8.0_242 included, you also need the Jetty’s ALPN boot library
to provide the ALPN service implementation, via the alpn-boot artifact.
For Java 8 versions from 1.8.0_252 included and later, Jetty’s ALPN boot library is not
necessary because the OpenJDK ALPN APIs have been backported to 1.8.0_252 and the
jetty-alpn-openjdk8-* artifacts can use these backported APIs if their presence is detected.
Alternatively, you can use the Jetty ALPN agent, that in turn uses theJetty ALPN boot library to transform the relevant OpenJDK classes when they are loaded.
The Jetty ALPN boot library modifies the relevant OpenJDK classes to add ALPN support and provides an ALPN API that application can use to enable ALPN.
When using Jetty as a standalone server via the Jetty distribution, ALPN support is automatically enabled when the http2 module is enabled.
This enables transitively the alpn-8 module which puts the jetty-alpn-openjdk8-server artifact in the server classpath, providing the ALPN OpenJDK 8 service implementation.
When using Jetty embedded, the ALPN support is provided by the jetty-alpn-openjdk8-client and jetty-alpn-openjdk8-server artifacts, respectively for client usage and server usage.
To get ALPN working with Java 8, you must have the jetty-alpn-openjdk8-client artifact or
the jetty-alpn-openjdk8-server artifact in the classpath.
Additionally, if you are using OpenJDK 1.8.0_242 or earlier, you need the Jetty ALPN boot
library (corresponding to the exact OpenJDK version you are using) in the boot classpath,
or alternatively you need the Jetty ALPN agent.
In the case of the Jetty ALPN boot library, start the JVM as follows:
java -Xbootclasspath/p:<path_to_alpn_boot_jar> ...Where path_to_alpn_boot_jar is the path on the file system for the alpn-boot artifact, such as the one at the Maven coordinates org.mortbay.jetty.alpn:alpn-boot.
|
Be certain to get the ALPN boot artifact version that matches the version of your JRE. |
ALPN agent and OpenJDK 8
The Jetty Project also maintains the Jetty ALPN agent, which is a JVM agent that provides the ALPN implementation. The Jetty ALPN agent can be use in alternative (never together) with the ALPN boot library.
The Jetty ALPN agent contains the ALPN boot libraries for every JDK 8 version. The agent can be used only with Java 8, but works with any Java 8 version.
The Jetty ALPN agent detects the JDK version currently running, picks the correspondent
ALPN boot library (or picks none if the JDK version is 1.8.0_252 or later), and
transforms, if necessary, the relevant OpenJDK classes to provide the ALPN support.
To use the Jetty ALPN agent, start the JVM as follows:
java -javaagent:<path_to_alpn_agent_jar> ...|
The Jetty ALPN agent works with any Java 8 version. It is required if you use
an OpenJDK version up to The Jetty ALPN agent can be left on the command line even when using an OpenJDK version
equal or greater than |
ALPN and Conscrypt
When using JDK 8 or later, you can use the Conscrypt security provider to provide the ALPN service implementation.
Conscrypt binds natively to BoringSSL (a fork of OpenSSL by Google), so ALPN will be supported via the support provided by BoringSSL (bundled together with Conscrypt).
When using Jetty as a standalone server via the Jetty distribution, ALPN is enabled by enabling the conscrypt module.
When using Jetty embedded, ALPN is enabled by the jetty-alpn-conscrypt-client and jetty-alpn-conscrypt-server artifacts, respectively for client usage and server usage.
In addition, you also need the Conscrypt artifacts, typically the org.conscrypt:conscrypt-openjdk-uber artifact.
All these artifacts must be added to the classpath.
ALPN and JDK 9
When using JDK 9 or later and Jetty as a standalone server via the Jetty distribution, ALPN support is automatically enabled when the http2 module is enabled.
This enables transitively the alpn-9 module which puts the jetty-alpn-java-server artifact in the server classpath, providing the ALPN JDK 9 service implementation.
When using JDK 9 or later and Jetty embedded, the ALPN service implementation is provided by the jetty-alpn-java-client and jetty-alpn-java-server artifacts, respectively for client usage and server usage, and must be added to the classpath.
Starting in OSGi
To use ALPN in an OSGi environment, in addition to what described above, you will also need to deploy the jetty-osgi-alpn jar.
This jar contains a Fragment-Host directive that ensures the ALPN classes will be available from the system bundle.
You can download the jetty-osgi-alpn jar from Maven Central.
|
OSGi requires a |
ALPN Troubleshooting
When starting the Jetty server, especially when using Jetty embedded, it may be possible that you see an error similar to this:
IllegalStateException: no ALPN processorThe error means that you don’t have the ALPN dependencies setup correctly in your classpath.
For example, you may have the jetty-alpn-java-server artifact in the classpath (which is correct when using JDK 9), but run your application with JDK 8.
Another example is when you have correctly put the alpn-boot artifact in the boot classpath, but you don’t have the jetty-alpn-openjdk8-server artifact in the classpath.
Details about ALPN and OpenJDK 8
The following sections only refer to the API and implementation of ALPN using the Jetty boot library.
The Jetty ALPN boot library is conceptually made of two parts: the ALPN APIs and the ALPN implementation.
The ALPN API is provided by the org.eclipse.jetty.alpn:alpn-api artifact.
This artifact is only needed by application code that uses the ALPN APIs.
The ALPN implementation is provided by the org.mortbay.jetty.alpn:alpn-boot artifact and consist of modifications to the OpenJDK classes.
The org.mortbay.jetty.alpn:alpn-boot artifact contains also the classes present in the org.eclipse.jetty.alpn:alpn-api artifact.
Understanding the ALPN API
Applications need to interact with ALPN TLS extension protocol negotiations. For example, server applications need to know whether the client supports ALPN, and client applications needs to know whether the server supports ALPN.
To implement this interaction, Jetty’s ALPN implementation provides an API to applications, hosted at Maven coordinates org.eclipse.jetty.alpn:alpn-api.
You need to declare this dependency as provided, because the alpn-boot jar already includes it (see the previous section), and it is therefore available from the boot classpath.
The API consists of a single class, org.eclipse.jetty.alpn.ALPN, and applications need to register instances of SSLSocket or SSLEngine with a ClientProvider or ServerProvider (depending on whether the application is a client application or server application).
Refer to ALPN Javadocs and to the examples below for further details about client and server provider methods.
Client Example
SSLContext sslContext = ...;
SSLSocket sslSocket = (SSLSocket)context.getSocketFactory().createSocket("localhost", server.getLocalPort());
ALPN.put(sslSocket, new ALPN.ClientProvider()
{
@Override
public List<String> protocols()
{
return Arrays.asList("h2", "http/1.1");
}
@Override
public void unsupported()
{
ALPN.remove(sslSocket);
}
@Override
public void selected(String protocol)
{
ALPN.remove(sslSocket);
System.out.println("Protocol Selected is: " + protocol);
}
});The ALPN implementation calls ALPN.ClientProvider methods protocols(), unsupported() and selected(String), so that the client application can:
-
Decide whether to support ALPN
-
Provide the protocols supported
-
Know whether the server supports ALPN
-
Know the protocol chosen by the server
Server Example
The example for SSLEngine is identical, and you just need to replace the SSLSocket instance with an SSLEngine instance.
SSLEngine sslEngine = ...;
ALPN.put(sslEngine, new ALPN.ServerProvider()
{
@Override
public void unsupported()
{
ALPN.remove(sslEngine);
}
@Override
public String select(List<String> protocols);
{
ALPN.remove(sslEngine);
return protocols.get(0);
}
});The ALPN implementation calls ALPN.ServerProvider methods unsupported(), and select(List<String>), so that the server application can:
-
know whether the client supports ALPN.
-
select one of the protocols the client supports.
Implementation Details
It is important that implementations of ALPN.ServerProvider and ALPN.ClientProvider remove the sslSocket or sslEngine when the negotiation is complete, like shown in the examples above.
Failing to do so will cause a memory leak.
Unit Tests
You can write and run unit tests that use the ALPN implementation. The solution that we use with Maven is to specify an additional command line argument to the Surefire plugin:
<project>
<properties>
<alpn-boot-version>8.1.4.v20150727</alpn-boot-version>
</properties>
<build>
<plugins>
<plugin>
<artifactId>maven-surefire-plugin</artifactId>
<configuration>
<argLine>
-Xbootclasspath/p:${settings.localRepository}/org/mortbay/jetty/alpn/alpn-boot/${alpn-boot-version}/alpn-boot-${alpn-boot-version}.jar
</argLine>
</configuration>
</plugin>
...
</plugins>
</build>
...
</project>Debugging
You can enable debug logging for the ALPN implementation in this way:
ALPN.debug = true;
Since the ALPN class is in the boot classpath, we chose not to use logging libraries because we do not want to override application logging library choices; therefore the logging is performed directly on System.err.
License Details
The ALPN implementation relies on modification of a few OpenJDK classes and on a few new classes that need to live in the sun.security.ssl package.
These classes are released under the same GPLv2+exception license of OpenJDK.
The ALPN class and its nested classes are released under same license as the classes of the Jetty project.
Versions
The ALPN implementation, relying on modifications of OpenJDK classes, updates every time there are updates to the modified OpenJDK classes.
| OpenJDK version | ALPN version |
|---|---|
1.7.0u40 |
7.1.0.v20141016 |
1.7.0u45 |
7.1.0.v20141016 |
1.7.0u51 |
7.1.0.v20141016 |
1.7.0u55 |
7.1.0.v20141016 |
1.7.0u60 |
7.1.0.v20141016 |
1.7.0u65 |
7.1.0.v20141016 |
1.7.0u67 |
7.1.0.v20141016 |
1.7.0u71 |
7.1.2.v20141202 |
1.7.0u72 |
7.1.2.v20141202 |
1.7.0u75 |
7.1.3.v20150130 |
1.7.0u76 |
7.1.3.v20150130 |
1.7.0u79 |
7.1.3.v20150130 |
1.7.0u80 |
7.1.3.v20150130 |
1.8.0 |
8.1.0.v20141016 |
1.8.0u05 |
8.1.0.v20141016 |
1.8.0u11 |
8.1.0.v20141016 |
1.8.0u20 |
8.1.0.v20141016 |
1.8.0u25 |
8.1.2.v20141202 |
1.8.0u31 |
8.1.3.v20150130 |
1.8.0u40 |
8.1.3.v20150130 |
1.8.0u45 |
8.1.3.v20150130 |
1.8.0u51 |
8.1.4.v20150727 |
1.8.0u60 |
8.1.5.v20150921 |
1.8.0u65 |
8.1.6.v20151105 |
1.8.0u66 |
8.1.6.v20151105 |
1.8.0u71 |
8.1.7.v20160121 |
1.8.0u72 |
8.1.7.v20160121 |
1.8.0u73 |
8.1.7.v20160121 |
1.8.0u74 |
8.1.7.v20160121 |
1.8.0u77 |
8.1.7.v20160121 |
1.8.0u91 |
8.1.7.v20160121 |
1.8.0u92 |
8.1.8.v20160420 |
1.8.0u101 |
8.1.9.v20160720 |
1.8.0u102 |
8.1.9.v20160720 |
1.8.0u111 |
8.1.9.v20160720 |
1.8.0u112 |
8.1.10.v20161026 |
1.8.0u121 |
8.1.11.v20170118 |
1.8.0u131 |
8.1.11.v20170118 |
1.8.0u141 |
8.1.11.v20170118 |
1.8.0u144 |
8.1.11.v20170118 |
1.8.0u151 |
8.1.11.v20170118 |
1.8.0u152 |
8.1.11.v20170118 |
1.8.0u161 |
8.1.12.v20180117 |
1.8.0u162 |
8.1.12.v20180117 |
1.8.0u171 |
8.1.12.v20180117 |
1.8.0u172 |
8.1.12.v20180117 |
1.8.0u181 |
8.1.12.v20180117 |
1.8.0u191 |
8.1.13.v20181017 |
1.8.0u192 |
8.1.13.v20181017 |
1.8.0u201 |
8.1.13.v20181017 |
1.8.0u202 |
8.1.13.v20181017 |
1.8.0u211[1] |
8.1.13.v20181017 |
1.8.0u212 |
8.1.13.v20181017 |
1.8.0u221[1] |
8.1.13.v20181017 |
1.8.0u222 |
8.1.13.v20181017 |
1.8.0u231[1] |
8.1.13.v20181017 |
1.8.0u232 |
8.1.13.v20181017 |
1.8.0u241[1] |
8.1.13.v20181017 |
1.8.0u242 |
8.1.13.v20181017 |
1.8.0u252 and later |
NOT NECESSARY |
[1] These are Oracle releases for which the source code is not available, or it is unclear what exactly is because there is no correspondent tag in the OpenJDK repository. We assume that the source code for these releases is equivalent (at least for the files modified to make ALPN work) to the release that follows (for example, for 1.8.0u211 we assume that the source code is equivalent to 1.8.0u212, for 1.8.0u221 we assume 1.8.0u222, etc.).
How to build ALPN
This section is for Jetty developers that need to update the ALPN implementation with the OpenJDK versions.
Clone the OpenJDK repository with the following command:
$ hg clone https://hg.openjdk.java.net/jdk8u/jdk8u jdk8u
$ cd !$
$ ./get_source.shTo update the source to a specific tag, use the following command:
$ ./make/scripts/hgforest.sh update <tag-name>The list of OpenJDK tags can be obtained from this page: OpenJDK 8 Tags.
You will then need to compare and incorporate the OpenJDK source changes into the modified OpenJDK classes at the ALPN GitHub Repository, branch master.
HTTP/2
Introducing HTTP/2
Jetty supports both a client and a server implementation for the HTTP/2 protocol as defined by RFC 7540.
The requirements for running HTTP/2 are JDK 8 or greater, and typically also ALPN support (see Application Layer Protocol Negotiation (ALPN)).
A server deployed over TLS (SSL) normally advertises the HTTP/2 protocol via the TLS extension Application Layer Protocol Negotiation (ALPN).
|
To use HTTP/2 in Jetty via a TLS connector you need to add the ALPN boot jar in the boot classpath. This is done automatically when using the Jetty distribution’s start.jar module system, but must be configured directly otherwise. |
Jetty HTTP/2 Security Update
In mid-2019, there were a number of CVEs were issued warning against vulnerable HTTP/2 implementations. These CVEs (CVE-2019-9511 thru CVE-2019-9518) generally centered around attackers manipulating and flooding HTTP/2 servers and creating a denial of service (DOS). These vulnerabilities were patched with Jetty 9.4.21.
As a result of these CVEs, Jetty introduced a new, configurable denial of service (DOS) protection feature in Jetty 9.4.22.
Jetty’s HTTP/2 implementation now features a new Rate Control parameter, jetty.http2.rateControl.maxEventsPerSecond, that defaults to 50 events per second, per connection for all pings, bad frames, settings frames, priority changes etc.
Jetty HTTP/2 Sub Projects
The Jetty HTTP/2 implementation consists of the following sub-projects (each producing a jar file):
-
http2-common: Contains the HTTP/2 API and a partial implementation shared across other modules. -
http2-hpack: Contains the HTTP/2 HPACK implementation for HTTP header compression. -
http2-server: Provides the server-side implementation of HTTP/2. -
http2-client: Provides the implementation of HTTP/2 client with a low level HTTP/2 API, dealing with HTTP/2 streams, frames, etc. -
http2-http-client-transport: Provides the implementation of the HTTP/2 transport forHttpClient(see HTTP Client). Applications can use the higher level API provided byHttpClientto send HTTP requests and receive HTTP responses, and the HTTP/2 transport will take care of converting them in HTTP/2 format (see also this blog entry).
Enabling HTTP/2
This section is written assuming that a Jetty base directory is being used. A demo Jetty base that supports HTTP/1, HTTPS/1 and deployment from a webapps directory can be created with the commands:
$ JETTY_BASE=http2-demo
$ mkdir $JETTY_BASE
$ cd $JETTY_BASE
$ java -jar $JETTY_HOME/start.jar --add-to-start=http,https,deployThe commands above create a $JETTY_BASE directory called http2-demo, and initializes the http, https and deploy modules (and their dependencies) to run a typical Jetty Server on port 8080 (for HTTP/1) and 8443 (for HTTPS/1).
Note that the HTTPS module downloads a demo keystore file with a self signed certificate, which needs to be replaced by a Certificate Authority issued certificate for real deployment.
To add HTTP/2 to this demo base, it is just a matter of enabling the http2 module with the following command:
$ java -jar $JETTY_HOME/start.jar --add-to-start=http2This command does not create a new connector, but instead simply adds the HTTP/2 protocol to the existing HTTPS/1 connector, so that it now supports both protocols on port 8443. To do this, it also transitively enables the ALPN module for protocol negotiation. The support for each protocol can be seen in the info logging when the server is started:
$ java -jar $JETTY_HOME/start.jar
...
2015-06-17 14:16:12.549:INFO:oejs.ServerConnector:main: Started ServerConnector@34c9c77f{HTTP/1.1,[http/1.1]}{0.0.0.0:8080}
2015-06-17 14:16:12.782:INFO:oejs.ServerConnector:main: Started ServerConnector@711f39f9{SSL,[ssl, alpn, h2, h2-17, http/1.1]}{0.0.0.0:8443}
...This log shows that port 8080 supports only HTTP/1.1 (which by specification includes HTTP/1.0 support), while port 8443 supports the SSL protocol, with ALPN negotiation to select between several versions of HTTP/2 (h2 & the draft h2-17) and HTTP/1.1. What is not shown is that HTTP/1.1 is the default ALPN protocol, so that if a client connects that does not speak ALPN, then HTTP/1.1 will be assumed.
A browser can now be pointed at https://localhost:8443/ and if it supports HTTP/2 then it will be used (often indicated by a lightening bolt icon in the address bar).
Note that a browser pointed at this server with URL starting with http://localhost:8080/ will still talk HTTP/1.1, as HTTP/2 has not been enabled on the plain text connector.
HTTP/2 can be enabled on the plain text connector and the server restarted with the following command:
$ java -jar $JETTY_HOME/start.jar --add-to-start=http2c
$ java -jar $JETTY_HOME/start.jar
..
2015-06-17 14:16:12.549:INFO:oejs.ServerConnector:main: Started ServerConnector@6f32cd1e{HTTP/1.1,[http/1.1, h2c, h2c-17]}{0.0.0.0:8080}
2015-06-17 14:16:12.782:INFO:oejs.ServerConnector:main: Started ServerConnector@711f39f9{SSL,[ssl, alpn, h2, h2-17, http/1.1]}{0.0.0.0:8443}
..No major browser currently supports plain text HTTP/2, so the 8080 port will only be able to use HTTP/2 with specific clients (eg curl) that use the upgrade mechanism or assume HTTP/2.
Configuring HTTP/2
Enabling the HTTP/2 module in the Jetty server does not create a HTTP/2 specific connector, but rather it adds a HTTP/2 Connection factory to an existing connector. Thus configuring HTTP/2 is a combination of configuring common properties on the connector and HTTP/2 specific properties on the connection factory. The modules and XML files involved can be seen with the following commands:
$ java -jar $JETTY_HOME/start.jar --list-modules
...
1) alpn-impl <transitive>
...
2) http ${jetty.base}/start.d/http.ini
2) ssl ${jetty.base}/start.d/ssl.ini
3) alpn ${jetty.base}/start.d/alpn.ini
3) http2c ${jetty.base}/start.d/http2c.ini
...
4) http2 ${jetty.base}/start.d/http2.ini
5) https ${jetty.base}/start.d/https.ini
$ java -jar $JETTY_HOME/start.jar --list-config
...
${jetty.home}/etc/jetty-ssl.xml
${jetty.home}/etc/jetty-ssl-context.xml
${jetty.home}/etc/jetty-alpn.xml
${jetty.home}/etc/jetty-http2c.xml
${jetty.home}/etc/jetty-http.xml
...
${jetty.home}/etc/jetty-http2.xml
${jetty.home}/etc/jetty-https.xmlThe common properties associated with connectors (host,port, timeouts, etc.) can be set in the module ini files (or start.ini if --add-to-start was used): ${jetty.base}/start.d/http.ini and ${jetty.base}/start.d/ssl.ini.
These properties are instantiated in the associated XML files: ${jetty.home}/etc/jetty-http.xml; ${jetty.home}/etc/jetty-ssl.xml, plus the SSL keystore is instantiated in ${jetty.home}/etc/jetty-ssl-context.xml.
|
If you are planning to edit XML files, make sure to copy them to your |
HTTP/2 specific properties can be set in the module ini files: ${jetty.base}/start.d/http2.ini and ${jetty.base}/start.d/http2c.ini, which are instantiated in the associated XML files: ${jetty.home}/etc/jetty-http2.xml; ${jetty.home}/etc/jetty-http2c.xml, respectively.
Currently there are very few HTTP/2 configuration properties and the default values are reasonable:
| Property | Description |
|---|---|
jetty.http2.maxConcurrentStreams |
The maximum number of concurrently open streams allowed on a single HTTP/2 connection (default 128). Larger values increase parallelism but cost a memory commitment. |
jetty.http2.initialSessionRecvWindow |
The initial receive flow control window size for a new session (default 1048576). Larger values may allow greater throughput but also risk head of line blocking if TCP/IP flow control is triggered. |
jetty.http2.initialStreamRecvWindow |
The initial receive flow control window size for a new stream (default 524288). Larger values may allow greater throughput but also risk head of line blocking if TCP/IP flow control is triggered. |
Configuring HTTP/2 Push
HTTP/2 Push is a mechanism that allows the server to send multiple resources to the client for a single client request. This will reduce the amount of round-trips necessary to retrieve all the resources that make up a web page and can significantly improve the page load time.
HTTP/2 Push can be automated in your application by configuring a PushCacheFilter in the web.xml, in this way:
<?xml version="1.0" encoding="UTF-8"?>
<web-app
xmlns="http://xmlns.jcp.org/xml/ns/javaee"
xmlns:xsi="http://www.w3.org/2001/XMLSchema-instance"
xsi:schemaLocation="http://xmlns.jcp.org/xml/ns/javaee http://xmlns.jcp.org/xml/ns/javaee/web-app_3_1.xsd"
metadata-complete="true"
version="3.1">
...
<filter>
<filter-name>PushFilter</filter-name>
<filter-class>org.eclipse.jetty.servlets.PushCacheFilter</filter-class>
<async-supported>true</async-supported>
</filter>
<filter-mapping>
<filter-name>PushFilter</filter-name>
<url-pattern>/*</url-pattern>
</filter-mapping>
...
</web-app>PushCacheFilter analyzes the HTTP requests for resources that arrive to your web application.
Some of these requests contain the HTTP Referer header that points to a resource that has been requested previously.
This allows the PushCacheFilter to organize resources in a tree, for example a root index.html resource having two children resources, styles.css and application.js, and styles.css having a child resource, background.png.
The root resource is called the primary resource, while descendant resources are called secondary resources.
The resource tree is built using a time window so that when a root resource is requested, only subsequent requests that are made within the time window will be added to the resource tree. The resource tree can also be limited in size so that the number of secondary resources associated to a primary resource is limited.
By default, only the resource path (without the query string) is used to associate secondary resources to the primary resource, but you can configure PushCacheFilter to take the query string into account.
PushCacheFilter can be configured with the following init-params:
-
associatePeriod: the time window, in milliseconds, within which a request for a secondary resource will be associated to a primary resource; defaults to 4000 ms -
maxAssociations: the max number of secondary resources that may be associated to a primary resource; defaults to 16 -
hosts: a comma separated list of hosts that are allowed in theRefererheader; defaults to the host in theHostheader -
ports: a comma separated list of ports that are allowed in theRefererheader; defaults to the port in theHostheader -
useQueryInKey: a boolean indicating whether the query string of the request should be considered when associating secondary resources to primary resources; defaults tofalse
Configuring HAProxy and Jetty
Typical website deployments have Apache (or Nginx) configured as reverse proxy to talk to one or more backend Jetty instances. This configuration cannot be used for HTTP/2 because Apache does not yet support HTTP/2 (nor does Nginx).
HAProxy is an open source solution that offers load balancing and proxying for TCP and HTTP based application, and can be used as a replacement for Apache or Nginx when these are used as reverse proxies and has the major benefit that supports HTTP/2. It also offers load balancing and several other features which can position it as a complete replacement for Apache or Nginx.
The deployment proposed here will have HAProxy play the role that Apache and Nginx usually do: to perform the TLS offloading (that is, decrypt and encrypt TLS) and then forwarding the now clear-text traffic to a backend Jetty server, speaking either HTTP/1.1 or HTTP/2.
The instructions that follow are for Linux.
Installing HAProxy
You will need HAProxy 1.5 or later, because it provides support for SSL and ALPN, both required by HTTP/2. Most Linux distributions have the HAProxy package available to be installed out of the box. For example on Ubuntu 15.04:
$ sudo apt-get install haproxyAlternatively you can download the HAProxy source code and build it on your environment by following the README bundled with the HAProxy source code tarball.
|
HAProxy supports ALPN only if built with OpenSSL 1.0.2 or greater.
Use |
Setup SSL for HAProxy
HAProxy will perform the TLS decryption and encryption much more efficiently than a Java implementation.
HAProxy will need a single file containing the X509 certificates and the private key, all in PEM format, with the following order:
-
The site certificate; this certificate’s Common Name refers to the site domain (for example: CN=*.webtide.com) and is signed by Certificate Authority #1.
-
The Certificate Authority #1 certificate; this certificate may be signed by Certificate Authority #2.
-
The Certificate Authority #2 certificate; this certificate may be signed by Certificate Authority #3; and so on until the Root Certificate Authority.
-
The Root Certificate Authority certificate.
-
The private key corresponding to the site certificate.
Let’s use keytool to generate a self signed certificate:
$ keytool -genkeypair -keyalg RSA -keystore keystore.p12 -storetype pkcs12 -storepass storepwd -ext SAN=DNS:domain.com
What is your first and last name?
[Unknown]: *.domain.com
What is the name of your organizational unit?
[Unknown]: Unit
What is the name of your organization?
[Unknown]: Domain
What is the name of your City or Locality?
[Unknown]: Torino
What is the name of your State or Province?
[Unknown]: TO
What is the two-letter country code for this unit?
[Unknown]: IT
Is CN=*.domain.com, OU=Unit, O=Domain, L=Torino, ST=TO, C=IT correct?
[no]: yesThe above command will generate a self signed certificate and private key for domain.com and subdomains, stored in the keystore.p12 file in PKCS#12 format.
We need to extract the certificate and the private key in PEM format.
To extract the certificate into certificate.pem:
$ keytool -exportcert -keystore keystore.p12 -storetype pkcs12 -storepass storepwd -rfc -file certificate.pemTo export the private key into private_key.pem:
$ openssl pkcs12 -in keystore.p12 -nodes -nocerts -out private_key.pem -passin pass:storepwdAt this point you just need to concatenate the two files into one, in the correct order:
$ cat certificate.pem private_key.pem > domain.pemThe domain.pem file will be used later by HAProxy.
HAProxy Configuration File
Now we can setup haproxy.cfg to configure HAProxy.
This is a minimal configuration:
global
tune.ssl.default-dh-param 1024
defaults
timeout connect 10000ms
timeout client 60000ms
timeout server 60000ms
frontend fe_http
mode http
bind *:80
# Redirect to https
redirect scheme https code 301
frontend fe_https
mode tcp
bind *:443 ssl no-sslv3 crt domain.pem ciphers TLSv1.2 alpn h2,http/1.1
default_backend be_http
backend be_http
mode tcp
server domain 127.0.0.1:8282The HAProxy configuration file works in the following way.
The fe_http front-end accepts connections on port 80 and redirects them to use the https scheme.
The fe_https front-end accepts connections on port 443 and it is where the TLS decryption/encryption happens.
You must specify the path to the PEM file containing the TLS key material (the crt domain.pem part), the ciphers that are suitable for HTTP/2 (the ciphers TLSv1.2), and the ALPN protocols supported (the alpn h2,http/1.1 ).
This front-end then forwards the now decrypted bytes to the back-end in mode tcp. The mode tcp says that HAProxy will not try to interpret the bytes as HTTP/1.1 but instead opaquely forward them to the back-end.
The be_http back-end will forward (again in mode tcp) the clear-text bytes to a Jetty connector that talks clear-text HTTP/2 and HTTP/1.1 on port 8282.
Setup Jetty for HTTP/2 and HTTP/1.1
The Jetty setup follows the steps of having Jetty installed in the JETTY_HOME directory, creating a JETTY_BASE directory and initializing it using Jetty’s command line tools.
You must enable the http2c module, that is the module that speaks clear-text HTTP/2.
Since the http2c module depends on the http module, the http module will be enabled transitively, and the final setup will therefore support both HTTP/2 and HTTP/1.1 in clear text.
Additionally, you will also enable the deploy module to be able to deploy a sample web application:
$ JETTY_BASE=haproxy-jetty-http2
$ mkdir $JETTY_BASE
$ cd $JETTY_BASE
$ java -jar $JETTY_HOME/start.jar --add-to-start=http2c,deployNow let’s deploy a demo web application and start Jetty:
$ cd $JETTY_BASE
$ cp $JETTY_HOME/demo-base/webapps/async-rest.war $JETTY_BASE/webapps/
$ java -jar $JETTY_HOME/start.jar jetty.http.host=127.0.0.1 jetty.http.port=8282Now you can browse https://domain.com/async-rest (replace domain.com with your own domain, or with localhost, to make this example work).
|
You want the Jetty connector that listens on port 8282 to be available only to HAProxy, and not to remote clients.
For this reason, you want to specify the |
Browsers supporting HTTP/2 will connect to HAProxy, which will decrypt the traffic and send it to Jetty. Likewise, HTTP/1.1 clients will connect to HAProxy, which will decrypt the traffic and send it to Jetty.
The Jetty connector, configured with the http2c module (and therefore transitively with the http module) is able to distinguish whether the incoming bytes are HTTP/2 or HTTP/1.1 and will handle the request accordingly.
The response is relayed back to HAProxy, which will encrypt it and send it back to the remote client.
This configuration offers you efficient TLS offloading, HTTP/2 support and transparent fallback to HTTP/1.1 for clients that don’t support HTTP/1.1.
FastCGI Support
FastCGI Introduction
FastCGI is a network protocol primarily used by a web server to communicate to a FastCGI server. FastCGI servers are typically used to serve web content generated by dynamic web languages, primarily PHP, but also Python, Ruby, Perl and others.
Web servers that supports FastCGI are, among others, Apache, Nginx, and Jetty. Web servers typically act as proxies, converting HTTP requests that they receive from clients (browsers) to FastCGI requests that are forwarded to the FastCGI server. The FastCGI server spawns the dynamic web language interpreter, passing it the information contained in the FastCGI request and a dynamic web language script is executed, producing web content, typically HTML. The web content is then formatted into a FastCGI response that is returned to the web server, which converts it to a HTTP response that is then returned to the client.
The most well known FastCGI server is the PHP FastCGI Process Manager, or php-fpm.
In the following we will assume that php-fpm is used as FastCGI server.
Jetty can be configured to act as a web server that supports FastCGI, replacing the functionality that is normally provided by Apache or Nginx. This allows users to leverage Jetty features such as HTTP/2, the unique support that Jetty provides for HTTP/2 Push, Jetty’s scalability, and of course Jetty’s native support for Java Web Standards such as Servlets, JSPs, etc.
Configuring Jetty for FastCGI
In this section you will see how to configure Jetty to serve WordPress via FastCGI.
The first step is to have WordPress installed on your server machine, for example under /var/www/wordpress.
For more information about how to install WordPress, please refer to the WordPress Installation Guide.
The second step is to install php-fpm and make sure it is configured to listen on a TCP socket; typically it is configured to listen to localhost:9000.
The third step is to install Jetty, for example under /opt/jetty, called in the following $JETTY_HOME.
Refer to Downloading Jetty for more information about how to install Jetty.
The fourth step is to create a Jetty base directory (see Managing Jetty Base and Jetty Home), called in the following $JETTY_BASE, where you setup the configuration needed to support FastCGI in Jetty, and configure the fcgi, http and deploy modules, so that Jetty will be able to accept HTTP requests from browsers, convert them in FastCGI, and proxy them to php-fpm:
$ mkdir -p /usr/jetty/wordpress
$ cd /usr/jetty/wordpress
$ java -jar $JETTY_HOME/start.jar --add-to-start=fcgi,http,deployTherefore $JETTY_BASE=/usr/jetty/wordpress.
The fifth step is to deploy the web application that provides the proxying of client requests to the FastCGI server, php-fpm.
Typically this is done by deploying a *.war file in the $JETTY_BASE/webapps directory.
For FastCGI there is no web application that needs developed - all the work has already been done for you by Jetty.
As such you only need to deploy a Jetty context XML file that configures the web application directly.
Copy and paste the following content as $JETTY_BASE/webapps/jetty-wordpress.xml:
<?xml version="1.0" encoding="UTF-8"?>
<!DOCTYPE Configure PUBLIC "-//Jetty//Configure//EN" "http://www.eclipse.org/jetty/configure_9_3.dtd">
<Configure class="org.eclipse.jetty.servlet.ServletContextHandler">
<New id="root" class="java.lang.String">
<Arg>/var/www/wordpress</Arg>
</New>
<Set name="contextPath">/</Set>
<Set name="resourceBase"><Ref refid="root" /></Set>
<Set name="welcomeFiles">
<Array type="string"><Item>index.php</Item></Array>
</Set>
<Call name="addFilter">
<Arg>org.eclipse.jetty.fcgi.server.proxy.TryFilesFilter</Arg>
<Arg>/*</Arg>
<Arg>
<Call name="of" class="java.util.EnumSet">
<Arg><Get name="REQUEST" class="javax.servlet.DispatcherType" /></Arg>
</Call>
</Arg>
<Call name="setInitParameter">
<Arg>files</Arg>
<Arg>$path /index.php?p=$path</Arg>
</Call>
</Call>
<Call name="addServlet">
<Arg>
<New class="org.eclipse.jetty.servlet.ServletHolder">
<Arg>default</Arg>
<Arg>
<Call name="forName" class="java.lang.Class">
<Arg>org.eclipse.jetty.servlet.DefaultServlet</Arg>
</Call>
</Arg>
<Call name="setInitParameter">
<Arg>dirAllowed</Arg>
<Arg>false</Arg>
</Call>
</New>
</Arg>
<Arg>/</Arg>
</Call>
<Call name="addServlet">
<Arg>org.eclipse.jetty.fcgi.server.proxy.FastCGIProxyServlet</Arg>
<Arg>*.php</Arg>
<Call name="setInitParameter">
<Arg>proxyTo</Arg>
<Arg>http://localhost:9000</Arg>
</Call>
<Call name="setInitParameter">
<Arg>prefix</Arg>
<Arg>/</Arg>
</Call>
<Call name="setInitParameter">
<Arg>scriptRoot</Arg>
<Arg><Ref refid="root" /></Arg>
</Call>
<Call name="setInitParameter">
<Arg>scriptPattern</Arg>
<Arg>(.+?\\.php)</Arg>
</Call>
</Call>
</Configure>An explanation of the above contents:
-
Linne 6 specifies the WordPress installation directory, in this example
/var/www/wordpress(as defined in the first step). -
Line 9 it is specified the context path at which WordPress will be served, in this example at the root context path
/. -
Line 10 specifies the resource base of the context, also set to the WordPress installation directory. This allows Jetty to serve static resources directly from the WordPress installation directory.
-
Line 12 specifies the welcome file as
index.php, so that Jetty can perform the proper redirects in case of URIs ending with the/character. -
Line 15 specifies the
TryFilesFilter, a Servlet Filter that has been inspired by the try_files functionality offered by Nginx. This filter tries to serve the resource from the file system first, and if the resource is not found it forwards the request asindex.php?p=$path, which will match the proxy servlet defined below. Refer to the TryFilesFilter documentation for further information. -
Line 29specifies Jetty’s
DefaultServletto serve static content such as CSS files, JavaScript files, etc.DefaultServletwill serve these files by looking in the resource base of the context, defined at line 10 (see above). -
Line 47 specifies the
FastCGIProxyServlet, a Servlet that proxies HTTP requests arriving from clients to FastCGI requests to the FastCGI server. -
Line 52 specifies the TCP address of the FastCGI server (
php-fpm), where HTTP requests are forwarded as FastCGI requests. -
Line 60 specifies once again the WordPress installation directory, so that the
FastCGIProxyServletcan pass this information to the FastCGI server. -
Line 64 specifies a regular expression that matches request URIs performed to this servlet, in addition to the standard URL mapping defined by Servlet at line 49. Refer to the FastCGIProxyServlet documentation for further information.
The last step is to start Jetty (see Starting Jetty) and navigate to http://localhost:8080 with your browser and enjoy WordPress:
$ cd $JETTY_BASE
$ java -jar /opt/jetty/start.jarConfiguring Jetty to Proxy HTTP/2 to FastCGI
In order to configure Jetty to listen for HTTP/2 requests from clients that are HTTP/2 enabled and forward them to the FastCGI server as FastCGI requests, you need to enable the http2 module, which in turn will require a TLS connector and consequently a keystore to read the key material required by TLS.
Enabling the http2 is easy; in additions to the modules you have enabled above, add the http2 module:
$ cd $JETTY_BASE
$ java -jar $JETTY_HOME/start.jar --add-to-start=http2The command above adds the http2 module (and its dependencies) to the existing modules and uses the default Jetty keystore to provide the key material required by TLS.
You will want to use your own keystore with your own private key and certificate for your own domain.
Remember that by adding the http2 module, you will start two JVMs: one that reads the configuration, and one that has the ALPN boot boot jar in the boot classpath, as explained in Configuring HTTP/2.
Since now your site will run over TLS, you need to make sure that the WordPress URL is also configured so.
If you have followed the steps of the previous section, your WordPress site is served at http://localhost:8080.
You will need to change that to be https://localhost:8443 from the WordPress administration web interface, or follow the WordPress instructions to do so without using the administration web interface.
The minimal modules required to run WordPress with Jetty on HTTP/2 are therefore: http2, http, fcgi and deploy.
These will setup a clear text connector on port 8080 for HTTP/1.1 and a TLS connector on port 8443 for HTTP/2 and HTTP/1.1.
At this point, you can start Jetty (see Starting Jetty), hit http://localhost:8080 with your browser and enjoy WordPress via HTTP/2 using a HTTP/2 enabled browser:
$ cd $JETTY_BASE
$ java -jar $JETTY_HOME/start.jarIf you don’t have a HTTP/2 enabled browser, WordPress will still be available over HTTP/1.1.
Provided Servlets, Filters, and Handlers
Jetty ships with a bundle of servlets that interact with the key classes. Most are in the org.eclipse.jetty.servlets package. These servlets and filters are among the principle elements of Jetty as a component-based infrastructure that holds and runs J2EE applications. As described, they play a major role in running and maintaining the Jetty server.
Also included are a number of Jetty specific handlers that allow access to internals of jetty that would not normally be exposed and are very useful testing environments and many production scenarios.
Default Servlet
Info
-
Classname:
org.eclipse.jetty.servlet.DefaultServlet -
Maven Artifact: org.eclipse.jetty:jetty-servlet
-
Javadoc: http://www.eclipse.org/jetty/javadoc/jetty-9/org/eclipse/jetty/servlet/DefaultServlet.html
Usage
The DefaultServlet implements the ResourceFactory interface and extends the HttpServlet abstract class.
It is usually mapped to "/" and provides handling for static content, OPTION and TRACE methods for the context.
The MOVE method is allowed if PUT and DELETE are allowed.
See the DefaultServlet javadoc.
Init Parameters
Jetty supports the following initParameters:
- acceptRanges
-
If
true, range requests and responses are supported. - dirAllowed
-
If
true, directory listings are returned if no welcome file is found. Otherwise 403 Forbidden displays. - redirectWelcome
-
If
true, welcome files are redirected rather that forwarded. - welcomeServlets
-
If
true, attempt to dispatch to welcome files that are servlets, but only after no matching static resources could be found. Iffalse, then a welcome file must exist on disk. Ifexact, then exact servlet matches are supported without an existing file. Default istrue. This must befalseif you want directory listings, but have index.jsp in your welcome file list. - precompressed
-
If set to a comma separated list of encoding types (that may be listed in a requests Accept-Encoding header) to file extension mappings to look for and serve. For example:
br=.br,gzip=.gz,bzip2=.bz. If set to a booleantrue, then a default set of compressed formats will be used, otherwise no precompressed formats supported. - gzip
-
Deprecated. Use
precompressedinstead. If set totrue, then static content is served as gzip content encoded if a matching resource is found ending with ".gz". - resourceBase
-
Set to replace the context resource base.
- resourceCache
-
If set, this is a context attribute name, which the servlet will use to look for a shared ResourceCache instance.
- relativeResourceBase
-
Set with a pathname relative to the base of the servlet context root. Useful for only serving static content out of only specific subdirectories.
- cacheControl
-
If set, all static content will have this value set as the cache-control header.
- pathInfoOnly
-
If
true, only the path info will be applied to the resourceBase - stylesheet
-
Set with the location of an optional stylesheet that will be used to decorate the directory listing html.
- etags
-
If
true, weak etags will be generated and handled. - maxCacheSize
-
Maximum total size of the cache or 0 for no cache.
- maxCachedFileSize
-
Maximum size of a file to cache.
- maxCachedFiles
-
Maximum number of files to cache.
- useFileMappedBuffer
-
If set to
true, mapped file buffer serves static content. Setting this value tofalsemeans that a direct buffer is used instead of a mapped file buffer. By default, this is set totrue. - otherGzipFileExtensions
-
A comma separated list of other file extensions that signify that a file is gzip compressed. If you don’t explicitly set this, it defaults to
.svgz. - encodingHeaderCacheSize
-
Max entries in a cache of ACCEPT-ENCODING headers
Proxy Servlet
Info
-
Classname:
org.eclipse.jetty.proxy.ProxyServlet -
Maven Artifact: org.eclipse.jetty:jetty-proxy
-
Javadoc: http://www.eclipse.org/jetty/javadoc/jetty-9/org/eclipse/jetty/proxy/ProxyServlet.html
Usage
An asynchronous servlet that forwards requests to another server either as a standard web reverse proxy (as defined by RFC2616) or as a transparent reverse proxy. Internally it uses the async jetty-client.
To facilitate JMX monitoring, the HttpClient instance is set as context attribute, prefixed with the servlet’s name and exposed by the mechanism provided by ContextHandler.MANAGED_ATTRIBUTES.
Init Parameters
The following init parameters may be used to configure the servlet:
- hostHeader
-
forces the host header to a particular value
- viaHost
-
the name to use in the Via header: Via: http/1.1 <viaHost>
- whiteList
-
comma-separated list of allowed proxy hosts
- blackList
-
comma-separated list of forbidden proxy hosts
In addition, there are a number of init parameters that can be used to configure the HttpClient instance used internally for the proxy.
- maxThreads
-
Default Value: 256 The max number of threads of HttpClient’s Executor
- maxConnections
-
Default Value: 32768 The max number of connections per destination. RFC 2616 suggests that 2 connections should be opened per each destination, but browsers commonly open 6 or more. If this
HttpClientis used for load testing, it is common to have only one destination (the server to load test), and it is recommended to set this value to a high value (at least as much as the threads present in the executor). - idleTimeout
-
Default Value: 30000 The idle timeout in milliseconds that a connection can be idle, that is without traffic of bytes in either direction.
- timeout
-
Default Value: 60000 The total timeout in milliseconds for the request/response conversation.
- requestBufferSize
-
Default Value: 4096 The size of the request buffer the request is written into.
- responseBufferSize
-
Default Value: 4096 The size of the response buffer the response is written into.
Balancer Servlet
Info
-
Classname:
org.eclipse.jetty.proxy.BalancerServlet -
Maven Artifact: org.eclipse.jetty:jetty-proxy
-
Javadoc: http://www.eclipse.org/jetty/javadoc/jetty-9/org/eclipse/jetty/proxy/BalancerServlet.html
Usage
The Balancer servlet allows for simple, sticky round robin load balancing leveraging the ProxyServlet that is distributed with Jetty.
In addition to the parameters for ProxyServlet, the following are available for the balancer servlet:
- stickySessions
-
True if sessions should be sticky for subsequent requests
- balancerMember.<name>.proxyTo
-
One of more of these are required and will be the locations that are used to proxy traffic to.
CGI Servlet
Info
-
Classname:
org.eclipse.jetty.servlets.CGI -
Maven Artifact: org.eclipse.jetty:jetty-servlets
-
Javadoc: http://www.eclipse.org/jetty/javadoc/jetty-9/org/eclipse/jetty/servlets/CGI.html
Usage
The CGI servlet class extends the abstract HttpServlet class.
When the init parameter is called, the cgi bin directory is set with the cgibinResourceBase.
Otherwise, it defaults to the resource base of the context.
The cgi bin uses three parameters:
- commandPrefix
-
The init parameter obtained when there is a prefix set to all commands directed to the method exec.
- Path
-
An init parameter passed to the exec environment as a PATH. This must be run unpacked somewhere in the filesystem.
- ENV_
-
An init parameter that points to an environment variable with the name stripped of the leading ENV_ and using the init parameter value.
Quality of Service Filter
Info
-
Classname:
org.eclipse.jetty.servlets.QoSFilter -
Maven Artifact: org.eclipse.jetty:jetty-servlets
-
Javadoc: http://www.eclipse.org/jetty/javadoc/jetty-9/org/eclipse/jetty/servlets/QoSFilter.html
Usage
Jetty supports Continuations, which allow non-blocking handling of HTTP requests, so that threads can be allocated in a managed way to provide application specific Quality of Service (QoS).
The QoSFilter is a utility servlet filter that implements some QoS features.
Understanding the Problem
Waiting for Resources
Web applications frequently use JDBC Connection pools to limit the simultaneous load on the database. This protects the database from peak loads, but makes the web application vulnerable to thread starvation. Consider a thread pool with 20 connections, being used by a web application that that typically receives 200 requests per second and each request holds a JDBC connection for 50ms. Such a pool can service on average 200*20*1000/50 = 400 requests per second.
However, if the request rate rises above 400 per second, or if the database slows down (due to a large query) or becomes momentarily unavailable, the thread pool can very quickly accumulate many waiting requests. If, for example, the website is "slashdotted" or experiences some other temporary burst of traffic and the request rate rises from 400 to 500 requests per second, then 100 requests per second join those waiting for a JDBC connection. Typically, a web server’s thread pool contains only a few hundred threads, so a burst or slow DB need only persist for a few seconds to consume the entire web server’s thread pool; this is called thread starvation. The key issue with thread starvation is that it effects the entire web application, and potentially the entire web server. Even if the requests using the database are only a small proportion of the total requests on the web server, all requests are blocked because all the available threads are waiting on the JDBC connection pool. This represents non-graceful degradation under load and provides a very poor quality of service.
Prioritizing Resources
Consider a web application that is under extreme load. This load might be due to a popularity spike (slashdot), usage burst (Christmas or close of business), or even a denial of service attack. During such periods of load, it is often desirable not to treat all requests as equals, and to give priority to high value customers or administrative users.
The typical behavior of a web server under extreme load is to use all its threads to service requests and to build up a backlog of unserviced requests. If the backlog grows deep enough, then requests start to timeout and users experience failures as well as delays.
Ideally, the web application should be able to examine the requests in the backlog, and give priority to high value customers and administrative users. But with the standard blocking servlet API, it is not possible to examine a request without allocating a thread to that request for the duration of its handling. There is no way to delay the handling of low priority requests, so if the resources are to be reallocated, then the low priority requests must all be failed.
Applying the QoSFilter
The Quality of Service Filter (QoSFilter) uses Continuations to avoid thread starvation, prioritize requests and give graceful degradation under load, to provide a high quality of service. When you apply the filter to specific URLs within a web application, it limits the number of active requests being handled for those URLs. Any requests in excess of the limit are suspended. When a request completes handling the limited URL, one of the waiting requests resumes and can be handled. You can assign priorities to each suspended request, so that high priority requests resume before lower priority requests.
Required JARs
To use the QoS Filter, these JAR files must be available in WEB-INF/lib:
-
$JETTY_HOME/lib/jetty-util.jar
-
$JETTY_HOME/lib/jetty-servlets.jar – contains QoSFilter
Sample Configuration
Place the configuration in a webapp’s web.xml or jetty-web.xml.
The default configuration processes ten requests at a time, servicing more important requests first and queuing up the rest.
This example processes fifty requests at a time:
<filter>
<filter-name>QoSFilter</filter-name>
<filter-class>org.eclipse.jetty.servlets.QoSFilter</filter-class>
<init-param>
<param-name>maxRequests</param-name>
<param-value>50</param-value>
</init-param>
</filter>Configuring QoS Filter Parameters
A semaphore polices the maxRequests limit.
The filter waits a short time while attempting to acquire the semaphore.
The waitMs init parameter controls the wait, avoiding the expense of a suspend if the semaphore is shortly available.
If the semaphore cannot be obtained, Jetty suspends the request for the default suspend period of the container or the value set as the suspendMs init parameter.
The QoS filter uses the following init parameters:
- maxRequests
-
The maximum number of requests to be serviced at a time. The default is 10.
- maxPriority
-
The maximum valid priority that can be assigned to a request. A request with a high priority value is more important than a request with a low priority value. The default is 10.
- waitMs
-
The length of time, in milliseconds, to wait while trying to accept a new request. Used when the maxRequests limit is reached. Default is 50 ms.
- suspendMs
-
Length of time, in milliseconds, that the request will be suspended if it is not accepted immediately. If not set, the container’s default suspend period applies. Default is -1 ms.
- managedAttr
-
If set to true, then this servlet is set as a
ServletContextattribute with the filter name as the attribute name. This allows a context external mechanism (for example, JMX viaContextHandler.MANAGED_ATTRIBUTES) to manage the configuration of the filter.
Mapping to URLs
You can use the <filter-mapping> syntax to map the QoSFilter to a servlet, either by using the servlet name, or by using a URL pattern.
In this example, a URL pattern applies the QoSFilter to every request within the web application context:
<filter-mapping>
<filter-name>QoSFilter</filter-name>
<url-pattern>/*</url-pattern>
</filter-mapping>Setting the Request Priority
Requests with higher values have a higher priority. The default request priorities assigned by the QoSFilter are:
-
2 — For any authenticated request
-
1 — For any request with a non-new valid session
-
0 — For all other requests
To customize the priority, subclass QoSFilter and then override the getPriority(ServletRequest request) method to return an appropriate priority for the request.
You can then use this subclass as your QoS filter.
Here’s an example:
public class ParsePriorityQoSFilter extends QoSFilter
{
protected int getPriority(ServletRequest request)
{
String p = ((HttpServletRequest)request).getParameter("priority");
if (p!=null)
return Integer.parseInt(p);
return 0;
}
}Denial of Service Filter
Info
-
Classname:
org.eclipse.jetty.servlets.DoSFilter -
Maven Artifact: org.eclipse.jetty:jetty-servlets
-
Javadoc: http://www.eclipse.org/jetty/javadoc/jetty-9/org/eclipse/jetty/servlets/DoSFilter.html
Usage
The Denial of Service (DoS) filter limits exposure to request flooding, whether malicious, or as a result of a misconfigured client. The DoS filter keeps track of the number of requests from a connection per second. If the requests exceed the limit, Jetty rejects, delays, or throttles the request, and sends a warning message. The filter works on the assumption that the attacker might be written in simple blocking style, so by suspending requests you are hopefully consuming the attacker’s resources. The DoS filter is related to the QoS filter, using Continuations to prioritize requests and avoid thread starvation.
Using the DoS Filter
Jetty places throttled requests in a queue, and proceed only when there is capacity available.
Required JARs
To use the DoS Filter, these JAR files must be available in WEB-INF/lib:
-
$JETTY_HOME/lib/jetty-util.jar
-
$JETTY_HOME/lib/jetty-servlets.jar
Sample Configuration
Place the configuration in a webapp’s web.xml or jetty-web.xml.
The default configuration allows 25 requests per connection at a time, servicing more important requests first, and queuing up the rest.
This example allow 30 requests at a time:
<filter>
<filter-name>DoSFilter</filter-name>
<filter-class>org.eclipse.jetty.servlets.DoSFilter</filter-class>
<init-param>
<param-name>maxRequestsPerSec</param-name>
<param-value>30</param-value>
</init-param>
</filter>Configuring DoS Filter Parameters
The following init parameters control the behavior of the filter:
- maxRequestsPerSec
-
Maximum number of requests from a connection per second. Requests in excess of this are first delayed, then throttled. Default is 25.
- delayMs
-
Delay imposed on all requests over the rate limit, before they are considered at all:
-
100 (ms) = Default
-
-1 = Reject request
-
0 = No delay
-
any other value = Delay in ms
-
- maxWaitMs
-
Length of time, in ms, to blocking wait for the throttle semaphore. Default is 50 ms.
- throttledRequests
-
Number of requests over the rate limit able to be considered at once. Default is 5.
- throttleMs
-
Length of time, in ms, to async wait for semaphore. Default is 30000L.
- maxRequestMs
-
Length of time, in ms, to allow the request to run. Default is 30000L.
- maxIdleTrackerMs
-
Length of time, in ms, to keep track of request rates for a connection, before deciding that the user has gone away, and discarding it. Default is 30000L.
- insertHeaders
-
If true, insert the DoSFilter headers into the response. Defaults to true.
- remotePort
-
If true, then rate is tracked by IP and port (effectively connection). Defaults to false.
- ipWhitelist
-
A comma-separated list of IP addresses that will not be rate limited.
- managedAttr
-
If set to true, then this servlet is set as a ServletContext attribute with the filter name as the attribute name. This allows a context external mechanism (for example, JMX via
ContextHandler.MANAGED_ATTRIBUTES) to manage the configuration of the filter.
Header Filter
Info
-
Classname:
org.eclipse.jetty.servlets.HeaderFilter -
Maven Artifact: org.eclipse.jetty:jetty-servlets
-
Javadoc: http://www.eclipse.org/jetty/javadoc/jetty-9/org/eclipse/jetty/servlets/HeaderFilter.html
Usage
The header filter sets or adds headers to each response based on an optionally included/excluded list of path specs, mime types, and/or HTTP methods.
This filter processes its configured headers before calling doFilter in the filter chain. Some of the headers configured in this filter may get overwritten by other filters and/or the servlet processing the request.
Required JARs
To use the Header Filter, these JAR files must be available in WEB-INF/lib:
-
$JETTY_HOME/lib/jetty-http.jar
-
$JETTY_HOME/lib/jetty-servlets.jar
-
$JETTY_HOME/lib/jetty-util.jar
Sample Configuration
Place the configuration in a webapp’s web.xml or jetty-web.xml.
This filter will perform the following actions on each response:
-
Set the X-Frame-Options header to DENY.
-
Add a Cache-Control header containing no-cache, no-store, must-revalidate
-
Set the Expires header to approximately one year in the future.
-
Add a Date header with the current system time.
|
Each action must be separated by a comma. |
<filter>
<filter-name>HeaderFilter</filter-name>
<filter-class>org.eclipse.jetty.servlets.HeaderFilter</filter-class>
<init-param>
<param-name>headerConfig</param-name>
<param-value>
set X-Frame-Options: DENY,
"add Cache-Control: no-cache, no-store, must-revalidate",
setDate Expires: 31540000000,
addDate Date: 0
</param-value>
</init-param>
</filter>Configuring Header Filter Parameters
The following init parameters control the behavior of the filter:
- includedPaths
-
Optional. Comma separated values of included path specs.
- excludedPaths
-
Optional. Comma separated values of excluded path specs.
- includedMimeTypes
-
Optional. Comma separated values of included mime types. The mime type will be guessed from the extension at the end of the request URL if the content type has not been set on the response.
- excludedMimeTypes
-
Optional. Comma separated values of excluded mime types. The mime type will be guessed from the extension at the end of the request URL if the content type has not been set on the response.
- includedHttpMethods
-
Optional. Comma separated values of included http methods.
- excludedHttpMethods
-
Optional. Comma separated values of excluded http methods.
- headerConfig
-
Comma separated values of actions to perform on headers. The syntax for each action is
action headerName: headerValue.
Supported header actions:
-
set- causes setsetHeaderto be called on the response -
add- causes setaddHeaderto be called on the response -
setDate- causessetDateHeaderto be called on the response. -
addDate- causesaddDateHeaderto be called on the response.
If setDate or addDate is used, headerValue should be the number of milliseconds to add to the current system time before writing the header value.
If a property is both included and excluded by the filter configuration, then it will be considered excluded.
Path spec rules:
-
If the spec starts with
^, the spec is assumed to be a regex based path spec and will match with normal Java regex rules. -
If the spec starts with
/, the spec is assumed to be a Servlet url-pattern rules path spec for either an exact match or prefix based match. -
If the spec starts with
*., the spec is assumed to be a Servlet url-pattern rules path spec for a suffix based match. -
All other syntaxes are unsupported.
Gzip Handler
Info
-
Classname:
org.eclipse.jetty.server.handler.gzip.GzipHandler -
Maven Artifact: org.eclipse.jetty:jetty-servlets
-
Javadoc: http://www.eclipse.org/jetty/javadoc/jetty-9/org/eclipse/jetty/server/handler/gzip/GzipHandler.html
Usage
The Jetty GzipHandler is a compression handler that you can apply to any dynamic resource (servlet).
It fixes many of the bugs in commonly available compression filters: it works with asynchronous servlets; it handles all ways to set content length.
It has been tested with Jetty continuations and suspending requests.
Some user-agents might be excluded from compression to avoid common browser bugs (yes, this means IE!).
The GzipHandler can be added to the entire server by enabling the gzip.mod module.
It may also be added to individual contexts in a context xml file.
|
Jetty 9 only compresses using GZip. Using deflate HTTP compression is not supported and will not function. |
Gzip Rules
GzipHandler will gzip the content of a response if:
-
It is mapped to a matching path
-
The request method is configured to support gzip
-
The request is not from an excluded User-Agent
-
accept-encoding header is set to gzip
-
The response status code is >=200 and <300
-
The content length is unknown or more than the minGzipSize initParameter or the minGzipSize is 0(default)
-
The content-type does not match an excluded mime-type
-
No content-encoding is specified by the resource
Compressing the content can greatly improve the network bandwidth usage, but at the cost of memory and CPU cycles. The DefaultServlet is capable of serving pre-compressed static content, which saves memory and CPU.
The GzipHandler installs an output interceptor which passes through to the DefaultServlet.
If the content served by DefaultServlet is already compressed, the GzipHandler does nothing; if it is not compressed, the content is compressed on-the-fly.
|
Automatic precompression by the |
Gzip Configuration
- minGzipSize
-
Content will only be compressed if content length is either unknown or greater than
minGzipSize. - checkGzExists (Deprecated)
-
False by default. If set to true, the handler will check for pre-compressed content.
- includedMethods
-
List of HTTP methods to compress. If not set, only
GETrequests are compressed. - includedMimeTypes
-
List of MIME types to compress.
- excludedMimeTypes
-
List of MIME types not to compress.
- excludedAgentPatterns
-
A list of regex patterns for User-Agent names from which requests should not be compressed.
- excludedPaths
-
List of paths to exclude from compression. Performs a
String.startsWith(String)comparison to check if the path matches. If it does match then there is no compression. To match subpaths use excludePathPatterns instead. - includedPaths
-
List of paths to consider for compression.
- includePaths
-
List of paths to definitely consider for compression.
Cross Origin Filter
Info
-
Classname:
org.eclipse.jetty.servlets.CrossOriginFilter -
Maven Artifact: org.eclipse.jetty:jetty-servlets
-
Javadoc: http://www.eclipse.org/jetty/javadoc/jetty-9/org/eclipse/jetty/servlets/CrossOriginFilter.html
Usage
HTTP requests made from a script are subject to well known restrictions, the most prominent being the same domain policy.
Firefox 3.5 introduced support for W3C’s Access Control for Cross-Site Requests specification, which requires a compliant client (for example, Firefox 3.5) and a compliant server (via this servlet filter).
This filter implements the required bits to support the server-side contract of the specification, and will allow a compliant client to perform cross-domain requests via the standard XMLHttpRequest object. If the client does not issue a compliant cross-domain request, this filter does nothing, and its overhead is the check of the presence of the cross-domain HTTP header.
This is extremely useful in CometD web applications where it is now possible to perform cross-domain long polling without using script injection (also known as the JSONP transport), and therefore removing all the downsides that the JSONP transport has (it’s chattier, does not react quickly to failures, has a message size limit, uses GET instead of POST, etc.).
Setup
You will need to put the jetty-servlets.jar file onto your classpath.
If you are creating a webapp, ensure that this jar is included in your webapp’s WEB-INF/lib.
Or, if you are running Jetty embedded you will need to ensure that jetty-servlets.jar is on the execution classpath.
You can download the jetty-servlets.jar from the Maven Central Repository at https://repo1.maven.org/maven2/org/eclipse/jetty/jetty-servlets/.
It is also available as part of the Jetty distribution in the $JETTY_HOME/lib directory.
Configuration
This is a regular servlet filter that must be configured in web.xml.
It supports the following configuration parameters:
- allowedOrigins
-
A comma separated list of origins that are allowed to access the resources. Default value is: * (all origins)
- allowedMethods
-
A comma separated list of HTTP methods that are allowed to be used when accessing the resources. Default value is: GET,POST,HEAD
- allowedHeaders
-
A comma separated list of HTTP headers that are allowed to be specified when accessing the resources. Default value is: X-Requested-With,Content-Type,Accept,Origin
- allowCredentials
-
A boolean indicating if the resource allows requests with credentials. Default value is: true
- preflightMaxAge
-
The number of seconds that preflight requests can be cached by the client. Default value is 1800 seconds (30 minutes)
- chainPreflight
-
If true preflight requests are chained to their target resource for normal handling (as an OPTION request). Otherwise the filter will response to the preflight. Default is true.
- exposedHeaders
-
A comma separated list of HTTP headers that are allowed to be exposed on the client. Default value is the empty list.
A typical configuration could be:
<web-app>
<filter>
<filter-name>cross-origin</filter-name>
<filter-class>org.eclipse.jetty.servlets.CrossOriginFilter</filter-class>
</filter>
<filter-mapping>
<filter-name>cross-origin</filter-name>
<url-pattern>/cometd/*</url-pattern>
</filter-mapping>
</web-app>Resource Handler
Info
-
Classname:
org.eclipse.jetty.server.handler.ResourceHandler -
Maven Artifact: org.eclipse.jetty:jetty-server
-
Javadoc: http://www.eclipse.org/jetty/javadoc/jetty-9/org/eclipse/jetty/server/handler/ResourceHandler.html
Usage
This handler will serve static content and handle If-Modified-Since headers and is suitable for simple serving of static content.
|
There is no caching done with this handler, so if you are looking for a more fully featured way of serving static content look to the Default Servlet. |
|
Requests for resources that do not exist are let pass (Eg no 404’s). |
Improving the Look and Feel
The resource handler has a default stylesheet which you can change by calling setStyleSheet(String location) with the location of a file on the system that it can locate through the resource loading system.
The default css is called jetty-dir.css and is located in the jetty-util package, pulled as a classpath resource from the jetty-util jar when requested through the ResourceHandler.
Embedded Example
The following is an example of a split fileserver, able to serve static content from multiple directory locations. Since this handler does not return 404’s on content you are able to iteratively try multiple resource handlers to resolve content.
//
// ========================================================================
// Copyright (c) 1995-2022 Mort Bay Consulting Pty Ltd and others.
// ------------------------------------------------------------------------
// All rights reserved. This program and the accompanying materials
// are made available under the terms of the Eclipse Public License v1.0
// and Apache License v2.0 which accompanies this distribution.
//
// The Eclipse Public License is available at
// http://www.eclipse.org/legal/epl-v10.html
//
// The Apache License v2.0 is available at
// http://www.opensource.org/licenses/apache2.0.php
//
// You may elect to redistribute this code under either of these licenses.
// ========================================================================
//
package org.eclipse.jetty.embedded;
import java.nio.file.Paths;
import org.eclipse.jetty.server.Server;
import org.eclipse.jetty.server.ServerConnector;
import org.eclipse.jetty.server.handler.ContextHandler;
import org.eclipse.jetty.server.handler.ContextHandlerCollection;
import org.eclipse.jetty.server.handler.ResourceHandler;
import org.eclipse.jetty.util.resource.PathResource;
import org.eclipse.jetty.util.resource.Resource;
/**
* A {@link ContextHandlerCollection} handler may be used to direct a request to
* a specific Context. The URI path prefix and optional virtual host is used to
* select the context.
*/
public class SplitFileServer
{
public static Server createServer(int port, Resource baseResource0, Resource baseResource1)
{
// Create the Server object and a corresponding ServerConnector and then
// set the port for the connector. In this example the server will
// listen on port 8080. If you set this to port 0 then when the server
// has been started you can called connector.getLocalPort() to
// programmatically get the port the server started on.
Server server = new Server();
ServerConnector connector = new ServerConnector(server);
connector.setPort(port);
server.addConnector(connector);
// Create a Context Handler and ResourceHandler. The ContextHandler is
// getting set to "/" path but this could be anything you like for
// building out your url. Note how we are setting the ResourceBase using
// our jetty maven testing utilities to get the proper resource
// directory, you needn't use these, you simply need to supply the paths
// you are looking to serve content from.
ResourceHandler rh0 = new ResourceHandler();
rh0.setDirectoriesListed(false);
ContextHandler context0 = new ContextHandler();
context0.setContextPath("/");
context0.setBaseResource(baseResource0);
context0.setHandler(rh0);
// Rinse and repeat the previous item, only specifying a different
// resource base.
ResourceHandler rh1 = new ResourceHandler();
rh1.setDirectoriesListed(false);
ContextHandler context1 = new ContextHandler();
context1.setContextPath("/");
context1.setBaseResource(baseResource1);
context1.setHandler(rh1);
// Create a ContextHandlerCollection and set the context handlers to it.
// This will let jetty process urls against the declared contexts in
// order to match up content.
ContextHandlerCollection contexts = new ContextHandlerCollection(
context0, context1
);
server.setHandler(contexts);
return server;
}
public static void main(String[] args) throws Exception
{
int port = ExampleUtil.getPort(args, "jetty.http.port", 8080);
Resource resource0 = new PathResource(Paths.get("src/test/resources/dir0"));
Resource resource1 = new PathResource(Paths.get("src/test/resources/dir1"));
Server server = createServer(port, resource0, resource1);
// Dump the server state
server.setDumpAfterStart(true);
// Start things up!
server.start();
// The use of server.join() the will make the current thread join and
// wait until the server is done executing.
server.join();
}
}Debug Handler
Info
-
Classname:
org.eclipse.jetty.server.handler.DebugHandler -
Maven Artifact: org.eclipse.jetty:jetty-server
-
Javadoc: http://www.eclipse.org/jetty/javadoc/jetty-9/org/eclipse/jetty/server/handler/DebugHandler.html
Usage
A simple handler that is useful to debug incoming traffic. It will log entry and exit points of HTTP requests as well as the response code.
Usage in standard distribution
The debug handler can be added to Jetty by activating the debug module.
Embedded usage
Server server = new Server(8080);
RolloverFileOutputStream outputStream = new RolloverFileOutputStream("MeinLogPfad/yyyy_mm_dd.request.log", true,10);
DebugHandler debugHandler = new DebugHandler();
debugHandler.setOutputStream(outputStream);
debugHandler.setHandler(server.getHandler());
server.setHandler(debugHandler);
server.start();Example output
15:14:05.838:qtp551889550-13-selector-0 OPENED HttpConnection@e910ee4{IDLE},g=HttpGenerator{s=START},p=HttpParser{s=START,0 of 0}
15:14:05.846:qtp551889550-57:http://0:0:0:0:0:0:0:1:8080/ REQUEST 0:0:0:0:0:0:0:1 GET __utma=111872281.10102721.1321534299.1369833564.1370447492.35; __utmz=111872281.1321534299.1.1.utmcsr=(direct)|utmccn=(direct)|utmcmd=(none); _opt_vi_RPY720HZ=75E12E63-0CD0-4D6F-8383-C90D5C8397C7; Mozilla/5.0 (Macintosh; Intel Mac OS X 10.8; rv:22.0) Gecko/20100101 Firefox/22.0
15:14:05.894:qtp551889550-57:http://0:0:0:0:0:0:0:1:8080/ RESPONSE 200 null
15:14:05.959:qtp551889550-59:http://0:0:0:0:0:0:0:1:8080/jetty.css REQUEST 0:0:0:0:0:0:0:1 GET __utma=111872281.10102721.1321534299.1369833564.1370447492.35; __utmz=111872281.1321534299.1.1.utmcsr=(direct)|utmccn=(direct)|utmcmd=(none); _opt_vi_RPY720HZ=75E12E63-0CD0-4D6F-8383-C90D5C8397C7; visited=yes; Mozilla/5.0 (Macintosh; Intel Mac OS X 10.8; rv:22.0) Gecko/20100101 Firefox/22.0
15:14:05.962:qtp551889550-59:http://0:0:0:0:0:0:0:1:8080/jetty.css RESPONSE 200 null
15:14:06.052:qtp551889550-57:http://0:0:0:0:0:0:0:1:8080/images/jetty-header.jpg REQUEST 0:0:0:0:0:0:0:1 GET __utma=111872281.10102721.1321534299.1369833564.1370447492.35; __utmz=111872281.1321534299.1.1.utmcsr=(direct)|utmccn=(direct)|utmcmd=(none); _opt_vi_RPY720HZ=75E12E63-0CD0-4D6F-8383-C90D5C8397C7; visited=yes; Mozilla/5.0 (Macintosh; Intel Mac OS X 10.8; rv:22.0) Gecko/20100101 Firefox/22.0
15:14:06.055:qtp551889550-57:http://0:0:0:0:0:0:0:1:8080/images/jetty-header.jpg RESPONSE 200 null
15:14:07.248:qtp551889550-59:http://0:0:0:0:0:0:0:1:8080/favicon.ico REQUEST 0:0:0:0:0:0:0:1 GET __utma=111872281.10102721.1321534299.1369833564.1370447492.35; __utmz=111872281.1321534299.1.1.utmcsr=(direct)|utmccn=(direct)|utmcmd=(none); _opt_vi_RPY720HZ=75E12E63-0CD0-4D6F-8383-C90D5C8397C7; visited=yes; Mozilla/5.0 (Macintosh; Intel Mac OS X 10.8; rv:22.0) Gecko/20100101 Firefox/22.0
15:14:07.251:qtp551889550-59:http://0:0:0:0:0:0:0:1:8080/favicon.ico RESPONSE 404 text/html;charset=ISO-8859-1
15:14:09.330:qtp551889550-57 CLOSED HttpConnection@e910ee4{INTERESTED},g=HttpGenerator{s=START},p=HttpParser{s=START,0 of -1}Statistics Handler
Info
-
Classname:
org.eclipse.jetty.server.handler.StatisticsHandler -
Maven Artifact: org.eclipse.jetty:jetty-server
-
Javadoc: http://www.eclipse.org/jetty/javadoc/jetty-9/org/eclipse/jetty/server/handler/StatisticsHandler.html
Usage
Jetty currently has two main statistics collection mechanisms:
-
Instances of
ConnectionStatisticscan collect statistics for each connection of a connector. -
The
StatisticsHandlerclass may be used to collect statistics for HTTP requests.
The StatisticsHandler and ConnectionStatistics are not included in the default Jetty configuration, these need to be configured manually or enabled using the Jetty stats module on the command line.
$ java -jar {$jetty.home}/start.jar --add-to-start=statsIn addition to these, the SessionHandler and DefaultSessionCache classes collect statistics for sessions.
These statistics are enabled by default and are accessible via JMX interface.
|
To view statistics, you have to be able to connect to Jetty using either JConsole or some other JMX agent. See Using JMX with Jetty for more information. |
Request Statistics
To collect request statistics a StatisticsHandler must be configured as one of the handlers of the server.
Typically this can be done as the top level handler, but you may choose to configure a statistics handler for just one context by creating a context configuration file.
You can enable the StatisticsHandler by activating the stats modules on the command line.
Alternately, if you are making multiple changes to the Jetty configuration, you could include statistics handler configuration into your own Jetty xml configuration. The following fragment shows how to configure a top level statistics handler:
<Configure id="Server" class="org.eclipse.jetty.server.Server">
<Call name="insertHandler">
<Arg>
<New id="StatsHandler" class="org.eclipse.jetty.server.handler.StatisticsHandler"/>
</Arg>
</Call>
</Configure>Connection Statistics
Detailed statistics on connection duration and number of messages are only collated when a connection is closed. The current and maximum number of connections are the only "live" statistics.
The following example shows how to turn on connection statistics in the Jetty XML format.
<Configure id="Server" class="org.eclipse.jetty.server.Server">
<Call name="addBeanToAllConnectors">
<Arg>
<New class="org.eclipse.jetty.io.ConnectionStatistics"/>
</Arg>
</Call>
</Configure>A special variant of ConnectionStatistics called IncludeExcludeConnectionStatistics allows you to refine which types of connection you want to collect statistics for.
The following example shows how this can be used to record statistics only for WebSocket connections.
<Configure id="Server" class="org.eclipse.jetty.server.Server">
<Call name="addBeanToAllConnectors">
<Arg>
<New class="org.eclipse.jetty.io.IncludeExcludeConnectionStatistics">
<Call name="include" arg="org.eclipse.jetty.websocket.common.io.AbstractWebSocketConnection"/>
</New>
</Arg>
</Call>
</Configure>Session Statistics
Session handling is built into Jetty for any servlet or webapp context. Detailed statistics on session duration are only collated when a session is closed. The current, minimum, and maximum number of sessions are the only "live" statistics. The session statistics are enabled by default and do not need to be configured.
IP Access Handler
Info
-
Classname:
org.eclipse.jetty.server.handler.IPAccessHandler -
Maven Artifact: org.eclipse.jetty:jetty-server
-
Javadoc: http://www.eclipse.org/jetty/javadoc/jetty-9/org/eclipse/jetty/server/handler/IPAccessHandler.html
Usage
Controls access to the wrapped handler by the real remote IP. Control is provided by white/black lists that include both internet addresses and URIs. This handler uses the real internet address of the connection, not one reported in the forwarded for headers, as this cannot be as easily forged.
Typically, the black/white lists will be used in one of three modes:
-
Blocking a few specific IPs/URLs by specifying several black list entries.
-
Allowing only some specific IPs/URLs by specifying several white lists entries.
-
Allowing a general range of IPs/URLs by specifying several general white list entries, that are then further refined by several specific black list exceptions.
An empty white list is treated as match all. If there is at least one entry in the white list, then a request must match a white list entry. Black list entries are always applied, so that even if an entry matches the white list, a black list entry will override it.
Internet addresses may be specified as absolute address or as a combination of four octet wildcard specifications (a.b.c.d) that are defined as follows.
-
nnn - an absolute value (0-255)
-
mmm-nnn - an inclusive range of absolute values, with following shorthand notations:
-
nnn- ⇒ nnn-255
-
-nnn ⇒ 0-nnn
-
- ⇒ 0-255
-
-
a,b,… - a list of wildcard specifications
Internet address specification is separated from the URI pattern using the "|" (pipe) character. URI patterns follow the servlet specification for simple * prefix and suffix wild cards (e.g. /, /foo, /foo/bar, /foo/bar/*, *.baz).
Earlier versions of the handler used internet address prefix wildcard specification to define a range of the internet addresses (e.g. 127., 10.10., 172.16.1.). They also used the first "/" character of the URI pattern to separate it from the internet address. Both of these features have been deprecated in the current version.
Examples of the entry specifications are:
-
10.10.1.2 - all requests from IP 10.10.1.2
-
10.10.1.2|/foo/bar - all requests from IP 10.10.1.2 to URI /foo/bar
-
10.10.1.2|/foo/* - all requests from IP 10.10.1.2 to URIs starting with /foo/
-
10.10.1.2|*.html - all requests from IP 10.10.1.2 to URIs ending with .html
-
10.10.0-255.0-255 - all requests from IPs within 10.10.0.0/16 subnet
-
10.10.0-.-255|/foo/bar - all requests from IPs within 10.10.0.0/16 subnet to URI /foo/bar
-
10.10.0-3,1,3,7,15|/foo/* - all requests from IPs addresses with last octet equal to 1,3,7,15 in subnet 10.10.0.0/22 to URIs starting with /foo/
Earlier versions of the handler used internet address prefix wildcard specification to define a range of the internet addresses (e.g. 127., 10.10., 172.16.1.). They also used the first "/" character of the URI pattern to separate it from the internet address. Both of these features have been deprecated in the current version.
Moved Context Handler
Info
-
Classname:
org.eclipse.jetty.server.handler.MovedContextHandler -
Maven Artifact: org.eclipse.jetty:jetty-server
Usage
You can use the MovedContextHandler to relocate or redirect a context that has changed context path and/or virtual hosts.
You can configure it to permanently redirect the old URL to the new URL, in which case Jetty sends a Http Status code of 301 to the browser with the new URL. Alternatively, you can make it non-permanent, in which case Jetty sends a 302 Http Status code along with the new URL.
In addition, as with any other context, you can configure a list of virtual hosts, meaning that this context responds only to requests to one of the listed host names.
Suppose you have a context deployed at /foo, but that now you want to deploy at the root context / instead.
-
First you reconfigure and redeploy the context on Jetty.
-
Next you need a way to redirect all the browsers who have bookmarked
/footo the new path. You create a new context xml file in{$jetty/.base}/webappsand configure theMovedContextHandlerto do the redirection from/footo/.
Below is an example.
This is a permanent redirection, which also preserves pathinfo and query strings on the redirect:
<?xml version="1.0" encoding="UTF-8"?>
<!DOCTYPE Configure PUBLIC "-//Jetty//Configure//EN" "http://www.eclipse.org/jetty/configure_9_3.dtd">
<Configure class="org.eclipse.jetty.server.handler.MovedContextHandler">
<Set name="contextPath">/foo</Set>
<Set name="newContextURL">/</Set>
<Set name="permanent">true</Set>
<Set name="discardPathInfo">false</Set>
<Set name="discardQuery">false</Set>
<Set name="virtualHosts">
<Array type="String">
<Item>209.235.245.73</Item>
<Item>127.0.0.73</Item>
<Item>acme.org</Item>
<Item>www.acme.org</Item>
<Item>server.acme.org</Item>
</Array>
</Set>
</Configure>Shutdown Handler
Info
-
Classname:
org.eclipse.jetty.server.handler.ShutdownHandler -
Maven Artifact: org.eclipse.jetty:jetty-server
-
Javadoc: http://www.eclipse.org/jetty/javadoc/jetty-9/org/eclipse/jetty/server/handler/ShutdownHandler.html
Usage
A handler that shuts the server down on a valid request.
This is used to perform "soft" restarts from Java.
If _exitJvm is set to true a hard System.exit() call is being made.
This is an example of how you can setup this handler directly with the Server. It can also be added as a part of handler chain or collection.
Server server = new Server(8080);
HandlerList handlers = new HandlerList();
handlers.setHandlers(new Handler[]
{ someOtherHandler, new ShutdownHandler(server,"secret password") });
server.setHandler(handlers);
server.start();This is an example that you can use to call the shutdown handler from within java.
public static void attemptShutdown(int port, String shutdownCookie) {
try {
URL url = new URL("http://localhost:" + port + "/shutdown?token=" + shutdownCookie);
HttpURLConnection connection = (HttpURLConnection)url.openConnection();
connection.setRequestMethod("POST");
connection.getResponseCode();
logger.info("Shutting down " + url + ": " + connection.getResponseMessage());
} catch (SocketException e) {
logger.debug("Not running");
// Okay - the server is not running
} catch (IOException e) {
throw new RuntimeException(e);
}
}Default Handler
Info
-
Classname:
org.eclipse.jetty.server.handler.DefaultHandler -
Maven Artifact: org.eclipse.jetty:jetty-server
-
Javadoc: http://www.eclipse.org/jetty/javadoc/jetty-9/org/eclipse/jetty/server/handler/DefaultHandler.html
Usage
A simple handler that is useful to terminate handler chains with a clean fashion.
As in the example below, if a resource to be served is not matched within the resource handler the DefaultHandler will take care of producing a 404 page.
This class is a useful template to either extend and embrace or simply provide a similar implementation for customizing to your needs.
There is also an Error Handler that services errors related to the servlet api specification, so it is best to not get the two confused.
|
The |
Server server = new Server(8080);
HandlerList handlers = new HandlerList();
ResourceHandler resourceHandler = new ResourceHandler();
resourceHandler.setBaseResource(Resource.newResource("."));
handlers.setHandlers(new Handler[]
{ resourceHandler, new DefaultHandler() });
server.setHandler(handlers);
server.start();Error Handler
Info
-
Classname:
org.eclipse.jetty.server.handler.ErrorHandler -
Maven Artifact: org.eclipse.jetty:jetty-server
-
Javadoc: http://www.eclipse.org/jetty/javadoc/jetty-9/org/eclipse/jetty/server/handler/ErrorHandler.html
Usage
A handler that is used to report errors from servlet contexts and webapp contexts to report error conditions. Primarily handles setting the various servlet spec specific response headers for error conditions. Can be customized by extending; for more information on this see Creating Custom Error Pages.
Rewrite Handler
The RewriteHandler matches a request against a set of rules, and modifies the request accordingly for any rules that match.
The most common use is to rewrite request URIs, but it is capable of much more: rules can also be configured to redirect the response, set a cookie or response code on the response, modify the header, etc.
Info
-
Classname: org.eclipse.jetty.rewrite.handler.RewriteHandler
-
Maven artifact: org.eclipse.jetty:jetty-rewrite
-
Javadoc: http://www.eclipse.org/jetty/javadoc/jetty-9/org/eclipse/jetty/rewrite/handler/RewriteHandler.html
The standard Jetty distribution bundle contains the jetty-rewrite module, so all you need to do is to enable it using one of the module commands, eg:
$ java -jar start.jar --add-to-start=rewrite|
If you are running the standard Jetty distribution with the sample test webapp, there will be a demo of the rewrite module at http://localhost:8080/test/rewrite/ |
Usage
The rewrite module enables the following Jetty xml config file on the execution path:
<?xml version="1.0"?><!DOCTYPE Configure PUBLIC "-//Jetty//Configure//EN" "http://www.eclipse.org/jetty/configure_9_3.dtd">
<Configure id="Server" class="org.eclipse.jetty.server.Server">
<!-- =========================================================== -->
<!-- configure rewrite handler -->
<!-- =========================================================== -->
<Call name="insertHandler">
<Arg>
<New class="org.eclipse.jetty.rewrite.handler.RewriteHandler">
<Set name="rewriteRequestURI"><Property name="jetty.rewrite.rewriteRequestURI" deprecated="rewrite.rewriteRequestURI" default="true"/></Set>
<Set name="rewritePathInfo"><Property name="jetty.rewrite.rewritePathInfo" deprecated="rewrite.rewritePathInfo" default="false"/></Set>
<Set name="originalPathAttribute"><Property name="jetty.rewrite.originalPathAttribute" deprecated="rewrite.originalPathAttribute" default="requestedPath"/></Set>
<!-- Set DispatcherTypes -->
<Set name="dispatcherTypes">
<Array type="javax.servlet.DispatcherType">
<Item><Call class="javax.servlet.DispatcherType" name="valueOf"><Arg>REQUEST</Arg></Call></Item>
<Item><Call class="javax.servlet.DispatcherType" name="valueOf"><Arg>ASYNC</Arg></Call></Item>
</Array>
</Set>
<Get id="Rewrite" name="ruleContainer"/>
<!-- see rewrite-compactpath.xml for example how to add a rule -->
</New>
</Arg>
</Call>
</Configure>As the commented out code shows, you configure the RewriteHandler by adding various rules.
There is an example of rules configuration in the standard distribution in the demo-base/etc/demo-rewrite-rules.xml file:
<?xml version="1.0"?><!DOCTYPE Configure PUBLIC "-//Jetty//Configure//EN" "http://www.eclipse.org/jetty/configure_9_3.dtd">
<!-- =============================================================== -->
<!-- Configure the demos -->
<!-- =============================================================== -->
<Configure id="Server" class="org.eclipse.jetty.server.Server">
<!-- ============================================================= -->
<!-- Add rewrite rules -->
<!-- ============================================================= -->
<Ref refid="Rewrite">
<!-- Add rule to protect against IE ssl bug -->
<Call name="addRule">
<Arg>
<New class="org.eclipse.jetty.rewrite.handler.MsieSslRule"/>
</Arg>
</Call>
<!-- protect favicon handling -->
<Call name="addRule">
<Arg>
<New class="org.eclipse.jetty.rewrite.handler.HeaderPatternRule">
<Set name="pattern">/favicon.ico</Set>
<Set name="name">Cache-Control</Set>
<Set name="value">Max-Age=3600,public</Set>
<Set name="terminating">true</Set>
</New>
</Arg>
</Call>
<!-- redirect from the welcome page to a specific page -->
<Call name="addRule">
<Arg>
<New class="org.eclipse.jetty.rewrite.handler.RewritePatternRule">
<Set name="pattern">/test/rewrite/</Set>
<Set name="replacement">/test/rewrite/info.html</Set>
</New>
</Arg>
</Call>
<!-- replace the entire request URI -->
<Call name="addRule">
<Arg>
<New class="org.eclipse.jetty.rewrite.handler.RewritePatternRule">
<Set name="pattern">/test/some/old/context</Set>
<Set name="replacement">/test/rewritten/newcontext</Set>
</New>
</Arg>
</Call>
<!-- replace the beginning of the request URI -->
<Call name="addRule">
<Arg>
<New class="org.eclipse.jetty.rewrite.handler.RewritePatternRule">
<Set name="pattern">/test/rewrite/for/*</Set>
<Set name="replacement">/test/rewritten/</Set>
</New>
</Arg>
</Call>
<!-- reverse the order of the path sections -->
<Call name="addRule">
<Arg>
<New class="org.eclipse.jetty.rewrite.handler.RewriteRegexRule">
<Set name="regex">(.*?)/reverse/([^/]*)/(.*)</Set>
<Set name="replacement">$1/reverse/$3/$2</Set>
</New>
</Arg>
</Call>
<!-- add a cookie to each path visited -->
<Call name="addRule">
<Arg>
<New class="org.eclipse.jetty.rewrite.handler.CookiePatternRule">
<Set name="pattern">/*</Set>
<Set name="name">visited</Set>
<Set name="value">yes</Set>
</New>
</Arg>
</Call>
<!-- actual redirect, instead of internal rewrite -->
<Call name="addRule">
<Arg>
<New class="org.eclipse.jetty.rewrite.handler.RedirectPatternRule">
<Set name="pattern">/test/redirect/*</Set>
<Set name="location">/test/redirected</Set>
</New>
</Arg>
</Call>
<!-- add a response rule -->
<Call name="addRule">
<Arg>
<New class="org.eclipse.jetty.rewrite.handler.ResponsePatternRule">
<Set name="pattern">/400Error</Set>
<Set name="code">400</Set>
<Set name="reason">ResponsePatternRule Demo</Set>
</New>
</Arg>
</Call>
</Ref>
</Configure>Embedded Example
This is an example for embedded Jetty, which does something similar to the configuration file example above:
Server server = new Server();
RewriteHandler rewrite = new RewriteHandler();
rewrite.setRewriteRequestURI(true);
rewrite.setRewritePathInfo(false);
rewrite.originalPathAttribute("requestedPath");
RedirectPatternRule redirect = new RedirectPatternRule();
redirect.setPattern("/redirect/*");
redirect.setReplacement("/redirected");
rewrite.addRule(redirect);
RewritePatternRule oldToNew = new RewritePatternRule();
oldToNew.setPattern("/some/old/context");
oldToNew.setReplacement("/some/new/context");
rewrite.addRule(oldToNew);
RewriteRegexRule reverse = new RewriteRegexRule();
reverse.setRegex("/reverse/([^/]*)/(.*)");
reverse.setReplacement("/reverse/$2/$1");
rewrite.addRule(reverse);
server.setHandler(rewrite);Rules
There are several types of rules that are written extending useful base rule classes.
PatternRule
Matches against the request URI using the servlet pattern syntax.
- CookiePatternRule
-
Adds a cookie to the response.
- HeaderPatternRule
-
Adds/modifies a header in the response.
- RedirectPatternRule
-
Redirects the response.
- ResponsePatternRule
-
Sends the response code (status or error).
- RewritePatternRule
-
Rewrite the URI by replacing the matched request path with a fixed string.
RegexRule
Matches against the request URI using regular expressions.
- RedirectRegexRule
-
Redirect the response.
- RewriteRegexRule
-
Rewrite the URI by matching with a regular expression. (The replacement string may use
Template:$nto replace the nth capture group.)
HeaderRule
Match against request headers. Match either on a header name and specific value, or on the presence of a header (with any value).
- ForwardedSchemaHeaderRule
-
Set the scheme on the request (defaulting to HTTPS).
Others
Extra rules that defy standard classification.
- MsieSslRule
-
Disables the keep alive for SSL from IE5 or IE6.
- LegacyRule
-
Implements the legacy API of RewriteHandler
RuleContainer
Groups rules together.
The contained rules will only be processed if the conditions for the RuleContainer evaluate to true.
- VirtualHostRuleContainer
-
Groups rules that apply only to a specific virtual host or a set of virtual hosts
Jetty Runner
This chapter explains how to use the jetty-runner to run your webapps without needing an installation of Jetty.
Use Jetty Without an Installed Distribution
The idea of the jetty-runner is extremely simple – run a webapp directly from the command line using a single jar file and as much default configuration as possible.
Of course, if your webapp is not as straightforward, the jetty-runner has command line options which allow you to customize the execution environment.
Preparation
You will need the jetty-runner jar:
-
Download the
jetty-runnerjar available at Maven Central.
Deploying a Simple Context
Let’s assume we have a very simple webapp that does not need any resources from its environment, nor any configuration apart from the defaults. Starting it is as simple as performing the following:
> java -jar jetty-runner.jar simple.warThis will start Jetty on port 8080, and deploy the webapp to /.
Your webapp does not have to be packed into a war, you can deploy a webapp that is a directory instead in the same way:
> java -jar jetty-runner.jar simpleIn fact, the webapp does not have to be a war or even a directory, it can simply be a Jetty context xml file that describes your webapp:
> java -jar jetty-runner.jar simple-context.xml|
When using a context xml file, the application being deployed is not even required to be a fully-fledged webapp. It can simply be a Jetty context. |
By default, jetty-runner implements all Configuration Classes so that users can set up and deploy new instances with as little configuration as possible.
If you wish to only implement certain Configuration Classes, they will need to be defined in the context xml for the webapp/context.
The default Configuration Classes are:
org.eclipse.jetty.webapp.WebInfConfiguration
org.eclipse.jetty.webapp.WebXmlConfiguration
org.eclipse.jetty.webapp.MetaInfConfiguration
org.eclipse.jetty.webapp.FragmentConfiguration
org.eclipse.jetty.webapp.JettyWebXmlConfiguration
org.eclipse.jetty.plus.webapp.EnvConfiguration
org.eclipse.jetty.plus.webapp.PlusConfiguration
org.eclipse.jetty.annotations.AnnotationConfiguration
You can learn more about implementing specific Configuration Classes here.
Deploying Multiple Contexts
If you have more than one webapp that must be deployed, simply provide them all on the command line.
You can control the context paths for them using the --path parameter.
Here’s an example of deploying 2 wars (although either or both of them could be unpacked directories instead):
> java -jar jetty-runner.jar --path /one my1.war --path /two my2.warIf you have context xml files that describe your webapps, you can fully configure your webapps in them and hence you won’t need to use the command line switches. Just provide the list of context files like so:
> java -jar jetty-runner.jar my-first-context.xml my-second-context.xml my-third-context.xml|
Switched used on the command line override configuration file settings.
So, for example, you could set the context path for the webapp inside the context xml file, and use the |
Changing the Default Port
By default the jetty-runner will listen on port 8080.
You can easily change this on the command line using the --port command.
Here’s an example that runs our simple.war on port 9090:
> java -jar jetty-runner.jar --port 9090 simple.warUsing jetty.xml Files
Instead of, or in addition to, using command line switches, you can use one or more jetty.xml files to configure the environment for your webapps.
Here’s an example where we apply two different jetty.xml files:
> java -jar jetty-runner.jar --config jetty.xml --config jetty-https.xml simple.warFull Configuration Reference
You can see the fill set of configuration options using the --help switch:
> java -jar jetty-runner.jar --helpHere’s what the output will look like:
Usage: java [-Djetty.home=dir] -jar jetty-runner.jar [--help|--version] [ server opts] [[ context opts] context ...]
Server opts:
--version - display version and exit
--log file - request log filename (with optional 'yyyy_mm_dd' wildcard
--out file - info/warn/debug log filename (with optional 'yyyy_mm_dd' wildcard
--host name|ip - interface to listen on (default is all interfaces)
--port n - port to listen on (default 8080)
--stop-port n - port to listen for stop command (or -DSTOP.PORT=n)
--stop-key n - security string for stop command (required if --stop-port is present) (or -DSTOP.KEY=n)
[--jar file]*n - each tuple specifies an extra jar to be added to the classloader
[--lib dir]*n - each tuple specifies an extra directory of jars to be added to the classloader
[--classes dir]*n - each tuple specifies an extra directory of classes to be added to the classloader
--stats [unsecure|realm.properties] - enable stats gathering servlet context
[--config file]*n - each tuple specifies the name of a jetty xml config file to apply (in the order defined)
Context opts:
[[--path /path] context]*n - WAR file, web app dir or context xml file, optionally with a context pathPrinting the Version
Print out the version of Jetty and then exit immediately.
> java -jar jetty-runner.jar --versionConfiguring a Request Log
Cause Jetty to write a request log with the given name.
If the file is prefixed with yyyy_mm_dd then the file will be automatically rolled over.
Note that for finer grained configuration of the request log, you will need to use a Jetty xml file instead.
> java -jar jetty-runner.jar --log yyyy_mm_dd-requests.log my.warConfiguring the Output Log
Redirect the output of jetty logging to the named file.
If the file is prefixed with yyyy_mm_dd then the file will be automatically rolled over.
> java -jar jetty-runner.jar --out yyyy_mm_dd-output.log my.warConfiguring the Interface for HTTP
Like Jetty standalone, the default is for the connectors to listen on all interfaces on a machine.
You can control that by specifying the name or ip address of the particular interface you wish to use with the --host argument:
> java -jar jetty-runner.jar --host 192.168.22.19 my.warConfiguring the Port for HTTP
The default port number is 8080. To configure a https connector, use a Jetty xml config file instead.
> java -jar jetty-runner.jar --port 9090 my.warConfiguring Stop
You can configure a port number for Jetty to listen on for a stop command, so you are able to stop it from a different terminal.
This requires the use of a "secret" key, to prevent malicious or accidental termination.
Use the --stop-port and --stop-key (or -DSTOP.PORT= and -DSTOP.KEY=, respectively) parameters as arguments to the jetty-runner:
> java -jar jetty-runner.jar --stop-port 8181 --stop-key abc123Then, to stop Jetty from a different terminal, you need to supply the same port and key information. For this you’ll either need a local installation of Jetty, the jetty-maven-plugin, the jetty-ant plugin, or a custom class. Here’s how to use a Jetty installation to perform a stop:
> java -jar start.jar -DSTOP.PORT=8181 -DSTOP.KEY=abc123 --stopConfiguring the Container Classpath
With a local installation of Jetty, you add jars and classes to the container’s classpath by putting them in the {$jetty.base}/lib directory.
With the jetty-runner, you can use the --lib, --jar and --classes arguments instead to achieve the same thing.
--lib adds the location of a directory which contains jars to add to the container classpath.
You can add 1 or more.
Here’s an example of configuring 2 directories:
> java -jar jetty-runner.jar --lib /usr/local/external/lib --lib $HOME/external-other/lib my.war--jar adds a single jar file to the container classpath.
You can add 1 or more.
Here’s an example of configuring 3 extra jars:
> java -jar jetty-runner.jar --jar /opt/stuff/jars/jar1.jar --jar $HOME/jars/jar2.jar --jar /usr/local/proj/jars/jar3.jar my.war--classes add the location of a directory containing classes to add to the container classpath.
You can add 1 or more.
Here’s an example of configuring a single extra classes dir:
> java -jar jetty-runner.jar --classes /opt/stuff/classes my.war|
When using the |
Gathering Statistics
If statistics gathering is enabled, then they are viewable by surfing to the context /stats.
You may optionally protect access to that context with a password.
Here’s an example of enabling statistics, with no password protection:
> java -jar jetty-runner.jar --stats unsecure my.warIf we wished to protect access to the /stats context, we would provide the location of a Jetty realm configuration file containing authentication and authorization information.
For example, we could use the following example realm file from the Jetty distribution:
jetty: MD5:164c88b302622e17050af52c89945d44,user
admin: CRYPT:adpexzg3FUZAk,server-administrator,content-administrator,admin
other: OBF:1xmk1w261u9r1w1c1xmq,user
plain: plain,user
user: password,user
# This entry is for digest auth. The credential is a MD5 hash of username:realmname:password
digest: MD5:6e120743ad67abfbc385bc2bb754e297,userAssuming we’ve copied it into the local directory, we would apply it like so
> java -jar jetty-runner.jar --stats realm.properties my.warAfter navigating to http://localhost:8080/ a few times, we can point to the stats servlet on http://localhost:8080/stats to see the output:
Statistics: Statistics gathering started 1490627ms ago Requests: Total requests: 9 Active requests: 1 Max active requests: 1 Total requests time: 63 Mean request time: 7.875 Max request time: 26 Request time standard deviation: 8.349764752888037 Dispatches: Total dispatched: 9 Active dispatched: 1 Max active dispatched: 1 Total dispatched time: 63 Mean dispatched time: 7.875 Max dispatched time: 26 Dispatched time standard deviation: 8.349764752888037 Total requests suspended: 0 Total requests expired: 0 Total requests resumed: 0 Responses: 1xx responses: 0 2xx responses: 7 3xx responses: 1 4xx responses: 0 5xx responses: 0 Bytes sent total: 1453 Connections: org.eclipse.jetty.server.ServerConnector@203822411 Protocols:http/1.1 Statistics gathering started 1490606ms ago Total connections: 7 Current connections open: 1 Max concurrent connections open: 2 Total connections duration: 72883 Mean connection duration: 12147.166666666666 Max connection duration: 65591 Connection duration standard deviation: 23912.40292977684 Total messages in: 7 Total messages out: 7 Memory: Heap memory usage: 49194840 bytes Non-heap memory usage: 12611696 bytes
Optimizing Jetty
There are many ways to optimize Jetty which vary depending on the situation. Are you trying to optimize for number of requests within a given amount of time? Are you trying to optimize the serving of static content? Do you have a large bit of hardware that you want to give entirely over to Jetty to use to its heart’s delight? This chapter examines a few of the many different ways to optimize Jetty.
Garbage Collection
Tuning the JVM garbage collection (GC) can greatly improve the performance of the JVM where Jetty and your application are running. Optimal tuning of the GC depends on the behavior of the application(s) and requires detailed analysis, but there are general recommendations to follow to at least obtain comprehensive GC logs that can be later analyzed.
Garbage Collection Logging Configuration
These options are general to OpenJDK (and therefore also for the Oracle JVM). They provide good information about the GC activity of your JVM, producing logs that can later be analyzed to perform finer tuning.
-Xloggc:/path/to/myjettybase/logs/gc.log
-XX:+PrintGCDateStamps
-XX:+PrintGCDetails
-XX:+ParallelRefProcEnabled
-XX:+PrintReferenceGC
-XX:+PrintTenuringDistribution
-XX:+PrintAdaptiveSizePolicyXlog:gc*,ergo*=trace,ref*=debug,age*=trace:file=/path/to/myjettybase/logs/gc.log:time,level,tagsThere are not many recommended options for GC that can apply to all users. However, the most obvious one is to disable explicit GC (this is performed regularly by RMI and can introduce an abnormal amount of GC pauses).
-XX:+DisableExplicitGCHigh Load
Configuring Jetty for high load, whether for load testing or for production, requires that the operating system, the JVM, Jetty, the application, the network and the load generation all be tuned.
Load Generation for Load Testing
Machines handling load generation must have their OS, JVM, etc., tuned just as much as the server machines.
The load generation should not be over the local network on the server machine, as this has unrealistic performance and latency as well as different packet sizes and transport characteristics.
The load generator should generate a realistic load. Avoid the following pitfalls:
-
A common mistake is that load generators often open relatively few connections that are extremely busy sending as many requests as possible over each connection. This causes the measured throughput to be limited by request latency (see Lies, Damned Lies and Benchmarks for an analysis of such an issue).
-
Another common mistake is to use TCP/IP for a single request, and to open many, many short-lived connections. This often results in accept queues filling and limitations due to file descriptor and/or port starvation.
-
A load generator should model the traffic profile from the normal clients of the server. For browsers, this is often between two and six connections that are mostly idle and that are used in sporadic bursts with read times in between. The connections are typically long held HTTP/1.1 connections.
-
Load generators should be written in asynchronously so that a limited number of threads does not restrict the maximum number of users that can be simulated. If the generator is not asynchronous, a thread pool of 2000 may only be able to simulate 500 or fewer users. The Jetty
HttpClientis an ideal choice for building a load generator as it is asynchronous and can simulate many thousands of connections (see the CometD Load Tester for a good example of a realistic load generator).
Operating System Tuning
Both the server machine and any load generating machines need to be tuned to support many TCP/IP connections and high throughput.
Linux
Linux does a reasonable job of self-configuring TCP/IP, but there are a few limits and defaults that you should increase.
You can configure most of these in /etc/security/limits.conf or via sysctl.
TCP Buffer Sizes
You should increase TCP buffer sizes to at least 16MB for 10G paths and tune the auto-tuning (keep in mind that you need to consider buffer bloat).
$ sysctl -w net.core.rmem_max=16777216
$ sysctl -w net.core.wmem_max=16777216
$ sysctl -w net.ipv4.tcp_rmem="4096 87380 16777216"
$ sysctl -w net.ipv4.tcp_wmem="4096 16384 16777216"Queue Sizes
net.core.somaxconn controls the size of the connection listening queue.
The default value is 128.
If you are running a high-volume server and connections are getting refused at a TCP level, you need to increase this value.
This setting can take a bit of finesse to get correct: if you set it too high, resource problems occur as it tries to notify a server of a large number of connections, and many remain pending, but if you set it too low, refused connections occur.
$ sysctl -w net.core.somaxconn=4096The net.core.netdev_max_backlog controls the size of the incoming packet queue for upper-layer (Java) processing.
The default (2048) may be increased and other related parameters adjusted with:
$ sysctl -w net.core.netdev_max_backlog=16384
$ sysctl -w net.ipv4.tcp_max_syn_backlog=8192
$ sysctl -w net.ipv4.tcp_syncookies=1Ports
If many outgoing connections are made (for example, on load generators), the operating system might run low on ports.
Thus it is best to increase the port range, and allow reuse of sockets in TIME_WAIT:
$ sysctl -w net.ipv4.ip_local_port_range="1024 65535"
$ sysctl -w net.ipv4.tcp_tw_recycle=1File Descriptors
Busy servers and load generators may run out of file descriptors as the system defaults are normally low.
These can be increased for a specific user in /etc/security/limits.conf:
theusername hard nofile 40000 theusername soft nofile 40000
Congestion Control
Linux supports pluggable congestion control algorithms. To get a list of congestion control algorithms that are available in your kernel run:
$ sysctl net.ipv4.tcp_available_congestion_controlIf cubic and/or htcp are not listed, you need to research the control algorithms for your kernel. You can try setting the control to cubic with:
$ sysctl -w net.ipv4.tcp_congestion_control=cubicMac OS
Tips welcome.
Windows
Tips welcome.
Network Tuning
Intermediaries such as nginx can use a non-persistent HTTP/1.0 connection. Make sure to use persistent HTTP/1.1 connections.
JVM Tuning
-
Tune the Garbage Collection
-
Allocate sufficient memory
-
Use the -server option
-
Jetty Tuning
Acceptors
The standard rule of thumb for the number of Accepters to configure is one per CPU on a given machine.
Low Resource Limits
Must not be configured for less than the number of expected connections.
Thread Pool
Configure with goal of limiting memory usage maximum available. Typically this is >50 and <500
Limiting Load
To achieve optimal fair handling for all users of a server, it can be necessary to limit the resources that each user/connection can utilize so as to maximize throughput for the server or to ensure that the entire server runs within the limitations of it’s runtime.
Low Resources Monitor
An instance of LowResourceMonitor may be added to a Jetty server to monitor for low resources situations and to take action to limit the number of idle connections on the server.
To configure the low resources monitor, you can enable the the lowresources.mod on the command line, which has the effect of including the following XML configuration:
<?xml version="1.0"?><!DOCTYPE Configure PUBLIC "-//Jetty//Configure//EN" "http://www.eclipse.org/jetty/configure_9_3.dtd">
<!-- =============================================================== -->
<!-- Mixin the Low Resources Monitor -->
<!-- =============================================================== -->
<Configure id="Server" class="org.eclipse.jetty.server.Server">
<Call name="addBean">
<Arg>
<New id="lowResourceMonitor" class="org.eclipse.jetty.server.LowResourceMonitor">
<Arg name="server"><Ref refid='Server'/></Arg>
<Set name="period"><Property name="jetty.lowresources.period" deprecated="lowresources.period" default="1000"/></Set>
<Set name="lowResourcesIdleTimeout"><Property name="jetty.lowresources.idleTimeout" deprecated="lowresources.lowResourcesIdleTimeout" default="1000"/></Set>
<Set name="monitorThreads"><Property name="jetty.lowresources.monitorThreads" deprecated="lowresources.monitorThreads" default="true"/></Set>
<Set name="maxConnections"><Property name="jetty.lowresources.maxConnections" deprecated="lowresources.maxConnections" default="0"/></Set>
<Set name="maxMemory"><Property name="jetty.lowresources.maxMemory" deprecated="lowresources.maxMemory" default="0"/></Set>
<Set name="maxLowResourcesTime"><Property name="jetty.lowresources.maxLowResourcesTime" deprecated="lowresources.maxLowResourcesTime" default="5000"/></Set>
<Set name="acceptingInLowResources"><Property name="jetty.lowresources.accepting" default="true"/></Set>
</New>
</Arg>
</Call>
</Configure>The monitor is configured with a period in milliseconds at which it will scan the server looking for a low resources condition, which may be one of:
-
If
monitorThreadsis configured as true and a connectors Executor is an instance of ThreadPool, then itsisLowOnThreads()method is used to detect low resources. -
If
maxConnectionsis configured to a number >0 then if the total number of connections from all monitored connectors exceeds this value, then low resources state is entered. -
If the
maxMemoryfield is configured to a number of bytes >0 then if the JVMs total memory minus its idle memory exceeds this value, then low resources state is entered.
Once low resources state is detected, then the monitor will iterate over all existing connections and set their IdleTimeout to its configured lowResourcesIdleTimeout in milliseconds.
This allows the idle time of existing connections to be reduced so that the connection is quickly closed if no further request are received.
If the low resources state persists longer than the time in milliseconds configured for the maxLowResourcesTime field, the the lowResourcesIdleTimeout is repeatedly applied so that new connections as well as existing connections will be limited.
Jetty Development Guide
Embedding
Jetty Embedded HelloWorld
This section provides a tutorial that shows how you can quickly develop embedded code against the Jetty API.
Downloading the Jars
Jetty is decomposed into many jars and dependencies to achieve a minimal footprint by selecting the minimal set of jars.
Typically it is best to use something like Maven to manage jars, however this tutorial uses an aggregate Jar that contains all of the required Jetty classes in one Jar.
You can manually download the aggregate jetty-all.jar using curl or a browser.
|
The central Maven repository has started to aggressively reject/deny access to the repository from the |
|
The |
Use curl as follows:
> mkdir Demo
> cd Demo
> curl -o jetty-all-uber.jar https://repo1.maven.org/maven2/org/eclipse/jetty/aggregate/jetty-all/{VERSION}/jetty-all-{VERSION}-uber.jarWriting a HelloWorld Example
The Embedding Jetty section contains many examples of writing against the Jetty API.
This tutorial uses a simple HelloWorld handler with a main method to run the server.
You can either download or create in an editor the file HelloWorld.java with the following content:
//
// ========================================================================
// Copyright (c) 1995-2022 Mort Bay Consulting Pty Ltd and others.
// ------------------------------------------------------------------------
// All rights reserved. This program and the accompanying materials
// are made available under the terms of the Eclipse Public License v1.0
// and Apache License v2.0 which accompanies this distribution.
//
// The Eclipse Public License is available at
// http://www.eclipse.org/legal/epl-v10.html
//
// The Apache License v2.0 is available at
// http://www.opensource.org/licenses/apache2.0.php
//
// You may elect to redistribute this code under either of these licenses.
// ========================================================================
//
package org.eclipse.jetty.embedded;
import java.io.IOException;
import javax.servlet.ServletException;
import javax.servlet.http.HttpServletRequest;
import javax.servlet.http.HttpServletResponse;
import org.eclipse.jetty.server.Request;
import org.eclipse.jetty.server.Server;
import org.eclipse.jetty.server.handler.AbstractHandler;
public class HelloWorld extends AbstractHandler
{
@Override
public void handle(String target,
Request baseRequest,
HttpServletRequest request,
HttpServletResponse response) throws IOException,
ServletException
{
// Declare response encoding and types
response.setContentType("text/html; charset=utf-8");
// Declare response status code
response.setStatus(HttpServletResponse.SC_OK);
// Write back response
response.getWriter().println("<h1>Hello World</h1>");
// Inform jetty that this request has now been handled
baseRequest.setHandled(true);
}
public static void main(String[] args) throws Exception
{
int port = ExampleUtil.getPort(args, "jetty.http.port", 8080);
Server server = new Server(port);
server.setHandler(new HelloWorld());
server.start();
server.join();
}
}Compiling the HelloWord example
The following command compiles the HelloWorld class:
> mkdir classes
> javac -d classes -cp jetty-all-uber.jar HelloWorld.javaRunning the Handler and Server
The following command runs the HelloWorld example:
> java -cp classes:jetty-all-uber.jar org.eclipse.jetty.embedded.HelloWorldYou can now point your browser at http://localhost:8080 to see your hello world page.
Next Steps
To learn more about Jetty, take these next steps:
-
Follow the examples in Embedding Jetty to better understand the jetty APIs.
-
Explore the complete Jetty javadoc
-
Consider using Jetty and Maven to manage your Jars and dependencies.
Embedding Jetty
Jetty has a slogan, "Don’t deploy your application in Jetty, deploy Jetty in your application!" What this means is that as an alternative to bundling your application as a standard WAR to be deployed in Jetty, Jetty is designed to be a software component that can be instantiated and used in a Java program just like any POJO. Put another way, running Jetty in embedded mode means putting an HTTP module into your application, rather than putting your application into an HTTP server.
This tutorial takes you step-by-step from the simplest Jetty server instantiation to running multiple web applications with standards-based deployment descriptors. The source for most of these examples is part of the standard Jetty project.
Overview
To embed a Jetty server the following steps are typical and are illustrated by the examples in this tutorial:
-
Create a Server instance.
-
Add/Configure Connectors.
-
Start the Server.
-
Wait on the server or do something else with your thread.
Creating the Server
The following code from SimplestServer.java instantiates and runs the simplest possible Jetty server:
//
// ========================================================================
// Copyright (c) 1995-2022 Mort Bay Consulting Pty Ltd and others.
// ------------------------------------------------------------------------
// All rights reserved. This program and the accompanying materials
// are made available under the terms of the Eclipse Public License v1.0
// and Apache License v2.0 which accompanies this distribution.
//
// The Eclipse Public License is available at
// http://www.eclipse.org/legal/epl-v10.html
//
// The Apache License v2.0 is available at
// http://www.opensource.org/licenses/apache2.0.php
//
// You may elect to redistribute this code under either of these licenses.
// ========================================================================
//
package org.eclipse.jetty.embedded;
import org.eclipse.jetty.server.Server;
/**
* The simplest possible Jetty server.
*/
public class SimplestServer
{
public static Server createServer(int port)
{
Server server = new Server(port);
// This has a connector listening on port specified
// and no handlers, meaning all requests will result
// in a 404 response
return server;
}
public static void main(String[] args) throws Exception
{
int port = ExampleUtil.getPort(args, "jetty.http.port", 8080);
Server server = createServer(port);
server.start();
server.join();
}
}This runs an HTTP server on port 8080. It is not a very useful server as it has no handlers, and thus returns a 404 error for every request.
Using Handlers
To produce a response to a request, Jetty requires that you set a Handler on the server. A handler may:
-
Examine/modify the HTTP request.
-
Generate the complete HTTP response.
-
Call another Handler (see
HandlerWrapper). -
Select one or many Handlers to call (see
HandlerCollection).
HelloWorld Handler
The following code based on HelloHandler.java shows a simple hello world handler:
//
// ========================================================================
// Copyright (c) 1995-2022 Mort Bay Consulting Pty Ltd and others.
// ------------------------------------------------------------------------
// All rights reserved. This program and the accompanying materials
// are made available under the terms of the Eclipse Public License v1.0
// and Apache License v2.0 which accompanies this distribution.
//
// The Eclipse Public License is available at
// http://www.eclipse.org/legal/epl-v10.html
//
// The Apache License v2.0 is available at
// http://www.opensource.org/licenses/apache2.0.php
//
// You may elect to redistribute this code under either of these licenses.
// ========================================================================
//
package org.eclipse.jetty.embedded;
import java.io.IOException;
import java.io.PrintWriter;
import javax.servlet.ServletException;
import javax.servlet.http.HttpServletRequest;
import javax.servlet.http.HttpServletResponse;
import org.eclipse.jetty.server.Request;
import org.eclipse.jetty.server.handler.AbstractHandler;
public class HelloHandler extends AbstractHandler
{
final String greeting;
final String body;
public HelloHandler()
{
this("Hello World");
}
public HelloHandler(String greeting)
{
this(greeting, null);
}
public HelloHandler(String greeting, String body)
{
this.greeting = greeting;
this.body = body;
}
@Override
public void handle(String target,
Request baseRequest,
HttpServletRequest request,
HttpServletResponse response) throws IOException,
ServletException
{
response.setContentType("text/html; charset=utf-8");
response.setStatus(HttpServletResponse.SC_OK);
PrintWriter out = response.getWriter();
out.println("<h1>" + greeting + "</h1>");
if (body != null)
{
out.println(body);
}
baseRequest.setHandled(true);
}
}The parameters passed to the handle method are:
-
target– the target of the request, which is either a URI or a name from a named dispatcher. -
baseRequest– the Jetty mutable request object, which is always unwrapped. -
request– the immutable request object, which may have been wrapped by a filter or servlet. -
response– the response, which may have been wrapped by a filter or servlet.
The handler sets the response status, content-type, and marks the request as handled before it generates the body of the response using a writer.
Running HelloWorldHandler
To allow a Handler to handle HTTP requests, you must add it to a Server instance. The following code from OneHandler.java shows how a Jetty server can use the HelloWorld handler:
//
// ========================================================================
// Copyright (c) 1995-2022 Mort Bay Consulting Pty Ltd and others.
// ------------------------------------------------------------------------
// All rights reserved. This program and the accompanying materials
// are made available under the terms of the Eclipse Public License v1.0
// and Apache License v2.0 which accompanies this distribution.
//
// The Eclipse Public License is available at
// http://www.eclipse.org/legal/epl-v10.html
//
// The Apache License v2.0 is available at
// http://www.opensource.org/licenses/apache2.0.php
//
// You may elect to redistribute this code under either of these licenses.
// ========================================================================
//
package org.eclipse.jetty.embedded;
import org.eclipse.jetty.server.Server;
public class OneHandler
{
public static Server createServer(int port)
{
Server server = new Server(port);
server.setHandler(new HelloHandler());
return server;
}
public static void main(String[] args) throws Exception
{
int port = ExampleUtil.getPort(args, "jetty.http.port", 8080);
Server server = createServer(port);
server.start();
server.join();
}
}One or more handlers do all request handling in Jetty.
Some handlers select other specific handlers (for example, a ContextHandlerCollection uses the context path to select a ContextHandler); others use application logic to generate a response (for example, the ServletHandler passes the request to an application Servlet), while others do tasks unrelated to generating the response (for example, RequestLogHandler or StatisticsHandler).
Later sections describe how you can combine handlers like aspects. You can see some of the handlers available in Jetty in the org.eclipse.jetty.server.handler package.
Handler Collections and Wrappers
Complex request handling is typically built from multiple Handlers that you can combine in various ways.
Jetty has several implementations of the HandlerContainer interface:
HandlerCollection-
Holds a collection of other handlers and calls each handler in order. This is useful for combining statistics and logging handlers with the handler that generates the response.
HandlerList-
A Handler Collection that calls each handler in turn until either an exception is thrown, the response is committed or the
request.isHandled()returns true. You can use it to combine handlers that conditionally handle a request, such as calling multiple contexts until one matches a virtual host. HandlerWrapper-
A Handler base class that you can use to daisy chain handlers together in the style of aspect-oriented programming. For example, a standard web application is implemented by a chain of a context, session, security and servlet handlers.
ContextHandlerCollection-
A specialized
HandlerCollectionthat uses the longest prefix of the request URI (thecontextPath) to select a containedContextHandlerto handle the request.
Scoped Handlers
Much of the standard Servlet container in Jetty is implemented with HandlerWrappers that daisy chain handlers together: ContextHandler to SessionHandler to SecurityHandler to ServletHandler.
However, because of the nature of the servlet specification, this chaining cannot be a pure nesting of handlers as the outer handlers sometimes need information that the inner handlers process.
For example, when a ContextHandler calls some application listeners to inform them of a request entering the context, it must already know which servlet the ServletHandler will dispatch the request to so that the servletPath method returns the correct value.
The HandlerWrapper is specialized to the ScopedHandler abstract class, which supports a daisy chain of scopes.
For example if a ServletHandler is nested within a ContextHandler, the order and nesting of execution of methods is:
Server.handle(...)
ContextHandler.doScope(...)
ServletHandler.doScope(...)
ContextHandler.doHandle(...)
ServletHandler.doHandle(...)
SomeServlet.service(...)
Thus when the ContextHandler handles the request, it does so within the scope the ServletHandler has established.
Resource Handler
The FileServer example shows how you can use a ResourceHandler to serve static content from the current working directory:
//
// ========================================================================
// Copyright (c) 1995-2022 Mort Bay Consulting Pty Ltd and others.
// ------------------------------------------------------------------------
// All rights reserved. This program and the accompanying materials
// are made available under the terms of the Eclipse Public License v1.0
// and Apache License v2.0 which accompanies this distribution.
//
// The Eclipse Public License is available at
// http://www.eclipse.org/legal/epl-v10.html
//
// The Apache License v2.0 is available at
// http://www.opensource.org/licenses/apache2.0.php
//
// You may elect to redistribute this code under either of these licenses.
// ========================================================================
//
package org.eclipse.jetty.embedded;
import java.nio.file.Path;
import java.nio.file.Paths;
import org.eclipse.jetty.server.Handler;
import org.eclipse.jetty.server.Server;
import org.eclipse.jetty.server.handler.DefaultHandler;
import org.eclipse.jetty.server.handler.HandlerList;
import org.eclipse.jetty.server.handler.ResourceHandler;
import org.eclipse.jetty.util.resource.PathResource;
import org.eclipse.jetty.util.resource.Resource;
/**
* Simple Jetty FileServer.
* This is a simple example of Jetty configured as a FileServer.
*/
public class FileServer
{
public static Server createServer(int port, Resource baseResource) throws Exception
{
// Create a basic Jetty server object that will listen on port 8080. Note that if you set this to port 0
// then a randomly available port will be assigned that you can either look in the logs for the port,
// or programmatically obtain it for use in test cases.
Server server = new Server(port);
// Create the ResourceHandler. It is the object that will actually handle the request for a given file. It is
// a Jetty Handler object so it is suitable for chaining with other handlers as you will see in other examples.
ResourceHandler resourceHandler = new ResourceHandler();
// Configure the ResourceHandler. Setting the resource base indicates where the files should be served out of.
// In this example it is the current directory but it can be configured to anything that the jvm has access to.
resourceHandler.setDirectoriesListed(true);
resourceHandler.setWelcomeFiles(new String[]{"index.html"});
resourceHandler.setBaseResource(baseResource);
// Add the ResourceHandler to the server.
HandlerList handlers = new HandlerList();
handlers.setHandlers(new Handler[]{resourceHandler, new DefaultHandler()});
server.setHandler(handlers);
return server;
}
public static void main(String[] args) throws Exception
{
int port = ExampleUtil.getPort(args, "jetty.http.port", 8080);
Path userDir = Paths.get(System.getProperty("user.dir"));
PathResource pathResource = new PathResource(userDir);
Server server = createServer(port, pathResource);
// Start things up! By using the server.join() the server thread will join with the current thread.
// See "http://docs.oracle.com/javase/1.5.0/docs/api/java/lang/Thread.html#join()" for more details.
server.start();
server.join();
}
}Notice that a HandlerList is used with the ResourceHandler and a DefaultHandler, so that the DefaultHandler generates a good 404 response for any requests that do not match a static resource.
Embedding Connectors
In the previous examples, the Server instance is passed a port number and it internally creates a default instance of a Connector that listens for requests on that port. However, often when embedding Jetty it is desirable to explicitly instantiate and configure one or more Connectors for a Server instance.
One Connector
The following example, OneConnector.java, instantiates, configures, and adds a single HTTP connector instance to the server:
//
// ========================================================================
// Copyright (c) 1995-2022 Mort Bay Consulting Pty Ltd and others.
// ------------------------------------------------------------------------
// All rights reserved. This program and the accompanying materials
// are made available under the terms of the Eclipse Public License v1.0
// and Apache License v2.0 which accompanies this distribution.
//
// The Eclipse Public License is available at
// http://www.eclipse.org/legal/epl-v10.html
//
// The Apache License v2.0 is available at
// http://www.opensource.org/licenses/apache2.0.php
//
// You may elect to redistribute this code under either of these licenses.
// ========================================================================
//
package org.eclipse.jetty.embedded;
import org.eclipse.jetty.server.Server;
import org.eclipse.jetty.server.ServerConnector;
/**
* A Jetty server with one connectors.
*/
public class OneConnector
{
public static Server createServer(int port) throws Exception
{
// The Server
Server server = new Server();
// HTTP connector
ServerConnector http = new ServerConnector(server);
http.setHost("localhost");
http.setPort(port);
http.setIdleTimeout(30000);
// Set the connector
server.addConnector(http);
// Set a handler
server.setHandler(new HelloHandler());
return server;
}
public static void main(String[] args) throws Exception
{
int port = ExampleUtil.getPort(args, "jetty.http.port", 8080);
Server server = createServer(port);
// Start the server
server.start();
server.join();
}
}In this example the connector handles the HTTP protocol, as that is the default for the ServerConnector class.
Many Connectors
When configuring multiple connectors (for example, HTTP and HTTPS), it may be desirable to share configuration of common parameters for HTTP.
To achieve this you need to explicitly configure the ServerConnector class with ConnectionFactory instances, and provide them with common HTTP configuration.
The ManyConnectors example, configures a server with two ServerConnector instances: the http connector has a HTTPConnectionFactory instance; the https connector has a SslConnectionFactory chained to a HttpConnectionFactory.
Both HttpConnectionFactory are configured based on the same HttpConfiguration instance, however the HTTPS factory uses a wrapped configuration so that a SecureRequestCustomizer can be added.
Embedding Servlets
Servlets are the standard way to provide application logic that handles HTTP requests.
Servlets are similar to a Jetty Handler except that the request object is not mutable and thus cannot be modified.
Servlets are handled in Jetty by a ServletHandler.
It uses standard path mappings to match a Servlet to a request; sets the requests servletPath and pathInfo; passes the request to the servlet, possibly via Filters to produce a response.
The MinimalServlets example creates a ServletHandler instance and configures a single HelloServlet:
//
// ========================================================================
// Copyright (c) 1995-2022 Mort Bay Consulting Pty Ltd and others.
// ------------------------------------------------------------------------
// All rights reserved. This program and the accompanying materials
// are made available under the terms of the Eclipse Public License v1.0
// and Apache License v2.0 which accompanies this distribution.
//
// The Eclipse Public License is available at
// http://www.eclipse.org/legal/epl-v10.html
//
// The Apache License v2.0 is available at
// http://www.opensource.org/licenses/apache2.0.php
//
// You may elect to redistribute this code under either of these licenses.
// ========================================================================
//
package org.eclipse.jetty.embedded;
import java.io.IOException;
import javax.servlet.http.HttpServlet;
import javax.servlet.http.HttpServletRequest;
import javax.servlet.http.HttpServletResponse;
import org.eclipse.jetty.server.Server;
import org.eclipse.jetty.servlet.ServletHandler;
public class MinimalServlets
{
public static Server createServer(int port)
{
// Note that if you set this to port 0 then a randomly available port
// will be assigned that you can either look in the logs for the port,
// or programmatically obtain it for use in test cases.
Server server = new Server(port);
// The ServletHandler is a dead simple way to create a context handler
// that is backed by an instance of a Servlet.
// This handler then needs to be registered with the Server object.
ServletHandler handler = new ServletHandler();
server.setHandler(handler);
// Passing in the class for the Servlet allows jetty to instantiate an
// instance of that Servlet and mount it on a given context path.
// IMPORTANT:
// This is a raw Servlet, not a Servlet that has been configured
// through a web.xml @WebServlet annotation, or anything similar.
handler.addServletWithMapping(HelloServlet.class, "/*");
return server;
}
public static void main(String[] args) throws Exception
{
// Create a basic jetty server object that will listen on port 8080.
int port = ExampleUtil.getPort(args, "jetty.http.port", 8080);
Server server = createServer(port);
// Start things up!
server.start();
// The use of server.join() the will make the current thread join and
// wait until the server thread is done executing.
server.join();
}
@SuppressWarnings("serial")
public static class HelloServlet extends HttpServlet
{
@Override
protected void doGet(HttpServletRequest request,
HttpServletResponse response) throws IOException
{
response.setStatus(HttpServletResponse.SC_OK);
response.setContentType("text/html");
response.setCharacterEncoding("utf-8");
response.getWriter().println("<h1>Hello from HelloServlet</h1>");
}
}
}Embedding Contexts
A ContextHandler is a ScopedHandler that responds only to requests that have a URI prefix that matches the configured context path.
Requests that match the context path have their path methods updated accordingly and the contexts scope is available, which optionally may include:
-
A
Classloaderthat is set as the Thread contextclassloaderwhile request handling is in scope. -
A set of attributes that is available via the
ServletContextAPI. -
A set of init parameters that is available via the
ServletContextAPI. -
A base Resource which is used as the document root for static resource requests via the
ServletContextAPI. -
A set of virtual host names.
The following OneContext example shows a context being established that wraps the HelloHandler:
//
// ========================================================================
// Copyright (c) 1995-2022 Mort Bay Consulting Pty Ltd and others.
// ------------------------------------------------------------------------
// All rights reserved. This program and the accompanying materials
// are made available under the terms of the Eclipse Public License v1.0
// and Apache License v2.0 which accompanies this distribution.
//
// The Eclipse Public License is available at
// http://www.eclipse.org/legal/epl-v10.html
//
// The Apache License v2.0 is available at
// http://www.opensource.org/licenses/apache2.0.php
//
// You may elect to redistribute this code under either of these licenses.
// ========================================================================
//
package org.eclipse.jetty.embedded;
import org.eclipse.jetty.server.Server;
import org.eclipse.jetty.server.handler.ContextHandler;
public class OneContext
{
public static Server createServer(int port)
{
Server server = new Server(port);
// Add a single handler on context "/hello"
ContextHandler context = new ContextHandler();
context.setContextPath("/hello");
context.setHandler(new HelloHandler());
// Can be accessed using http://localhost:8080/hello
server.setHandler(context);
return server;
}
public static void main(String[] args) throws Exception
{
int port = ExampleUtil.getPort(args, "jetty.http.port", 8080);
Server server = createServer(port);
// Start the server
server.start();
server.join();
}
}When many contexts are present, you can embed a ContextHandlerCollection to efficiently examine a request URI to then select the matching ContextHandler(s) for the request.
The ManyContexts example shows how many such contexts you can configure:
//
// ========================================================================
// Copyright (c) 1995-2022 Mort Bay Consulting Pty Ltd and others.
// ------------------------------------------------------------------------
// All rights reserved. This program and the accompanying materials
// are made available under the terms of the Eclipse Public License v1.0
// and Apache License v2.0 which accompanies this distribution.
//
// The Eclipse Public License is available at
// http://www.eclipse.org/legal/epl-v10.html
//
// The Apache License v2.0 is available at
// http://www.opensource.org/licenses/apache2.0.php
//
// You may elect to redistribute this code under either of these licenses.
// ========================================================================
//
package org.eclipse.jetty.embedded;
import org.eclipse.jetty.server.Server;
import org.eclipse.jetty.server.handler.ContextHandler;
import org.eclipse.jetty.server.handler.ContextHandlerCollection;
public class ManyContexts
{
public static Server createServer(int port)
{
Server server = new Server(port);
ContextHandler context = new ContextHandler("/");
context.setContextPath("/");
context.setHandler(new HelloHandler("Root Hello"));
ContextHandler contextFR = new ContextHandler("/fr");
contextFR.setHandler(new HelloHandler("Bonjour"));
ContextHandler contextIT = new ContextHandler("/it");
contextIT.setHandler(new HelloHandler("Buongiorno"));
ContextHandler contextV = new ContextHandler("/");
contextV.setVirtualHosts(new String[]{"127.0.0.2"});
contextV.setHandler(new HelloHandler("Virtual Hello"));
ContextHandlerCollection contexts = new ContextHandlerCollection(
context, contextFR, contextIT, contextV
);
server.setHandler(contexts);
return server;
}
public static void main(String[] args) throws Exception
{
int port = ExampleUtil.getPort(args, "jetty.http.port", 8080);
Server server = createServer(port);
server.start();
server.dumpStdErr();
server.join();
}
}Embedding ServletContexts
A ServletContextHandler is a specialization of ContextHandler with support for standard sessions and Servlets.
The following OneServletContext example instantiates a DefaultServlet to server static content from /tmp/ and a DumpServlet that creates a session and dumps basic details about the request:
//
// ========================================================================
// Copyright (c) 1995-2022 Mort Bay Consulting Pty Ltd and others.
// ------------------------------------------------------------------------
// All rights reserved. This program and the accompanying materials
// are made available under the terms of the Eclipse Public License v1.0
// and Apache License v2.0 which accompanies this distribution.
//
// The Eclipse Public License is available at
// http://www.eclipse.org/legal/epl-v10.html
//
// The Apache License v2.0 is available at
// http://www.opensource.org/licenses/apache2.0.php
//
// You may elect to redistribute this code under either of these licenses.
// ========================================================================
//
package org.eclipse.jetty.embedded;
import java.io.IOException;
import java.nio.file.Path;
import java.nio.file.Paths;
import java.util.EnumSet;
import javax.servlet.Filter;
import javax.servlet.FilterChain;
import javax.servlet.FilterConfig;
import javax.servlet.ServletContextEvent;
import javax.servlet.ServletContextListener;
import javax.servlet.ServletException;
import javax.servlet.ServletRequest;
import javax.servlet.ServletRequestEvent;
import javax.servlet.ServletRequestListener;
import javax.servlet.ServletResponse;
import javax.servlet.http.HttpServletResponse;
import org.eclipse.jetty.server.Server;
import org.eclipse.jetty.servlet.DefaultServlet;
import org.eclipse.jetty.servlet.ListenerHolder;
import org.eclipse.jetty.servlet.ServletContextHandler;
import org.eclipse.jetty.servlet.ServletHolder;
import org.eclipse.jetty.util.resource.PathResource;
import org.eclipse.jetty.util.resource.Resource;
import static javax.servlet.DispatcherType.ASYNC;
import static javax.servlet.DispatcherType.REQUEST;
public class OneServletContext
{
public static Server createServer(int port, Resource baseResource)
{
Server server = new Server(port);
ServletContextHandler context = new ServletContextHandler(ServletContextHandler.SESSIONS);
context.setContextPath("/");
context.setBaseResource(baseResource);
server.setHandler(context);
// add hello servlet
context.addServlet(HelloServlet.class, "/hello/*");
// Add dump servlet on multiple url-patterns
ServletHolder debugHolder = new ServletHolder("debug", DumpServlet.class);
context.addServlet(debugHolder, "/dump/*");
context.addServlet(debugHolder, "*.dump");
// add default servlet (for error handling and static resources)
context.addServlet(DefaultServlet.class, "/");
// sprinkle in a few filters to demonstrate behaviors
context.addFilter(TestFilter.class, "/test/*", EnumSet.of(REQUEST));
context.addFilter(TestFilter.class, "*.test", EnumSet.of(REQUEST, ASYNC));
// and a few listeners to show other ways of working with servlets
context.getServletHandler().addListener(new ListenerHolder(InitListener.class));
context.getServletHandler().addListener(new ListenerHolder(RequestListener.class));
return server;
}
public static void main(String[] args) throws Exception
{
int port = ExampleUtil.getPort(args, "jetty.http.port", 8080);
Path tempDir = Paths.get(System.getProperty("java.io.tmpdir"));
Server server = createServer(port, new PathResource(tempDir));
server.start();
server.dumpStdErr();
server.join();
}
public static class TestFilter implements Filter
{
@Override
public void init(FilterConfig filterConfig)
{
}
@Override
public void doFilter(ServletRequest request, ServletResponse response, FilterChain chain) throws IOException, ServletException
{
if (response instanceof HttpServletResponse)
{
HttpServletResponse httpServletResponse = (HttpServletResponse)response;
httpServletResponse.setHeader("X-TestFilter", "true");
}
chain.doFilter(request, response);
}
@Override
public void destroy()
{
}
}
public static class InitListener implements ServletContextListener
{
@Override
public void contextInitialized(ServletContextEvent sce)
{
sce.getServletContext().setAttribute("X-Init", "true");
}
@Override
public void contextDestroyed(ServletContextEvent sce)
{
}
}
public static class RequestListener implements ServletRequestListener
{
@Override
public void requestInitialized(ServletRequestEvent sre)
{
sre.getServletRequest().setAttribute("X-ReqListener", "true");
}
@Override
public void requestDestroyed(ServletRequestEvent sre)
{
}
}
}Embedding Web Applications
A WebAppContext is an extension of a ServletContextHandler that uses the standard layout and web.xml to configure the servlets, filters and other features from a web.xml and/or annotations.
The following OneWebApp example configures the Jetty test webapp.
Web applications can use resources the container provides, and in this case a LoginService is needed and also configured:
//
// ========================================================================
// Copyright (c) 1995-2022 Mort Bay Consulting Pty Ltd and others.
// ------------------------------------------------------------------------
// All rights reserved. This program and the accompanying materials
// are made available under the terms of the Eclipse Public License v1.0
// and Apache License v2.0 which accompanies this distribution.
//
// The Eclipse Public License is available at
// http://www.eclipse.org/legal/epl-v10.html
//
// The Apache License v2.0 is available at
// http://www.opensource.org/licenses/apache2.0.php
//
// You may elect to redistribute this code under either of these licenses.
// ========================================================================
//
package org.eclipse.jetty.embedded;
import java.io.File;
import org.eclipse.jetty.server.Server;
import org.eclipse.jetty.webapp.WebAppContext;
public class OneWebApp
{
public static Server createServer(int port)
{
// Create a basic jetty server object that will listen on port 8080.
// Note that if you set this to port 0 then a randomly available port
// will be assigned that you can either look in the logs for the port,
// or programmatically obtain it for use in test cases.
Server server = new Server(port);
// The WebAppContext is the entity that controls the environment in
// which a web application lives and breathes. In this example the
// context path is being set to "/" so it is suitable for serving root
// context requests and then we see it setting the location of the war.
// A whole host of other configurations are available, ranging from
// configuring to support annotation scanning in the webapp (through
// PlusConfiguration) to choosing where the webapp will unpack itself.
WebAppContext webapp = new WebAppContext();
webapp.setContextPath("/");
File warFile = JettyDistribution.resolve("demo-base/webapps/async-rest.war").toFile();
webapp.setWar(warFile.getAbsolutePath());
// A WebAppContext is a ContextHandler as well so it needs to be set to
// the server so it is aware of where to send the appropriate requests.
server.setHandler(webapp);
return server;
}
public static void main(String[] args) throws Exception
{
int port = ExampleUtil.getPort(args, "jetty.http.port", 8080);
Server server = createServer(port);
// Start things up!
server.start();
server.dumpStdErr();
// The use of server.join() the will make the current thread join and
// wait until the server is done executing.
server.join();
}
}Like Jetty XML
The typical way to configure an instance of the Jetty server is via jetty.xml and associated configuration files.
However the Jetty XML configuration format is just a simple rendering of what you can do in code; it is very simple to write embedded code that does precisely what the jetty.xml configuration does.
The LikeJettyXml example following renders in code the behavior obtained from the configuration files:
//
// ========================================================================
// Copyright (c) 1995-2022 Mort Bay Consulting Pty Ltd and others.
// ------------------------------------------------------------------------
// All rights reserved. This program and the accompanying materials
// are made available under the terms of the Eclipse Public License v1.0
// and Apache License v2.0 which accompanies this distribution.
//
// The Eclipse Public License is available at
// http://www.eclipse.org/legal/epl-v10.html
//
// The Apache License v2.0 is available at
// http://www.opensource.org/licenses/apache2.0.php
//
// You may elect to redistribute this code under either of these licenses.
// ========================================================================
//
package org.eclipse.jetty.embedded;
import java.io.FileNotFoundException;
import java.lang.management.ManagementFactory;
import java.nio.file.Files;
import java.nio.file.Path;
import java.nio.file.Paths;
import org.eclipse.jetty.deploy.DeploymentManager;
import org.eclipse.jetty.deploy.PropertiesConfigurationManager;
import org.eclipse.jetty.deploy.bindings.DebugListenerBinding;
import org.eclipse.jetty.deploy.providers.WebAppProvider;
import org.eclipse.jetty.http.HttpVersion;
import org.eclipse.jetty.io.ConnectionStatistics;
import org.eclipse.jetty.jmx.MBeanContainer;
import org.eclipse.jetty.rewrite.handler.MsieSslRule;
import org.eclipse.jetty.rewrite.handler.RewriteHandler;
import org.eclipse.jetty.rewrite.handler.ValidUrlRule;
import org.eclipse.jetty.security.HashLoginService;
import org.eclipse.jetty.server.AsyncRequestLogWriter;
import org.eclipse.jetty.server.CustomRequestLog;
import org.eclipse.jetty.server.DebugListener;
import org.eclipse.jetty.server.Handler;
import org.eclipse.jetty.server.HttpConfiguration;
import org.eclipse.jetty.server.HttpConnectionFactory;
import org.eclipse.jetty.server.LowResourceMonitor;
import org.eclipse.jetty.server.SecureRequestCustomizer;
import org.eclipse.jetty.server.Server;
import org.eclipse.jetty.server.ServerConnector;
import org.eclipse.jetty.server.SslConnectionFactory;
import org.eclipse.jetty.server.handler.ContextHandlerCollection;
import org.eclipse.jetty.server.handler.DefaultHandler;
import org.eclipse.jetty.server.handler.HandlerCollection;
import org.eclipse.jetty.server.handler.StatisticsHandler;
import org.eclipse.jetty.util.ssl.SslContextFactory;
import org.eclipse.jetty.util.thread.QueuedThreadPool;
import org.eclipse.jetty.util.thread.ScheduledExecutorScheduler;
import org.eclipse.jetty.webapp.Configuration;
/**
* Starts the Jetty Distribution's demo-base directory using entirely
* embedded jetty techniques.
*/
public class LikeJettyXml
{
public static Server createServer(int port, int securePort, boolean addDebugListener) throws Exception
{
// Path to as-built jetty-distribution directory
Path jettyHomeBuild = JettyDistribution.get();
// Find jetty home and base directories
String homePath = System.getProperty("jetty.home", jettyHomeBuild.toString());
Path homeDir = Paths.get(homePath);
String basePath = System.getProperty("jetty.base", homeDir.resolve("demo-base").toString());
Path baseDir = Paths.get(basePath);
// Configure jetty.home and jetty.base system properties
String jettyHome = homeDir.toAbsolutePath().toString();
String jettyBase = baseDir.toAbsolutePath().toString();
System.setProperty("jetty.home", jettyHome);
System.setProperty("jetty.base", jettyBase);
// === jetty.xml ===
// Setup Threadpool
QueuedThreadPool threadPool = new QueuedThreadPool();
threadPool.setMaxThreads(500);
// Server
Server server = new Server(threadPool);
// Scheduler
server.addBean(new ScheduledExecutorScheduler(null, false));
// HTTP Configuration
HttpConfiguration httpConfig = new HttpConfiguration();
httpConfig.setSecureScheme("https");
httpConfig.setSecurePort(securePort);
httpConfig.setOutputBufferSize(32768);
httpConfig.setRequestHeaderSize(8192);
httpConfig.setResponseHeaderSize(8192);
httpConfig.setSendServerVersion(true);
httpConfig.setSendDateHeader(false);
// httpConfig.addCustomizer(new ForwardedRequestCustomizer());
// Handler Structure
HandlerCollection handlers = new HandlerCollection();
ContextHandlerCollection contexts = new ContextHandlerCollection();
handlers.setHandlers(new Handler[]{contexts, new DefaultHandler()});
server.setHandler(handlers);
// === jetty-jmx.xml ===
MBeanContainer mbContainer = new MBeanContainer(
ManagementFactory.getPlatformMBeanServer());
server.addBean(mbContainer);
// === jetty-http.xml ===
ServerConnector http = new ServerConnector(server,
new HttpConnectionFactory(httpConfig));
http.setPort(port);
http.setIdleTimeout(30000);
server.addConnector(http);
// === jetty-https.xml ===
// SSL Context Factory
Path keystorePath = Paths.get("src/main/resources/etc/keystore").toAbsolutePath();
if (!Files.exists(keystorePath))
throw new FileNotFoundException(keystorePath.toString());
SslContextFactory sslContextFactory = new SslContextFactory.Server();
sslContextFactory.setKeyStorePath(keystorePath.toString());
sslContextFactory.setKeyStorePassword("OBF:1vny1zlo1x8e1vnw1vn61x8g1zlu1vn4");
sslContextFactory.setKeyManagerPassword("OBF:1u2u1wml1z7s1z7a1wnl1u2g");
sslContextFactory.setTrustStorePath(keystorePath.toString());
sslContextFactory.setTrustStorePassword("OBF:1vny1zlo1x8e1vnw1vn61x8g1zlu1vn4");
// SSL HTTP Configuration
HttpConfiguration httpsConfig = new HttpConfiguration(httpConfig);
httpsConfig.addCustomizer(new SecureRequestCustomizer());
// SSL Connector
ServerConnector sslConnector = new ServerConnector(server,
new SslConnectionFactory(sslContextFactory, HttpVersion.HTTP_1_1.asString()),
new HttpConnectionFactory(httpsConfig));
sslConnector.setPort(securePort);
server.addConnector(sslConnector);
// === jetty-deploy.xml ===
DeploymentManager deployer = new DeploymentManager();
if (addDebugListener)
{
DebugListener debug = new DebugListener(System.err, true, true, true);
server.addBean(debug);
deployer.addLifeCycleBinding(new DebugListenerBinding(debug));
}
deployer.setContexts(contexts);
deployer.setContextAttribute(
"org.eclipse.jetty.server.webapp.ContainerIncludeJarPattern",
".*/[^/]*servlet-api-[^/]*\\.jar$|.*/javax.servlet.jsp.jstl-.*\\.jar$|.*/[^/]*taglibs.*\\.jar$");
WebAppProvider webAppProvider = new WebAppProvider();
webAppProvider.setMonitoredDirName(jettyBase + "/webapps");
webAppProvider.setDefaultsDescriptor(jettyHome + "/etc/webdefault.xml");
webAppProvider.setScanInterval(1);
webAppProvider.setExtractWars(true);
webAppProvider.setConfigurationManager(new PropertiesConfigurationManager());
deployer.addAppProvider(webAppProvider);
server.addBean(deployer);
// === setup jetty plus ==
Configuration.ClassList classlist = Configuration.ClassList
.setServerDefault(server);
classlist.addAfter(
"org.eclipse.jetty.webapp.FragmentConfiguration",
"org.eclipse.jetty.plus.webapp.EnvConfiguration",
"org.eclipse.jetty.plus.webapp.PlusConfiguration");
classlist.addBefore("org.eclipse.jetty.webapp.JettyWebXmlConfiguration",
"org.eclipse.jetty.annotations.AnnotationConfiguration");
// === jetty-stats.xml ===
StatisticsHandler stats = new StatisticsHandler();
stats.setHandler(server.getHandler());
server.setHandler(stats);
server.addBeanToAllConnectors(new ConnectionStatistics());
// === Rewrite Handler
RewriteHandler rewrite = new RewriteHandler();
rewrite.setHandler(server.getHandler());
server.setHandler(rewrite);
rewrite.addRule(new MsieSslRule());
rewrite.addRule(new ValidUrlRule());
// === jetty-requestlog.xml ===
AsyncRequestLogWriter logWriter = new AsyncRequestLogWriter(jettyHome + "/logs/yyyy_mm_dd.request.log");
CustomRequestLog requestLog = new CustomRequestLog(logWriter, CustomRequestLog.EXTENDED_NCSA_FORMAT + " \"%C\"");
logWriter.setFilenameDateFormat("yyyy_MM_dd");
logWriter.setRetainDays(90);
logWriter.setTimeZone("GMT");
server.setRequestLog(requestLog);
// === jetty-lowresources.xml ===
LowResourceMonitor lowResourcesMonitor = new LowResourceMonitor(server);
lowResourcesMonitor.setPeriod(1000);
lowResourcesMonitor.setLowResourcesIdleTimeout(200);
lowResourcesMonitor.setMonitorThreads(true);
lowResourcesMonitor.setMaxMemory(0);
lowResourcesMonitor.setMaxLowResourcesTime(5000);
server.addBean(lowResourcesMonitor);
// === test-realm.xml ===
HashLoginService login = new HashLoginService();
login.setName("Test Realm");
login.setConfig(jettyBase + "/etc/realm.properties");
login.setHotReload(false);
server.addBean(login);
return server;
}
public static void main(String[] args) throws Exception
{
int port = ExampleUtil.getPort(args, "jetty.http.port", 8080);
int securePort = ExampleUtil.getPort(args, "jetty.https.port", 8443);
Server server = createServer(port, securePort, true);
// Extra options
server.setDumpAfterStart(true);
server.setDumpBeforeStop(false);
server.setStopAtShutdown(true);
// Start the server
server.start();
server.join();
}
}Embedded Examples
Jetty has a rich history of being embedded into a wide variety of applications. In this section we will walk you through a number of our simple examples under our embedded-jetty-examples project in our git repository.
|
These files are pulled directly from our git repository when this document is generated. If the line numbers do not line up feel free to fix this documentation in github and give us a pull request, or at least open an issue to notify us of the discrepancy. |
Simple File Server
This example shows how to create a simple file server in Jetty.
It is perfectly suitable for test cases where you need an actual web server to obtain a file from, it could easily be configured to serve files from a directory under src/test/resources.
Note that this does not have any logic for caching of files, either within the server or setting the appropriate headers on the response.
It is simply a few lines that illustrate how easy it is to serve out some files.
//
// ========================================================================
// Copyright (c) 1995-2022 Mort Bay Consulting Pty Ltd and others.
// ------------------------------------------------------------------------
// All rights reserved. This program and the accompanying materials
// are made available under the terms of the Eclipse Public License v1.0
// and Apache License v2.0 which accompanies this distribution.
//
// The Eclipse Public License is available at
// http://www.eclipse.org/legal/epl-v10.html
//
// The Apache License v2.0 is available at
// http://www.opensource.org/licenses/apache2.0.php
//
// You may elect to redistribute this code under either of these licenses.
// ========================================================================
//
package org.eclipse.jetty.embedded;
import java.nio.file.Path;
import java.nio.file.Paths;
import org.eclipse.jetty.server.Handler;
import org.eclipse.jetty.server.Server;
import org.eclipse.jetty.server.handler.DefaultHandler;
import org.eclipse.jetty.server.handler.HandlerList;
import org.eclipse.jetty.server.handler.ResourceHandler;
import org.eclipse.jetty.util.resource.PathResource;
import org.eclipse.jetty.util.resource.Resource;
/**
* Simple Jetty FileServer.
* This is a simple example of Jetty configured as a FileServer.
*/
public class FileServer
{
public static Server createServer(int port, Resource baseResource) throws Exception
{
// Create a basic Jetty server object that will listen on port 8080. Note that if you set this to port 0
// then a randomly available port will be assigned that you can either look in the logs for the port,
// or programmatically obtain it for use in test cases.
Server server = new Server(port);
// Create the ResourceHandler. It is the object that will actually handle the request for a given file. It is
// a Jetty Handler object so it is suitable for chaining with other handlers as you will see in other examples.
ResourceHandler resourceHandler = new ResourceHandler();
// Configure the ResourceHandler. Setting the resource base indicates where the files should be served out of.
// In this example it is the current directory but it can be configured to anything that the jvm has access to.
resourceHandler.setDirectoriesListed(true);
resourceHandler.setWelcomeFiles(new String[]{"index.html"});
resourceHandler.setBaseResource(baseResource);
// Add the ResourceHandler to the server.
HandlerList handlers = new HandlerList();
handlers.setHandlers(new Handler[]{resourceHandler, new DefaultHandler()});
server.setHandler(handlers);
return server;
}
public static void main(String[] args) throws Exception
{
int port = ExampleUtil.getPort(args, "jetty.http.port", 8080);
Path userDir = Paths.get(System.getProperty("user.dir"));
PathResource pathResource = new PathResource(userDir);
Server server = createServer(port, pathResource);
// Start things up! By using the server.join() the server thread will join with the current thread.
// See "http://docs.oracle.com/javase/1.5.0/docs/api/java/lang/Thread.html#join()" for more details.
server.start();
server.join();
}
}Run it!
After you have started things up you should be able to navigate to http://localhost:8080/index.html (assuming one is in the resource base directory) and you are good to go.
Maven Coordinates
To use this example in your project you will need the following Maven dependencies declared.
<dependency>
<groupId>org.eclipse.jetty</groupId>
<artifactId>jetty-server</artifactId>
<version>${project.version}</version>
</dependency>Split File Server
This example builds on the Simple File Server to show how chaining multiple ResourceHandlers together can let you aggregate multiple directories to serve content on a single path and how you can link these together with ContextHandlers.
//
// ========================================================================
// Copyright (c) 1995-2022 Mort Bay Consulting Pty Ltd and others.
// ------------------------------------------------------------------------
// All rights reserved. This program and the accompanying materials
// are made available under the terms of the Eclipse Public License v1.0
// and Apache License v2.0 which accompanies this distribution.
//
// The Eclipse Public License is available at
// http://www.eclipse.org/legal/epl-v10.html
//
// The Apache License v2.0 is available at
// http://www.opensource.org/licenses/apache2.0.php
//
// You may elect to redistribute this code under either of these licenses.
// ========================================================================
//
package org.eclipse.jetty.embedded;
import java.nio.file.Paths;
import org.eclipse.jetty.server.Server;
import org.eclipse.jetty.server.ServerConnector;
import org.eclipse.jetty.server.handler.ContextHandler;
import org.eclipse.jetty.server.handler.ContextHandlerCollection;
import org.eclipse.jetty.server.handler.ResourceHandler;
import org.eclipse.jetty.util.resource.PathResource;
import org.eclipse.jetty.util.resource.Resource;
/**
* A {@link ContextHandlerCollection} handler may be used to direct a request to
* a specific Context. The URI path prefix and optional virtual host is used to
* select the context.
*/
public class SplitFileServer
{
public static Server createServer(int port, Resource baseResource0, Resource baseResource1)
{
// Create the Server object and a corresponding ServerConnector and then
// set the port for the connector. In this example the server will
// listen on port 8080. If you set this to port 0 then when the server
// has been started you can called connector.getLocalPort() to
// programmatically get the port the server started on.
Server server = new Server();
ServerConnector connector = new ServerConnector(server);
connector.setPort(port);
server.addConnector(connector);
// Create a Context Handler and ResourceHandler. The ContextHandler is
// getting set to "/" path but this could be anything you like for
// building out your url. Note how we are setting the ResourceBase using
// our jetty maven testing utilities to get the proper resource
// directory, you needn't use these, you simply need to supply the paths
// you are looking to serve content from.
ResourceHandler rh0 = new ResourceHandler();
rh0.setDirectoriesListed(false);
ContextHandler context0 = new ContextHandler();
context0.setContextPath("/");
context0.setBaseResource(baseResource0);
context0.setHandler(rh0);
// Rinse and repeat the previous item, only specifying a different
// resource base.
ResourceHandler rh1 = new ResourceHandler();
rh1.setDirectoriesListed(false);
ContextHandler context1 = new ContextHandler();
context1.setContextPath("/");
context1.setBaseResource(baseResource1);
context1.setHandler(rh1);
// Create a ContextHandlerCollection and set the context handlers to it.
// This will let jetty process urls against the declared contexts in
// order to match up content.
ContextHandlerCollection contexts = new ContextHandlerCollection(
context0, context1
);
server.setHandler(contexts);
return server;
}
public static void main(String[] args) throws Exception
{
int port = ExampleUtil.getPort(args, "jetty.http.port", 8080);
Resource resource0 = new PathResource(Paths.get("src/test/resources/dir0"));
Resource resource1 = new PathResource(Paths.get("src/test/resources/dir1"));
Server server = createServer(port, resource0, resource1);
// Dump the server state
server.setDumpAfterStart(true);
// Start things up!
server.start();
// The use of server.join() the will make the current thread join and
// wait until the server is done executing.
server.join();
}
}Run it!
After you have started things up you should be able to navigate to http://localhost:8090/index.html (assuming one is in the resource base directory) and you are good to go. Any requests for files will be looked for in the first resource handler, then the second, and so on and so forth.
Maven Coordinates
To use this example as is in your project you will need the following maven dependencies declared. We would recommend not using the toolchain dependency in your actual application.
<dependency>
<groupId>org.eclipse.jetty</groupId>
<artifactId>jetty-server</artifactId>
<version>${project.version}</version>
</dependency>
<dependency>
<groupId>org.eclipse.jetty.toolchain</groupId>
<artifactId>jetty-test-helper</artifactId>
<version>2.2</version>
</dependency>Multiple Connectors
This example shows how to configure Jetty to use multiple connectors, specifically so it can process both http and https requests. Since the meat of this example is the server and connector configuration it only uses a simple HelloHandler but this example should be easily merged with other examples like those deploying servlets or webapps.
//
// ========================================================================
// Copyright (c) 1995-2022 Mort Bay Consulting Pty Ltd and others.
// ------------------------------------------------------------------------
// All rights reserved. This program and the accompanying materials
// are made available under the terms of the Eclipse Public License v1.0
// and Apache License v2.0 which accompanies this distribution.
//
// The Eclipse Public License is available at
// http://www.eclipse.org/legal/epl-v10.html
//
// The Apache License v2.0 is available at
// http://www.opensource.org/licenses/apache2.0.php
//
// You may elect to redistribute this code under either of these licenses.
// ========================================================================
//
package org.eclipse.jetty.embedded;
import java.io.FileNotFoundException;
import java.nio.file.Files;
import java.nio.file.Path;
import java.nio.file.Paths;
import org.eclipse.jetty.http.HttpVersion;
import org.eclipse.jetty.server.Connector;
import org.eclipse.jetty.server.HttpConfiguration;
import org.eclipse.jetty.server.HttpConnectionFactory;
import org.eclipse.jetty.server.SecureRequestCustomizer;
import org.eclipse.jetty.server.Server;
import org.eclipse.jetty.server.ServerConnector;
import org.eclipse.jetty.server.SslConnectionFactory;
import org.eclipse.jetty.util.ssl.SslContextFactory;
/**
* A Jetty server with multiple connectors.
*/
public class ManyConnectors
{
public static Server createServer(int plainPort, int securePort) throws Exception
{
// Since this example shows off SSL configuration, we need a keystore
// with the appropriate key.
Path keystorePath = Paths.get("src/main/resources/etc/keystore").toAbsolutePath();
if (!Files.exists(keystorePath))
throw new FileNotFoundException(keystorePath.toString());
// Create a basic jetty server object without declaring the port. Since
// we are configuring connectors directly we'll be setting ports on
// those connectors.
Server server = new Server();
// HTTP Configuration
// HttpConfiguration is a collection of configuration information
// appropriate for http and https. The default scheme for http is
// <code>http</code> of course, as the default for secured http is
// <code>https</code> but we show setting the scheme to show it can be
// done. The port for secured communication is also set here.
HttpConfiguration httpConfig = new HttpConfiguration();
httpConfig.setSecureScheme("https");
httpConfig.setSecurePort(securePort);
httpConfig.setOutputBufferSize(32768);
// HTTP connector
// The first server connector we create is the one for http, passing in
// the http configuration we configured above so it can get things like
// the output buffer size, etc. We also set the port (8080) and
// configure an idle timeout.
ServerConnector http = new ServerConnector(server,
new HttpConnectionFactory(httpConfig));
http.setPort(plainPort);
http.setIdleTimeout(30000);
// SSL Context Factory for HTTPS
// SSL requires a certificate so we configure a factory for ssl contents
// with information pointing to what keystore the ssl connection needs
// to know about. Much more configuration is available the ssl context,
// including things like choosing the particular certificate out of a
// keystore to be used.
SslContextFactory sslContextFactory = new SslContextFactory.Server();
sslContextFactory.setKeyStorePath(keystorePath.toString());
sslContextFactory.setKeyStorePassword("OBF:1vny1zlo1x8e1vnw1vn61x8g1zlu1vn4");
sslContextFactory.setKeyManagerPassword("OBF:1u2u1wml1z7s1z7a1wnl1u2g");
// OPTIONAL: Un-comment the following to use Conscrypt for SSL instead of
// the native JSSE implementation.
//Security.addProvider(new OpenSSLProvider());
//sslContextFactory.setProvider("Conscrypt");
// HTTPS Configuration
// A new HttpConfiguration object is needed for the next connector and
// you can pass the old one as an argument to effectively clone the
// contents. On this HttpConfiguration object we add a
// SecureRequestCustomizer which is how a new connector is able to
// resolve the https connection before handing control over to the Jetty
// Server.
HttpConfiguration httpsConfig = new HttpConfiguration(httpConfig);
SecureRequestCustomizer src = new SecureRequestCustomizer();
src.setStsMaxAge(2000);
src.setStsIncludeSubDomains(true);
httpsConfig.addCustomizer(src);
// HTTPS connector
// We create a second ServerConnector, passing in the http configuration
// we just made along with the previously created ssl context factory.
// Next we set the port and a longer idle timeout.
ServerConnector https = new ServerConnector(server,
new SslConnectionFactory(sslContextFactory, HttpVersion.HTTP_1_1.asString()),
new HttpConnectionFactory(httpsConfig));
https.setPort(securePort);
https.setIdleTimeout(500000);
// Here you see the server having multiple connectors registered with
// it, now requests can flow into the server from both http and https
// urls to their respective ports and be processed accordingly by jetty.
// A simple handler is also registered with the server so the example
// has something to pass requests off to.
// Set the connectors
server.setConnectors(new Connector[]{http, https});
// Set a handler
server.setHandler(new HelloHandler());
return server;
}
public static void main(String[] args) throws Exception
{
int port = ExampleUtil.getPort(args, "jetty.http.port", 8080);
int securePort = ExampleUtil.getPort(args, "jetty.https.port", 8443);
Server server = createServer(port, securePort);
// Start the server
server.start();
server.dumpStdErr();
server.join();
}
}Walkthrough
Start things up!
By using the server.join() the server thread will join with the current thread.
See Thread.join() for more details.
Maven Coordinates
To use this example in your project you will need the following Maven dependencies declared.
<dependency>
<groupId>org.eclipse.jetty</groupId>
<artifactId>jetty-server</artifactId>
<version>${project.version}</version>
</dependency>
<dependency>
<groupId>org.eclipse.jetty</groupId>
<artifactId>jetty-security</artifactId>
<version>${project.version}</version>
</dependency>Secured Hello Handler
This example shows how to wrap one handler with another one that handles security.
We have a simple Hello Handler that just return a greeting but add on the restriction that to get this greeting you must authenticate.
Another thing to remember is that this example uses the ConstraintSecurityHandler which is what supports the security mappings inside of the servlet api, it could be easier to show just the SecurityHandler usage, but the constraint provides more configuration power.
If you don’t need that you can drop the Constraint bits and use just the SecurityHandler.
//
// ========================================================================
// Copyright (c) 1995-2022 Mort Bay Consulting Pty Ltd and others.
// ------------------------------------------------------------------------
// All rights reserved. This program and the accompanying materials
// are made available under the terms of the Eclipse Public License v1.0
// and Apache License v2.0 which accompanies this distribution.
//
// The Eclipse Public License is available at
// http://www.eclipse.org/legal/epl-v10.html
//
// The Apache License v2.0 is available at
// http://www.opensource.org/licenses/apache2.0.php
//
// You may elect to redistribute this code under either of these licenses.
// ========================================================================
//
package org.eclipse.jetty.embedded;
import java.io.FileNotFoundException;
import java.net.URL;
import java.util.Collections;
import org.eclipse.jetty.security.ConstraintMapping;
import org.eclipse.jetty.security.ConstraintSecurityHandler;
import org.eclipse.jetty.security.HashLoginService;
import org.eclipse.jetty.security.LoginService;
import org.eclipse.jetty.security.authentication.BasicAuthenticator;
import org.eclipse.jetty.server.Server;
import org.eclipse.jetty.util.security.Constraint;
public class SecuredHelloHandler
{
public static Server createServer(int port) throws FileNotFoundException
{
// Create a basic jetty server object that will listen on port 8080.
// Note that if you set this to port 0 then a randomly available port
// will be assigned that you can either look in the logs for the port,
// or programmatically obtain it for use in test cases.
Server server = new Server(port);
// Since this example is for our test webapp, we need to setup a
// LoginService so this shows how to create a very simple hashmap based
// one. The name of the LoginService needs to correspond to what is
// configured a webapp's web.xml and since it has a lifecycle of its own
// we register it as a bean with the Jetty server object so it can be
// started and stopped according to the lifecycle of the server itself.
// In this example the name can be whatever you like since we are not
// dealing with webapp realms.
String realmResourceName = "etc/realm.properties";
ClassLoader classLoader = SecuredHelloHandler.class.getClassLoader();
URL realmProps = classLoader.getResource(realmResourceName);
if (realmProps == null)
throw new FileNotFoundException("Unable to find " + realmResourceName);
LoginService loginService = new HashLoginService("MyRealm",
realmProps.toExternalForm());
server.addBean(loginService);
// A security handler is a jetty handler that secures content behind a
// particular portion of a url space. The ConstraintSecurityHandler is a
// more specialized handler that allows matching of urls to different
// constraints. The server sets this as the first handler in the chain,
// effectively applying these constraints to all subsequent handlers in
// the chain.
ConstraintSecurityHandler security = new ConstraintSecurityHandler();
server.setHandler(security);
// This constraint requires authentication and in addition that an
// authenticated user be a member of a given set of roles for
// authorization purposes.
Constraint constraint = new Constraint();
constraint.setName("auth");
constraint.setAuthenticate(true);
constraint.setRoles(new String[]{"user", "admin"});
// Binds a url pattern with the previously created constraint. The roles
// for this constraint mapping are mined from the Constraint itself
// although methods exist to declare and bind roles separately as well.
ConstraintMapping mapping = new ConstraintMapping();
mapping.setPathSpec("/*");
mapping.setConstraint(constraint);
// First you see the constraint mapping being applied to the handler as
// a singleton list, however you can passing in as many security
// constraint mappings as you like so long as they follow the mapping
// requirements of the servlet api. Next we set a BasicAuthenticator
// instance which is the object that actually checks the credentials
// followed by the LoginService which is the store of known users, etc.
security.setConstraintMappings(Collections.singletonList(mapping));
security.setAuthenticator(new BasicAuthenticator());
security.setLoginService(loginService);
// The Hello Handler is the handler we are securing so we create one,
// and then set it as the handler on the
// security handler to complain the simple handler chain.
HelloHandler hh = new HelloHandler();
// chain the hello handler into the security handler
security.setHandler(hh);
return server;
}
public static void main(String[] args) throws Exception
{
int port = ExampleUtil.getPort(args, "jetty.http.port", 8080);
Server server = createServer(port);
// Start things up!
server.start();
// The use of server.join() the will make the current thread join and
// wait until the server is done executing.
server.join();
}
}Run it!
After you have started things up you should be able to navigate to http://localhost:8080/index.html (assuming one is in the resource base directory) and you are good to go.
The Realm Properties File
#
# This file defines users passwords and roles for a HashUserRealm
#
# The format is
# <username>: <password>[,<rolename> ...]
#
# Passwords may be clear text, obfuscated or checksummed. The class
# org.eclipse.jetty.util.security.Password should be used to generate obfuscated
# passwords or password checksums
#
# If DIGEST Authentication is used, the password must be in a recoverable
# format, either plain text or OBF:.
#
jetty: MD5:164c88b302622e17050af52c89945d44,user
admin: CRYPT:adpexzg3FUZAk,server-administrator,content-administrator,admin,user
other: OBF:1xmk1w261u9r1w1c1xmq,user
plain: plain,user
user: password,user
# This entry is for digest auth. The credential is a MD5 hash of username:realmname:password
digest: MD5:6e120743ad67abfbc385bc2bb754e297,userMaven Coordinates
To use this example in your project you will need the following Maven dependencies declared.
<dependency>
<groupId>org.eclipse.jetty</groupId>
<artifactId>jetty-server</artifactId>
<version>${project.version}</version>
</dependency>Minimal Servlet
This example shows the bare minimum required for deploying a servlet into Jetty. Note that this is strictly a servlet, not a servlet in the context of a web application, that example comes later. This is purely just a servlet deployed and mounted on a context and able to process requests. This example is excellent for situations where you have a simple servlet that you need to unit test, just mount it on a context and issue requests using your favorite http client library (like our Jetty client found in HTTP Client).
//
// ========================================================================
// Copyright (c) 1995-2022 Mort Bay Consulting Pty Ltd and others.
// ------------------------------------------------------------------------
// All rights reserved. This program and the accompanying materials
// are made available under the terms of the Eclipse Public License v1.0
// and Apache License v2.0 which accompanies this distribution.
//
// The Eclipse Public License is available at
// http://www.eclipse.org/legal/epl-v10.html
//
// The Apache License v2.0 is available at
// http://www.opensource.org/licenses/apache2.0.php
//
// You may elect to redistribute this code under either of these licenses.
// ========================================================================
//
package org.eclipse.jetty.embedded;
import java.io.IOException;
import javax.servlet.http.HttpServlet;
import javax.servlet.http.HttpServletRequest;
import javax.servlet.http.HttpServletResponse;
import org.eclipse.jetty.server.Server;
import org.eclipse.jetty.servlet.ServletHandler;
public class MinimalServlets
{
public static Server createServer(int port)
{
// Note that if you set this to port 0 then a randomly available port
// will be assigned that you can either look in the logs for the port,
// or programmatically obtain it for use in test cases.
Server server = new Server(port);
// The ServletHandler is a dead simple way to create a context handler
// that is backed by an instance of a Servlet.
// This handler then needs to be registered with the Server object.
ServletHandler handler = new ServletHandler();
server.setHandler(handler);
// Passing in the class for the Servlet allows jetty to instantiate an
// instance of that Servlet and mount it on a given context path.
// IMPORTANT:
// This is a raw Servlet, not a Servlet that has been configured
// through a web.xml @WebServlet annotation, or anything similar.
handler.addServletWithMapping(HelloServlet.class, "/*");
return server;
}
public static void main(String[] args) throws Exception
{
// Create a basic jetty server object that will listen on port 8080.
int port = ExampleUtil.getPort(args, "jetty.http.port", 8080);
Server server = createServer(port);
// Start things up!
server.start();
// The use of server.join() the will make the current thread join and
// wait until the server thread is done executing.
server.join();
}
@SuppressWarnings("serial")
public static class HelloServlet extends HttpServlet
{
@Override
protected void doGet(HttpServletRequest request,
HttpServletResponse response) throws IOException
{
response.setStatus(HttpServletResponse.SC_OK);
response.setContentType("text/html");
response.setCharacterEncoding("utf-8");
response.getWriter().println("<h1>Hello from HelloServlet</h1>");
}
}
}Walkthrough
Start things up! By using the server.join() the server thread will join with the current thread.
See Thread.join() for more details.
It is really simple to create useful servlets for testing behaviors. Sometimes you need a http server to run a unit test against that will return test content and wiring up a servlet like this makes it trivial.
After you have started things up you should be able to navigate to http://localhost:8080/ and you are good to go.
Maven Coordinates
To use this example in your project you will need the following Maven dependencies declared.
<dependency>
<groupId>org.eclipse.jetty</groupId>
<artifactId>jetty-servlet</artifactId>
<version>${project.version}</version>
</dependency>Web Application
This example shows how to deploy a simple webapp with an embedded instance of Jetty. This is useful when you want to manage the lifecycle of a server programmatically, either within a production application or as a simple way to deploying and debugging a full scale application deployment. In many ways it is easier then traditional deployment since you control the classpath yourself, making this easy to wire up in a test case in Maven and issue requests using your favorite http client library (like our Jetty client found in HTTP Client).
//
// ========================================================================
// Copyright (c) 1995-2022 Mort Bay Consulting Pty Ltd and others.
// ------------------------------------------------------------------------
// All rights reserved. This program and the accompanying materials
// are made available under the terms of the Eclipse Public License v1.0
// and Apache License v2.0 which accompanies this distribution.
//
// The Eclipse Public License is available at
// http://www.eclipse.org/legal/epl-v10.html
//
// The Apache License v2.0 is available at
// http://www.opensource.org/licenses/apache2.0.php
//
// You may elect to redistribute this code under either of these licenses.
// ========================================================================
//
package org.eclipse.jetty.embedded;
import java.io.File;
import org.eclipse.jetty.server.Server;
import org.eclipse.jetty.webapp.WebAppContext;
public class OneWebApp
{
public static Server createServer(int port)
{
// Create a basic jetty server object that will listen on port 8080.
// Note that if you set this to port 0 then a randomly available port
// will be assigned that you can either look in the logs for the port,
// or programmatically obtain it for use in test cases.
Server server = new Server(port);
// The WebAppContext is the entity that controls the environment in
// which a web application lives and breathes. In this example the
// context path is being set to "/" so it is suitable for serving root
// context requests and then we see it setting the location of the war.
// A whole host of other configurations are available, ranging from
// configuring to support annotation scanning in the webapp (through
// PlusConfiguration) to choosing where the webapp will unpack itself.
WebAppContext webapp = new WebAppContext();
webapp.setContextPath("/");
File warFile = JettyDistribution.resolve("demo-base/webapps/async-rest.war").toFile();
webapp.setWar(warFile.getAbsolutePath());
// A WebAppContext is a ContextHandler as well so it needs to be set to
// the server so it is aware of where to send the appropriate requests.
server.setHandler(webapp);
return server;
}
public static void main(String[] args) throws Exception
{
int port = ExampleUtil.getPort(args, "jetty.http.port", 8080);
Server server = createServer(port);
// Start things up!
server.start();
server.dumpStdErr();
// The use of server.join() the will make the current thread join and
// wait until the server is done executing.
server.join();
}
}Run it!
After you have started things up you should be able to navigate to http://localhost:8080/ and you are good to go.
Maven Coordinates
To use this example in your project you will need the following Maven dependencies declared.
<dependency>
<groupId>org.eclipse.jetty</groupId>
<artifactId>jetty-webapp</artifactId>
<version>${project.version}</version>
</dependency>Web Application with JSP
This example is very similar to the one in the previous section, although it enables the embedded webapp to use JSPs.
As of jetty-9.2, we use the JSP engine from Apache, which relies on a Servlet Specification 3.1 style ServletContainerInitializer to initialize itself.
To get this to work with Jetty, you need to enable annotations processing, as shown in this example code:
//
// ========================================================================
// Copyright (c) 1995-2022 Mort Bay Consulting Pty Ltd and others.
// ------------------------------------------------------------------------
// All rights reserved. This program and the accompanying materials
// are made available under the terms of the Eclipse Public License v1.0
// and Apache License v2.0 which accompanies this distribution.
//
// The Eclipse Public License is available at
// http://www.eclipse.org/legal/epl-v10.html
//
// The Apache License v2.0 is available at
// http://www.opensource.org/licenses/apache2.0.php
//
// You may elect to redistribute this code under either of these licenses.
// ========================================================================
//
package org.eclipse.jetty.embedded;
import java.io.FileNotFoundException;
import java.net.URL;
import java.nio.file.Files;
import java.nio.file.Path;
import org.eclipse.jetty.security.HashLoginService;
import org.eclipse.jetty.server.Server;
import org.eclipse.jetty.util.resource.PathResource;
import org.eclipse.jetty.webapp.Configuration;
import org.eclipse.jetty.webapp.WebAppContext;
public class OneWebAppWithJsp
{
public static Server createServer(int port) throws FileNotFoundException
{
// Create a basic jetty server object that will listen on port 8080.
// Note that if you set this to port 0 then
// a randomly available port will be assigned that you can either look
// in the logs for the port,
// or programmatically obtain it for use in test cases.
Server server = new Server(port);
// The WebAppContext is the entity that controls the environment in
// which a web application lives and breathes.
// In this example the context path is being set to "/" so it
// is suitable for serving root context
// requests and then we see it setting the location of the war.
// A whole host of other configurations are
// available, ranging from configuring to support annotation scanning in
// the webapp (through PlusConfiguration), to choosing where
// the webapp will unpack itself.
WebAppContext webapp = new WebAppContext();
webapp.setContextPath("/");
Path warFile = JettyDistribution.resolve("demo-base/webapps/test.war");
if (!Files.exists(warFile))
{
throw new FileNotFoundException(warFile.toString());
}
webapp.setWarResource(new PathResource(warFile));
webapp.setExtractWAR(true);
// This webapp will use jsps and jstl. We need to enable the
// AnnotationConfiguration in order to correctly
// set up the jsp container
Configuration.ClassList classlist = Configuration.ClassList
.setServerDefault(server);
classlist.addBefore(
"org.eclipse.jetty.webapp.JettyWebXmlConfiguration",
"org.eclipse.jetty.annotations.AnnotationConfiguration");
// Set the ContainerIncludeJarPattern so that jetty examines these
// container-path jars for tlds, web-fragments etc.
// If you omit the jar that contains the jstl .tlds, the jsp engine will
// scan for them instead.
webapp.setAttribute(
"org.eclipse.jetty.server.webapp.ContainerIncludeJarPattern",
".*/[^/]*servlet-api-[^/]*\\.jar$|.*/javax.servlet.jsp.jstl-.*\\.jar$|.*/[^/]*taglibs.*\\.jar$");
// A WebAppContext is a ContextHandler as well so it needs to be set to
// the server so it is aware of where to
// send the appropriate requests.
server.setHandler(webapp);
// Configure a LoginService.
// Since this example is for our test webapp, we need to setup a
// LoginService so this shows how to create a very simple hashmap based
// one. The name of the LoginService needs to correspond to what is
// configured in the webapp's web.xml and since it has a lifecycle of
// its own we register it as a bean with the Jetty server object so it
// can be started and stopped according to the lifecycle of the server
// itself.
String realmResourceName = "etc/realm.properties";
ClassLoader classLoader = OneWebAppWithJsp.class.getClassLoader();
URL realmProps = classLoader.getResource(realmResourceName);
if (realmProps == null)
throw new FileNotFoundException("Unable to find " + realmResourceName);
HashLoginService loginService = new HashLoginService();
loginService.setName("Test Realm");
loginService.setConfig(realmProps.toExternalForm());
server.addBean(loginService);
return server;
}
public static void main(String[] args) throws Exception
{
int port = ExampleUtil.getPort(args, "jetty.http.port", 8080);
Server server = createServer(port);
// Start things up!
server.start();
server.dumpStdErr();
// The use of server.join() the will make the current thread join and
// wait until the server is done executing.
server.join();
}
}Run it!
After you have started things up you should be able to navigate to http://localhost:8080/jsp/ and click on any of the links to jsps.
Maven Coordinates
To use this example in your project, you will need the following Maven dependencies declared, in addition to those from the previous section:
<dependency>
<groupId>org.eclipse.jetty</groupId>
<artifactId>jetty-annotations</artifactId>
<version>${project.version}</version>
</dependency>
<dependency>
<groupId>org.eclipse.jetty</groupId>
<artifactId>apache-jsp</artifactId>
<version>${project.version}</version>
</dependency>
<dependency>
<groupId>org.eclipse.jetty</groupId>
<artifactId>apache-jstl</artifactId>
<version>${project.version}</version>
</dependency>Adding Examples
If you would like to add an example to this list, fork the documentation project from github (see the blue bar at the bottom of this page) and add the new page.
Feel free to add the example contents directly as a [source.java] and we will take it from there.
If you feel and example is missing, feel free to open a bug to ask for it. No guarantees, but the more helpful and demonstrative it is the better.
HTTP Client
Introduction
The Jetty HTTP client module provides easy-to-use APIs and utility classes to perform HTTP (or HTTPS) requests.
Jetty’s HTTP client is non-blocking and asynchronous. It offers an asynchronous API that never blocks for I/O, making it very efficient in thread utilization and well suited for high performance scenarios such as load testing or parallel computation.
However, when all you need to do is to perform a GET request to a resource, Jetty’s HTTP client offers also a synchronous API; a programming interface
where the thread that issued the request blocks until the request/response conversation is complete.
Jetty’s HTTP client supports different transports: HTTP/1.1, FastCGI and HTTP/2.
This means that the semantic of a HTTP request (that is, " GET me the resource /index.html ") can be carried over the network in different formats.
The most common and default format is HTTP/1.1.
That said, Jetty’s HTTP client can carry the same request using the FastCGI format or the new HTTP/2 format.
The FastCGI transport is heavily used in Jetty’s FastCGI support that allows Jetty to work as a reverse proxy to PHP (exactly like Apache or Nginx do) and therefore be able to serve - for example - WordPress websites.
The HTTP/2 transport allows Jetty’s HTTP client to perform requests using HTTP/2 to HTTP/2 enabled web sites, see also Jetty’s HTTP/2 support.
Out of the box features that you get with the Jetty HTTP client include:
-
Redirect support - redirect codes such as 302 or 303 are automatically followed.
-
Cookies support - cookies sent by servers are stored and sent back to servers in matching requests.
-
Authentication support - HTTP "Basic" and "Digest" authentications are supported, others are pluggable.
-
Forward proxy support - HTTP proxying and SOCKS4 proxying.
Starting HttpClient
The main class is named org.eclipse.jetty.client.HttpClient.
You can think of a HttpClient instance as a browser instance.
Like a browser it can make requests to different domains, it manages redirects, cookies and authentication, you can configure it with a proxy, and
it provides you with the responses to the requests you make.
In order to use HttpClient, you must instantiate it, configure it, and then start it:
// Instantiate HttpClient
HttpClient httpClient = new HttpClient();
// Configure HttpClient, for example:
httpClient.setFollowRedirects(false);
// Start HttpClient
httpClient.start();You may create multiple instances of HttpClient, but typically one instance is enough for an application.
There are several reasons for having multiple HttpClient instances including, but not limited to:
-
You want to specify different configuration parameters (for example, one instance is configured with a forward proxy while another is not)
-
You want the two instances to behave like two different browsers and hence have different cookies, different authentication credentials…etc.
-
You want to use different transports
When you create a HttpClient instance using the parameterless constructor, you will only be able to perform plain HTTP requests and you will not be able to perform HTTPS requests.
In order to perform HTTPS requests, you should create first a SslContextFactory.Client, configure it, and pass it to the HttpClient constructor.
When created with a SslContextFactory, the HttpClient will be able to perform both HTTP and HTTPS requests to any domain.
// Instantiate and configure the SslContextFactory
SslContextFactory.Client sslContextFactory = new SslContextFactory.Client();
// Instantiate HttpClient with the SslContextFactory
HttpClient httpClient = new HttpClient(sslContextFactory);
// Configure HttpClient, for example:
httpClient.setFollowRedirects(false);
// Start HttpClient
httpClient.start();Stopping HttpClient
It is recommended that when your application stops, you also stop the HttpClient instance (or instances) that you are using.
httpClient.stop();Stopping HttpClient makes sure that the memory it holds (for example, authentication credentials, cookies, etc.) is released, and that the thread pool and scheduler are properly stopped allowing all threads used by HttpClient to exit.
API Usage
Blocking APIs
The simple way to perform a HTTP request is the following:
ContentResponse response = httpClient.GET("http://domain.com/path?query");The method HttpClient.GET(…) performs a HTTP GET request to the given URI and returns a ContentResponse when the request/response conversation completes successfully.
The ContentResponse object contains the HTTP response information: status code, headers and possibly content.
The content length is limited by default to 2 MiB; for larger content see Response Content Handling.
If you want to customize the request, for example by issuing a HEAD request instead of a GET, and simulating a browser user agent, you can do it in this way:
ContentResponse response = httpClient.newRequest("http://domain.com/path?query")
.method(HttpMethod.HEAD)
.agent("Mozilla/5.0 (X11; Ubuntu; Linux x86_64; rv:17.0) Gecko/20100101 Firefox/17.0")
.send();This is a shorthand for:
Request request = httpClient.newRequest("http://domain.com/path?query");
request.method(HttpMethod.HEAD);
request.agent("Mozilla/5.0 (X11; Ubuntu; Linux x86_64; rv:17.0) Gecko/20100101 Firefox/17.0");
ContentResponse response = request.send();You first create a request object using httpClient.newRequest(…), and then you customize it using the fluent API style (that is, a chained invocation of methods on the request object).
When the request object is customized, you call request.send() that produces the ContentResponse when the request/response conversation is complete.
Simple POST requests also have a shortcut method:
ContentResponse response = httpClient.POST("http://domain.com/entity/1")
.param("p", "value")
.send();The POST parameter values added via the param() method are automatically URL-encoded.
Jetty’s HTTP client automatically follows redirects, so it handles the typical web pattern POST/Redirect/GET, and the response object contains the content of the response of the GET request.
Following redirects is a feature that you can enable/disable on a per-request basis or globally.
File uploads also require one line, and make use of JDK 7′s java.nio.file classes:
ContentResponse response = httpClient.newRequest("http://domain.com/upload")
.method(HttpMethod.POST)
.file(Paths.get("file_to_upload.txt"), "text/plain")
.send();It is possible to impose a total timeout for the request/response conversation using the Request.timeout(…) method as follows:
ContentResponse response = httpClient.newRequest("http://domain.com/path?query")
.timeout(5, TimeUnit.SECONDS)
.send();In the example above, when the 5 seconds expire, the request is aborted and a java.util.concurrent.TimeoutException is thrown.
Non-Blocking APIs
So far we have shown how to use Jetty HTTP client in a blocking style - that is, the thread that issues the request blocks until the request/response conversation is complete.
This section will look at Jetty’s HTTP client non-blocking, asynchronous APIs that are perfectly suited for large content downloads, for parallel processing of requests/responses and in cases where performance and efficient thread and resource utilization is a key factor.
The asynchronous APIs rely heavily on listeners that are invoked at various stages of request and response processing. These listeners are implemented by applications and may perform any kind of logic. The implementation invokes these listeners in the same thread that is used to process the request or response. Therefore, if the application code in these listeners takes a long time to execute, the request or response processing is delayed until the listener returns.
If you need to execute application code that takes long time inside a listener, you must spawn your own thread and remember to deep copy any data provided by the listener that you will need in your code, because when the listener returns the data it provides may be recycled/cleared/destroyed.
Request and response processing are executed by two different threads and therefore may happen concurrently. A typical example of this concurrent processing is an echo server, where a large upload may be concurrent with the large download echoed back. As a side note, remember that responses may be processed and completed before requests; a typical example is a large upload that triggers a quick response - for example an error - by the server: the response may arrive and be completed while the request content is still being uploaded.
The application thread that calls Request.send(Response.CompleteListener) performs the processing of the request until either the request is fully processed or until it would block on I/O, then it returns (and therefore never blocks).
If it would block on I/O, the thread asks the I/O system to emit an event when the I/O will be ready to continue, then returns.
When such an event is fired, a thread taken from the HttpClient thread pool will resume the processing of the request.
Response are processed from the I/O thread that fires the event that bytes are ready to be read.
Response processing continues until either the response is fully processed or until it would block for I/O.
If it would block for I/O, the thread asks the I/O system to emit an event when the I/O will be ready to continue, then returns.
When such an event is fired, a thread taken from the HttpClient thread pool will resume the processing of the response.
When the request and the response are both fully processed, the thread that finished the last processing (usually the thread that processes the response, but may also be the thread that processes the request - if the request takes more time than the response to be processed) is used to de-queue the next request for the same destination and processes it.
A simple asynchronous GET request that discards the response content can be written in this way:
httpClient.newRequest("http://domain.com/path")
.send(new Response.CompleteListener()
{
@Override
public void onComplete(Result result)
{
// Your logic here
}
});Method Request.send(Response.CompleteListener) returns void and does not block; the Response.CompleteListener provided as a parameter is notified when the request/response conversation is complete, and the Result parameter allows you to access the response object.
You can write the same code using JDK 8′s lambda expressions:
httpClient.newRequest("http://domain.com/path")
.send(result -> { /* Your logic here */ });You can impose a total timeout for the request/response conversation in the same way used by the synchronous API:
httpClient.newRequest("http://domain.com/path")
.timeout(3, TimeUnit.SECONDS)
.send(result -> { /* Your logic here */ });The example above will impose a total timeout of 3 seconds on the request/response conversation.
The HTTP client APIs use listeners extensively to provide hooks for all possible request and response events, and with JDK 8′s lambda expressions they are even more fun to use:
httpClient.newRequest("http://domain.com/path")
// Add request hooks
.onRequestQueued(request -> { ... })
.onRequestBegin(request -> { ... })
... // More request hooks available
// Add response hooks
.onResponseBegin(response -> { ... })
.onResponseHeaders(response -> { ... })
.onResponseContent((response, buffer) -> { ... })
... // More response hooks available
.send(result -> { ... });This makes Jetty HTTP client suitable for HTTP load testing because, for example, you can accurately time every step of the request/response conversation (thus knowing where the request/response time is really spent).
Have a look at the Request.Listener class to know about request events, and to the Response.Listener class to know about response events.
Content Handling
Request Content Handling
Jetty’s HTTP client provides a number of utility classes off the shelf to handle request content.
You can provide request content as String, byte[], ByteBuffer, java.nio.file.Path, InputStream, and provide your own implementation of org.eclipse.jetty.client.api.ContentProvider.
Here’s an example that provides the request content using java.nio.file.Paths:
ContentResponse response = httpClient.newRequest("http://domain.com/upload")
.method(HttpMethod.POST)
.file(Paths.get("file_to_upload.txt"), "text/plain")
.send();This is equivalent to using the PathContentProvider utility class:
ContentResponse response = httpClient.newRequest("http://domain.com/upload")
.method(HttpMethod.POST)
.content(new PathContentProvider(Paths.get("file_to_upload.txt")), "text/plain")
.send();Alternatively, you can use FileInputStream via the InputStreamContentProvider utility class:
ContentResponse response = httpClient.newRequest("http://domain.com/upload")
.method(HttpMethod.POST)
.content(new InputStreamContentProvider(new FileInputStream("file_to_upload.txt")), "text/plain")
.send();Since InputStream is blocking, then also the send of the request will block if the input stream blocks, even in case of usage of the asynchronous HttpClient APIs.
If you have already read the content in memory, you can pass it as a byte[] using the BytesContentProvider utility class:
byte[] bytes = ...;
ContentResponse response = httpClient.newRequest("http://domain.com/upload")
.method(HttpMethod.POST)
.content(new BytesContentProvider(bytes), "text/plain")
.send();If the request content is not immediately available, but your application will be notified of the content to send, you can use DeferredContentProvider in this way:
DeferredContentProvider content = new DeferredContentProvider();
httpClient.newRequest("http://domain.com/upload")
.method(HttpMethod.POST)
.content(content)
.send(new Response.CompleteListener()
{
@Override
public void onComplete(Result result)
{
// Your logic here
}
});
// Content not available yet here
...
// An event happens, now content is available
byte[] bytes = ...;
content.offer(ByteBuffer.wrap(bytes));
...
// All content has arrived
content.close();While the request content is awaited and consequently uploaded by the client application, the server may be able to respond (at least with the response headers) completely asynchronously.
In this case, Response.Listener callbacks will be invoked before the request is fully sent.
This allows fine-grained control of the request/response conversation: for example the server may reject contents that are too big, send a response to the client, which in turn may stop the content upload.
Another way to provide request content is by using an OutputStreamContentProvider,
which allows applications to write request content when it is available to the OutputStream provided by OutputStreamContentProvider:
OutputStreamContentProvider content = new OutputStreamContentProvider();
// Use try-with-resources to close the OutputStream when all content is written
try (OutputStream output = content.getOutputStream())
{
client.newRequest("localhost", 8080)
.method(HttpMethod.POST)
.content(content)
.send(new Response.CompleteListener()
{
@Override
public void onComplete(Result result)
{
// Your logic here
}
});
...
// Write content
writeContent(output);
}
// End of try-with-resource, output.close() called automatically to signal end of contentResponse Content Handling
Jetty HTTP client allows applications to handle response content in different ways.
The first way is to buffer the response content in memory; this is done when using the blocking APIs (see Blocking APIs) and the content is buffered within a ContentResponse up to 2 MiB.
If you want to control the length of the response content (for example limiting to values smaller than the default of 2 MiB), then you can use a org.eclipse.jetty.client.util.FutureResponseListener in this way:
Request request = httpClient.newRequest("http://domain.com/path");
// Limit response content buffer to 512 KiB
FutureResponseListener listener = new FutureResponseListener(request, 512 * 1024);
request.send(listener);
ContentResponse response = listener.get(5, TimeUnit.SECONDS);If the response content length is exceeded, the response will be aborted, and an exception will be thrown by method get().
If you are using the asynchronous APIs (see Non-Blocking APIs), you can use the BufferingResponseListener utility class:
httpClient.newRequest("http://domain.com/path")
// Buffer response content up to 8 MiB
.send(new BufferingResponseListener(8 * 1024 * 1024)
{
@Override
public void onComplete(Result result)
{
if (!result.isFailed())
{
byte[] responseContent = getContent();
// Your logic here
}
}
});The second way is the most efficient (because it avoids content copies) and allows you to specify a Response.ContentListener, or a subclass, to handle the content as soon as it arrives.
In the example below, Response.Listener.Adapter is a class that implements both Response.ContentListener and Response.CompleteListener and can be passed to Request.send().
Jetty’s HTTP client will invoke the onContent() method zero or more times (until there is content), and finally invoke the onComplete() method.
httpClient .newRequest("http://domain.com/path")
.send(new Response.Listener.Adapter()
{
@Override
public void onContent(Response response, ByteBuffer buffer)
{
// Your logic here
}
});The third way allows you to wait for the response and then stream the content using the InputStreamResponseListener utility class:
InputStreamResponseListener listener = new InputStreamResponseListener();
httpClient.newRequest("http://domain.com/path")
.send(listener);
// Wait for the response headers to arrive
Response response = listener.get(5, TimeUnit.SECONDS);
// Look at the response
if (response.getStatus() == HttpStatus.OK_200)
{
// Use try-with-resources to close input stream.
try (InputStream responseContent = listener.getInputStream())
{
// Your logic here
}
}Cookies Support
Jetty HTTP client supports cookies out of the box.
The HttpClient instance receives cookies from HTTP responses and stores them in a java.net.CookieStore, a class that is part of the JDK.
When new requests are made, the cookie store is consulted and if there are matching cookies (that is, cookies that are not expired and that match domain and path of the request) then they are added to the requests.
Applications can programmatically access the cookie store to find the cookies that have been set:
CookieStore cookieStore = httpClient.getCookieStore();
List<HttpCookie> cookies = cookieStore.get(URI.create("http://domain.com/path"));Applications can also programmatically set cookies as if they were returned from a HTTP response:
CookieStore cookieStore = httpClient.getCookieStore();
HttpCookie cookie = new HttpCookie("foo", "bar");
cookie.setDomain("domain.com");
cookie.setPath("/");
cookie.setMaxAge(TimeUnit.DAYS.toSeconds(1));
cookieStore.add(URI.create("http://domain.com"), cookie);Cookies may be added only for a particular request:
ContentResponse response = httpClient.newRequest("http://domain.com/path")
.cookie(new HttpCookie("foo", "bar"))
.send();You can remove cookies that you do not want to be sent in future HTTP requests:
CookieStore cookieStore = httpClient.getCookieStore();
URI uri = URI.create("http://domain.com");
List<HttpCookie> cookies = cookieStore.get(uri);
for (HttpCookie cookie : cookies)
cookieStore.remove(uri, cookie);If you want to totally disable cookie handling, you can install a HttpCookieStore.Empty instance in this way:
httpClient.setCookieStore(new HttpCookieStore.Empty());You can enable cookie filtering by installing a cookie store that performs the filtering logic in this way:
httpClient.setCookieStore(new GoogleOnlyCookieStore());
public class GoogleOnlyCookieStore extends HttpCookieStore
{
@Override
public void add(URI uri, HttpCookie cookie)
{
if (uri.getHost().endsWith("google.com"))
super.add(uri, cookie);
}
}The example above will retain only cookies that come from the google.com domain or sub-domains.
Special Characters in Cookies
Jetty is compliant with RFC6265, and as such care must be taken when setting a cookie value that includes special characters such as ;.
Previously, Version=1 cookies defined in RFC2109 (and continued in RFC2965) allowed for special/reserved characters to be enclosed within double quotes when declared in a Set-Cookie response header:
Set-Cookie: foo="bar;baz";Version=1;Path="/secur"This was added to the HTTP Response header as follows:
Cookie cookie = new Cookie("foo", "bar;baz");
cookie.setPath("/secur");
response.addCookie(cookie);The introduction of RFC6265 has rendered this approach no longer possible; users are now required to encode cookie values that use these special characters.
This can be done utilizing javax.servlet.http.Cookie as follows:
Cookie cookie = new Cookie("foo", URLEncoder.encode("bar;baz", "utf-8"));Jetty validates all cookie names and values being added to the HttpServletResponse via the addCookie(Cookie) method.
If an illegal value is discovered Jetty will throw an IllegalArgumentException with the details.
Authentication Support
Jetty’s HTTP client supports the BASIC and DIGEST authentication mechanisms defined by RFC 7235.
You can configure authentication credentials in the HTTP client instance as follows:
URI uri = new URI("http://domain.com/secure");
String realm = "MyRealm";
String user = "username";
String pass = "password";
// Add authentication credentials
AuthenticationStore auth = httpClient.getAuthenticationStore();
auth.addAuthentication(new BasicAuthentication(uri, realm, user, pass));
ContentResponse response = httpClient
.newRequest(uri)
.send()
.get(5, TimeUnit.SECONDS);Jetty’s HTTP client tests authentication credentials against the challenge(s) the server issues (see our section here on secure password obfuscation), and if they match it automatically sends the right authentication headers to the server for authentication. If the authentication is successful, it caches the result and reuses it for subsequent requests for the same domain and matching URIs.
The HTTP conversation for a successful match is the following:
Application HttpClient Server
| | |
|--- GET ---|------------ GET ----------->|
| | |
| |<-- 401 + WWW-Authenticate --|
| | |
| |--- GET + Authentication --->|
| | |
|<-- 200 ---|------------ 200 ------------|
The application does not receive events related to the response with code 401, they are handled internally by HttpClient which produces a request similar to the original but with the correct Authorization header, and then relays the response with code 200 to the application.
Successful authentications are cached, but it is possible to clear them in order to force authentication again:
httpClient.getAuthenticationStore().clearAuthenticationResults();Authentications may be preempted to avoid the additional roundtrip due to the server challenge in this way:
AuthenticationStore auth = httpClient.getAuthenticationStore();
URI uri = URI.create("http://domain.com/secure");
auth.addAuthenticationResult(new BasicAuthentication.BasicResult(uri, "username", "password"));In this way, requests for the given URI are enriched by HttpClient immediately with the Authorization header, and the server should respond with a 200 and the resource content rather than with the 401 and the challenge.
It is also possible to preempt the authentication for a single request only, in this way:
URI uri = URI.create("http://domain.com/secure");
Authentication.Result authn = new BasicAuthentication.BasicResult(uri, "username", "password")
Request request = httpClient.newRequest(uri);
authn.apply(request);
request.send();See also the proxy authentication section for further information about how authentication works with HTTP proxies.
Proxy Support
Jetty’s HTTP client can be configured to use proxies to connect to destinations.
Two types of proxies are available out of the box: a HTTP proxy (provided by class org.eclipse.jetty.client.HttpProxy) and a SOCKS 4 proxy (provided by class org.eclipse.jetty.client.Socks4Proxy).
Other implementations may be written by subclassing ProxyConfiguration.Proxy.
The following is a typical configuration:
ProxyConfiguration proxyConfig = httpClient.getProxyConfiguration();
HttpProxy proxy = new HttpProxy("proxyHost", proxyPort);
// Do not proxy requests for localhost:8080
proxy.getExcludedAddresses().add("localhost:8080");
// add the new proxy to the list of proxies already registered
proxyConfig.getProxies().add(proxy);
ContentResponse response = httpClient.GET(uri);You specify the proxy host and port, and optionally also the addresses that you do not want to be proxied, and then add the proxy configuration on the ProxyConfiguration instance.
Configured in this way, HttpClient makes requests to the HTTP proxy (for plain-text HTTP requests) or establishes a tunnel via HTTP CONNECT (for encrypted HTTPS requests).
Proxy Authentication Support
Jetty’s HTTP client support proxy authentication in the same way it supports server authentication.
In the example below, the proxy requires Basic authentication, but the server requires Digest authentication, and therefore:
URI proxyURI = new URI("http://proxy.net:8080");
URI serverURI = new URI("http://domain.com/secure");
AuthenticationStore auth = httpClient.getAuthenticationStore();
// Proxy credentials.
auth.addAuthentication(new BasicAuthentication(proxyURI, "ProxyRealm", "proxyUser", "proxyPass"));
// Server credentials.
auth.addAuthentication(new DigestAuthentication(serverURI, "ServerRealm", "serverUser", "serverPass"));
// Proxy configuration.
ProxyConfiguration proxyConfig = httpClient.getProxyConfiguration();
HttpProxy proxy = new HttpProxy("proxy.net", 8080);
proxyConfig.getProxies().add(proxy);
ContentResponse response = httpClient.newRequest(serverURI)
.send()
.get(5, TimeUnit.SECONDS);The HTTP conversation for successful authentications on both the proxy and the server is the following:
Application HttpClient Proxy Server
| | | |
|--- GET -->|------------- GET ------------->| |
| | | |
| |<----- 407 + Proxy-Authn -------| |
| | | |
| |------ GET + Proxy-Authz ------>| |
| | | |
| | |---------- GET --------->|
| | | |
| | |<--- 401 + WWW-Authn ----|
| | | |
| |<------ 401 + WWW-Authn --------| |
| | | |
| |-- GET + Proxy-Authz + Authz -->| |
| | | |
| | |------ GET + Authz ----->|
| | | |
|<-- 200 ---|<------------ 200 --------------|<--------- 200 ----------|
The application does not receive events related to the responses with code 407 and 401 since they are handled internally by HttpClient.
Similarly to the authentication section, the proxy authentication result and the server authentication result can be preempted to avoid, respectively, the 407 and 401 roundtrips.
Pluggable Transports
Jetty’s HTTP client can be configured to use different transports to carry the semantic of HTTP requests and responses.
This means that the intention of a client to request resource /index.html using the GET method can be carried over the network in different formats.
A HTTP client transport is the component that is in charge of converting a high-level, semantic, HTTP requests such as "GET resource /index.html" into the specific format understood by the server (for example, HTTP/2), and to convert the server response from the specific format (HTTP/2) into high-level, semantic objects that can be used by applications.
In this way, applications are not aware of the actual protocol being used. This allows them to write their logic against a high-level API that hides the details of the specific protocol being used over the network.
The most common protocol format is HTTP/1.1, a text-based protocol with lines separated by \r\n:
GET /index.html HTTP/1.1\r\n
Host: domain.com\r\n
...
\r\nHowever, the same request can be made using FastCGI, a binary protocol:
x01 x01 x00 x01 x00 x08 x00 x00
x00 x01 x01 x00 x00 x00 x00 x00
x01 x04 x00 x01 xLL xLL x00 x00
x0C x0B D O C U M E
N T _ U R I / i
n d e x . h t m
l
...Similarly, HTTP/2 is a binary protocol that transports the same information in a yet different format.
HTTP/1.1 Transport
HTTP/1.1 is the default transport.
// No transport specified, using default.
HttpClient client = new HttpClient();
client.start();If you want to customize the HTTP/1.1 transport, you can explicitly configure HttpClient in this way:
int selectors = 1;
HttpClientTransportOverHTTP transport = new HttpClientTransportOverHTTP(selectors);
HttpClient client = new HttpClient(transport, null);
client.start();The example above allows you to customize the number of NIO selectors that HttpClient will be using.
HTTP/2 Transport
The HTTP/2 transport can be configured in this way:
HTTP2Client h2Client = new HTTP2Client();
h2Client.setSelectors(1);
HttpClientTransportOverHTTP2 transport = new HttpClientTransportOverHTTP2(h2Client);
HttpClient client = new HttpClient(transport, null);
client.start();HTTP2Client is the lower-level client that provides an API based on HTTP/2 concepts such as sessions, streams and frames that are specific to HTTP/2.
HttpClientTransportOverHTTP2 uses HTTP2Client to format high-level semantic HTTP requests ("GET resource /index.html") into the HTTP/2 specific format.
FastCGI Transport
The FastCGI transport can be configured in this way:
int selectors = 1;
String scriptRoot = "/var/www/wordpress";
HttpClientTransportOverFCGI transport = new HttpClientTransportOverFCGI(selectors, false, scriptRoot);
HttpClient client = new HttpClient(transport, null);
client.start();In order to make requests using the FastCGI transport, you need to have a FastCGI server such as PHP-FPM (see also http://php.net/manual/en/install.fpm.php).
The FastCGI transport is primarily used by Jetty’s FastCGI support to serve PHP pages (WordPress for example).
Maven and Jetty
This chapter explains how to use Jetty with Maven and the Jetty Maven plugin.
Using Maven
Apache Maven is a software project management and comprehension tool. Based on the concept of a project object model (POM), Maven can manage a project’s build, reporting and documentation from a central piece of information.
It is an ideal tool to build a web application project, and such projects can use the jetty-maven-plugin to easily run the web application and save time in development. You can also use Maven to build, test and run a project which embeds Jetty.
|
Use of Maven and the jetty-maven-plugin is not required. Using Maven for Jetty implementations is a popular choice, but users encouraged to manage their projects in whatever way suits their needs. Other popular tools include Ant and Gradle. |
First we’ll have a look at a very simple HelloWorld java application that embeds Jetty, then a simple webapp which makes use of the jetty-maven-plugin to speed up the development cycle.
Using Embedded Jetty with Maven
To understand the basic operations of building and running against Jetty, first review:
Maven uses convention over configuration, so it is best to use the project structure Maven recommends. You can use archetypes to quickly setup Maven projects, but we will set up the structure manually for this simple tutorial example:
> mkdir JettyMavenHelloWorld
> cd JettyMavenHelloWorld
> mkdir -p src/main/java/org/exampleCreating the HelloWorld Class
Use an editor to create the file src/main/java/org/example/HelloWorld.java with the following contents:
package org.example;
import javax.servlet.http.HttpServletRequest;
import javax.servlet.http.HttpServletResponse;
import javax.servlet.ServletException;
import java.io.IOException;
import org.eclipse.jetty.server.Server;
import org.eclipse.jetty.server.Request;
import org.eclipse.jetty.server.handler.AbstractHandler;
public class HelloWorld extends AbstractHandler
{
public void handle(String target,
Request baseRequest,
HttpServletRequest request,
HttpServletResponse response)
throws IOException, ServletException
{
response.setContentType("text/html;charset=utf-8");
response.setStatus(HttpServletResponse.SC_OK);
baseRequest.setHandled(true);
response.getWriter().println("<h1>Hello World</h1>");
}
public static void main(String[] args) throws Exception
{
Server server = new Server(8080);
server.setHandler(new HelloWorld());
server.start();
server.join();
}
}Creating the POM Descriptor
The pom.xml file declares the project name and its dependencies.
Use an editor to create the file pom.xml in the JettyMavenHelloWorld directory with the following contents:
<project xmlns="http://maven.apache.org/POM/4.0.0"
xmlns:xsi="http://www.w3.org/2001/XMLSchema-instance"
xsi:schemaLocation="http://maven.apache.org/POM/4.0.0 http://maven.apache.org/maven-v4_0_0.xsd">
<modelVersion>4.0.0</modelVersion>
<groupId>org.example</groupId>
<artifactId>hello-world</artifactId>
<version>0.1-SNAPSHOT</version>
<packaging>jar</packaging>
<name>Jetty HelloWorld</name>
<properties>
<!-- Adapt this to a version found on
https://repo1.maven.org/maven2/org/eclipse/jetty/jetty-maven-plugin/
-->
<jettyVersion>9.3.9.v20160517</jettyVersion>
</properties>
<dependencies>
<dependency>
<groupId>org.eclipse.jetty</groupId>
<artifactId>jetty-server</artifactId>
<version>${jettyVersion}</version>
</dependency>
</dependencies>
<build>
<plugins>
<plugin>
<groupId>org.codehaus.mojo</groupId>
<artifactId>exec-maven-plugin</artifactId>
<version>1.1</version>
<executions>
<execution><goals><goal>java</goal></goals></execution>
</executions>
<configuration>
<mainClass>org.example.HelloWorld</mainClass>
</configuration>
</plugin>
</plugins>
</build>
</project>Building and Running Embedded HelloWorld
You can now compile and execute the HelloWorld class by using these commands:
> mvn clean compile exec:javaYou can point your browser to http://localhost:8080 to see the Hello World page.
You can observe what Maven is doing for you behind the scenes by using the mvn dependency:tree command, which reveals the transitive dependency resolved and downloaded as:
> mvn dependency:tree
[INFO] Scanning for projects...
...
[INFO]
[INFO] ------------------------------------------------------------------------
[INFO] Building Jetty HelloWorld 0.1-SNAPSHOT
[INFO] ------------------------------------------------------------------------
[INFO]
[INFO] --- maven-dependency-plugin:2.8:tree (default-cli) @ hello-world ---
...
[INFO] org.example:hello-world:jar:0.1-SNAPSHOT
[INFO] \- org.eclipse.jetty:jetty-server:jar:9.3.9.v20160517:compile
[INFO] +- javax.servlet:javax.servlet-api:jar:3.1.0:compile
[INFO] +- org.eclipse.jetty:jetty-http:jar:9.3.9.v20160517:compile
[INFO] | \- org.eclipse.jetty:jetty-util:jar:9.3.9.v20160517:compile
[INFO] \- org.eclipse.jetty:jetty-io:jar:9.3.9.v20160517:compile
[INFO] ------------------------------------------------------------------------
[INFO] BUILD SUCCESS
[INFO] ------------------------------------------------------------------------
[INFO] Total time: 4.145 s
[INFO] Finished at: 2016-08-01T13:46:42-04:00
[INFO] Final Memory: 15M/209M
[INFO] ------------------------------------------------------------------------Developing a Standard WebApp with Jetty and Maven
The previous section demonstrated how to use Maven with an application that embeds Jetty. Now we will examine instead how to develop a standard webapp with Maven and Jetty. First create the Maven structure (you can use the maven webapp archetype instead if you prefer):
> mkdir JettyMavenHelloWarApp
> cd JettyMavenHelloWebApp
> mkdir -p src/main/java/org/example
> mkdir -p src/main/webapp/WEB-INFCreating a Servlet
Use an editor to create the file src/main/java/org/example/HelloServlet.java with the following contents:
package org.example;
import java.io.IOException;
import javax.servlet.ServletException;
import javax.servlet.http.HttpServlet;
import javax.servlet.http.HttpServletRequest;
import javax.servlet.http.HttpServletResponse;
public class HelloServlet extends HttpServlet
{
protected void doGet(HttpServletRequest request, HttpServletResponse response) throws ServletException, IOException
{
response.setContentType("text/html");
response.setStatus(HttpServletResponse.SC_OK);
response.getWriter().println("<h1>Hello Servlet</h1>");
response.getWriter().println("session=" + request.getSession(true).getId());
}
}You need to declare this servlet in the deployment descriptor, so create the file src/main/webapp/WEB-INF/web.xml and add the following contents:
<?xml version="1.0" encoding="UTF-8"?>
<web-app
xmlns="http://xmlns.jcp.org/xml/ns/javaee"
xmlns:xsi="http://www.w3.org/2001/XMLSchema-instance"
xsi:schemaLocation="http://xmlns.jcp.org/xml/ns/javaee http://xmlns.jcp.org/xml/ns/javaee/web-app_3_1.xsd"
metadata-complete="false"
version="3.1">
<servlet>
<servlet-name>Hello</servlet-name>
<servlet-class>org.example.HelloServlet</servlet-class>
</servlet>
<servlet-mapping>
<servlet-name>Hello</servlet-name>
<url-pattern>/hello/*</url-pattern>
</servlet-mapping>
</web-app>Creating the POM Descriptor
The pom.xml file declares the project name and its dependencies.
Use an editor to create the file pom.xml with the following contents in the JettyMavenHelloWarApp directory, noting particularly the declaration of the jetty-maven-plugin:
<project xmlns="http://maven.apache.org/POM/4.0.0"
xmlns:xsi="http://www.w3.org/2001/XMLSchema-instance"
xsi:schemaLocation="http://maven.apache.org/POM/4.0.0 http://maven.apache.org/maven-v4_0_0.xsd">
<modelVersion>4.0.0</modelVersion>
<groupId>org.example</groupId>
<artifactId>hello-world</artifactId>
<version>0.1-SNAPSHOT</version>
<packaging>war</packaging>
<name>Jetty HelloWorld WebApp</name>
<properties>
<jettyVersion>{VERSION}</jettyVersion>
</properties>
<dependencies>
<dependency>
<groupId>javax.servlet</groupId>
<artifactId>javax.servlet-api</artifactId>
<version>3.1.0</version>
<scope>provided</scope>
</dependency>
</dependencies>
<build>
<plugins>
<plugin>
<groupId>org.eclipse.jetty</groupId>
<artifactId>jetty-maven-plugin</artifactId>
<version>${jettyVersion}</version>
</plugin>
</plugins>
</build>
</project>Building and Running the Web Application
Now you can both build and run the web application without needing to assemble it into a war by using the jetty-maven-plugin via the command:
> mvn jetty:runYou can see the static and dynamic content at http://localhost:8080/hello
There are a great deal of configuration options available for the jetty-maven-plugin to help you build and run your webapp. The full reference is at Configuring the Jetty Maven Plugin.
Building a WAR file
You can create a Web Application Archive (WAR) file from the project with the command:
> mvn packageThe resulting war file is in the target directory and may be deployed on any standard servlet server, including Jetty.
Configuring the Jetty Maven Plugin
The Jetty Maven plugin is useful for rapid development and testing. You can add it to any webapp project that is structured according to the Maven defaults. The plugin can then periodically scan your project for changes and automatically redeploy the webapp if any are found. This makes the development cycle more productive by eliminating the build and deploy steps: you use your IDE to make changes to the project, and the running web container automatically picks them up, allowing you to test them straight away.
|
You should use Maven 3.3+ for this plugin. |
While the Jetty Maven Plugin can be very useful for development we do not recommend its use in a production capacity. In order for the plugin to work it needs to leverage many internal Maven apis and Maven itself it not a production deployment tool. We recommend either the traditional distribution deployment approach or using embedded Jetty.
Quick Start: Get Up and Running
First, add jetty-maven-plugin to your pom.xml definition:
<plugin>
<groupId>org.eclipse.jetty</groupId>
<artifactId>jetty-maven-plugin</artifactId>
<version>{VERSION}</version>
</plugin>Then, from the same directory as your root pom.xml, type:
mvn jetty:runThis starts Jetty and serves up your project on http://localhost:8080/.
Jetty will continue to run until you stop it. While it runs it periodically scans for changes to your project files If you save changes and recompile your class files, Jetty redeploys your webapp, and you can instantly test the changes that were just made.
You can terminate the plugin with a ctrl-c in the terminal window where it is running.
|
The classpath of the running Jetty instance and its deployed webapp are managed by Maven, and may not be exactly what you expect.
For example: a webapp’s dependent jars might be referenced via the local repository, not the |
Supported Goals
The Jetty Maven plugin has a number of distinct Maven goals.
Arguably the most useful is the run goal which runs Jetty on an unassembled webapp.
There are other goals which help you accomplish different tasks.
For example, you might need to run your webapp in a forked instance of Jetty rather than within the process running Maven; or you may need finer grained control over the maven lifecycle stage in which you wish to deploy your webapp.
There are different goals to accomplish these tasks, as well as several others.
To see a list of all goals supported by the Jetty Maven plugin, do:
mvn jetty:helpTo see the detailed list of parameters that can be configured for a particular goal, in addition to its description, do:
mvn jetty:help -Ddetail=true -Dgoal= <goal name>Configuring the Jetty Container
These configuration elements set up the Jetty environment in which your webapp executes. They are common to most goals:
- httpConnector
-
Optional. If not specified, Jetty will create a ServerConnector instance listening on port 8080. You can change this default port number by using the system property
jetty.http.porton the command line, for example,mvn -Djetty.http.port=9999 jetty:run. Alternatively, you can use this configuration element to set up the information for the ServerConnector. The following are the valid configuration sub-elements:- port
-
The port number for the connector to listen on. By default it is 8080.
- host
-
The particular interface for the connector to listen on. By default, all interfaces.
- name
-
The name of the connector, which is useful for configuring contexts to respond only on particular connectors.
- idleTimeout
-
Maximum idle time for a connection.
You could instead configure the connectors in a standard jetty xml config file and put its location into the
jettyXmlparameter. Note that since Jetty 9.0 it is no longer possible to configure a https connector directly in the pom.xml: you need to use jetty xml config files to do it.
- jettyXml
-
Optional. A comma separated list of locations of Jetty xml files to apply in addition to any plugin configuration parameters. You might use it if you have other webapps, handlers, specific types of connectors etc., to deploy, or if you have other Jetty objects that you cannot configure from the plugin.
- scanIntervalSeconds
-
The pause in seconds between sweeps of the webapp to check for changes and automatically hot redeploy if any are detected. By default this is 0, which disables hot deployment scanning. A number greater than 0 enables it.
- reload
-
Default value is "automatic", used in conjunction with a non-zero `scanIntervalSeconds` causes automatic hot redeploy when changes are detected. Set to "manual" instead to trigger scanning by typing a linefeed in the console running the plugin. This might be useful when you are doing a series of changes that you want to ignore until you’re done. In that use, use the
reloadparameter. - dumpOnStart
-
Optional. Default value is false. If true, then jetty will dump out the server structure on start.
- loginServices
-
Optional. A list of
org.eclipse.jetty.security.LoginServiceimplementations. Note that there is no default realm. If you use a realm in yourweb.xmlyou can specify a corresponding realm here. You could instead configure the login services in a jetty xml file and add its location to thejettyXmlparameter. - requestLog
-
Optional. An implementation of the
org.eclipse.jetty.server.RequestLogrequest log interface. An implementation that respects the NCSA format is available asorg.eclipse.jetty.server.NCSARequestLog. There are three other ways to configure the RequestLog:-
In a jetty xml config file, as specified in the
jettyXmlparameter. -
In a context xml config file, as specified in the
contextXmlparameter. -
In the
webAppelement.
See Configuring Request Logs for more information.
-
- server
-
Optional as of Jetty 9.3.1. This would configure an instance of the
org.eclipse.jetty.server.Serverfor the plugin to use, however it is usually NOT necessary to configure this, as the plugin will automatically configure one for you. In particular, if you use the jettyXml element, then you generally DON’T want to define this element, as you are probably using the jettyXml file to configure up a Server with a special constructor argument, such as a custom threadpool. If you define both a server element AND use a jetty xml element which points to a config file that has a line like<Configure id="Server" class="org.eclipse.jetty.server.Server">then the the xml configuration will override what you configure for the server in thepom.xml. - stopPort
-
Optional. Port to listen on for stop commands. Useful to use in conjunction with the stop or run-forked goals.
- stopKey
-
Optional. Used in conjunction with stopPort for stopping jetty. Useful when used in conjunction with the stop or run-forked goals.
- systemProperties
-
Optional. Allows you to configure System properties for the execution of the plugin. For more information, see Setting System Properties.
- systemPropertiesFile
-
Optional. A file containing System properties to set for the execution of the plugin. By default, settings that you make here do not override any system properties already set on the command line, by the JVM, or in the POM via
systemProperties. Read Setting System Properties for how to force overrides. - skip
-
Default is false. If true, the execution of the plugin exits. Same as setting the SystemProperty
-Djetty.skipon the command line. This is most useful when configuring Jetty for execution during integration testing and you want to skip the tests. - useProvidedScope
-
Default value is
false. If true, the dependencies with<scope>provided</scope>are placed onto the container classpath. Be aware that this is NOT the webapp classpath, as "provided" indicates that these dependencies would normally be expected to be provided by the container. You should very rarely ever need to use this. Instead, you should copy the provided dependencies as explicit dependencies of theplugininstead. - excludedGoals
-
Optional. A list of Jetty plugin goal names that will cause the plugin to print an informative message and exit. Useful if you want to prevent users from executing goals that you know cannot work with your project.
Configuring a Https Connector
In order to configure an HTTPS connector, you need to use jetty xml configuration files. This example uses files copied directly from the jetty distribution etc/ directory, although you can of course make up your own xml file or files. We will use the following files:
- jetty.xml
-
Sets up various characteristics of the
org.eclipse.jetty.server.Serverinstance for the plugin to use. Importantly, it sets up theorg.eclipse.jetty.server.HttpConfigurationelement that we can refer to in subsequent xml files that configure the connectors. Below is the relevant section taken from jetty.xml.<Configure id="Server" class="org.eclipse.jetty.server.Server"> ... <New id="httpConfig" class="org.eclipse.jetty.server.HttpConfiguration"> <Set name="secureScheme"><Property name="jetty.httpConfig.secureScheme" default="https" /></Set> <Set name="securePort"><Property name="jetty.httpConfig.securePort" deprecated="jetty.secure.port" default="8443" /></Set> <Set name="outputBufferSize"><Property name="jetty.httpConfig.outputBufferSize" deprecated="jetty.output.buffer.size" default="32768" /></Set> <Set name="outputAggregationSize"><Property name="jetty.httpConfig.outputAggregationSize" deprecated="jetty.output.aggregation.size" default="8192" /></Set> <Set name="requestHeaderSize"><Property name="jetty.httpConfig.requestHeaderSize" deprecated="jetty.request.header.size" default="8192" /></Set> <Set name="responseHeaderSize"><Property name="jetty.httpConfig.responseHeaderSize" deprecated="jetty.response.header.size" default="8192" /></Set> <Set name="sendServerVersion"><Property name="jetty.httpConfig.sendServerVersion" deprecated="jetty.send.server.version" default="true" /></Set> <Set name="sendDateHeader"><Property name="jetty.httpConfig.sendDateHeader" deprecated="jetty.send.date.header" default="false" /></Set> <Set name="headerCacheSize"><Property name="jetty.httpConfig.headerCacheSize" default="1024" /></Set> <Set name="delayDispatchUntilContent"><Property name="jetty.httpConfig.delayDispatchUntilContent" deprecated="jetty.delayDispatchUntilContent" default="true"/></Set> <Set name="maxErrorDispatches"><Property name="jetty.httpConfig.maxErrorDispatches" default="10"/></Set> <Set name="blockingTimeout"><Property name="jetty.httpConfig.blockingTimeout" default="-1"/></Set> <Set name="persistentConnectionsEnabled"><Property name="jetty.httpConfig.persistentConnectionsEnabled" default="true"/></Set> <Set name="cookieCompliance"><Call class="org.eclipse.jetty.http.CookieCompliance" name="valueOf"><Arg><Property name="jetty.httpConfig.cookieCompliance" default="RFC6265"/></Arg></Call></Set> <!-- Uncomment to enable handling of X-Forwarded- style headers <Call name="addCustomizer"> <Arg><New class="org.eclipse.jetty.server.ForwardedRequestCustomizer"/></Arg> </Call> --> </New> ... </Configure> - jetty-ssl.xml
-
Sets up ssl which will be used by the https connector. Here’s the
jetty-ssl.xmlfile from the jetty-distribution:<?xml version="1.0"?><!DOCTYPE Configure PUBLIC "-//Jetty//Configure//EN" "http://www.eclipse.org/jetty/configure_9_3.dtd"> <!-- ============================================================= --> <!-- Base SSL configuration --> <!-- This configuration needs to be used together with 1 or more --> <!-- of jetty-https.xml or jetty-http2.xml --> <!-- ============================================================= --> <Configure id="Server" class="org.eclipse.jetty.server.Server"> <!-- =========================================================== --> <!-- Add an SSL Connector with no protocol factories --> <!-- =========================================================== --> <Call name="addConnector"> <Arg> <New id="sslConnector" class="org.eclipse.jetty.server.ServerConnector"> <Arg name="server"><Ref refid="Server" /></Arg> <Arg name="acceptors" type="int"><Property name="jetty.ssl.acceptors" deprecated="ssl.acceptors" default="-1"/></Arg> <Arg name="selectors" type="int"><Property name="jetty.ssl.selectors" deprecated="ssl.selectors" default="-1"/></Arg> <Arg name="factories"> <Array type="org.eclipse.jetty.server.ConnectionFactory"> <!-- uncomment to support proxy protocol <Item> <New class="org.eclipse.jetty.server.ProxyConnectionFactory"/> </Item>--> </Array> </Arg> <Set name="host"><Property name="jetty.ssl.host" deprecated="jetty.host" /></Set> <Set name="port"><Property name="jetty.ssl.port" deprecated="ssl.port" default="8443" /></Set> <Set name="idleTimeout"><Property name="jetty.ssl.idleTimeout" deprecated="ssl.timeout" default="30000"/></Set> <Set name="acceptorPriorityDelta"><Property name="jetty.ssl.acceptorPriorityDelta" deprecated="ssl.acceptorPriorityDelta" default="0"/></Set> <Set name="acceptQueueSize"><Property name="jetty.ssl.acceptQueueSize" deprecated="ssl.acceptQueueSize" default="0"/></Set> <Set name="reuseAddress"><Property name="jetty.ssl.reuseAddress" default="true"/></Set> <Set name="acceptedTcpNoDelay"><Property name="jetty.ssl.acceptedTcpNoDelay" default="true"/></Set> <Set name="acceptedReceiveBufferSize"><Property name="jetty.ssl.acceptedReceiveBufferSize" default="-1"/></Set> <Set name="acceptedSendBufferSize"><Property name="jetty.ssl.acceptedSendBufferSize" default="-1"/></Set> <Get name="SelectorManager"> <Set name="connectTimeout"><Property name="jetty.ssl.connectTimeout" default="15000"/></Set> </Get> </New> </Arg> </Call> <!-- =========================================================== --> <!-- Create a TLS specific HttpConfiguration based on the --> <!-- common HttpConfiguration defined in jetty.xml --> <!-- Add a SecureRequestCustomizer to extract certificate and --> <!-- session information --> <!-- =========================================================== --> <New id="sslHttpConfig" class="org.eclipse.jetty.server.HttpConfiguration"> <Arg><Ref refid="httpConfig"/></Arg> <Call name="addCustomizer"> <Arg> <New class="org.eclipse.jetty.server.SecureRequestCustomizer"> <Arg name="sniRequired" type="boolean"><Property name="jetty.ssl.sniRequired" default="false"/></Arg> <Arg name="sniHostCheck" type="boolean"><Property name="jetty.ssl.sniHostCheck" default="true"/></Arg> <Arg name="stsMaxAgeSeconds" type="int"><Property name="jetty.ssl.stsMaxAgeSeconds" default="-1"/></Arg> <Arg name="stsIncludeSubdomains" type="boolean"><Property name="jetty.ssl.stsIncludeSubdomains" default="false"/></Arg> </New> </Arg> </Call> </New> </Configure> - jetty-https.xml
-
Set up the https connector using the HttpConfiguration from
jetty.xmland the ssl configuration fromjetty-ssl.xml:<?xml version="1.0"?><!DOCTYPE Configure PUBLIC "-//Jetty//Configure//EN" "http://www.eclipse.org/jetty/configure_9_3.dtd"> <!-- ============================================================= --> <!-- Configure an HTTPS connector. --> <!-- This configuration must be used in conjunction with jetty.xml --> <!-- and jetty-ssl.xml. --> <!-- ============================================================= --> <Configure id="sslConnector" class="org.eclipse.jetty.server.ServerConnector"> <Call name="addIfAbsentConnectionFactory"> <Arg> <New class="org.eclipse.jetty.server.SslConnectionFactory"> <Arg name="next">http/1.1</Arg> <Arg name="sslContextFactory"><Ref refid="sslContextFactory"/></Arg> </New> </Arg> </Call> <Call name="addConnectionFactory"> <Arg> <New class="org.eclipse.jetty.server.HttpConnectionFactory"> <Arg name="config"><Ref refid="sslHttpConfig" /></Arg> <Arg name="compliance"><Call class="org.eclipse.jetty.http.HttpCompliance" name="valueOf"><Arg><Property name="jetty.http.compliance" default="RFC7230"/></Arg></Call></Arg> </New> </Arg> </Call> </Configure>
Now you need to let the plugin know to apply the files above:
<plugin>
<groupId>org.eclipse.jetty</groupId>
<artifactId>jetty-maven-plugin</artifactId>
<version>{VERSION}</version>
<configuration>
<jettyXml>jetty.xml,jetty-ssl.xml,jetty-https.xml</jettyXml>
</configuration>
</plugin>|
Just as with an installed distribution of Jetty, the ordering of the xml files is significant. |
You can also use Jetty xml files to configure a http connector for the plugin to use.
Here we use the same jetty-http.xml file from the Jetty distribution:
<?xml version="1.0"?><!DOCTYPE Configure PUBLIC "-//Jetty//Configure//EN" "http://www.eclipse.org/jetty/configure_9_3.dtd">
<!-- ============================================================= -->
<!-- Configure the Jetty Server instance with an ID "Server" -->
<!-- by adding an HTTP connector. -->
<!-- This configuration must be used in conjunction with jetty.xml -->
<!-- ============================================================= -->
<Configure id="Server" class="org.eclipse.jetty.server.Server">
<!-- =========================================================== -->
<!-- Add an HTTP Connector. -->
<!-- Configure an o.e.j.server.ServerConnector with a single -->
<!-- HttpConnectionFactory instance using the common httpConfig -->
<!-- instance defined in jetty.xml -->
<!-- -->
<!-- Consult the javadoc of o.e.j.server.ServerConnector and -->
<!-- o.e.j.server.HttpConnectionFactory for all configuration -->
<!-- that may be set here. -->
<!-- =========================================================== -->
<Call name="addConnector">
<Arg>
<New id="httpConnector" class="org.eclipse.jetty.server.ServerConnector">
<Arg name="server"><Ref refid="Server" /></Arg>
<Arg name="acceptors" type="int"><Property name="jetty.http.acceptors" deprecated="http.acceptors" default="-1"/></Arg>
<Arg name="selectors" type="int"><Property name="jetty.http.selectors" deprecated="http.selectors" default="-1"/></Arg>
<Arg name="factories">
<Array type="org.eclipse.jetty.server.ConnectionFactory">
<Item>
<New class="org.eclipse.jetty.server.HttpConnectionFactory">
<Arg name="config"><Ref refid="httpConfig" /></Arg>
<Arg name="compliance"><Call class="org.eclipse.jetty.http.HttpCompliance" name="valueOf"><Arg><Property name="jetty.http.compliance" default="RFC7230_LEGACY"/></Arg></Call></Arg>
</New>
</Item>
</Array>
</Arg>
<Set name="host"><Property name="jetty.http.host" deprecated="jetty.host" /></Set>
<Set name="port"><Property name="jetty.http.port" deprecated="jetty.port" default="8080" /></Set>
<Set name="idleTimeout"><Property name="jetty.http.idleTimeout" deprecated="http.timeout" default="30000"/></Set>
<Set name="acceptorPriorityDelta"><Property name="jetty.http.acceptorPriorityDelta" deprecated="http.acceptorPriorityDelta" default="0"/></Set>
<Set name="acceptQueueSize"><Property name="jetty.http.acceptQueueSize" deprecated="http.acceptQueueSize" default="0"/></Set>
<Set name="reuseAddress"><Property name="jetty.http.reuseAddress" default="true"/></Set>
<Set name="acceptedTcpNoDelay"><Property name="jetty.http.acceptedTcpNoDelay" default="true"/></Set>
<Set name="acceptedReceiveBufferSize"><Property name="jetty.http.acceptedReceiveBufferSize" default="-1"/></Set>
<Set name="acceptedSendBufferSize"><Property name="jetty.http.acceptedSendBufferSize" default="-1"/></Set>
<Get name="SelectorManager">
<Set name="connectTimeout"><Property name="jetty.http.connectTimeout" default="15000"/></Set>
</Get>
</New>
</Arg>
</Call>
</Configure>Now we add it to the list of configs for the plugin to apply:
<plugin>
<groupId>org.eclipse.jetty</groupId>
<artifactId>jetty-maven-plugin</artifactId>
<version>{VERSION}</version>
<configuration>
<jettyXml>jetty.xml,jetty-http.xml,jetty-ssl.xml,jetty-https.xml</jettyXml>
</configuration>
</plugin>Alternatively, you can use the httpConnector configuration element inside the pom instead as described above.
Configuring Your WebApp
These configuration parameters apply to your webapp. They are common to almost all goals.
- webApp
-
This is an instance of org.eclipse.jetty.maven.plugin.JettyWebAppContext, which is an extension to the class
org.eclipse.jetty.webapp.WebAppContext. You can use any of the setter methods on this object to configure your webapp. Here are a few of the most useful ones:- contextPath
-
The context path for your webapp. By default, this is set to
/. If using a custom value for this parameter, you probably want to include the leading/, example/mycontext. - descriptor
-
The path to the
web.xmlfile for your webapp. - defaultsDescriptor
-
The path to a
webdefault.xmlfile that will be applied to your webapp before theweb.xml. If you don’t supply one, Jetty uses a default file baked into thejetty-webapp.jar. - overrideDescriptor
-
The path to a
web.xmlfile that Jetty applies after reading yourweb.xml. You can use this to replace or add configuration. - tempDirectory
-
The path to a dir that Jetty can use to expand or copy jars and jsp compiles when your webapp is running. The default is
${project.build.outputDirectory}/tmp. - baseResource
-
The path from which Jetty serves static resources. Defaults to
src/main/webapp. - resourceBases
-
Use instead of
baseResourceif you have multiple directories from which you want to serve static content. This is an array of directory names. - baseAppFirst
-
Defaults to "true". Controls whether any overlaid wars are added before or after the original base resource(s) of the webapp. See the section on overlaid wars for more information.
- containerIncludeJarPattern
-
Defaults to
./javax.servlet-[/]\.jar$|./servlet-api-[/]\.jar$|.javax.servlet.jsp.jstl-[^/]\.jar|.taglibs-standard-impl-.\.jar. This is a pattern that is applied to the names of the jars on the container’s classpath (ie the classpath of the plugin, not that of the webapp) that should be scanned for fragments, tlds, annotations etc. This is analogous to the context attribute org.eclipse.jetty.server.webapp.ContainerIncludeJarPattern that is documented here. You can define extra patterns of jars that will be included in the scan. - webInfIncludeJarPattern
-
Defaults to matching all of the dependency jars for the webapp (ie the equivalent of WEB-INF/lib). You can make this pattern more restrictive to only match certain jars by using this setter. This is analogous to the context attribute org.eclipse.jetty.server.webapp.WebInfIncludeJarPattern that is documented here.
- contextXml
-
The path to a context xml file that is applied to your webapp AFTER the
webAppelement.
jetty:run
The run goal runs on a webapp that does not have to be built into a WAR.
Instead, Jetty deploys the webapp from its sources.
It looks for the constituent parts of a webapp in the Maven default project locations, although you can override these in the plugin configuration.
For example, by default it looks for:
-
resources in
${project.basedir}/src/main/webapp -
classes in
${project.build.outputDirectory} -
web.xmlin${project.basedir}/src/main/webapp/WEB-INF/
The plugin automatically ensures the classes are rebuilt and up-to-date before deployment. If you change the source of a class and your IDE automatically compiles it in the background, the plugin picks up the changed class.
You do not need to assemble the webapp into a WAR, saving time during the development cycle. Once invoked, you can configure the plugin to run continuously, scanning for changes in the project and automatically performing a hot redeploy when necessary. Any changes you make are immediately reflected in the running instance of Jetty, letting you quickly jump from coding to testing, rather than going through the cycle of: code, compile, reassemble, redeploy, test.
|
As of Jetty 9.4.7, when using jetty:run in a multi-module build, it is no longer necessary to build each of the modules that form dependencies of the webapp first. Thus, if your webapp depends on other modules in your project and they are present in the reactor at the same time, jetty will use their compiled classes rather than their jar files from your local maven repository. |
Here is an example, which turns on scanning for changes every ten seconds, and sets the webapp context path to /test:
<plugin>
<groupId>org.eclipse.jetty</groupId>
<artifactId>jetty-maven-plugin</artifactId>
<version>{VERSION}</version>
<configuration>
<scanIntervalSeconds>10</scanIntervalSeconds>
<webApp>
<contextPath>/test</contextPath>
</webApp>
</configuration>
</plugin>Configuration
In addition to the webApp element that is common to most goals, the jetty:run goal supports:
- classesDirectory
-
Location of your compiled classes for the webapp. You should rarely need to set this parameter. Instead, you should set
build outputDirectoryin yourpom.xml. - testClassesDirectory
-
Location of the compiled test classes for your webapp. By default this is
${project.build.testOutputDirectory}. - useTestScope
-
If true, the classes from
testClassesDirectoryand dependencies of scope "test" are placed first on the classpath. By default this is false. - webAppSourceDirectory
-
By default, this is set to
${project.basedir}/src/main/webapp. If your static sources are in a different location, set this parameter accordingly. - jettyEnvXml
-
Optional. Location of a
jetty-env.xmlfile, which allows you to make JNDI bindings that satisfyenv-entry,resource-env-ref, andresource-reflinkages in theweb.xmlthat are scoped only to the webapp and not shared with other webapps that you might be deploying at the same time (for example, by using a ` jettyConfig` file). - scanTargets
-
Optional. A list of files and directories to periodically scan in addition to those the plugin automatically scans.
- scanTargetPatterns
-
Optional. If you have a long list of extra files you want scanned, it is more convenient to use pattern matching expressions to specify them instead of enumerating them with the
scanTargetsListofscanTargetPatterns, each consisting of a directory, and including and/or excluding parameters to specify the file matching patterns. - scanClassesPattern
-
Since 9.3.0. Optional. Include and exclude patterns that can be applied to the classesDirectory for the purposes of scanning, it does not affect the classpath. If a file or directory is excluded by the patterns then a change in that file (or subtree in the case of a directory) is ignored and will not cause the webapp to redeploy. Patterns are specified as a relative path using a glob-like syntax as described in the javadoc for FileSystem.getPathMatcher.
- scanTestClassesPattern
-
Since 9.3.0. Optional. Include and exclude patterns that can be applied to the testClassesDirectory for the purposes of scanning, it does not affect the classpath. If a file or directory is excluded by the patterns then a change in that file (or subtree in the case of a directory) is ignored and will not cause the webapp to redeploy. Patterns are specified as a relative path using a glob-like syntax as described in the javadoc for FileSystem.getPathMatcher.
Here’s an example:
<project>
...
<plugins>
...
<plugin>
<groupId>org.eclipse.jetty</groupId>
<artifactId>jetty-maven-plugin</artifactId>
<version>{VERSION}</version>
<configuration>
<webAppSourceDirectory>${project.basedir}/src/staticfiles</webAppSourceDirectory>
<webApp>
<contextPath>/</contextPath>
<descriptor>${project.basedir}/src/over/here/web.xml</descriptor>
<jettyEnvXml>${project.basedir}/src/over/here/jetty-env.xml</jettyEnvXml>
</webApp>
<classesDirectory>${project.basedir}/somewhere/else</classesDirectory>
<scanClassesPattern>
<excludes>
<exclude>**/Foo.class</exclude>
</excludes>
</scanClassesPattern>
<scanTargets>
<scanTarget>src/mydir</scanTarget>
<scanTarget>src/myfile.txt</scanTarget>
</scanTargets>
<scanTargetPatterns>
<scanTargetPattern>
<directory>src/other-resources</directory>
<includes>
<include>**/*.xml</include>
<include>**/*.properties</include>
</includes>
<excludes>
<exclude>**/myspecial.xml</exclude>
<exclude>**/myspecial.properties</exclude>
</excludes>
</scanTargetPattern>
</scanTargetPatterns>
</configuration>
</plugin>
</plugins>
...
</project>If, for whatever reason, you cannot run on an unassembled webapp, the goals run-war and run-exploded work on unassembled webapps.
jetty:run-war
This goal first packages your webapp as a WAR file and then deploys it to Jetty.
If you set a non-zero scanInterval, Jetty watches your pom.xml and the WAR file; if either changes, it redeploys the war.
Configuration
- war
-
The location of the built WAR file. This defaults to
${project.build.directory}/${project.build.finalName}.war. If this is not sufficient, set it to your custom location.
Here’s how to set it:
<project>
...
<plugins>
...
<plugin>
<groupId>org.eclipse.jetty</groupId>
<artifactId>jetty-maven-plugin</artifactId>
<version>{VERSION}</version>
<configuration>
<war>${project.basedir}/target/mycustom.war</war>
</configuration>
</plugin>
</plugins>
</project>jetty:run-exploded
The run-exploded goal first assembles your webapp into an exploded WAR file and then deploys it to Jetty.
If you set a non-zero scanInterval, Jetty watches your pom.xml,`WEB-INF/lib, WEB-INF/ and WEB-INF/web.xml for changes and redeploys when necessary.
Configuration
- war
-
The location of the exploded WAR. This defaults to
${project.build.directory}/${project.build.finalName}, but you can override the default by setting this parameter.
Here’s how to set it:
<project>
...
<plugins>
...
<plugin>
<groupId>org.eclipse.jetty</groupId>
<artifactId>maven-jetty-plugin</artifactId>
<version>{VERSION}</version>
<configuration>
<war>${project.basedir}/target/myfunkywebapp</war>
</configuration>
</plugin>
</plugins>
</project>jetty:deploy-war
This is basically the same as jetty:run-war, but without assembling the WAR of the current module - you can nominate the location of any war to run.
Unlike run-war, the phase in which this plugin executes is not bound to the "package" phase - you may bind it to any phase to use it.
Configuration
- war
-
The location of the WAR file. This defaults to
${project.build.directory}/${project.build.finalName}, but you can override the default by setting this parameter. - daemon
-
If true, this plugin will start Jetty but let the build continue. This is useful if you want to start jetty as an execution binding in a particular phase and then stop it in another. Alternatively, you can set this parameter to false, in which case Jetty will block and you will need to use a ctrl-c to stop it.
Here’s the configuration:
<project>
...
<plugins>
...
<plugin>
<groupId>org.eclipse.jetty</groupId>
<artifactId>jetty-maven-plugin</artifactId>
<version>{VERSION}</version>
<configuration>
<war>/opt/special/some-app.war</war>
<stopKey>alpha</stopKey>
<stopPort>9099</stopPort>
</configuration>
<executions>
<execution>
<id>start-jetty</id>
<phase>test-compile</phase>
<goals>
<goal>deploy-war</goal>
</goals>
</execution>
<execution>
<id>stop-jetty</id>
<phase>test</phase>
<goals>
<goal>stop</goal>
</goals>
</execution>
</executions>
</plugin>
</plugins>
</project>jetty:run-forked
This goal allows you to start the webapp in a new JVM, optionally passing arguments to that new JVM.
This goal supports mostly the same configuration parameters as the jetty:run goal with a couple of extras to help configure the forked process.
Unlike the jetty:run goal, the jetty:run-forked goal will not scan the webapp for changes and redeploy.
Configuration
The available configuration parameters - in addition to those for the jetty:run goal - are:
- jvmArgs
-
Optional. A string representing arbitrary arguments to pass to the forked JVM.
- env
-
Optional. Map of key/value pairs to pass as environment to the forked JVM.
- waitForChild
-
Default is
true. This causes the parent process to wait for the forked process to exit. In this case you can usectrl-cto terminate both processes. It is more useful to set it tofalse, in which case the parent process terminates whilst leaving the child process running. You use thejetty:stopgoal to stop the child process. In the case wherewaitForChildisfalse, the output from the child process is written totarget/jetty.out. - maxChildChecks
-
Default is
50. This is maximum number of times the parent process checks to see if the child process has started. Only relevant ifwaitForChildisfalse. - maxChildCheckInterval
-
Default is
100. This is the time in milliseconds between checks to see if the child process has started. Only relevant ifwaitForChildisfalse. - forkWebXml
-
Default is
target/fork-web.xml. This is the name of the file into which jetty generates the effective web.xml for use by the child process. - javaPath
-
Default will be your
${java.home}/bin/javaThis the java executable used to start the child process
The following jetty:run parameters are NOT applicable:
-
scanTargets
-
scanTargetPatterns
-
scanClassesPattern
-
scanTestClassesPattern
Some of the container configuration parameters are NOT available with this goal:
- scanIntervalSeconds
-
Not supported. The forked jetty will not monitor and redeploy the webapp.
- reload
-
Not supported. The forked jetty will not redeploy the webapp.
- httpConnector
-
Not supported. To define custom connectors use a jetty xml file instead.
- loginServices
-
Not supported. To define LoginServices use a jetty xml or context xml file instead.
- requestLog
-
Not supported. To define a RequestLog setup, use a jetty xml or context xml file instead.
- systemProperties
-
Not supported. Use the
jvmArgsparameter to pass system properties to the forked process.
To deploy your unassembled web app to Jetty running in a new JVM:
mvn jetty:run-forkedJetty continues to execute until you either:
-
Press
ctrl-cin the terminal window to stop the plugin, which also stops the forked JVM (only if you started withwaitForChild=true) -
Use
jetty:stopto stop the forked JVM, which also stops the plugin.
|
If you want to set a custom port for the Jetty connector you need to specify it in a |
jetty:run-distro
Introduced in Jetty 9.4.8, this goal allows you to execute your unassembled webapp in a local distribution of Jetty. This can be useful if your webapp requires a highly customized environment in which to run. If your webapp is designed to run in the jetty distribution in production, then this goal is the closest approximation to that environment.
Similar to the jetty:run-forked goal, this goal will fork a child process in which to execute your webapp in the distro.
Configuration
The configuration parameters are mostly the same as the jetty:run goal (although see below for some exceptions), with the addition of:
- jettyBase
-
Optional. The location of an existing jetty base directory to use to deploy the webapp. The existing base will be copied to the
target/directory before the webapp is deployed. If there is no existing jetty base, a fresh one will be made intarget/jetty-base. - jettyHome
-
Optional. The location of an existing unpacked jetty distribution. If one does not exist, a fresh jetty distribution will be downloaded from maven and installed to the
targetdirectory. - jettyProperties
-
Optional. An array of jetty properties to specify on the command line for the child process.
- jvmArgs
-
Optional. A string representing arguments that should be passed to the jvm of the child process.
- modules
-
Optional. An array of names of jetty modules that the jetty child process will activate.
- waitForChild
-
Default is
true. Like jetty:run-forked, iftrue, the parent process will wait for the child to exit and echo all of its output to the parent’s stdout/stderr. In that case you can terminate both processes with acntrl-c. Iffalse, the parent does not wait for the child to finish, and the child will write all of its output totarget/jetty.out. To stop the asynchronously executing child process you can usejetty:stop. - maxChildChecks
-
Default value 10. This is the maximum number of times the parent will check to see if the child started correctly when
waitForChildisfalse. - maxChildCheckInterval
-
Default value 100. This is the interval in milliseconds between checks to see if the child started correctly. Only applicable if
waitForChildisfalse. - javaPath
-
Default will be your
${java.home}/bin/javaThis the java executable used to start the child process
|
Use the |
The following jetty:run parameters are NOT applicable to this goal:
-
scanTargets
-
scanTargetPatterns
-
scanClassesPattern
-
scanTestClassesPattern
The following container configuration options are NOT applicable for this goal:
- scanIntervalSeconds
-
Not supported. This goal will not monitor and redeploy the webapp.
- reload
-
Not supported. This goal will not redeploy the webapp.
- httpConnector
-
Not supported. Use the
modulesparameter to enable appropriate modules, or thejettyBaseparameter to point to an appropriately configured jetty base. - loginServices
-
Not supported. Use the
modulesparameter to enable appropriate modules, or thejettyBaseparameter to point to an appropriately configured jetty base. - requestLog
-
Not supported. Use the
modulesparameter to enable appropriate modules, or thejettyBaseparameter to point to an appropriately configured jetty base. - systemProperties
-
Not supported. Use the
jvmArgsparameter to pass system properties to the forked process.
Here’s an example of using the configuration parameters:
<project>
...
<plugins>
...
<plugin>
<groupId>org.eclipse.jetty</groupId>
<artifactId>jetty-maven-plugin</artifactId>
<version>{VERSION}</version>
<configuration>
<stopKey>alpha</stopKey>
<stopPort>9099</stopPort>
<jettyBase>/my/existing/jetty-base</jettyBase>
<contextXml>/some/existing/context.xml</contextXml>
<useTestClasspath>true</useTestClasspath>
<modules>
<module>apache-jsp</module>
<module>apache-jstl</module>
<module>jmx</module>
</modules>
<jettyProperties>
<jettyProperty>jetty.server.dumpAfterStart=true</jettyProperty>
</jettyProperties>
<jvmArgs>-Dorg.eclipse.jetty.webapp.LEVEL=DEBUG</jvmArgs>
<webApp>
<contextPath>/mypath</contextPath>
</webApp>
</configuration>
</plugin>
...
</plugins>
</project>|
When defining modules for this goal, use the standard Jetty module names and not the name of the related Jetty sub-project.
For example, in the configuration above support for JMX is configured by adding the |
To deploy your unassembled web app to jetty running as a local distribution:
mvn jetty:run-distrojetty:start
This goal is for use with an execution binding in your pom.xml.
It is similar to the jetty:run goal, however it does NOT first execute the build up until the test-compile phase to ensure that all necessary classes and files of the webapp have been generated.
This is most useful when you want to control the start and stop of Jetty via execution bindings in your pom.xml.
For example, you can configure the plugin to start your webapp at the beginning of your unit tests and stop at the end.
To do this, you need to set up a couple of execution scenarios for the Jetty plugin.
You use the pre-integration-test and post-integration-test Maven build phases to trigger the execution and termination of Jetty:
<plugin>
<groupId>org.eclipse.jetty</groupId>
<artifactId>jetty-maven-plugin</artifactId>
<version>{VERSION}</version>
<configuration>
<scanIntervalSeconds>10</scanIntervalSeconds>
<stopKey>foo</stopKey>
<stopPort>9999</stopPort>
</configuration>
<executions>
<execution>
<id>start-jetty</id>
<phase>pre-integration-test</phase>
<goals>
<goal>start</goal>
</goals>
<configuration>
<scanIntervalSeconds>0</scanIntervalSeconds>
</configuration>
</execution>
<execution>
<id>stop-jetty</id>
<phase>post-integration-test</phase>
<goals>
<goal>stop</goal>
</goals>
</execution>
</executions>
</plugin>jetty:stop
The stop goal stops a running instance of Jetty. To use it, you need to configure the plugin with a special port number and key. That same port number and key will also be used by the other goals that start jetty.
- stopPort
-
A port number for Jetty to listen on to receive a stop command to cause it to shutdown.
- stopKey
-
A string value sent to the
stopPortto validate the stop command. - stopWait
-
The maximum time in seconds that the plugin will wait for confirmation that Jetty has stopped. If false or not specified, the plugin does not wait for confirmation but exits after issuing the stop command.
Here’s a configuration example:
<plugin>
<groupId>org.eclipse.jetty</groupId>
<artifactId>jetty-maven-plugin</artifactId>
<version>{VERSION}</version>
<configuration>
<stopPort>9966</stopPort>
<stopKey>foo</stopKey>
<stopWait>10</stopWait>
</configuration>
</plugin>Then, while Jetty is running (in another window), type:
mvn jetty:stopThe stopPort must be free on the machine you are running on.
If this is not the case, you will get an "Address already in use" error message after the "Started ServerConnector …" message.
jetty:effective-web-xml
This goal calculates a synthetic web.xml (the "effective web.xml") according to the rules of the Servlet Specification taking into account all sources of discoverable configuration of web components in your application: descriptors (webdefault.xml, web.xml, web-fragment.xml`s, `web-override.xml) and discovered annotations (@WebServlet, @WebFilter, @WebListener).
Note that no programmatic declarations of servlets, filters and listeners can be taken into account.
The effective web.xml from these combined sources is generated and displayed as maven log output.
Other useful information about your webapp that is produced as part of the analysis is also stored as context parameters in the effective-web.xml.
The effective-web.xml can be used in conjunction with the Quickstart feature to quickly start your webapp (note that Quickstart is not appropriate for the mvn jetty goals).
The following configuration parameters allow you to save the file:
- deleteOnExit
-
By default this is
true. If set tofalse, the effective web.xml is generated into a file calledeffective-web.xmlin the buildtargetdirectory. - effectiveWebXml
-
The full path name of a file into which you would like the effective web xml generated.
You can also generate the origin of each element into the effective web.xml file. The origin is either a descriptor eg web.xml,web-fragment.xml,override-web.xml file, or an annotation eg @WebServlet. Some examples of elements with origin attribute information are:
<listener origin="DefaultsDescriptor(file:///path/to/distro/etc/webdefault.xml):21">
<listener origin="WebDescriptor(file:///path/to/base/webapps/test-spec/WEB-INF/web.xml):22">
<servlet-class origin="FragmentDescriptor(jar:file:///path/to/base/webapps/test-spec/WEB-INF/lib/test-web-fragment.jar!/META-INF/web-fragment.xml):23">
<servlet-class origin="@WebServlet(com.acme.test.TestServlet):24">To generate origin information, use the following configuration parameters on the webApp element:
- originAttribute
-
The name of the attribute that will contain the origin. By default it is
origin. - generateOrigin
-
False by default. If true, will force the generation of the originAttribute onto each element.
Using Overlaid wars
If your webapp depends on other war files, the jetty:run and jetty:run-forked goals are able to merge resources from all of them. It can do so based on the settings of the maven-war-plugin, or if your project does not use the maven-war-plugin to handle the overlays, it can fall back to a simple algorithm to determine the ordering of resources.
With maven-war-plugin
The maven-war-plugin has a rich set of capabilities for merging resources.
The jetty:run and jetty:run-forked goals are able to interpret most of them and apply them during execution of your unassembled webapp.
This is probably best seen by looking at a concrete example.
Suppose your webapp depends on the following wars:
<dependency>
<groupId>com.acme</groupId>
<artifactId>X</artifactId>
<type>war</type>
</dependency>
<dependency>
<groupId>com.acme</groupId>
<artifactId>Y</artifactId>
<type>war</type>
</dependency>Containing:
WebAppX:
/foo.jsp
/bar.jsp
/WEB-INF/web.xml
WebAppY:
/bar.jsp
/baz.jsp
/WEB-INF/web.xml
/WEB-INF/special.xmlThey are configured for the maven-war-plugin:
<plugin>
<groupId>org.apache.maven.plugins</groupId>
<artifactId>maven-war-plugin</artifactId>
<version>{VERSION}</version>
<configuration>
<overlays>
<overlay>
<groupId>com.acme</groupId>
<artifactId>X</artifactId>
<excludes>
<exclude>bar.jsp</exclude>
</excludes>
</overlay>
<overlay>
<groupId>com.acme</groupId>
<artifactId>Y</artifactId>
<excludes>
<exclude>baz.jsp</exclude>
</excludes>
</overlay>
<overlay>
</overlay>
</overlays>
</configuration>
</plugin>Then executing jetty:run would yield the following ordering of resources: com.acme.X.war : com.acme.Y.war: ${project.basedir}/src/main/webapp.
Note that the current project’s resources are placed last in the ordering due to the empty <overlay/> element in the maven-war-plugin.
You can either use that, or specify the <baseAppFirst>false</baseAppFirst> parameter to the jetty-maven-plugin.
Moreover, due to the exclusions specified above, a request for the resource ` bar.jsp` would only be satisfied from com.acme.Y.war.
Similarly as baz.jsp is excluded, a request for it would result in a 404 error.
Without maven-war-plugin
The algorithm is fairly simple, is based on the ordering of declaration of the dependent wars, and does not support exclusions.
The configuration parameter <baseAppFirst> (see the section on Configuring Your Webapp for more information) can be used to control whether your webapp’s resources are placed first or last on the resource path at runtime.
For example, suppose our webapp depends on these two wars:
<dependency>
<groupId>com.acme</groupId>
<artifactId>X</artifactId>
<type>war</type>
</dependency>
<dependency>
<groupId>com.acme</groupId>
<artifactId>Y</artifactId>
<type>war</type>
</dependency>Suppose the webapps contain:
WebAppX:
/foo.jsp
/bar.jsp
/WEB-INF/web.xml
WebAppY:
/bar.jsp
/baz.jsp
/WEB-INF/web.xml
/WEB-INF/special.xmlThen our webapp has available these additional resources:
/foo.jsp (X)
/bar.jsp (X)
/baz.jsp (Y)
/WEB-INF/web.xml (X)
/WEB-INF/special.xml (Y)Configuring Security Settings
You can configure LoginServices in the plugin. Here’s an example of setting up the HashLoginService for a webapp:
<plugin>
<groupId>org.eclipse.jetty</groupId>
<artifactId>jetty-maven-plugin</artifactId>
<version>{VERSION}</version>
<configuration>
<scanIntervalSeconds>10</scanIntervalSeconds>
<webApp>
<contextPath>/test</contextPath>
</webApp>
<loginServices>
<loginService implementation="org.eclipse.jetty.security.HashLoginService">
<name>Test Realm</name>
<config>${project.basedir}/src/etc/realm.properties</config>
</loginService>
</loginServices>
</configuration>
</plugin>Using Multiple Webapp Root Directories
If you have external resources that you want to incorporate in the execution of a webapp, but which are not assembled into war files, you can’t use the overlaid wars method described above, but you can tell Jetty the directories in which these external resources are located. At runtime, when Jetty receives a request for a resource, it searches all the locations to retrieve the resource. It’s a lot like the overlaid war situation, but without the war.
Here is a configuration example:
<configuration>
<webApp>
<contextPath>/${build.finalName}</contextPath>
<baseResource implementation="org.eclipse.jetty.util.resource.ResourceCollection">
<resourcesAsCSV>src/main/webapp,/home/johndoe/path/to/my/other/source,/yet/another/folder</resourcesAsCSV>
</baseResource>
</webApp>
</configuration>Running More than One Webapp
With jetty:run
You can use either a jetty.xml file to configure extra (pre-compiled) webapps that you want to deploy, or you can use the <contextHandlers> configuration element to do so.
If you want to deploy webapp A, and webapps B and C in the same Jetty instance:
Putting the configuration in webapp A’s pom.xml:
<plugin>
<groupId>org.eclipse.jetty</groupId>
<artifactId>jetty-maven-plugin</artifactId>
<version>{VERSION}</version>
<configuration>
<scanIntervalSeconds>10</scanIntervalSeconds>
<webApp>
<contextPath>/test</contextPath>
</webApp>
<contextHandlers>
<contextHandler implementation="org.eclipse.jetty.maven.plugin.JettyWebAppContext">
<war>${project.basedir}../../B.war</war>
<contextPath>/B</contextPath>
</contextHandler>
<contextHandler implementation="org.eclipse.jetty.maven.plugin.JettyWebAppContext">
<war>${project.basedir}../../C.war</war>
<contextPath>/C</contextPath>
</contextHandler>
</contextHandlers>
</configuration>
</plugin>|
If the |
Alternatively, add a jetty.xml file to webapp A.
Copy the jetty.xml file from the Jetty distribution, and then add WebAppContexts for the other 2 webapps:
<Ref refid="Contexts">
<Call name="addHandler">
<Arg>
<New class="org.eclipse.jetty.maven.plugin.JettyWebAppContext">
<Set name="contextPath">/B</Set>
<Set name="war">../../B.war</Set>
</New>
</Arg>
</Call>
<Call>
<Arg>
<New class="org.eclipse.jetty.maven.plugin.JettyWebAppContext">
<Set name="contextPath">/C</Set>
<Set name="war">../../C.war</Set>
</New>
</Arg>
</Call>
</Ref>Then configure the location of this jetty.xml file into webapp A’s jetty plugin:
<plugin>
<groupId>org.eclipse.jetty</groupId>
<artifactId>jetty-maven-plugin</artifactId>
<version>{VERSION}</version>
<configuration>
<scanIntervalSeconds>10</scanIntervalSeconds>
<webApp>
<contextPath>/test</contextPath>
</webApp>
<jettyXml>src/main/etc/jetty.xml</jettyXml>
</configuration>
</plugin>For either of these solutions, the other webapps must already have been built, and they are not automatically monitored for changes. You can refer either to the packed WAR file of the pre-built webapps or to their expanded equivalents.
With jetty:run-distro
Simply configure a jetty base that contains all of the other prebuilt webapps you wish to deploy.
Setting System Properties
You can specify property name/value pairs that Jetty sets as System properties for the execution of the plugin. This feature is useful to tidy up the command line and save a lot of typing.
However, sometimes it is not possible to use this feature to set System properties - sometimes the software component using the System property is already initialized by the time that maven runs (in which case you will need to provide the System property on the command line), or by the time that Jetty runs. In the latter case, you can use the maven properties plugin to define the system properties instead. Here’s an example that configures the logback logging system as the Jetty logger:
<plugin>
<groupId>org.codehaus.mojo</groupId>
<artifactId>properties-maven-plugin</artifactId>
<version>1.0-alpha-2</version>
<executions>
<execution>
<goals>
<goal>set-system-properties</goal>
</goals>
<configuration>
<properties>
<property>
<name>logback.configurationFile</name>
<value>${project.baseUri}/resources/logback.xml</value>
</property>
</properties>
</configuration>
</execution>
</executions>
</plugin>|
If a System property is already set (for example, from the command line or by the JVM itself), then by default these configured properties DO NOT override them (see below for use of the <force> parameter). |
Specifying System Properties in the POM
Here’s an example of how to specify System properties in the POM:
<plugin>
<groupId>org.eclipse.jetty</groupId>
<artifactId>jetty-maven-plugin</artifactId>
<configuration>
<systemProperties>
<systemProperty>
<name>fooprop</name>
<value>222</value>
</systemProperty>
</systemProperties>
<webApp>
<contextPath>/test</contextPath>
</webApp>
</configuration>
</plugin>To change the default behavior so that these system properties override those on the command line, use the <force> parameter:
<plugin>
<groupId>org.eclipse.jetty</groupId>
<artifactId>jetty-maven-plugin</artifactId>
<configuration>
<systemProperties>
<force>true</force>
<systemProperty>
<name>fooprop</name>
<value>222</value>
</systemProperty>
</systemProperties>
<webApp>
<contextPath>/test</contextPath>
</webApp>
</configuration>
</plugin>Specifying System Properties in a File
You can also specify your System properties in a file.
System properties you specify in this way do not override System properties that set on the command line, by the JVM, or directly in the POM via systemProperties.
Suppose we have a file called mysys.props which contains the following:
fooprop=222This can be configured on the plugin like so:
<plugin>
<groupId>org.eclipse.jetty</groupId>
<artifactId>jetty-maven-plugin</artifactId>
<configuration>
<systemPropertiesFile>${project.basedir}/mysys.props</systemPropertiesFile>
<webApp>
<contextPath>/test</contextPath>
</webApp>
</configuration>
</plugin>You can instead specify the file by setting the System property jetty.systemPropertiesFile on the command line.
Files Scanned by the Jetty Maven Plugin
If you set a non zero scanIntervalSeconds configuration parameter, the jetty-maven-plugin will scan certain files for changes, and redeploy the webapp if necessary.
The files that are scanned depend on the goal being executed.
Scanner Matrix
| Goal | Files |
|---|---|
|
|
|
|
|
|
|
|
Jetty Jspc Maven Plugin
This plugin will help you pre-compile your jsps and works in conjunction with the Maven war plugin to put them inside an assembled war.
Configuration
Here’s the basic setup required to put the jspc plugin into your build:
<plugin>
<groupId>org.eclipse.jetty</groupId>
<artifactId>jetty-jspc-maven-plugin</artifactId>
<version>{VERSION}</version>
<executions>
<execution>
<id>jspc</id>
<goals>
<goal>jspc</goal>
</goals>
<configuration>
</configuration>
</execution>
</executions>
</plugin>The configurable parameters are as follows:
- webXmlFragment
-
Default value:
$\{project.basedir}/target/webfrag.xmlFile into which to generate the servlet declarations. Will be merged with an existing
web.xml. - webAppSourceDirectory
-
Default value:
$\{project.basedir}/src/main/webappRoot of resources directory where jsps, tags etc are located.
- webXml
-
Default value:
$\{project.basedir}/src/main/webapp/WEB-INF/web.xmlThe web.xml file to use to merge with the generated fragments.
- includes
-
Default value:
\/.jsp, \/.jspxThe comma separated list of patterns for file extensions to be processed.
- excludes
-
Default value:
\/.svn\/The comma separated list of patterns for file extensions to be skipped.
- classesDirectory
-
Default value:
$\{project.build.outputDirectory}Location of classes for the webapp.
- generatedClasses
-
Default value:
$\{project.build.outputDirectory}Location to put the generated classes for the jsps.
- insertionMarker
-
Default value: none
A marker string in the src
web.xmlfile which indicates where to merge in the generated web.xml fragment. Note that the marker string will NOT be preserved during the insertion. Can be left blank, in which case the generated fragment is inserted just before the line containing</web-app>. - useProvidedScope
-
Default value: false
If true, jars of dependencies marked with <scope>provided</scope> will be placed on the compilation classpath.
- mergeFragment
-
Default value: true
Whether or not to merge the generated fragment file with the source web.xml. The merged file will go into the same directory as the webXmlFragment.
- keepSources
-
Default value: false
If true, the generated .java files are not deleted at the end of processing.
- sourceVersion
-
Introduced in Jetty 9.3.6. Java version of jsp source files. Defaults to 1.7.
- targetVersion
-
Introduced in Jetty 9.3.6. Java version of class files generated from jsps. Defaults to 1.7.
- tldJarNamePatterns
-
Default value:
.taglibs[/]\.jar|.jstl-impl[/]\.jar$Patterns of jars on the 'system' (ie container) path that contain tlds. Use | to separate each pattern.
- jspc
-
Default value: the
org.apache.jasper.JspCinstance being configured.The JspC class actually performs the pre-compilation. All setters on the JspC class are available. You can download the javadoc here.
Taking all the default settings, here’s how to configure the war plugin to use the generated web.xml that includes all of the jsp servlet declarations:
<plugin>
<groupId>org.apache.maven.plugins</groupId>
<artifactId>maven-war-plugin</artifactId>
<configuration>
<webXml>${project.basedir}/target/web.xml</webXml>
</configuration>
</plugin>Precompiling only for Production Build
As compiling jsps is usually done during preparation for a production release and not usually done during development, it is more convenient to put the plugin setup inside a <profile> which which can be deliberately invoked during prep for production.
For example, the following profile will only be invoked if the flag -Dprod is present on the run line:
<profiles>
<profile>
<id>prod</id>
<activation>
<property><name>prod</name></property>
</activation>
<build>
<plugins>
<plugin>
<groupId>org.eclipse.jetty</groupId>
<artifactId>jetty-jspc-maven-plugin</artifactId>
<version>{VERSION}</version>
<!-- put your configuration in here -->
</plugin>
<plugin>
<groupId>org.apache.maven.plugins</groupId>
<artifactId>maven-war-plugin</artifactId>
<!-- put your configuration in here -->
</plugin>
</plugins>
</build>
</profile>
</profiles>The following invocation would cause your code to be compiled, the jsps to be compiled, the <servlet> and <servlet-mapping>s inserted in the web.xml and your webapp assembled into a war:
$ mvn -Dprod packagePrecompiling Jsps with Overlaid Wars
Precompiling jsps with an overlaid war requires a bit more configuration. This is because you need to separate the steps of unpacking the overlaid war and then repacking the final target war so the jetty-jspc-maven-plugin has the opportunity to access the overlaid resources.
In the example we’ll show, we will use an overlaid war.
The overlaid war will provide the web.xml file but the jsps will be in src/main/webapp (i.e. part of the project that uses the overlay).
We will unpack the overlaid war file, compile the jsps and merge their servlet definitions into the extracted web.xml, then pack everything into a war.
Here’s an example configuration of the war plugin that separate those phases into an unpack phase, and then a packing phase:
<plugin>
<artifactId>maven-war-plugin</artifactId>
<executions>
<execution>
<id>unpack</id>
<goals><goal>exploded</goal></goals>
<phase>generate-resources</phase>
<configuration>
<webappDirectory>target/foo</webappDirectory>
<overlays>
<overlay />
<overlay>
<groupId>org.eclipse.jetty</groupId>
<artifactId>test-jetty-webapp</artifactId>
</overlay>
</overlays>
</configuration>
</execution>
<execution>
<id>pack</id>
<goals><goal>war</goal></goals>
<phase>package</phase>
<configuration>
<warSourceDirectory>target/foo</warSourceDirectory>
<webXml>target/web.xml</webXml>
</configuration>
</execution>
</executions>
</plugin>Now you also need to configure the jetty-jspc-maven-plugin so that it can use the web.xml that was extracted by the war unpacking and merge in the generated definitions of the servlets.
This is in target/foo/WEB-INF/web.xml.
Using the default settings, the web.xml merged with the jsp servlet definitions will be put into target/web.xml.
<plugin>
<groupId>org.eclipse.jetty</groupId>
<artifactId>jetty-jspc-maven-plugin</artifactId>
<version>{VERSION}</version>
<executions>
<execution>
<id>jspc</id>
<goals>
<goal>jspc</goal>
</goals>
<configuration>
<webXml>target/foo/WEB-INF/web.xml</webXml>
<includes>**/*.foo</includes>
<excludes>**/*.fff</excludes>
</configuration>
</execution>
</executions>
</plugin>Ant and Jetty
This chapter explains how to use Jetty with Ant and the Jetty Ant tasks.
Ant Jetty Plugin
The Ant Jetty plugin is a part of Jetty 9 under the jetty-ant module.
This plugin makes it possible to start a Jetty web server directly from the Ant build script, and to embed the Jetty web server inside your build process.
Its purpose is to provide almost the same functionality as the Jetty plugin for Maven: dynamic application reloading, working directly on web application sources, and tightly integrating with the build system.
<dependency>
<groupId>org.eclipse.jetty</groupId>
<artifactId>jetty-ant</artifactId>
</dependency>Preparing Your Project
To set up your project for Ant to run Jetty, you need a Jetty distribution and the jetty-ant Jar:
-
Download a Jetty distribution and unpack it in the local filesystem.
-
Get the jetty-ant Jar.
-
Make a directory in your project called
jetty-lib/. -
Copy all of the Jars in your Jetty distribution’s
libdirectory, and all its subdirectories, into your newjetty-libdir. When copying the Jars, don’t preserve the Jetty distribution’s lib dir hierarchy – all the jars should be directly inside your ` jetty-lib` dir. -
Also copy the jetty-ant Jar you downloaded earlier into the
jetty-libdir. -
Make a directory in your project called
jetty-temp.
Now you’re ready to edit or create your Ant build.xml file.
Preparing the build.xml file
Begin with an empty build.xml:
<project name="Jetty-Ant integration test" basedir=".">
</project>Add a <taskdef> that imports all available Jetty tasks:
<project name="Jetty-Ant integration test" basedir=".">
<path id="jetty.plugin.classpath">
<fileset dir="jetty-lib" includes="*.jar"/>
</path>
<taskdef classpathref="jetty.plugin.classpath" resource="tasks.properties" loaderref="jetty.loader" />
</project>Now you are ready to add a new target for running Jetty:
<project name="Jetty-Ant integration test" basedir=".">
<path id="jetty.plugin.classpath">
<fileset dir="jetty-lib" includes="*.jar"/>
</path>
<taskdef classpathref="jetty.plugin.classpath" resource="tasks.properties" loaderref="jetty.loader" />
<target name="jetty.run">
<jetty.run />
</target>
</project>This is the minimal configuration you need. You can now start Jetty on the default port of 8080.
Starting Jetty via Ant
At the command line enter:
> ant jetty.runConfiguring the Jetty Container
A number of configuration options can help you set up the Jetty environment so that your web application has all the resources it needs:
- ports and connectors
-
To configure the port that Jetty starts on you need to define a connector. First you need to configure a
<typedef>for the Connector class and then define the connector in the Jetty tags:<project name="Jetty-Ant integration test" basedir="."> <path id="jetty.plugin.classpath"> <fileset dir="jetty-lib" includes="*.jar"/> </path> <taskdef classpathref="jetty.plugin.classpath" resource="tasks.properties" loaderref="jetty.loader" /> <typedef name="connector" classname="org.eclipse.jetty.ant.types.Connector" classpathref="jetty.plugin.classpath" loaderref="jetty.loader" /> <target name="jetty.run"> <jetty.run> <connectors> <connector port="8090"/> </connectors> </jetty.run> </target> </project>You can set the port to 0, which starts the Jetty server connector on an arbitrary available port. You can then access these values from system properties
jetty.ant.server.portandjetty.ant.server.host. - login services
-
If your web application requires authentication and authorization services, you can configure these on the Jetty container. Here’s an example of how to set up an org.eclipse.jetty.security.HashLoginService:
<project name="Jetty-Ant integration test" basedir="."> <path id="jetty.plugin.classpath"> <fileset dir="jetty-lib" includes="*.jar"/> </path> <taskdef classpathref="jetty.plugin.classpath" resource="tasks.properties" loaderref="jetty.loader" /> <typedef name="hashLoginService" classname="org.eclipse.jetty.security.HashLoginService" classpathref="jetty.plugin.classpath" loaderref="jetty.loader" /> <target name="jetty.run"> <jetty.run> <loginServices> <hashLoginService name="Test Realm" config="${basedir}/realm.properties"/> </loginServices> </jetty.run> </target> </project> - request log
-
The
requestLogoption allows you to specify a request logger for the Jetty instance. You can either use the org.eclipse.jetty.server.NCSARequestLog class, or supply the name of your custom class:<project name="Jetty-Ant integration test" basedir="."> <path id="jetty.plugin.classpath"> <fileset dir="jetty-lib" includes="*.jar"/> </path> <taskdef classpathref="jetty.plugin.classpath" resource="tasks.properties" loaderref="jetty.loader" /> <target name="jetty.run"> <jetty.run requestLog="com.acme.MyFancyRequestLog"> </jetty.run> </target> </project> - temporary directory
-
You can configure a directory as a temporary file store for uses such as expanding files and compiling JSPs by supplying the
tempDirectoryoption:<project name="Jetty-Ant integration test" basedir="."> <path id="jetty.plugin.classpath"> <fileset dir="jetty-lib" includes="*.jar"/> </path> <taskdef classpathref="jetty.plugin.classpath" resource="tasks.properties" loaderref="jetty.loader" /> <target name="jetty.run"> <jetty.run tempDirectory="${basedir}/jetty-temp"> </jetty.run> </target> </project> - other context handlers
-
You may need to configure some other context handlers to run at the same time as your web application. You can specify these other context handlers using the
<contextHandlers>element. You need to supply a<typedef>for it before you can use it:<project name="Jetty-Ant integration test" basedir="."> <path id="jetty.plugin.classpath"> <fileset dir="jetty-lib" includes="*.jar"/> </path> <taskdef classpathref="jetty.plugin.classpath" resource="tasks.properties" loaderref="jetty.loader" /> <typedef name="contextHandlers" classname="org.eclipse.jetty.ant.types.ContextHandlers" classpathref="jetty.plugin.classpath" loaderref="jetty.loader" /> <target name="jetty.run"> <jetty.run> <contextHandlers> <contextHandler resourceBase="${basedir}/stuff" contextPath="/stuff"/> </contextHandlers> </jetty.run> </target> </project> - system properties
-
As a convenience, you can configure system properties by using the
<systemProperties>element. Be aware that, depending on the purpose of the system property, setting it from within the Ant execution may mean that it is evaluated too late, as the JVM evaluates some system properties on entry.<project name="Jetty-Ant integration test" basedir="."> <path id="jetty.plugin.classpath"> <fileset dir="jetty-lib" includes="*.jar"/> </path> <taskdef classpathref="jetty.plugin.classpath" resource="tasks.properties" loaderref="jetty.loader" /> <target name="jetty.run"> <jetty.run> <systemProperties> <systemProperty name="foo" value="bar"/> </systemProperties> </jetty.run> </target> </project> - jetty XML file
-
If you have a lot of configuration to apply to the Jetty container, it can be more convenient to put it into a standard Jetty XML configuration file and have the Ant plugin apply it before starting Jetty:
<project name="Jetty-Ant integration test" basedir="."> <path id="jetty.plugin.classpath"> <fileset dir="jetty-lib" includes="*.jar"/> </path> <taskdef classpathref="jetty.plugin.classpath" resource="tasks.properties" loaderref="jetty.loader" /> <target name="jetty.run"> <jetty.run jettyXml="${basedir}/jetty.xml"> </jetty.run> </target> </project> - scanning for changes
-
The most useful mode in which to run the Ant plugin is for it to continue to execute Jetty and automatically restart your web application if any part of it changes (for example, your IDE recompiles the classes of the web application). The
scanIntervalSecondsoption controls how frequently the<jetty.run>task scans your web application/WAR file for changes. The default value of0disables scanning. Here’s an example where Jetty checks for changes every five seconds:<project name="Jetty-Ant integration test" basedir="."> <path id="jetty.plugin.classpath"> <fileset dir="jetty-lib" includes="*.jar"/> </path> <taskdef classpathref="jetty.plugin.classpath" resource="tasks.properties" loaderref="jetty.loader" /> <target name="jetty.run"> <jetty.run scanIntervalSeconds="5"> </jetty.run> </target> </project> - stopping
-
In normal mode (
daemon="false"), the<jetty.run>task runs until youcntrl-cit. It may be useful to script both the stop AND the start of Jetty. For such a case, we provide the<jetty.stop>task. + To use it, you need to provide a port and an identifying string to both the ` <jetty.run>` and the<jetty.stop>tasks, where<jetty.run>listens on the given port for a stop message containing the given string, and cleanly stops Jetty when it is received. The<jetty.stop>task sends this stop message. You can also optionally provide astopWaitvalue (in seconds), which is the length of time the<jetty.stop>task waits for confirmation that the stop succeeded:<project name="Jetty-Ant integration test" basedir="."> <path id="jetty.plugin.classpath"> <fileset dir="jetty-lib" includes="*.jar"/> </path> <taskdef classpathref="jetty.plugin.classpath" resource="tasks.properties" loaderref="jetty.loader" /> <target name="jetty.run"> <jetty.run stopPort="9999" stopKey="9999"> </jetty.run> </target> <target name="jetty.stop"> <jetty.stop stopPort="9999" stopKey="9999" stopWait="10"/> </target> </project>To stop jetty via Ant, enter:
> ant jetty.stop - execution without pausing ant
-
Usually, the
<jetty.run>task runs until youcntrl-cit, pausing the execution of Ant as it does so. In some cases, it may be useful to let Ant continue executing. For example, to run your unit tests you may need other tasks to execute while Jetty is running. For this case, we provide thedaemonoption. This defaults tofalse. Fortrue, Ant continues to execute after starting Jetty. If Ant exits, so does Jetty. Understand that this option does not fork a new process for Jetty.<project name="Jetty-Ant integration test" basedir="."> <path id="jetty.plugin.classpath"> <fileset dir="jetty-lib" includes="*.jar"/> </path> <taskdef classpathref="jetty.plugin.classpath" resource="tasks.properties" loaderref="jetty.loader" /> <target name="jetty.run"> <jetty.run daemon="true"> </jetty.run> </target> </project>
Deploying a Web Application
Add a <typedef> for the org.eclipse.jetty.ant.AntWebAppContext class with name webApp, then add a <webApp> element to <jetty.run> to describe your web application.
The following example deploys a web application that is expanded in the local directory foo/ to context path ` / `:
<project name="Jetty-Ant integration test" basedir=".">
<path id="jetty.plugin.classpath">
<fileset dir="jetty-lib" includes="*.jar"/>
</path>
<taskdef classpathref="jetty.plugin.classpath" resource="tasks.properties" loaderref="jetty.loader" />
<typedef name="webApp" classname="org.eclipse.jetty.ant.AntWebAppContext"
classpathref="jetty.plugin.classpath" loaderref="jetty.loader" />
<target name="jetty.run">
<jetty.run>
<webApp war="${basedir}/foo" contextPath="/"/>
</jetty.run>
</target>
</project>- deploying a WAR file
-
It is not necessary to expand the web application into a directory. It is fine to deploy it as a WAR file:
<project name="Jetty-Ant integration test" basedir="."> <path id="jetty.plugin.classpath"> <fileset dir="jetty-lib" includes="*.jar"/> </path> <taskdef classpathref="jetty.plugin.classpath" resource="tasks.properties" loaderref="jetty.loader" /> <typedef name="webApp" classname="org.eclipse.jetty.ant.AntWebAppContext" classpathref="jetty.plugin.classpath" loaderref="jetty.loader" /> <target name="jetty.run"> <jetty.run> <webApp war="${basedir}/foo.war" contextPath="/"/> </jetty.run> </target> </project> - deploying more than one web application
-
You can also deploy more than one web application:
<project name="Jetty-Ant integration test" basedir="."> <path id="jetty.plugin.classpath"> <fileset dir="jetty-lib" includes="*.jar"/> </path> <taskdef classpathref="jetty.plugin.classpath" resource="tasks.properties" loaderref="jetty.loader" /> <typedef name="webApp" classname="org.eclipse.jetty.ant.AntWebAppContext" classpathref="jetty.plugin.classpath" loaderref="jetty.loader" /> <target name="jetty.run"> <jetty.run> <webApp war="${basedir}/foo.war" contextPath="/"/> <webApp war="${basedir}/other contextPath="/other"/> <webApp war="${basedir}/bar.war" contextPath="/bar"/> </jetty.run> </target> </project>
Configuring the Web Application
As the org.eclipse.jetty.ant.AntWebAppContext class is an extension of
the
org.eclipse.jetty.webapp.WebAppContext
class, you can configure it by adding attributes of the same name
(without the set or add prefix) as the setter methods.
Here’s an example that specifies the location of the web.xml file (equivalent to method AntWebAppContext.setDescriptor()) and the web application’s temporary directory (equivalent to method AntWebAppContext.setTempDirectory()):
<project name="Jetty-Ant integration test" basedir=".">
<path id="jetty.plugin.classpath">
<fileset dir="jetty-lib" includes="*.jar"/>
</path>
<taskdef classpathref="jetty.plugin.classpath" resource="tasks.properties" loaderref="jetty.loader" />
<typedef name="webApp" classname="org.eclipse.jetty.ant.AntWebAppContext"
classpathref="jetty.plugin.classpath" loaderref="jetty.loader" />
<target name="jetty.run">
<jetty.run>
<webApp descriptor="${basedir}/web.xml" tempDirectory="${basedir}/my-temp" war="${basedir}/foo" contextPath="/"/>
</jetty.run>
</target>
</project>Other extra configuration options for the AntWebAppContext include:
- extra classes and Jars
-
If your web application’s classes and Jars do not reside inside
WEB-INFof the resource base directory, you can use the <classes> and <jar> elements to tell Ant where to find them. Here’s an example:<project name="Jetty-Ant integration test" basedir="."> <path id="jetty.plugin.classpath"> <fileset dir="jetty-lib" includes="*.jar"/> </path> <taskdef classpathref="jetty.plugin.classpath" resource="tasks.properties" loaderref="jetty.loader" /> <typedef name="webApp" classname="org.eclipse.jetty.ant.AntWebAppContext" classpathref="jetty.plugin.classpath" loaderref="jetty.loader" /> <target name="jetty.run"> <jetty.run> <webApp descriptor="${basedir}/web.xml" tempDirectory="${basedir}/my-temp" war="${basedir}/foo" contextPath="/"> <classes dir="${basedir}/classes"> <include name="**/*.class"/> <include name="**/*.properties"/> </classes> <lib dir="${basedir}/jars"> <include name="**/*.jar"/> <exclude name="**/*.dll"/> </lib> </webApp> </jetty.run> </target> </project> - context attributes
-
Jetty allows you to set up ServletContext attributes on your web application. You configure them in a context XML file that is applied to your WebAppContext instance prior to starting it. For convenience, the Ant plugin permits you to configure these directly in the build file. Here’s an example:
<project name="Jetty-Ant integration test" basedir="."> <path id="jetty.plugin.classpath"> <fileset dir="jetty-lib" includes="*.jar"/> </path> <taskdef classpathref="jetty.plugin.classpath" resource="tasks.properties" loaderref="jetty.loader" /> <typedef name="webApp" classname="org.eclipse.jetty.ant.AntWebAppContext" classpathref="jetty.plugin.classpath" loaderref="jetty.loader" /> <target name="jetty.run"> <jetty.run> <webApp war="${basedir}/foo" contextPath="/"> <attributes> <attribute name="my.param" value="123"/> </attributes> </webApp> </jetty.run> </target> </project> jetty-env.xmlfile-
If you are using features such as JNDI with your web application, you may need to configure a
WEB-INF/jetty-env.xmlfile to define resources. If the structure of your web application project is such that the source ofjetty-env.xmlfile resides somewhere other thanWEB-INF, you can use thejettyEnvXmlattribute to tell Ant where to find it:<project name="Jetty-Ant integration test" basedir="."> <path id="jetty.plugin.classpath"> <fileset dir="jetty-lib" includes="*.jar"/> </path> <taskdef classpathref="jetty.plugin.classpath" resource="tasks.properties" loaderref="jetty.loader" /> <typedef name="webApp" classname="org.eclipse.jetty.ant.AntWebAppContext" classpathref="jetty.plugin.classpath" loaderref="jetty.loader" /> <target name="jetty.run"> <jetty.run> <webApp war="${basedir}/foo" contextPath="/" jettyEnvXml="${basedir}/jetty-env.xml"> <attributes> </webApp> </jetty.run> </target> </project> - context XML file
-
You may prefer or even require to do some advanced configuration of your web application outside of the Ant build file. In this case, you can use a standard context XML configuration file which the Ant plugin applies to your web application before it is deployed. Be aware that the settings from the context XML file override those of the attributes and nested elements you defined in the build file.
project name="Jetty-Ant integration test" basedir="."> <path id="jetty.plugin.classpath"> <fileset dir="jetty-lib" includes="*.jar"/> </path> <taskdef classpathref="jetty.plugin.classpath" resource="tasks.properties" loaderref="jetty.loader" /> <typedef name="webApp" classname="org.eclipse.jetty.ant.AntWebAppContext" classpathref="jetty.plugin.classpath" loaderref="jetty.loader" /> <target name="jetty.run"> <jetty.run> <webApp war="${basedir}/foo" contextPath="/" contextXml="${basedir}/jetty-env.xml"> <attributes> </webApp> </jetty.run> </target> </project>
Handlers
Writing Custom Handlers
The Handler is the Jetty component that deals with received requests.
Many users of Jetty never need to write a Jetty Handler, but instead use the Servlet API. You can reuse the existing Jetty handlers for context, security, sessions and servlets without the need for extension. However, some users might have special requirements or footprint concerns that prohibit the use of the full servlet API. For them implementing a Jetty handler is a straight forward way to provide dynamic web content with a minimum of fuss.
See the section on Jetty Architecture to understand more about Handlers vs. Servlets.
The Handler API
The Handler interface provides Jetty’s core of content generation or manipulation. Classes that implement this interface are used to coordinate requests, filter requests and generate content.
The core API of the Handler interface is:
public void handle(String target, Request baseRequest, HttpServletRequest request, HttpServletResponse response)
throws IOException, ServletExceptionAn implementation of this method can handle a request and pass the request onto another handler (or servlet), or it can modify and/or wrap the request before passing it on. This gives three styles of handler:
-
Coordinating Handlers - Handlers that route requests to other handlers (
HandlerCollection,ContextHandlerCollection) -
Filtering Handlers - Handlers that augment a request and pass it on to other handlers (
HandlerWrapper,ContextHandler,SessionHandler) -
Generating Handlers - Handlers that produce content (
ResourceHandlerandServletHandler)
The Target
The target of a handler is an identifier for the resource that should handle the passed request. This is normally the URI that is parsed from an HTTP Request. However, in two key circumstances the target may differ from the URI of the passed request:
-
If the request has been dispatched to a named resource, such as a named servlet, the target is the name of that resource.
-
If the request is being made by a call to
RequestDispatcher, the target is the URI of the included resource and is different to the URI of the actual request.
The Request and Response
The request and response objects used in the signature of the handle method are
ServletRequest and ServletResponse.
These are the standard APIs and are moderately restricted in what they can do to the request and response.
More often than not, access to the Jetty implementations of these classes is required: Request and Response.
However, as the request and response may be wrapped by handlers, filters and servlets, it is not possible to pass the implementation directly.
The following mantra retrieves the core implementation objects from under any wrappers:
Request base_request = request instanceof Request ? (Request)request : HttpConnection.getCurrentConnection().getHttpChannel().getRequest();
Response base_response = response instanceof Response ? (Response)response : HttpConnection.getCurrentConnection().getHttpChannel().getResponse();Notice that if the handler passes the request on to another handler, it should use the Request/Response objects passed in, and not the base objects. This is to preserve any wrapping done by up stream handlers.
The Dispatch
The dispatch argument indicates the state of the handling of the call and may be:
-
REQUEST == 1- An original request received from a connector. -
FORWARD == 2- A request being forwarded by a RequestDispatcher. -
INCLUDE == 4- A request being included by a RequestDispatcher. -
ERROR == 8- A request being forwarded to a error handler by the container.
These mostly have significance for servlet and related handlers. For example, the security handler only applies authentication and authorization to REQUEST dispatches.
Handling Requests
A Handler may handle a request by:
Generating a Response
The OneHandler embedded example shows how a simple handler can generate a response.
You can use the standard servlet response API, which will typically set some status, content headers and then write out the content:
response.setContentType("text/html");
response.setStatus(HttpServletResponse.SC_OK);
response.getWriter().println("<h1>Hello OneHandler</h1>");It is also very important that a handler indicate that it has completed handling the request and that the request should not be passed to other handlers:
Request base_request = (request instanceof Request) ? (Request)request:HttpConnection.getCurrentConnection().getHttpChannel().getRequest();
base_request.setHandled(true);Filtering the Request and/or Response
Once the base request or response object is obtained, you can modify it. Typically you would make modifications to accomplish:
-
Breaking the URI into contextPath, servletPath and pathInfo components.
-
Associating a resource base with a request for static content.
-
Associating a session with a request.
-
Associating a security principal with a request.
-
Changing the URI and paths during a request dispatch forward to another resource.
You can also update the context of the request:
-
Setting the current threads context classloader.
-
Setting thread locals to identify the current
ServletContext.
Typically Jetty passes a modified request to another handler and undoes modifications in a finally block afterwards:
try
{
base_request.setSession(a_session);
next_handler.handle(target,request,response,dispatch);
}
finally
{
base_request.setSession(old_session);
}The classes that implement the HandlerWrapper class are typically handler filters of this style.
Passing the Request and Response to Another Handler
A handler might simply inspect the request and use the target, request URI or other information to select another handler to pass the request to.
These handlers typically implement the HandlerContainer interface.
Examples include:
-
Class
HandlerCollection- A collection of handlers, where each handler is called regardless of the state of the request. This is typically used to pass a request to aContextHandlerCollection, and then theRequestLogHandler. -
HandlerList- A list of handlers that are called in turn until the request state is set as handled. -
ContextHandlerCollection- A collection of Handlers, of which one is selected by best match for the context path.
Injecting Handlers
The Handler needs to be added to the server classpath as described in Managing Server Classpath.
Then it can be added to the server, either by overriding some existing XML configuration files such as jetty.xml as shown below, or by defining a custom module as described in Custom Modules.
<?xml version="1.0"?>
<!DOCTYPE Configure PUBLIC "-//Jetty//Configure//EN" "http://www.eclipse.org/jetty/configure_9_3.dtd">
<Configure id="Server" class="org.eclipse.jetty.server.Server">
<Call name="setHandler">
<Arg>
<New id="myCustomJettyHandler" class="com.my.handler.CustomJettyHandler" />
</Arg>
</Call>
</Configure>More About Handlers
See the latest Jetty JavaDoc for detailed information on each Jetty handler.
WebSocket Introduction
WebSocket is a new protocol for bidirectional communications initiated via HTTP/1.1 upgrade and providing basic message framing, layered over TCP. It is based on a low-level framing protocol that delivers messages in either UTF-8 TEXT or BINARY format.
A single message in WebSocket can be of any size (the underlying framing however does have a single frame limit of 63-bits). There can be an unlimited number of messages sent. Messages are sent sequentially, the base protocol does not support interleaved messages.
A WebSocket connection goes through some basic state changes:
| State | Description |
|---|---|
CONNECTING |
A HTTP Upgrade to WebSocket is in progress |
OPEN |
The HTTP Upgrade succeeded and the socket is now open and ready to read / write |
CLOSING |
A WebSocket Close Handshake has been started |
CLOSED |
WebSocket is now closed, no more read/write possible |
When a WebSocket is closed, a status code and short reason string is provided.
What Jetty provides
Jetty provides an implementation of the following standards and specs.
- RFC-6455
-
The WebSocket Protocol
We support the version 13 of the released and final spec.
Jetty tests its WebSocket protocol implementation using the autobahn testsuite.
|
The early drafts of WebSocket were supported in Jetty 7 and Jetty 8, but this support has been removed in Jetty 9. This means that Jetty 9 will not support the old browsers that implemented the early drafts of WebSocket. (such as Safari 5.0 or Opera 12) |
|
Want to know if the browser you are targeting supports WebSocket? Use caniuse.com/websockets to find out. |
- JSR-356
-
The Java WebSocket API (
javax.websocket)This is the official Java API for working with WebSockets.
Unstable standards and specs:
- perframe-compression
-
Per Frame Compression Extension.
An early extension draft from the Google/Chromium team that would provide WebSocket frame compression. perframe-compression using deflate algorithm is present on many versions of Chrome/Chromium.
Jetty’s support for perframe-compression is based on the draft-04 spec. This standard is being replaced with permessage-compression.
- permessage-compression
-
Per Frame Compression Extension.
This is the replacement for perframe-compression, switching the compression to being based on the entire message, not the individual frames.
WebSocket APIs
APIs and libraries to implement your WebSockets using Jetty.
- Jetty WebSocket API
-
The basic common API for creating and working with WebSockets using Jetty.
- Jetty WebSocket Server API
-
Write WebSocket Server Endpoints for Jetty.
- Jetty WebSocket Client API
-
Connect to WebSocket servers with Jetty.
- Java WebSocket Client API
-
The new standard Java WebSocket Client API (
javax.websocket) [JSR-356] - Java WebSocket Server API
-
The new standard Java WebSocket Server API (
javax.websocket.server) [JSR-356]
Enabling WebSocket
To enable Websocket, you need to enable the websocket module.
Once this module is enabled for your Jetty base, it will apply to all webapps deployed to that base. If you want to be more selective about which webapps use Websocket, then you can:
- Disable JSR-356 for a particular webapp
-
You can disable jsr-356 for a particular webapp by setting the context attribute
org.eclipse.jetty.websocket.jsr356tofalse. This will mean that websockets are not available to your webapp, however deployment time scanning for websocket-related classes such as endpoints will still occur. This can be a significant impost if your webapp contains a lot of classes and/or jar files. To completely disable websockets and avoid all setup costs associated with it for a particular webapp, use instead the context attributeorg.eclipse.jetty.containerInitializerExclusionPattern, described next, which allows you to exclude the websocket ServletContainerInitializer that causes the scanning. - Completely disable jsr-356 for a particular webapp
-
Set the
org.eclipse.jetty.containerInitializerExclusionPatterncontext attribute to includeorg.eclipse.jetty.websocket.jsr356.server.deploy.WebSocketServerContainerInitializer. Here’s an example of doing this in code, although you can do the same in xml:WebAppContext context = new WebAppContext(); context.setAttribute("org.eclipse.jetty.containerInitializerExclusionPattern", "org.eclipse.jetty.websocket.jsr356.server.deploy.WebSocketServerContainerInitializer|com.acme.*");
Jetty Websocket API
These pages are works in progress that have not been moved to their respective sections yet.
Jetty WebSocket API Usage
Jetty provides its own more powerful WebSocket API, with a common core API for both server and client use of WebSockets.
It is an event driven API based on WebSocket Messages.
WebSocket Events
Every WebSocket can receive various events:
- On Connect Event
-
An indication to the WebSocket that the Upgrade has succeeded and the WebSocket is now open.
You will receive a
org.eclipse.jetty.websocket.api.Sessionobject that references the specific session for this Open Event.For normal WebSockets, it is important to hold onto this Session and use it for communicating with the Remote Endpoint.
For Stateless WebSockets, the Session will be passed into each event as it occurs, allowing you to only have 1 instance of a WebSocket serving many Remote Endpoints.
- On Close Event
-
An indication that the WebSocket is now closed.
Every Close Event will have a Status Code (and an optional Closure Reason Message)
A normal WebSocket closure will go through a Close Handshake where both the Local Endpoint and the Remote Endpoint both send a Close frame to indicate that the connection is closed.
It is possible for the Local WebSocket to indicate its desire to Close by issuing a Close frame to the Remote Endpoint, but the Remote Endpoint can continue to send messages until it sends a Close Frame. This is known as a Half-Open connection, and it is important to note that once the Local Endpoint has send the Close Frame it cannot write anymore WebSocket traffic.
On an abnormal closure, such as a connection disconnect or a connection timeout, the low level connection will be terminated without going through a Close Handshake, this will still result in an On Close Event (and likely a corresponding On Error Event).
- On Error Event
-
If an error occurred, during the implementation, the WebSocket will be notified via this event handler.
- On Message Event
-
An indication that a complete message has been received and is ready for handling by your WebSocket.
This can be a (UTF8) TEXT message or a raw BINARY message.
WebSocket Session
The Session object can be used to:
The Connection State (is it open or not).
if(session.isOpen()) {
// send message
}Is the Connection Secure.
if(session.isSecure()) {
// connection is using 'wss://'
}What was in the Upgrade Request and Response.
UpgradeRequest req = session.getUpgradeRequest();
String channelName = req.getParameterMap().get("channelName");
UpgradeResponse resp = session.getUpgradeResponse();
String subprotocol = resp.getAcceptedSubProtocol();What is the Local and Remote Address.
InetSocketAddress remoteAddr = session.getRemoteAddress();Get and Set the Idle Timeout
session.setIdleTimeout(2000); // 2 second timeoutSend Messages to Remote Endpoint
The most important feature of the Session is access to the org.eclipse.jetty.websocket.api.RemoteEndpoint needed to send messages.
With RemoteEndpoint you can choose to send TEXT or BINARY WebSocket messages, or the WebSocket PING and PONG control frames.
Blocking Send Message
Most calls are blocking in nature, and will not return until the send has completed (or has thrown an exception).
RemoteEndpoint remote = session.getRemote();
// Blocking Send of a BINARY message to remote endpoint
ByteBuffer buf = ByteBuffer.wrap(new byte[] { 0x11, 0x22, 0x33, 0x44 });
try
{
remote.sendBytes(buf);
}
catch (IOException e)
{
e.printStackTrace(System.err);
}How to send a simple Binary message using the RemoteEndpoint. This will block until the message is sent, possibly throwing an IOException if unable to send the message.
RemoteEndpoint remote = session.getRemote();
// Blocking Send of a TEXT message to remote endpoint
try
{
remote.sendString("Hello World");
}
catch (IOException e)
{
e.printStackTrace(System.err);
}How to send a simple Text message using the RemoteEndpoint. This will block until the message is sent, possibly throwing an IOException if unable to send the message.
Send Partial Message
If you have a large message to send, and want to send it in pieces and parts, you can utilize the partial message sending methods of RemoteEndpoint.
Just be sure you finish sending your message (isLast == true).
RemoteEndpoint remote = session.getRemote();
// Blocking Send of a BINARY message to remote endpoint
// Part 1
ByteBuffer buf1 = ByteBuffer.wrap(new byte[] { 0x11, 0x22 });
// Part 2 (last part)
ByteBuffer buf2 = ByteBuffer.wrap(new byte[] { 0x33, 0x44 });
try
{
remote.sendPartialBytes(buf1,false);
remote.sendPartialBytes(buf2,true); // isLast is true
}
catch (IOException e)
{
e.printStackTrace(System.err);
}How to send a Binary message in 2 parts, using the partial message support in RemoteEndpoint. This will block until each part of the message is sent, possibly throwing an IOException if unable to send the partial message.
RemoteEndpoint remote = session.getRemote();
// Blocking Send of a TEXT message to remote endpoint
String part1 = "Hello";
String part2 = " World";
try
{
remote.sendPartialString(part1,false);
remote.sendPartialString(part2,true); // last part
}
catch (IOException e)
{
e.printStackTrace(System.err);
}How to send a Text message in 2 parts, using the partial message support in RemoteEndpoint. This will block until each part of the message is sent, possibly throwing an IOException if unable to send the partial message.
Send Ping / Pong Control Frame
You can also send Ping and Pong control frames using the RemoteEndpoint.
RemoteEndpoint remote = session.getRemote();
// Blocking Send of a PING to remote endpoint
String data = "You There?";
ByteBuffer payload = ByteBuffer.wrap(data.getBytes());
try
{
remote.sendPing(payload);
}
catch (IOException e)
{
e.printStackTrace(System.err);
}How to send a Ping control frame, with a payload of "You There?" (arriving at Remote Endpoint as a byte array payload).
This will block until the message is sent, possibly throwing an IOException if unable to send the ping frame.
RemoteEndpoint remote = session.getRemote();
// Blocking Send of a PONG to remote endpoint
String data = "Yup, I'm here";
ByteBuffer payload = ByteBuffer.wrap(data.getBytes());
try
{
remote.sendPong(payload);
}
catch (IOException e)
{
e.printStackTrace(System.err);
}How to send a Pong control frame, with a payload of "Yup I’m here" (arriving at Remote Endpoint as a byte array payload).
This will block until the message is sent, possibly throwing an IOException if unable to send the pong frame.
To be correct in your usage of Pong frames, you should return the same byte array data that you received in the Ping frame.
Async Send Message
However there are also 2 Async send message methods available:
Both return a Future<Void> that can be used to test for success and failure of the message send using standard java.util.concurrent.Future behavior.
RemoteEndpoint remote = session.getRemote();
// Async Send of a BINARY message to remote endpoint
ByteBuffer buf = ByteBuffer.wrap(new byte[] { 0x11, 0x22, 0x33, 0x44 });
remote.sendBytesByFuture(buf);How to send a simple Binary message using the RemoteEndpoint. The message will be enqueued for outgoing write, but you will not know if it succeeded or failed.
RemoteEndpoint remote = session.getRemote();
// Async Send of a BINARY message to remote endpoint
ByteBuffer buf = ByteBuffer.wrap(new byte[] { 0x11, 0x22, 0x33, 0x44 });
try
{
Future<Void> fut = remote.sendBytesByFuture(buf);
// wait for completion (forever)
fut.get();
}
catch (ExecutionException | InterruptedException e)
{
// Send failed
e.printStackTrace();
}How to send a simple Binary message using the RemoteEndpoint, tracking the Future<Void> to know if the send succeeded or failed.
RemoteEndpoint remote = session.getRemote();
// Async Send of a BINARY message to remote endpoint
ByteBuffer buf = ByteBuffer.wrap(new byte[] { 0x11, 0x22, 0x33, 0x44 });
Future<Void> fut = null;
try
{
fut = remote.sendBytesByFuture(buf);
// wait for completion (timeout)
fut.get(2,TimeUnit.SECONDS);
}
catch (ExecutionException | InterruptedException e)
{
// Send failed
e.printStackTrace();
}
catch (TimeoutException e)
{
// timeout
e.printStackTrace();
if (fut != null)
{
// cancel the message
fut.cancel(true);
}
}How to send a simple Binary message using the RemoteEndpoint, tracking the Future<Void> and waiting only prescribed amount of time for the send to complete, cancelling the message if the timeout occurs.
RemoteEndpoint remote = session.getRemote();
// Async Send of a TEXT message to remote endpoint
remote.sendStringByFuture("Hello World");How to send a simple Text message using the RemoteEndpoint. The message will be enqueued for outgoing write, but you will not know if it succeeded or failed.
RemoteEndpoint remote = session.getRemote();
// Async Send of a TEXT message to remote endpoint
try
{
Future<Void> fut = remote.sendStringByFuture("Hello World");
// wait for completion (forever)
fut.get();
}
catch (ExecutionException | InterruptedException e)
{
// Send failed
e.printStackTrace();
}How to send a simple Binary message using the RemoteEndpoint, tracking the Future<Void> to know if the send succeeded or failed.
RemoteEndpoint remote = session.getRemote();
// Async Send of a TEXT message to remote endpoint
Future<Void> fut = null;
try
{
fut = remote.sendStringByFuture("Hello World");
// wait for completion (timeout)
fut.get(2,TimeUnit.SECONDS);
}
catch (ExecutionException | InterruptedException e)
{
// Send failed
e.printStackTrace();
}
catch (TimeoutException e)
{
// timeout
e.printStackTrace();
if (fut != null)
{
// cancel the message
fut.cancel(true);
}
}How to send a simple Binary message using the RemoteEndpoint, tracking the Future<Void> and waiting only prescribed amount of time for the send to complete, cancelling the message if the timeout occurs.
Using WebSocket Annotations
The most basic form of WebSocket is a marked up POJO with annotations provided by the Jetty WebSocket API.
//
// ========================================================================
// Copyright (c) 1995-2022 Mort Bay Consulting Pty Ltd and others.
// ------------------------------------------------------------------------
// All rights reserved. This program and the accompanying materials
// are made available under the terms of the Eclipse Public License v1.0
// and Apache License v2.0 which accompanies this distribution.
//
// The Eclipse Public License is available at
// http://www.eclipse.org/legal/epl-v10.html
//
// The Apache License v2.0 is available at
// http://www.opensource.org/licenses/apache2.0.php
//
// You may elect to redistribute this code under either of these licenses.
// ========================================================================
//
package examples.echo;
import org.eclipse.jetty.websocket.api.Session;
import org.eclipse.jetty.websocket.api.annotations.OnWebSocketMessage;
import org.eclipse.jetty.websocket.api.annotations.WebSocket;
/**
* Example EchoSocket using Annotations.
*/
@WebSocket(maxTextMessageSize = 64 * 1024)
public class AnnotatedEchoSocket
{
@OnWebSocketMessage
public void onText(Session session, String message)
{
if (session.isOpen())
{
System.out.printf("Echoing back message [%s]%n", message);
// echo the message back
session.getRemote().sendString(message, null);
}
}
}The above example is a simple WebSocket echo endpoint that will echo back any TEXT messages it receives.
This implementation is using a stateless approach to a Echo socket, as the Session is being passed into the Message event as the event occurs. This would allow you to reuse the single instance of the AnnotatedEchoSocket for working with multiple endpoints.
The annotations you have available:
- @WebSocket
-
A required class level annotation.
Flags this POJO as being a WebSocket.
The class must be not abstract and public.
- @OnWebSocketConnect
-
An optional method level annotation.
Flags one method in the class as receiving the On Connect event.
Method must be public, not abstract, return void, and have a single Session parameter.
- @OnWebSocketClose
-
An optional method level annotation.
Flags one method in the class as receiving the On Close event.
Method signature must be public, not abstract, and return void.
The method parameters:
-
Session(optional) -
int closeCode(required) -
String closeReason(required)
-
- @OnWebSocketMessage
-
An optional method level annotation.
Flags up to 2 methods in the class as receiving On Message events.
You can have 1 method for TEXT messages, and 1 method for BINARY messages.
Method signature must be public, not abstract, and return void.
The method parameters for Text messages:
- @OnWebSocketError
-
An optional method level annotation.
Flags one method in the class as receiving Error events from the WebSocket implementation.
Method signatures must be public, not abstract, and return void.
The method parameters:
-
Session(optional) -
Throwable cause(required)
-
- @OnWebSocketFrame
-
An optional method level annotation.
Flags one method in the class as receiving Frame events from the WebSocket implementation after they have been processed by any extensions declared during the Upgrade handshake.
Method signatures must be public, not abstract, and return void.
The method parameters:
Using WebSocketListener
The basic form of a WebSocket using the org.eclipse.jetty.websocket.api.WebSocketListener for incoming events.
//
// ========================================================================
// Copyright (c) 1995-2022 Mort Bay Consulting Pty Ltd and others.
// ------------------------------------------------------------------------
// All rights reserved. This program and the accompanying materials
// are made available under the terms of the Eclipse Public License v1.0
// and Apache License v2.0 which accompanies this distribution.
//
// The Eclipse Public License is available at
// http://www.eclipse.org/legal/epl-v10.html
//
// The Apache License v2.0 is available at
// http://www.opensource.org/licenses/apache2.0.php
//
// You may elect to redistribute this code under either of these licenses.
// ========================================================================
//
package examples.echo;
import org.eclipse.jetty.websocket.api.Session;
import org.eclipse.jetty.websocket.api.WebSocketListener;
/**
* Example EchoSocket using Listener.
*/
public class ListenerEchoSocket implements WebSocketListener
{
private Session outbound;
@Override
public void onWebSocketBinary(byte[] payload, int offset, int len)
{
/* only interested in text messages */
}
@Override
public void onWebSocketClose(int statusCode, String reason)
{
this.outbound = null;
}
@Override
public void onWebSocketConnect(Session session)
{
this.outbound = session;
}
@Override
public void onWebSocketError(Throwable cause)
{
cause.printStackTrace(System.err);
}
@Override
public void onWebSocketText(String message)
{
if ((outbound != null) && (outbound.isOpen()))
{
System.out.printf("Echoing back message [%s]%n", message);
// echo the message back
outbound.getRemote().sendString(message, null);
}
}
}This is by far the most basic and best performing (speed and memory wise) WebSocket implementation you can create. If the listener is too much work for you, you can instead opt for the WebSocketAdapter
Using the WebSocketAdapter
A basic adapter for managing the Session object on the WebSocketListener.
//
// ========================================================================
// Copyright (c) 1995-2022 Mort Bay Consulting Pty Ltd and others.
// ------------------------------------------------------------------------
// All rights reserved. This program and the accompanying materials
// are made available under the terms of the Eclipse Public License v1.0
// and Apache License v2.0 which accompanies this distribution.
//
// The Eclipse Public License is available at
// http://www.eclipse.org/legal/epl-v10.html
//
// The Apache License v2.0 is available at
// http://www.opensource.org/licenses/apache2.0.php
//
// You may elect to redistribute this code under either of these licenses.
// ========================================================================
//
package examples.echo;
import java.io.IOException;
import org.eclipse.jetty.websocket.api.WebSocketAdapter;
/**
* Example EchoSocket using Adapter.
*/
public class AdapterEchoSocket extends WebSocketAdapter
{
@Override
public void onWebSocketText(String message)
{
if (isConnected())
{
try
{
System.out.printf("Echoing back message [%s]%n", message);
// echo the message back
getRemote().sendString(message);
}
catch (IOException e)
{
e.printStackTrace(System.err);
}
}
}
}This is a convenience class to make using the WebSocketListener easier, and provides some useful methods to check the state of the Session.
Jetty WebSocket Server API
Jetty provides the ability to wire up WebSocket endpoints to Servlet Path Specs via the use of a WebSocketServlet bridge servlet.
Internally, Jetty manages the HTTP Upgrade to WebSocket and migration from a HTTP Connection to a WebSocket Connection.
This will only work when running within the Jetty Container (unlike past Jetty technologies, you cannot get Jetty WebSocket server functionality running Jetty within other containers like JBoss, Tomcat, or WebLogic).
The Jetty WebSocketServlet
To wire up your WebSocket to a specific path via the WebSocketServlet, you will need to extend org.eclipse.jetty.websocket.servlet.WebSocketServlet and specify what WebSocket object should be created with incoming Upgrade requests.
//
// ========================================================================
// Copyright (c) 1995-2022 Mort Bay Consulting Pty Ltd and others.
// ------------------------------------------------------------------------
// All rights reserved. This program and the accompanying materials
// are made available under the terms of the Eclipse Public License v1.0
// and Apache License v2.0 which accompanies this distribution.
//
// The Eclipse Public License is available at
// http://www.eclipse.org/legal/epl-v10.html
//
// The Apache License v2.0 is available at
// http://www.opensource.org/licenses/apache2.0.php
//
// You may elect to redistribute this code under either of these licenses.
// ========================================================================
//
package examples;
import javax.servlet.annotation.WebServlet;
import org.eclipse.jetty.websocket.servlet.WebSocketServlet;
import org.eclipse.jetty.websocket.servlet.WebSocketServletFactory;
@SuppressWarnings("serial")
@WebServlet(name = "MyEcho WebSocket Servlet", urlPatterns = {"/echo"})
public class MyEchoServlet extends WebSocketServlet
{
@Override
public void configure(WebSocketServletFactory factory)
{
// set a 10 second timeout
factory.getPolicy().setIdleTimeout(10000);
// register MyEchoSocket as the WebSocket to create on Upgrade
factory.register(MyEchoSocket.class);
}
}This example will create a Servlet mapped via the @WebServlet annotation to the Servlet path spec of "/echo" (or you can do this manually in the WEB-INF/web.xml of your web application) which will create MyEchoSocket instances when encountering HTTP Upgrade requests.
The WebSocketServlet.configure(WebSocketServletFactory factory) is where you put your specific configuration for your WebSocket.
In the example we specify a 10 second idle timeout and register MyEchoSocket with the default WebSocketCreator the WebSocket class we want to be created on Upgrade.
|
It is important that you take in account any firewall or router timeouts when configuring websockets. Be sure the websocket configuration is lower than your firewall or router. |
Using the WebSocketCreator
All WebSocket’s are created via whatever WebSocketCreator you have registered with the WebSocketServletFactory.
By default, the WebSocketServletFactory is a simple WebSocketCreator capable of creating a single WebSocket object.
Use WebSocketCreator.register(Class<?> websocket) to tell the WebSocketServletFactory which class it should instantiate (make sure it has a default constructor).
If you have a more complicated creation scenario, you might want to provide your own WebSocketCreator that bases the WebSocket it creates off of information present in the UpgradeRequest object.
//
// ========================================================================
// Copyright (c) 1995-2022 Mort Bay Consulting Pty Ltd and others.
// ------------------------------------------------------------------------
// All rights reserved. This program and the accompanying materials
// are made available under the terms of the Eclipse Public License v1.0
// and Apache License v2.0 which accompanies this distribution.
//
// The Eclipse Public License is available at
// http://www.eclipse.org/legal/epl-v10.html
//
// The Apache License v2.0 is available at
// http://www.opensource.org/licenses/apache2.0.php
//
// You may elect to redistribute this code under either of these licenses.
// ========================================================================
//
package examples;
import org.eclipse.jetty.websocket.servlet.ServletUpgradeRequest;
import org.eclipse.jetty.websocket.servlet.ServletUpgradeResponse;
import org.eclipse.jetty.websocket.servlet.WebSocketCreator;
public class MyAdvancedEchoCreator implements WebSocketCreator
{
private MyBinaryEchoSocket binaryEcho;
private MyEchoSocket textEcho;
public MyAdvancedEchoCreator()
{
// Create the reusable sockets
this.binaryEcho = new MyBinaryEchoSocket();
this.textEcho = new MyEchoSocket();
}
@Override
public Object createWebSocket(ServletUpgradeRequest req, ServletUpgradeResponse resp)
{
for (String subprotocol : req.getSubProtocols())
{
if ("binary".equals(subprotocol))
{
resp.setAcceptedSubProtocol(subprotocol);
return binaryEcho;
}
if ("text".equals(subprotocol))
{
resp.setAcceptedSubProtocol(subprotocol);
return textEcho;
}
}
// No valid subprotocol in request, ignore the request
return null;
}
}Here we show a WebSocketCreator that will utilize the WebSocket subprotocol information from request to determine what WebSocket type should be created.
//
// ========================================================================
// Copyright (c) 1995-2022 Mort Bay Consulting Pty Ltd and others.
// ------------------------------------------------------------------------
// All rights reserved. This program and the accompanying materials
// are made available under the terms of the Eclipse Public License v1.0
// and Apache License v2.0 which accompanies this distribution.
//
// The Eclipse Public License is available at
// http://www.eclipse.org/legal/epl-v10.html
//
// The Apache License v2.0 is available at
// http://www.opensource.org/licenses/apache2.0.php
//
// You may elect to redistribute this code under either of these licenses.
// ========================================================================
//
package examples;
import javax.servlet.annotation.WebServlet;
import org.eclipse.jetty.websocket.servlet.WebSocketServlet;
import org.eclipse.jetty.websocket.servlet.WebSocketServletFactory;
@SuppressWarnings("serial")
@WebServlet(name = "MyAdvanced Echo WebSocket Servlet", urlPatterns = {"/advecho"})
public class MyAdvancedEchoServlet extends WebSocketServlet
{
@Override
public void configure(WebSocketServletFactory factory)
{
// set a 10 second timeout
factory.getPolicy().setIdleTimeout(10000);
// set a custom WebSocket creator
factory.setCreator(new MyAdvancedEchoCreator());
}
}When you want a custom WebSocketCreator, use WebSocketServletFactory.setCreator(WebSocketCreator creator) and the WebSocketServletFactory will use your creator for all incoming Upgrade requests on this servlet.
Other uses for a WebSocketCreator:
-
Controlling the selection of WebSocket subprotocol
-
Performing any WebSocket origin you deem important.
-
Obtaining the HTTP headers from incoming request
-
Obtaining the Servlet HttpSession object (if it exists)
-
Specifying a response status code and reason
If you don’t want to accept the upgrade, simply return null from the link:http://www.eclipse.org/jetty/javadoc/jetty-9/org/eclipse/jetty/websocket/servlet/WebSocketCreator.html#createWebSocket(org.eclipse.jetty.websocket.api.UpgradeRequest, org.eclipse.jetty.websocket.api.UpgradeResponse)[WebSocketCreator.createWebSocket(UpgradeRequest req, UpgradeResponse resp)] method.
Jetty WebSocket Client API
Jetty also provides a Jetty WebSocket Client Library to write make talking to WebSocket servers easier.
To use the Jetty WebSocket Client on your own Java project you will need the following maven artifacts.
<dependency>
<groupId>org.eclipse.jetty.websocket</groupId>
<artifactId>websocket-client</artifactId>
<version>${project.version}</version>
</dependency>The WebSocketClient
To use the WebSocketClient you will need to hook up a WebSocket object instance to a specific destination WebSocket URI.
//
// ========================================================================
// Copyright (c) 1995-2022 Mort Bay Consulting Pty Ltd and others.
// ------------------------------------------------------------------------
// All rights reserved. This program and the accompanying materials
// are made available under the terms of the Eclipse Public License v1.0
// and Apache License v2.0 which accompanies this distribution.
//
// The Eclipse Public License is available at
// http://www.eclipse.org/legal/epl-v10.html
//
// The Apache License v2.0 is available at
// http://www.opensource.org/licenses/apache2.0.php
//
// You may elect to redistribute this code under either of these licenses.
// ========================================================================
//
package examples;
import java.net.URI;
import java.util.concurrent.TimeUnit;
import org.eclipse.jetty.websocket.client.ClientUpgradeRequest;
import org.eclipse.jetty.websocket.client.WebSocketClient;
/**
* Example of a simple Echo Client.
*/
public class SimpleEchoClient
{
public static void main(String[] args)
{
String destUri = "ws://echo.websocket.org";
if (args.length > 0)
{
destUri = args[0];
}
WebSocketClient client = new WebSocketClient();
SimpleEchoSocket socket = new SimpleEchoSocket();
try
{
client.start();
URI echoUri = new URI(destUri);
ClientUpgradeRequest request = new ClientUpgradeRequest();
client.connect(socket, echoUri, request);
System.out.printf("Connecting to : %s%n", echoUri);
// wait for closed socket connection.
socket.awaitClose(5, TimeUnit.SECONDS);
}
catch (Throwable t)
{
t.printStackTrace();
}
finally
{
try
{
client.stop();
}
catch (Exception e)
{
e.printStackTrace();
}
}
}
}The above example connects to a remote WebSocket server and hands off a SimpleEchoSocket to perform the logic on the websocket once connected, waiting for the socket to register that it has closed.
//
// ========================================================================
// Copyright (c) 1995-2022 Mort Bay Consulting Pty Ltd and others.
// ------------------------------------------------------------------------
// All rights reserved. This program and the accompanying materials
// are made available under the terms of the Eclipse Public License v1.0
// and Apache License v2.0 which accompanies this distribution.
//
// The Eclipse Public License is available at
// http://www.eclipse.org/legal/epl-v10.html
//
// The Apache License v2.0 is available at
// http://www.opensource.org/licenses/apache2.0.php
//
// You may elect to redistribute this code under either of these licenses.
// ========================================================================
//
package examples;
import java.util.concurrent.CountDownLatch;
import java.util.concurrent.Future;
import java.util.concurrent.TimeUnit;
import org.eclipse.jetty.websocket.api.Session;
import org.eclipse.jetty.websocket.api.StatusCode;
import org.eclipse.jetty.websocket.api.annotations.OnWebSocketClose;
import org.eclipse.jetty.websocket.api.annotations.OnWebSocketConnect;
import org.eclipse.jetty.websocket.api.annotations.OnWebSocketError;
import org.eclipse.jetty.websocket.api.annotations.OnWebSocketMessage;
import org.eclipse.jetty.websocket.api.annotations.WebSocket;
/**
* Basic Echo Client Socket
*/
@WebSocket(maxTextMessageSize = 64 * 1024)
public class SimpleEchoSocket
{
private final CountDownLatch closeLatch;
@SuppressWarnings("unused")
private Session session;
public SimpleEchoSocket()
{
this.closeLatch = new CountDownLatch(1);
}
public boolean awaitClose(int duration, TimeUnit unit) throws InterruptedException
{
return this.closeLatch.await(duration, unit);
}
@OnWebSocketClose
public void onClose(int statusCode, String reason)
{
System.out.printf("Connection closed: %d - %s%n", statusCode, reason);
this.session = null;
this.closeLatch.countDown(); // trigger latch
}
@OnWebSocketConnect
public void onConnect(Session session)
{
System.out.printf("Got connect: %s%n", session);
this.session = session;
try
{
Future<Void> fut;
fut = session.getRemote().sendStringByFuture("Hello");
fut.get(2, TimeUnit.SECONDS); // wait for send to complete.
fut = session.getRemote().sendStringByFuture("Thanks for the conversation.");
fut.get(2, TimeUnit.SECONDS); // wait for send to complete.
}
catch (Throwable t)
{
t.printStackTrace();
}
}
@OnWebSocketMessage
public void onMessage(String msg)
{
System.out.printf("Got msg: %s%n", msg);
if (msg.contains("Thanks"))
{
session.close(StatusCode.NORMAL, "I'm done");
}
}
@OnWebSocketError
public void onError(Throwable cause)
{
System.out.print("WebSocket Error: ");
cause.printStackTrace(System.out);
}
}When the SimpleEchoSocket connects, it sends 2 Text messages and then closes the socket.
The onMessage(String msg) receives the responses from the remote server WebSocket and outputs them to the console.
Continuations
Introduction
Continuations are a mechanism to implement Asynchronous servlets similar to asynchronous features in Servlet 3.0, but provides a simpler and portable interface.
Why Asynchronous Servlets ?
Not Asynchronous IO
The concept of Asynchronous Servlets is often confused with Asynchronous IO or the use of NIO. However, Asynchronous Servlets are not primarily motivated by asynchronous IO, since:
-
HTTP Requests are mostly small and arrive in a single packet. Servlets rarely block on requests.
-
Many responses are small and fit within the server buffers, so servlets often do not block writing responses.
-
Even if we could expose asynchronous IO in a servlet, it is a hard paradigm to program. For example what would an application do if it read 2 bytes of a 3 byte UTF-8 character? It would have to buffer and wait for more bytes. This is best done by the container rather than the application.
Asynchronous Waiting
The main use-case for asynchronous servlets is waiting for non-IO events or resources. Many web applications need to wait at some stage during the processing of a HTTP request, for example:
-
Waiting for a resource to be available before processing the request (e.g., thread, JDBC Connection).
-
Waiting for an application event in an AJAX Comet application (e.g., chat message, price change).
-
Waiting for a response from a remote service (e.g., RESTful or SOAP call to a web service).
The servlet API (pre 2.5) supports only a synchronous call style, so that any waiting that a servlet needs to do must be with blocking. Unfortunately this means that the thread allocated to the request must be held during that wait along with all its resources: kernel thread, stack memory and often pooled buffers, character converters, EE authentication context, etc. It is wasteful of system resources to hold these resources while waiting. Significantly better scalability and quality of service can be achieved if waiting is done asynchronously.
Asynchronous Servlet Examples
AJAX Comet Server Push
Web 2.0 applications can use the comet technique (aka AJAX Push, Server Push, Long Polling) to dynamically update a web page without refreshing the entire page.
Consider a stock portfolio web application. Each browser will send a long poll request to the server asking for any of the user’s stock prices that have changed. The server will receive the long poll requests from all its clients, but will not immediately respond. Instead the server waits until a stock price changes, at which time it will send a response to each of the clients with that stock in their portfolio. The clients that receive the long poll response will immediately send another long poll request so they may obtain future price changes.
Thus the server will typically hold a long poll request for every connected user, so if the servlet is not asynchronous, there would need more than 1000 threads available to handle 1000 simultaneous users. 1000 threads can consume over 256MB of memory; that would be better used for the application rather than idly waiting for a price to change.
If the servlet is asynchronous, then the number of threads needed is governed by the time to generate each response and the frequency of price changes. If every user receives a price every 10 seconds and the response takes 10ms to generate, then 1000 users can be serviced with just 1 thread, and the 256MB of stack be freed for other purposes.
For more on comet see the cometd project that works asynchronously with Jetty.
Asynchronous RESTful Web Service
Consider a web application that accesses a remote web service (e.g., SOAP service or RESTful service). Typically a remote web service can take hundreds of milliseconds to produce a response — eBay’s RESTful web service frequently takes 350ms to respond with a list of auctions matching a given keyword — while only a few 10s of milliseconds of CPU time are needed to locally process a request and generate a response.
To handle 1000 requests per second, which each perform a 200ms web service call, a webapp would needs 1000*(200+20)/1000 = 220 threads and 110MB of stack memory. It would also be vulnerable to thread starvation if bursts occurred or the web service became slower. If handled asynchronously, the web application would not need to hold a thread while waiting for web service response. Even if the asynchronous mechanism cost 10ms (which it doesn’t), then this webapp would need 1000*(20+10)/1000 = 30 threads and 15MB of stack memory. This is a 86% reduction in the resources required and 95MB more memory would be available for the application. Furthermore, if multiple web services request are required, the asynchronous approach allows these to be made in parallel rather than serially, without allocating additional threads.
For an example of Jetty’s solution, see the Asynchronous REST example
Quality of Service (e.g., JDBC Connection Pool)
Consider a web application handling on average 400 requests per second, with each request interacting with the database for 50ms. To handle this load, 400*50/1000 = 20 JDBC connections are need on average. However, requests do not come at an even rate and there are often bursts and pauses. To protect a database from bursts, often a JDBC connection pool is applied to limit the simultaneous requests made on the database. So for this application, it would be reasonable to apply a JDBC pool of 30 connections, to provide for a 50% margin.
If momentarily the request rate doubled, then the 30 connections would only be able to handle 600 requests per second, and 200 requests per second would join those waiting on the JDBC Connection pool. Then if the servlet container had a thread pool with 200 threads, that would be entirely consumed by threads waiting for JDBC connections in 1 second of this request rate. After 1s, the web application would be unable to process any requests at all because no threads would be available. Even requests that do not use the database would be blocked due to thread starvation. To double the thread pool would require an additional 100MB of stack memory and would only give the application another 1s of grace under load!
This thread starvation situation can also occur if the database runs slowly or is momentarily unavailable. Thread starvation is a very frequently reported problem, and causes the entire web service to lock up and become unresponsive. If the web container was able to suspend the requests waiting for a JDBC connection without threads, then thread starvation would not occur, as only 30 threads would be consumed by requests accessing the database and the other 470 threads would be available to process the request that do not access the database.
For an example of Jetty’s solution, see the Quality of Service Filter.
Servlet Threading Model
The scalability issues of Java servlets are caused mainly by the server threading model:
Thread per connection
The traditional IO model of Java associated a thread with every TCP/IP connection. If you have a few very active threads, this model can scale to a very high number of requests per second.
However, the traffic profile typical of many web applications is many persistent HTTP connections that are mostly idle while users read pages or search for the next link to click. With such profiles, the thread-per-connection model can have problems scaling to the thousands of threads required to support thousands of users on large scale deployments.
Thread per request
The Java NIO libraries support asynchronous IO, so that threads no longer need to be allocated to every connection. When the connection is idle (between requests), then the connection is added to an NIO select set, which allows one thread to scan many connections for activity. Only when IO is detected on a connection is a thread allocated to it. However, the servlet 2.5 API model still requires a thread to be allocated for the duration of the request handling.
This thread-per-request model allows much greater scaling of connections (users) at the expense of a small reduction to maximum requests per second due to extra scheduling latency.
Asynchronous Request handling
The Jetty Continuation (and the servlet 3.0 asynchronous) API introduce a change in the servlet API that allows a request to be dispatched multiple times to a servlet. If the servlet does not have the resources required on a dispatch, then the request is suspended (or put into asynchronous mode), so that the servlet may return from the dispatch without a response being sent. When the waited-for resources become available, the request is re-dispatched to the servlet, with a new thread, and a response is generated.
Using Continuations
Asynchronous servlets were originally introduced with Jetty 6 Continuations, which were a Jetty specific mechanism. From Jetty 7 onwards, the Continuations API has been extended to be a general purpose API that will work asynchronously on any servlet-3.0 container, as well as on Jetty 6, 7, or 8. Continuations will also work in blocking mode with any servlet 2.5 container.
Obtaining a Continuation
The ContinuationSupport factory class can be used to obtain a continuation instance associated with a request:
Continuation continuation = ContinuationSupport.getContinuation(request);
Suspending a Request
To suspend a request, the suspend method can be called on the continuation:
void doGet(HttpServletRequest request, HttpServletResponse response)
{
...
// optionally:
// continuation.setTimeout(long);
continuation.suspend();
...
}The lifecycle of the request will be extended beyond the return to the container from the Servlet.service(…) method and Filter.doFilter(…) calls. When these dispatch methods return, the suspended request will not yet be committed and a response will not yet be sent to the HTTP client.
Once the request has been suspended, the continuation should be registered with an asynchronous service so that it may be used by an asynchronous callback when the waited-for event happens.
The request will be suspended until either continuation.resume() or continuation.complete() is called. If neither is called then the continuation will timeout.
The timeout should be set before the suspend, by a call to continuation.setTimeout(long) if no timeout is set, then the default period is used.
If no timeout listeners resume or complete the continuation, then the continuation is resumed with continuation.isExpired() true.
Suspension is analogous to the servlet 3.0 request.startAsync() method. Unlike jetty 6 continuations, an exception is not thrown by suspend and the method should return normally.
This allows the registration of the continuation to occur after suspension and avoids the need for a mutex.
If an exception is desirable (to bypass code that is unaware of continuations and may try to commit the response), then continuation.undispatch() may be called to exit the current thread from the current dispatch by throwing a ContinuationThrowable.
Resuming a Request
Once an asynchronous event has occurred, the continuation can be resumed:
void myAsyncCallback(Object results)
{
continuation.setAttribute("results",results);
continuation.resume();
}When a continuation is resumed, the request is re-dispatched to the servlet container, almost as if the request had been received again.
However during the re-dispatch, the continuation.isInitial() method returns false and any attributes set by the asynchronous handler are available.
Continuation resume is analogous to Servlet 3.0 AsyncContext.dispatch().
Completing a Request
As an alternative to resuming a request, an asynchronous handler may write the response itself. After writing the response, the handler must indicate the request handling is complete by calling the complete method:
void myAsyncCallback(Object results)
{
writeResults(continuation.getServletResponse(),results);
continuation.complete();
}After complete is called, the container schedules the response to be committed and flushed. Continuation complete is analogous to Servlet 3.0 AsyncContext.complete().
Continuation Listeners
An application may monitor the status of a continuation by using a ContinuationListener:
void doGet(HttpServletRequest request, HttpServletResponse response)
{
...
Continuation continuation = ContinuationSupport.getContinuation(request);
continuation.addContinuationListener(new ContinuationListener()
{
public void onTimeout(Continuation continuation) { ... }
public void onComplete(Continuation continuation) { ... }
});
continuation.suspend();
...
}Continuation listeners are analogous to Servlet 3.0 AsyncListeners.
Common Continuation Patterns
Suspend Resume Pattern
The suspend/resume style is used when a servlet and/or filter is used to generate the response after an asynchronous wait that is terminated by an asynchronous handler. Typically a request attribute is used to pass results and to indicate if the request has already been suspended.
void doGet(HttpServletRequest request, HttpServletResponse response)
{
// if we need to get asynchronous results
Object results = request.getAttribute("results");
if (results==null)
{
final Continuation continuation = ContinuationSupport.getContinuation(request);
// if this is not a timeout
if (continuation.isExpired())
{
sendMyTimeoutResponse(response);
return;
}
// suspend the request
continuation.suspend(); // always suspend before registration
// register with async service. The code here will depend on the
// the service used (see Jetty HttpClient for example)
myAsyncHandler.register(new MyHandler()
{
public void onMyEvent(Object result)
{
continuation.setAttribute("results",results);
continuation.resume();
}
});
return; // or continuation.undispatch();
}
// Send the results
sendMyResultResponse(response,results);
}This style is very good when the response needs the facilities of the servlet container (e.g., it uses a web framework) or if one event may resume many requests so the container’s thread pool can be used to handle each of them.
Suspend Continue Pattern
The suspend/complete style is used when an asynchronous handler is used to generate the response:
void doGet(HttpServletRequest request, HttpServletResponse response)
{
final Continuation continuation = ContinuationSupport.getContinuation(request);
// if this is not a timeout
if (continuation.isExpired())
{
sendMyTimeoutResponse(request,response);
return;
}
// suspend the request
continuation.suspend(); // response may be wrapped.
// register with async service. The code here will depend on the
// the service used (see Jetty HttpClient for example)
myAsyncHandler.register(new MyHandler()
{
public void onMyEvent(Object result)
{
sendMyResultResponse(continuation.getServletResponse(),results);
continuation.complete();
}
});
}This style is very good when the response does not need the facilities of the servlet container (e.g., it does not use a web framework) and if an event will resume only one continuation. If many responses are to be sent (e.g., a chat room), then writing one response may block and cause a DOS on the other responses.
Examples
-
The ChatServlet example shows how to make a chat room using Async Servlets. The same principles are applied to frameworks like cometd which provide an richer environment for such applications, based on Continuations.
-
The QoSFilter uses suspend/resume style to limit the number of requests simultaneously within the filter. This can be used to protect a JDBC connection pool or other limited resource from too many simultaneous requests.
If too many requests are received, the extra requests wait for a short time on a semaphore, before being suspended. As requests within the filter return, they use a priority queue to resume the suspended requests. This allows your authenticated or priority users to get a better share of your server’s resources when the machine is under load.
-
The DosFilter is similar to the QoSFilter, but protects a web application from a denial of service attack, as much as is possible from within a web application.
If too many requests are detected coming from one source, then those requests are suspended and a warning generated. This works on the assumption that the attacker may be written in simple blocking style, so by suspending you are hopefully consuming their resources. True protection from DOS can only be achieved by network devices (or eugenics :)).
-
The ProxyServlet uses the suspend/complete style and the Jetty asynchronous HTTP client to implement a scalable Proxy server (or transparent proxy).
Frameworks
CDI
Contexts and Dependency Injection for Java EE (CDI) is a standard implemented by frameworks such as Weld and Apache OpenWebBeans. This is a common way to assemble and configure webapplications by a process often referred to as 'decoration'.
Jetty integration of CDI frameworks allows CDI to be used to inject the Filters, Servlets and Listeners created within a Servlet Context. There are two approaches to integration:
-
CDI implementation can integrate with Jetty. This requires the CDI implementation to have Jetty specific code. Since Jetty-9.4.20 a loosely bound mechanism has been available for CDI implementations to extends the Jetty
DecoratedObjectFactorywithout hard API dependencies. Prior to that, CDI implementations directly called jetty APIs that need to be explicitly exposed to the webapp. -
Alternately, Jetty can integrate with CDI implementations by using standard CDI SPIs.
Jetty CDI Modules
The Jetty distribution come with several CDI modules. These modules do not provide CDI, but instead enable one of more integration mechanisms.
Jetty cdi Module
The cdi module supports either two modes of CDI integration which can be selected either by the "org.eclipse.jetty.cdi" context init parameter or the "org.eclipse.jetty.cdi" server attribute (which is initialised from the "jetty.cdi.mode" start property).
Supported modes are:
-
CdiSpiDecoratorJetty will call the CDI SPI within the webapp to decorate objects (default). -
CdiDecoratingListerThe webapp may register a decorator on the context attribute "org.eclipse.jetty.cdi.decorator".
cd $JETTY_BASE java -jar $JETTY_HOME/start.jar --add-to-start=cdi
Jetty cdi-decorate Module
This module depends on the cdi module and sets the default mode to CdiDecoratingListener.
This is the preferred mode for Weld integration.
cd $JETTY_BASE java -jar $JETTY_HOME/start.jar --add-to-start=cdi-decorate
Jetty cdi-spi Module
This module depends on the cdi module and sets the default mode to CdiSpiDecorator.
This is the preferred mode for Open Web Beans integration.
cd $JETTY_BASE java -jar $JETTY_HOME/start.jar --add-to-start=cdi-spi
Jetty cdi2 Module
This module supports the deprecated technique of exposing private Jetty decorate APIs to the CDI implementation in the webapp.
cd $JETTY_BASE java -jar $JETTY_HOME/start.jar --add-to-start=cdi2
This module is equivalent to directly modifying the class path configuration with a jetty-web.xml like:
<?xml version="1.0" encoding="UTF-8"?>
<!DOCTYPE Configure PUBLIC "-//Jetty//Configure//EN" "http://www.eclipse.org/jetty/configure.dtd">
<Configure class="org.eclipse.jetty.webapp.WebAppContext">
<Call name="prependServerClass">
<Arg>-org.eclipse.jetty.util.Decorator</Arg>
</Call>
<Call name="prependServerClass">
<Arg>-org.eclipse.jetty.util.DecoratedObjectFactory</Arg>
</Call>
<Call name="prependServerClass">
<Arg>-org.eclipse.jetty.server.handler.ContextHandler.</Arg>
</Call>
<Call name="prependServerClass">
<Arg>-org.eclipse.jetty.server.handler.ContextHandler</Arg>
</Call>
<Call name="prependServerClass">
<Arg>-org.eclipse.jetty.servlet.ServletContextHandler</Arg>
</Call>
</Configure>|
The |
Embedded Jetty with CDI
When starting embedded Jetty programmatically from the main method, to use CDI it may be
necessary:
-
enable a Jetty CDI integration mode
-
and/or enable a CDI frame integration.
However, depending on the exact configuration of the embedded server, either or both steps may not be required as `ServletContainerInitializer`s may be discovered.
The details for embedding CDI is explained in the Embedded Jetty with Weld section, which can also be adapted to other CDI frameworks.
Weld
Weld can be used to add support for CDI (Contexts and Dependency Injection) to Servlets, Listeners and Filters. It is easily configured with Jetty 9.
Weld Setup
The easiest way to configure weld is within the Jetty distribution itself. This can be accomplished either by enabling one of the startup modules described in CDI Framework:
-
the
cdi-decoratemodule is the preferred Weld integration. The activation of this module by Weld can be confirmed by the following Weld log:
INFO: WELD-ENV-001212: Jetty CdiDecoratingListener support detected, CDI injection will be available in Listeners, Servlets and Filters.
-
the
cdi-spimodule works with Weld, but may restrict some non standard features. The activation of this module by Weld can be confirmed by the following Weld log:
INFO: WELD-ENV-001213: Jetty CDI SPI support detected, CDI injection will be available in Listeners, Servlets and Filters.
-
the deprecated
cdi2module works with Weld prior to 3.1.2.Final. The activation of this module by Weld can be confirmed by the following Weld log:
INFO: WELD-ENV-001201: Jetty 7.2+ detected, CDI injection will be available in Servlets and Filters. Injection into Listeners is not supported.
To activate the preferred cdi-decorate module use:
cd $JETTY_BASE java -jar $JETTY_HOME/start.jar --add-to-start=cdi-decorate
|
For use with the jetty-maven-plugin, the best idea is to make the org.jboss.weld.servlet:weld-servlet and jetty-cdi artifacts plugin dependencies (not a webapp dependency). |
Weld with Embedded Jetty
When starting embedded Jetty programmatically from the main method it is necessary to:
-
enable a jetty CDI integration mode by registering a
ListenerorServletContainerInitializer -
enable Weld by registering either its
ListenerorServletContainerInitializer
Using a ServletContextHandler
Embedded usage often uses a ServletContextHandler which is the base class of WebappContext and lacks the features of "web.xml" configuration and must be configured directly.
The examples in this section based on a server and context set up as follows:
public class Main {
public static void main(String[] args) throws Exception {
Server jetty = new Server(8080);
ServletContextHandler context = new ServletContextHandler();
context.setContextPath("/");
server.setHandler(context);
context.addServlet(HelloWorldServlet.class, "/*");
/* CDI enabling goes here. See options below */
jetty.start();
jetty.join();
}
public static class HelloWorldServlet extends HttpServlet {
@Inject BeanManager manager;
protected void doGet(HttpServletRequest req, HttpServletResponse resp) throws ServletException, IOException {
resp.setContentType("text/plain");
resp.getWriter().append("Hello from " + manager);
}
}
}Initialize Weld with ServletContainerInitializers
The best way to initialize both Jetty Weld integration is to use their respective ServletContainerInitializers:
import org.eclipse.jetty.cdi.CdiServletContainerInitializer;
import org.eclipse.jetty.cdi.CdiDecoratingListener;
import org.jboss.weld.environment.servlet.EnhancedListener;
// ...
context.setInitParameter(
CdiServletContainerInitializer.CDI_INTEGRATION_ATTRIBUTE,
CdiDecoratingListener.MODE);
context.addBean(new ServletContextHandler.Initializer(context,
new EnhancedListener()));
context.addBean(new ServletContextHandler.Initializer(context,
new CdiServletContainerInitializer()));This code uses the ServletContextHandler.Initializer utility class added in Jetty-9.4.30.
Prior to that the same effect can be achieved with a custom implementation of ServletContextHandler.ServletContainerInitializerCaller.
Initialize Weld with Listeners
Jetty Weld integration can also be initialized by directly adding the listeners required:
import org.eclipse.jetty.cdi.CdiDecoratingListener;
import org.jboss.weld.environment.servlet.Listener;
// ...
context.addEventListener(new CdiDecoratingListener(context));
context.addEventListener(new Listener());Other Weld initializations
When running embedded without a context classloader, it is not actually required to initialize Jetty at all. If just Weld is initialized then it will disover the Jetty APIs and use the deprecated integration:
import org.jboss.weld.environment.servlet.Listener;
// ...
context.addEventListener(new Listener());However, this results in only a partially functional integration and the following warning:
INFO: WELD-ENV-001201: Jetty 7.2+ detected, CDI injection will be available in Servlets and Filters. Injection into Listeners is not supported.
Jetty can also be initialized by adding the org.eclipse.jetty.webapp.DecoratingListener listener instead of the org.eclipse.jetty.cdi.CdiDecoratingListener.
However, this introduces a needless dependency on jetty-webapp and is not the preferred method.
Initialize Weld with WebappContext
Some embedded usage still makes use of the WebappContext class for the convention-over-configuration benefits.
The methods described for ServletContextHandler will work for WebappContext:
import org.eclipse.jetty.cdi.CdiServletContainerInitializer;
import org.eclipse.jetty.cdi.CdiDecoratingListener;
import org.jboss.weld.environment.servlet.EnhancedListener;
// ...
Server server = new Server(8080);
WebAppContext webapp = new WebAppContext();
webapp.setContextPath("/");
server.setHandler(webapp);
webapp.setInitParameter(
CdiServletContainerInitializer.CDI_INTEGRATION_ATTRIBUTE,
CdiDecoratingListener.MODE);
webapp.addBean(new ServletContextHandler.Initializer(webapp,
new CdiServletContainerInitializer()));
webapp.addBean(new ServletContextHandler.Initializer(webapp,
new EnhancedListener()));
// ...Alternately the webapp can be configured to discover the SCIs:
Server server = new Server(8080);
WebAppContext webapp = new WebAppContext();
webapp.setContextPath("/");
server.setHandler(webapp);
webapp.setInitParameter(
CdiServletContainerInitializer.CDI_INTEGRATION_ATTRIBUTE,
CdiDecoratingListener.MODE);
// Need the AnnotationConfiguration to detect SCIs
Configuration.ClassList.setServerDefault(server).addBefore(
JettyWebXmlConfiguration.class.getName(),
AnnotationConfiguration.class.getName());
// Need to expose our SCI class.
webapp.getServerClasspathPattern().add("-" + CdiServletContainerInitializer.class.getName());
webapp.getSystemClasspathPattern().add(CdiServletContainerInitializer.class.getName());
// ...Spring Setup
You can assemble and configure Jetty in code or with almost any IoC style framework including Spring. If all you want to do is setup a Jetty server in your stock Spring usage, simply look at the xml snippet below as an example. If you want to replace the jetty-xml being used to start the normal Jetty distribution with spring, you may do so however currently it will not leverage the rest of the module system.
Jetty-Spring Module
The skeleton of a jetty spring module can be enabled from the jetty-distribution via the module mechanism. For example:
$ java -jar start.jar --add-to-start=springThis (or the alternative --add-to-start=spring command) creates a ${jetty.home}/lib/spring directory and populates it with the jetty-spring integration jar.
It does NOT supply the spring jars and their dependencies.
You will need to download these and place them into jetty’s classpath - you can use the ${jetty.home}/lib/spring directory created by spring.mod for this purpose.
Using Spring to Configure Jetty
Configuring Jetty via Spring is simply a matter of calling the API as Spring beans. The following is an example mimicking the default jetty startup configuration.
<?xml version="1.0" encoding="UTF-8"?>
<!DOCTYPE beans PUBLIC "-//SPRING//DTD BEAN//EN" "http://www.springframework.org/dtd/spring-beans.dtd">
<!-- =============================================================== -->
<!-- Configure the Jetty Server with Spring -->
<!-- This file is the similar to jetty.xml, but written in spring -->
<!-- XmlBeanFactory format. -->
<!-- =============================================================== -->
<beans>
<bean id="contexts" class="org.eclipse.jetty.server.handler.ContextHandlerCollection"/>
<bean id="server" name="Main" class="org.eclipse.jetty.server.Server" init-method="start" destroy-method="stop">
<constructor-arg>
<bean id="threadPool" class="org.eclipse.jetty.util.thread.QueuedThreadPool">
<property name="minThreads" value="10"/>
<property name="maxThreads" value="50"/>
</bean>
</constructor-arg>
<property name="connectors">
<list>
<bean id="connector" class="org.eclipse.jetty.server.ServerConnector">
<constructor-arg ref="server"/>
<property name="port" value="8080"/>
</bean>
</list>
</property>
<property name="handler">
<bean id="handlers" class="org.eclipse.jetty.server.handler.HandlerCollection">
<property name="handlers">
<list>
<ref bean="contexts"/>
<bean id="defaultHandler" class="org.eclipse.jetty.server.handler.DefaultHandler"/>
</list>
</property>
</bean>
</property>
<property name="beans">
<list>
<bean id="deploymentManager" class="org.eclipse.jetty.deploy.DeploymentManager">
<property name="contexts" ref="contexts"/>
<property name="appProviders">
<list>
<bean id="webAppProvider" class="org.eclipse.jetty.deploy.providers.WebAppProvider">
<property name="monitoredDirName" value="webapps"/>
<property name="scanInterval" value="1"/>
<property name="extractWars" value="true"/>
</bean>
</list>
</property>
</bean>
</list>
</property>
</bean>
</beans>OSGI
Introduction
The Jetty OSGi infrastructure provides a Jetty container inside an OSGi container.
Traditional JavaEE webapps can be deployed, in addition to Jetty ContextHandlers, along with OSGi web bundles.
In addition, the infrastructure also supports the OSGi HttpService interface.
General Setup
All of the Jetty jars contain manifest entries appropriate to ensure that they can be deployed into an OSGi container as bundles. You will need to install some jetty jars into your OSGi container. You can always find the Jetty jars either in the Maven Central repository, or you can download a distribution of Jetty. Here’s the absolute minimal set of Jetty jars:
| Jar | Bundle Symbolic Name |
|---|---|
jetty-util |
org.eclipse.jetty.util |
jetty-http |
org.eclipse.jetty.http |
jetty-io |
org.eclipse.jetty.io |
jetty-security |
org.eclipse.jetty.security |
jetty-server |
org.eclipse.jetty.server |
jetty-servlet |
org.eclipse.jetty.servlet |
jetty-webapp |
org.eclipse.jetty.webapp |
jetty-deploy |
org.eclipse.jetty.deploy |
jetty-xml |
org.eclipse.jetty.xml |
jetty-osgi-servlet-api |
org.eclipse.jetty.osgi-servlet-api |
You must also install the Apache Aries SPI Fly bundles as many parts of Jetty - for example ALPN, websocket, annotations - use the ServiceLoader mechanism, which requires an OSGi Service Loader Mediator like SPI Fly:
| Jar | Bundle Symbolic Name | Location |
|---|---|---|
org.apache.aries.spifly:org.apache.aries.spifly.dynamic.bundle-1.2.4.jar |
org.apache.aries.spifly.dynamic.bundle |
|
We strongly recommend that you also deploy the annotation-related jars also, as the Servlet Specification increasingly relies on annotations for functionality. |
You will also need the OSGi Event Management service and the OSGi Configuration Management service. If your OSGi container does not automatically make these available, you will need to add them in a way appropriate to your container.
The Jetty OSGi Container
The jetty-osgi-boot jar
Now that you have the basic set of Jetty jars installed, you can install the jetty-osgi-boot.jar bundle, downloadable from the maven central repo here.
This bundle will instantiate and make available the Jetty OSGi container when it is started. If this bundle is not auto-started upon installation into your OSGi container, you should start it manually using a command appropriate for your container.
Customizing the Jetty Container
Before going ahead with the install, you may want to customize the Jetty container.
In general this is done by a combination of System properties and the usual Jetty xml configuration files.
The way you define the System properties will depend on which OSGi container you are using, so ensure that you are familiar with how to set them for your environment.
In the following examples, we will assume that the OSGi container allows us to set System properties as simple name=value pairs.
The available System properties are:
- jetty.http.port
-
If not specified, this defaults to the usual jetty port of 8080.
- jetty.home
-
Either this property or the jetty.home.bundle must be specified. This property should point to a file system location that has an
etc/directory containing xml files to configure the Jetty container on startup. For example:jetty.home=/opt/custom/jettyWhere
/opt/custom/jettycontains:etc/jetty.xml etc/jetty-selector.xml etc/jetty-deploy.xml etc/jetty-special.xml - jetty.home.bundle
-
Either this property or the jetty.home property must be specified. This property should specify the symbolic name of a bundle which contains a directory called
jettyhome/. Thejettyhome/directory should have a subdirectory calledetc/that contains the xml files to be applied to Jetty on startup. The jetty-osgi-boot.jar contains ajettyhome/directory with a default set of xml configuration files. Here’s how you would specify it:jetty.home.bundle=org.eclipse.jetty.osgi.bootHere’s a partial listing of that jar that shows you the names of the xml files contained within it:
META-INF/MANIFEST.MF jettyhome/etc/jetty.xml jettyhome/etc/jetty-deploy.xml jettyhome/etc/jetty-http.xml - jetty.etc.config.urls
-
This specifies the paths of the xml files that are to be used. If not specified, they default to:
etc/jetty.xml,etc/jetty-http.xml,etc/jetty-deploy.xmlNote that the paths can either be relative or absolute, or a mixture. If the path is relative, it is resolved against either jetty.home or jetty.home.bundle, whichever was specified. You can use this ability to mix and match jetty configuration files to add functionality, such as adding in a https connector. Here’s an example of adding a HTTPS connector, using the relevant files from the jetty-distribution:
etc/jetty.xml, etc/jetty-http.xml, /opt/jetty/etc/jetty-ssl.xml, /opt/jetty/etc/jetty-https.xml, etc/jetty-deploy.xml
Note that regardless of whether you set the jetty.home or jetty.home.bundle property, when Jetty executes the configuration files, it will set an appropriate value for jetty.home so that references in xml files to
<property name="jetty.home">will work. Be careful, however, if you are mixing and matching relative and absolute configuration file paths: the value of jetty.home is determined from the resolved location of the relative files only.
The Jetty Container as an OSGi Service
You can now go ahead and deploy the jetty-osgi-boot.jar into your OSGi container. A Jetty server instance will be created, the xml config files applied to it, and then published as an OSGi service. Normally, you will not need to interact with this service instance, however you can retrieve a reference to it using the usual OSGi API:
org.osgi.framework.BundleContext bc;
org.osgi.framework.ServiceReference ref = bc.getServiceReference("org.eclipse.jetty.server.Server");The Server service has a couple of properties associated with it that you can retrieve using the org.osgi.framework.ServiceReference.getProperty(String) method:
- managedServerName
-
The Jetty Server instance created by the jetty-osgi-boot.jar will be called "defaultJettyServer"
- jetty.etc.config.urls
-
The list of xml files resolved from either jetty.home or jetty.home.bundle/jettyhome
Adding More Jetty Servers
As we have seen in the previous section, the jetty-osgi-boot code will create an org.eclipse.jetty.server.Server instance, apply the xml configuration files specified by jetty.etc.config.urls System property to it, and then register it as an OSGi Service.
The name associated with this default instance is defaultJettyServer.
You can create other Server instances, register them as OSGi Services, and the jetty-osgi-boot code will notice them, and configure them so that they can deploy ContextHandlers and webapp bundles.
When you deploy webapps or ContextHandlers as bundles or Services (see sections below) you can target them to be deployed to a particular server instance via
the Server’s name.
Here’s an example of how to create a new Server instance and register it with OSGi so that the jetty-osgi-boot code will find it and configure it so it can be a deployment target:
public class Activator implements BundleActivator
{
public void start(BundleContext context) throws Exception
{
Server server = new Server();
//do any setup on Server in here
String serverName = "fooServer";
Dictionary serverProps = new Hashtable();
//define the unique name of the server instance
serverProps.put("managedServerName", serverName);
serverProps.put("jetty.http.port", "9999");
//let Jetty apply some configuration files to the Server instance
serverProps.put("jetty.etc.config.urls", "file:/opt/jetty/etc/jetty.xml,file:/opt/jetty/etc/jetty-selector.xml,file:/opt/jetty/etc/jetty-deploy.xml");
//register as an OSGi Service for Jetty to find
context.registerService(Server.class.getName(), server, serverProps);
}
}Now that we have created a new Server called "fooServer", we can deploy webapps and ContextHandlers as Bundles or Services to it (see below for more information on this). Here’s an example of deploying a webapp as a Service and targeting it to the "fooServer" Server we created above:
public class Activator implements BundleActivator
{
public void start(BundleContext context) throws Exception
{
//Create a webapp context as a Service and target it at the "fooServer" Server instance
WebAppContext webapp = new WebAppContext();
Dictionary props = new Hashtable();
props.put("war",".");
props.put("contextPath","/acme");
props.put("managedServerName", "fooServer");
context.registerService(ContextHandler.class.getName(),webapp,props);
}
}Deploying Bundles as Webapps
The Jetty OSGi container listens for the installation of bundles, and will automatically attempt to deploy any that appear to be webapps.
Any of the following criteria are sufficient for Jetty to deploy the bundle as a webapp:
- Bundle contains a WEB-INF/web.xml file
-
If the bundle contains a web descriptor, then it is automatically deployed. This is an easy way to deploy classic JavaEE webapps.
- Bundle MANIFEST contains Jetty-WarFolderPath (for releases prior tojetty-9.3) or Jetty-WarResourcePath
-
This is the location within the bundle of the webapp resources. Typically this would be used if the bundle is not a pure webapp, but rather the webapp is a component of the bundle. Here’s an example of a bundle where the resources of the webapp are not located at the root of the bundle, but rather inside the subdirectory
web/:MANIFEST:Bundle-Name: Web Jetty-WarResourcePath: web Import-Package: javax.servlet;version="3.1", javax.servlet.resources;version="3.1" Bundle-SymbolicName: com.acme.sample.webBundle contents:
META-INF/MANIFEST.MF web/index.html web/foo.html web/WEB-INF/web.xml com/acme/sample/web/MyStuff.class com/acme/sample/web/MyOtherStuff.class - Bundle MANIFEST contains Web-ContextPath
-
This header can be used in conjunction with either of the two preceding headers to control the context path to which the webapp is deployed, or alone to identify that the bundle’s contents should be published as a webapp. This header is part of the RFC-66 specification for using webapps with OSGi. Here’s an example based on the previous one where we use the
Web-ContextPathheader to set its deployment context path to be "/sample" :MANIFEST:Bundle-Name: Web Jetty-WarResourcePath: web Web-ContextPath: /sample Import-Package: javax.servlet;version="3.1", javax.servlet.resources;version="3.1" Bundle-SymbolicName: com.acme.sample.web
You can also define extra headers in your bundle MANIFEST that help customize the web app to be deployed:
- Jetty-defaultWebXmlFilePath
-
The location of a
webdefault.xmlfile to apply to the webapp. The location can be either absolute (either absolute path or file: url), or relative (in which case it is interpreted as relative to the bundle root). Defaults to thewebdefault.xmlfile built into the Jetty OSGi container. - Jetty-WebXmlFilePath
-
The location of the
web.xmlfile. The location can be either absolute (either absolute path or file: url), or relative (in which case it is interpreted as relative to the bundle root). Defaults toWEB-INF/web.xml - Jetty-extraClassPath
-
A classpath of additional items to add to the webapp’s classloader.
- Jetty-bundleInstall
-
The path to the base folder that overrides the computed bundle installation - mostly useful for those OSGi frameworks that unpack bundles by default.
- Require-TldBundle
-
A comma separated list of bundle symbolic names of bundles containing TLDs that this webapp depends upon.
- managedServerName
-
The name of the Server instance to which to deploy this webapp bundle. If not specified, defaults to the default Server instance called "defaultJettyServer".
- Jetty-WarFragmentResourcePath
-
The path within a fragment hosted by the web-bundle that contains static resources for the webapp. The path is appended to the base resource for the webapp (see Jetty-WarResourcePath).
- Jetty-WarPrependFragmentResourcePath
-
The path within a fragment hosted by the web-bundle that contains static resources for the webapp. The path is prepended to the base resource for the webapp (see Jetty-WarResourcePath).
- Jetty-ContextFilePath
-
A comma separated list of paths within the webapp bundle to Jetty context files that will be applied to the webapp. Alternatively you may include a single Jetty context file called
jetty-webapp-context.xmlin the webapp bundle’s META-INF directory and it will be automatically applied to the webapp.
Determining the Context Path for a Webapp Bundle
As we have seen in the previous section, if the bundle MANIFEST contains the RFC-66 header Web-ContextPath, Jetty will use that as the context path.
If the MANIFEST does not contain that header, then Jetty will concoct a context path based on the last element of the bundle’s location (by calling Bundle.getLocation()) after stripping off any file extensions.
For example, suppose we have a bundle whose location is:
file://some/where/over/the/rainbow/oz.warThe corresponding synthesized context path would be:
/ozExtra Properties Available for Webapp Bundles
You can further customize your webapp by including a Jetty context xml file that is applied to the webapp.
This xml file must be placed in META-INF of the bundle, and must be called jetty-webapp-context.xml.
Here’s an example of a webapp bundle listing containing such a file:
META-INF/MANIFEST.MF
META-INF/jetty-webapp-context.xml
web/index.html
web/foo.html
web/WEB-INF/web.xml
com/acme/sample/web/MyStuff.class
com/acme/sample/web/MyOtherStuff.classHere’s an example of the contents of a META-INF/jetty-webapp-context.xml file:
<?xml version="1.0" encoding="UTF-8"?>
<!DOCTYPE Configure PUBLIC "-//Jetty//Configure//EN" "http://www.eclipse.org/jetty/configure_9_3.dtd">
<Configure class="org.eclipse.jetty.webapp.WebAppContext">
<Set name="defaultsDescriptor"><Property name="bundle.root"/>META-INF/webdefault.xml</Set>
</Configure>As you can see, it is a normal context xml file used to set up a webapp. There are, however, some additional useful properties that can be referenced
- Server
-
This is a reference to the Jetty
org.eclipse.jetty.server.Serverinstance to which the webapp being configured in the context xml file will be deployed. - bundle.root
-
This is a reference to the
org.eclipse.jetty.util.resource.Resourcethat represents the location of the Bundle. Note that this could be either a directory in the file system if the OSGi container automatically unpacks bundles, or it may be a jar:file: url if the bundle remains packed.
Deploying Bundles as Jetty ContextHandlers
In addition to deploying webapps, the Jetty OSGi container listens for the installation of bundles that are not heavyweight webapps, but rather use the flexible Jetty-specific concept of ContextHandlers.
The following is the criteria used to decide if a bundle can be deployed as a ContextHandler:
- Bundle MANIFEST contains Jetty-ContextFilePath
-
A comma separated list of names of context files - each one of which represents a ContextHandler that should be deployed by Jetty. The context files can be inside the bundle, external to the bundle somewhere on the file system, or external to the bundle in the jetty.home directory.
A context file that is inside the bundle:
Jetty-ContextFilePath: ./a/b/c/d/foo.xmlA context file that is on the file system:
Jetty-ContextFilePath: /opt/app/contexts/foo.xmlA context file that is relative to jetty.home:
Jetty-ContextFilePath: contexts/foo.xmlA number of different context files:
Jetty-ContextFilePath: ./a/b/c/d/foo.xml,/opt/app/contexts/foo.xml,contexts/foo.xml
Other MANIFEST properties that can be used to configure the deployment of the ContextHandler:
- managedServerName
-
The name of the Server instance to which to deploy this webapp bundle. If not specified, defaults to the default Server instance called "defaultJettyServer".
Determining the Context Path for a ContextHandler Bundle
Usually, the context path for the ContextHandler will be set by the context xml file.
However, you can override any path set in the context xml file by using the Web-ContextPath header in the MANIFEST.
Extra Properties Available for Context Xml Files
Before the Jetty OSGi container applies a context xml file found in a Jetty-ContextFilePath MANIFEST header, it sets a few useful propertiesthat can be referred to within the xml file:
- Server
-
This is a reference to the Jetty
org.eclipse.jetty.server.Serverinstance to which theContextHandlerbeing configured in the context xml file will be deployed. - bundle.root
-
This is a reference to the
org.eclipse.jetty.util.resource.Resourcethat represents the location of the Bundle (obtained by callingBundle.getLocation()). Note that this could be either a directory in the file system if the OSGi container automatically unpacks bundles, or it may be a jar:file: url if the bundle remains packed.
Here’s an example of a context xml file that makes use of these properties:
<?xml version="1.0" encoding="UTF-8"?><!DOCTYPE Configure PUBLIC "-//Jetty//Configure//EN" "http://www.eclipse.org/jetty/configure_9_3.dtd">
<Configure class="org.eclipse.jetty.server.handler.ContextHandler">
<!-- Get root for static content, could be on file system or this bundle -->
<Call id="res" class="org.eclipse.jetty.util.resource.Resource" name="newResource">
<Arg><Property name="bundle.root"/></Arg>
</Call>
<Ref refid="res">
<Call id="base" name="addPath">
<Arg>/static/</Arg>
</Call>
</Ref>
<Set name="contextPath">/unset</Set>
<!-- Set up the base resource for static files relative to inside bundle -->
<Set name="baseResource">
<Ref refid="base"/>
</Set>
<Set name="handler">
<New class="org.eclipse.jetty.server.handler.ResourceHandler">
<Set name="welcomeFiles">
<Array type="String">
<Item>index.html</Item>
</Array>
</Set>
<Set name="cacheControl">max-age=3600,public</Set>
</New>
</Set>
</Configure>Deploying Services as Webapps
In addition to listening for bundles whose format or MANIFEST entries define a webapp or ContextHandler for to be deployed, the Jetty OSGi container also listens for the registration of OSGi services that are instances of org.eclipse.jetty.webapp.WebAppContext.
So you may programmatically create a WebAppContext, register it as a service, and have Jetty pick it up and deploy it.
Here’s an example of doing that with a simple bundle that serves static content, and an org.osgi.framework.BundleActivator that instantiates the WebAppContext:
The bundle contents:
META-INF/MANIFEST.MF
index.html
com/acme/osgi/Activator.classThe MANIFEST.MF:
Bundle-Classpath: .
Bundle-Name: Jetty OSGi Test WebApp
DynamicImport-Package: org.eclipse.jetty.*;version="[9.0,10.0)"
Bundle-Activator: com.acme.osgi.Activator
Import-Package: org.eclipse.jetty.server.handler;version="[9.0,10)",
org.eclipse.jetty.webapp;version="[9.0,10)",
org.osgi.framework;version= "[1.5,2)",
org.osgi.service.cm;version="1.2.0",
org.osgi.service.packag eadmin;version="[1.2,2)",
org.osgi.service.startlevel;version="1.0.0",
org.osgi.service.url;version="1.0.0",
org.osgi.util.tracker;version= "1.3.0",
org.xml.sax,org.xml.sax.helpers
Bundle-SymbolicName: com.acme.testwebappThe Activator code:
public void start(BundleContext context) throws Exception
{
WebAppContext webapp = new WebAppContext();
Dictionary props = new Hashtable();
props.put("Jetty-WarResourcePath",".");
props.put("contextPath","/acme");
context.registerService(WebAppContext.class.getName(),webapp,props);
}The above setup is sufficient for Jetty to recognize and deploy the WebAppContext at /acme.
As the example shows, you can use OSGi Service properties in order to communicate extra configuration information to Jetty:
- Jetty-WarFolderPath (for releases prior to 9.3) or Jetty-WarResourcePath
-
The location within the bundle of the root of the static resources for the webapp
- Web-ContextPath
-
The context path at which to deploy the webapp.
- Jetty-defaultWebXmlFilePath
-
The location within the bundle of a
webdefault.xmlfile to apply to the webapp. Defaults to that of the Jetty OSGi container. - Jetty-WebXmlFilePath
-
The location within the bundle of the
web.xmlfile. Defaults toWEB-INF/web.xml - Jetty-extraClassPath
-
A classpath of additional items to add to the webapp’s classloader.
- Jetty-bundleInstall
-
The path to the base folder that overrides the computed bundle installation - mostly useful for those OSGi frameworks that unpack bundles by default.
- Require-TldBundle
-
A comma separated list of bundle symbolic names of bundles containing TLDs that this webapp depends upon.
- managedServerName
-
The name of the Server instance to which to deploy this webapp. If not specified, defaults to the default Server instance called "defaultJettyServer".
- Jetty-WarFragmentResourcePath
-
The path within a fragment hosted by the web-bundle that contains static resources for the webapp. The path is appended to the base resource for the webapp (see Jetty-WarResourcePath).
- Jetty-WarPrependFragmentResourcePath
-
The path within a fragment hosted by the web-bundle that contains static resources for the webapp. The path is prepended to the base resource for the webapp (see Jetty-WarResourcePath).
Deploying Services as ContextHandlers
Similarly to WebApp`Contexts, the Jetty OSGi container can detect the registration of an OSGi Service that represents a ContextHandler and ensure that it is deployed.
The ContextHandler can either be fully configured before it is registered as an OSGi service - in which case the Jetty OSGi container will merely deploy it - or the ContextHandler can be partially configured, with the Jetty OSGi container completing the configuration via a context xml file and properties associated with the Service.
Here’s an example of doing that with a simple bundle that serves static content with an org.osgi.framework.BundleActivator that instantiates a ContextHandler and registers it as an OSGi Service, passing in properties that define a context xml file and context path for Jetty to apply upon deployment:
The bundle contents:
META-INF/MANIFEST.MF
static/index.html
acme.xml
com/acme/osgi/Activator.class
com/acme/osgi/Activator$1.classThe MANIFEST:
Bundle-Classpath: .
Bundle-Name: Jetty OSGi Test Context
DynamicImport-Package: org.eclipse.jetty.*;version="[9.0,10.0)"
Bundle-Activator: com.acme.osgi.Activator
Import-Package: javax.servlet;version="2.6.0",
javax.servlet.resources;version="2.6.0",
org.eclipse.jetty.server.handler;version="[9.0,10)",
org.osgi.framework;version="[1.5,2)",
org.osgi.service.cm;version="1.2.0",
org.osgi.service.packageadmin;version="[1.2,2)",
org.osgi.service.startlevel;version="1.0.0.o",
org.osgi.service.url;version="1.0.0",
org.osgi.util.tracker;version="1.3.0",
org.xml.sax,org.xml.sax.helpers
Bundle-SymbolicName: com.acme.testcontextThe Activator code:
public void start(final BundleContext context) throws Exception
{
ContextHandler ch = new ContextHandler();
ch.addEventListener(new ServletContextListener () {
@Override
public void contextInitialized(ServletContextEvent sce)
{
System.err.println("Context is initialized");
}
@Override
public void contextDestroyed(ServletContextEvent sce)
{
System.err.println("Context is destroyed!");
}
});
Dictionary props = new Hashtable();
props.put("Web-ContextPath","/acme");
props.put("Jetty-ContextFilePath", "acme.xml");
context.registerService(ContextHandler.class.getName(),ch,props);
}The contents of the acme.xml context file:
<?xml version="1.0" encoding="UTF-8"?><!DOCTYPE Configure PUBLIC "-//Jetty//Configure//EN" "http://www.eclipse.org/jetty/configure_9_3.dtd">
<Configure class="org.eclipse.jetty.server.handler.ContextHandler">
<!-- Get root for static content, could be on file system or this bundle -->
<Call id="res" class="org.eclipse.jetty.util.resource.Resource" name="newResource">
<Arg><Property name="bundle.root"/></Arg>
</Call>
<Ref refid="res">
<Call id="base" name="addPath">
<Arg>/static/</Arg>
</Call>
</Ref>
<Set name="contextPath">/unset</Set>
<!-- Set up the base resource for static files relative to inside bundle -->
<Set name="baseResource">
<Ref refid="base"/>
</Set>
<Set name="handler">
<New class="org.eclipse.jetty.server.handler.ResourceHandler">
<Set name="welcomeFiles">
<Array type="String">
<Item>index.html</Item>
</Array>
</Set>
<Set name="cacheControl">max-age=3600,public</Set>
</New>
</Set>
</Configure>You may also use the following OSGi Service properties:
- managedServerName
-
The name of the Server instance to which to deploy this webapp. If not specified, defaults to the default Server instance called "defaultJettyServer".
Extra Properties Available for Context Xml Files
Before the Jetty OSGi container applies a context xml file found in a Jetty-ContextFilePath property, it sets a few useful properties that can be referred to within the xml file:
- Server
-
This is a reference to the Jetty
org.eclipse.jetty.server.Serverinstance to which theContextHandlerbeing configured in the context xml file will be deployed. - bundle.root
-
This is a reference to the
org.eclipse.jetty.util.resource.Resourcethat represents the location of the Bundle publishing theContextHandleras a Service (obtained by callingBundle.getLocation()). Note that this could be either a directory in the file system if the OSGi container automatically unpacks bundles, or it may be a jar:file: url if the bundle remains packed.
In the example above, you can see both of these properties being used in the context xml file.
Support for the OSGi Service Platform Enterprise Specification
The Jetty OSGi container implements several aspects of the Enterprise Specification v4.2 for the WebAppContexts and ContextHandlers that it deploys from either bundles or OSGi services as outlined in foregoing sections.
Context Attributes
For each WebAppContext or ContextHandler, the following context attribute is set, as required by section 128.6.1 Bundle Context page 427:
- osgi-bundleContext
-
The value of this attribute is the
BundleContextrepresenting the Bundle associated with theWebAppContextorContextHandler.
Service Attributes
As required by the specification section 128.3.4 Publishing the Servlet Context page 421, each WebAppContext and ContextHandler deployed by the Jetty OSGi container is also published as an OSGi service (unless it has been already - see sections 1.6 and 1.7).
The following properties are associated with these services:
- osgi.web.symbolicname
-
The symbolic name of the Bundle associated with the
WebAppContextorContextHandler - osgi.web.version
-
The Bundle-Version header from the Bundle associated with the
WebAppContextorContextHandler - osgi.web.contextpath
-
The context path of the
WebAppContextorContextHandler
OSGi Events
As required by the specification section 128.5 Events pg 426, the following OSGi Event Admin events will be posted:
- org/osgi/service/web/DEPLOYING
-
The Jetty OSGi container is about to deploy a
WebAppContextorContextHandler - org/osgi/service/web/DEPLOYED
-
The Jetty OSGi container has finished deploying a
WebAppContextorContextHandlerand it is in service - org/osgi/service/web/UNDEPLOYING
-
The Jetty OSGi container is about to undeploy a
WebAppContextorContextHandler - org/osgi/service/web/UNDEPLOYED
-
The Jetty OSGi container has finished undeploying a
WebAppContextorContextHandlerand it is no longer in service - org/osgi/service/web/FAILED
-
The Jetty OSGi container failed to deploy a
WebAppContextorContextHandler
Using JSPs
Setup
In order to use JSPs with your webapps and bundles you will need to install the JSP and JSTL jars and their dependencies into your OSGi container. Some you will find in the Jetty distribution, whereas others you will need to download from Maven central. Here is the list of recommended jars (NOTE the version numbers may change in future):
| Jar | Bundle Symbolic Name | Location |
|---|---|---|
The annotation jars |
||
org.mortbay.jasper:apache-el |
org.mortbay.jasper.apache-el |
Distribution lib/apache-jsp |
org.mortbay.jasper:apache-jsp |
org.mortbay.jasper.apache-jsp |
Distribution lib/apache-jsp |
org.eclipse.jetty:apache-jsp |
org.eclipse.jetty.apache-jsp |
Distribution lib/apache-jsp |
org.eclipse.jdt.core-3.8.2.v20130121.jar |
org.eclipse.jdt.core.compiler.batch |
Distribution lib/apache-jsp |
org.eclipse.jetty.osgi:jetty-osgi-boot-jsp |
org.eclipse.jetty.osgi.boot.jsp |
|
For the JSTL library, we recommend the use of the implementation from Glassfish, as it has fewer dependencies:
| Jar | Bundle Symbolic Name | The jsp jars |
|---|---|---|
org.eclipse.jetty.orbit:javax.servlet.jsp.jstl-1.2.0.v201105211821.jar |
javax.servlet.jsp.jstl |
However, if you wish, you may use the JSTL implementation from Apache instead, although you will need to source some dependency jars with suitable OSGi manifests:
| Jar | Bundle Symbolic Name | Location |
|---|---|---|
The jsp jars |
||
org.apache.taglibs:taglibs-standard-spec:jar:1.2.1 |
org.apache.taglibs.taglibs-standard-spec |
Distribution lib/apache-jstl |
org.apache.taglibs:taglibs-standard-spec:jar:1.2.1 |
org.apache.taglibs.standard-impl |
Distribution lib/apache-jstl |
org.apache.xalan 2.7.1 |
Try Eclipse Orbit |
|
org.apache.xml.serializer 2.7.1 |
Try Eclipse Orbit |
The jetty-osgi-boot-jsp jar
To be able to use JSPs you will need to also install the jetty-osgi-boot-jsp.jar into your OSGi container. This jar can be obtained from maven central here.
This bundle acts as a fragment extension to the jetty-osgi-boot.jar and adds in support for using JSP.
Using TagLibs
The Jetty JSP OSGi container will make available the JSTL tag library to all webapps. If you only use this tag library, then your webapp will work without any further modification.
However, if you make use of other taglibs, you will need to ensure that they are installed into the OSGi container, and also define some System properties and/or MANIFEST headers in your webapp.
This is necessary because the classloading regime used by the OSGi container is very different than that used by JSP containers, and the MANIFEST of a normal webapp does not contain enough information for the OSGi environment to allow a JSP container to find and resolve TLDs referenced in the webapp’s .jsp files.
Firstly, lets look at an example of a web bundle’s modified MANIFEST file so you get an idea of what is required.
This example is a web bundle that uses the Spring servlet framework:
Bundle-SymbolicName: com.acme.sample
Bundle-Name: WebSample
Web-ContextPath: taglibs
Import-Bundle: org.springframework.web.servlet
Require-TldBundle: org.springframework.web.servlet
Bundle-Version: 1.0.0
Import-Package: org.eclipse.virgo.web.dm;version="[3.0.0,4.0.0)",org.s
pringframework.context.config;version="[2.5.6,4.0.0)",org.springframe
work.stereotype;version="[2.5.6,4.0.0)",org.springframework.web.bind.
annotation;version="[2.5.6,4.0.0)",org.springframework.web.context;ve
rsion="[2.5.6,4.0.0)",org.springframework.web.servlet;version="[2.5.6
,4.0.0)",org.springframework.web.servlet.view;version="[2.5.6,4.0.0)"The Require-TldBundle header tells the Jetty OSGi container that this bundle contains TLDs that need to be passed over to the JSP container for processing. The Import-Bundle header ensures that the implementation classes for these TLDs will be available to the webapp on the OSGi classpath.
The format of the Require-TldBundle header is a comma separated list of one or more symbolic names of bundles containing TLDs.
Container Path Taglibs
Some TLD jars are required to be found on the Jetty OSGi container’s classpath, rather than considered part of the web bundle’s classpath. For example, this is true of JSTL and Java Server Faces. The Jetty OSGi container takes care of JSTL for you, but you can control which other jars are considered as part of the container’s classpath by using the System property org.eclipse.jetty.osgi.tldbundles:
- org.eclipse.jetty.osgi.tldbundles
-
System property defined on the OSGi environment that is a comma separated list of symbolic names of bundles containing taglibs that will be treated as if they are on the container’s classpath for web bundles. For example:
org.eclipse.jetty.osgi.tldbundles=com.acme.special.tags,com.foo.web,org.bar.web.frameworkYou will still need to define the Import-Bundle header in the
MANIFESTfile for the web bundle to ensure that the TLD bundles are on the OSGi classpath.
Alternatively or additionally, you can define a pattern as a context attribute that will match symbolic bundle names in the OSGi environment containing TLDs that should be considered as discovered from the container’s classpath.
- org.eclipse.jetty.server.webapp.containerIncludeBundlePattern
-
This pattern must be specified as a context attribute of the
WebAppContextrepresenting the web bundle. Unless you are deploying your ownWebAppContext(see Deploying Services as Webapps), you won’t have a reference to theWebAppContextto do this. In that case, it can be specified on theorg.eclipse.jetty.deploy.DeploymentManager, where it will be applied to every webapp deployed by the Jetty OSGi container. Thejetty-osgi-boot.jarcontains the defaultjettyhome/etc/jetty-deploy.xmlfile where theDeploymentManageris defined. To set the pattern, you will need to provide your own etc files - see the section on customizing the jetty container for how to do this. Here’s how thejetty-deploy.xmlfile would look if we defined a pattern that matched all bundle symbolic names ending in "tag" and "web":<?xml version="1.0"?> <!DOCTYPE Configure PUBLIC "-//Jetty//Configure//EN" "http://www.eclipse.org/jetty/configure_9_3.dtd"> <Configure id="Server" class="org.eclipse.jetty.server.Server"> <Call name="addBean"> <Arg> <New id="DeploymentManager" class="org.eclipse.jetty.deploy.DeploymentManager"> <Set name="contexts"> <Ref refid="Contexts" /> </Set> <Call name="setContextAttribute"> <Arg>org.eclipse.jetty.server.webapp.ContainerIncludeBundlePattern</Arg> <Arg>.*\.tag$|.*\.web$</Arg> </Call> </New> </Arg> </Call> </Configure>Again, you will still need to define suitable Import-Bundle headers in your web bundle
MANIFESTto ensure that bundles matching the pattern are available on the OSGi class path.
Using Annotations/ServletContainerInitializers
Annotations are very much part of the Servlet 3.0 and 3.1 specifications. In order to use them with Jetty in OSGi, you will need to deploy some extra jars into your OSGi container:
| Jar | Bundle Symbolic Name | Location |
|---|---|---|
The spifly jars |
||
org.ow2.asm:asm-7.0.jar |
org.objectweb.asm |
|
org.ow2.asm:asm-commons-7.0.jar |
org.objectweb.asm.commons |
|
org.ow2.asm:asm-tree-7.0.jar |
org.objectweb.asm.tree |
|
javax.annotation:javax.annotation-api-1.2.jar |
javax.annotation-api |
|
jta api version 1.1.1 (eg org.apache.geronimo.specs:geronimo-jta_1.1_spec-1.1.1.jar)* |
Maven central |
|
javax mail api version 1.4.1 (eg org.eclipse.jetty.orbit:javax.mail.glassfish-1.4.1.v201005082020.jar)* |
Maven central |
|
jetty-jndi |
org.eclipse.jetty.jndi |
Distribution lib/ |
jetty-plus |
org.eclipse.jetty.plus |
Distribution lib/ |
jetty-annotations |
org.eclipse.jetty.annotations |
Distribution lib/ |
|
If you wish to use JSPs you will need to deploy these annotation-related jars. |
|
You may be able to deploy later versions or other providers of these specifications, however these particular versions are known to have correct manifests and have been tested and known to work with OSGi. |
Even if your webapp itself does not not use annotations, you may need to deploy these jars because your webapp depends on a Jetty module or a 3rd party library that uses a javax.servlet.ServletContainerInitializer. This interface requires annotation support. It is implemented by providers of code that extend the capabilities of the container. An example of this is the Jetty JSR356 Websocket implementation, although it is being used increasingly commonly in popular libraries like Spring, Jersey and JSP containers.
To find ServletContainerInitializers on the classpath, Jetty uses the Java ServiceLoader
mechanism.
For this to function in OSGi, you will need an OSGi R5 compatible container, and have support for the Service Loader Mediator.
Jetty has been tested with the Aries SpiFly module, which is the reference implementation of the Service Loader Mediator, and is listed in the jars above.
OSGi Containers
Felix
The Jetty OSGi integration has been successfully tested against Felix 5.0.0.
You will require the following extra Felix services, available as separately downloadable jars:
Unfortunately, as of Felix 4.x there is a difficultly with the resolution of the javax.transaction package.
A description of the problem and hint to solving it is described [here].
The simplest solution for this is to extract the default.properties file from the felix.jar, change the declaration of the javax.sql and javax.transaction packages and set the changed lines as the value of the org.osgi.framework.system.packages property in the conf/config.properties file.
The default.properties file defines the default org.osgi.framework.system.packages property like this:
# Default packages exported by system bundle.
org.osgi.framework.system.packages=org.osgi.framework; version=1.7.0, \
org.osgi.framework.hooks.bundle; version=1.1.0, \
org.osgi.framework.hooks.resolver; version=1.0.0, \
org.osgi.framework.hooks.service; version=1.1.0, \
org.osgi.framework.hooks.weaving; version=1.0.0, \
org.osgi.framework.launch; version=1.1.0, \
org.osgi.framework.namespace; version=1.0.0, \
org.osgi.framework.startlevel; version=1.0.0, \
org.osgi.framework.wiring; version=1.1.0, \
org.osgi.resource; version=1.0.0, \
org.osgi.service.packageadmin; version=1.2.0, \
org.osgi.service.startlevel; version=1.1.0, \
org.osgi.service.url; version=1.0.0, \
org.osgi.util.tracker; version=1.5.1 \
${jre-${java.specification.version}}The last line must be substituted for one of the definitions further down in the file that is suitable for the jvm you are using.
You will take these lines and copy them into the conf/config.properties file, after having replaced the line $\{jre-$\{java.specification.version}} with all of the lines relevant to your version of the jvm.
For example, for a 1.7 jvm, you will find this property definition:
jre-1.7=, \
javax.accessibility;uses:="javax.swing.text";version="0.0.0.1_007_JavaSE", \
javax.activation;version="0.0.0.1_007_JavaSE", \
javax.activity;version="0.0.0.1_007_JavaSE", \
javax.annotation.processing;uses:="javax.tools,javax.lang.model,javax.lang.model.element,javax.lang.model.util";version="0.0.0.1_007_JavaSE", \
javax.annotation;version="0.0.0.1_007_JavaSE", \
javax.crypto.interfaces;uses:="javax.crypto.spec,javax.crypto";version="0.0.0.1_007_JavaSE", \
javax.crypto.spec;uses:="javax.crypto";version="0.0.0.1_007_JavaSE", \
javax.crypto;uses:="javax.crypto.spec";version="0.0.0.1_007_JavaSE", \
javax.imageio.event;uses:="javax.imageio";version="0.0.0.1_007_JavaSE", \
javax.imageio.metadata;uses:="org.w3c.dom,javax.imageio";version="0.0.0.1_007_JavaSE", \
javax.imageio.plugins.bmp;uses:="javax.imageio";version="0.0.0.1_007_JavaSE", \
javax.imageio.plugins.jpeg;uses:="javax.imageio";version="0.0.0.1_007_JavaSE", \
javax.imageio.spi;uses:="javax.imageio.stream,javax.imageio,javax.imageio.metadata";version="0.0.0.1_007_JavaSE", \
javax.imageio.stream;uses:="javax.imageio";version="0.0.0.1_007_JavaSE", \
javax.imageio;uses:="javax.imageio.metadata,javax.imageio.stream,javax.imageio.spi,javax.imageio.event";version="0.0.0.1_007_JavaSE", \
javax.jws.soap;version="0.0.0.1_007_JavaSE", \
javax.jws;version="0.0.0.1_007_JavaSE", \
javax.lang.model.element;uses:="javax.lang.model.type,javax.lang.model";version="0.0.0.1_007_JavaSE", \
javax.lang.model.type;uses:="javax.lang.model.element,javax.lang.model";version="0.0.0.1_007_JavaSE", \
javax.lang.model.util;uses:="javax.lang.model,javax.lang.model.element,javax.annotation.processing,javax.lang.model.type";version="0.0.0.1_007_JavaSE", \
javax.lang.model;version="0.0.0.1_007_JavaSE", \
javax.management.loading;uses:="javax.management";version="0.0.0.1_007_JavaSE", \
javax.management.modelmbean;uses:="javax.management,javax.management.loading";version="0.0.0.1_007_JavaSE", \
javax.management.monitor;uses:="javax.management";version="0.0.0.1_007_JavaSE", \
javax.management.openmbean;uses:="javax.management";version="0.0.0.1_007_JavaSE", \
javax.management.relation;uses:="javax.management";version="0.0.0.1_007_JavaSE", \
javax.management.remote.rmi;uses:="javax.management.remote,javax.security.auth,javax.management,javax.management.loading,javax.naming,javax.rmi.ssl,org.omg.CORBA,org.omg.CORBA_2_3.portable,org.omg.CORBA.portable,javax.rmi.CORBA,javax.rmi";version="0.0.0.1_007_JavaSE", \
javax.management.remote;uses:="javax.security.auth,javax.management";version="0.0.0.1_007_JavaSE", \
javax.management.timer;uses:="javax.management";version="0.0.0.1_007_JavaSE", \
javax.management;uses:="javax.management.loading,javax.management.openmbean";version="0.0.0.1_007_JavaSE", \
javax.naming.directory;uses:="javax.naming";version="0.0.0.1_007_JavaSE", \
javax.naming.event;uses:="javax.naming,javax.naming.directory";version="0.0.0.1_007_JavaSE", \
javax.naming.ldap;uses:="javax.naming,javax.naming.directory,javax.net.ssl,javax.naming.event";version="0.0.0.1_007_JavaSE", \
javax.naming.spi;uses:="javax.naming,javax.naming.directory";version="0.0.0.1_007_JavaSE", \
javax.naming;uses:="javax.naming.spi";version="0.0.0.1_007_JavaSE", \
javax.net.ssl;uses:="javax.security.cert,javax.security.auth.x500,javax.net";version="0.0.0.1_007_JavaSE", \
javax.net;version="0.0.0.1_007_JavaSE", \
javax.print.attribute.standard;uses:="javax.print.attribute";version="0.0.0.1_007_JavaSE", \
javax.print.attribute;version="0.0.0.1_007_JavaSE", \
javax.print.event;uses:="javax.print,javax.print.attribute";version="0.0.0.1_007_JavaSE", \
javax.print;uses:="javax.print.attribute,javax.print.event,javax.print.attribute.standard";version="0.0.0.1_007_JavaSE", \
javax.rmi.CORBA;uses:="org.omg.CORBA,org.omg.CORBA_2_3.portable,org.omg.CORBA.portable,org.omg.SendingContext";version="0.0.0.1_007_JavaSE", \
javax.rmi.ssl;uses:="javax.net,javax.net.ssl";version="0.0.0.1_007_JavaSE", \
javax.rmi;uses:="org.omg.CORBA,javax.rmi.CORBA";version="0.0.0.1_007_JavaSE", \
javax.script;version="0.0.0.1_007_JavaSE", \
javax.security.auth.callback;version="0.0.0.1_007_JavaSE", \
javax.security.auth.kerberos;uses:="javax.security.auth,javax.crypto";version="0.0.0.1_007_JavaSE", \
javax.security.auth.login;uses:="javax.security.auth,javax.security.auth.callback";version="0.0.0.1_007_JavaSE", \
javax.security.auth.spi;uses:="javax.security.auth.callback,javax.security.auth.login,javax.security.auth";version="0.0.0.1_007_JavaSE", \
javax.security.auth.x500;uses:="javax.security.auth";version="0.0.0.1_007_JavaSE", \
javax.security.auth;version="0.0.0.1_007_JavaSE", \
javax.security.cert;version="0.0.0.1_007_JavaSE", \
javax.security.sasl;uses:="javax.security.auth.callback";version="0.0.0.1_007_JavaSE", \
javax.sound.midi.spi;uses:="javax.sound.midi";version="0.0.0.1_007_JavaSE", \
javax.sound.midi;uses:="javax.sound.midi.spi";version="0.0.0.1_007_JavaSE", \
javax.sound.sampled.spi;uses:="javax.sound.sampled";version="0.0.0.1_007_JavaSE", \
javax.sound.sampled;uses:="javax.sound.sampled.spi";version="0.0.0.1_007_JavaSE", \
javax.sql.rowset.serial;uses:="javax.sql.rowset";version="0.0.0.1_007_JavaSE", \
javax.sql.rowset.spi;uses:="javax.sql,javax.naming,javax.sql.rowset";version="0.0.0.1_007_JavaSE", \
javax.sql.rowset;uses:="javax.sql,javax.sql.rowset.serial,javax.sql.rowset.spi";version="0.0.0.1_007_JavaSE", \
javax.sql;uses:="javax.transaction.xa";version="0.0.0.1_007_JavaSE", \
javax.swing.border;uses:="javax.swing";version="0.0.0.1_007_JavaSE", \
javax.swing.colorchooser;uses:="javax.swing,javax.swing.border,javax.swing.event,javax.swing.text";version="0.0.0.1_007_JavaSE", \
javax.swing.event;uses:="javax.swing,javax.swing.text,javax.swing.table,javax.swing.tree,javax.swing.undo";version="0.0.0.1_007_JavaSE", \
javax.swing.filechooser;uses:="javax.swing";version="0.0.0.1_007_JavaSE", \
javax.swing.plaf.basic;uses:="javax.swing.border,javax.swing,javax.swing.plaf,javax.swing.text,javax.swing.event,javax.swing.colorchooser,javax.accessibility,javax.swing.filechooser,javax.swing.text.html,javax.sound.sampled,javax.swing.table,javax.swing.plaf.synth,javax.swing.tree";version="0.0.0.1_007_JavaSE", \
javax.swing.plaf.metal;uses:="javax.swing.plaf,javax.swing,javax.swing.border,javax.swing.text,javax.swing.plaf.basic,javax.swing.filechooser,javax.swing.event,javax.swing.tree";version="0.0.0.1_007_JavaSE", \
javax.swing.plaf.multi;uses:="javax.accessibility,javax.swing,javax.swing.plaf,javax.swing.filechooser,javax.swing.text,javax.swing.tree";version="0.0.0.1_007_JavaSE", \
javax.swing.plaf.nimbus;uses:="javax.swing,javax.swing.plaf,javax.swing.border,javax.swing.plaf.synth";version="0.0.0.1_007_JavaSE", \
javax.swing.plaf.synth;uses:="javax.swing,javax.swing.plaf,javax.swing.text,javax.swing.border,javax.swing.plaf.basic,javax.swing.colorchooser,javax.swing.event,javax.xml.parsers,org.xml.sax,org.xml.sax.helpers,javax.swing.table,javax.swing.tree";version="0.0.0.1_007_JavaSE", \
javax.swing.plaf;uses:="javax.swing,javax.swing.border,javax.accessibility,javax.swing.filechooser,javax.swing.text,javax.swing.tree";version="0.0.0.1_007_JavaSE", \
javax.swing.table;uses:="javax.swing.event,javax.swing.plaf,javax.swing.border,javax.swing,javax.accessibility";version="0.0.0.1_007_JavaSE", \
javax.swing.text.html.parser;uses:="javax.swing.text,javax.swing.text.html";version="0.0.0.1_007_JavaSE", \
javax.swing.text.html;uses:="javax.swing.event,javax.swing.text,javax.accessibility,javax.swing,javax.swing.plaf,javax.swing.border,javax.swing.undo";version="0.0.0.1_007_JavaSE", \
javax.swing.text.rtf;uses:="javax.swing.text";version="0.0.0.1_007_JavaSE", \
javax.swing.text;uses:="javax.swing.event,javax.swing.tree,javax.swing.undo,javax.swing,javax.swing.plaf,javax.swing.plaf.basic,javax.print,javax.print.attribute,javax.accessibility,javax.swing.text.html";version="0.0.0.1_007_JavaSE", \
javax.swing.tree;uses:="javax.swing.event,javax.swing,javax.swing.border,javax.swing.plaf,javax.swing.plaf.basic";version="0.0.0.1_007_JavaSE", \
javax.swing.undo;uses:="javax.swing,javax.swing.event";version="0.0.0.1_007_JavaSE", \
javax.swing;uses:="javax.swing.event,javax.accessibility,javax.swing.text,javax.swing.plaf,javax.swing.border,javax.swing.tree,javax.swing.table,javax.swing.colorchooser,javax.swing.plaf.basic,javax.swing.text.html,javax.swing.filechooser,javax.print,javax.print.attribute,javax.swing.plaf.metal";version="0.0.0.1_007_JavaSE", \
javax.tools;uses:="javax.lang.model.element,javax.annotation.processing,javax.lang.model";version="0.0.0.1_007_JavaSE", \
javax.transaction.xa;version="0.0.0.1_007_JavaSE", \
javax.transaction;version="0.0.0.1_007_JavaSE", \
javax.xml.bind.annotation.adapters;uses:="javax.xml.bind";version="0.0.0.1_007_JavaSE", \
javax.xml.bind.annotation;uses:="javax.xml.transform,javax.xml.bind,javax.xml.parsers,javax.xml.transform.dom,org.w3c.dom";version="0.0.0.1_007_JavaSE", \
javax.xml.bind.attachment;uses:="javax.activation";version="0.0.0.1_007_JavaSE", \
javax.xml.bind.helpers;uses:="javax.xml.bind.annotation.adapters,javax.xml.transform.dom,org.w3c.dom,org.xml.sax,javax.xml.bind.attachment,javax.xml.stream,javax.xml.transform,javax.xml.transform.stream,javax.xml.validation,javax.xml.transform.sax,javax.xml.bind,javax.xml.parsers";version="0.0.0.1_007_JavaSE", \
javax.xml.bind.util;uses:="javax.xml.transform.sax,javax.xml.bind,org.xml.sax,org.xml.sax.ext,org.xml.sax.helpers";version="0.0.0.1_007_JavaSE", \
javax.xml.bind;uses:="javax.xml.validation,javax.xml.namespace,javax.xml.datatype,javax.xml.transform,javax.xml.bind.annotation,javax.xml.transform.stream,org.w3c.dom,javax.xml.bind.attachment,javax.xml.stream,javax.xml.bind.annotation.adapters,org.xml.sax";version="0.0.0.1_007_JavaSE", \
javax.xml.crypto.dom;uses:="javax.xml.crypto,org.w3c.dom";version="0.0.0.1_007_JavaSE", \
javax.xml.crypto.dsig.dom;uses:="javax.xml.crypto.dsig,javax.xml.crypto,org.w3c.dom,javax.xml.crypto.dom";version="0.0.0.1_007_JavaSE", \
javax.xml.crypto.dsig.keyinfo;uses:="javax.xml.crypto";version="0.0.0.1_007_JavaSE", \
javax.xml.crypto.dsig.spec;uses:="javax.xml.crypto";version="0.0.0.1_007_JavaSE", \
javax.xml.crypto.dsig;uses:="javax.xml.crypto,javax.xml.crypto.dsig.spec,javax.xml.crypto.dsig.keyinfo";version="0.0.0.1_007_JavaSE", \
javax.xml.crypto;uses:="javax.xml.crypto.dsig.keyinfo";version="0.0.0.1_007_JavaSE", \
javax.xml.datatype;uses:="javax.xml.namespace";version="0.0.0.1_007_JavaSE", \
javax.xml.namespace;version="0.0.0.1_007_JavaSE", \
javax.xml.parsers;uses:="javax.xml.validation,org.w3c.dom,org.xml.sax,org.xml.sax.helpers";version="0.0.0.1_007_JavaSE", \
javax.xml.soap;uses:="javax.activation,javax.xml.namespace,org.w3c.dom,javax.xml.transform.dom,javax.xml.transform";version="0.0.0.1_007_JavaSE", \
javax.xml.stream.events;uses:="javax.xml.namespace,javax.xml.stream";version="0.0.0.1_007_JavaSE", \
javax.xml.stream.util;uses:="javax.xml.stream,javax.xml.stream.events,javax.xml.namespace";version="0.0.0.1_007_JavaSE", \
javax.xml.stream;uses:="javax.xml.stream.events,javax.xml.namespace,javax.xml.stream.util,javax.xml.transform";version="0.0.0.1_007_JavaSE", \
javax.xml.transform.dom;uses:="javax.xml.transform,org.w3c.dom";version="0.0.0.1_007_JavaSE", \
javax.xml.transform.sax;uses:="org.xml.sax.ext,javax.xml.transform,org.xml.sax,javax.xml.transform.stream";version="0.0.0.1_007_JavaSE", \
javax.xml.transform.stax;uses:="javax.xml.stream,javax.xml.transform,javax.xml.stream.events";version="0.0.0.1_007_JavaSE", \
javax.xml.transform.stream;uses:="javax.xml.transform";version="0.0.0.1_007_JavaSE", \
javax.xml.transform;version="0.0.0.1_007_JavaSE", \
javax.xml.validation;uses:="org.w3c.dom.ls,javax.xml.transform,javax.xml.transform.stream,org.xml.sax,org.w3c.dom";version="0.0.0.1_007_JavaSE", \
javax.xml.ws.handler.soap;uses:="javax.xml.ws.handler,javax.xml.namespace,javax.xml.soap,javax.xml.bind";version="0.0.0.1_007_JavaSE", \
javax.xml.ws.handler;uses:="javax.xml.ws,javax.xml.namespace";version="0.0.0.1_007_JavaSE", \
javax.xml.ws.http;uses:="javax.xml.ws";version="0.0.0.1_007_JavaSE", \
javax.xml.ws.soap;uses:="javax.xml.ws.spi,javax.xml.ws,javax.xml.soap";version="0.0.0.1_007_JavaSE", \
javax.xml.ws.spi.http;version="0.0.0.1_007_JavaSE", \
javax.xml.ws.spi;uses:="javax.xml.ws,javax.xml.ws.wsaddressing,javax.xml.transform,org.w3c.dom,javax.xml.namespace,javax.xml.ws.handler,javax.xml.bind";version="0.0.0.1_007_JavaSE", \
javax.xml.ws.wsaddressing;uses:="javax.xml.bind.annotation,javax.xml.namespace,org.w3c.dom,javax.xml.transform,javax.xml.bind,javax.xml.ws,javax.xml.ws.spi";version="0.0.0.1_007_JavaSE", \
javax.xml.ws;uses:="javax.xml.ws.handler,javax.xml.ws.spi,javax.xml.ws.spi.http,javax.xml.transform,org.w3c.dom,javax.xml.bind.annotation,javax.xml.transform.stream,javax.xml.bind,javax.xml.namespace";version="0.0.0.1_007_JavaSE", \
javax.xml.xpath;uses:="org.xml.sax,javax.xml.namespace";version="0.0.0.1_007_JavaSE", \
javax.xml;version="0.0.0.1_007_JavaSE", \
org.ietf.jgss;version="0.0.0.1_007_JavaSE", \
org.omg.CORBA.DynAnyPackage;uses:="org.omg.CORBA";version="0.0.0.1_007_JavaSE", \
org.omg.CORBA.ORBPackage;uses:="org.omg.CORBA";version="0.0.0.1_007_JavaSE", \
org.omg.CORBA.TypeCodePackage;uses:="org.omg.CORBA";version="0.0.0.1_007_JavaSE", \
org.omg.CORBA.portable;uses:="org.omg.CORBA,org.omg.CORBA_2_3.portable";version="0.0.0.1_007_JavaSE", \
org.omg.CORBA;uses:="org.omg.CORBA.portable,org.omg.CORBA.DynAnyPackage,org.omg.CORBA.ORBPackage,org.omg.CORBA_2_3.portable,org.omg.CORBA.TypeCodePackage";version="0.0.0.1_007_JavaSE", \
org.omg.CORBA_2_3.portable;uses:="org.omg.CORBA,org.omg.CORBA.portable";version="0.0.0.1_007_JavaSE", \
org.omg.CORBA_2_3;uses:="org.omg.CORBA,org.omg.CORBA.portable";version="0.0.0.1_007_JavaSE", \
org.omg.CosNaming.NamingContextExtPackage;uses:="org.omg.CORBA,org.omg.CORBA.portable";version="0.0.0.1_007_JavaSE", \
org.omg.CosNaming.NamingContextPackage;uses:="org.omg.CORBA,org.omg.CORBA.portable,org.omg.CosNaming";version="0.0.0.1_007_JavaSE", \
org.omg.CosNaming;uses:="org.omg.CORBA.portable,org.omg.CORBA,org.omg.PortableServer,org.omg.CosNaming.NamingContextPackage,org.omg.CosNaming.NamingContextExtPackage";version="0.0.0.1_007_JavaSE", \
org.omg.Dynamic;uses:="org.omg.CORBA,org.omg.CORBA.portable";version="0.0.0.1_007_JavaSE", \
org.omg.DynamicAny.DynAnyFactoryPackage;uses:="org.omg.CORBA,org.omg.CORBA.portable";version="0.0.0.1_007_JavaSE", \
org.omg.DynamicAny.DynAnyPackage;uses:="org.omg.CORBA,org.omg.CORBA.portable";version="0.0.0.1_007_JavaSE", \
org.omg.DynamicAny;uses:="org.omg.CORBA,org.omg.CORBA.portable,org.omg.DynamicAny.DynAnyFactoryPackage,org.omg.DynamicAny.DynAnyPackage";version="0.0.0.1_007_JavaSE", \
org.omg.IOP.CodecFactoryPackage;uses:="org.omg.CORBA,org.omg.CORBA.portable";version="0.0.0.1_007_JavaSE", \
org.omg.IOP.CodecPackage;uses:="org.omg.CORBA,org.omg.CORBA.portable";version="0.0.0.1_007_JavaSE", \
org.omg.IOP;uses:="org.omg.CORBA,org.omg.CORBA.portable,org.omg.IOP.CodecFactoryPackage,org.omg.IOP.CodecPackage";version="0.0.0.1_007_JavaSE", \
org.omg.Messaging;uses:="org.omg.CORBA,org.omg.CORBA.portable";version="0.0.0.1_007_JavaSE", \
org.omg.PortableInterceptor.ORBInitInfoPackage;uses:="org.omg.CORBA,org.omg.CORBA.portable";version="0.0.0.1_007_JavaSE", \
org.omg.PortableInterceptor;uses:="org.omg.CORBA,org.omg.CORBA.portable,org.omg.IOP,org.omg.PortableInterceptor.ORBInitInfoPackage,org.omg.CORBA_2_3.portable,org.omg.Dynamic";version="0.0.0.1_007_JavaSE", \
org.omg.PortableServer.CurrentPackage;uses:="org.omg.CORBA,org.omg.CORBA.portable";version="0.0.0.1_007_JavaSE", \
org.omg.PortableServer.POAManagerPackage;uses:="org.omg.CORBA,org.omg.CORBA.portable";version="0.0.0.1_007_JavaSE", \
org.omg.PortableServer.POAPackage;uses:="org.omg.CORBA,org.omg.CORBA.portable";version="0.0.0.1_007_JavaSE", \
org.omg.PortableServer.ServantLocatorPackage;uses:="org.omg.CORBA,org.omg.CORBA.portable";version="0.0.0.1_007_JavaSE", \
org.omg.PortableServer.portable;uses:="org.omg.CORBA,org.omg.PortableServer";version="0.0.0.1_007_JavaSE", \
org.omg.PortableServer;uses:="org.omg.CORBA,org.omg.CORBA.portable,org.omg.PortableServer.CurrentPackage,org.omg.PortableServer.POAManagerPackage,org.omg.PortableServer.POAPackage,org.omg.PortableServer.portable,org.omg.CORBA_2_3,org.omg.PortableServer.ServantLocatorPackage";version="0.0.0.1_007_JavaSE", \
org.omg.SendingContext;uses:="org.omg.CORBA,org.omg.CORBA.portable";version="0.0.0.1_007_JavaSE", \
org.omg.stub.java.rmi;uses:="javax.rmi.CORBA";version="0.0.0.1_007_JavaSE", \
org.w3c.dom.bootstrap;uses:="org.w3c.dom";version="0.0.0.1_007_JavaSE", \
org.w3c.dom.events;uses:="org.w3c.dom,org.w3c.dom.views";version="0.0.0.1_007_JavaSE", \
org.w3c.dom.ls;uses:="org.w3c.dom,org.w3c.dom.events,org.w3c.dom.traversal";version="0.0.0.1_007_JavaSE", \
org.w3c.dom;version="0.0.0.1_007_JavaSE", \
org.xml.sax.ext;uses:="org.xml.sax,org.xml.sax.helpers";version="0.0.0.1_007_JavaSE", \
org.xml.sax.helpers;uses:="org.xml.sax";version="0.0.0.1_007_JavaSE", \
org.xml.sax;version="0.0.0.1_007_JavaSE"Remove the definition for the javax.transaction packages, and remove the uses:= clause for the javax.sql packages (but leaving the version clause). Concatenate all the lines together.
You’ll wind up with something like this in your conf/config.properties file:
org.osgi.framework.system.packages=org.osgi.framework;version=1.7.0, org.osgi.framework.hooks.bundle;version=1.1.0, org.osgi.framework.hooks.resolver;version=1.0.0, org.osgi.framework.hooks.service;version=1.1.0, org.osgi.framework.hooks.weaving;version=1.0.0, org.osgi.framework.launch;version=1.1.0, org.osgi.framework.namespace;version=1.0.0, org.osgi.framework.startlevel;version=1.0.0, org.osgi.framework.wiring;version=1.1.0, org.osgi.resource;version=1.0.0, org.osgi.service.packageadmin; version=1.2.0, org.osgi.service.startlevel; version=1.1.0, org.osgi.service.url;version=1.0.0, org.osgi.util.tracker;version=1.5.1 javax.accessibility;uses:="javax.swing.text";version="0.0.0.1_007_JavaSE", javax.activation;version="0.0.0.1_007_JavaSE", javax.activity;version="0.0.0.1_007_JavaSE", javax.annotation.processing;uses:="javax.tools,javax.lang.model,javax.lang.model.element,javax.lang.model.util";version="0.0.0.1_007_JavaSE", javax.annotation;version="0.0.0.1_007_JavaSE", javax.crypto.interfaces;uses:="javax.crypto.spec,javax.crypto";version="0.0.0.1_007_JavaSE", javax.crypto.spec;uses:="javax.crypto";version="0.0.0.1_007_JavaSE", javax.crypto;uses:="javax.crypto.spec";version="0.0.0.1_007_JavaSE", javax.imageio.event;uses:="javax.imageio";version="0.0.0.1_007_JavaSE", javax.imageio.metadata;uses:="org.w3c.dom,javax.imageio";version="0.0.0.1_007_JavaSE", javax.imageio.plugins.bmp;uses:="javax.imageio";version="0.0.0.1_007_JavaSE", javax.imageio.plugins.jpeg;uses:="javax.imageio";version="0.0.0.1_007_JavaSE", javax.imageio.spi;uses:="javax.imageio.stream,javax.imageio,javax.imageio.metadata";version="0.0.0.1_007_JavaSE", javax.imageio.stream;uses:="javax.imageio";version="0.0.0.1_007_JavaSE", javax.imageio;uses:="javax.imageio.metadata,javax.imageio.stream,javax.imageio.spi,javax.imageio.event";version="0.0.0.1_007_JavaSE", javax.jws.soap;version="0.0.0.1_007_JavaSE", javax.jws;version="0.0.0.1_007_JavaSE", javax.lang.model.element;uses:="javax.lang.model.type,javax.lang.model";version="0.0.0.1_007_JavaSE", javax.lang.model.type;uses:="javax.lang.model.element,javax.lang.model";version="0.0.0.1_007_JavaSE", javax.lang.model.util;uses:="javax.lang.model,javax.lang.model.element,javax.annotation.processing,javax.lang.model.type";version="0.0.0.1_007_JavaSE", javax.lang.model;version="0.0.0.1_007_JavaSE", javax.management.loading;uses:="javax.management";version="0.0.0.1_007_JavaSE", javax.management.modelmbean;uses:="javax.management,javax.management.loading";version="0.0.0.1_007_JavaSE", javax.management.monitor;uses:="javax.management";version="0.0.0.1_007_JavaSE", javax.management.openmbean;uses:="javax.management";version="0.0.0.1_007_JavaSE", javax.management.relation;uses:="javax.management";version="0.0.0.1_007_JavaSE", javax.management.remote.rmi;uses:="javax.management.remote,javax.security.auth,javax.management,javax.management.loading,javax.naming,javax.rmi.ssl,org.omg.CORBA,org.omg.CORBA_2_3.portable,org.omg.CORBA.portable,javax.rmi.CORBA,javax.rmi";version="0.0.0.1_007_JavaSE", javax.management.remote;uses:="javax.security.auth,javax.management";version="0.0.0.1_007_JavaSE", javax.management.timer;uses:="javax.management";version="0.0.0.1_007_JavaSE", javax.management;uses:="javax.management.loading,javax.management.openmbean";version="0.0.0.1_007_JavaSE", javax.naming.directory;uses:="javax.naming";version="0.0.0.1_007_JavaSE", javax.naming.event;uses:="javax.naming,javax.naming.directory";version="0.0.0.1_007_JavaSE", javax.naming.ldap;uses:="javax.naming,javax.naming.directory,javax.net.ssl,javax.naming.event";version="0.0.0.1_007_JavaSE", javax.naming.spi;uses:="javax.naming,javax.naming.directory";version="0.0.0.1_007_JavaSE", javax.naming;uses:="javax.naming.spi";version="0.0.0.1_007_JavaSE", javax.net.ssl;uses:="javax.security.cert,javax.security.auth.x500,javax.net";version="0.0.0.1_007_JavaSE", javax.net;version="0.0.0.1_007_JavaSE", javax.print.attribute.standard;uses:="javax.print.attribute";version="0.0.0.1_007_JavaSE", javax.print.attribute;version="0.0.0.1_007_JavaSE", javax.print.event;uses:="javax.print,javax.print.attribute";version="0.0.0.1_007_JavaSE", javax.print;uses:="javax.print.attribute,javax.print.event,javax.print.attribute.standard";version="0.0.0.1_007_JavaSE", javax.rmi.CORBA;uses:="org.omg.CORBA,org.omg.CORBA_2_3.portable,org.omg.CORBA.portable,org.omg.SendingContext";version="0.0.0.1_007_JavaSE", javax.rmi.ssl;uses:="javax.net,javax.net.ssl";version="0.0.0.1_007_JavaSE", javax.rmi;uses:="org.omg.CORBA,javax.rmi.CORBA";version="0.0.0.1_007_JavaSE", javax.script;version="0.0.0.1_007_JavaSE", javax.security.auth.callback;version="0.0.0.1_007_JavaSE", javax.security.auth.kerberos;uses:="javax.security.auth,javax.crypto";version="0.0.0.1_007_JavaSE", javax.security.auth.login;uses:="javax.security.auth,javax.security.auth.callback";version="0.0.0.1_007_JavaSE", javax.security.auth.spi;uses:="javax.security.auth.callback,javax.security.auth.login,javax.security.auth";version="0.0.0.1_007_JavaSE", javax.security.auth.x500;uses:="javax.security.auth";version="0.0.0.1_007_JavaSE", javax.security.auth;version="0.0.0.1_007_JavaSE", javax.security.cert;version="0.0.0.1_007_JavaSE", javax.security.sasl;uses:="javax.security.auth.callback";version="0.0.0.1_007_JavaSE", javax.sound.midi.spi;uses:="javax.sound.midi";version="0.0.0.1_007_JavaSE", javax.sound.midi;uses:="javax.sound.midi.spi";version="0.0.0.1_007_JavaSE", javax.sound.sampled.spi;uses:="javax.sound.sampled";version="0.0.0.1_007_JavaSE", javax.sound.sampled;uses:="javax.sound.sampled.spi";version="0.0.0.1_007_JavaSE", javax.sql.rowset.serial;version="0.0.0.1_007_JavaSE", javax.sql.rowset.spi;version="0.0.0.1_007_JavaSE", javax.sql.rowset;version="0.0.0.1_007_JavaSE", javax.sql;version="0.0.0.1_007_JavaSE", javax.swing.border;uses:="javax.swing";version="0.0.0.1_007_JavaSE", javax.swing.colorchooser;uses:="javax.swing,javax.swing.border,javax.swing.event,javax.swing.text";version="0.0.0.1_007_JavaSE", javax.swing.event;uses:="javax.swing,javax.swing.text,javax.swing.table,javax.swing.tree,javax.swing.undo";version="0.0.0.1_007_JavaSE", javax.swing.filechooser;uses:="javax.swing";version="0.0.0.1_007_JavaSE", javax.swing.plaf.basic;uses:="javax.swing.border,javax.swing,javax.swing.plaf,javax.swing.text,javax.swing.event,javax.swing.colorchooser,javax.accessibility,javax.swing.filechooser,javax.swing.text.html,javax.sound.sampled,javax.swing.table,javax.swing.plaf.synth,javax.swing.tree";version="0.0.0.1_007_JavaSE", javax.swing.plaf.metal;uses:="javax.swing.plaf,javax.swing,javax.swing.border,javax.swing.text,javax.swing.plaf.basic,javax.swing.filechooser,javax.swing.event,javax.swing.tree";version="0.0.0.1_007_JavaSE", javax.swing.plaf.multi;uses:="javax.accessibility,javax.swing,javax.swing.plaf,javax.swing.filechooser,javax.swing.text,javax.swing.tree";version="0.0.0.1_007_JavaSE", javax.swing.plaf.nimbus;uses:="javax.swing,javax.swing.plaf,javax.swing.border,javax.swing.plaf.synth";version="0.0.0.1_007_JavaSE", javax.swing.plaf.synth;uses:="javax.swing,javax.swing.plaf,javax.swing.text,javax.swing.border,javax.swing.plaf.basic,javax.swing.colorchooser,javax.swing.event,javax.xml.parsers,org.xml.sax,org.xml.sax.helpers,javax.swing.table,javax.swing.tree";version="0.0.0.1_007_JavaSE", javax.swing.plaf;uses:="javax.swing,javax.swing.border,javax.accessibility,javax.swing.filechooser,javax.swing.text,javax.swing.tree";version="0.0.0.1_007_JavaSE", javax.swing.table;uses:="javax.swing.event,javax.swing.plaf,javax.swing.border,javax.swing,javax.accessibility";version="0.0.0.1_007_JavaSE", javax.swing.text.html.parser;uses:="javax.swing.text,javax.swing.text.html";version="0.0.0.1_007_JavaSE", javax.swing.text.html;uses:="javax.swing.event,javax.swing.text,javax.accessibility,javax.swing,javax.swing.plaf,javax.swing.border,javax.swing.undo";version="0.0.0.1_007_JavaSE", javax.swing.text.rtf;uses:="javax.swing.text";version="0.0.0.1_007_JavaSE", javax.swing.text;uses:="javax.swing.event,javax.swing.tree,javax.swing.undo,javax.swing,javax.swing.plaf,javax.swing.plaf.basic,javax.print,javax.print.attribute,javax.accessibility,javax.swing.text.html";version="0.0.0.1_007_JavaSE", javax.swing.tree;uses:="javax.swing.event,javax.swing,javax.swing.border,javax.swing.plaf,javax.swing.plaf.basic";version="0.0.0.1_007_JavaSE", javax.swing.undo;uses:="javax.swing,javax.swing.event";version="0.0.0.1_007_JavaSE", javax.swing;uses:="javax.swing.event,javax.accessibility,javax.swing.text,javax.swing.plaf,javax.swing.border,javax.swing.tree,javax.swing.table,javax.swing.colorchooser,javax.swing.plaf.basic,javax.swing.text.html,javax.swing.filechooser,javax.print,javax.print.attribute,javax.swing.plaf.metal";version="0.0.0.1_007_JavaSE", javax.tools;uses:="javax.lang.model.element,javax.annotation.processing,javax.lang.model";version="0.0.0.1_007_JavaSE", javax.xml.bind.annotation.adapters;uses:="javax.xml.bind";version="0.0.0.1_007_JavaSE", javax.xml.bind.annotation;uses:="javax.xml.transform,javax.xml.bind,javax.xml.parsers,javax.xml.transform.dom,org.w3c.dom";version="0.0.0.1_007_JavaSE", javax.xml.bind.attachment;uses:="javax.activation";version="0.0.0.1_007_JavaSE", javax.xml.bind.helpers;uses:="javax.xml.bind.annotation.adapters,javax.xml.transform.dom,org.w3c.dom,org.xml.sax,javax.xml.bind.attachment,javax.xml.stream,javax.xml.transform,javax.xml.transform.stream,javax.xml.validation,javax.xml.transform.sax,javax.xml.bind,javax.xml.parsers";version="0.0.0.1_007_JavaSE", javax.xml.bind.util;uses:="javax.xml.transform.sax,javax.xml.bind,org.xml.sax,org.xml.sax.ext,org.xml.sax.helpers";version="0.0.0.1_007_JavaSE", javax.xml.bind;uses:="javax.xml.validation,javax.xml.namespace,javax.xml.datatype,javax.xml.transform,javax.xml.bind.annotation,javax.xml.transform.stream,org.w3c.dom,javax.xml.bind.attachment,javax.xml.stream,javax.xml.bind.annotation.adapters,org.xml.sax";version="0.0.0.1_007_JavaSE", javax.xml.crypto.dom;uses:="javax.xml.crypto,org.w3c.dom";version="0.0.0.1_007_JavaSE", javax.xml.crypto.dsig.dom;uses:="javax.xml.crypto.dsig,javax.xml.crypto,org.w3c.dom,javax.xml.crypto.dom";version="0.0.0.1_007_JavaSE", javax.xml.crypto.dsig.keyinfo;uses:="javax.xml.crypto";version="0.0.0.1_007_JavaSE", javax.xml.crypto.dsig.spec;uses:="javax.xml.crypto";version="0.0.0.1_007_JavaSE", javax.xml.crypto.dsig;uses:="javax.xml.crypto,javax.xml.crypto.dsig.spec,javax.xml.crypto.dsig.keyinfo";version="0.0.0.1_007_JavaSE", javax.xml.crypto;uses:="javax.xml.crypto.dsig.keyinfo";version="0.0.0.1_007_JavaSE", javax.xml.datatype;uses:="javax.xml.namespace";version="0.0.0.1_007_JavaSE", javax.xml.namespace;version="0.0.0.1_007_JavaSE", javax.xml.parsers;uses:="javax.xml.validation,org.w3c.dom,org.xml.sax,org.xml.sax.helpers";version="0.0.0.1_007_JavaSE", javax.xml.soap;uses:="javax.activation,javax.xml.namespace,org.w3c.dom,javax.xml.transform.dom,javax.xml.transform";version="0.0.0.1_007_JavaSE", javax.xml.stream.events;uses:="javax.xml.namespace,javax.xml.stream";version="0.0.0.1_007_JavaSE", javax.xml.stream.util;uses:="javax.xml.stream,javax.xml.stream.events,javax.xml.namespace";version="0.0.0.1_007_JavaSE", javax.xml.stream;uses:="javax.xml.stream.events,javax.xml.namespace,javax.xml.stream.util,javax.xml.transform";version="0.0.0.1_007_JavaSE", javax.xml.transform.dom;uses:="javax.xml.transform,org.w3c.dom";version="0.0.0.1_007_JavaSE", javax.xml.transform.sax;uses:="org.xml.sax.ext,javax.xml.transform,org.xml.sax,javax.xml.transform.stream";version="0.0.0.1_007_JavaSE", javax.xml.transform.stax;uses:="javax.xml.stream,javax.xml.transform,javax.xml.stream.events";version="0.0.0.1_007_JavaSE", javax.xml.transform.stream;uses:="javax.xml.transform";version="0.0.0.1_007_JavaSE", javax.xml.transform;version="0.0.0.1_007_JavaSE", javax.xml.validation;uses:="org.w3c.dom.ls,javax.xml.transform,javax.xml.transform.stream,org.xml.sax,org.w3c.dom";version="0.0.0.1_007_JavaSE", javax.xml.ws.handler.soap;uses:="javax.xml.ws.handler,javax.xml.namespace,javax.xml.soap,javax.xml.bind";version="0.0.0.1_007_JavaSE", javax.xml.ws.handler;uses:="javax.xml.ws,javax.xml.namespace";version="0.0.0.1_007_JavaSE", javax.xml.ws.http;uses:="javax.xml.ws";version="0.0.0.1_007_JavaSE", javax.xml.ws.soap;uses:="javax.xml.ws.spi,javax.xml.ws,javax.xml.soap";version="0.0.0.1_007_JavaSE", javax.xml.ws.spi.http;version="0.0.0.1_007_JavaSE", javax.xml.ws.spi;uses:="javax.xml.ws,javax.xml.ws.wsaddressing,javax.xml.transform,org.w3c.dom,javax.xml.namespace,javax.xml.ws.handler,javax.xml.bind";version="0.0.0.1_007_JavaSE", javax.xml.ws.wsaddressing;uses:="javax.xml.bind.annotation,javax.xml.namespace,org.w3c.dom,javax.xml.transform,javax.xml.bind,javax.xml.ws,javax.xml.ws.spi";version="0.0.0.1_007_JavaSE", javax.xml.ws;uses:="javax.xml.ws.handler,javax.xml.ws.spi,javax.xml.ws.spi.http,javax.xml.transform,org.w3c.dom,javax.xml.bind.annotation,javax.xml.transform.stream,javax.xml.bind,javax.xml.namespace";version="0.0.0.1_007_JavaSE", javax.xml.xpath;uses:="org.xml.sax,javax.xml.namespace";version="0.0.0.1_007_JavaSE", javax.xml;version="0.0.0.1_007_JavaSE", org.ietf.jgss;version="0.0.0.1_007_JavaSE", org.omg.CORBA.DynAnyPackage;uses:="org.omg.CORBA";version="0.0.0.1_007_JavaSE", org.omg.CORBA.ORBPackage;uses:="org.omg.CORBA";version="0.0.0.1_007_JavaSE", org.omg.CORBA.TypeCodePackage;uses:="org.omg.CORBA";version="0.0.0.1_007_JavaSE", org.omg.CORBA.portable;uses:="org.omg.CORBA,org.omg.CORBA_2_3.portable";version="0.0.0.1_007_JavaSE", org.omg.CORBA;uses:="org.omg.CORBA.portable,org.omg.CORBA.DynAnyPackage,org.omg.CORBA.ORBPackage,org.omg.CORBA_2_3.portable,org.omg.CORBA.TypeCodePackage";version="0.0.0.1_007_JavaSE", org.omg.CORBA_2_3.portable;uses:="org.omg.CORBA,org.omg.CORBA.portable";version="0.0.0.1_007_JavaSE", org.omg.CORBA_2_3;uses:="org.omg.CORBA,org.omg.CORBA.portable";version="0.0.0.1_007_JavaSE", org.omg.CosNaming.NamingContextExtPackage;uses:="org.omg.CORBA,org.omg.CORBA.portable";version="0.0.0.1_007_JavaSE", org.omg.CosNaming.NamingContextPackage;uses:="org.omg.CORBA,org.omg.CORBA.portable,org.omg.CosNaming";version="0.0.0.1_007_JavaSE", org.omg.CosNaming;uses:="org.omg.CORBA.portable,org.omg.CORBA,org.omg.PortableServer,org.omg.CosNaming.NamingContextPackage,org.omg.CosNaming.NamingContextExtPackage";version="0.0.0.1_007_JavaSE", org.omg.Dynamic;uses:="org.omg.CORBA,org.omg.CORBA.portable";version="0.0.0.1_007_JavaSE", org.omg.DynamicAny.DynAnyFactoryPackage;uses:="org.omg.CORBA,org.omg.CORBA.portable";version="0.0.0.1_007_JavaSE", org.omg.DynamicAny.DynAnyPackage;uses:="org.omg.CORBA,org.omg.CORBA.portable";version="0.0.0.1_007_JavaSE", org.omg.DynamicAny;uses:="org.omg.CORBA,org.omg.CORBA.portable,org.omg.DynamicAny.DynAnyFactoryPackage,org.omg.DynamicAny.DynAnyPackage";version="0.0.0.1_007_JavaSE", org.omg.IOP.CodecFactoryPackage;uses:="org.omg.CORBA,org.omg.CORBA.portable";version="0.0.0.1_007_JavaSE", org.omg.IOP.CodecPackage;uses:="org.omg.CORBA,org.omg.CORBA.portable";version="0.0.0.1_007_JavaSE", org.omg.IOP;uses:="org.omg.CORBA,org.omg.CORBA.portable,org.omg.IOP.CodecFactoryPackage,org.omg.IOP.CodecPackage";version="0.0.0.1_007_JavaSE", org.omg.Messaging;uses:="org.omg.CORBA,org.omg.CORBA.portable";version="0.0.0.1_007_JavaSE", org.omg.PortableInterceptor.ORBInitInfoPackage;uses:="org.omg.CORBA,org.omg.CORBA.portable";version="0.0.0.1_007_JavaSE", org.omg.PortableInterceptor;uses:="org.omg.CORBA,org.omg.CORBA.portable,org.omg.IOP,org.omg.PortableInterceptor.ORBInitInfoPackage,org.omg.CORBA_2_3.portable,org.omg.Dynamic";version="0.0.0.1_007_JavaSE", org.omg.PortableServer.CurrentPackage;uses:="org.omg.CORBA,org.omg.CORBA.portable";version="0.0.0.1_007_JavaSE", org.omg.PortableServer.POAManagerPackage;uses:="org.omg.CORBA,org.omg.CORBA.portable";version="0.0.0.1_007_JavaSE", org.omg.PortableServer.POAPackage;uses:="org.omg.CORBA,org.omg.CORBA.portable";version="0.0.0.1_007_JavaSE", org.omg.PortableServer.ServantLocatorPackage;uses:="org.omg.CORBA,org.omg.CORBA.portable";version="0.0.0.1_007_JavaSE", org.omg.PortableServer.portable;uses:="org.omg.CORBA,org.omg.PortableServer";version="0.0.0.1_007_JavaSE", org.omg.PortableServer;uses:="org.omg.CORBA,org.omg.CORBA.portable,org.omg.PortableServer.CurrentPackage,org.omg.PortableServer.POAManagerPackage,org.omg.PortableServer.POAPackage,org.omg.PortableServer.portable,org.omg.CORBA_2_3,org.omg.PortableServer.ServantLocatorPackage";version="0.0.0.1_007_JavaSE", org.omg.SendingContext;uses:="org.omg.CORBA,org.omg.CORBA.portable";version="0.0.0.1_007_JavaSE", org.omg.stub.java.rmi;uses:="javax.rmi.CORBA";version="0.0.0.1_007_JavaSE", org.w3c.dom.bootstrap;uses:="org.w3c.dom";version="0.0.0.1_007_JavaSE", org.w3c.dom.events;uses:="org.w3c.dom,org.w3c.dom.views";version="0.0.0.1_007_JavaSE", org.w3c.dom.ls;uses:="org.w3c.dom,org.w3c.dom.events,org.w3c.dom.traversal";version="0.0.0.1_007_JavaSE", org.w3c.dom;version="0.0.0.1_007_JavaSE", org.xml.sax.ext;uses:="org.xml.sax,org.xml.sax.helpers";version="0.0.0.1_007_JavaSE", org.xml.sax.helpers;uses:="org.xml.sax";version="0.0.0.1_007_JavaSE", org.xml.sax;version="0.0.0.1_007_JavaSE"You should now be able to start Felix, and deploy all the jars listed on this page.
You should see output similar to this on the console, using the felix:lb command:
ID|State |Level|Name
0|Active | 0|System Bundle (4.4.1)
1|Active | 1|ASM (7.0)
2|Active | 1|ASM commons classes (7.0)
3|Active | 1|ASM Tree class visitor (7.0)
4|Active | 1|geronimo-jta_1.1_spec (1.1.1)
5|Active | 1|javax.annotation API (1.2.0)
6|Active | 1|javax.mail bundle from Glassfish (1.4.1.v201005082020)
7|Active | 1|Java Server Pages Standard Tag Library API Bundle (1.2.0.v201105211821)
8|Active | 1|JavaServer Pages (TM) TagLib Implementation (1.2.2)
9|Active | 1|Jetty :: Servlet Annotations (9.4.14)
10|Active | 1|Jetty :: Deployers (9.4.14)
11|Active | 1|Jetty :: Http Utility (9.4.14)
12|Active | 1|Jetty :: IO Utility (9.4.14)
13|Active | 1|Jetty :: JNDI Naming (9.4.14)
14|Active | 1|Jetty :: OSGi :: Boot (9.4.14)
15|Resolved | 1|Jetty-OSGi-Jasper Integration (9.4.14)
16|Active | 1|Jetty Servlet API and Schemas for OSGi (3.1.0)
17|Active | 1|Jetty :: Plus (9.4.14)
18|Active | 1|Jetty :: Security (9.4.14)
19|Active | 1|Jetty :: Server Core (9.4.14)
20|Active | 1|Jetty :: Servlet Handling (9.4.14)
21|Active | 1|Jetty :: Utility Servlets and Filters (9.4.14)
22|Active | 1|Jetty :: Utilities (9.4.14)
23|Active | 1|Jetty :: Webapp Application Support (9.4.14)
24|Active | 1|Jetty :: XML utilities (9.4.14)
25|Active | 1|Apache Aries SPI Fly Dynamic Weaving Bundle (1.2)
27|Active | 1|Apache Felix Bundle Repository (2.0.2)
28|Active | 1|Apache Felix Configuration Admin Service (1.8.0)
29|Active | 1|Apache Felix EventAdmin (1.3.2)
30|Active | 1|Apache Felix Gogo Command (0.14.0)
31|Active | 1|Apache Felix Gogo Runtime (0.12.1)
32|Active | 1|Apache Felix Gogo Shell (0.10.0)
33|Active | 1|Apache Felix Log Service (1.0.1)
34|Active | 1|Jetty :: Apache JSP (9.4.14)
35|Active | 1|Eclipse Compiler for Java(TM) (3.8.2.v20130121-145325)
36|Active | 1|Mortbay EL API and Implementation (8.5.33.1)
37|Active | 1|Mortbay Jasper (8.5.33.1)
Eclipse
The Jetty OSGi integration has been successfully tested against Equinox Mars RC1.
Ensure that these services are present:
Eclipse Update Site
There is a list of Eclipse P2 sites for the jetty releases maintained at http://download.eclipse.org/jetty/updates/jetty-bundles-9.x/
Each P2 repo has one big feature group that defines most of the Jetty jars. Beware: No 3rd party dependency jars are included, so you will need to have installed the dependencies listed previously in this document.
In addition, as the feature group includes websocket, you will need to download and have installed the javax.websocket-api jar:
| Jar | Bundle Symbolic Name | Location |
|---|---|---|
javax.websocket-api |
javax.websocket-api |
Metro
Metro is the reference implementation for web services. You can easily use Metro with Jetty to integrate web services with your web applications.
Metro Setup
-
Download the Metro distribution and unpack it to your disk. We’ll refer to the unpacked location as
$metro.home. -
Create the directory
$jetty.home/lib/metro -
Copy the jars from $metro.home/lib to
$jetty.home/lib/metro -
Edit the start.ini file and add an OPTION line for metro near the end.
OPTIONS=metro
That’s all the setup you need to do to integrate Jetty and Metro.
Now read the Metro documentation on how to create web services. The Metro distribution you downloaded should also contain several example web applications in the $metro.home/samples directory that you can build and deploy to Jetty (simply by copying the war file produced by the build).
Here’s an example of the log output from Jetty when one of the sample Metro wars (from $metro.home/samples/async) is deployed to Jetty:
[2093] java -jar start.jar
2013-07-26 15:47:53.480:INFO:oejs.Server:main: jetty-9.0.4.v20130625
2013-07-26 15:47:53.549:INFO:oejdp.ScanningAppProvider:main: Deployment monitor [file:/home/user/jetty-distribution-{VERSION}/webapps/] at interval 1
Jul 26, 2013 3:47:53 PM com.sun.xml.ws.transport.http.servlet.WSServletContextListener contextInitialized
INFO: WSSERVLET12: JAX-WS context listener initializing
Jul 26, 2013 3:47:56 PM com.sun.xml.ws.server.MonitorBase createRoot
INFO: Metro monitoring rootname successfully set to: com.sun.metro:pp=/,type=WSEndpoint,name=/metro-async-AddNumbersService-AddNumbersImplPort
Jul 26, 2013 3:47:56 PM com.sun.xml.ws.transport.http.servlet.WSServletDelegate <init>
INFO: WSSERVLET14: JAX-WS servlet initializing
2013-07-26 15:47:56.800:INFO:oejsh.ContextHandler:main: Started o.e.j.w.WebAppContext@75707c77{/metro-async,file:/tmp/jetty-0.0.0.0-8080-metro-async.war-_metro-async-any-/webapp/,AVAILABLE}{/metro-async.war}
2013-07-26 15:47:56.853:INFO:oejs.ServerConnector:main: Started ServerConnector@47dce809{HTTP/1.1}{0.0.0.0:8080}Jetty Reference Guide
Architecture
General items related to the architecture of jetty and how it deals with certain design decisions.
Jetty Architecture
View from 20,000 feet
The Jetty Server is the plumbing between a collection of `Connector`s that accept connections and a collection of `Handler`s that service requests from the connections and produce responses, with threads from a thread pool doing the work.
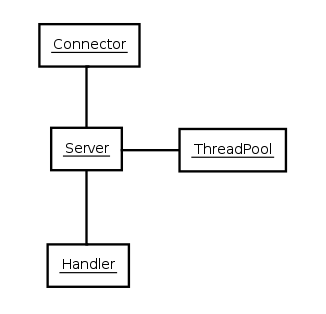
While the Jetty request/responses are derived from the Servlet API, the full features of the Servlet API
are only available if you configure the appropriate handlers.
For example, the session API on the request is inactive unless the request has been passed to a SessionHandler.
The concept of a Servlet itself is implemented by a ServletHandler.
If Servlets are not required, there is very little overhead in the use of the servlet request/response APIs.
Thus you can build a Jetty server using only connectors and handlers, without using Servlets.
The job of configuring Jetty is building a tree of connectors and handlers and providing their individual configurations. As Jetty components are simply Plain Old Java Objects (POJOs), you can accomplish this assembly and configuration of components by a variety of techniques:
-
In code, see the examples in the Jetty Source XRef.
-
Using Jetty XML, a dependency injection style in XML format.
-
With your dependency injection framework of choice, Spring or XBean.
-
Using Jetty WebApp and Context Deployers.
Patterns
The implementation of Jetty follows some fairly standard patterns.
Most abstract concepts such as Connector`s and `Handler`s are captured by interfaces.
Generic handling for those interfaces is then provided in an abstract implementation
such as `AbstractConnector and AbstractHandler.
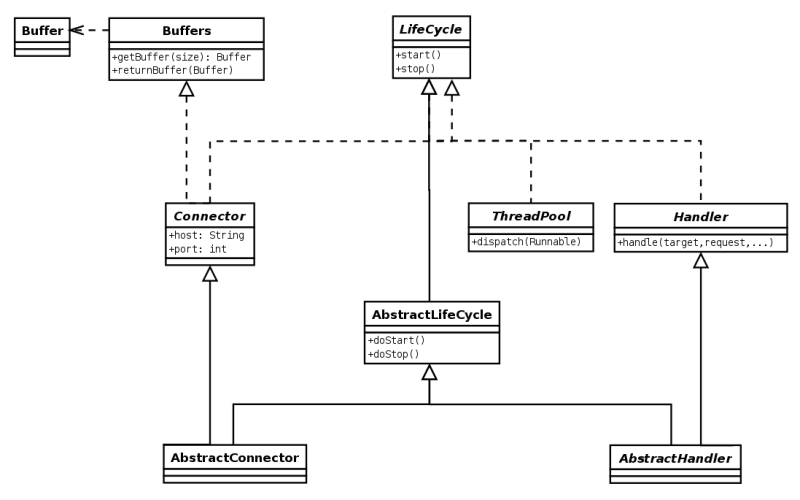
The JSR77 inspired life cycle of most Jetty components is represented by the LifeCycle
interface and the AbstractLifeCycle implementation used as the base of many Jetty components.
Connectors
A Connector is the component that accepts TCP connections.
For each accepted TCP connection, the Connector asks a ConnectionFactory to create
a Connection object that handles the network traffic on that TCP connection, parsing
and generating bytes for a specific protocol.
A ServerConnector can therefore be configured with one or more ConnectionFactory.
The simplest case is a single ConnectionFactory such as HttpConnectionFactory, that
creates HttpConnection objects that parse and generate bytes for the HTTP/1.1 protocol.
A more complex case can be a ServerConnector configured with three factories:
ProxyConnectionFactory, SslConnectionFactory and HttpConnectionFactory.
Such connector will be able to handle PROXY protocol bytes coming from a load balancer
such as HAProxy (with the ProxyConnectionFactory), then handle TLS bytes (with
SslConnectionFactory) and therefore decrypting/encrypting the bytes from/to a remote
client, and finally handling HTTP/1.1 bytes (with HttpConnectionFactory).
Each ConnectionFactory is asked to create a Connection object for each TCP connection;
the Connection objects will be chained together to handle the bytes, each for its
own protocol.
Therefore the ProxyConnection will handle the PROXY protocol bytes, SslConnection
will handle the encryption/decryption of the bytes, and HttpConnection will handle
the HTTP/1.1 bytes producing a request and response object that will be processed by
applications.
Advanced usages of Jetty will allow users to write their own ConnectionFactory to
handle custom protocols that are not implemented directly by the Jetty project,
therefore using Jetty as a generic network server.
Handlers
A Handler is the component that deals with HTTP requests and responses.
The core API of a handler is the handle method:
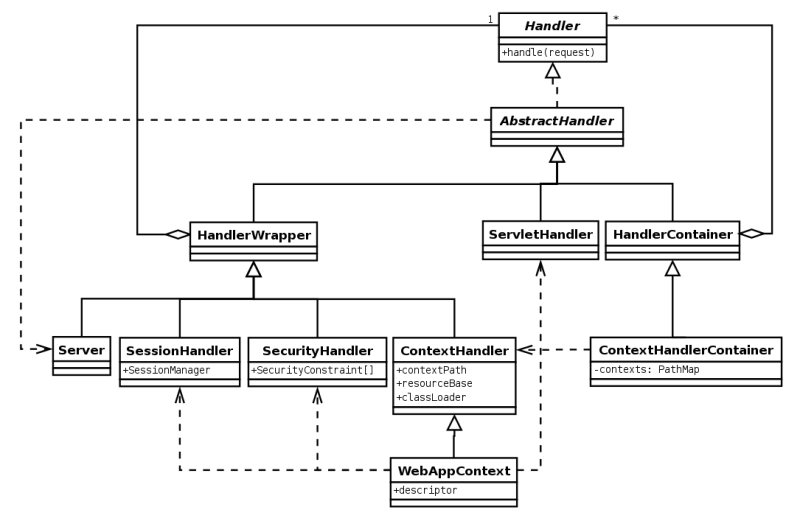
public void handle(String target, Request baseRequest, HttpServletRequest request, HttpServletResponse response) throws IOException, ServletExceptionParameters:
-
target– the target of the request, either a URI or a name. -
baseRequest– the original unwrapped request object. -
request– the request object, either as thebaseRequestobject or a wrapper ofbaseRequest. You can use the HttpConnection.getCurrentConnection() method to access the Request object if required. -
response – the response object, either unwrapped as
Responseor a wrapper of that response. You can use the HttpConnection.getCurrentConnection() method to access theResponseobject if required.
An implementation of this method can handle the request, pass the request onto another handler (or servlet) or it might modify and/or wrap the request and then pass it on. This gives three styles of Handler:
-
Coordinating handlers – handlers that route requests to other handlers (
HandlerCollection,ContextHandlerCollection) -
Filtering handlers – handlers that augment a request and pass it on to other handlers (
HandlerWrapper,ContextHandler,SessionHandler) -
Generating handlers – handlers that produce content (
ResourceHandlerandServletHandler)
Nested Handlers and Handlers Called Sequentially
You can combine handlers to handle different aspects of a request by nesting them, calling them in sequence, or by combining the two models.
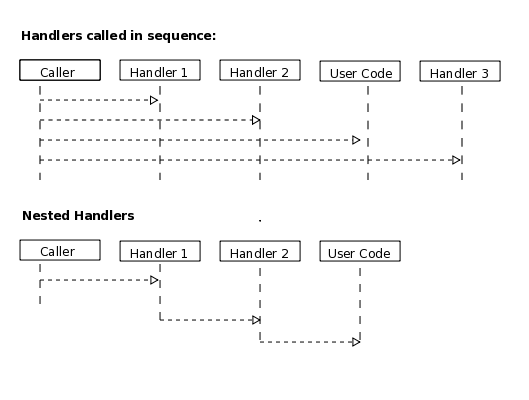
Handlers called in sequence perform actions that do not depend on the next invocation, nor on the handler order.
They handle a request and generate the response without interacting with other handlers.
The main class for this model is HandlerCollection.
Nested handlers are called according to a before/invokeNext/after pattern.
The main class for nested handlers is HandlerWrapper.
Nested handlers are much more common than those called in sequence.
See also Writing Custom Handlers.
Servlet Handler
The ServletHandler is a Handler that generates content by passing the request to any
configured Servlet Filters and then to a Servlet mapped by a URI pattern.
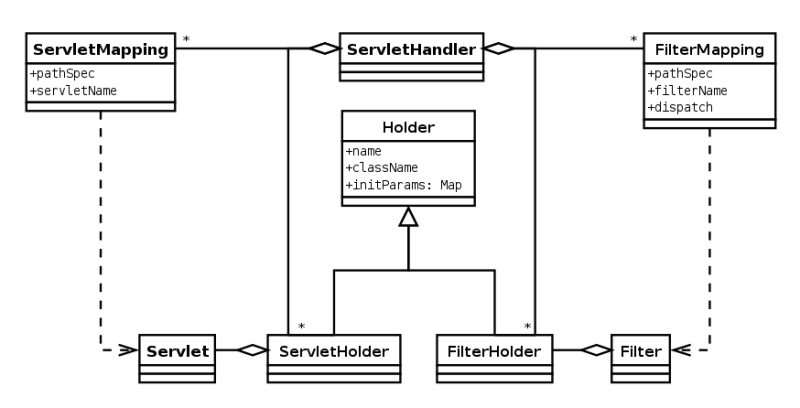
A ServletHandler is normally deployed within the scope of a ServletContext, which is a
ContextHandler that provides convenience methods for mapping URIs to servlets.
Filters and Servlets can also use a RequestDispatcher to reroute a request to another context
or another Servlet in the current context.
Contexts
Contexts are handlers that group other handlers below a particular URI context path or a virtual host. Typically a context can have:
-
A context path that defines which requests are handled by the context (e.g.
/myapp) -
A resource base for static content (a document root)
-
A class loader to obtain classes specific to the context (typically from
/WEB-INF/classesand/WEB-INF/lib) -
Virtual host names
Contexts implementations include:
-
ContextHandler -
ServletContextHandler -
WebAppContext
A web application context combines handlers for security, session and servlets in a single unit
that you can configure with a web.xml descriptor.
Web Application
A WebAppContext is a derivation of ServletContextHandler that supports the standardized layout
of a web application and configuration of session, security, listeners, filter, servlets, and JSP
via a web.xml descriptor normally found in the /WEB-INF directory of a web application.
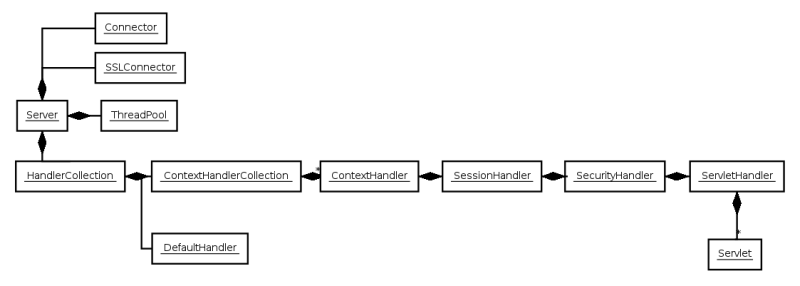
Essentially WebAppContext is a convenience class that assists the construction and configuration
of other handlers to achieve a standard web application configuration.
Configuration is actually done by pluggable implementations of the Configuration class and the
prime among these is WebXmlConfiguration.
Jetty Classloading
Class loading in a web container is slightly more complex than a normal Java application. The normal configuration is that each web context (web application or WAR file) has its own classloader, which has the system classloader as its parent. Such a classloader hierarchy is normal in Java, however the servlet specification complicates the hierarchy because it requires the following:
-
Classes contained within
WEB-INF/liborWEB-INF/classeshave priority over classes on the parent classloader. This is the opposite of the normal behavior of a Java 2 classloader. -
System classes such as
java.lang.Stringare excluded from the webapp priority, and you may not replace them with classes inWEB-INF/liborWEB-INF/classes. Unfortunately the specification does not clearly state what classes are System classes, and it is unclear if alljavaxclasses should be treated as System classes. -
Server implementation classes like Server should be hidden from the web application and should not be available in any classloader. Unfortunately the specification does not state what classes are Server classes, and it is unclear if common libraries like the Xerces parser should be treated as Implementation classes.
Configuring Webapp Classloading
Jetty provides configuration options to control the three webapp class loading issues identified above.
You can configure webapp classloading by several methods on the WebAppContext.
You can call these methods directly if you are working with the Jetty API, or you can inject methods from a context XML file if you are using the Context Provider ([using-context-provider]).
You CANNOT set these methods from a jetty-web.xml file, as it executes after the classloader configuration is set.
As a note, jetty-web.xml uses the webapp classpath and not the classpath of the server.
Controlling Webapp Classloader Priority
The method org.eclipse.jett .webapp.WebAppContext.setParentLoaderPriority(boolean) allows control over the priority given to webapp classes over system classes. If you set it to false (the default), Jetty uses standard webapp classloading priority. However, if in this mode some classes that are dependencies of other classes are loaded from the parent classloader (due to settings of system classes below), ambiguities might arise as both the webapp and system classloader versions can end up being loaded.
If set to true, Jetty uses normal JavaSE classloading priority, and gives priority to the parent/system classloader. This avoids the issues of multiple versions of a class within a webapp, but the version the parent/system loader provides must be the right version for all webapps you configure in this way.
Configuring Webapp Classloader Caching
Introduced in Jetty 9.3.6, the CachingWebAppClassLoader can be used to cache getResource(String) results.
For webapps that search for classes and resources regularly, this can increase speed and performance.
This is an optional feature and it should be noted that it can conflict with several other libraries such as JSP, JSTL, JSF and CDI.
As such, this feature must be manually enabled for each webapp you want to use it in.
Below is an example of implementing this feature using Jetty IoC XML format:
<Configure id="mywebapp" class="org.eclipse.jetty.webapp.WebAppContext">
...
<Set name="classLoader">
<New class="org.eclipse.jetty.webapp.CachingWebAppClassLoader">
<Arg><Ref refid="mywebapp"/></Arg>
</New>
</Set>
...
</Configure>Setting System Classes
You can call the methods WebAppContext.setSystemClasses(String[]) or WebAppContext.getSystemClasspathPattern().add(String) to allow fine control over which classes are considered system classes.
-
A web application can see a System class.
-
A WEB-INF class cannot replace a System class.
The default system classes are:
| System Classes | Note |
|---|---|
java. |
Java SE classes (per servlet spec v2.5 / SRV.9.7.2). |
javax. |
Java SE classes (per servlet spec v2.5 / SRV.9.7.2). |
org.xml. |
Needed by javax.xml. |
org.w3c. |
Needed by javax.xml. |
org.eclipse.jetty.continuation. |
Webapp can see and not change continuation classes. |
org.eclipse.jetty.jndi. |
Webapp can see and not change naming classes. |
org.eclipse.jetty.jaas. |
Webapp can see and not change JAAS classes. |
org.eclipse.jetty.websocket. |
WebSocket is a Jetty extension. |
org.eclipse.jetty.servlet.DefaultServlet |
Webapp can see and not change default servlet. |
Absolute classname can be passed, names ending with . are treated as packages names, and names starting with - are treated as negative matches and must be listed before any enclosing packages.
Setting Server Classes
You can call the methods org.eclipse.jetty.webapp.WebAppContext.setServerClasses(String Array) or org.eclipse.jetty.webapp.WebAppContext.addServerClass(String) to allow fine control over which classes are considered Server classes.
-
A web application cannot see a Server class.
-
A WEB-INF class can replace a Server class.
The default server classes are:
| Server Classes | -org.eclipse.jetty.continuation. |
|---|---|
Don’t hide continuation classes. |
-org.eclipse.jetty.jndi. |
Don’t hide naming classes. |
-org.eclipse.jetty.jaas. |
Don’t hide jaas classes. |
-org.eclipse.jetty.servlets. |
Don’t hide utility servlet classes if provided. |
-org.eclipse.jetty.servlet.DefaultServlet |
Don’t hide default servlet. |
-org.eclipse.jetty.servlet.listener. |
Don’t hide utility listeners |
-org.eclipse.jetty.websocket. |
Don’t hide websocket extension. |
org.eclipse.jetty. |
Adding Extra Classpaths to Jetty
You can add extra classpaths to Jetty in several ways.
Using start.jar
If you are using start.jar via the Jetty distribution, at startup the Jetty runtime automatically loads option Jars from the top level $jetty.home/lib directory. The default settings include:
-
Adding Jars under
$jetty.home/lib/extto the system classpath. You can place additional Jars here. -
Adding the directory
$jetty.home/resourcesto the classpath (may contain classes or other resources). -
Adding a single path defined by the command line parameter path.
Using the extraClasspath() method
You can add an additional classpath to a context classloader by calling org.eclipse.jetty.webapp.WebAppContext.setExtraClasspath(String) with a comma-separated list of paths. You can do so directly to the API via a context XML file such as the following:
<Configure class="org.eclipse.jetty.webapp.WebAppContext">
...
<Set name="extraClasspath">../my/classes,../my/jars/special.jar,../my/jars/other.jar</Set>
...Using a Custom WebAppClassLoader
If none of the alternatives already described meet your needs, you can always provide a custom classloader for your webapp. We recommend, but do not require, that your custom loader subclasses WebAppClassLoader.
If you do not subclass WebAppClassLoader, we recommend that you implement the ClassVisibilityChecker interface. Without this interface, session persistence will be slower.
You configure the classloader for the webapp like so:
MyCleverClassLoader myCleverClassLoader = new MyCleverClassLoader();
...
WebAppContext webapp = new WebAppContext();
...
webapp.setClassLoader(myCleverClassLoader);You can also accomplish this in a context xml file.
Starting Jetty with a Custom ClassLoader
If you start a Jetty server using a custom class loader–consider the Jetty classes not being available to the system class loader, only your custom class loader–you may run into class loading issues when the WebAppClassLoader kicks in.
By default the WebAppClassLoader uses the system class loader as its parent, hence the problem. This is easy to fix, like so:
context.setClassLoader(new WebAppClassLoader(this.getClass().getClassLoader(), context));or
context.setClassLoader(new WebAppClassLoader(new MyCustomClassLoader(), context));Managing 1xx Responses
The HTTP RFC allows for 1xx informational responses to be sent before a real content response. Unfortunately the servlet specification does not provide a way for these to be sent, so Jetty has had to provide non-standard handling of these headers.
100 Continue
The 100 Continue response should be sent by the server when a client sends a request with a Expect: 100-continue header, as the client will not send the body of the request until the 100 continue response has been sent.
The intent of this feature is to allow a server to inspect the headers and to tell the client to not send a request body that might be too large or insufficiently private or otherwise unable to be handled.
Jetty achieves this by waiting until the input stream or reader is obtained by the filter/servlet, before sending the 100 continues response. Thus a filter/servlet may inspect the headers of a request before getting the input stream and send an error response (or redirect etc.) rather than the 100 continues.
102 Processing
RFC 2518 defines the 102 processing response that can be sent "when the server has a reasonable expectation that the request will take significant time to complete. As guidance, if a method is taking longer than 20 seconds (a reasonable, but arbitrary value) to process the server SHOULD return a 102 (Processing) response".
So if a request is received with the Expect: 102-processing header, then a filter/servlet may send a 102 response (without terminating further processing) by calling servletResponse.sendError(102);.
Creating a Custom Protocol
You can create custom protocols with Jetty. This page provides an example of how to do so, with Telnet as the protocol.
To create a custom Telnet protocol, complete the following tasks:
-
Implement a
TelnetServerConnectionFactory. -
Implement a
TelnetServerConnectionby extendingo.e.j.io.AbstractConnection. -
Create a parser/interpreter for the bytes you receive (this is totally independent from Jetty).
-
If needed, design an API for the application to use to process the bytes received (also independent from Jetty). The API likely has a respond back primitive that uses a Jetty provided
EndPointandEndPoint.write(Callback, Buffer…)to write the response bytes.
Implementing a TelnetServerConnectionFactory
Begin with an org.eclipse.jetty.server.ServerConnector, which you can use as is. ServerConnector takes a o.e.j.server.ConnectionFactory, which creates o.e.j.io.Connection objects that interpret the bytes the connector receives.
You must implement ConnectionFactory with a TelnetServerConnectionFactory, where you return a Connection implementation (for example, TelnetServerConnection).
Implementing the TelnetServerConnection
For the Connection implementation you need to extend from o.e.j.io.AbstractConnection because it provides many facilities that you would otherwise need to re-implement from scratch.
For each Connection instance there is associated an o.e.j.io.EndPoint instance.
Think of EndPoint as a specialized version of JDK’s SocketChannel.
You use the EndPoint to read, write, and close.
You don’t need to implement EndPoint, because Jetty provides concrete
classes for you to use.
The Connection is the passive side (that is, Jetty calls it when there is data to read), while the EndPoint is the active part (that is, applications call it to write data to the other end).
When there is data to read, Jetty calls AbstractConnection.onFillable(), which you must implement in your TelnetServerConnection.
A typical implementation reads bytes from the EndPoint by calling EndPoint.fill(ByteBuffer).
For examples, look at both the simpler SPDYConnection (in the SPDY client package, but server also uses it), and the slightly more complex HttpConnection.
Parsing the Bytes Received
After you read the bytes, you need to parse them. For the Telnet protocol there is not much to parse, but perhaps you have your own commands that you want to interpret and execute. Therefore typically every connection has an associated parser instance. In turn, a parser usually emits parse events that a parser listener interprets, as the following examples illustrate:
-
In HTTP, the Jetty HTTP parser parses the request line (and emits a parser event), then parses the headers (and emits a parser event for each) until it recognizes the end of the headers (and emits another parser event). At that point, the interpreter or parser listener (which for HTTP is
o.e.j.server.HttpChannel) has all the information necessary to build aHttpServletRequestobject and can call the user code (the web application, that is, servlets/filters). -
In SPDY, the Jetty SPDY parser parses a SPDY frame (and emits a parser event), and the parser listener (an instance of o.e.j.spdy.StandardSession) interprets the parser events and calls user code (application-provided listeners).
With ConnectionFactory, Connection, parser, and parser listeners in place, you have configured the read side.
Designing an API to Process Bytes
At this point, server applications typically write data back to the client.
The Servlet API (for HTTP) or application-provided listeners (for SPDY) expose an interface to web applications so that they can write data back to the client.
The implementation of those interfaces must link back to the EndPoint instance associated with the Connection instance so that it can write data via EndPoint.write(Callback, ByteBuffer…).
This is an asynchronous call, and it notifies the callback when all the buffers have been fully written.
For example, in the Servlet API, applications use a ServletOutputStream to write the response content.
ServletOutputStream is an abstract class that Jetty implements, enabling Jetty to handle the writes from the web application; the writes eventually end up in an EndPoint.write(…) call.
Tips for Designing an API
If you want to write a completely asynchronous implementation, your API to write data to the client must have a callback/promise concept: “Call me back when you are done, and (possibly) give me the result of the computation."
SPDY’s Stream class is a typical example. Notice how the methods there exist in two versions, a synchronous (blocking) one, and an asynchronous one that takes as last parameter a Callback (if no result is needed), or a Promise (if a result is needed). It is trivial to write the synchronous version in terms of the asynchronous version.
You can use EndPoint.write(Callback, ByteBuffer…) in a blocking way as follows:
FutureCallback callback = new FutureCallback();
endPoint.write(callback, buffers);
callback.get();With the snippet above your API can be synchronous or asynchronous (your choice), but implemented synchronously.
Platforms, Stacks and Alternative Distributions
Many many options…
In addition to using Jetty in its distribution form and its multiple embedded forms, there are a number of alternative ways to use Jetty. Many products and open source projects out there distribute Jetty themselves, in both distribution and embedded forms, not to mention different operating systems bundling Jetty in other installable forms.
If your platform supports Jetty from a distribution or deployment perspective and want to be included on this list just fork the documentation and submit a pull request, or contact us. Check out our list of Powered By page for software that makes use of Jetty, often in novel and exciting ways.
Jelastic
Jelastic is a wonderful place to host your applications with solid support for Jetty. As a cloud hosting platform they take the majority of configuration and installation details out of the picture and focus on letting you focus on your web application.
CloudFoundry
|
This is an increasingly aged integration, things like likely changed enough this is not directly useful but may serve as a useful starting point should someone want to look into it. |
Overview
CloudFoundry is an open platform intended as a place to deploy end user applications in a manner which is both simple and eminently scalable to fit the needs of the application. With the release of their V2 framework the Jetty project has created a buildpack which allows you to deploy your java based web application onto Jetty and still make use of the remainder of the CloudFoundry platform.
This buildpack itself is quite simple to use.
A collection of ruby scripting and the buildpack conventions will allow Jetty to be downloaded, configured and customized to your needs and then have your web application deployed onto it.
While the default buildpack we have created is useful to deploy a stock configuration of jetty, it is quite likely that you will want to fork the buildpack and tweak it to fit your immediate needs.
This process is made trivial since buildpacks install from a github repository.
For example, to change the jetty version simply fork it in GitHub and tweak the JETTY_VERSION string in the jetty_web.rb file.
If you have additional modifications to make to the Jetty server, like perhaps configuring additional static contexts, setting up a proxy servlet, adding jar files to the jetty home/lib/ext directory, etc you can either adapt the ruby scripting directly or place them under the appropriate location in the /resources directory of this buildpack and they will be copied into the correct location.
For the time being I’ll leave this buildpack under my personal github account and should there be interest expressed I am more then happy to push it over to https://github.com/jetty-project down the road for proper contributions, etc.
Usage
To show how incredibly easy it is to use the Jetty buildpack with cloudfoundry, this is all the more you need to do to deploy your application.
Refer to the CloudFoundry documentation to get started, get the cf utilities installed and an environment configured.
$ cf push snifftest --buildpack=git://github.com/jmcc0nn3ll/jetty-buildpack.git|
In this example the web application is uploaded from the current directory so make sure you have changed directory into the root of your web application.
The |
You will be prompted to answer a series of questions describing the execution environment and any additional services you need enabled (databases, etc).
Instances> 1
Custom startup command> none
1: 64M
2: 128M
3: 256M
4: 512M
5: 1G
Memory Limit> 256M
Creating snifftest... OK
1: snifftest
2: none
Subdomain> snifftest
1: a1-app.cf-app.com
2: none
Domain> a1-app.cf-app.com
Binding snifftest.a1-app.cf-app.com to snifftest... OK
Create services for application?> n
Save configuration?> nOnce answered you will see the installation process of your application.
Uploading snifftest... OK
Starting snifftest... OK
-> Downloaded app package (4.0K)
Initialized empty Git repository in /tmp/buildpacks/jetty-buildpack.git/.git/
Installing jetty-buildpack.git.
Downloading JDK...
Copying openjdk-1.7.0_21.tar.gz from the buildpack cache ...
Unpacking JDK to .jdk
Downloading Jetty: jetty-distribution-{VERSION}.tar.gz
Downloading jetty-distribution-{VERSION}.tar.gz from http://repo2.maven.org/maven2/org/eclipse/jetty/jetty-distribution/9.0.3.v20130506/ ...
Unpacking Jetty to .jetty
-> Uploading staged droplet (36M)
-> Uploaded droplet
Checking snifftest...
Staging in progress...
Staging in progress...
Staging in progress...
Staging in progress...
Staging in progress...
Staging in progress...
0/1 instances: 1 starting
0/1 instances: 1 starting
0/1 instances: 1 starting
0/1 instances: 1 starting
1/1 instances: 1 running
OKThe application is now available at the configured location! Under the url http://snifftest.a1-app.cf-app.com/ in this particular example.
Acknowledgements
The Jetty buildpack was forked from the CloudFoundry Java buildpack. The Virgo Buildpack that Glyn worked on was used as a sanity check.
CloudFoundry buildpacks were modelled on Heroku buildpacks.
Amazon Elastic Beanstalk
|
This is an increasingly aged integration, things like likely changed enough this is not directly useful but may serve as a useful starting point should someone want to look into it. |
Elastic Beanstalk is a component with the Amazon Web Services offering that allows you to configure an entire virtual machine based on one of several available baseline configurations and then customize it through a powerful configuration system. While the default offerings currently available are based on Tomcat for for the java community, we worked out the basics using that configuration system to enable the usage of Jetty instead.
Overview
Elastic beanstalk has a very powerful configuration mechanism so this integration taps into that to effectively rework the tomcat configuration and replace it with the bits required to make jetty run in its place. Below is a walk through of what the various configuration files are doing and how the general flow of configuration on beanstalk happens.
There is an .ebextensions directory in your beanstalk application which contains all of the files requires to configure and customize your beanstalk and application combo.
Files that end in .config in this directory are processed in alphabetical order.
- 00-java7.config
-
installs java 7 onto the beanstalk environment and makes it the default
- 10-tweak.config
-
not required, but changes the
/opt/elasticbeanstalkdirectory to be readable making debugging easier - 11-jetty.config
-
installs jetty9 into
/opt/jetty-9and removes unneeded distribution files - 12-beanstalk.config
-
handles replacing tomcat with jetty in many configuration files, configures logging and wires up system startup processes. Some files in your
.ebextensionsdirectory are moved to replace files under /opt/elasticbeanstalk.
If you look in the .ebextensions directory of your application you should also see other jetty specific xml and ini files.
The final config file handles these as they are largely customization for your application.
- 20-testapp.config
-
layers application specific configuration files into the jetty installation
The files in our example test webapp here enable various OPTIONS for libraries that need to be loaded, customize the root application being deployed and even deploy additional contexts like we do in our jetty distribution demo. This is also the mechanism that you would use to wire up application specific things, for example if you needed additional software installed, customized directories made, etc.
Maven Bits
Support for this feature leverages Maven to make things easy and is composed of three different modules.
- jetty-beanstalk-overlay
-
This is the collection of scripts that are required to wedge jetty into the normal beanstalk setup. This module is intended to extract into an webapp to enable it for beanstalk usage with jetty.
- jetty-beanstalk-resources
-
This generates an artifact of files that are downloaded by the configuration process and contains replacements for certain beanstalk files as well as various system level jetty configuration files like an updated
jetty.shscript for the/etc/init.dsetup. - jetty-beanstalk-testapp
-
An example webapp that shows both how to combine the war file from another maven module with the jetty-beanstalk-overlay to produce a beanstalk enabled application bundle. Also included is examples of how to alter the jetty configuration for things like a customized
start.inifile.
|
The test webapps needs access to a snapshot version of the test-jetty-webapp so it really serves as more of an example of how to layer your webapp with the bits required to customize your app for beanstalk and jetty. |
To actually make use of these artifacts you currently must clone this git repository and build it locally. Once you have the artifacts you simply need to copy the approach in the jetty-beanstalk-testapp to apply the configuration to your webapp.
|
Bluepill is used to manage the start and stop process of the app server.
This seems to be a problematic bit of software with a colored history and the version in use at the time of this writing is old.
When starting and stopping (or restarting) the appserver you may see error messages show up that the Server timed out getting a response or things like that.
These are red herrings and my experience is that jetty has started and stopped just fine, the pid file required shows up in a very timely fashion (under |
Fedora
As of Fedora 19, Jetty 9 is the version of Jetty available. This distribution of Jetty is not created or maintained by the Jetty project though we have had a fair amount of communication with the folks behind it and we are very pleased with how this Linux distribution has stayed current. Releases are kept largely in sync with our releases as there is a wonderful automatic notification mechanism in place for Fedora that detects our releases and immediately opens an issue for them to update.
Ubuntu
Currently there are no actual .deb files available for installing on Debian based Linux machines but there is a handy blog that as been largely been kept up to date on the steps involved through the comments.
Jetty XML Reference
Jetty XML Syntax
The Jetty XML syntax is a straightforward mapping of XML elements to a Java API so that POJOs can be instantiated and getters, setters, and methods called.
It is very similar to Inversion Of Control (IOC) or Dependency Injection (DI) frameworks like Spring or Plexus (but it predates all of them).
Typically Jetty XML is used by jetty.xml to configure a Jetty server or by a context.xml file to configure a ContextHandler or subclass, but you can also use the mechanism to configure arbitrary POJOs.
This page describes the basic syntax of Jetty XML configuration. See Jetty XML Usage for information on how you can use and combine Jetty XML. See configuration files for specific examples.
Basic XML Configuration File Example
The following XML configuration file creates some Java objects and sets some attributes:
<?xml version="1.0"?>
<!DOCTYPE Configure PUBLIC "-//Jetty//Configure//EN" "http://www.eclipse.org/jetty/configure_9_3.dtd">
<Configure id="foo" class="com.acme.Foo">
<Set name="name">demo</Set>
<Set name="nested">
<New id="bar" class="com.acme.Bar">
<Arg>true</Arg>
<Set name="wibble">10</Set>
<Set name="wobble">xyz</Set>
<Set name="parent"><Ref refid="foo"/></Set>
<Call name="init">
<Arg>false</Arg>
</Call>
</New>
</Set>
<Ref refid="bar">
<Set name="wibble">20</Set>
<Get name="parent">
<Set name="name">demo2</Set>
</Get>
</Ref>
</Configure>The XML above is equivalent to the following Java code:
com.acme.Foo foo = new com.acme.Foo();
foo.setName("demo");
com.acme.Bar bar = new com.acme.Bar(true);
bar.setWibble(10);
bar.setWobble("xyz");
bar.setParent(foo);
bar.init(false);
foo.setNested(bar);
bar.setWibble(20);
bar.getParent().setName("demo2");Overview
Understanding DTD and Parsing
The document type descriptor (configure.dtd) describes all valid elements in a Jetty XML configuration file using the Jetty IoC format. The first two lines of an XML must reference the DTD to be used to validate the XML like:
<?xml version="1.0" encoding="UTF-8"?>
<!DOCTYPE Configure PUBLIC "-//Jetty//Configure//EN" "http://www.eclipse.org/jetty/configure_9_3.dtd">
...Typcically a good XML editor will fetch the DTD from the URL and use it to give syntax highlighting and validation while a configuration file is being edited. Some editors also allows DTD files to be locally cached. The URL may point to configure.dtd if you want the latest current version, or to a specific version like configure_9_3.dtd if you want a particular validation feature set.
Files that conform to the configure.dtd format are processed in Jetty by the XmlConfiguration class which may also validate the XML (using a version of the DTD from the classes jar file), but is by default run in a forgiving mode that tries to work around validation failures.
To ensure your web.xml, web-fragment.xml and webdefault.xml files are validated, you will also need to set the validateXml attribute to true:
<Call name="setAttribute">
<Arg>org.eclipse.jetty.webapp.validateXml</Arg>
<Arg type="Boolean">true</Arg>
</Call>Jetty XML Configuration Scope
The configuration of object instances with Jetty IoC XML is done on a scoped basis, so that for any given XML element there is a corresponding Object in scope and the nested XML elements apply to that. The outer most scope is given by a Configure element and elements like Call, New and Get establish new scopes. The following example uses the name fields to explain the scope.
<Configure class="com.example.Foo">
<Set name="fieldOnFoo">value</Set>
<Set name="fieldOnFoo">
<New class="com.example.Bar">
<Set name=fieldOnBar>value</Set>
<Call name="methodOnBarWithNoArgs"/>
</New>
</Set>
<Call name="methodOnFoo">
<Arg>value for first arg of methodOnFoo</Arg>
<Arg><New class="com.example.Bar"/></Arg>
<Set name="fieldOnObjectReturnedByMethodOnFoo">value</Set>
<Call name="methodOnObjectReturnedByMethodOnFooWithNoArgs"/>
</Call>
</Configure>Coercing Arguments to a Type
When trying to match XML elements to java elements, Jetty XmlConfiguration may need to coerces values to match method arguments.
By default it does so on a best effort basis, but you can also specify explicit types with the type attribute.
Supported values for type are: String, Character, Short, Byte, Integer, Long, Boolean, Float, Double, char, short, byte, int, long, boolean, float, double, URL, InetAddress, InetAddrPort, and void.
Referring to a Class
If you do not specify the classname, Jetty assumes you are calling the method on the object that is current in scope (eg the object of the surrounding Configure, New or Get clause).
If the class attribute is specified to a fully-qualified class name, then it is either used to create a new instance (Configure and New elements) or is used to access a static (Call, Set or Get elements).
Referring to an Object
You can use the id attribute to store a reference to the current object when first creating or referring to this object. You can then use the Ref element to reference the object later. The ID must be unique for each object you create.
Attribute vs Element Style
For XML elements that contain only other XML Elements, there is a choice of using attributes or elements style. The following is an example of attribute style:
<Call id="result" class="org.example.SomeClass" name="someMethod" arg="value0,value1"/>
Attribute style has the benefit of brevity, but is limited by: values can only be Strings; multivalued items can not contain ','; values may not be subject to property expansion or other elements that return values. Thus, the more verbose element style is available and the following is semantically equivalent to the attribute style above:
<Call>
<Id>result</Id>
<Class>org.example.SomeClass</Class>
<Name>someMethod</Name>
<Arg>value0</Arg>
<Arg>value1</Arg>
</Call>
Note that multivalued elements like Arg must be repeated and may not be comma-separated like they are when provided as attributes.
It is possible to use a mix of styles and the following example shows a moretypical example that uses property expansion as the reason for element style:
<Call id="result" name="someMethod">
<Class><Property name="which.class">
<Default><Property name="default.class" default="org.example.SomeClass"/>
</Property></Class>
<Arg>value0</Arg>
<Arg>value1</Arg>
</Call>
Attributes may not be expressed as elements when their parent element is one that contains data.
Thus Arg, Item, Set, Put and Get elements may not have their attributes expressed as elements.
<Configure>
This is the root element that specifies the class of object that is to be configured.
It is usually either the Server, in jetty.xml, or a WebAppContext in jetty-web.xml.
| Attribute | Required | Description |
|---|---|---|
id |
no |
A reference to the object that was created. If you define multiple Configure elements with the same id, they will be treated as one object, even if they’re in different files. You can use this to break up configuration of an object (such as the Server) across multiple files. |
class |
no |
The fully qualified classname of the object to be
configured. Could be |
Can Contain
Examples
Basic Example
<Configure class="org.eclipse.jetty.server.Server">
<Set name="port">8080</Set>
</Configure>This is equivalent to:
org.eclipse.jetty.server.Server server = new org.eclipse.jetty.server.Server();
server.setPort(8080);Using id to break up configuration of one object across multiple files
In etc/jetty.xml:
<Configure id="Server" class="org.eclipse.jetty.server.Server">
<!-- basic configuration here -->
</Configure>In etc/jetty-logging.xml:
<Configure id="Server" class="org.eclipse.jetty.server.Server">
<!-- assumes that you have the basic server configuration set up; this file only contains additional configuration for logging -->
</Configure>Then run the combined configuration using:
java -jar start.jar etc/jetty.xml jetty-logging.xml
<Set>
A Set element maps to a call to a setter method or field on the current object.
It can contain text and/or elements such as Call, New, SystemProperty, etc., as values.
The name and optional type attributes are used to select the setter method.
If you do not specify a value type, white space is trimmed out of the value.
If it contains multiple elements as values, they are added as strings before being converted to any specified type.
| Attribute | Required | Description |
|---|---|---|
name |
yes |
the name of the setter method to call, or the field to set. If the name given is xxx, then a setXxx method is used. If the setXxx method cannot be found, then the xxx field is used. |
type |
no |
the declared type of the argument. See also discussion of type for Arg for how to define null and empty string values. |
class |
no |
if present, then this Set is treated as a static set method invocation |
Can Contain
Examples
Basic Example
<Configure id="server" class="org.eclipse.jetty.server.Server">
<Set name="port">8080</Set>
</Configure>Set via a System Property
<Configure id="server" class="org.eclipse.jetty.server.Server">
<Set name="port"><SystemProperty name="jetty.http.port" /></Set>
</Configure>Creating a NewObject and Setting It on the Server
<Configure id="server" class="org.eclipse.jetty.server.Server">
<Set name="threadPool">
<New class="org.eclipse.jetty.util.thread.QueuedThreadPool">
<Set name="minThreads">10</Set>
<Set name="maxThreads">1000</Set>
</New>
</Set>
</Configure>This is equivalent to:
org.eclipse.jetty.server.Server server = new org.eclipse.jetty.server.Server();
org.eclipse.jetty.util.thread.QueuedThreadPool threadPool = new org.eclipse.jetty.util.thread.QueuedThreadPool();
threadPool.setMinThreads(10);
threadPool.setMaxThreads(1000);
server.setThreadPool(threadPool);Invoking a Static Setter
<Configure id="server" class="org.eclipse.jetty.server.Server">
<Set class="org.eclipse.jetty.util.log.Log" name="logToParent">loggerName</Set>
</Configure><Get>
A Get element maps to a call to a getter method or field on the current object.
It can contain nested elements such as Set, Put, Call, etc.; these act on the object returned by the Get call.
| Attribute | Required | Description |
|---|---|---|
name |
yes |
the name of the getter method to call, or the field to get. If the name given is xxx, then a getXxx method is used. If the getXxx method cannot be found, then the xxx field is used. |
class |
no |
f present, then this Get is treated as a static getter or field. |
id |
no |
if present, then you can use this id to refer to the returned object later. |
Can Contain
Examples
Basic Example
This simple example doesn’t do much on its own.
You would normally use this in conjunction with a <Ref id="Logger" />.
<Configure id="server" class="org.eclipse.jetty.server.Server">
<Get id="Logger" class="org.eclipse.jetty.util.log.Log" name="log"/>
</Configure>Invoking a Static Getter and Call Methods on the Returned Object
<Configure id="server" class="org.eclipse.jetty.server.Server">
<Get class="java.lang.System" name="out">
<Call name="println">
<Arg>Server version is: <Get class="org.eclipse.jetty.server.Server" name="version"/></Arg>
</Call>
</Get>
</Configure><Put>
A Put element maps to a call to a put method on the current object, which must implement the Map interface.
It can contain text and/or elements such as Call, New, SystemProperty, etc. as values.
If you do not specify a no value type, white space is trimmed out of the value.
If it contains multiple elements as values, they are added as strings before being converted to any specified type.
| Attribute | Required | Description |
|---|---|---|
name |
yes |
used as the put key |
type |
no |
forces the type of the value. See also discussion of type for Arg for how to define null and empty string values. |
Can Contain
Example
<Get name="someKindOfMap">
<Put name="keyName">objectValue</Put>
</Get><Call>
A Call element maps to an arbitrary call to a method on the current object.
It can contain a sequence of Arg elements followed by a sequence of configuration elements, such as Set, Put, Call.
The <Arg>s are passed as arguments to the method; the sequence of configuration elements act on the object returned by the original call.
| Attribute | Required | Description |
|---|---|---|
name |
yes |
the name of the arbitrary method to call. The method called will use the exact name you provide it. |
class |
no |
if present, then this Call is treated as a static method. |
id |
no |
if present, you can use this id to refer to any object returned by the call, for later use. |
arg |
no |
comma separated list of arguments may be used for simple string values rather than Arg elements |
Can Contain
Attributes as elements (Id, Name, Class) plus Arg element, Set element, Get element, Put element, Call element, New element, Ref element, Array element, Map element, Property element
Examples
Basic example
<Call name="doFoo">
<Arg>bar</Arg>
<Set name="test">1, 2, 3</Set>
</Call>This is equivalent to:
Object o2 = o1.doFoo("bar");
o2.setTest("1, 2, 3");Invoking a static method
<Call class="com.acme.Foo" name="setString">
<Arg>somestring</Arg>
</Call>Which is equivalent to:
com.acme.Foo.setString("somestring");Invoking the Actual MethodInstead of Relying on Getter/Setter Magic
<Configure id="Server" class="org.eclipse.jetty.server.Server">
<Call name="getPort" id="port" />
<Call class="com.acme.Environment" name="setPort">
<Arg>
<Ref refid="port"/>
</Arg>
</Call>
</Configure>Which is equivalent to:
org.mortbay.jetty.Server server = new org.mortbay.jetty.Server();
com.acme.Environment.setPort( server.getPort() );<Arg>
An Arg element can be an argument of either a method or a constructor. Use it within [jetty-syntax-call] and [jetty-syntax-new].
It can contain text and/or elements, such as Call, New, SystemProperty, etc., as values.
The optional type attribute can force the type of the value.
If you don’t specify a type, white space is trimmed out of the value.
If it contains multiple elements as values, they are added as strings before being converted to any specified type.
Simple String arguments can also be specified as a string separated arg attribute on the parent element.
| Attribute | Required | Description |
|---|---|---|
type |
no |
force the type of the argument. If you do not provide a value for the element, if you use type of "String", the value will be the empty string (""), otherwise it is null. |
Can Contain
Examples
Basic examples
<Arg>foo</Arg> <!-- String -->
<Arg>true</Arg> <!-- Boolean -->
<Arg>1</Arg> <!-- int, long, short, float, double -->
<Arg><Ref refid="foo" /></Arg> <!-- any object; reference a previously created object with id "foo", and pass it as a parameter -->
<Arg></Arg> <!-- null value -->
<Arg type="String"></Arg> <!-- empty string "" -->Coercing Type
This explicitly coerces the type to a boolean:
<Arg type="boolean">False</Arg>As a Parameter
Here are a couple of examples of Arg element being used as a parameter to methods and to constructors:
<Call class="com.acme.Environment" name="setFoo">
<Arg>
<New class="com.acme.Foo">
<Arg>bar</Arg>
</New>
</Arg>
</Call>This is equivalent to:
com.acme.Environment.setFoo(new com.acme.Foo("bar"));<New class="com.acme.Baz">
<Arg>
<Call id="bar" class="com.acme.MyStaticObjectFactory" name="createObject">
<Arg>2</Arg>
</Call>
</Arg>
</New>This is equivalent to:
new com.acme.Baz(com.acme.MyStaticObjectFactory.createObject(2));<New>
Instantiates an object.
Equivalent to new in Java, and allows the creation of a new object.
A New element can contain a sequence of Arg element's, followed by a sequence of configuration elements (Set, Put, etc).
Arg element's are used to select a constructor for the object to be created.
The sequence of configuration elements then acts on the newly-created object.
| Attribute | Required | Description |
|---|---|---|
class |
yes |
fully qualified classname, which determines the type of the new object that is instantiated. |
id |
no |
gives a unique name to the object which can be referenced later by Ref elements. |
arg |
no |
comma separated list of arguments may be used for simple string values rather than Arg elements |
Can Contain
Attributes as elements (Id, Class) plus Arg element, Set element, Get element, Put element, Call element, New element, Ref element, Array element, Map element, Property element
Examples
Basic example
<New class="com.acme.Foo">
<Arg>bar</Arg>
</New>Which is equivalent to:
com.acme.Foo foo = new com.acme.Foo("bar");Instantiate with the Default Constructor
<New class="com.acme.Foo" />Which is equivalent to:
com.acme.Foo foo = new com.acme.Foo();Instantiate with Multiple Arguments, Then Configuring Further
<New id="foo" class="com.acme.Foo">
<Arg>bar</Arg>
<Arg>baz</Arg>
<Set name="test">1, 2, 3</Set>
</New>Which is equivalent to:
Object foo = new com.acme.Foo("bar", "baz");
foo.setTest("1, 2, 3");<Ref>
A Ref element allows a previously created object to be referenced by a unique id.
It can contain a sequence of elements, such as Set or Put which then act on the referenced object.
You can also use a Ref element as a value for other elements such as Set and Arg.
The Ref element provides convenience and eases readability.
You can usually achieve the effect of the Ref by nesting elements (method calls), but this can get complicated very easily.
The Ref element makes it possible to refer to the same object if you’re using it multiple times, or passing it into multiple methods.
It also makes it possible to split up configuration across multiple files.
| Attribute | Required | Description |
|---|---|---|
refid |
yes |
the unique identifier used to name a previously created object. |
Can Contain
Examples
Basic example
Use the referenced object as an argument to a method call or constructor:
<Get id="foo" name="xFoo" />
<Set name="test"><Ref refid="foo"/></Set>This is equivalent to:
foo = getXFoo();
setSomeMethod(foo);Manipulating the Object Returned by Ref
<Get id="foo" name="xFoo" />
<Ref refid="foo">
<Set name="test">1, 2, 3</Set>
</Ref>This is equivalent to:
foo = getXFoo();
foo.setTest("1, 2, 3");Ref vs. Nested Elements
Here is an example of the difference in syntax between using the Ref element, and nesting method calls.
They are exactly equivalent:
<!-- using Ref in conjunction with Get -->
<Configure id="Server" class="org.eclipse.jetty.server.Server">
<Get id="Logger" class="org.eclipse.jetty.util.log.Log" name="log"/>
<Ref refid="Logger">
<Set name="debugEnabled">true</Set>
</Ref>
</Configure>
<!-- calling the setter directly on the object returned by Get -->
<Configure id="Server" class="org.eclipse.jetty.server.Server">
<Get class="org.eclipse.jetty.util.log.Log" name="log">
<Set name="debugEnabled">true</Set>
</Get>
</Configure>Here is a more practical example, taken from the handler configuration section in etc/jetty.xml:
<Set name="handler">
<New id="Handlers" class="org.eclipse.jetty.server.handler.HandlerCollection">
<Set name="handlers">
<Array type="org.eclipse.jetty.server.Handler">
<Item>
<!-- create a new instance of a ContextHandlerCollection named "Contexts" -->
<New id="Contexts" class="org.eclipse.jetty.server.handler.ContextHandlerCollection"/>
</Item>
<Item>
<New id="DefaultHandler" class="org.eclipse.jetty.server.handler.DefaultHandler"/>
</Item>
<Item>
<!-- create a new instance of a RequestLogHandler named "RequestLog" -->
<New id="RequestLog" class="org.eclipse.jetty.server.handler.RequestLogHandler"/>
</Item>
</Array>
</Set>
</New>
</Set>
<Call name="addBean">
<Arg>
<New class="org.eclipse.jetty.deploy.ContextDeployer">
<!-- pass in the ContextHandlerCollection object ("Contexts") that was created earlier, as an argument -->
<Set name="contexts"><Ref refid="Contexts"/></Set>
</New>
</Arg>
</Call>
<!-- configure the RequestLogHandler object ("RequestLog") that we created earlier -->
<Ref refid="RequestLog">
...
</Ref><Array>
An Array element allows the creation of a new array.
| Attribute | Required | Description |
|---|---|---|
type |
no |
specify what types of items the array can contain. |
id |
no |
unique identifier you can use to refer to the array later. |
Can Contain
Example
<Array type="java.lang.String">
<Item>value0</Item>
<Item><New class="java.lang.String"><Arg>value1</Arg></New></Item>
</Array>This is equivalent to:
String[] a = new String[] { "value0", new String("value1") };<Item>
An Item element defines an entry for Array and Map elements.
| Attribute | Required | Description |
|---|---|---|
type |
no |
force the types of value. |
id |
no |
unique identifier that you can use to refer to the array later. |
<Map>
A Map element allows the creation of a new HashMap and to populate it with (key, value) pairs.
| Attribute | Required | Description |
|---|---|---|
id |
no |
unique identifier you can use to refer to the map later. |
Can Contain
Example
<Map>
<Entry>
<Item>keyName</Item>
<Item><New class="java.lang.String"><Arg>value1</Arg></New></Item>
</Entry>
</Map>This is equivalent to:
Map m = new HashMap();
m.put("keyName", new String("value1"));<SystemProperty>
A SystemProperty element gets the value of a JVM system property.
It can be used within elements that accept values, such as Set, Put, Arg.
| Attribute | Required | Description |
|---|---|---|
name |
yes |
property name |
default |
no |
a default value as a fallback |
id |
no |
unique identifier which you can use to refer to the array later. |
Can Contain
Only attributes as Elements (Id, Name, Default).
Example
<SystemProperty name="jetty.http.port" default="8080"/>That is equivalent to:
System.getProperty("jetty.http.port", "8080");Both try to retrieve the value of jetty.http.port.
If jetty.http.port is not set, then 8080 is used.
<Property>
A Property element allows arbitrary properties to be retrieved by name.
It can contain a sequence of elements, such as Set, Put, Call that act on the retrieved object.
| Attribute | Required | Description |
|---|---|---|
name |
yes |
property name |
default |
no |
a default value as a fallback |
id |
no |
unique identifier which you can use to refer to the array later. |
The Name attribute may be a comma separated list of property names, with the first property name being the "official" name, and the others names being old, deprecated property names that are kept for backward compatibility.
A warning log is issued when deprecated property names are used.
The Default attribute contains the value to use in case none of the property names is found.
Can Contain
The attributes may be expressed as contained Elements (Id, Name, Default).
Example
<Property name="Server">
<Call id="jdbcIdMgr" name="getAttribute">
<Arg>jdbcIdMgr</Arg>
</Call>
</Property>Jetty XML Usage
Jetty provides an XML-based configuration.
It is grounded in Java’s Reflection API. Classes in the java.lang.reflect represent Java methods and classes, such that you can instantiate objects and invoke their methods based on their names and argument types.
Behind the scenes, Jetty’s XML config parser translates the XML elements and attributes into Reflection calls.
Using jetty.xml
To use jetty.xml, specify it as a configuration file when running Jetty.
java -jar start.jar etc/jetty.xml|
If you start Jetty without specifying a configuration file, Jetty automatically locates and uses the default installation |
Using Multiple Configuration Files
You are not limited to one configuration file; you can use multiple configuration files when running Jetty, and Jetty will configure the appropriate server instance.
The ID of the server in the <Configure> tag specifies the instance you want to configure.
Each server ID in a configuration file creates a new server instance within the same JVM.
If you use the same ID across multiple configuration files, those configurations are all applied to the same server.
Setting Parameters in Configuration Files
You can set parameters in configuration files either with system properties (using <SystemProperty>) or properties files (using <Property>) passed via the command line.
For example, this code in jetty.xml allows the port to be defined on the command line, falling back onto `8080`if the port is not specified:
<Set name="port"><SystemProperty name="jetty.http.port" default="8080"/></Set>Then you modify the port while running Jetty by using this command:
java -Djetty.http.port=8888 -jar start.jar etc/jetty.xmlAn example of defining both system properties and properties files from the command line:
java -Djetty.http.port=8888 -jar start.jar myjetty.properties etc/jetty.xml etc/other.xmljetty.xml
jetty.xml is the default configuration file for Jetty, typically located at $JETTY_HOME/etc/jetty.xml. Usually the jetty.xml configures:
-
The Server class (or subclass if extended) and global options.
-
A ThreadPool (min and max thread).
-
Connectors (ports, timeouts, buffer sizes, protocol).
-
The handler structure (default handlers and/or a contextHandlerCollections).
-
The deployment manager that scans for and deploys webapps and contexts.
-
Login services that provide authentication checking.
-
A request log.
Not all Jetty features are configured in jetty.xml.
There are several optional configuration files that share the same format as jetty.xml and, if specified, concatenate to it.
These configuration files are also stored in $JETTY_HOME/etc/, and examples of them are in Github Repository.
The selection of which configuration files to use is controlled by start.jar and the process of merging configuration is described in Jetty XML Usage.
Root Element
jetty.xml configures an instance of the Jetty org.eclipse.jetty.server.Server.
<?xml version="1.0"?>
<!DOCTYPE Configure PUBLIC "-//Jetty//Configure//EN" "http://www.eclipse.org/jetty/configure_9_3.dtd">
<Configure id="Server" class="org.eclipse.jetty.server.Server">
...
</Configure>Examples
$JETTY_HOME/etc contains the default jetty.xml, as well as other sample configuration files (jetty-*.xml) which can be passed to the server via the command line.
Additional Resources
-
Jetty XML Syntax –in-depth reference for Jetty-specific configuration XML syntax.
-
jetty.xml –configuration file for configuring the entire server
jetty-web.xml
jetty-web.xml is a Jetty configuration file that you can bundle with a specific web application.
The format of jetty-web.xml is the same as jetty.xml – it is an XML mapping of the Jetty API.
This document offers an overview for using the jetty-web.xml configuration file.
For a more in-depth look at the syntax, see Jetty XML Syntax.
Root Element
jetty-web.xml applies on a per-webapp basis, and configures an instance of org.eclipse.jetty.webapp.WebAppContext.
<?xml version="1.0" encoding="UTF-8"?>
<!DOCTYPE Configure PUBLIC "-//Jetty//Configure//EN" "http://www.eclipse.org/jetty/configure_9_3.dtd">
<Configure class="org.eclipse.jetty.webapp.WebAppContext">
..
</Configure>|
Make sure you are applying the configuration to an instance of the proper class. |
Using jetty-web.xml
Place the jetty-web.xml into your web application’s WEB-INF folder.
When Jetty deploys a web application, it looks for a file called WEB-INF/jetty-web.xml or WEB-INF/web-jetty.xml within the web application (or WAR) and applies the configuration found there.
Be aware that jetty-web.xml is called after all other configuration has been applied to the web application.
|
It is important to note that |
jetty-web.xml Examples
The distribution contains an example of jetty-web.xml inside the WEB-INF folder of the test webapp WAR ($JETTY_HOME/demo-base/webapps/test.war/WEB-INF/jetty-web.xml).
Additional jetty-web.xml Resources
-
Jetty XML Syntax –in-depth reference for Jetty-specific configuration XML syntax.
-
jetty.xml –configuration file for configuring the entire server
jetty-env.xml
jetty-env.xml is an optional Jetty file that configures JNDI resources for an individual webapp.
The format of jetty-env.xml is the same as jetty.xml –it is an XML mapping of the Jetty API.
When Jetty deploys a web application, it automatically looks for a file called ` WEB-INF/jetty-env.xml` within the web application (or WAR), and sets up the webapp naming environment so that naming references in the WEB-INF/web.xml file can be resolved from the information provided in the WEB-INF/jetty-env.xml and jetty.xml files.
You define global naming resources on the server via jetty.xml.
jetty-env.xml Root Element
Jetty applies jetty-env.xml on a per-webapp basis, and configures an instance of org.eclipse.jetty.webapp.WebAppContext.
<?xml version="1.0" encoding="UTF-8"?>
<!DOCTYPE Configure PUBLIC "-//Jetty//Configure//EN" "http://www.eclipse.org/jetty/configure_9_3.dtd">
<Configure class="org.eclipse.jetty.webapp.WebAppContext">
..
</Configure>|
Make sure you are applying the configuration to an instance of the proper class. |
Using jetty-env.xml
Place the jetty-env.xml file in your web application’s WEB-INF folder.
<?xml version="1.0"?>
<!DOCTYPE Configure PUBLIC "-//Jetty//Configure//EN" "http://www.eclipse.org/jetty/configure_9_3.dtd">
<Configure class="org.eclipse.jetty.webapp.WebAppContext">
<!-- Add an EnvEntry only valid for this webapp -->
<New id="gargle" class="org.eclipse.jetty.plus.jndi.EnvEntry">
<Arg>gargle</Arg>
<Arg type="java.lang.Double">100</Arg>
<Arg type="boolean">true</Arg>
</New>
<!-- Add an override for a global EnvEntry -->
<New id="wiggle" class="org.eclipse.jetty.plus.jndi.EnvEntry">
<Arg>wiggle</Arg>
<Arg type="java.lang.Double">55.0</Arg>
<Arg type="boolean">true</Arg>
</New>
<!-- an XADataSource -->
<New id="mydatasource99" class="org.eclipse.jetty.plus.jndi.Resource">
<Arg>jdbc/mydatasource99</Arg>
<Arg>
<New class="com.atomikos.jdbc.SimpleDataSourceBean">
<Set name="xaDataSourceClassName">org.apache.derby.jdbc.EmbeddedXADataSource</Set>
<Set name="xaDataSourceProperties">databaseName=testdb99;createDatabase=create</Set>
<Set name="UniqueResourceName">mydatasource99</Set>
</New>
</Arg>
</New>
</Configure>Additional jetty-env.xml Resources
-
Jetty XML Syntax –In-depth reference for Jetty-specific configuration XML syntax.
-
jetty.xml –Configuration file for configuring the entire server.
webdefault.xml
The webdefault.xml file saves web applications from having to define a lot of house-keeping and container-specific elements in their own web.xml files.
For example, you can use it to set up MIME-type mappings and JSP servlet-mappings.
Jetty applies webdefault.xml to a web application before the application’s own WEB-INF/web.xml, which means that it cannot override values inside the webapp’s web.xml.
It uses the jetty.xml syntax.
Generally, it is convenient for all webapps in a Jetty instance to share the same webdefault.xml file.
However, it is certainly possible to provide differentiated ` webdefault.xml` files for individual web applications.
The webdefault.xml file is located in $(jetty.home)/etc/webdefault.xml.
Using webdefault.xml
You can specify a custom configuration file to use for specific webapps, or for all webapps. If you do not specify an alternate defaults descriptor, the $JETTY-HOME/etc/jetty-deploy.xml file will configure jetty to automatically use $JETTY_HOME/etc/webdefault.xml.
|
To ensure your |
The webdefault.xml included with the Jetty Distribution contains several configuration options, such as init params and servlet mappings, and is separated into sections for easy navigation.
Some of the more common options include, but are not limited to:
- dirAllowed
-
If true, directory listings are returned if no welcome file is found. Otherwise 403 Forbidden displays.
- precompressed
-
If set to a comma separated list of file extensions, these indicate compressed formats that are known to map to a MIME-type that may be listed in a requests Accept-Encoding header. If set to a boolean True, then a default set of compressed formats will be used, otherwise no pre-compressed formats.
- maxCacheSize
-
Maximum total size of the cache or 0 for no cache.
- maxCachedFileSize
-
Maximum size of a file to cache.
- maxCachedFiles
-
Maximum number of files to cache.
Creating a Custom webdefault.xml for One WebApp
You can specify a custom webdefault.xml for an individual web application in that webapp’s jetty.xml as follows:
<Configure class="org.eclipse.jetty.webapp.WebAppContext">
...
<!-- Set up the absolute path to the custom webdefault.xml -->
<Set name="defaultsDescriptor">/my/path/to/webdefault.xml</Set>
...
</Configure>The equivalent in code is:
import org.eclipse.jetty.webapp.WebAppContext;
...
WebAppContext wac = new WebAppContext();
...
//Set up the absolute path to the custom webdefault.xml.
wac.setDefaultsDescriptor("/my/path/to/webdefault.xml");
...Alternatively, you can use a Jetty Classloading to find the resource representing your custom webdefault.xml.
Creating a Custom webdefault.xml for Multiple WebApps
If you want to apply the same custom webdefault.xml to a number of webapps, provide the path to the file in jetty.xml in the $JETTY_HOME/etc/jetty-deploy.xml file:
<Set name="defaultsDescriptor"><Property name="jetty.home" default="." />/other/path/to/another/webdefault.xml</Set>Using the Jetty Maven Plugin
Similarly, when using the Jetty Maven Plugin you provide a customized webdefault.xml file for your webapp as follows:
<project>
...
<plugins>
<plugin>
...
<artifactId>jetty-maven-plugin</artifactId>
<configuration>
<webApp>
...
<defaultsDescriptor>/my/path/to/webdefault.xml</defaultsDescriptor>
</webApp>
</configuration>
</plugin>
...
</plugins>
...
</project>Additional Resources
-
jetty-web.xml –Reference for
web.xmlfiles -
Jetty override-web.xml –Information for this
web.xml-formatted file, applied after the webapp’sweb.xmlwebapp. -
jetty.xml –Reference for
jetty.xmlfiles
Jetty override-web.xml
To deploy a web application or WAR into different environments, most likely you will need to customize the webapp for compatibility with each environment.
The challenge is to do so without changing the webapp itself. You can use a jetty.xml file for some of this work since it is not part of the webapp.
But there are some changes that jetty.xml cannot accomplish, for example, modifications to servlet init-params and context init-params.
Using webdefault.xml is not an option because Jetty applies webdefault.xml to a web application before the application’s own WEB-INF/web.xml, which means that it cannot override values inside the webapp’s ` web.xml`.
The solution is override-web.xml.
It is a web.xml file that Jetty applies to a web application after the application’s own WEB-INF/web.xml, which means that it can override values or add new elements.
This is defined on a per-webapp basis, using the Jetty XML Syntax.
Using override-web.xml
You can specify the override-web.xml to use for an individual web application in a deployable xml file located in Jetty webapps folder .
For example, if you had a webapp named MyApp, you would place a deployable xml file named myapp.xml in ${jetty.base}/webapps which includes an overrideDescriptor entry for the override-web.xml file.
<Configure class="org.eclipse.jetty.webapp.WebAppContext">
...
<!-- Set up the path to the custom override descriptor,
relative to your $(jetty.home) directory or to the current directory -->
<Set name="overrideDescriptor"><SystemProperty name="jetty.home" default="."/>/my/path/to/override-web.xml</Set>
...
</Configure>The equivalent in code is:
import org.eclipse.jetty.webapp.WebAppContext;
...
WebAppContext wac = new WebAppContext();
...
//Set the path to the override descriptor, based on your $(jetty.home) directory
wac.setOverrideDescriptor(System.getProperty("jetty.home")+"/my/path/to/override-web.xml");
...Alternatively, you can use the classloader (Jetty Classloading) to get the path to the override descriptor as a resource.
Using the Jetty Maven Plugin
Use the <overrideDescriptor> tag as follows:
<project>
...
<plugins>
<plugin>
...
<artifactId>jetty-maven-plugin</artifactId>
<configuration>
<webAppConfig>
...
<overrideDescriptor>src/main/resources/override-web.xml</overrideDescriptor>
</webAppConfig>
</configuration>
</plugin>
...
</plugins>
...
</project>Additional Resources
-
webdefault.xml –Information for this
web.xml-formatted file, applied before the webapp’sweb.xmlwebapp. -
jetty.xml –Reference for
jetty.xmlfiles
Troubleshooting
This is a collection of helpful tricks and tips that we have come across to address odd issues that might arise.
Troubleshooting Zip Exceptions
A Zip exception occurs when Jetty rereads a Jar or WAR file.
The JVM maintains a cache of zip file indexes, and does not support hot replacement of zip files. Thus if you redeploy a web application using the same WAR or Jar files, exceptions occur when Jetty rereads the jars. See Oracle Bug 4774421 for more information.
Remedy
The remedy is to avoid hot replacing Jar or WAR files, which can be difficult if you are using the Webapp Provider. You can use the following techniques to reduce exposure to this issue:
-
Deploy unpacked classes in the
WEB-INF/classesdirectory rather than as a Jar file underWEB-INF/lib. -
Deploy all WAR and Jar files with a version number in their filename or path. If the code changes, a new version number applies, avoiding the cache problem.
-
Deploy a packed WAR file with the setExtractWAR option set to true. This causes the WAR to be extracted to a temporary directory and thus to a new location. This might not be sufficient if you want to hot-replace and re-extract the WAR, so you might also need to use WebAppContext.setCopyWebInf(true), which (re)copies just the WEB-INF directory to a different location.
-
Deploy an unpacked WAR file with the setCopyWebDir option set to true. This causes the directory to be extracted to a new location.
If you have problems with Windows file-locking preventing static file editing (such as JSP or HTML), use the WebAppContext .setCopyWebDir(true) option.
Troubleshooting Locked Files on Windows
Jetty buffers static content for webapps such as HTML files, CSS files, images, etc. If you are using NIO connectors, Jetty uses memory-mapped files to do this. The problem is that on Windows, memory mapping a file causes the file to lock, so that you cannot update or replace the file. Effectively this means that you have to stop Jetty to update a file.
Remedy
Jetty provides a configuration switch for the DefaultServlet that enables or disables the use of memory-mapped files.
If you are running on Windows and are having file-locking problems, you should set this switch to disable memory-mapped file buffers.
Use one of the following options to configure the switch.
Using override-web.xml
An override-web.xml file can be placed in your webapp’s WEB-INF directory to change the default setting of the DefaultServlet for memory-mapped file buffers.
Create an override-web.xml file with appropriate headers for your version of the servlet specification, and place the following inside the <web-app> element:
<servlet>
<servlet-name>default</servlet-name>
<init-param>
<param-name>useFileMappedBuffer</param-name>
<param-value>false</param-value>
</init-param>
</servlet>Using a Context XML File
You can create or update a context xml file that configures your webapp to apply the setting to disable memory-mapped file buffers. Add the following to your context xml file:
<Call name="setInitParameter">
<Arg>org.eclipse.jetty.servlet.Default.useFileMappedBuffer</Arg>
<Arg>false</Arg>
</Call>Using the Jetty Maven Plugin
If you don’t want to use either of the other two solutions, you can configure the plugin directly to disable memory-mapped file buffers.
Add the following to the plugin’s configuration under the <webApp> element:
<_initParams>
<org.eclipse.jetty.servlet.Default.useFileMappedBuffer>false</org.eclipse.jetty.servlet.Default.useFileMappedBuffer>
</_initParams>Alternate Remedy
You can force a WebAppContext to always copy a web app directory on deployment.
The base directory of your web app (i.e. the root directory where your static content exists) will be copied to the temp directory.
Configure this in an xml file like so:
<New id="myWebAppContext" class="org.eclipse.jetty.webapp.WebAppContext">
<Set name="contextPath">/</Set>
<Set name="war">./webapps/fredapp</Set>
<Set name="copyWebDir">true</Set>
.
.
</New>|
Be careful with this option when using an explicitly settemp directory name - as the name of the temp directory will not unique across redeployments, copying the static content into the same directory name each time may not avoid the locking problem. |
Preventing Memory Leaks
If you have memory leaks, and you have thoroughly investigated tools like jconsole, yourkit, jprofiler, jvisualvm or any of the other profiling and analysis tools, and you can eliminate your code as the source of the problem, read the following sections about how to prevent memory leaks in your application.
Preventing WebApp Classloader Pinning
|
This feature is available for Jetty 7.6.6 and later. |
Code that keeps references to a webapp classloader can cause memory leaks. These leaks fall generally into two categories: static fields and daemon threads.
-
A static field is initialized with the value of the classloader, which happens to be a webapp classloader; as Jetty undeploys and redeploys the webapp, the static reference lives on, meaning garbage collecting cannot occur for the webapp classloader.
-
When Jetty starts as a daemon thread and is outside the lifecycle of the webapp, threads have references to the context classloader that created them, leading to a memory leak if that classloader belongs to a webapp. For a good discussion of the issue see Anatomy of a PermGen Memory Leak.
We provide a number of workaround classes that preemptively invoke the problematic code with the Jetty classloader, thereby ensuring the webapp classloader is not pinned. Be aware that since some of the problematic code creates threads, you should be selective about which preventers you enable, and use only those that are specific to your application.
Preventers
Jetty includes the following preventers.
| Preventer Name | Problem Addressed |
|---|---|
AppContextLeakPreventer |
The call to |
AWTLeakPreventer |
The |
DOMLeakPreventer |
DOM parsing can cause the webapp classloader to be pinned, due to the static field ` RuntimeException` of |
DriverManagerLeakPreventer |
The number of threads dedicated to accepting incoming connections. |
GCThreadLeakPreventer |
Calls to |
Java2DLeakPreventer |
|
LDAPLeakPreventer |
If |
LoginConfigurationLeakPreventer |
The |
SecurityProviderLeakPreventer |
Some security providers, such as |
Configuring Preventers
You can individually enable each preventer by adding an instance to a Server with the ` addBean(Object)` call. Here’s an example of how to do it in code with the org.eclipse.jetty.util.preventers.AppContextLeakPreventer:
Server server = new Server();
server.addBean(new AppContextLeakPreventer());You can add the equivalent in code to the $JETTY_HOME/etc/jetty.xml file or any jetty xml file that is configuring a Server instance.
Be aware that if you have more than one Server instance in your JVM, you should configure these preventers on just one of them.
Here’s the example from code put into xml:
<Configure id="Server" class="org.eclipse.jetty.server.Server">
<Call name="addBean">
<Arg>
<New class="org.eclipse.jetty.util.preventers.AppContextLeakPreventer"/>
</Arg>
</Call>
</Configure>JSP Bugs: Permgen Problems
The JSP engine in Jetty is Jasper. This was originally developed under the Apache Tomcat project, but over time many different project have forked it. All Jetty versions up to 6 used Apache-based Jasper exclusively, with Jetty 6 using Apache Jasper only for JSP 2.0. With the advent of JSP 2.1, Jetty 6 switched to using Jasper from Sun’s Glassfish project, which is now the reference implementation.
All forks of Jasper suffer from a problem whereby using JSP tag files puts the permgen space under pressure. This is because of the classloading architecture of the JSP implementation. Each JSP file is effectively compiled and its class loaded in its own classloader to allow for hot replacement. Each JSP that contains references to a tag file compiles the tag if necessary and then loads it using its own classloader. If you have many JSPs that refer to the same tag file, the tag’s class is loaded over and over again into permgen space, once for each JSP. See Glassfish bug 3963 and Apache bug 43878. The Apache Tomcat project has already closed this bug with status WON’T FIX, however the Glassfish folks still have the bug open and have scheduled it to be fixed. When the fix becomes available, the Jetty project will pick it up and incorporate into our release program.
JVM Bugs
This section describes garbage collection and direct ByteBuffer problems.
Garbage Collection Problems
One symptom of a cluster of JVM related memory issues is the OOM exception accompanied by a message such as java.lang.OutOfMemoryError: requested xxxx bytes for xxx.
Out of swap space?
Oracle bug 4697804 describes how this can happen in the scenario when the garbage collector needs to allocate a bit more space during its run and tries to resize the heap, but fails because the machine is out of swap space. One suggested work around is to ensure that the JVM never tries to resize the heap, by setting min heap size to max heap size:
java -Xmx1024m -Xms1024mAnother workaround is to ensure you have configured sufficient swap space on your device to accommodate all programs you are running concurrently.
Direct ByteBuffers
Exhausting native memory is another issue related to JVM bugs.
The symptoms to look out for are the process size growing, but heap use remaining relatively constant.
Both the JIT compiler and nio ByteBuffers can consume native memory.
Oracle bug 6210541 discusses a still-unsolved problem whereby the JVM itself allocates a direct ByteBuffer in some circumstances while the system never garbage collects, effectively eating native memory.
Guy Korland’s blog discusses this problem here and here.
As the JIT compiler consumes native memory, the lack of available memory may manifest itself in the JIT as OutOfMemory exceptions such as Exception in thread "CompilerThread0" java.lang.OutOfMemoryError: requested xxx bytes for ChunkPool::allocate. Out of swap
space?
By default, Jetty allocates and manages its own pool of direct ByteBuffers for io if you configure the nio SelectChannelConnector. It also allocates MappedByteBuffers to memory-map static files via the DefaultServlet settings. However, you could be vulnerable to this JVM ByteBuffer allocation problem if you have disabled either of these options. For example, if you’re on Windows, you may have disabled the use of memory-mapped buffers for the static file cache on the DefaultServlet to avoid the file-locking problem.
Troubleshooting Slow Deployment
After upgrading to a version of Jetty that supports Servlet Spec 3.0 or above, enabling some new modules, or introducing some new jars to your webapp, you notice that your deployment time is increased. This could be due to scanning for classes caused by a ServletContainerInitializer.
As documented in the section on Using Annotations, even if your webapp has set metadata-complete=true in web.xml, all jars within your webapp may still be scanned due to one or more ServletContainerInitializers that have a @HandlesTypes annotation listing the names of classes in which it is interested.
There are 3 ways to speed up deployment time:
-
limit which ServletContainerInitializers to include
-
limit which jars to scan
-
limit the scan to the first deployment only
Remedies
Limit Which ServletContainerInitializers to Execute
As documented in the section Excluding ServletContainerInitializers, you can provide a context attribute that defines a pattern of ServletContainerInitializer (SCI) class names to ignore. These SCIs will not be examined for @HandlesTypes and will not be executed. This is useful if you have included a 3rd party jar that has a SCI on which your code does not rely.
Limit Which Jars to Scan
As documented in the section Jars Scanned for Annotations, you can explicitly define which jars to include in the scanning process. This is helpful if you have a lot of jars in your webapp, and you know that they do not contain any classes referenced by an @HandlesTypes annotation on a ServletContainerInitializer that will be executed.
Limit Scanning to First Deployment Only (Quickstart)
The quickstart mechanism will do a normal deployment - obeying any limits on SCIs and jars to scan as documented here - the first time the webapp is deployed only. Subsequent deployments will re-use the information discovered during the first deployment. This is useful if you cannot limit the scan significantly by using any of the mechanisms described here, but you don’t want to incur the cost of scanning on every redeployment. The quickstart mechanism and how to use it is described here.
Jetty Security Reports
List of Security Reports
A current list of Jetty security reports can be viewed on the Project Home Page.
Reporting Security Issues
There are a number of avenues for reporting security issues to the Jetty project available.
If the issue is directly related to Jetty itself then reporting to the Jetty developers is encouraged. The most direct method is to mail security@webtide.com. Since Webtide is comprised of the active committers of the Jetty project this is our preferred reporting method. We are generally flexible in how we work with reporters of security issues but we reserve the right to act in the interests of the Jetty project in all circumstances.
If the issue is related to Eclipse or its Jetty integration then we encourage you to reach out to security@eclipse.org.
If the issue is related to integrations with Jetty we are happy to work with you to identify the proper entity and either of the approaches above is fine.
We prefer that security issues are reported directly to Jetty developers as opposed through GitHub Issues since it currently has no facility to tag issues as private.
Java WatchService
The JVM WatchService is in place to monitor objects like a directory for changes, and then update it’s contents and notify the application of those changes.
This service is useful for features like Hot Deployment.
When a change is detected, the WatchService will enter a "quiet time" where it is waiting for the change (or changes) to be made and completed before notifying the application of the change.
Example:
A new war file is copied into /webapps.
The WatchService can (depending on implementation) see that the file was created (which is registered as an event!, and that its growing in size (another event).
With the quiet time, each of the events are gated behind that timeout before the aggregated events are sent to the application.
While some operating systems such as Windows have a native value for this quiet time, not all do, notably OSX. At the core this is a limitation of the JVM’s FileSystem-specific implementation, but one that has been raised to the attention of the project.
Remedy
To help offset the delay in systems like OSX, Jetty defaults the value for non-native implementations to a time of 5000ms. Using values lower than 5000ms is not recommended and has shown to frequently fail.
Debugging
Options
Given how flexible Jetty is in how it can be configured and deployed into development and production, there exists a wealth of different options for debugging your application in you favorite environment. In this section we will gather up some of these different options available and explain how you can use them. If you would like to contribute to this section simply fork the repository and contribute the information, or open a github issue with the information and we’ll bring it over.
Enable remote debugging
Remote Debugging
If you have a web application deployed into Jetty you can interact with it remotely from a debugging perspective easily. The basics are that you must start up the remote JVM with additional parameters and then start up a remote debugging session in Eclipse for the webapp in question. This is easily accomplished.
|
This example assumes you are deploying your web application into the jetty-distribution. |
Starting Jetty
Assuming you have your webapp deployed into jetty, there are two different ways to approach this:
- Via command line
-
Add the required parameters on the commandline like so.
$ java -Xdebug -agentlib:jdwp=transport=dt_socket,address=9999,server=y,suspend=n -jar start.jar - Via
start.ini -
This approach is best used if you want to debug a particular jetty-distribution and not have to remember the commandline incantations.
-
Edit the
start.iniand uncomment the --exec line, this is required if you are adding jvm options to the start.ini file as jetty-start must generate the classpath required and fork a new jvm. -
Add the parameters mentioned above in the Command Line option so your start.ini looks like this:
#=========================================================== # Configure JVM arguments. # If JVM args are include in an ini file then --exec is needed # to start a new JVM from start.jar with the extra args. # If you wish to avoid an extra JVM running, place JVM args # on the normal command line and do not use --exec #----------------------------------------------------------- --exec -Xdebug -agentlib:jdwp=transport=dt_socket,address=9999,server=y,suspend=n # -Xmx2000m # -Xmn512m # -XX:+UseConcMarkSweepGC # -XX:ParallelCMSThreads=2 # -XX:+CMSClassUnloadingEnabled # -XX:+UseCMSCompactAtFullCollection # -XX:CMSInitiatingOccupancyFraction=80 # -verbose:gc # -XX:+PrintGCDateStamps # -XX:+PrintGCTimeStamps # -XX:+PrintGCDetails # -XX:+PrintTenuringDistribution # -XX:+PrintCommandLineFlags # -XX:+DisableExplicitGCUncomment any other jvm environmental options you so desire for your debugging session.
-
Regardless of the option chosen, you should see the following lines at the top of your jetty-distribution startup.
Listening for transport dt_socket at address: 9999
-
Linking with your IDE
Refer to the documentation for your ide:
Debugging With IntelliJ
There are a number of options available to debug your application in IntelliJ.
If not done already prepare your application for remote debugging as described here: Enable remote debugging
Linking with IntelliJ
Next we need to link the IntelliJ project with the deployed webapp.
-
Within IntelliJ, open the project containing the webapp deployed into jetty that you want to debug. SelectRun → Edit Configurations. Add a new configuration by clicking the "+" icon. Choose Remote. Make sure the port you choose is the same as the one you added in Enable remote debugging.
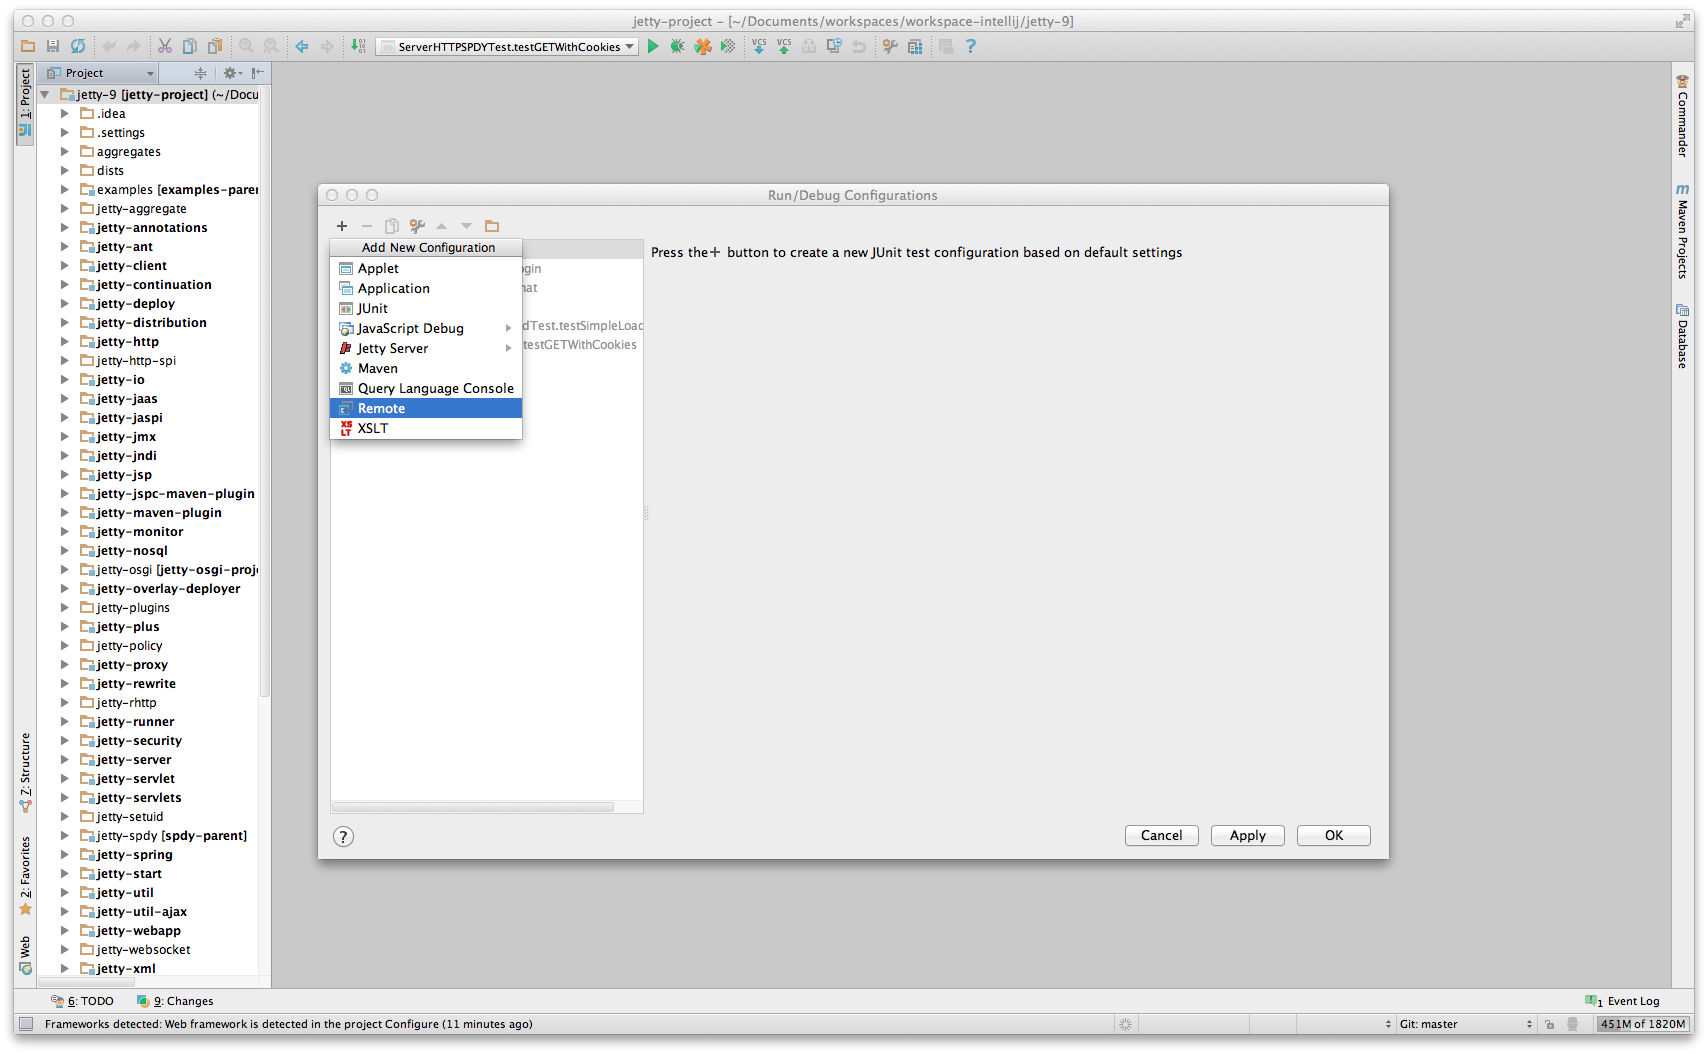
-
Next in your webapp you can set a breakpoint within a servlet which when it is tripped will halt the remote jvm’s processing thread to await for debugging commands from your IntelliJ instance. To set a breakpoint, simply open the servlet or any other class you want to debug and click left to the line you want to set the breakpoint at (where the red dot is on the next screenshot). The red dot and red background on the line mark the breakpoint.
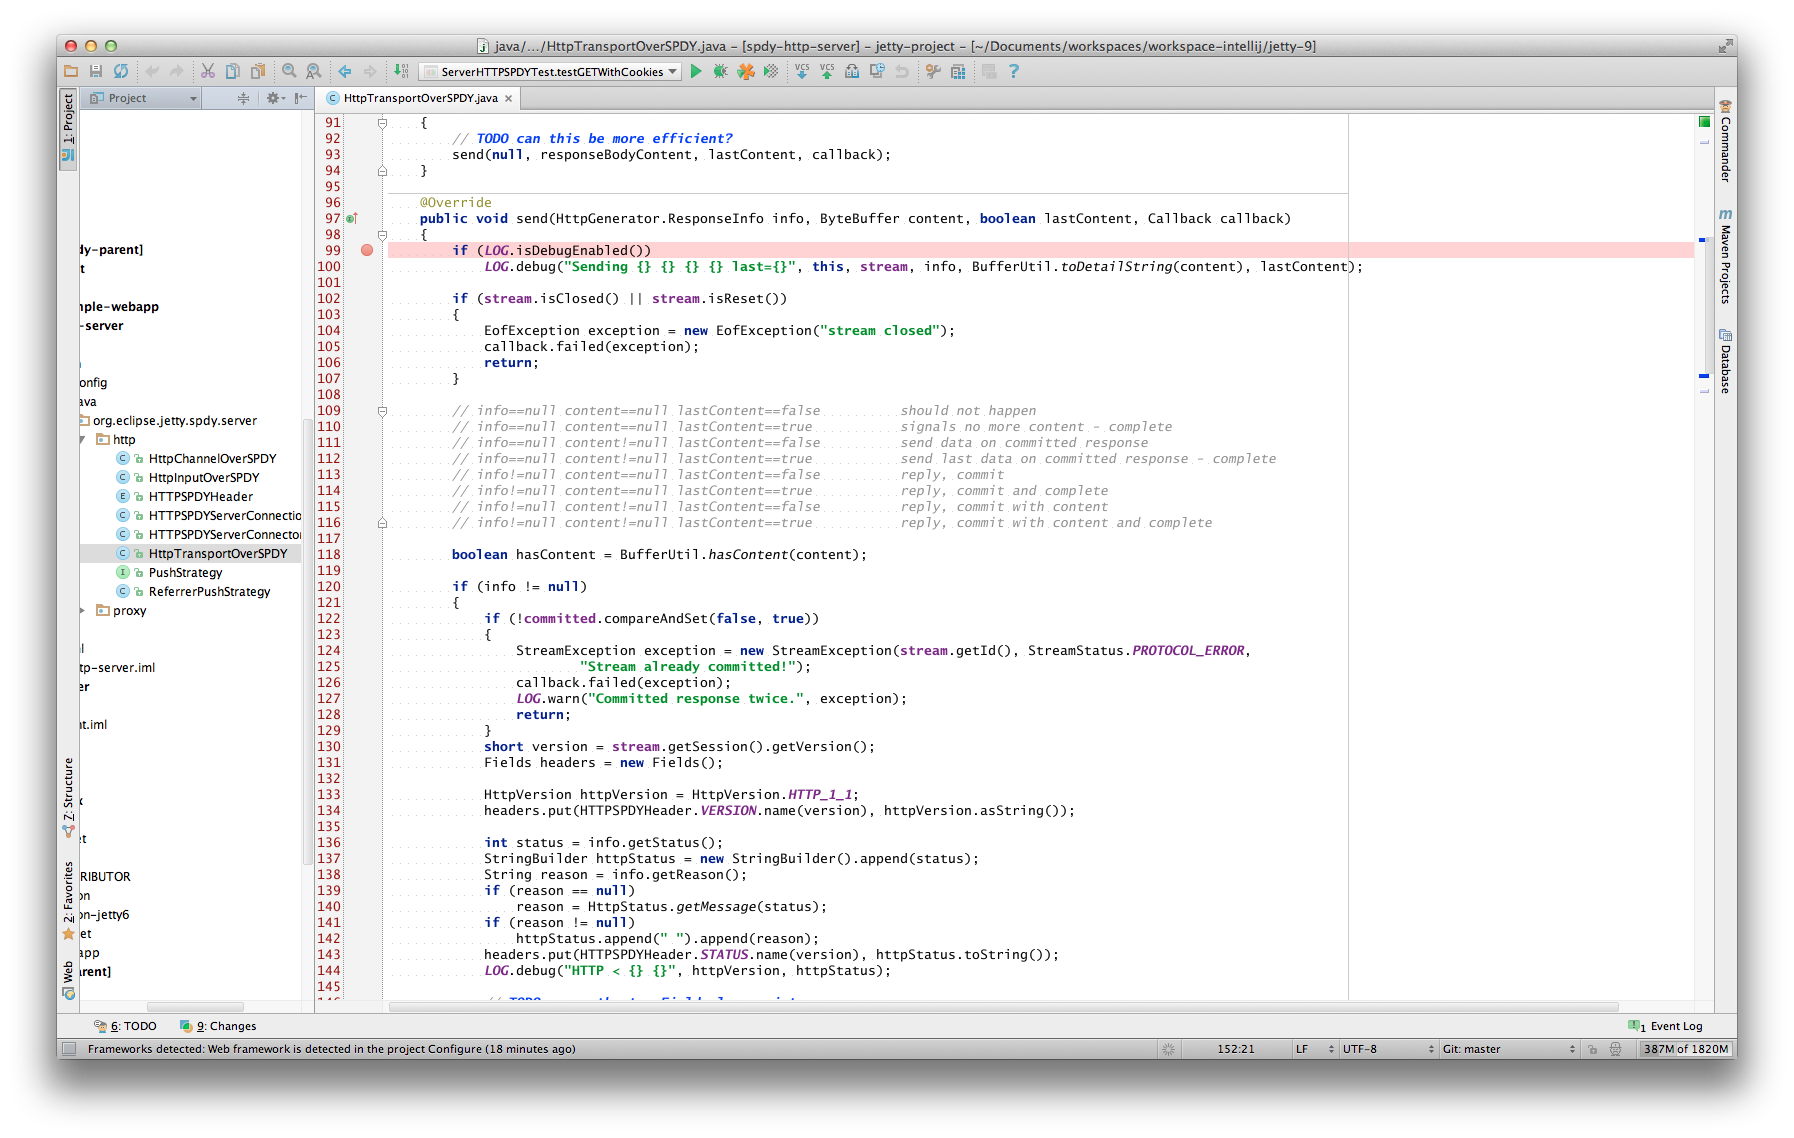
-
Accessing that servlet within your browser, pointed at your remote debug configured jetty-distribution, should transition your IntelliJ instance to the standard debugger view.
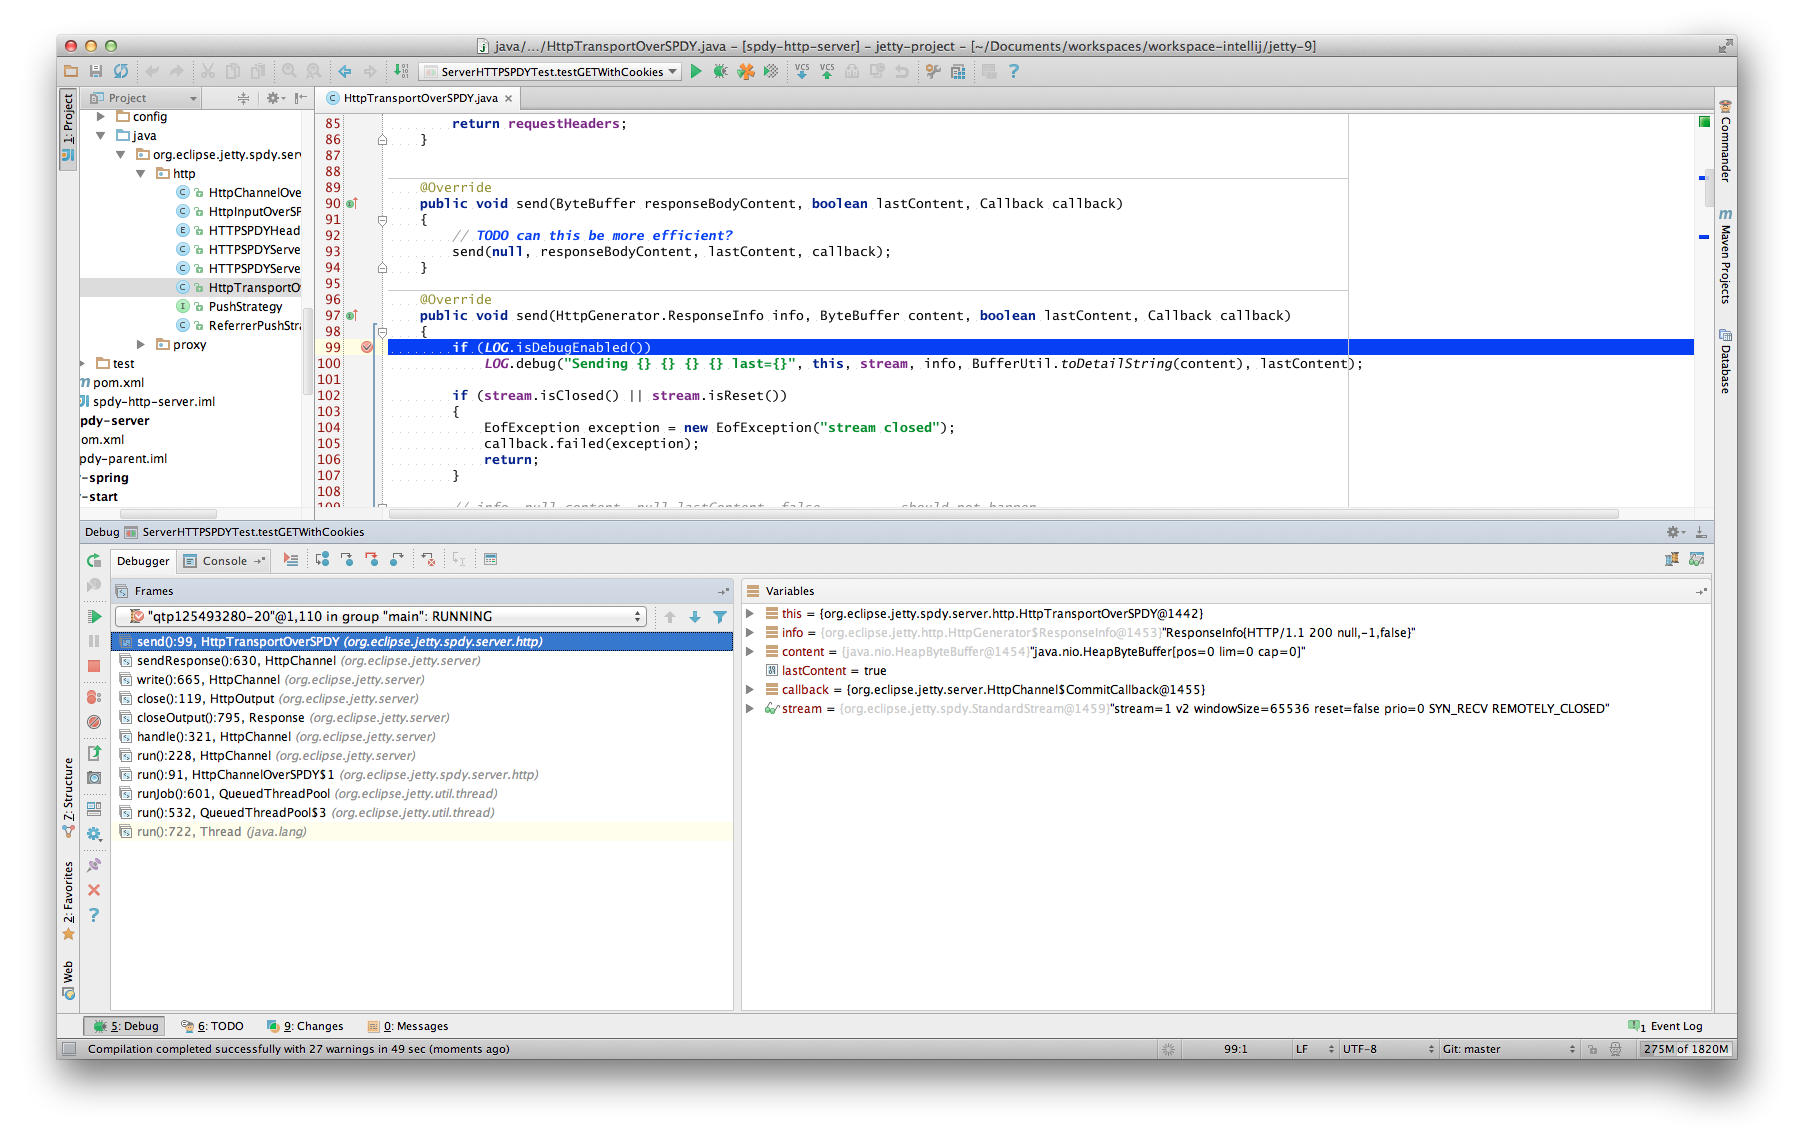
Within IntelliJ
Since Jetty can be incredibly simple to embed, many people choose to create a small main method which they can launch directly within IntelliJ in order to more easily debug their entire application.
The best place to get started on this approach is to look through Embedding Jetty and the Embedded Examples sections.
Once you have a main method defined in order to launch your application, open the source file and right-click the main method. Select Debug or simply hit CTRL+SHIFT+D. In your Console tab within IntelliJ you should see your application startup and once it has completed startup you should be able to configure breakpoints and hit the Jetty instance as normal via your web browser. The same thing works for unit tests. Instead of the main method run debug on the test method you want to debug.
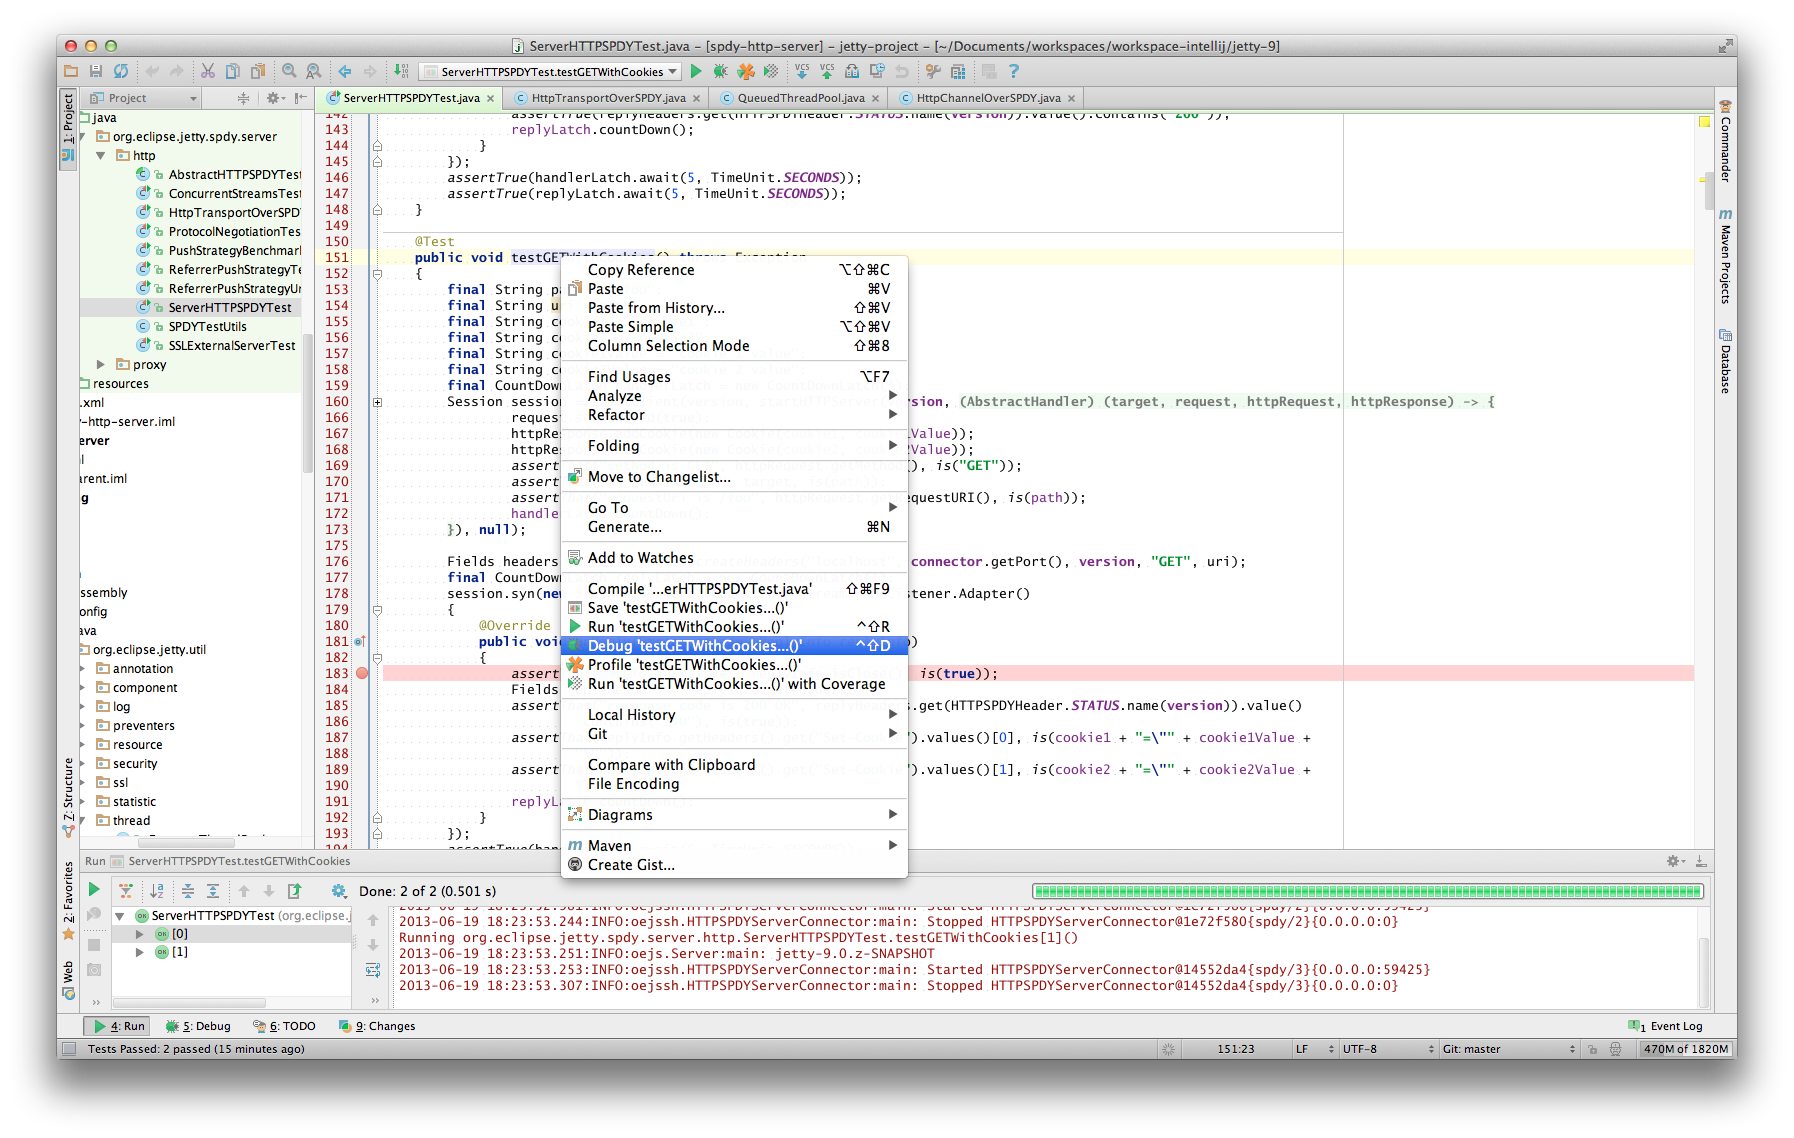
Debugging in IntelliJ is extremely powerful. For example it’s possible to have conditional breakpoints that only trigger a break if the configured conditions are met. Have a look at the various tutorials in the internet or the IntelliJ documentation for further details.
|
You can easily configure logging through a |
Debugging With Eclipse
There are a number of options available to debug your application in Eclipse.
If not done already prepare your application for remote debugging as described here: Enable remote debugging
Linking with Eclipse
Next we need to link the Eclipse project with the deployed webapp.
-
Within Eclipse, right-click on the project containing the webapp deployed into jetty and select Debug → Debug Configurations and create a new configuration of Remote Java Application. Make sure the port you choose is the same as the one you added in Enable remote debugging.
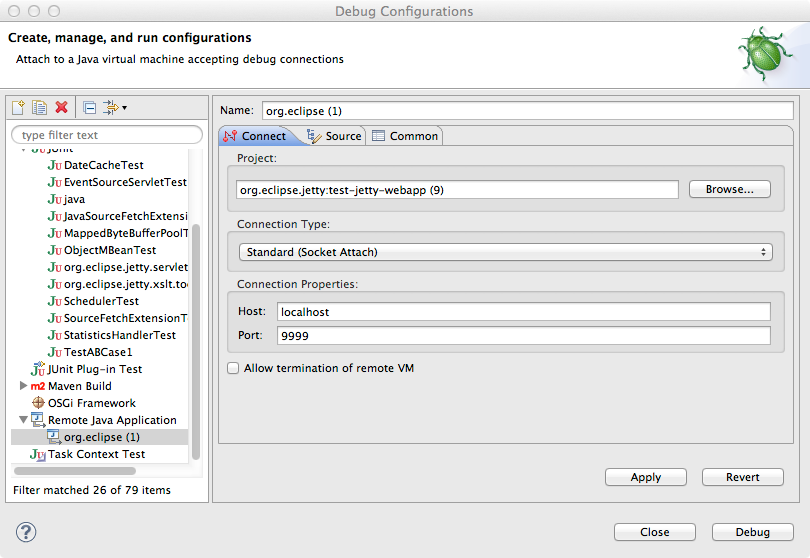
-
Next in your webapp you can set a breakpoint within a servlet which when it is tripped will halt the remote jvm’s processing thread to await for debugging commands from your Eclipse instance.
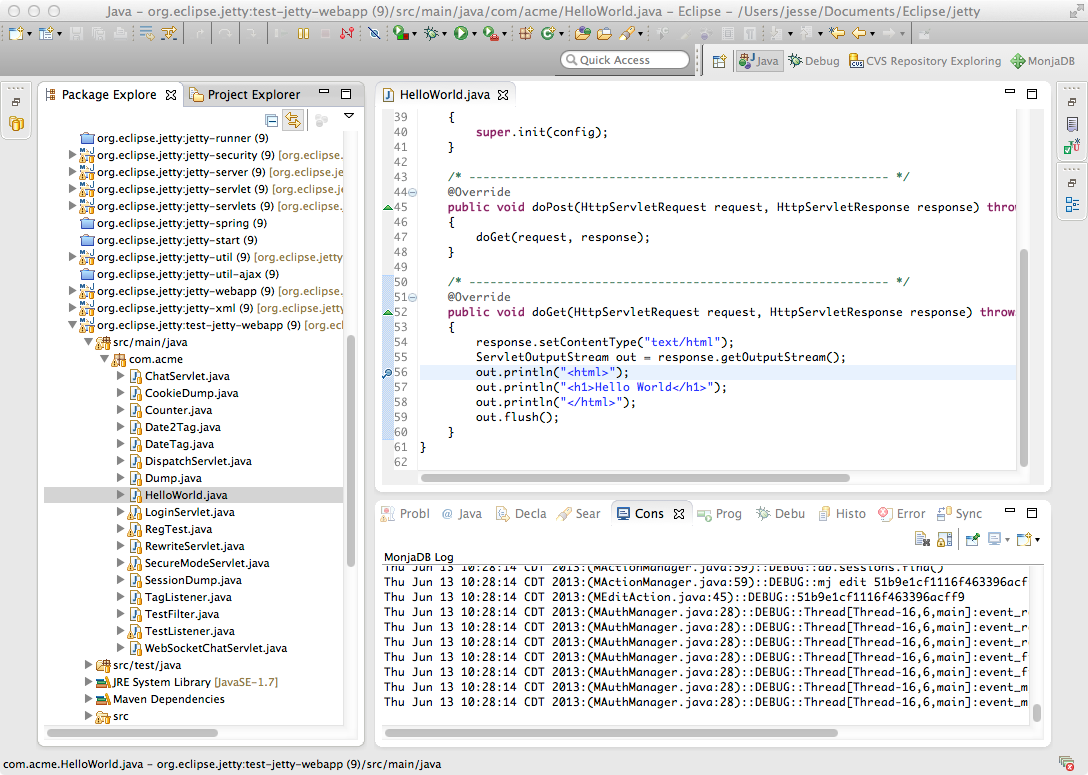
-
Accessing that servlet within your browser, pointed at your remote debug configurated jetty-distribution, should transition your Eclipse instance to the standard Debug view.
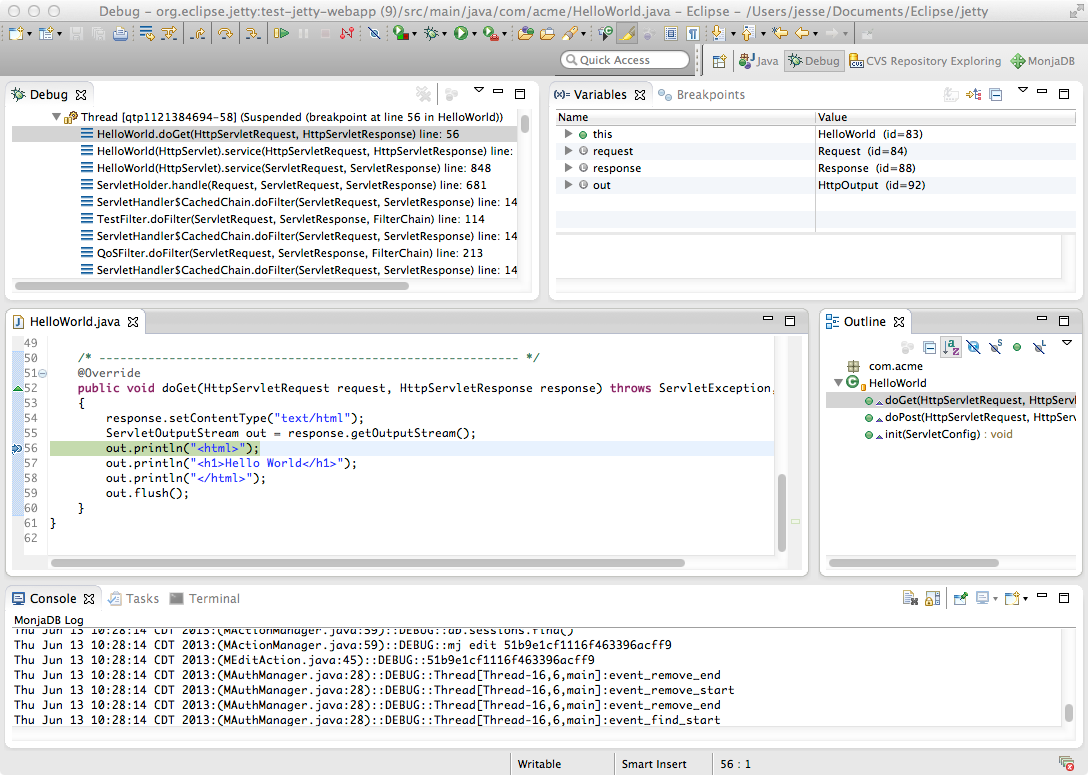
Within Eclipse
Since Jetty can be incredibly simple to embed, many people choose to create a small main method which they can launch directly within Eclipse in order to more easily debug their entire application.
The best place to get started on this approach is to look through Embedding Jetty and the Embedded Examples sections.
Once you have a main method defined in order to launch your application, right-click on the source file and selectDebug As → Java Application. In your Console tab within Eclipse you should see your application startup and once it has completed startup you should be able to configure breakpoints and hit the Jetty instance as normal via your web browser.
|
You can easily configure logging through a |
Contributing to Jetty
There are many ways to contribute to Jetty, from hardened developers looking to sharpen their skills to neophytes interested in working with an open source project for the first time. Here we show ways to interact with the Jetty community, give feedback to the developers and contribute patches to both core Jetty code and even this document.
Community
Developers and users alike are welcome to engage the Jetty community. We all have day jobs here so don’t just ask questions and get frustrated if no one answers right away. Stick around to hear an answer, one is likely coming at some point!
Mailing Lists
We have a number of options for people that wish to subscribe to our mailing lists.
-
Jetty Developers List
-
Jetty Users List
-
Jetty Announcements List
-
Jetty Commit List
Documentation
This document is produced using a combination of maven, git, and asciidoc. We welcome anyone and everyone to contribute to the content of this book. Below is the information on how to obtain the source of this book and to build it as well as information on how to contribute back to it.
Note: All contributions to this documentation are under the EPLv1 and the copyright is assigned to Mort Bay.
Tools
You will need:
- git
-
This documentation is part of the Jetty project so all contributions must be through the normal Jetty contribution process.
You can go one of two ways for using git, if you are familiar with SCM’s and the command line interface feel free to install and use git from there. Otherwise we would recommend you use the github client itself as it will help with some of the workflow involved with working with git. All contributions much be signed and can be pulled into Jetty through the normal pull request process.
- maven 3
-
We build the documentation with maven 3 which can be found at Apache Maven.
Render Chain
The Jetty documentation is all written in asciidoc which is used as the origin format. The maven build uses the asciidoctor-maven-plugin to process all of the .adoc files into a single docbook file which is then used to produce the final output. We use this intermediary step in order to primarily produce chunked html which we then deploy to the Eclipse Jetty website. However we can also use this docbook output to produce pdf files, epub books or even Eclipse Help files should we so desire.
Getting Started (cli)
First you need to obtain the source of the documentation project.
Clone the repository:
$ git clone https://github.com/jetty/jetty.project.gitYou will now have a local directory with all of jetty, including the jetty-documentation. Now we move on to building it.
$ cd jetty.project/jetty-documentation
$ mvn installWhile maven is running you may see a lot of files being downloaded. If you are not familiar with maven, then what you are seeing is maven setting up the execution environment for generating the documentation. This build will first produce docbook xml and then through the docbkx-maven-plugin generate the chunked html output. The downloads are all of the java dependencies that are required to make this build work. After a while the downloading will stop and you should see the execution of the asciidoctor-maven-plugin followed by the docbkx-maven-plugin.
[INFO] --- asciidoctor-maven-plugin:1.5.3:process-asciidoc (output-html) @ jetty-documentation ---
[INFO] Rendered /Users/jesse/src/projects/jetty/jetty-docs/src/main/asciidoc/index.adoc
[INFO]
[INFO] Processing input file: index.xml
[INFO] Applying customization parameters
[INFO] Chunking output.
[INFO] See /Users/jesse/src/projects/jetty/jetty-docs/target/docbkx/html/index for generated file(s)The build is finished once you see a message akin to this:
[INFO] ------------------------------------------------------------------------
[INFO] BUILD SUCCESS
[INFO] ------------------------------------------------------------------------
[INFO] Total time: 7.014s
[INFO] Finished at: Tue Oct 25 14:15:37 CDT 2011
[INFO] Final Memory: 14M/229M
[INFO] ------------------------------------------------------------------------You may now open your web browser and browse to the first page of the html output to see what you have produced! Generally you can do this with File → Open File → which will open a file system browsing screen, navigate to your jetty-documentation directory and then further into target/docbkx/html/index/index.html which is the first page of the produced documentation.
|
If the build is broken, feel free to notify us. |
Making Changes
Now that you have built the documentation, you want to edit it and make some changes. We’ll now have to take a bit of as step back and look at how git and github works. In the above example you have cloned directly from our canonical documentation repository. Obviously we can not allow anyone immediate access to this repository so you must make a fork of it for your own and then issue back pull requests to build up documentation karma. In English that means that you would go to the url of the documentation in github:
https://github.com/jetty/jetty.project
When you are on this page you will see a little button called 'Fork' which you can click and you will be taken back to your main page on github where you have a new repository. When you checkout this repository you are free to commit to your heart’s delight all the changes you so direly wish to see in the Jetty documentation. You can clone it to your local machine and build it the same way as above. So let’s start small with a little example. Find some paragraph in the documentation that you think needs changed. Locate that in the local checkout and make the change. Now follow the process to push that change back into Jetty proper. Do make sure the change works and the build isn’t broken though so make sure you run maven and check the output. Then commit the change.
$ git commit -s -m "Tweaked the introduction to fix a horrid misspelled word." src/main/asciidoc/quickstart/introduction/topic.xml|
In order for us to accept your commit into the Jetty repository you must have an Eclipse CLA on file and sign your commit. Please check out the patches section for more information. |
This will commit the change in your local repository. You can then push the change up to your repository on github.
$ git pushNow you’ll see some output showing that your change has been propagated to your repository on github. In fact if you navigate to that repository at the top of the files list you should see your comment there. Success, your change is now positioned for notifying us about it! If you click on the commit message itself you’ll be taken to a screen that shows what files were changed in that commit. In the upper right corner is a button for 'Pull Request'. When you select this and follow the workflow we will then be notified of your contribution and will be able to apply it to our git repository upon review.
Thats it! You have successfully contributed to the documentation efforts of the Jetty project. After enough of these sorts of contributions and building up good community karma, you may be asked to join us as a committer on the documentation.
Conventions
Below is list of conventions that should be followed when developing documentation within this framework. These are not set in stone and should be updated as we learn more.
- ventilated prose
-
Each sentence should be on its own line with a hard return at the end of the line. Asciidoc rendering does not treat this style as separate lines and will produce paragraphs correctly. The primary benefit is that you can easily see changes between scm versions of files, and it makes it trivial to quickly look through a pull request. Additional benefits are the ability to comment out a sentence mid paragraph or move sentences around within a paragraph. Enabling Soft Line Wrap in your favorite editor can make this a bit easier to stomach.
- id’s
-
Critically important for being able to generate url’s that can be used in a persistent fashion. Without sane id’s the chapters and sections will have generated id which are rooted in some obscure location based voodoo. A url using these 'e12c8673' type links will not be durable across generations of the documentation. These id’s need to be used on chapters and sections two deep, and anywhere that you intend to cross link deeper.
The id values go into a global namespace so they must be unique across the entire document or the last example will win and any cross links will go there. Below is an example of an id.
[[this-id-an-id]]
- link vs xref
-
The
link:item should be generally used for linking around the document when you want to choose the text that will be rendered in the link itself. However if you are linking to a section and want to use the title itself as the link text, use thexref:tag without the hashmark in front of the link id. - version differences
-
In general differences in functionality within a release should go into nested sections and use titles like 'Prior to: ' or 'In version: '.
- license blocks
-
Each adoc file should contain the license block that exists in the index.adoc file and a copy has been added to the bottom of this page as well for reference.
// // ======================================================================== // Copyright (c) 1995-2022 Mort Bay Consulting Pty Ltd and others. // ======================================================================== // All rights reserved. This program and the accompanying materials // are made available under the terms of the Eclipse Public License v1.0 // and Apache License v2.0 which accompanies this distribution. // // The Eclipse Public License is available at // http://www.eclipse.org/legal/epl-v10.html // // The Apache License v2.0 is available at // http://www.opensource.org/licenses/apache2.0.php // // You may elect to redistribute this code under either of these licenses. // ======================================================================== //
Some admonition examples:
|
A note about the previous case to be aware of. |
|
Important notes are marked with an icon. |
|
Tips that make your life easier. |
|
Places where you have to be careful what you are doing. |
|
Where extreme care has to be taken. Data corruption or other nasty things may occur if these warnings are ignored. |
Oddities
-
If an included file ends with a list entry, it needs to have two empty lines at the end of the file in order for the section rendering to work correctly.
Source Control and Building
If you want to contribute to the development of jetty, you will need to work with a handful of technologies.
Source Control
Jetty uses several development trunks for its artifacts. They are mirrored on github through http://github.com/eclipse, or you can look through them via the Eclipse setup at the URLs below.
Primary Interest SCM URLs
These are the URLs to the GIT repositories for the Jetty code. They are for people who are working on the Jetty project, as well as for people who are interested in examining or modifying the Jetty code for their own projects.
- Jetty Project Repository
Build and Project Infrastructure SCM URLs
These are the URLs for Jetty-related code and metadata. These are not needed to use Jetty; these are primarily of use for people who are working with Jetty-the-project (as opposed to using Jetty-the-server in their own projects).
- Administrative pom.xml file
- Build related artifacts that release separately, common assembly descriptors, remote resources, etc.
- Files associated with the development of Jetty — code styles, formatting, iplogs, etc.
Build
Jetty requires the use of Java 8 and the latest releases are always recommended to build.
Jetty uses Apache Maven 3 for managing its build and primary project metadata.
Building Jetty should simply be a matter of changing into the relevant directory and executing the following commands:
$ git clone https://github.com/jetty/jetty.project.git
$ cd jetty.project
$ mvn installAll relevant dependencies will be downloaded into your local repository automatically.
|
Jetty has a great many test cases that run through the course of its build. Periodically we find some test cases to be more time dependent than they should be and this results in intermittent test failures. You can help track these down by opening a bug report. |
Import into Eclipse
Jetty is a Maven project. To develop Jetty in Eclipse, follow these directions:
Install m2e plugin
-
From the Eclipse menu at the top of the screen, select Help > Eclipse Marketplace.
-
Search for m2e.
-
Install the Maven Integration for Eclipse
Clone the git repository
Using either the egit plugin or git on the commandline (as in the build section above), obtain the jetty source.
Import the Maven Projects
-
From the Eclipse menu, select File > Import
-
From the Maven folder, select Existing Maven Projects.
-
Click Next.
-
In the Import Maven projects pane, click Browse and select the top folder of the jetty source tree.
-
Click Next/Finish to import all of jetty into Eclipse.
-
Wait for Eclipse and m2e to compilie and set up the project.
Coding Standards
Jetty uses number of conventions for its source code.
Code Formatting
Jetty uses the code formatting the following project specifies.
Code Templates
Jetty specifies the following code templates for use by the project developers.
Code Conventions
The following is an example of the Java formatting and naming styles to apply to Jetty:
import some.exact.ClassName; // GOOD
import some.wildcard.package.*; // BAD!
package org.always.have.a.package;
/* --------------------------------------------------------- */
/** Always have some javadoc
*/
class MyClassName
{
// indent by 4 spaces.
// use spaced to indent
// The code must format OK with default tabsize of 8.
private static final int ALL_CAPS_FOR_PUBLIC_CONSTANTS=1;
// Field prefixed with __ for static of _ for normal fields.
// This convention is no longer mandatory, but any given
// class should either consistently use this style or not.
private static String __staticField;
private Object _privateField;
// use getters and setters rather than public fields.
public void setPrivateField(Object privateField)
{
_privateField=privateField;
}
public Object getPrivateField()
{
return _privateField;
}
public void doSomething()
throws SomeException
{
Object local_variable = _privateField;
if (local_variable==null)
{
// do Something
}
}
}Issues, Features, and Bugs
As with any constantly evolving software project, there will be issues, features, and bugs. We want to know whats bugging you!
File bugs as Issues in our Github repository Issues at Github
Contributing Patches
We love seeing people contribute patches to the Jetty project and the process is relatively simple. The requirements to commit are modest but very important to the Eclipse Foundation and the intellectual property of the open source project. The following is the general process by which we operate.
-
You must have a signed Eclipse Contributor Agreement.
-
This agreement must be under the same email address as the Git pull request originates from.
-
The commit must be signed.
-
When the pull request is made, a git-hook will validate the email address.
-
If the result is a green checkbox then the Jetty committers can review the pull request.
-
If the result is a red X then there is absolutely nothing the Jetty committers can do to accept the commit at this point.
-
-
This may not be the final form a commit will take, there may be some back and forth and you may be asked to re-issue a pull request.
Not everything is specifically relevant since we are at GitHub but the crux of things are detailed there. The ECA is critically important to the process.
Sign an Eclipse Contributor Agreement (ECA)
The Eclipse Foundation has a strong Intellectual Property policy which tracks contributions in detail to ensure that:
-
Did the contributor author 100% of the content?
-
Does the contributor have the rights to contribute this content to Eclipse?
-
Is the contribution under the project’s license(s) (e.g. EPL)
A contributor needs to e-sign a Eclipse Contributor Agreement (for more explanation see the Eclipse ECA FAQ ) regardless of how their contribution patch is provided. You can familiarize yourself with the Eclipse wiki page at Contributing via Git. In order to have a pull request accepted by any Eclipse project you must complete this agreement.
|
Log into the Eclipse home page (you will need to create an account with the Eclipse Foundation if you have not already done so), click on "Eclipse ECA", and complete the form. Be sure to use the same email address when you create any Git commit records. |
Configuring Git
GitHub has copious amounts of quality documentation on how to interact with the system and you will minimally need to configure the user.email property. Check out the following guide on GitHub for more information.
Making the Commit
When making the commit for the pull request it is vital that you "sign-off" on the commit using git commit -s option.
Without this sign-off, your patch cannot be applied to the Jetty repository because it will be rejected.
You can check out the guide at Github for more information.
|
One way to think of this is that when you sign the ECA you are indicating that you are free to contribute to eclipse, but that doesn’t mean everything you ever do can be contributed. Using the commit signing mechanism indicates that your commit is under the auspices of your agreement. |
If a pull request is for a particular issue in our repository then the format of the commit message is important. The message should follow the form "Issue #123 <description of the commit>". When the Jetty project runs releases we have an automated process that scans for commits with this format for inclusion in our VERSION.txt file.
> git commit -s -m "Issue #123 resolving the issue by adding widget"The Pull Request
Pull requests are very much a GitHub process so best explained by Github.
Our Policies
We wholeheartedly welcome contributions to Jetty and will do our best to process them in a timely fashion. While not every contribution will be accepted, our commitment is to work with interested parties on the things they care about. With that in mind, we can only handle pull requests with actively engaged parties. We reserve the right to abandon pull requests whose authors do no respond in a timely fashion.
We will generally adhere to the following time frames for contributions:
-
Invalid Pull Requests - 1 week
-
These pull requests do not follow the contribution requirements for some reason, be it missing contributor agreement or the wrong email.
-
We will try and follow up with the pull request author to resolve the issue but much of this is out of our hands and are between committer and the Eclipse Foundation.
-
If we do not hear from the contributor after a week we will close the pull request.
-
-
Valid Pull Requests - 2 weeks
-
These pull requests have a green check mark after the commit title.
-
If the pull request can be immediately applied we will do so.
-
There may need to be some conversation on the issue in which case a committer will follow up with the author in the pull request.
-
If the original contributor does not respond within 2 weeks we may close the commit.
-
If we see value in the commit yet the author has not responded after 2 weeks we may make some variation of the commit ourselves.
-
Releasing Jetty
There are a number of steps to releasing jetty. It is not just limited to running a couple of maven commands and then moving onto bigger and better things. There are a number of process related issues once the fun maven bits have been completed.
Building and Staging a Releasable Version
This release script is for jetty-9 (to release jetty-7 or jetty-8 see older documentation).
-
Pick your version identification strings.
These follow a strict format and will be used when prompted during step listitem_title below.
Release Version : 9.0.0.v20130322 (v[year][month][day]) Next Development Version : 9.0.1-SNAPSHOT Tag Name : jetty-9.9.0.v20130322
-
We use the 'release-9' branch to avoid problems with other developers actively working on the master branch.
// Get all of the remotes $ git pull origin // Create a local tracking branch (if you haven't already) $ git branch --track release-9 refs/remotes/origin/release-9 // Check out your local tracking branch. $ git checkout release-9 // Merge from master into the branch (this becomes your point in time // from master that you will be releasing from) $ git merge --no-ff master -
Update the VERSION.txt with changes from the git logs, this populates the resolves issues since the last release.
$ mvn -N -Pupdate-version -
Edit the VERSION.txt file to set the 'Release Version' at the top alongside the Date of this release.
$ vi VERSION.txt -
Make sure everything is commit’d and pushed to github.com/jetty/jetty.project
$ git commit -m "Updating VERSION.txt top section" VERSION.txt $ git push origin release-9 -
Prepare the Release
This step updates the <version> elements in the pom.xml files, does a test build with these new versions, and then commits the pom.xml changes to your local git repo. The
eclipse-releaseprofile is required on the prepare in order to bring in the jetty aggregates as that profile defines a module which is ignored otherwise.$ mvn release:prepare -DreleaseVersion=9.0.0.v20130322 \ -DdevelopmentVersion=9.0.1-SNAPSHOT \ -Dtag=jetty-9.0.0.v20130322 \ -Peclipse-release -
Perform the Release
This step performs the release and deploys it to a oss.sonatype.org staging repository.
$ mvn release:perform -
Set up files for next development versions.
Edit
VERSION.txtfor 'Next Development Version' at the top. Do not date this line.Make sure everything is commit’d and pushed to github.com/jetty/jetty.project
$ vi VERSION.txt $ git commit -m "Updating VERSION.txt top section" VERSION.txt $ git push origin release-9 -
Close the staging repository on oss.sonatype.org
-
Announce stage to the mailing list for testing.
-
Once the staged repository has been approved by the rest of the committers.
-
Release the staging repository to maven central on oss.sonatype.org
-
Merge back the changes in release-9 to master
$ git checkout master $ git merge --no-ff release-9 $ git push origin master
-
Building and Deploying Aggregate Javadoc and Xref
Define the jetty.eclipse.website server entry in your .m2/settings.xml file. You’ll need to have access to the dev.eclipse.org machine to perform these actions. If you don’t know if you have access to this then you probably don’t and will need to ask a project leader for help.
To build and deploy the aggregate javadoc and jxr bits:
$ cd target/checkout
$ mvn -Paggregate-site javadoc:aggregate jxr:jxr
$ mvn -N site:deployThis will generate the aggregate docs and deploy them to the /home/www/jetty/<project version>/jetty-project directory on download.eclipse.org.
Deploying Distribution Files
Since we also provide alternative locations to download jetty distributions we need to copy these into place. There are a couple of scripts that will take care of this although they need to be localized to your particular execution environment and you need to have authorization to put stuff where it needs to go. These scripts are located at:
To localize the scripts to your environment:
-
ensure you have "curl" installed
-
edit the scripts and replace all ssh login lines with your own login id
Once these are setup you can deploy a release to eclipse with the following incantation:
$ ./promote-to-eclipse.sh 9.0.0.v20130322Each of these scripts will download all of the relevant files from maven central and then copy them into the correct location on eclipse infrastructure. On the eclipse side of it they will also adjust the xref and javadoc documentation links if they remain broken as well as regenerate all of the html files on the eclipse download site.
Updating Stable Links
Since we are not allowed to have symbolic links on the download site we have to log into the machine manually and remove the previous stable directory and update it with a new release. Maintaining the conventions we use on the site will allow all 'stable' links to be stable and not needed to update to the latest major Jetty build version:
$ ssh <user>@build.eclipse.org
$ cd ~downloads/jetty/
$ rm -Rf stable-9
$ cp -r <version> stable-9
$ ./index.shThis needs to be done for all Eclipse Jetty releases (regardless of version). In addition we have to work to reduce the footprint of jetty on the primary eclipse download resources so we want to move older releases to the eclipse archive site.
$ cd ~/downloads/jetty
$ mv <old release> /home/data/httpd/archive.eclipse.org/jetty/
$ ./index.shPeriodically we need to do the same for the osgi P2 repositories to keep the size of our downloads directory at a reasonable size.
Building an OSGi P2 Repository
Most of the jetty jars are also osgi bundles, plus we release some specific bundles that integrate jetty closely with osgi. To do this, we use a Hudson job on the eclipse infrastructure. You will need to have permission to access https://ci.eclipse.org/shared/view/Jetty-RT/
There are Hudson jobs that build osgi p2 repos for each of the major releases of jetty:7 (jetty-rt-bundles-7), 8 (jetty-rt-bundles-8) and 9 (jetty-rt-bundles-9). You will need to start a manual build of the job that matches the version of jetty that you are releasing. You will be prompted to supply some parameters to the build:
- pack_and_sign
-
By default, this is ticked. Leave it ticked.
- jetty_release-version
-
Enter the version number of the release, eg 9.2.6.v20141205
- force_context_qualifier
-
Leave this blank.
- set_pom_version
-
Enter the major.minor.point release number, eg 9.2.6
- delete_tycho_meta
-
This is ticked by default. Leave it ticked
- BRANCH_NAME
-
This is not the branch of the jetty release. Rather it refers to the branch structure of the project that drives the jetty p2 release. It will already be set correctly for the selected job, so don’t change it unless you have an extremely good reason.
Once you have supplied the necessary parameters, the build job will commence and the bundles and update site zips will generated and automatically placed in the /home/data/httpd/downlaod.eclipse.org/jetty/updates/jetty-bundles-[MAJOR.VERSION].x, where [MAJOR.VERSION] matches the major version number of the jetty release you are doing.
These files will then be visible from MAJOR.VERSION.x, where [MAJOR.VERSION] corresponds to the major version of the jetty release you are doing.
Release Documentation
There are two git repositories you need to be aware of for releasing jetty-documentation.The jetty-documentation is located in our github repository and the jetty-website is located at eclipse.
- jetty-documentation
- jetty-website
Do the following steps to publish documentation for the release:
-
Checkout the jetty-documentation repository.
-
Edit the <version> of the jetty-documentation pom.xml and change it locally to be the release number, eg 9.2.6.v20141205
-
Build the documentation with mvn clean install
-
Checkout the jetty-website
-
Inside the documentation/ directory, make a directory named the same as the release number, eg 9.2.6.v20141205/
-
Copy the built
documentationfrom jetty-documentation/target/docbkx/html/jetty into the new directory -
Edit the
index.htmlfile in thedocumentationdirectory and add the newly released documentation url. Make sure you follow the other examples and include therel="nofollow"attribute on the link so that search engines do not crawl newly created documentation, otherwise we are subject to duplicate content penalties in SEO. -
Commit the changes to the jetty-website project
|
There is a separate Jenkins build job that publishes documentation to https://www.eclipse.org/jetty/documentation/current triggered by a push of changed files to the jetty-documentation project. If you commit your change to the <version> number from step 2, then these builds will use the same release version number. It is preferable if you don’t commit that version number change, or better yet, ensure that it is set to the next -SNAPSHOT version number for your jetty major release number. |
Testing a Jetty Release
To test a Jetty release, complete the following steps for each release you want to test:
-
Download the staged release:
wget https://oss.sonatype.org/content/repositories/jetty-[reponumber]/org/eclipse/jetty/jetty-distribution/[jetty-version]/jetty-distribution-9.[jetty-minor-version].tar.gz -
Extract to a directory of your choice.
-
Start jetty:
cd [installdir] ; java -jar start.jar -
If there are no exceptions, proceed. Otherwise, investigate.
-
Open http://localhost:8080/ in a browser. In the examples section click "Test Jetty Webapp". You should see the
test.warwebapp. -
Go through ALL the tests and verify that everything works as expected.
-
In the examples section click "JAAS Test" and verify that everything works as expected.
-
In the examples section click "JNDI Test" and verify that everything works as expected.
-
In the examples section click "Servlet 3.1 Test" and verify that everything works as expected.
-
Verify that hot deployment works.
cd [installdir] ; touch [pathToJettyDistribution]/webapps.demo/test.xml -
Verify that
test.wargets redeployed inSTDOUT. -
Verify that the spdy example webapp and spdy-proxy do work
cd jetty_src/jetty-spdy/spdy-example-webapp mvn jetty:run-forked -
Browse to https://localhost:8443 and verify that all looks ok
-
Stop the server with CTRL+C and restart it in proxy mode:
mvn -Pproxy jetty:run-forked -
Browse to http://localhost:8080 and https://localhost:8443 and verify that all looks ok
Testing CometD
-
Clone CometD.
clone git://github.com/cometd/cometd.git git clone git://github.com/cometd/cometd.git -
Edit
pom.xmland updatejetty-version.<properties> <project.build.sourceEncoding>UTF-8</project.build.sourceEncoding> <jetty-version>7.6.2.v20120308</jetty-version> <jetty-plugin-version>${jetty-version}</jetty-plugin-version> <slf4j.version>1.6.4</slf4j.version> <spring-version>3.1.0.RELEASE</spring-version> </properties> <repositories> <repository> <id>Jetty Staging</id> <url>https://oss.sonatype.org/content/repositories/jetty-988/</url> </repository> </repositories> -
Build Cometd:
mvn clean install -
Be patient.
-
Run the loadtest as it is described here: http://cometd.org/documentation/2.x/howtos/loadtesting. Keep the default values, but make sure that you raise the clients setting to 1000. Run the loadtest until ''JIT compilation time'' is close to a value of zero (about 10k calls).
-
Make sure that the performance results are reasonably fast. On a MacBook Pro i7 2.6ghz dualcore produces the following:
======================================== Statistics Started at Fri Mar 09 13:44:35 CET 2012 Operative System: Mac OS X 10.7.3 amd64 JVM : Oracle Corporation Java HotSpot(TM) 64-Bit Server VM runtime 23.0-b16 1.7.0_04-ea-b14 Processors: 4 System Memory: 99.583336% used of 30.0 GiB Used Heap Size: 36.490677 MiB Max Heap Size: 1920.0 MiB Young Generation Heap Size: 896.0 MiB - - - - - - - - - - - - - - - - - - - - Testing 1000 clients in 100 rooms, 10 rooms/client Sending 1000 batches of 10x50 bytes messages every 10000 ?s [GC [PSYoungGen: 786432K->8736K(917504K)] 823650K->45954K(1966080K), 0.0309940 secs] [Times: user=0.09 sys=0.00, real=0.03 secs] [GC [PSYoungGen: 795168K->11424K(917504K)] 832386K->48642K(1966080K), 0.0513360 secs] [Times: user=0.13 sys=0.00, real=0.05 secs] [GC [PSYoungGen: 797856K->14560K(917504K)] 835074K->51778K(1966080K), 0.0432940 secs] [Times: user=0.12 sys=0.00, real=0.05 secs] [GC [PSYoungGen: 800992K->15680K(917504K)] 838210K->52898K(1966080K), 0.0491200 secs] [Times: user=0.14 sys=0.00, real=0.05 secs] [GC [PSYoungGen: 802112K->17568K(917504K)] 839330K->54786K(1966080K), 0.0484950 secs] [Times: user=0.14 sys=0.00, real=0.05 secs] [GC [PSYoungGen: 804000K->17600K(917504K)] 841218K->54818K(1966080K), 0.0456460 secs] [Times: user=0.14 sys=0.01, real=0.05 secs] [GC [PSYoungGen: 804032K->19488K(917504K)] 841250K->56706K(1966080K), 0.0542000 secs] [Times: user=0.15 sys=0.00, real=0.05 secs] [GC [PSYoungGen: 805920K->20224K(917504K)] 843138K->57442K(1966080K), 0.0486350 secs] [Times: user=0.16 sys=0.00, real=0.05 secs] [GC [PSYoungGen: 806656K->20192K(917504K)] 843874K->57410K(1966080K), 0.0566690 secs] [Times: user=0.15 sys=0.00, real=0.06 secs] [GC [PSYoungGen: 806624K->21152K(917504K)] 843842K->58370K(1966080K), 0.0536740 secs] [Times: user=0.16 sys=0.00, real=0.06 secs] [GC [PSYoungGen: 807584K->21088K(917504K)] 844802K->58306K(1966080K), 0.0576060 secs] [Times: user=0.18 sys=0.00, real=0.06 secs] [GC [PSYoungGen: 807520K->22080K(917504K)] 844738K->59298K(1966080K), 0.0663300 secs] [Times: user=0.19 sys=0.01, real=0.06 secs] - - - - - - - - - - - - - - - - - - - - Statistics Ended at Fri Mar 09 13:45:21 CET 2012 Elapsed time: 45826 ms Time in JIT compilation: 52 ms Time in Young Generation GC: 606 ms (12 collections) Time in Old Generation GC: 0 ms (0 collections) Garbage Generated in Young Generation: 9036.513 MiB Garbage Generated in Survivor Generation: 21.65625 MiB Garbage Generated in Old Generation: 0.0 MiB Average CPU Load: 156.54865/400 ---------------------------------------- Outgoing: Elapsed = 45820 ms | Rate = 218 messages/s - 21 requests/s - ~0.083 Mib/s Waiting for messages to arrive 996960/999045 All messages arrived 999045/999045 Messages - Success/Expected = 999045/999045 Incoming - Elapsed = 45945 ms | Rate = 21743 messages/s - 9496 responses/s(43.68%) - ~8.295 Mib/s Messages - Wall Latency Distribution Curve (X axis: Frequency, Y axis: Latency): @ _ 24 ms (8765, 0.88%) @ _ 45 ms (58952, 5.90%) @ _ 67 ms (87065, 8.71%) @ _ 88 ms (113786, 11.39%) @ _ 109 ms (167426, 16.76%) @ _ 131 ms (176163, 17.63%) ^50% @ _ 152 ms (123182, 12.33%) @ _ 174 ms (90918, 9.10%) @ _ 195 ms (67209, 6.73%) ^85% @ _ 216 ms (46989, 4.70%) @ _ 238 ms (24975, 2.50%) ^95% @ _ 259 ms (16509, 1.65%) @ _ 281 ms (8454, 0.85%) ^99% @ _ 302 ms (4324, 0.43%) @ _ 323 ms (2955, 0.30%) @ _ 345 ms (957, 0.10%) ^99.9% @ _ 366 ms (204, 0.02%) @ _ 388 ms (144, 0.01%) @ _ 409 ms (25, 0.00%) @ _ 430 ms (43, 0.00%) Messages - Wall Latency 50th%/99th% = 117/275 ms Messages - Wall Latency Min/Ave/Max = 2/123/430 ms Messages - Network Latency Min/Ave/Max = 1/114/417 ms Thread Pool - Concurrent Threads max = 239 | Queue Size max = 1002 | Queue Latency avg/max = 12/101 ms -
Deploy
cometd.warto thewebappsdirectory of the jetty-distribution tested above.cp cometd-demo/target/cometd-demo-[version].war [pathToJetty]/jetty-distribution-[jetty-version]/webapps/ -
Start jetty and make sure there are no exceptions.
cd [pathToJetty] && java -jar start.jar -
Go through all pages of the demo and test them:
http://localhost:8080/cometd-demo-2.4.1-SNAPSHOT/
If all tests are green, you are done!
Upgrading Jetty
Upgrading from Jetty 9.3.x to Jetty 9.4.0
The purpose of this guide is to assist users migrating from Jetty 9.3.x to 9.4.0. It is not comprehensive, but covers many of the major changes included in the release that may prove as problem areas for users.
The jetty.sh Script
The file jetty.sh, typically used to start Jetty as a service in Linux/Unix machines underwent only small changes, such as the addition of LSB tags.
You can safely replace the jetty.sh file packaged with Jetty 9.3 with the version found in Jetty 9.4.
Removed Classes
ConcurrentArrayQueue was removed from use in Jetty 9.3 and the class has been removed entirely as part of Jetty 9.4.
Module Changes in Jetty 9.4
| Jetty 9.3 Module | Jetty 9.4 Module |
|---|---|
|
|
|
|
|
|
|
|
|
|
Logging Modules
The module logging is no longer available in Jetty 9.4.
The logging module structure present in Jetty 9.3 has been replaced with a more fine-grained structure in Jetty 9.4, so that you have now more choices available that are also easier to configure.
The migration path is different depending on whether you have completely customized this module or not.
If you have a Jetty 9.3 installation, and you have both $jetty.base/modules/logging.mod and $jetty.base/etc/jetty-logging.xml, then this module is local to your $jetty.base setup and will be used by Jetty 9.4 as before.
No changes are required for your implementation.
If either $jetty.base/modules/logging.mod or $jetty.base/etc/jetty-logging.xml are missing, then you were relying on those present in $jetty.home, which were present in Jetty 9.3, but are no longer available in Jetty 9.4.
The Jetty 9.3 logging module has been renamed to console-capture in Jetty 9.4.
You need to open your Jetty 9.3 start.ini and replace the references to the logging modules with console-capture.
For example, in an existing Jetty 9.3 start.ini file the module declaration for logging would look like this:
--module=logging
jetty.logging.retainDays=7In 9.4, it should be replaced by:
--module=console-capture
jetty.console-capture.retainDays=7The properties that may be present in your Jetty 9.3’s start.ini, such as jetty.logging.retainDays will still be working in Jetty 9.4, but a warning will be printed at Jetty 9.4 startup, saying to replace them with correspondent jetty.console-capture.* properties such as jetty.console-capture.retainDays.
For information on logging modules in the Jetty 9.4 architecture please see the section on configuring logging modules.
Session Management
Session management received a significant overhaul in Jetty 9.4. Session functionality has been refactored to promote code-reuse, easier configuration and easier customization. Whereas previously users needed to edit xml configuration files, in Jetty 9.4 all session behavior is controlled by properties that are exposed by the various session modules. Users now configure session management by selecting a composition of session modules.
Change Overview
- SessionIdManager
-
Previously there was a different class of SessionIdManager - with different configuration options - depending upon which type of clustering technology chosen. In Jetty 9.4, there is only one type, the org.eclipse.jetty.server.session.DefaultSessionIdManager.
- SessionManager
-
Previously, there was a different class of SessionManager depending upon which the type of clustering technology chosen. In Jetty 9.4 we have removed the SessionManager class and split its functionality into different, more easily extensible and composable classes:
- General setters
-
All of the common setup of sessions such as the maxInactiveInterval and session cookie-related configuration has been moved to the org.eclipse.jetty.server.session.SessionHandler
| 9.3 SessionManager | 9.4 SessionHandler |
|---|---|
|
|
|
|
|
|
|
|
|
|
|
|
|
|
|
|
|
|
- Persistence
-
In Jetty 9.3
SessionManagers(and sometimesSessionIdManagers) implemented the persistence mechanism. In Jetty 9.4 we have moved this functionality into theorg.eclipse.jetty.server.session.SessionDataStore. - Session cache
-
In Jetty 9.3 the
SessionManagerheld a map of session objects in memory. In Jetty 9.4 this has been moved into the neworg.eclipse.jetty.server.session.SessionCacheinterface.
For more information, please refer to the documentation on Jetty Session Architecture.
Default Sessions
As with earlier versions of Jetty, if you do not explicitly configure any session modules, the default session infrastructure will be enabled. In previous versions of Jetty this was referred to as "hash" session management. The new default provides similar features to the old hash session management:
-
A session scavenger thread that runs every 10mins and removes expired sessions
-
A session id manager that generates unique session ids and handles session id sharing during context forwarding
-
An in-memory cache of session objects.
Requests for the same session in the same context share the same session object. Session objects remain in the cache until they expire or are explicitly invalidated.
If you wish to configure the default setup further, enable the session-cache-hash module.
Compatibility
As Session objects do not persist beyond a server restart, there are no compatibility issues.
Sessions using the Filesystem
In earlier versions of Jetty, persisting sessions to the local filesystem was an option of the "hash" session manager.
In Jetty 9.4 this has been refactored to its own configurable module session-store-file.
Compatibility
Sessions stored to files by earlier versions of jetty are not compatible with jetty-9.4 sessions. Here is a comparison of file formats, note that the file contents are listed in order of file output:
| Jetty 9.3 | Jetty 9.4 |
|---|---|
File name: |
File name: |
|
|
|
|
|
|
|
|
|
|
|
|
|
|
|
|
|
|
|
|
|
|
|
|
|
|
|
|
Session data is now only loaded when requested.
Previous functionality such as |
JDBC Sessions
As with earlier versions of Jetty, sessions may be persisted to a relational database.
Enable the session-store-jdbc module.
Compatibility
Sessions stored to the database by earlier versions of jetty are not compatible with jetty-9.4 sessions.
The incompatibility is minor: in jetty-9.4 the rowid primary key column is no longer used, and the primary key is a composite of (sessionid,contextpath,vhost) columns.
NoSQL Sessions
As with earlier versions of Jetty, sessions may be persisted to a document database.
Jetty supports the Mongo document database.
Enable the session-store-mongo module.
Compatibility
Sessions stored to mongo by earlier versions of jetty are not compatible with jetty-9.4 sessions. The key for each subdocument that represents the session information for a context is different between jetty-9.3 and 9.4:
| Jetty 9.3 | Jetty 9.4 |
|---|---|
Each context key is: vhost+context+path, where empty vhosts="::" and root context = "*" and / is replaced by _ |
Each context key is: vhost:contextpath, where empty vhosts="0_0_0_0" and root context = "" and / replaced by _ |
eg "::/contextA" |
eg " 0_0_0_0:_contextA" |
Infinispan Sessions
As with earlier versions of Jetty, sessions may be clustered via Infinispan to either an in-process or remote infinispan instance.
Enable the session-store-infinispan module.
Compatibility
Sessions stored in infinispan by jetty-9.3 are incompatible with jetty-9.4.
In Jetty 9.3 the serialized object stored to represent the session data was org.eclipse.jetty.session.infinispan.SerializableSessionData.
In Jetty 9.4 the serialized object is org.eclipse.jetty.serer.session.SessionData.
GCloud Datastore
As with earlier versions of Jetty, sessions may be persisted to Google’s GCloud Datastore.
Enable the session-store-gcloud module.
Compatibility
Sessions stored into GCloud Datastore by Jetty 9.3 are incompatible with Jetty 9.4, although the incompatibility is trivial: the name of the session id entity property has changed:
| Jetty 9.3 | Jetty 9.4 |
|---|---|
Kind: |
Kind: |
key: |
key: |
"clusterId": |
"id": |
"contextPath" : |
"contextPath": |
"vhost" : |
"vhost": |
"accessed": |
"accessed": |
"lastAccessed": |
"lastAccessed": |
"createTime": |
"createTime": |
"cookieSetTime": |
"cookieSetTime": |
"lastNode": |
"lastNode": |
"expiry": |
"expiry": |
"maxInactive": |
"maxInactive": |
"attributes": |
"attributes": |
GCloud Datastore with Memcached
As with earlier versions of Jetty, sessions can be both persisted to Google’s GCloud Datastore, and cached into Memcached for faster access.
Enable the session-store-gcloud and session-store-cache modules.
Compatibility
Sessions stored into Memcached by earlier versions of jetty are incompatible with Jetty 9.4.
Previous versions of jetty stored org.eclipse.jetty.gcloud.memcached.session.SerializableSessionData whereas Jetty 9.4 stores org.eclipse.jetty.server.session.SessionData.
ServletContainerInitializers
As of Jetty-9.4.4, unless the web.xml is version 3.0 or greater, only ServletContainerInitializers that are on the container classpath will be discovered.
Users wishing to use ServletContainerInitializers from within the webapp with older versions of web.xml must either upgrade their web.xml version, or call WebAppContext.setConfigurationDiscovered(true) either programmatically or in xml.
Upgrading the web.xml version is preferable.