Keycloak based authentication
Install Java 21
- Update the package index:
sudo apt update - Install OpenJDK 21:
sudo apt install openjdk-21-jdk
Set JAVA_HOME
- Edit the
~/.bashrcfile:vim ~/.bashrc - Add the following line at the end of the file:
export JAVA_HOME=/usr/lib/jvm/java-21-openjdk-amd64 - Save and exit the editor.
- Update the environment variables:
source ~/.bashrc - Or you can set environment variable in
/etc/environmentfile
Install PostgreSQL
- Install PostgreSQL 14 or higher.
sudo apt update && sudo apt upgrade -y
sudo apt install postgresql-14
Set Username and Password in PostgreSQL
- Switch to the PostgreSQL user:
sudo su postgres - Access the PostgreSQL console:
psql - Execute the following SQL commands:
CREATE USER keycloak WITH ENCRYPTED PASSWORD 'mystrongandsecurepassword';
CREATE DATABASE keycloak;
GRANT ALL PRIVILEGES ON DATABASE keycloak TO keycloak;
Install Keycloak
- Download Keycloak 26.0.6 from the official repository.
- Or download the tar file
wget https://github.com/keycloak/keycloak/releases/download/26.0.6/keycloak-26.0.6.tar.gz - Extract the downloaded file to the /opt folder,
sudo tar -xvf myfiles.tar -C /opt - Goto
/opt/keycloak-26.x.x/conffolder and setup the following inkeycloak.conffile:
# Database

# The database vendor.
db=postgres

# The username of the database user.
db-username=keycloak

# The password of the database user.
db-password=mystrongandsecurepassword

# The full database JDBC URL. If not provided, a default URL is set based on the selected database vendor.
db-url=jdbc:postgresql://localhost/keycloak

# Changes for SW360
keycloak-admin=admin
keycloak-admin-password=admin

log=console,file

# Should be true for productive
hostname-strict-backchannel=false
hostname-strict-https=false

# Should be false for productive
http-enabled=true
http-port=8083

https-port=8533
Start Keycloak
- Navigate to the Keycloak directory,
cd /opt/keycloak-26.x.x/bin - Run the start-dev command for development (with HTTP):
./kc.sh start-dev
- Run the start command for productive (with HTTPS):
./kc.sh start
- Run the start command with the necessary parameters(with debug mode):
sudo ./kc.sh start-dev --log="console,file" --debug --log-level=INFO,org.eclipse.sw360.keycloak.spi:debug,org.eclipse.sw360.keycloak.event.listener:debug
Build the Backend
- Build the SW360 backend code using Maven,
mvn clean install -DskipTests -Dbase.deploy.dir=/opt/apache-tomcat-11.x.x/ -Dlistener.deploy.dir=/opt/keycloak-26.x.x/providers -P deploy - Start the Apache Tomcat server.
Keycloak Providers and Libraries
Providers are used to read users from SW360 DB and register users from keycloak to SW360 DB.
- After building the backend with deploy profile, following files should be
copied and available at
/opt/keycloak-26.x.x/providers/:
commonIO-19.0.0.jar
datahandler-19.0.0.jar
httpcore5-5.2.5.jar
libthrift-0.20.0.jar
spring-security-crypto-6.3.3.jar
sw360-keycloak-event-listener.jar
sw360-keycloak-user-storage-provider.jar
Setup Provider to use external thrift server
The KeyCloak providers use thrift clients to connect to the SW360 backend. By default, they look for the thrift
client to be listening on http://localhost:8080, which will be true for if KeyCloak and SW360 backend are running on
the same server. However, if they are not, you need to set the thrift client URL by providing SPI configuration value
via KeyCloak’s Configuration provider.
- If you are using
keycloak.confto store your configuration, add the following line to the file:spi-events-listener-sw360-add-user-to-couchdb-thrift=http://<thrift-backend-server>:<thrift-backend-port> spi-storage-sw360-user-storage-jpa-thrift=http://<thrift-backend-server>:<thrift-backend-port> - If you are using environment variables, configuration can be set with variables:
KC_SPI_EVENTS_LISTENER_SW360_ADD_USER_TO_COUCHDB_THRIFT=http://<thrift-backend-server>:<thrift-backend-port>
KC_SPI_STORAGE_SW360_USER_STORAGE_JPA_THRIFT=http://<thrift-backend-server>:<thrift-backend-port>
Keycloak Admin Console
Login to Keycloak admin console.
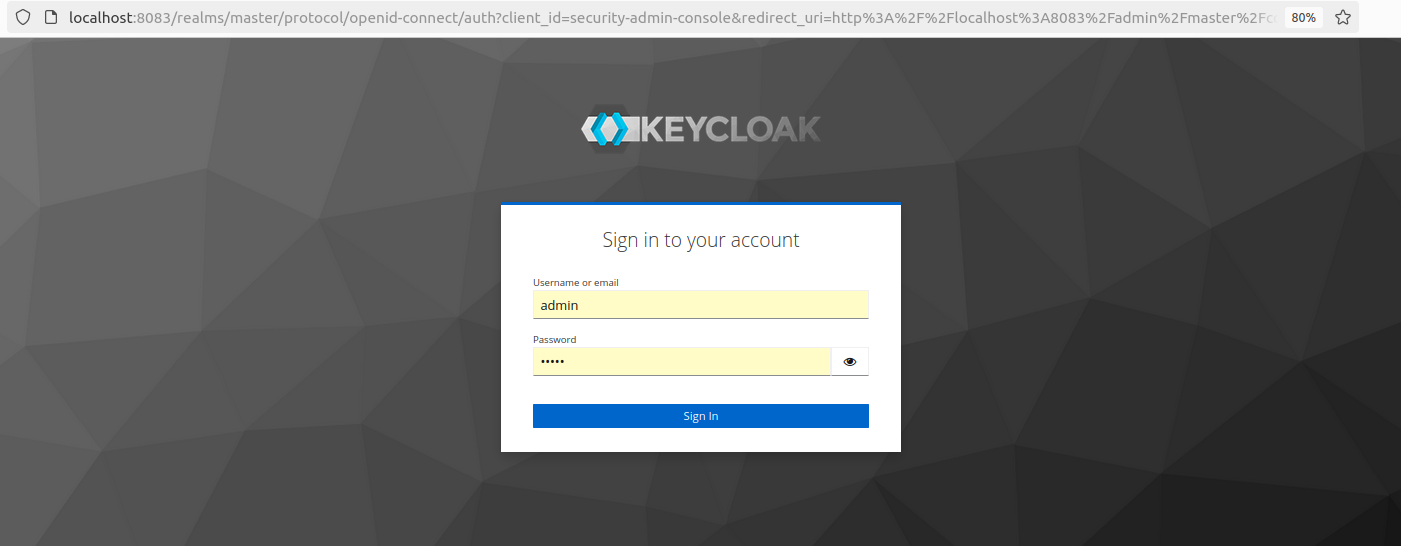
username: admin
password: admin
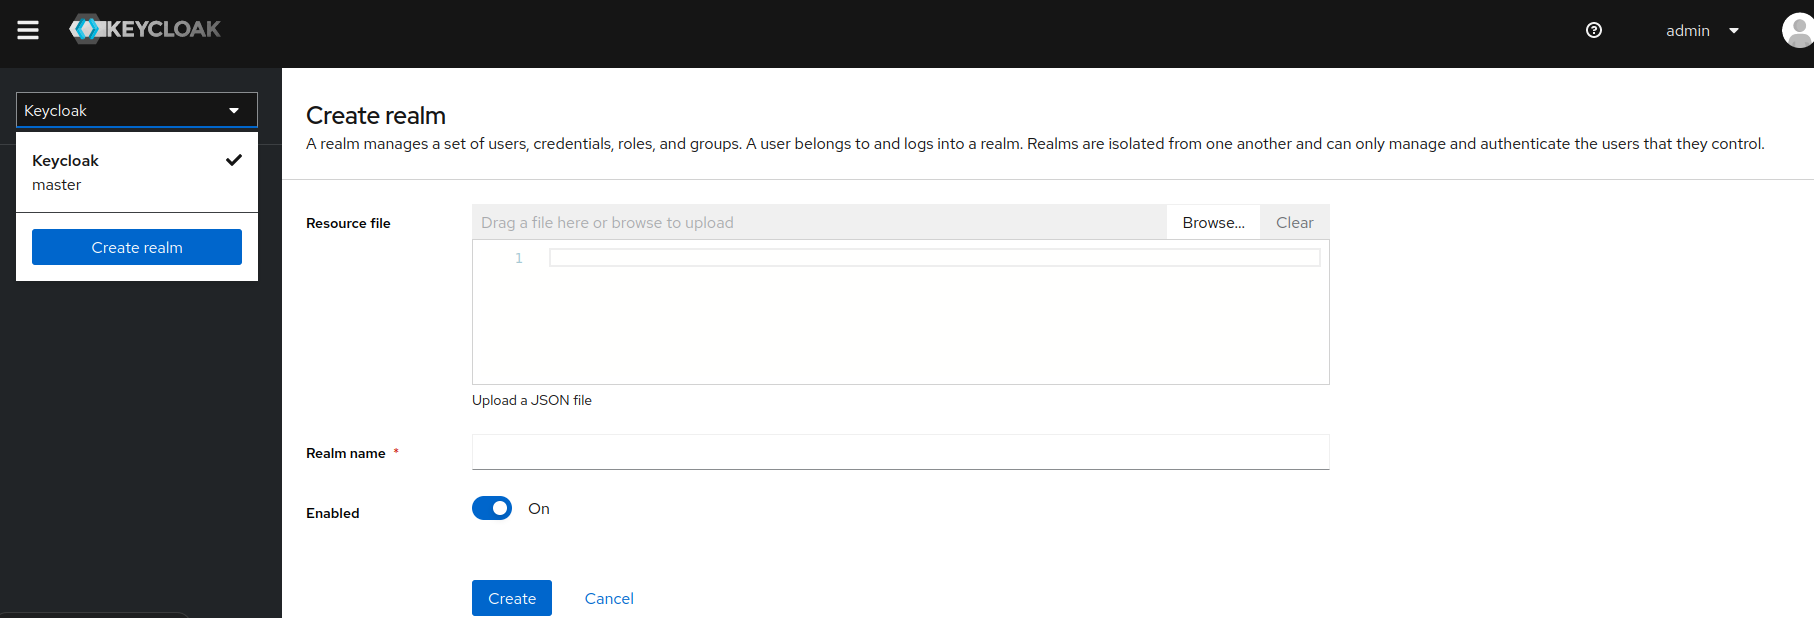
Create Realm and name it sw360.
Get the JWT issuer and key set for realm and update the backend file at
rest/resource-server/src/main/resources/application.ymland reinstall the backend. Restart the Tomcat server.- Select “OpenID Endpoint Configuration” from the “Realm Settings” and copy
jwks_uri. It will look something likehttp://localhost:8083/realms/sw360/protocol/openid-connect/certs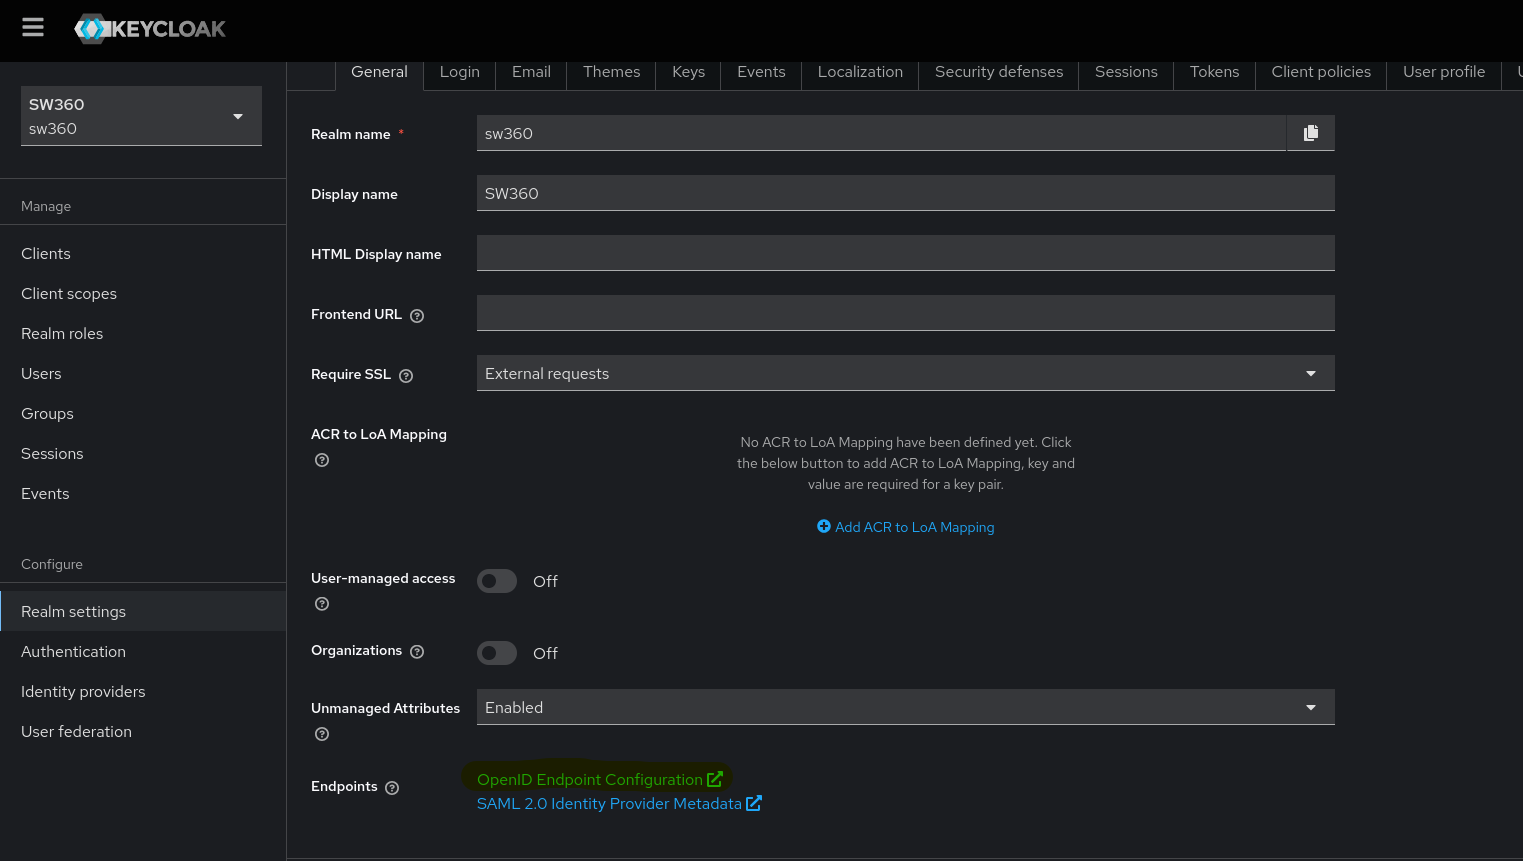
- Update the
issuer-uriandjwk-set-uriin theapplication.ymlfile with this copiedjwks_uri. - Build and install the backend one more time.
- Select “OpenID Endpoint Configuration” from the “Realm Settings” and copy
Create Client in Keycloak.
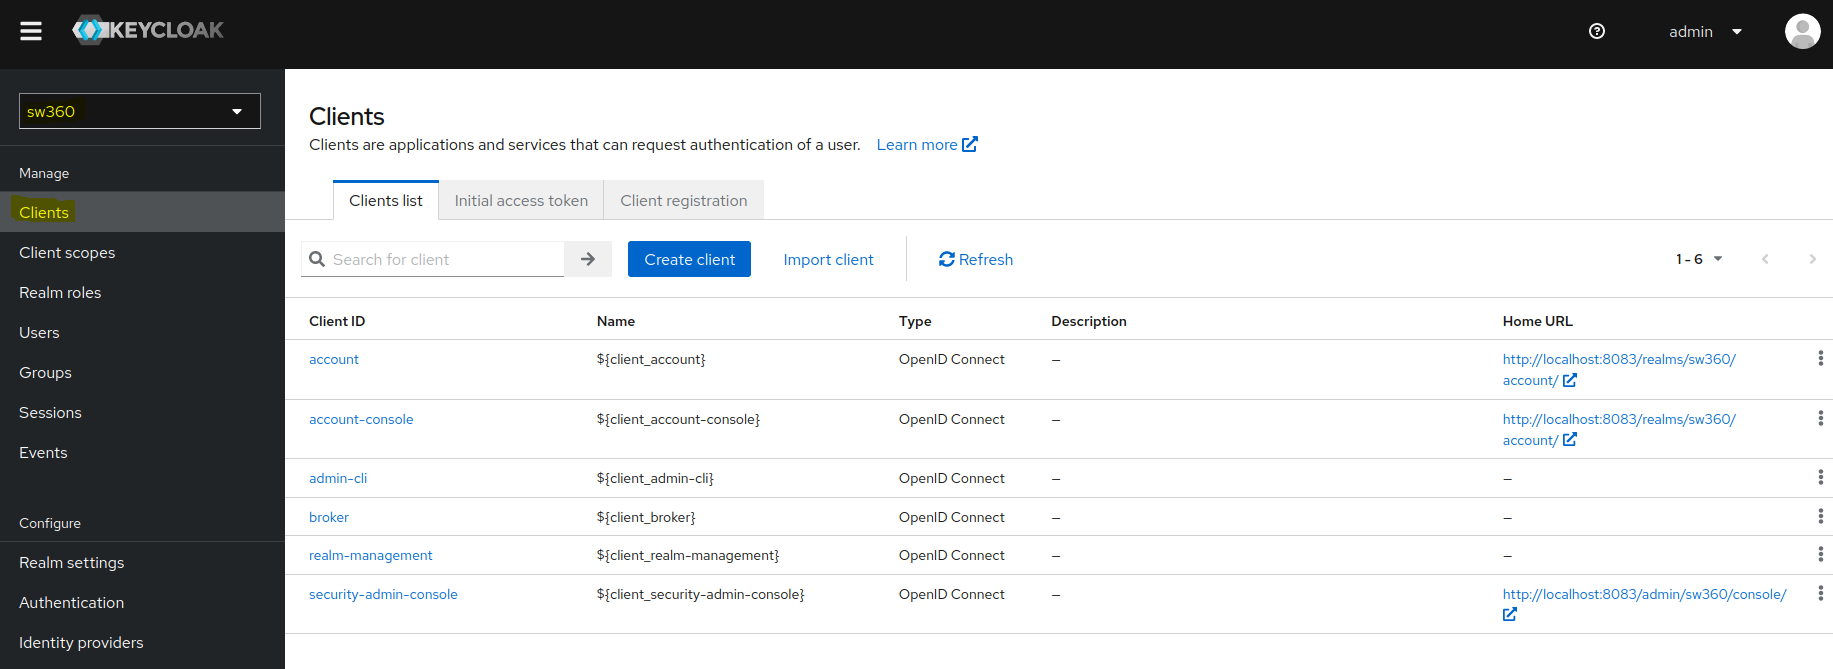
- Follow the below steps for client creation:
Under General settings, enter Client ID which will be used in
.envfile (SW360 Frontend Repo) as well as in rest.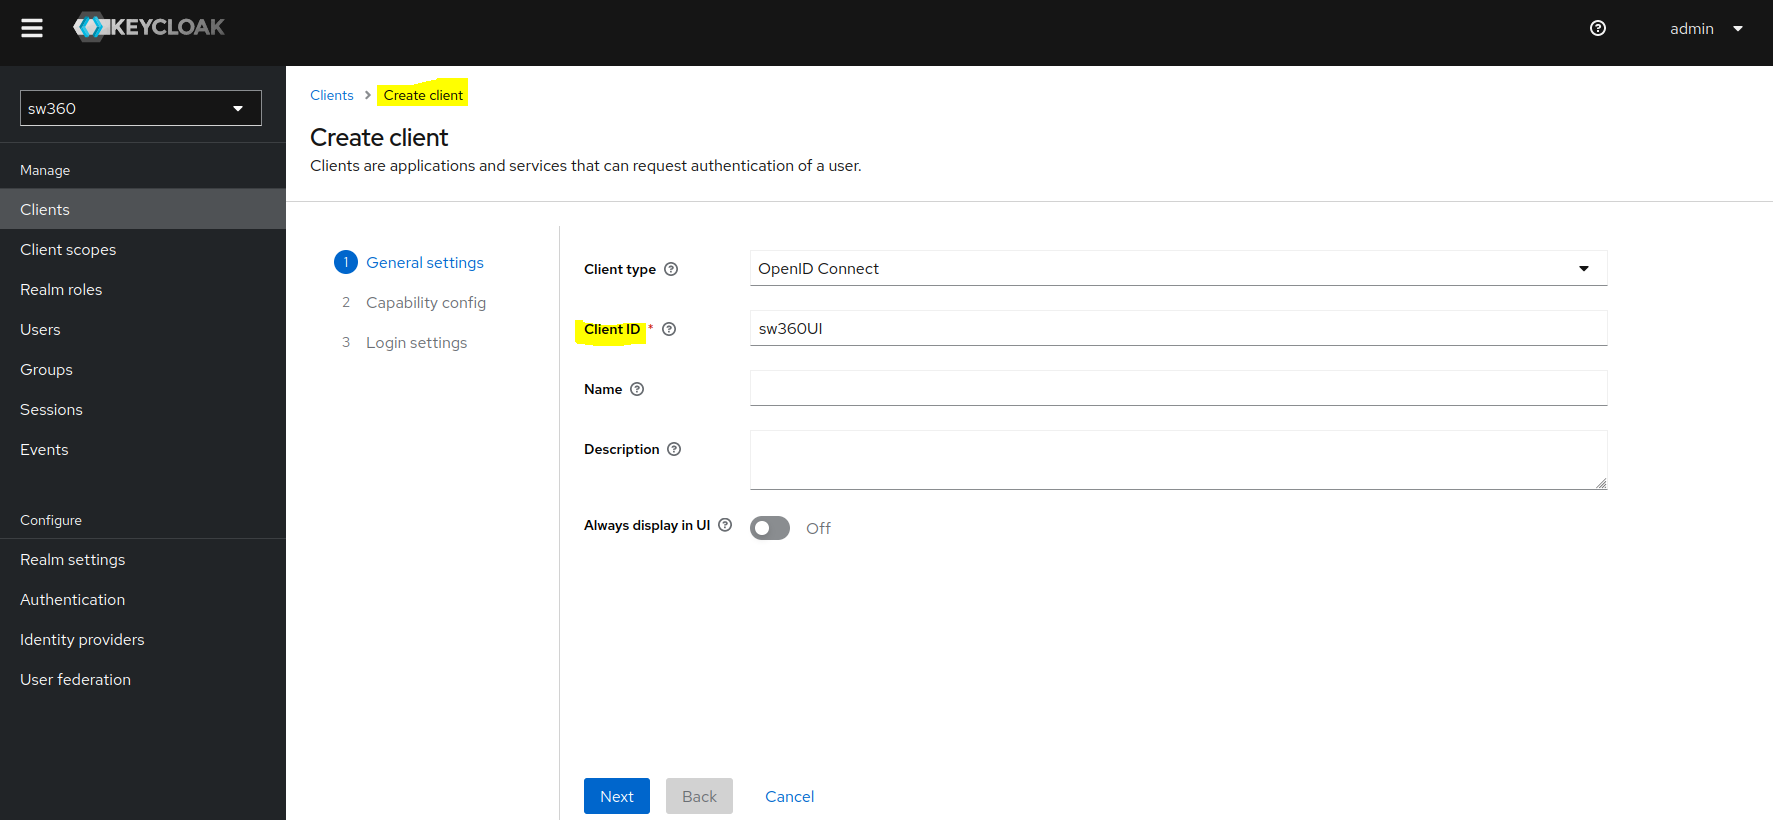
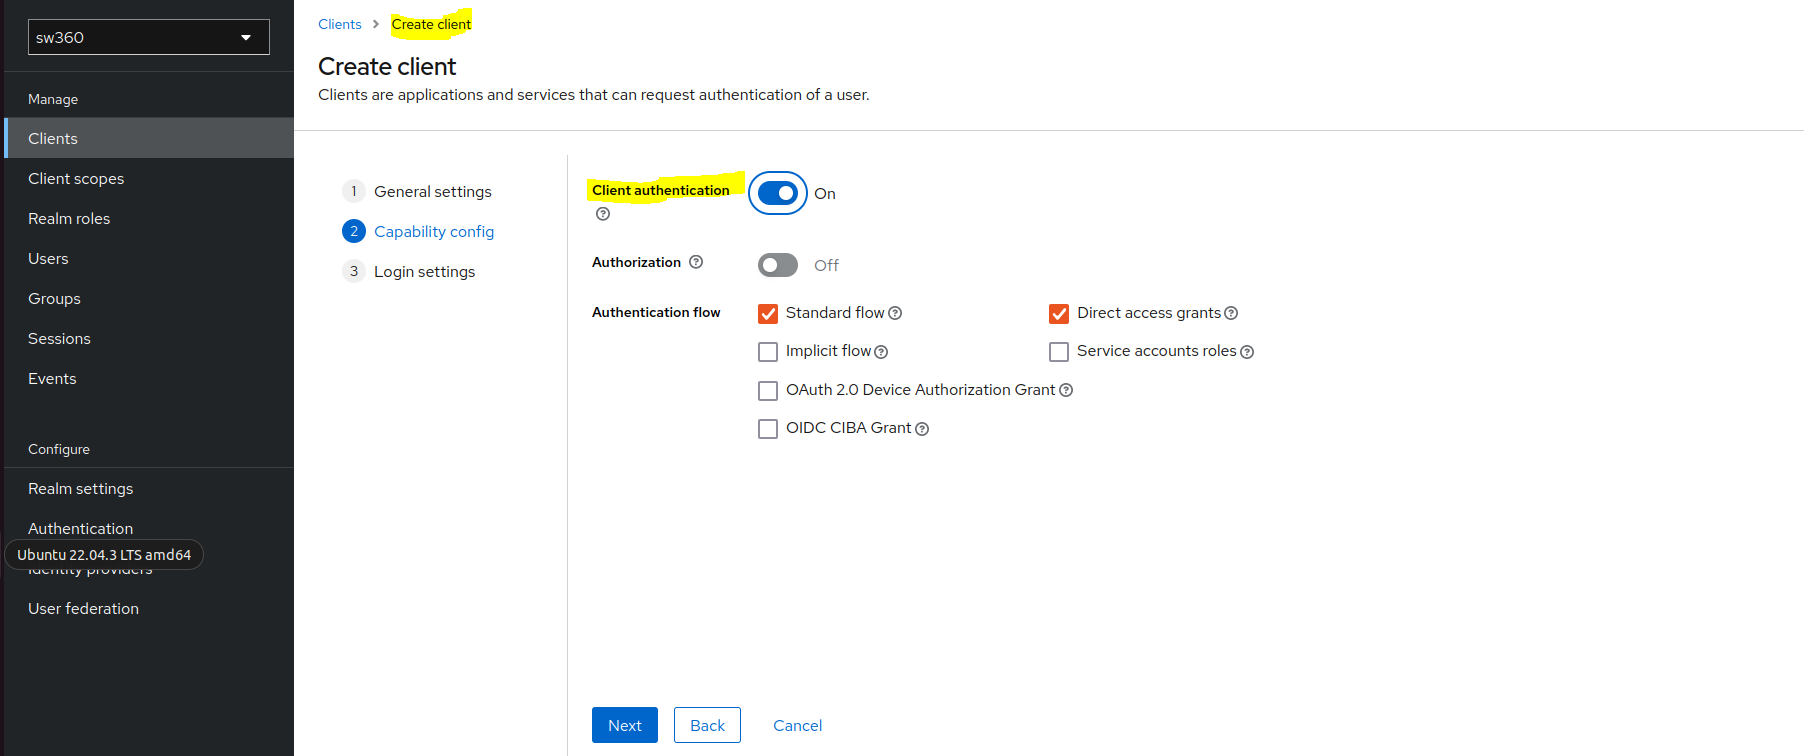
In Capability config enable Client authentication.
Goto Login settings and enter below fields:
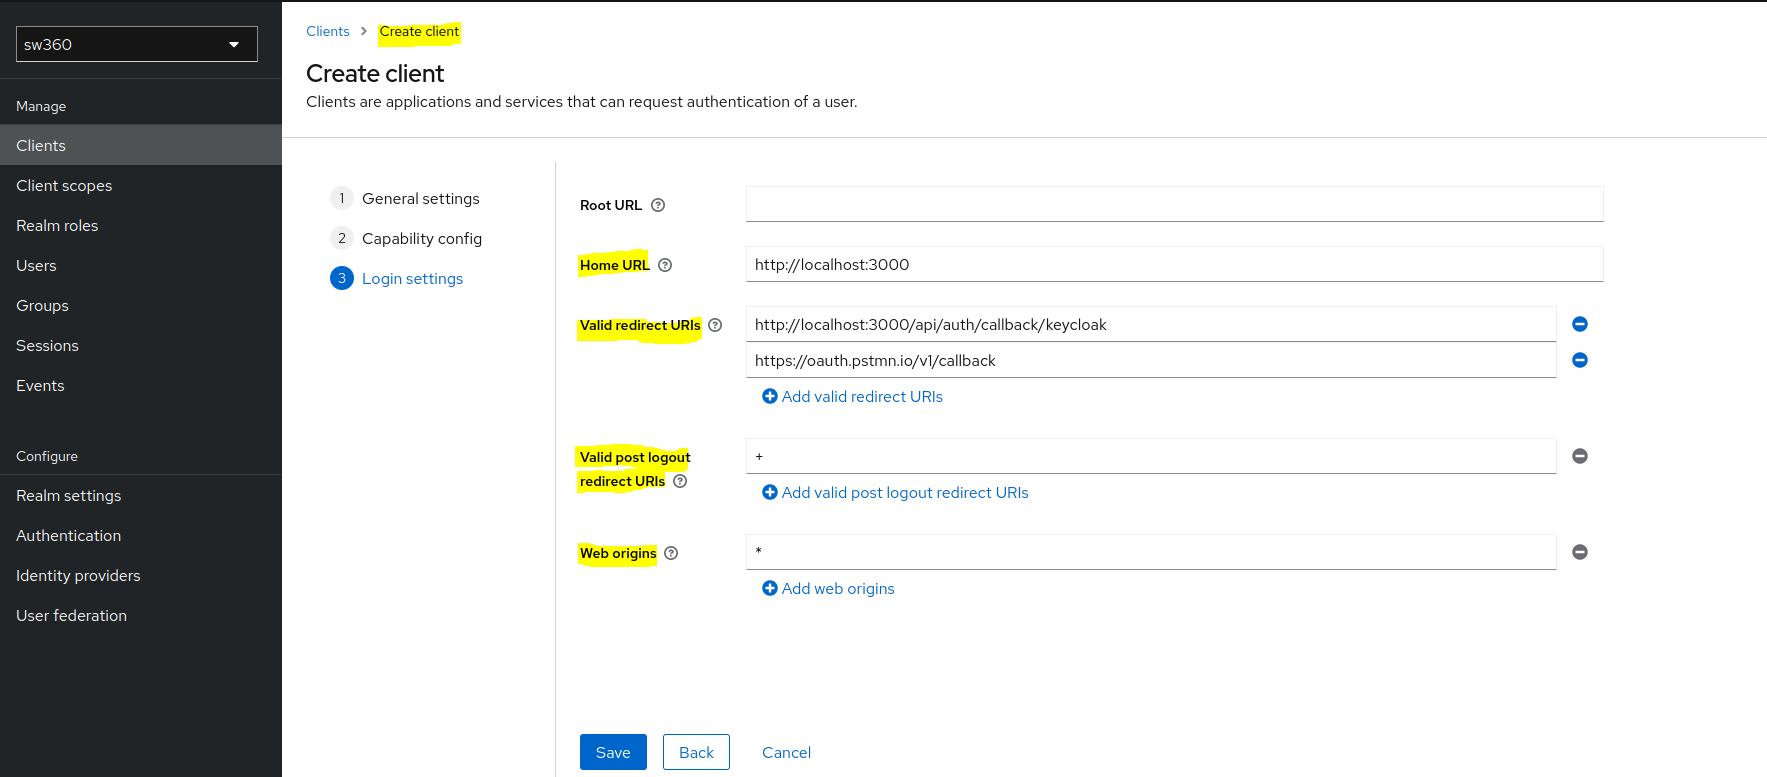
Home URL: http://localhost:3000
Valid redirect URIs: http://localhost:3000/api/auth/callback/keycloak, https://oauth.pstmn.io/v1/callback
Valid post logout redirect URIs: +
Web origins: *
- Follow the below steps for client creation:
Create Client Scopes.
Create
READscope by clicking on Create client scope button.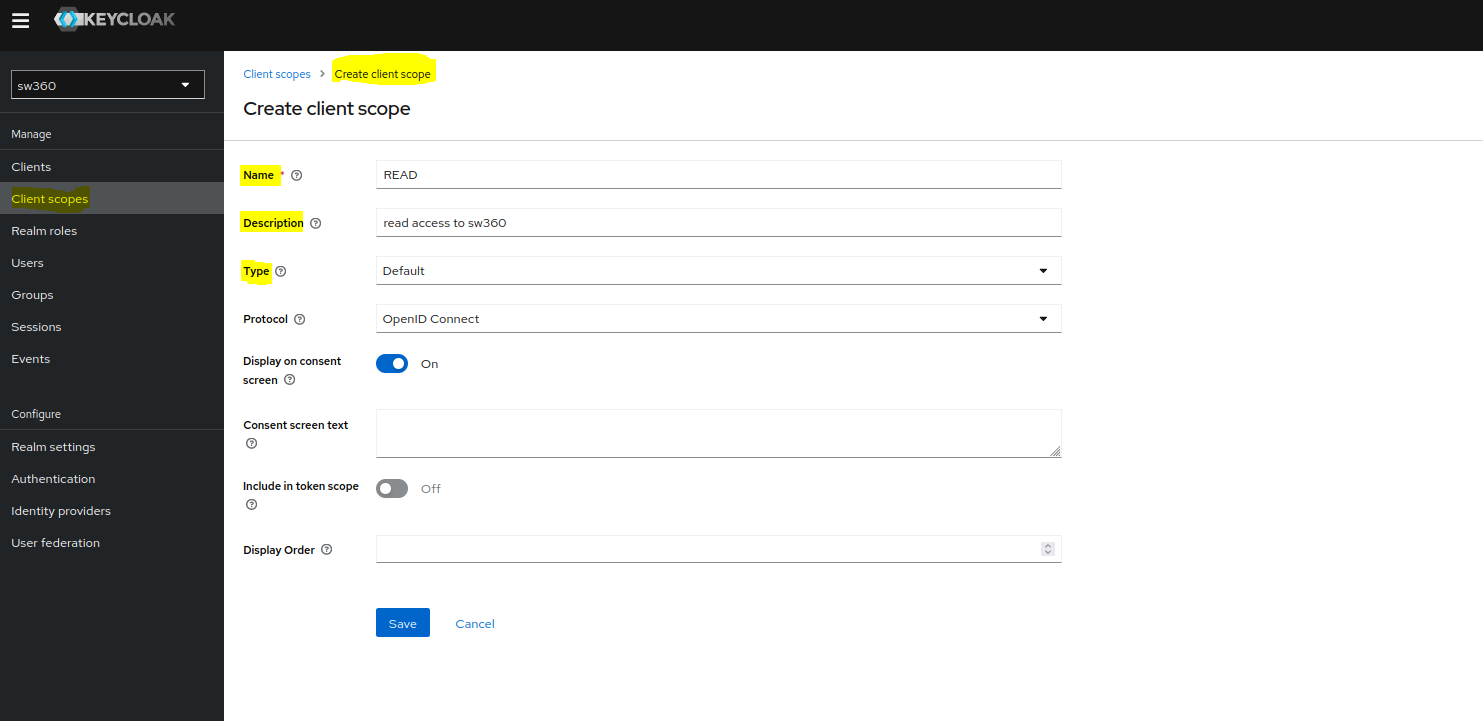
Similarly create
WRITEscope.
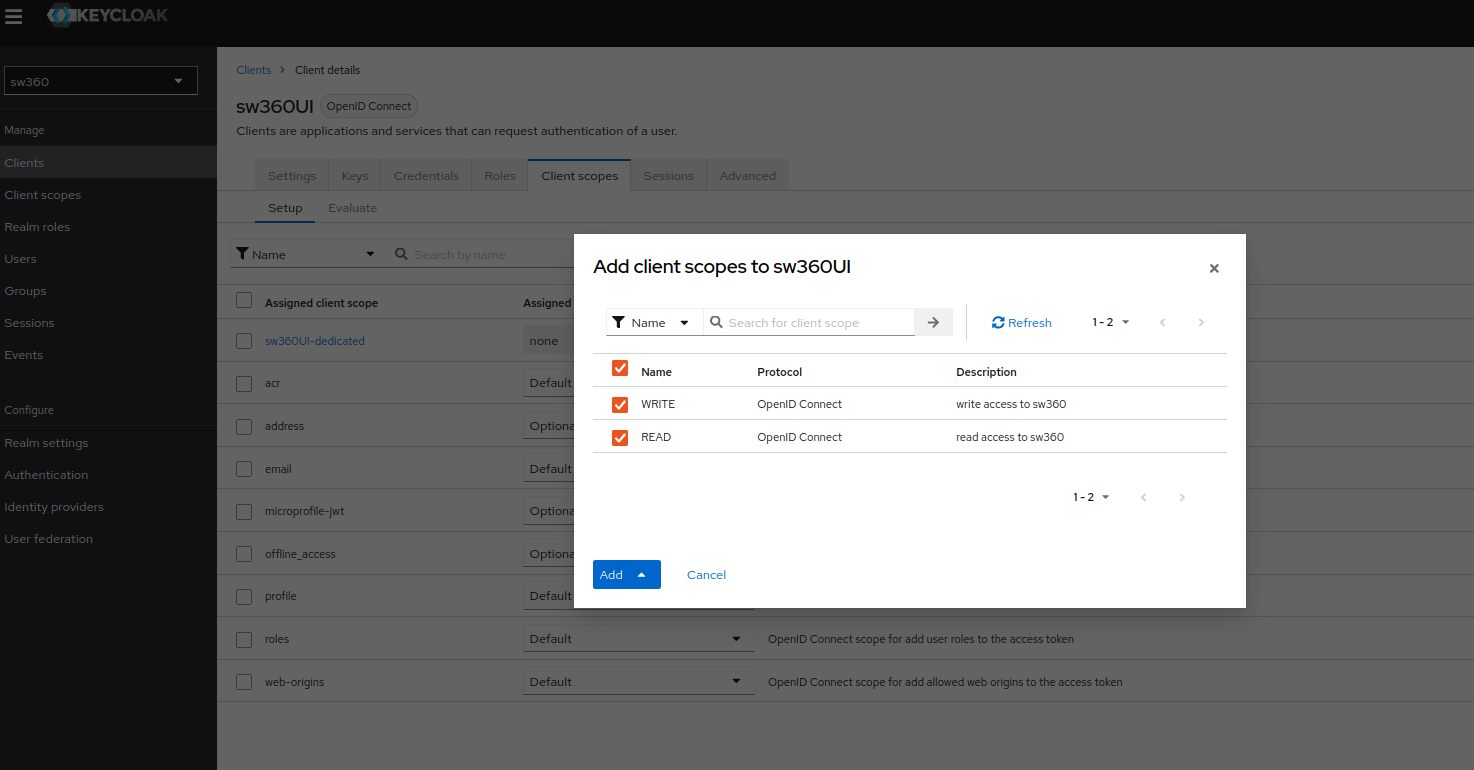
Add Scopes to our Client.
Goto Clients, then select your newly created client in Client lists page.
Goto Client scopes page, click on Add client scope and there you will see your READ and WRITE scopes that you need to add.
Select both scopes and then click on Add (default).
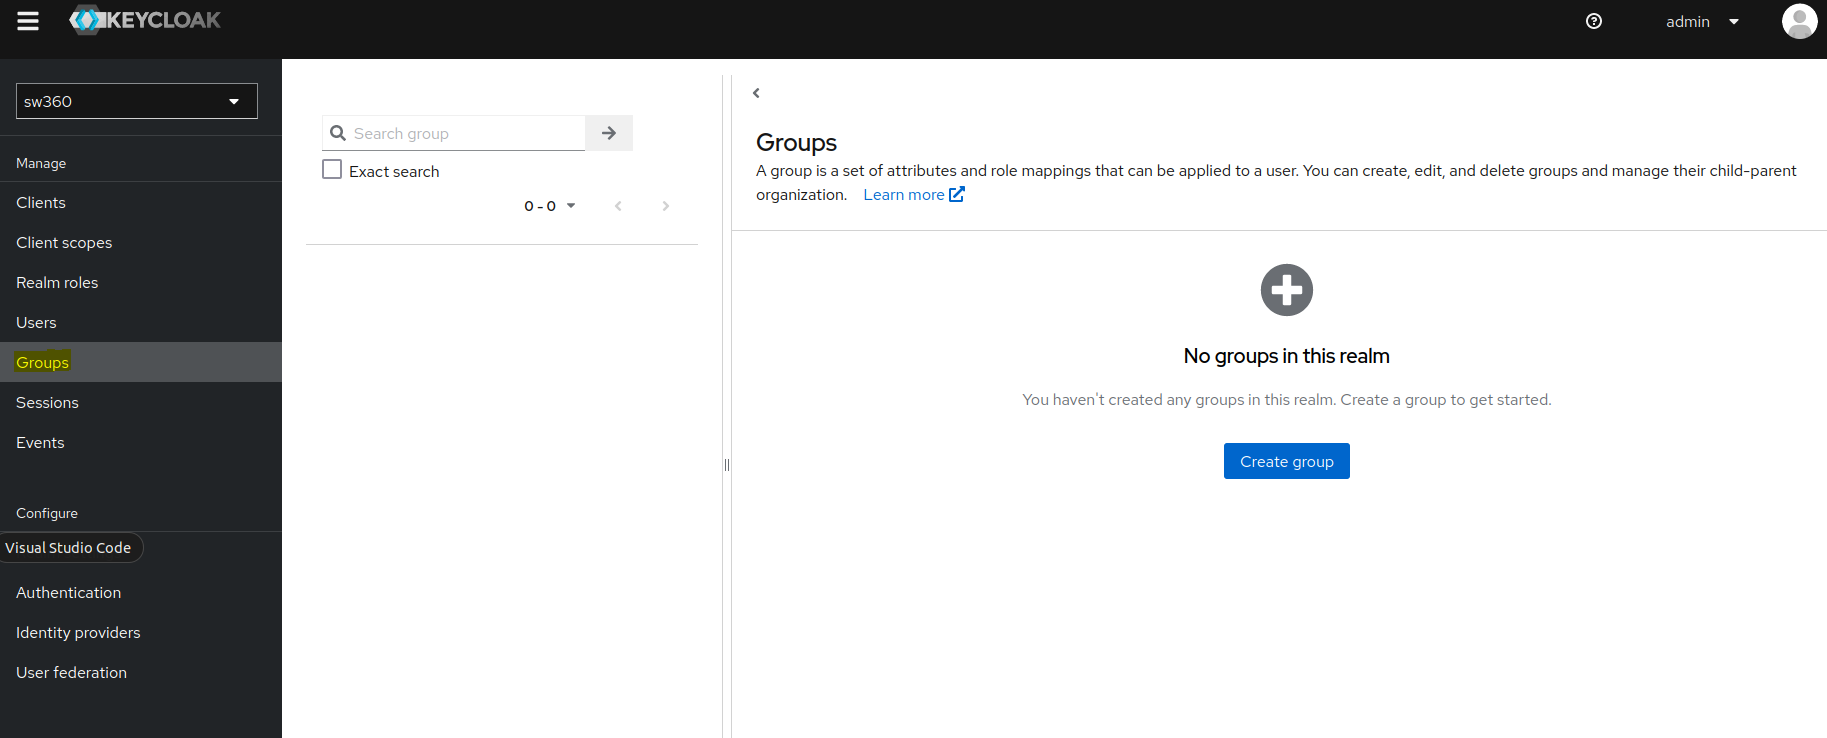
Create Groups.
Goto Groups and create different groups that we are going to use in sw360.
Create 7 groups:
ADMIN,CLEARING_ADMIN,CLEARING_EXPERT,ECC_ADMIN,SECURITY_ADMIN,SW360_ADMIN,USER.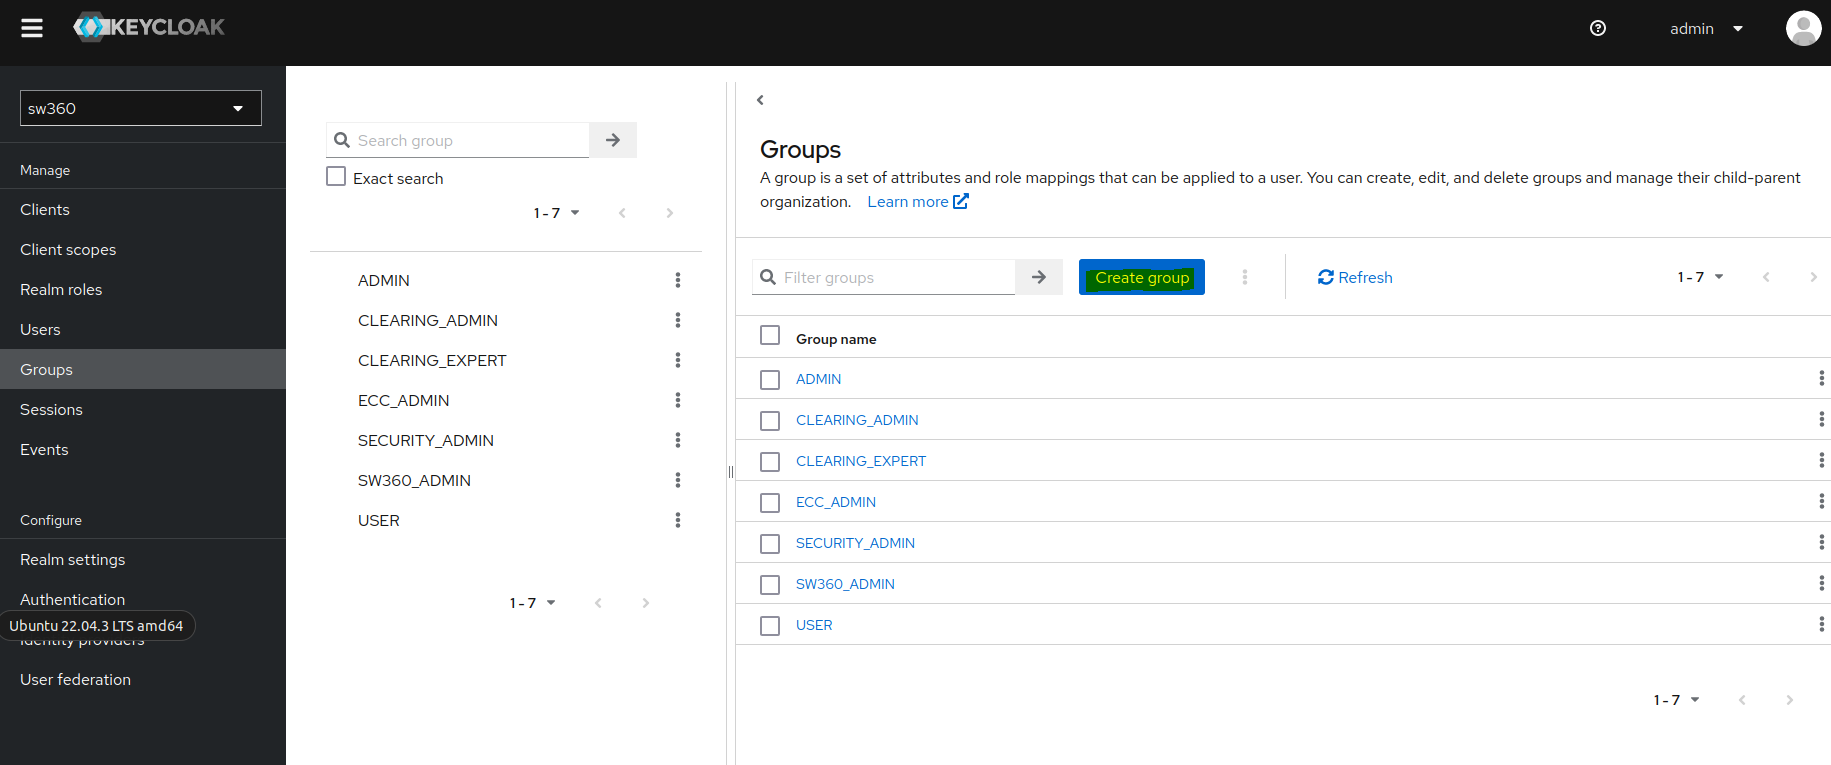
Create an Attribute.
Goto Realm settings then click on User profile page where we can create a new attribute.
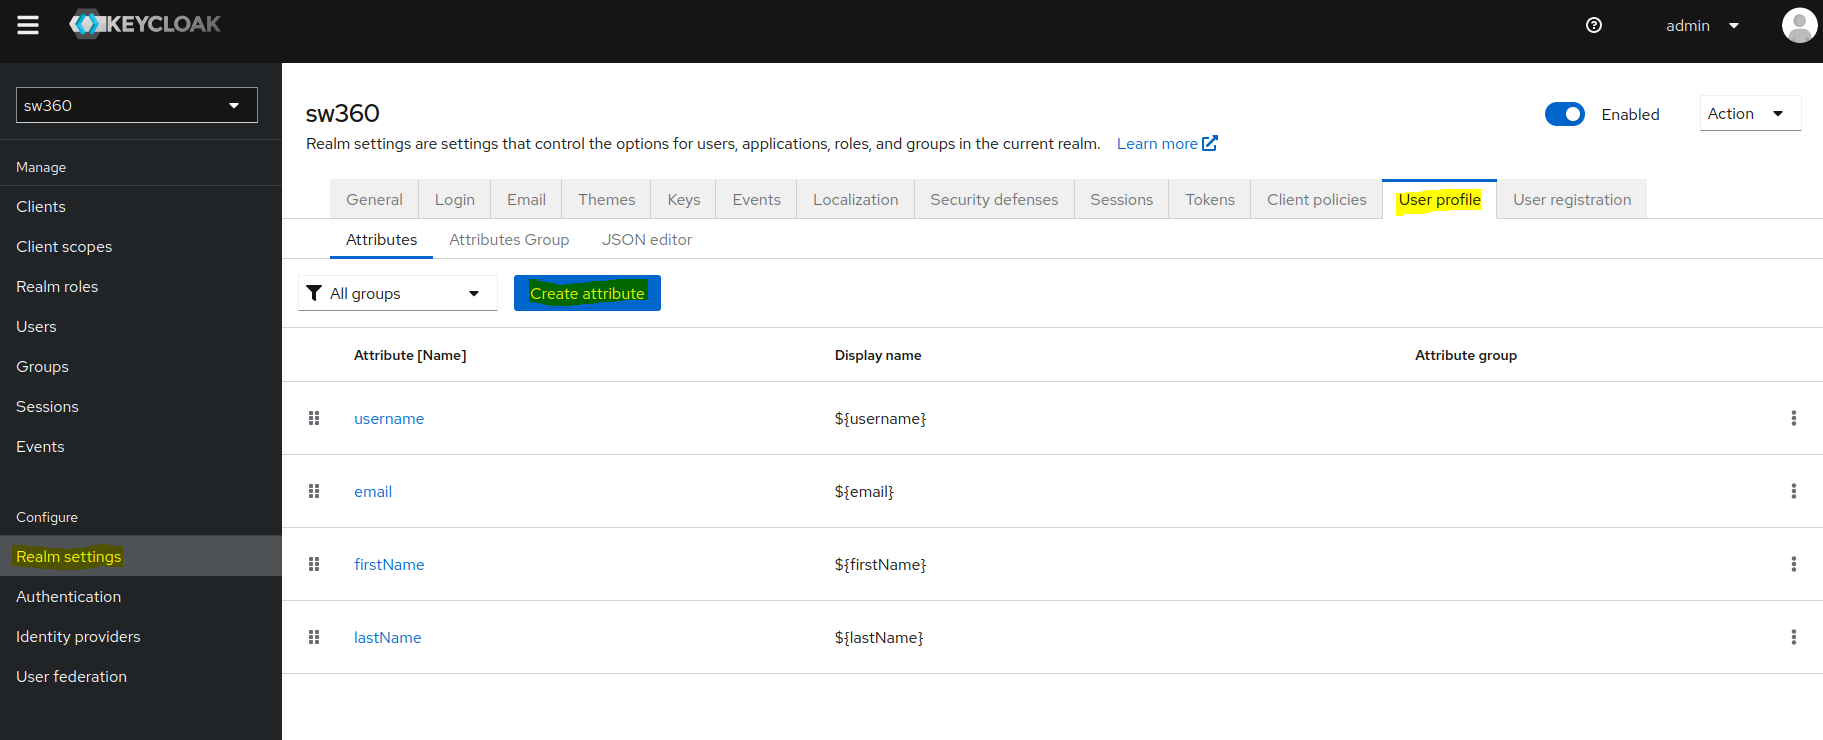
Create a new attribute by the name
Departmentand give the required permissions as shown in screenshot.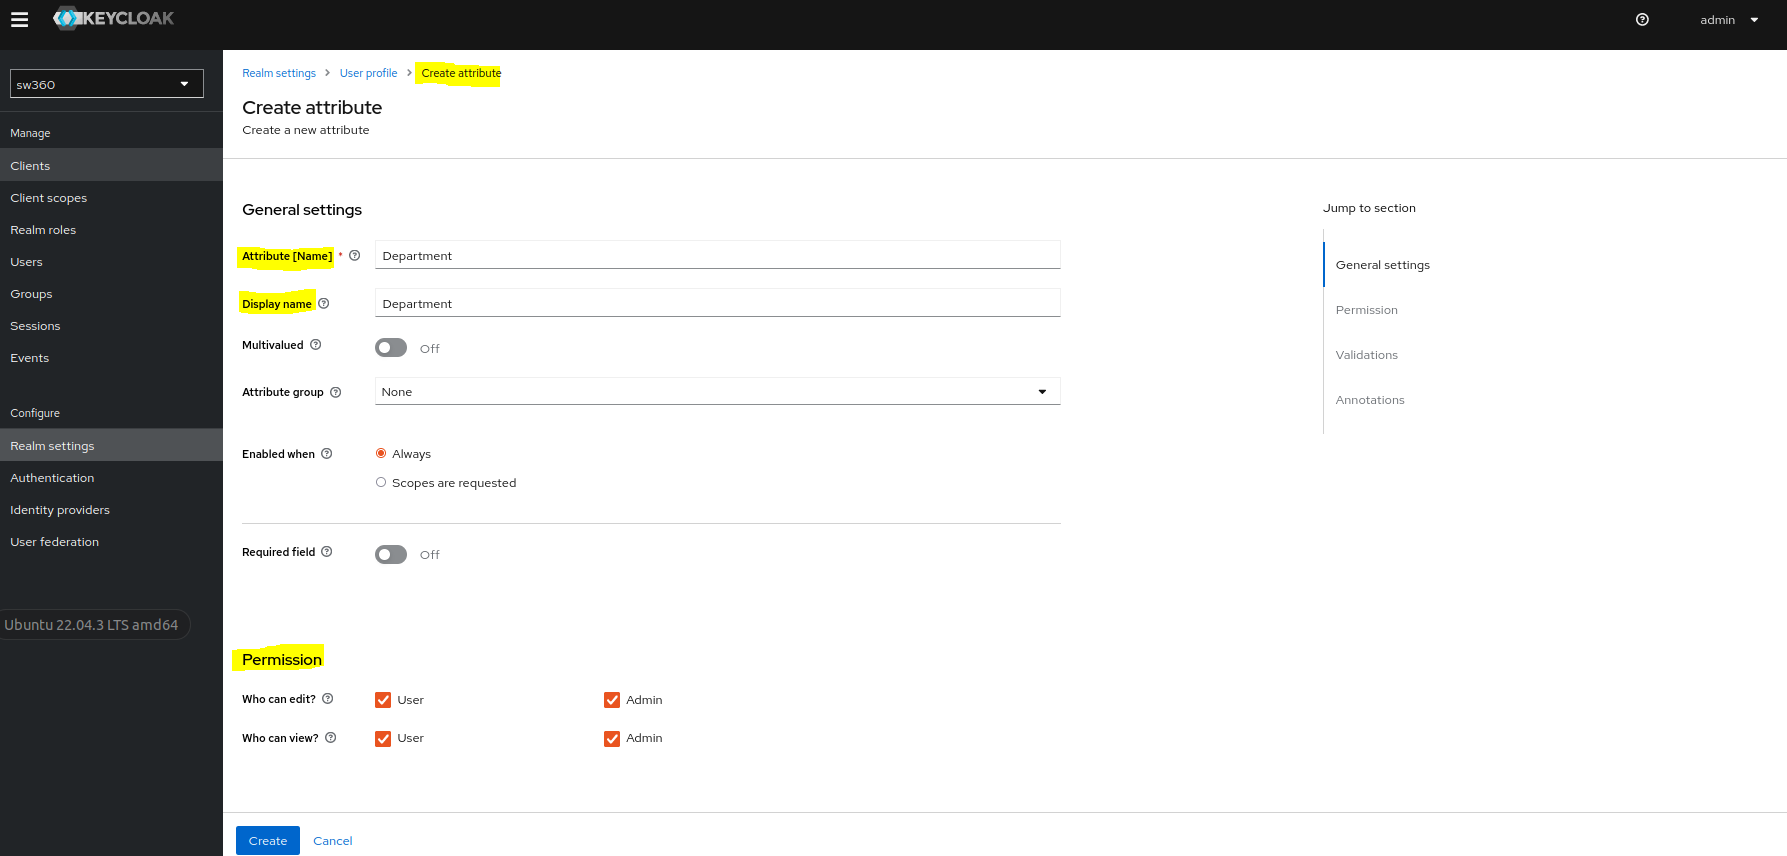
Add Event Listener.
Goto Events page in Realm settings.
Click on event listeners dropdown and select sw360-add-user-to-couchdb.
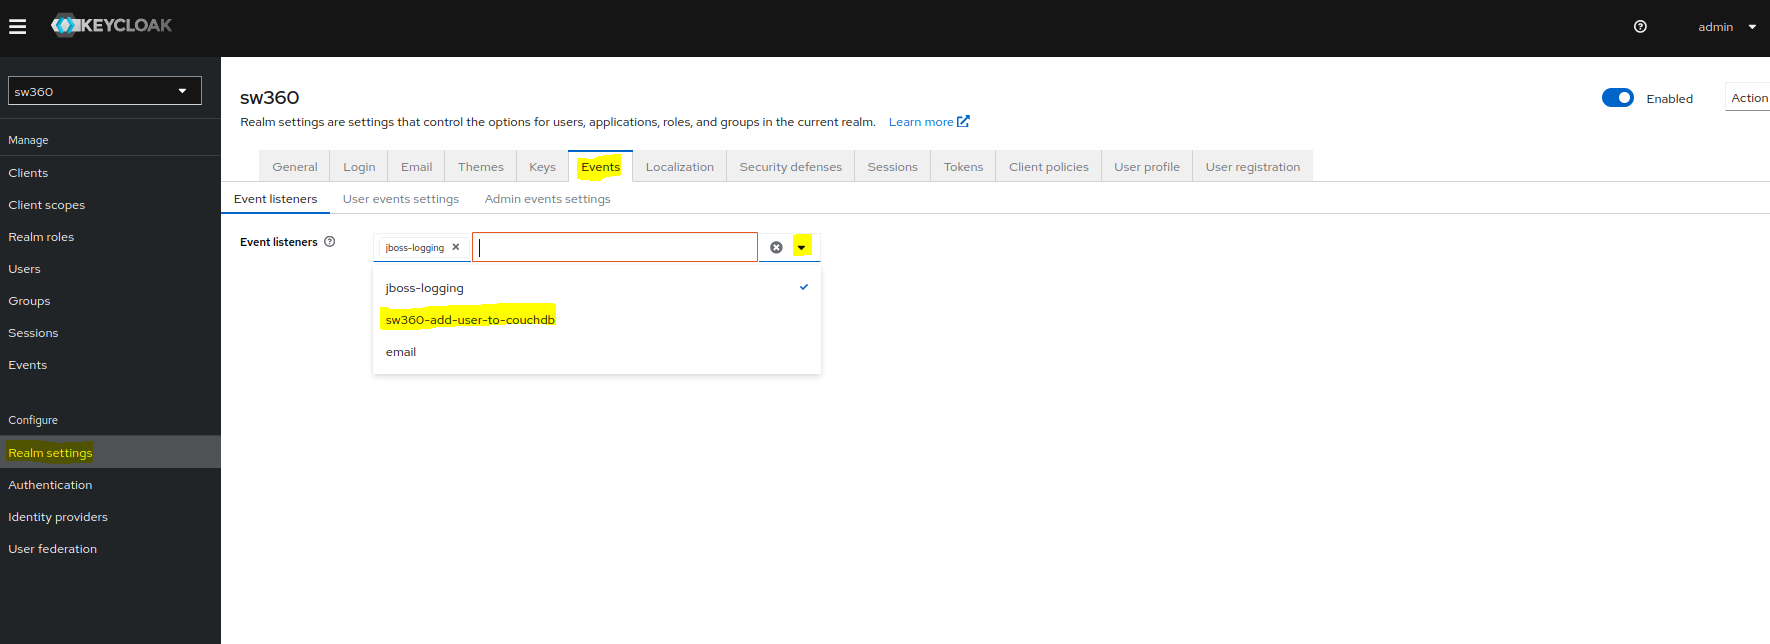
Access to external Databases.
Goto User federation and select sw360-user-storage-jpa providers.
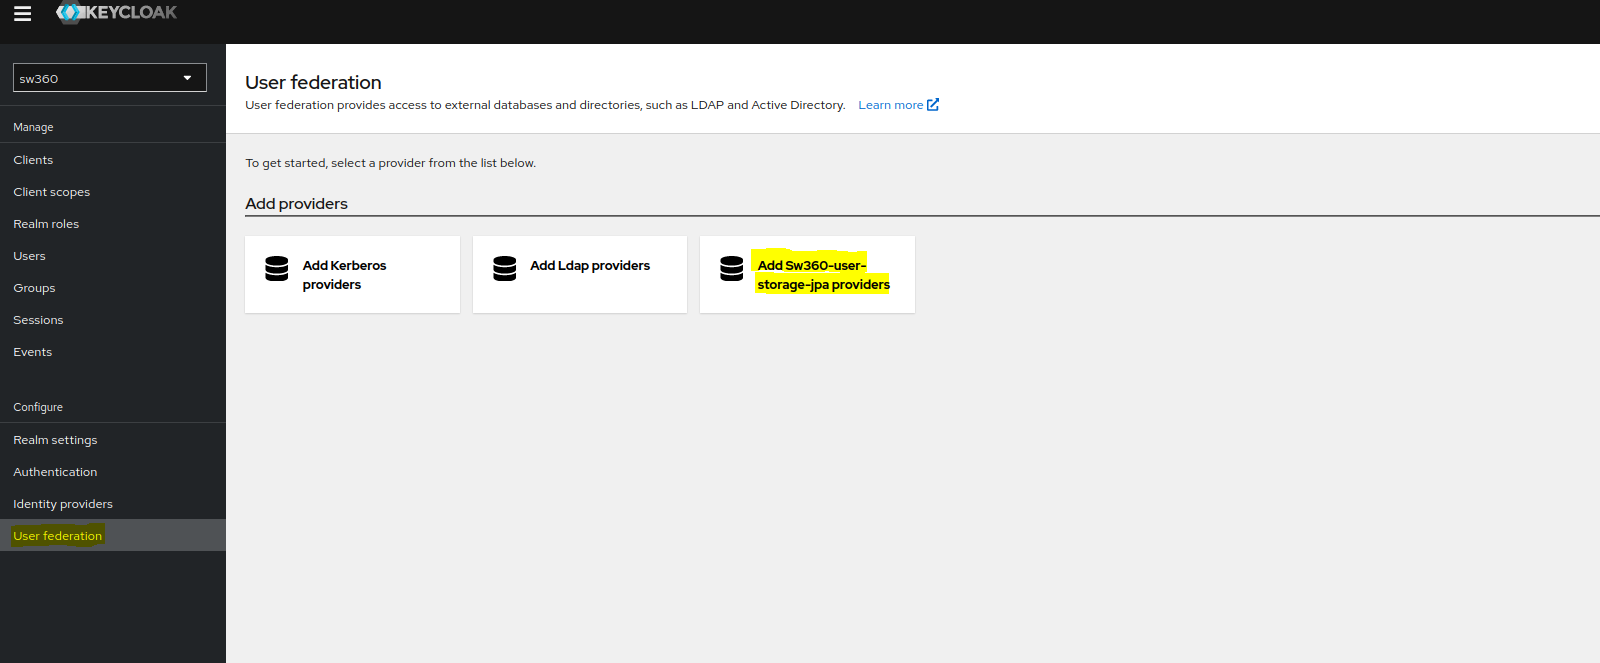
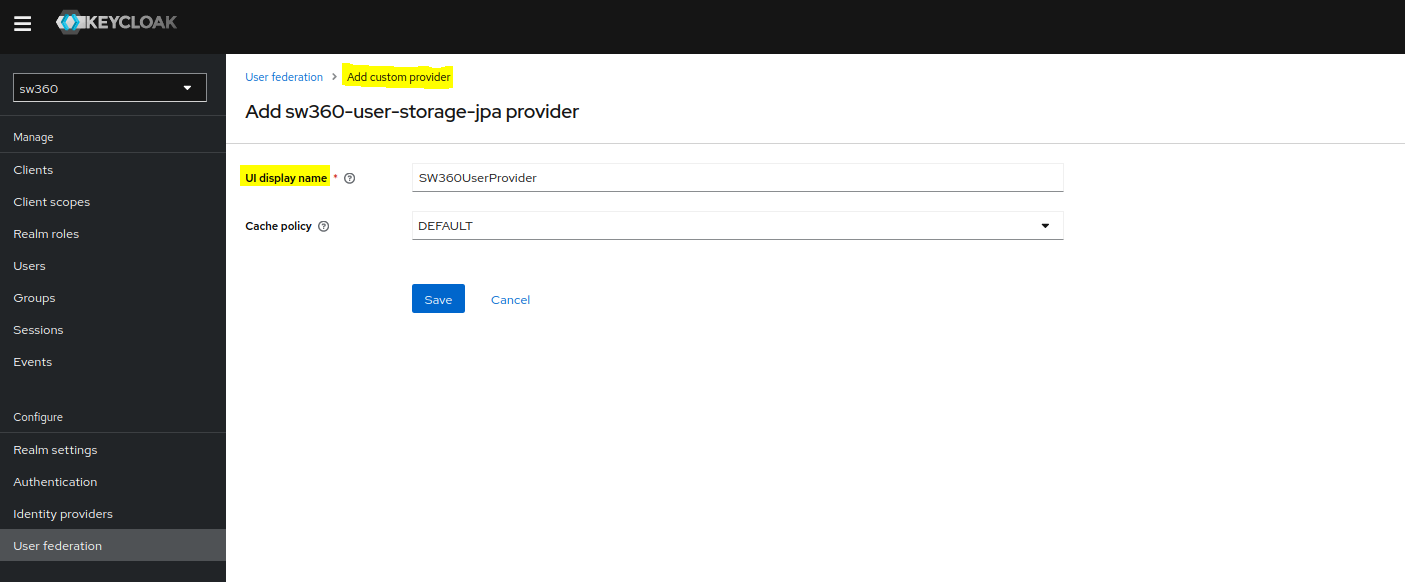
Give proper name and create the custom provider.
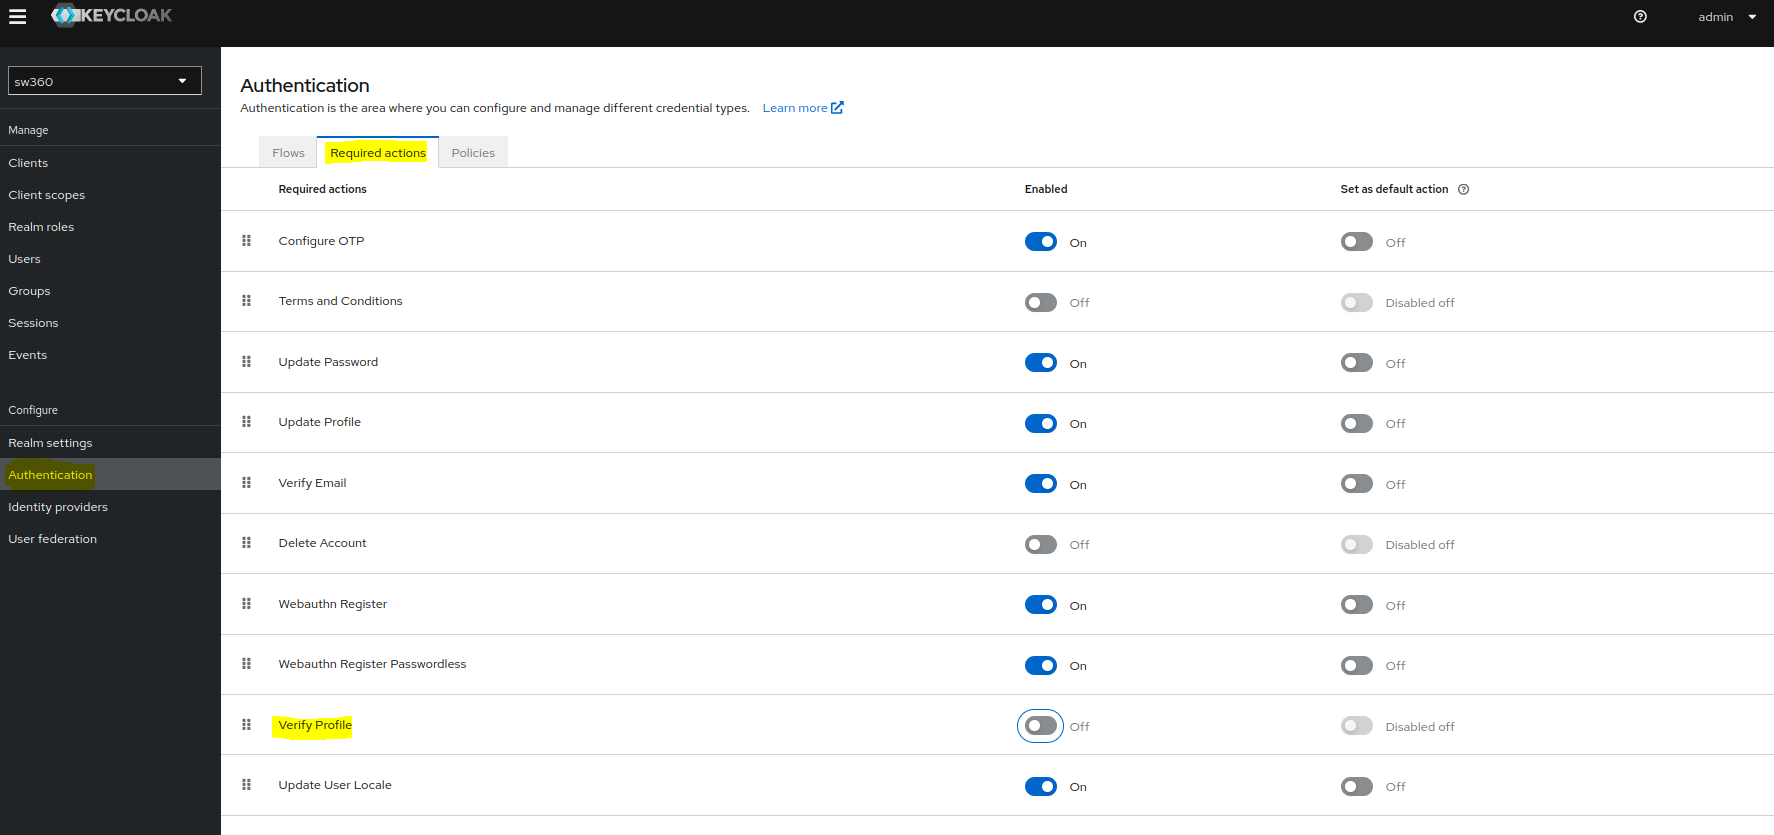
Check Authentication Settings
Goto Authentication and apply the permissions in Required actions as shown in screenshot.
Create Users
To create a new user one can goto Users section.
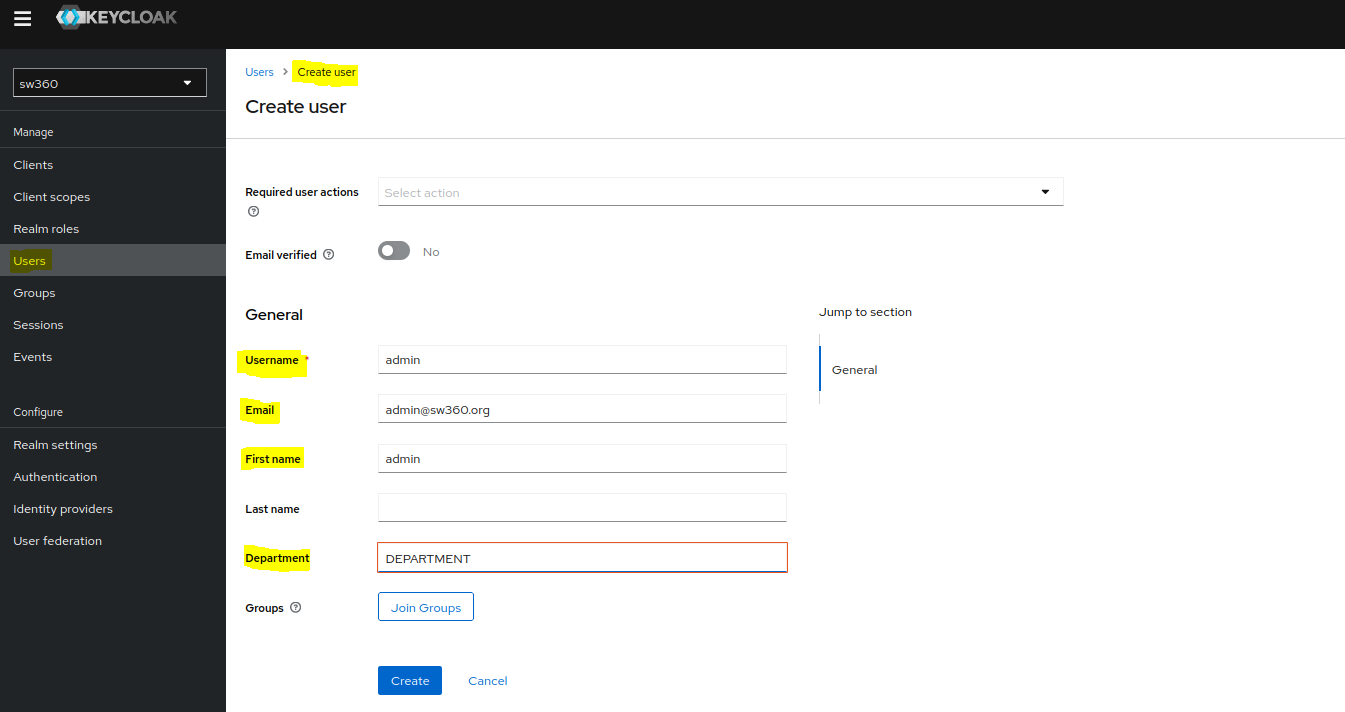
Also check whether user is created in CouchDB or not.
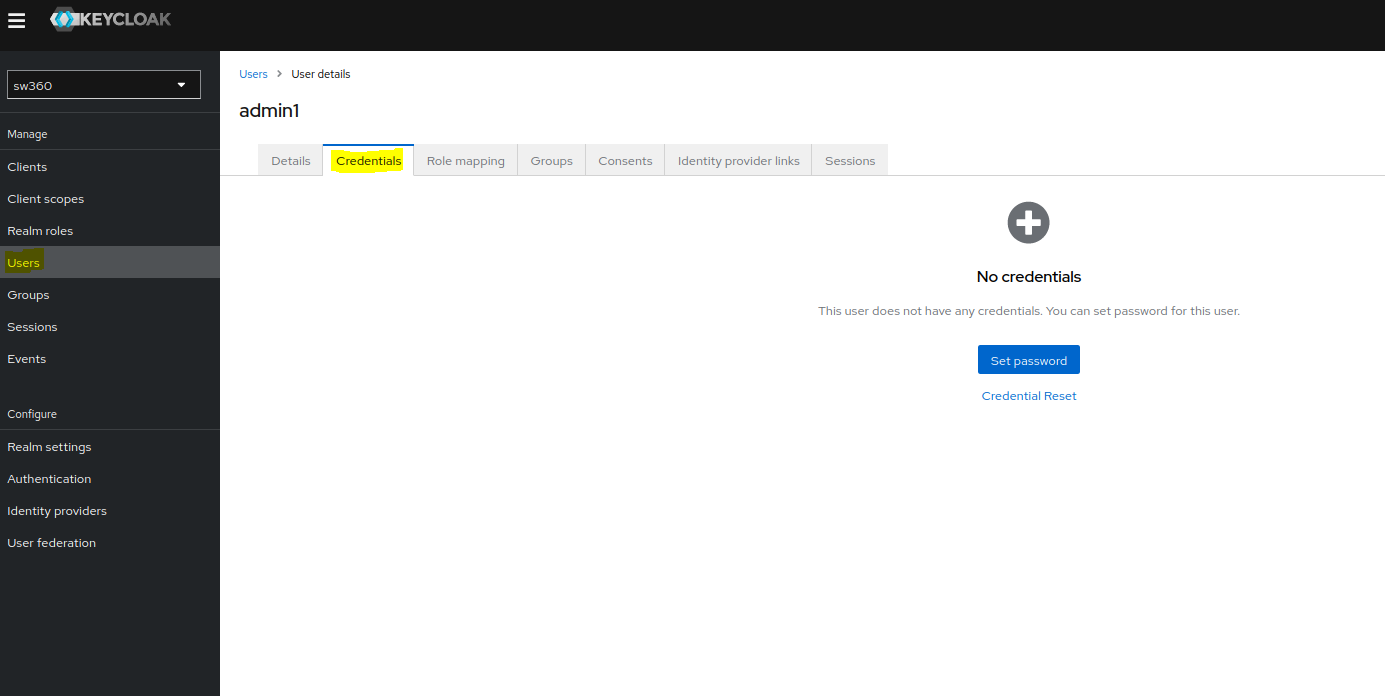
Set password for the newly created user by selecting the user and going to the Credentials page.
Adding Identity Providers in Keycloak for Azure AD Integration
Prerequisites
- Keycloak 26.0.5 installed and running
- Azure AD tenant with necessary permissions
Step 1: Create an Application in Azure AD
Step 2: Configure the Application
Step 3: Configure Keycloak
- Log in to the Keycloak admin console.
- Select the realm sw360 to add the identity provider.
- Go to Identity Providers and select OpenID Connect v1.0 from the dropdown.
- Fill in the following details:
- Alias:
azure-foss360 - Display Name:
Login with AzureAD - Authorization URL:
https://login.microsoftonline.com/<your-tenant-id>/oauth2/v2.0/authorize - Token URL:
https://login.microsoftonline.com/<your-tenant-id>/oauth2/v2.0/token - Logout URL:
https://login.microsoftonline.com/<your-tenant-id>/oauth2/v2.0/logout - User Info URL:
https://graph.microsoft.com/oidc/userinfo - Issuer:
https://login.microsoftonline.com/<your-tenant-id>/v2.0 - JWKS URL:
https://login.microsoftonline.com/<your-tenant-id>/discovery/v2.0/keys - Validate Signatures: ON
- Use JWKS URL: ON
- Trust Email: ON
- Client ID: The Application (client) ID from Azure AD
- Client Secret: The client secret you created in Azure AD
- Default Scopes:
openid profile email
- Alias:
- Click Save.
Step 4: Test the Integration
- Click on Authentication from Left hand Configure Group section
- Click on Browser Flow
- Click config of Identity Provider Redirector
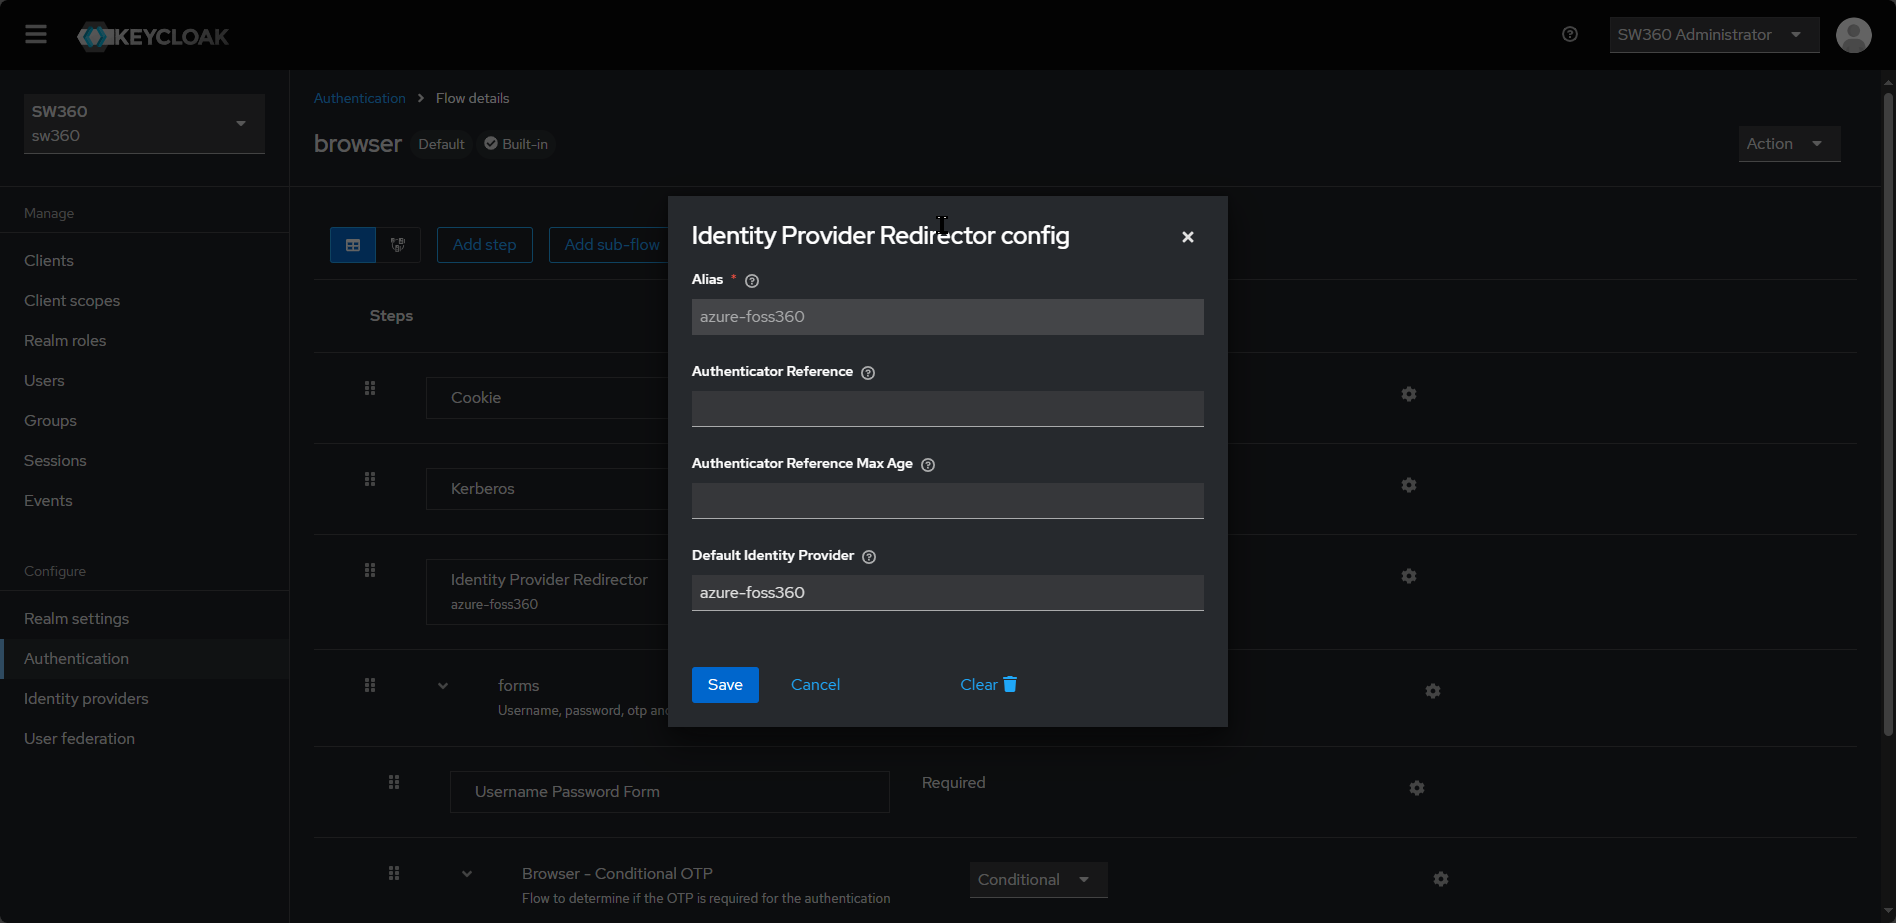
- Provide Default Identity Provider as the value which was given in Identity Providers Alias ( e.g.
azure-foss360in previous section) and click on save. - With this configuration update now access http://localhost:8080 and verify the automatic login with Azure ID redirect.
Clone SW360 Frontend Repository
Follow the instructions to setup the frontend using keycloak from Version 19.x on Debian 12 guide, section 3.3.3.
Token Creation for REST
Type of authorization will be OAuth 2.0.
Enter the below details while creating a new Bearer token:
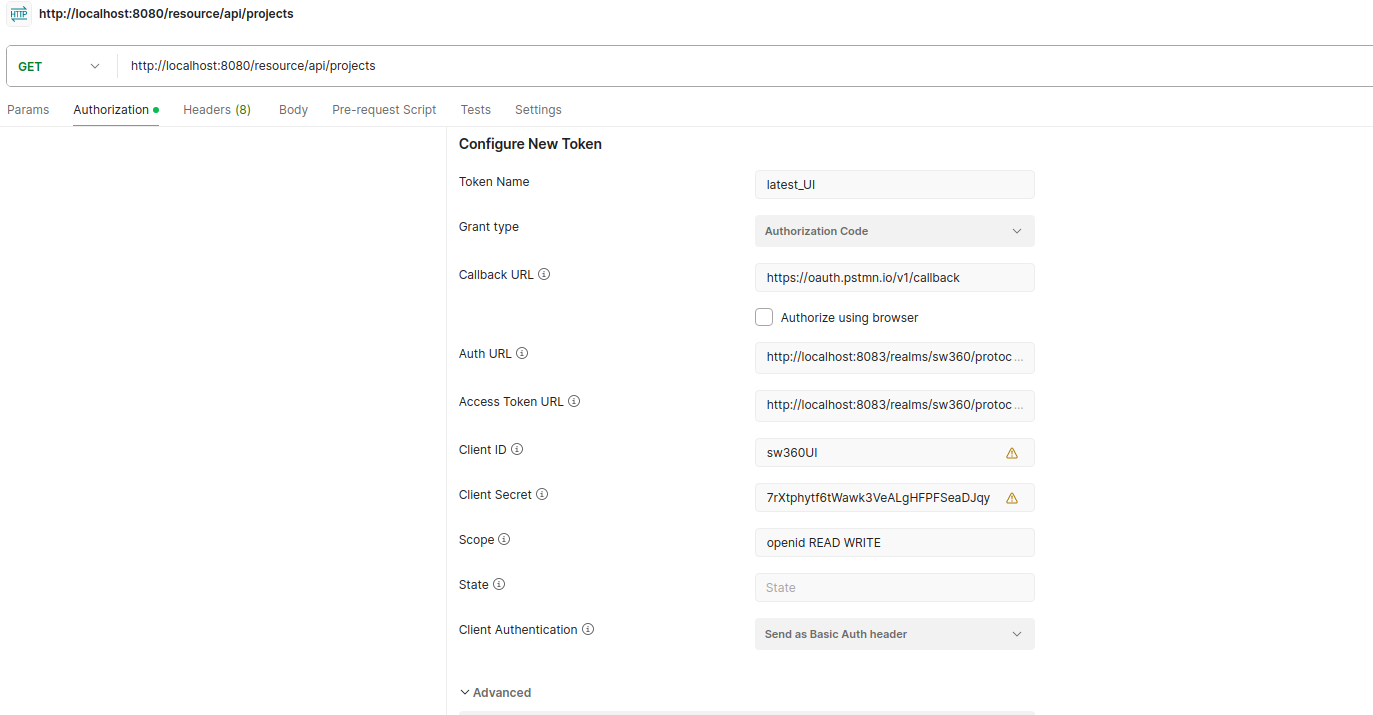
Clallback URL: https://oauth.pstmn.io/v1/callback
Auth URL: http://localhost:8083/realms/sw360/protocol/openid-connect/auth
Access Token URL: http://localhost:8083/realms/sw360/protocol/openid-connect/token
Get Client Id and Client Secret from Keycloak client
Scope: openid READ WRITE