Native Install v14 and v16
How to install and run SW360 v16.0.0
These instructions worked on Ubuntu 20.04 and has detailed explanations for newcomers.
This is a guide with detailed explanation of how to install and run SW360 natively on you local machine.
It includes installation of all dependencies manually, which will not use docker or other container system during the installation or run.
SW360 is an Open Source project. The SW360 repository and SW360 website repositories are published on GitHub.
In this file you will find how to:
- Install SW360 and its dependencies
- Run SW360 and its dependencies
- Check all services are working
- Be aware of cautions and notes
What does SW360 use to construct the UI.
- Java - Java is a class-based, object-oriented programming language.
- Maven - Maven is a build automation tool for Java projects.
- Liferay bundled with Tomcat - Liferay is a Java-based web application platform for the development of customizable portals and websites. And Apache Tomcat provides a “pure Java” HTTP web server environment in which Java code can run.
- PostgreSQL - PostgreSQL or Postgres, is a relational database management system.
- Couchdb - Apache CouchDB is a document-oriented NoSQL database, it uses JSON to store data, and provides HTTP for an API.
- CVE-Search - CVE-Search is a tool to perform local searches for known vulnerabilities (CVE - Common Vulnerabilities and Exposures).
1. Install SW360 and its dependencies
1.1 Clone the SW360 Github repository and checkout to stable version.
$ git clone https://github.com/eclipse/sw360.git
$ cd sw360/
$ git checkout sw360-16.0.0-M1
Check if you have correct repository version
$ git branch
1.2. Install Java, Maven
Install java and maven:
$ sudo apt install openjdk-11-jre-headless
You may use this “$ sudo apt install default-jdk” command instead. Check if java is installed:
$ java --version [check]
Install maven:
$ sudo apt update
$ sudo apt install maven
Check if Maven is installed:
$ mvn --version
1.3. Install Liferay portal and its dependencies
$ ./scripts/docker-config/download_dependencies.sh
$ ls -la ./deps     [check if all dependencies have proper sizes]
$ ./scripts/install-thrift.sh
$ thrift --version   [check]
After this step, check whether the “./deps/jars/libthriftxxx.jar” has version at the end of its name instead of xxx, and has size of 345Kb. If no, download the correct jar from this link:
$ wget https://repo1.maven.org/maven2/org/apache/thrift/libthrift/0.16.0/libthrift-0.16.0.jar
$ mv libthrift-0.16.0.jar ./deps/jars
Once the correct Thrift library is found, install Liferay and copy dependency “.jar” files under “liferay_xxx/osgi/modules” folder:
$ tar -xzvf liferay-ce-portal-tomcat-7.3.4-ga5-20200811154319029.tar.gz
$ cp ./deps/jars/* deps/liferay-ce-portal-7.3.4-ga5/osgi/modules/
Now set all environment variables of SW360 path to your local “.bashrc”: You may use other text editor instead of vim.
$ vim ~/.bashrc
Scroll till the end of the .bashrc file and add following lines, make sure to put correct absolute paths of your local machine in the place of {absolute path to sw360 repository folder}.
export JAVA_HOME=$(dirname $(dirname $(readlink -f $(which java))))
export PATH=$PATH:$JAVA_HOME/bin
export LIFERAY_INSTALL="/{absolute path to sw360 repository folder}/sw360/deps/liferay-ce-portal-7.3.4-ga5"
export SW360_DIR_INSTALL="{absolute path to sw360 repository folder}/sw360"
Save the .bashrc file and run it:
$ source ~/.bashrc
1.4. Make and build SW360
Go to sw360 repository folder firstly.
We also suggest you change the environment settings (frontend/configuration/setenv.sh) to avoid the lack of memory before making and building SW360.
$ vim frontend/configuration/setenv.sh
# The following settings should be adapted to your needs
JAVA_MEMORY_MIN="3g"
JAVA_MEMORY_MAX="6g"

# The following settings should not be touched unless you know what you are doing
# Misconfiguration may be lead to an unusable instance.
JAVA_OPTS="$JAVA_OPTS -Dfile.encoding=UTF8"
JAVA_OPTS="$JAVA_OPTS -Dorg.apache.catalina.loader.WebappClassLoader.ENABLE_CLEAR_REFERENCES=false"
JAVA_OPTS="$JAVA_OPTS -Duser.timezone=GMT"
JAVA_OPTS="$JAVA_OPTS -Xms${JAVA_MEMORY_MIN} -Xmx${JAVA_MEMORY_MAX}"
JAVA_OPTS="$JAVA_OPTS -XX:+UseG1GC"
JAVA_OPTS="$JAVA_OPTS -XX:+CMSParallelRemarkEnabled"
JAVA_OPTS="$JAVA_OPTS -XX:SurvivorRatio=20"

JAVA_OPTS="$JAVA_OPTS -Dlog4j2.formatMsgNoLookups=true"
Then we can type the following command to install: “sudo” might not be necessary, and this will take time, around 5 min]
$ mvn clean
$ sudo mvn install -DskipTests
If the installation was successful, then need to deploy the project to be able to run. Check which tomcat version do you have and put that in the place of {existing version 9.0.33}, normally it should be just “tomcat-9.0.33”.
sudo mvn package -P deploy -Dbase.deploy.dir=. -Dliferay.deploy.dir=${LIFERAY_INSTALL}/deploy -Dbackend.deploy.dir=${LIFERAY_INSTALL}/tomcat-{existing version 9.0.33}/webapps -Drest.deploy.dir=${LIFERAY_INSTALL}/tomcat-{existing version 9.0.33}/webapps -DskipTests
This will create /deploy under root, so sudo is necessary, however you can chmod /deploy. This will take time, around 5 - 10 min. After deploying the project, you should copy the portal-ext.properties to the place of the Liferay.
cp frontend/configuration/portal-ext.properties ${LIFERAY_INSTALL}/
Then modify the file: setup.wizard.enabled=false -> setup.wizard.enabled=true Then copy the files in the directory scripts/docker-config/etc_sw360/ to the directory /etc/sw360/. If the directory /etc/sw360/ does not exist, create it and chmod it.
cp -r scripts/docker-config/etc_sw360/* /etc/sw360/
After this step, you should be able to run Tomcat server and see the index page of SW360 portal. Check SW360
1.5. Install PostgreSQL
Install PostgerSQL manually, you can install through “apt install” too:
$ sudo apt install zlib1g-dev -y
$ sudo apt install libreadline-dev -y
$ wget https://download.postgresql.org/pub/source/v10.14/postgresql-10.14.tar.gz
$ tar -xvf postgresql-10.14.tar.gz
$ cd postgresql-10.14/
$ mkdir -p  /PATH_TO/sw360postgres
$ ./configure -prefix=/PATH_TO/sw360postgres
$ make
$ sudo make install
Set the paths for Postgres in the .bashrc otherwise you have to export them each time. Use same procedure as before in 3rd step.
$ vim ~/.bashrc
Got to the end of the .bashrc file and add following lines, make sure to add correct paths of previously configured sw360postgres. Here $HOME is the absolute path of your user, such as “/home/username”:
$ export PATH=$HOME/sw360postgres/bin:$PATH
$ export PGDATA=$HOME/sw360postgres/data
$ export LD_LIBRARY_PATH=$HOME/sw360postgres/lib
$ export PGPORT=5432
Check if paths have been set, result must be the absolute paths:
$ echo $PATH
$ echo $PGDATA
$ echo $LD_LIBRARY_PATH
$ echo $PGPORT
After paths are set, postgres service can be run:
$  cd /PATH_TO/sw360postgres/bin
$ ./initdb --encoding=UTF8 --no-locale
$ ./pg_ctl start
You will see that the server has started. Note: If you installed through “apt install” then start the postgres service by following command, where after @ comes the installed version, if postgres isn’t running you won’t be able to connect to the server, and the error message is not explaining well that server isn’t actually running at the moment:
sudo systemctl status postgresql@12-main.service
sudo systemctl start postgresql@12-main.service
Normally, Default postgres creates user “postgres” with “postgres” password, use that to enter PostgreSQL terminal:
$ sudo -i -u postgres
$ psql
You will be logged in as user named “postgres”.
$ psql postgres
postgres=# \du
postgres=# create database lportal;
postgres=# ALTER USER postgres WITH PASSWORD 'sw360fossy';
postgres=# ALTER ROLE postgres with superuser;
postgres=# \q
Connect to postgres shell, and check users information
$ psql -d lportal
# \du
# \dt
# \l
1.6. Install Couch DB
To install from aptitute type:
$ sudo apt update
$ sudo apt install -y couchdb
You may refer to the bottom Native Installation 14 version CouchDB manual configuration for seting credentials.
After, run CouchDb service, check if it’s working:
$ sudo systemctl start couchdb.service
Check if CouchDB is responding:
$ curl localhost:5984
This should return json containing version information You can use “start/stop/status/restart” command with systemctl for controlling CouchDB service.
1.7. Install CVE-Search
Follow these detailed instructions:
[https://github.com/cve-search/cve-search/blob/master/docs/source/getting_started/installation.rst]
To connect it to SW360, see following instructions:
https://www.eclipse.org/sw360/docs/deployment/deploy-cve-search/
Notes:
- In the instruction be careful with setting apt link for mongodb, if somehow it destroys your “sudo apt update” command, go to “/etc/apt/sources.list” file and comment out the broken line, that’s probably the one you lately added at the end of the file. This happens because some PPA are outdated but remain in the instructions.
1.8. Configure SW360
Before going to configuration page, need to start the Liferay Tomcat server:
$ {path to sw360 installation}/./deps_backup/liferay-ce-portal-7.3.4-ga5/tomcat-9.0.33/bin/startup.sh
You can use …bin/shutdown.sh script to stop the server. If startup.sh script responded “Tomcat started. Then you are close to see SW360 portal page: To do so, open this url from your browser:
http://127.0.0.1:8080
This will take time, around 5 min. If you can see liferay page, then go to the following links to configure SW360 portal.
- https://qiita.com/K-Hama/items/1582b4e1bf248025eabb#liferaygui%E8%A8%AD%E5%AE%9A - instructions in Japanese.
- https://www.eclipse.org/sw360/docs/deployment/legacy/deploy-liferay7.3 - instrutions in English
Notes:
Probably your postgres user and password are different, then replace the configurations “deps/liferay-ce-portal-7.3.4-ga5/portal-setup-wizard.properties” file or add the new user into postgres with required credentials.
After creating user, if you can’t sign in to SW360 portal https://www.eclipse.org/sw360/img/sw360screenshots/deploy73/2020-08-13_20.09.26.png try to login with “test” password and the same email “setup@sw360.org” as you set in during configuration.
2. Run SW360 and its dependencies
2.1. Run dependencies
Turn on the CouchDB and Postgres services
$ sudo systemctl start couchdb.service
$ sudo systemctl start postgres@@12-main.service
Check if both are running:
$ sudo systemctl status couchdb.service
$ sudo systemctl status postgres@@12-main.service
You should be able to see something like this:
... systemd[1]: Started PostgreSQL Cluster 12-main.
...
... halt systemd[1]: Started Apache CouchDB.
Run Liferay portal
$ ./deps/liferay-ce-portal-7.3.4-ga5/tomcat-9.0.33/bin/startup.sh
Make sure to type correct path to the startup.sh file.
2.3. Run SW360
Open the localhost:8080 page from the browser If all the previous steps were successfuly done you will be able to see this page: https://www.eclipse.org/sw360/img/sw360screenshots/deploy73/2020-08-13_20.24.21.png Now enjoy SW360 portal!
Check all services are working
To fully use SW360 you need to have following services running, please check one by one by opening your browser and typing url, or using curl from command line:
| Service | URL/Port | Notes |
|---|---|---|
| Tomcat | http://127.0.0.1:8080 | When Tomcat is installed without liferay it uses same 8080 port |
| Liferay | http://127.0.0.1:8080 | If Liferay version is correct you will see Liferay white-blue index page not Tomcat yellow-green page. |
| PostgreSQL | http://127.0.0.1:5432 | |
| CouchDB | http://127.0.0.1:5984/_utils | |
| CVE-Search | http://127.0.0.1:5000/admin |
Be aware of cautions and notes
There are various versions of Tomcat with or without Liferay, however here we use Liferay which has already bundled Tomcat inside it’s installation archive, that means you don’t have to install Tomcat separately. In this case, when script liferay- xxx / tomcat- yyy/start.sh is run, the 8080 page will be visible, and will be overwritten by Liferay.
If the service has problem with Liferay then you will not see Liferay blue-white page. If you see other than that then you need to go through 3rd step of Liferay installation, check it’s version and reinstall it.
If you still face the problem with Thrift or Liferay page isn’t responding properly, type this command in the shell, to set the missing Thrift version environment variable, and run the ./scripts/install-thrift.sh again, then start from 3rd step of installation again:
THRIFT_VERSION=${THRIFT_VERSION:-0.16.0}
Native Install SW360 Version-14.0.0
SW360 Version up test
1. Overview
1.1 SW360 Portal
A software component catalogue application - designed to work with FOSSology.
SW360 is a server with a REST interface and a Liferay CE portal application to maintain your projects / products and the software components within. It can manage SPDX files for maintaining the license conditions and maintain license information.
This material helps user to install SW360 14.0
1.2 Environment
| Package Name | Version |
|---|---|
| Ubuntu | 20.04 |
| Apt | 2.0.2 |
| Wget | 1.20.3 |
| Curl | 7.68.0 |
| Git | 2.25.1 |
| Maven | 3.6.0 |
| OpenJDK | 11.0.5 |
2.Install & Config proxy for Environment
2.1 Apt
2.2 Wget
2.3 Curl
2.4 Git
2.5 Maven
2.6 OpenJDK
2.1 Apt
Create file with name proxy.conf in folder /etc/apt/apt.conf.d
$ sudo gedit /etc/apt/apt.conf.d/proxy.conf
Add the following line few files proxy.conf
    Acquire {
        HTTP::proxy "http://username:password@server:port";
        HTTPS::proxy "http://username:password@server:port";
    }
2.2 Wget
Create file ~/.wgetrc
$ sudo gedit ~/.wgetrc
Add the following line few files ~/.wgetrc
	use_proxy=yes
	  http_proxy=http://username:password@server:port
	  https_proxy=http://username:password@server:port
2.3 Curl
2.3.1 Install Curl
$ sudo apt update$ sudo apt install curl
2.3.2 Config proxy
Create file
~/.curlrc$ sudo gedit ~/.curlrc
Add the following line few files
~/.curlrc
proxy=http://username:password@server:port/
2.4 Git
2.4.1 Install Git
$ sudo apt update$ sudo apt install git
2.4.2 Config proxy
Create file
~/.gitconfig$ sudo gedit ~/.gitconfig
Add the following line few files
~/.gitconfig[http] proxy = http://username:password@server:port sslverify = false [https] proxy = http://username:password@server:port
2.5 Maven
2.5.1 Install Maven
*Go to back Home in Terminal
$ sudo apt update$ sudo apt install maven
2.5.2 Config proxy for Maven
- Create Folder with path
/home/user/.m2
$ mkdir /home/user/.m2
- Create File in Folder
.m2
$ touch /home/user/.m2/settings.xml
Copy the following lines into tag
      <settings>
          <proxies>
              <proxy>

                  <id>optional1</id>

                  <active>true</active>

                  <protocol>http</protocol>

                  <username>username</username>

                  <password>password</password>

                  <host>server</host>

                  <port>port</port>

                  <nonProxyHosts>local.net</nonProxyHosts>

              </proxy>

              <proxy>

                 <id>optional1</id>

                  <active>true</active>

                  <protocol>http</protocol>

                  <username>username</username>

                  <password>password</password>

                  <host>server</host>

                  <port>port</port>

                  <nonProxyHosts>local.net</nonProxyHosts>

              </proxy>
          </proxies>
      </settings>
2.6 OpenJDK 11
- And install OpenJDK 11
$ sudo apt install openjdk-11-jdk
- Check version:
$ java --version- Output:
openjdk version "11.0.15" 2022-04-19 OpenJDK Runtime Environment (build 11.0.15+10-Ubuntu-0ubuntu0.18.04.1) OpenJDK 64-Bit Server VM (build 11.0.15+10-Ubuntu-0ubuntu0.18.04.1, mixed mode, sharing)- Install JDK successfully
3. Native install 14.0 (without docker-compose)
The installation consists of some tasks::
3.1 Install A Liferay Community Edition bundled with Tomcat and download dependencies as OSGi modules
3.2 Install Couchdb version 3.2.2
3.3 Install Couchdb Lucene
3.4 Clone Project sw360 with version 14
3.5 Install Thrift version 14.0
3.6 Compiling and deploying
3.7 Version Management Table
3.1 Install A Liferay Community Edition bundled with Tomcat
Make folder
workin path of work:/home/user$ mkdir work
Download Liferay Portal CE 7.3.4 GA5
$ cd work$ wget --no-check-certificate https://sourceforge.net/projects/lportal/files/Liferay%20Portal/7.3.4%20GA5/liferay-ce-portal-tomcat-7.3.4-ga5-20200811154319029.tar.gz/download -O liferay-ce-portal-tomcat-7.3.4-ga5.tar.gz
Extract downloaded file
$ tar -xzf liferay-ce-portal-tomcat-7.3.4-ga5.tar.gz
Set Environment for
${LIFERAY_INSTALL}$ export LIFERAY_INSTALL=/opt/liferay-ce-portal-7.3.4-ga5
Move to
${LIFERAY_INSTALL}/deployand Run command:$ cd ${LIFERAY_INSTALL}/deploywget https://search.maven.org/remotecontent?filepath=commons-codec/commons-codec/1.12/commons-codec-1.12.jar -O commons-codec-1.12.jarwget https://search.maven.org/remotecontent?filepath=org/apache/commons/commons-collections4/4.4/commons-collections4-4.4.jar -O commons-collections4-4.4.jarwget https://search.maven.org/remotecontent?filepath=org/apache/commons/commons-csv/1.4/commons-csv-1.4.jar -O commons-csv-1.4.jarwget https://search.maven.org/remotecontent?filepath=commons-io/commons-io/2.6/commons-io-2.6.jar -O commons-io-2.6.jarwget https://search.maven.org/remotecontent?filepath=commons-lang/commons-lang/2.4/commons-lang-2.4.jar -O commons-lang-2.4.jarwget https://search.maven.org/remotecontent?filepath=commons-logging/commons-logging/1.2/commons-logging-1.2.jar -O commons-logging-1.2.jarwget https://search.maven.org/remotecontent?filepath=com/google/code/gson/gson/2.8.5/gson-2.8.5.jar -O gson-2.8.5.jarwget https://search.maven.org/remotecontent?filepath=com/google/guava/guava/21.0/guava-21.0.jar -O guava-21.0.jarwget https://search.maven.org/remotecontent?filepath=com/fasterxml/jackson/core/jackson-annotations/2.11.3/jackson-annotations-2.11.3.jar -O jackson-annotations-2.11.3.jarwget https://search.maven.org/remotecontent?filepath=com/fasterxml/jackson/core/jackson-core/2.11.3/jackson-core-2.11.3.jar -O jackson-core-2.11.3.jarwget https://search.maven.org/remotecontent?filepath=com/fasterxml/jackson/core/jackson-databind/2.11.3/jackson-databind-2.11.3.jar -O jackson-databind-2.11.3.jarwget https://repo1.maven.org/maven2/org/apache/commons/commons-compress/1.20/commons-compress-1.20.jar -O commons-compress-1.20.jarwget https://repo1.maven.org/maven2/org/apache/thrift/libthrift/0.13.0/libthrift-0.13.0.jar -O libthrift-0.13.0.jar
Create
portal-ext.propertiesfile inliferay-ce-portal-7.3.4-ga5folderCopy content from https://github.com/eclipse/sw360/blob/sw360-14.0.0-M1/frontend/configuration/portal-ext.properties to portal-ext.properties
Edit
portal-ext.properties: uncomment below lines# default.admin.password=sw360fossy # default.admin.screen.name=setup # default.admin.email.address.prefix=setup # default.admin.first.name=Setup # default.admin.last.name=Administrator
Remove files in folder
hypersonicwith path:/home/user/work/liferay-ce-portal-7.3.4-ga5/data/hypersonic$ rm -rf /home/user/work/liferay-ce-portal-7.3.4-ga5/data/hypersonic/*
Move folder
liferay-ce-portal-7.3.4-ga5to/opt$ sudo mv liferay-ce-portal-7.3.4-ga5 /opt
3.2 Install Couchdb version 3.2.2
Run the following commands:
$ sudo apt update && sudo apt install -y curl apt-transport-https gnupg$ curl https://couchdb.apache.org/repo/keys.asc | gpg --dearmor | sudo tee /usr/share/keyrings/couchdb-archive-keyring.gpg >/dev/null 2>&1$ source /etc/os-release$ echo "deb [signed-by=/usr/share/keyrings/couchdb-archive-keyring.gpg] https://apache.jfrog.io/artifactory/couchdb-deb/ ${VERSION_CODENAME} main" \| sudo tee /etc/apt/sources.list.d/couchdb.list >/dev/null$ sudo apt update$ sudo apt install -y couchdb
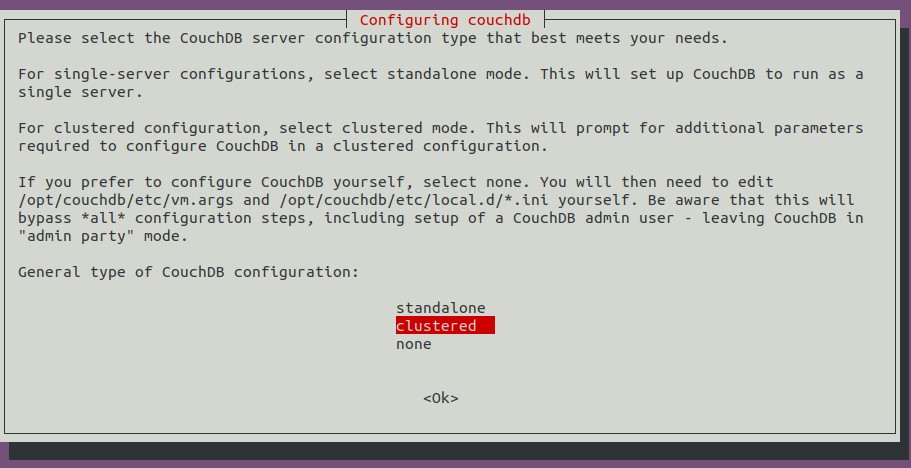
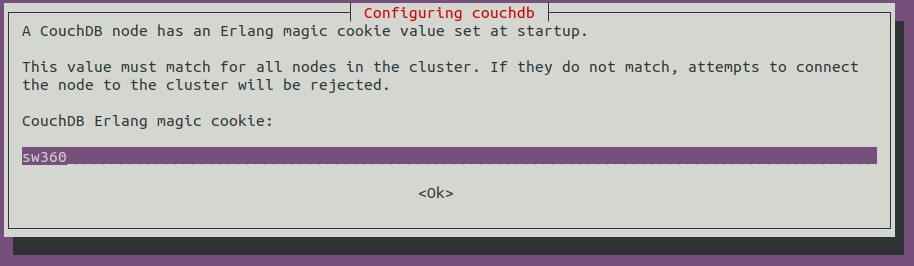
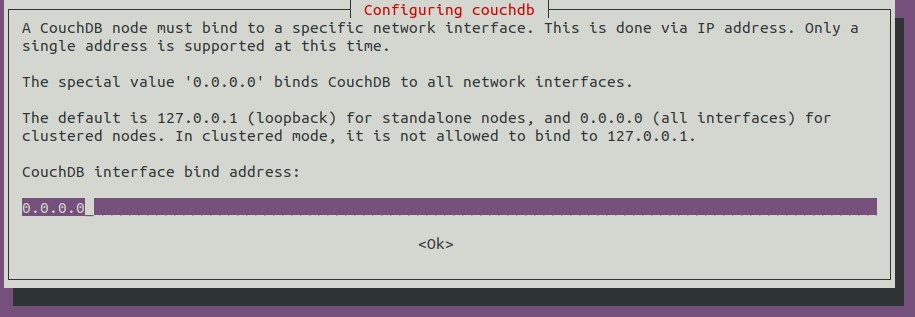
Config and Setup Couchdb follow images:
- Config Couchdb Type
- Config node name
- Set up magic cookie
- Config bind address
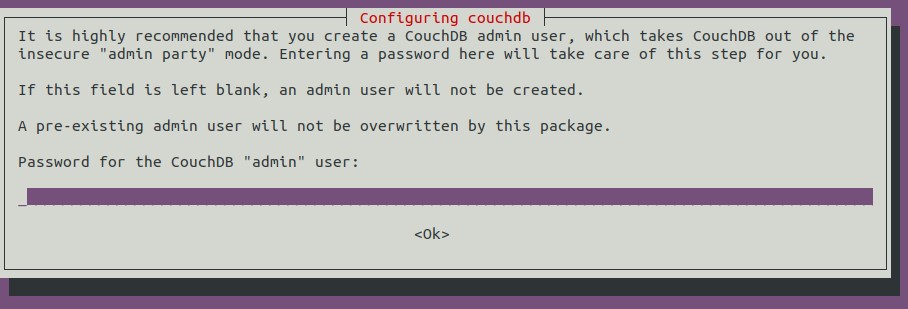
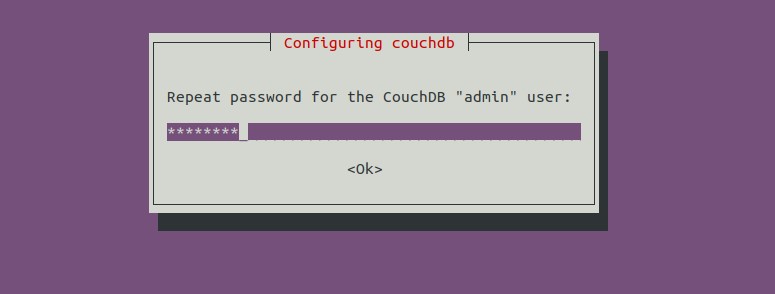
- Set up Couchdb Password
- Repeat Password
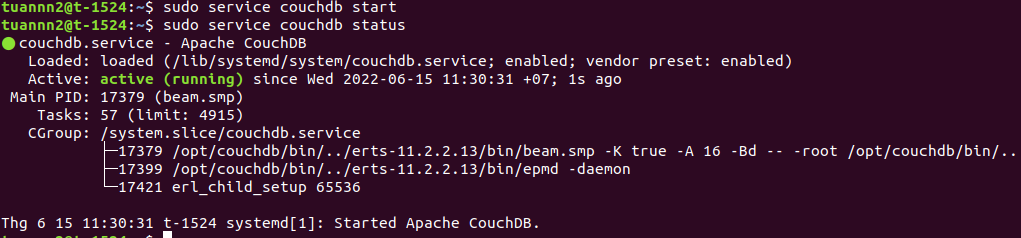
- Start and status of Couchdb
- Stop and status of Couchdb
- Config Couchdb Type
Url and account when config couchdb
- Username:
admin - Password:
password - Url:
http://localhost:5984/_utils
- Username:
Command Line When Start, Stop, check status Couchdb
- Start Couchdb:
$ sudo service couchdb start - Stop Couchdb:
$ sudo service couchdb stop - Check status:
$ sudo service couchdb status
- Start Couchdb:

3.3 Install Couchdb Lucene
SW360 uses for searching the contents of the couchdb databases a lucene-based server named couchdb-lucene
Run command download Couchdb Lucene
wget --no-check-certificate https://github.com/rnewson/couchdb-lucene/archive/v2.1.0.tar.gz -O couchdb-lucene.tar.gz
Note Extract liferay To folder
workwith path of work:/home/user/worktar -xzf couchdb-lucene.tar.gz
Run command:
cd couchdb-lucene-2.1.0sed -i "s/allowLeadingWildcard=false/allowLeadingWildcard=true/" ./src/main/resources/couchdb-lucene.inised -i "s/localhost:5984/admin:password@localhost:5984/" ./src/main/resources/couchdb-lucene.iniwget https://raw.githubusercontent.com/sw360/sw360vagrant/master/shared/couchdb-lucene.patchpatch -p1 < couchdb-lucene.patchmvn clean install war:warcp target/couchdb-lucene-*.war /opt/liferay-ce-portal-7.3.4-ga5/tomcat-9.0.33/webapps/couchdb-lucene.war
3.4 Clone sw360 with version 14.0.0
Clone sw360 source code to folder
workwith path:/home/user/work$ git clone https://github.com/eclipse/sw360
Checkout to tag 14.0.0 version
$ cd sw360$ git checkout sw360-14.0.0-M1
3.5 Install Thrift version 0.14
For thrift, we need version 0.14. The installation script in Path:
SW360_REPOSITORY/scripts/install-thrift.shRun command:
$ chmod +x install-thrift.sh$ sudo ./install-thrift.sh
In case there is thrift in the package management of the OS you re running on, just make sure, you have version 0.14
Check version thrift
$ thrift --versionOutput:
Thrift version 0.14.0- Install Thrift successfully
3.6 Compile and deploy
Start couchdb
$ sudo service couchdb start
Set Environment for
${LIFERAY_INSTALL}$ cd /home/user/work/sw360$ export LIFERAY_INSTALL=/opt/liferay-ce-portal-7.3.4-ga5
To clean everything and install without running the tests
$ mvn clean install -DskipTests
For deployment run the command
mvn package -P deploy -Dbase.deploy.dir=. -Dliferay.deploy.dir=${LIFERAY_INSTALL}/deploy -Dbackend.deploy.dir=${LIFERAY_INSTALL}/tomcat-9.0.33/webapps -Drest.deploy.dir=${LIFERAY_INSTALL}/tomcat-9.0.33/webapps -DskipTests
3.6.1 Start and Configure Liferay
Set Environment for
${LIFERAY_INSTALL}$ export LIFERAY_INSTALL=/opt/liferay-ce-portal-7.3.4-ga5
Start liferay
$ ${LIFERAY_INSTALL}/tomcat-9.0.33/bin/startup.sh
Log
$ tail -f ${LIFERAY_INSTALL}/tomcat-9.0.33/logs/*
Url SW360 :
https://localhost:8080
3.6.2 Configure Liferay Portal
- Can follow the steps in the following link https://www.eclipse.org/sw360/docs/deployment/legacy/deploy-liferay7.3 or follow these steps:
- Import users
- Open the panel on the left side by clicking the button on the top left.
- Click on
SW360on the top right to go to the homepage. - Click on
Startinside the “Welcome” section. - Go to
Admin->User(URL:/group/guest/users). - Scroll down to section
UPLOAD USERS, select a user file from the very beginning and clickUpload Userson the right side. A user file can be found here in the sw360vagrant project * Download:$ wget https://github.com/sw360/sw360vagrant/blob/master/shared/test_users_with_passwords_12345.csv
3.7 Version Management Table (sw360 14.0)
| Package Name | Version |
|---|---|
| Liferay | 7.3.4 |
| Tomcat | 9.0.33 |
| Couchdb | 3.2.2 |
| Open JDK | 11.0.15 |
| Thrift | 0.14.0 |
| SW360 | 14.0.0 |
3.8 Config couchdb with Sw360 (sw360 14.0)
Create folder
sw360in path/etc/sudo mkdir sw360
Create 2 folder
authorizationandrestin path/etc/sw360sudo mkdir authorizationsudo mkdir rest
Create file
application.ymlin path/etc/sw360/authorizatonwith content:
        #
        # Copyright Siemens AG, 2017, 2019. Part of the SW360 Portal Project.
        #
        # This program and the accompanying materials are made
        # available under the terms of the Eclipse Public License 2.0
        # which is available at https://www.eclipse.org/legal/epl-2.0/
        #
        # SPDX-License-Identifier: EPL-2.0
        #

        # Port to open in standalone mode
        server:
        port: 8090

        # Connection to the couch databases. Will be used to store client credentials
        couchdb:
        url: http://localhost:5984
        database: sw360oauthclients
        # if your couchdb does not use authentication, pls just don't use the settings for username and password
        username: admin
        password: password

        jwt:
        secretkey: sw360SecretKey

        spring:
        jackson:
            serialization:
            indent_output: true

        # Common SW360 properties
        sw360:
        # The url of the Liferay instance
        sw360-portal-server-url: ${SW360_PORTAL_SERVER_URL:http://127.0.0.1:8080}
        # The id of the company in Liferay that sw360 is run for
        sw360-liferay-company-id: ${SW360_LIFERAY_COMPANY_ID:20101}
        # Allowed origins that should be set in the header
        cors:
            allowed-origin: ${SW360_CORS_ALLOWED_ORIGIN:#{null}}

        security:
        # Configuration for enabling authorization via headers, e.g. when using SSO
        # in combination with a reverse proxy server
        customheader:
            headername:
            # You have to enable authorization by headers explicitly here
            enabled: false
            # Attention: please make sure that the proxy is removing there headers
            # if they are coming from anywhere else then the authentication server
            intermediateauthstore: custom-header-auth-marker
            email: authenticated-email
            extid: authenticated-extid
            # also available - at least in saml pre auth - are "givenname", "surname" and "department"

        oauth2:
            resource:
            id: sw360-REST-API
- Create file
application.ymlin path/etc/sw360/restwith content:
        #
        # Copyright Siemens AG, 2017. Part of the SW360 Portal Project.
        # Copyright Bosch.IO GmbH 2020
        #
        # This program and the accompanying materials are made
        # available under the terms of the Eclipse Public License 2.0
        # which is available at https://www.eclipse.org/legal/epl-2.0/
        #
        # SPDX-License-Identifier: EPL-2.0
        #

        server:
        port: 8091

        management:
        endpoints:
            enabled-by-default: false
            web:
            base-path:
        endpoint:
            health:
            enabled: true
            show-details: always
            info:
            enabled: true
            web:
            base-path: /

        spring:
        servlet:
            multipart:
            max-file-size: 500MB
            max-request-size: 600MB

        # logging:
        #   level:
        #     org.springframework.web: DEBUG

        security:
        oauth2:
            resource:
            id: sw360-REST-API
            jwt:
                keyValue: |
                -----BEGIN PUBLIC KEY-----
                MIIBIjANBgkqhkiG9w0BAQEFAAOCAQ8AMIIBCgKCAQEApz8Cr1o5yHMv/FUdF5uy
                VptilqdWtNvw5S6Tr4IaQ4XR9QPt8nlRsjOngfG4QCcKMBWJISldFg8PlJWUBeV+
                6TwQUidxokl2GbO6/+QA+lz1a5Ei1Y1pcnvFeRb2pdYlH3Yg6fXMxS6QwDLk27pZ
                5xbpSDIGISDesyaIMvwaKdhAbFW/tTb/oJY7rCPvmYLT80kJzilijJ/W01jMMSHg
                9Yi5cCt1eU/s78co+pxHzwNXO0Ul4iRpo/CXprQCsSIsdWkJTo6btal1xzd292Da
                d+9xq499JEsNbcqLfCq8DBQ7CEz6aJjMvPkvZiCrFIGxC/Gqmw35DQ4688rbkKSJ
                PQIDAQAB
                -----END PUBLIC KEY-----

        sw360:
        thrift-server-url: ${SW360_THRIFT_SERVER_URL:http://localhost:8080}
        test-user-id: admin@sw360.org
        test-user-password: sw360-password
        couchdb-url: ${SW360_COUCHDB_URL:http://localhost:5984}
        cors:
            allowed-origin: ${SW360_CORS_ALLOWED_ORIGIN:#{null}}
- Create file
couchdb.propertiesin path/etc/sw360with content:
        #
        # Copyright Siemens AG, 2020. Part of the SW360 Portal Project.
        #
        # This program and the accompanying materials are made
        # available under the terms of the Eclipse Public License 2.0
        # which is available at https://www.eclipse.org/legal/epl-2.0/
        #
        # SPDX-License-Identifier: EPL-2.0
        #

        couchdb.url = http://localhost:5984
        couchdb.user = admin
        couchdb.password = password
        couchdb.database = sw360db
        couchdb.usersdb = sw360users
        couchdb.attachments = sw360attachments
        lucenesearch.limit = 10000
- Create file
sw360.propertiesand/etc/sw360with content:
        # Copyright Siemens AG, 2016-2017. Part of the SW360 Portal Project.
        #
        # This program and the accompanying materials are made
        # available under the terms of the Eclipse Public License 2.0
        # which is available at https://www.eclipse.org/legal/epl-2.0/
        #
        # SPDX-License-Identifier: EPL-2.0
        #

        # common property file for the backend services
        backend.url= http://localhost:8080

        licenseinfo.spdxparser.use-license-info-from-files=true
        mainline.state.enabled.for.user=false

        # settings for the mail utility:
        # if host is not set, e-mailing is disabled
        MailUtil_host=
        MailUtil_from=__No_Reply__@sw360.org
        MailUtil_port=25
        MailUtil_enableStarttls=
        MailUtil_enableSsl=
        MailUtil_isAuthenticationNecessary=
        MailUtil_login=
        MailUtil_password=
        MailUtil_enableDebug=
        MailUtil_supportMailAddress=

        # text patterns for mail utility
        defaultBegin = \
        *** This is an automatically generated email, please do not reply. ***\n\n\
        Dear SW360-user,\n\n
        defaultEnd = \
        With best regards,\n\
        SW360-support
        unsubscribeNoticeBefore =\n\n*** If you do not wish to receive mails from SW360, please notify:
        unsubscribeNoticeAfter =. ***

        subjectForNewModerationRequest= New moderation request
        subjectForUpdateModerationRequest= Update on moderation request
        subjectForAcceptedModerationRequest= Your moderation request has been accepted
        subjectForDeclinedModerationRequest= Your moderation request has been declined
        subjectForDeclinedUserModerationRequest= Your request for a SW360 user account has been declined
        subjectForNewComponent= New component created
        subjectForUpdateComponent= Component updated
        subjectForNewRelease= New release created
        subjectForUpdateRelease= Release updated
        subjectForNewProject= New project created
        subjectForUpdateProject= Project updated
        subjectForNewClearingRequest= New clearing request <%s> for Project <%s>
        subjectForClearingRequestComment= New comment added in clearing request <%s> for Project <%s>
        subjectForUpdatedClearingRequest= Your clearing request <%s> has been updated for Project <%s>
        subjectForClosedClearingRequest= Your clearing request <%s> has been closed for Project <%s>
        subjectForRejectedClearingRequest= Your clearing request <%s> has been rejected for Project <%s>
        subjectForUpdatedProjectWithClearingRequest= Project <%s> with clearing request <%s> updated

        textForNewModerationRequest= a new moderation request has been added to your SW360-account.\n\n
        textForUpdateModerationRequest= \
        one of the moderation requests previously added to your \
        SW360-account has been updated.\n\n
        textForAcceptedModerationRequest= your moderation request to change the %s %s has been accepted by one of the moderators.\n\n
        textForDeclinedModerationRequest= your moderation request to change the %s %s has been declined by one of the moderators.\n\n
        textForDeclinedUserModerationRequest= your request for a SW360 user account has been declined by one of the administrators.\n\n
        textForNewComponent= a new component %s, in which you take part, has been created.\n\n
        textForUpdateComponent= the component %s, in which you take part, has been updated.\n\n
        textForNewRelease= a new release %s %s, in which you take part, has been created.\n\n
        textForUpdateRelease= the release %s %s, in which you take part, has been updated.\n\n
        textForNewProject= a new project %s %s, in which you take part, has been created.\n\n
        textForUpdateProject= the project %s %s, in which you take part, has been updated.\n\n
        textForClosedClearingRequest= your clearing request with id: %s for the project %s has been closed by the clearing team.\n\n
        textForRejectedClearingRequest= your clearing request with id: %s for the project %s has been rejected by the clearing team.\n\n
        #attachment.store.file.system.location=/opt/sw360tempattachments
        #enable.attachment.store.to.file.system=false
        #attachment.store.file.system.permission=rwx------
        #attachemnt.delete.no.of.days=30

        #Uncomment the below file location if the log4j2.xml file is placed inside etc/sw360 folder.
        #sw360changelog.config.file.location=/etc/sw360/log4j2.xml
        enable.sw360.change.log=false
        sw360changelog.output.path=sw360changelog/sw360changelog
References for more information
License
[SPDX-License-Identifier: EPL-2.0]