Want to contribute?
Great! We try to make it easy, and all contributions, even the smaller ones, are more than welcome.
This includes bug reports, fixes, documentation, examples... But first, please read this page.
Table of Contents
- Legal
- Reporting an issue
- Get the Code
- Before you contribute
- Development Tools
- Project Setup
- Working on Issue
- Workflow Tips
- Documentation
- Frequently Asked Questions
Legal
All original contributions to Eclipse JKube are licensed under the Eclipse Public License - v2.0. You would need to complete some legal steps before starting to contribute to the project.
- Create an Eclipse account
- Sign Eclipse Contributor Agreement
Configure your local git config to set correct email address and name. This is important step as ECA validation check tries to infer contributor details via git commit:
git config user.name "Your Name"git config user.email "your_email@example.com"Reporting an issue
Eclipse JKube uses GitHub to manage the issues. Please open an issue directly in GitHub.
If you believe you found a bug (It's very likely you did), please open an issue indicating a way to reproduce it, what you are seeing and what you are expecting to see.
If you want your issue to be resolved quickly, please include in your issue:
- Operating System
- Eclipse JKube version
- Java version
- Maven/Gradle version
- Target cluster version (Kubernetes, OpenShift, Minikube, CRC, etc.)
Get The Code
Project's source code is available on GitHub. If you're interested in contributing to the project, you need to fork the project.
Before you contribute
To contribute use GitHub pull requests from your own fork.
All commits must be signed-off by a user that has signed the Eclipse Contributor Agreement.
Trying out project as end user
Before contributing to any Open Source project, it's important to have basic understanding of what the project is about. It is advised to try out the project as an end user. This project is a collection of Maven and Gradle plugins for Kubernetes and Red Hat OpenShift, it's advised to learn about these technologies if you're interested in seriously contributing to the project.
You can read some blogs about project or watch videos on Eclipse JKube YouTube channel .
Finding an issue to work on
You're free to start with any type of contribution, whether it is documentation or some issue you faced while
trying out the project. From time to time we create new issues tagged with label good first issue .
If you're contributing for the first time, we advise to start with a first timers only issues.
These issues are a great way to getting started with project. They are divided into three categories at the moment.
First Timers Only Issues
first timers only issues are usually one line changes that are created for contributors who are contributing to the project for the
first time. Even if you are quite skilled, please consider doing one issue of this category, to get used to the process (e.g PR creation workflow, ECA commit signoff requirement). After that, you
are invited to move on up to the more difficult tasks, leaving some of the easy tasks to others so they can get involved and achieve change
themselves.
These issues are aimed for first-time contributors to get acquainted with the project and the Eclipse Foundation contributing policies. Users are only allowed to take one of these issues and are also encouraged to tackle one of these before doing more complex code contributions. These issues are extremely simple to solve. In general, the code changes are already described in the issue. The main purpose is to ensure that contributors have signed an ECA and are familiar with the GitHub pull request procedures.
Good First Issues
good first issue issues are slightly involved issues that are created for contributors that have already contributed to the project.
These issues are aimed for users who have already tackled a first-timers-only and would like to continue their contributing journey on the project.
These issues are slightly more complicated and will require actual work from the contributor.
The main purpose is for contributors to gain confidence while working on the code-base and to keep them engaged in the project.
Help Wanted Issues
help wanted issues are more complex issues created to be picked by contributors familiar with codebase.
These issues are more complex and are aimed for regular contributors of the project or people who are familiar with the code-base.
Code reviews
All reviews, including submissions by project members, need to be reviewed before being merged by the project official committers.
We usually require two approvals in order to merge a pull request. Project members usually review it within a week or two. Feel free to notify them in case feedback is not provided on your pull request.
Tests and documentation are not optional
Don't forget to include unit tests in your pull requests along with documentation (Reference information, javadoc, etc.).
Please make sure you have verified project is compiling cleanly when you run existing tests as well:
mvn clean installWorkflow Tips
- Please try to work on a single issue at a time.
- Please provide updates each week or so, otherwise someone else may take the issue.
- If an issue has an assignee without any update in a week, feel free to notify them that you're interested in working in that issue.
- If you realize you can't complete a task - please leave a comment on the issue and unassign yourself from the issue.
Development Tools
In order to contribute code to the project, it is recommended to install these tools for smooth development experience:
Project Setup
Building Project Locally
In order to build the project, you would require to install these first:
- Install Java SDK 11+ (OpenJDK recommended)
- Install Apache Maven
Once you've set these tools, you can compile the project using maven.
In order to build project quickly by skipping tests, use this command:
mvn clean install -DskipTestsIn order to perform complete build by running all unit and integration tests, use this command:
mvn clean installAfter the build is successful, the artifacts should be available in your local Maven repository $HOME/.m2.
Testing Local Build
In order to try out local build, you can build the project and use the SNAPSHOT version in one of the quickstarts.
For example, if project version is x.yz-SNAPSHOT, you can go to any quickstart in quickstarts/ directory and change
plugin version used in quickstart project to use the development version.
With Maven
mvn clean install -DskipTests
# Testing Kubernetes Maven Plugin in quickstarts/mavencd quickstarts/maven/spring-bootmvn k8s:resource -Djkube.version=x.yz-SNAPSHOT -Pkubernetes
With Gradle
# Testing Kubernetes Gradle Plugin in quickstarts/gradlecd quickstarts/gradle/spring-boot# Edit build.gradle to change Kubernetes Gradle Plugin version to 'x.yz-SNAPSHOT'./gradlew k8sResourceDebugging Plugins
Maven
In order to debug Kubernetes Maven Plugin, use mvnDebug instead of mvn to start debug process:
mvnDebug k8s:resourcePreparing to execute Maven in debug modeListening for transport dt_socket at address: 8000After starting this session, you would need to connect to this process from your IDE via remote JVM debugging configuration.
Gradle
In order to debug Kubernetes Gradle Plugin, use
./gradlew -Dorg.gradle.debug=true k8sResourceAfter starting this session, you would need to connect to this process from your IDE via remote JVM debugging configuration.
GitPod
You can also use Gitpod to contribute without install anything on your computer. Click here to start a workspace.
IDE Config and Code Style
Code formatting is done by the Eclipse code formatter using the configuration files found in the ide-config directory.
Eclipse IDE Setup
Open the Preferences window, and then navigate to Java -> Code Style -> Formatter.
Click Import and then select the eclipse-format.xml file in the ide-config directory.
Next navigate to Java -> Code Style -> Organize Imports.
Click Import and select the eclipse.importorder file in the ide-config directory.
IntelliJ IDEA Setup
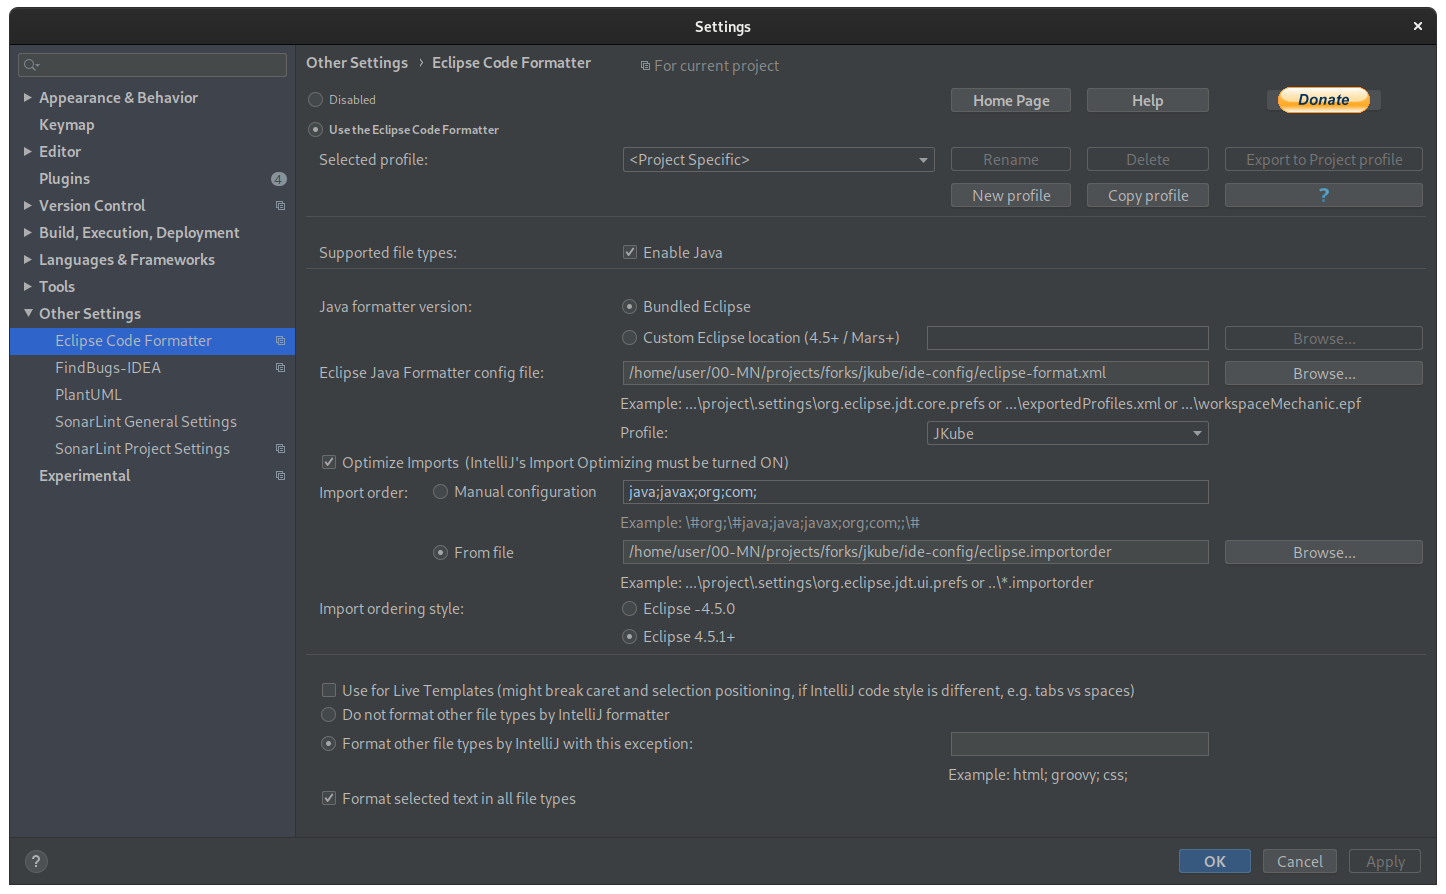
Open the Preferences window (or Settings depending on your edition), navigate to Plugins and install the Eclipse Code Formatter Plugin from the Marketplace.
Restart your IDE, open the Preferences (or Settings) window again and navigate to Other Settings -> Eclipse Code Formatter.
Select Use the Eclipse Code Formatter, then change the Eclipse Java Formatter Config File to point to the
eclipse-format.xml file in the ide-config directory.
Make sure the Optimize Imports box is ticked, and select the eclipse.importorder file as the import order config file.

Working on Issue
While working on issue, please try to align your changes with existing coding conventions. Here are some examples:
- When adding a new file, please don't forget to add the license header via
mvn -N license:format - Please configure your IDE to not add wildcard imports, we don't use wildcard imports.
- Please make sure you have verified that project compiles cleanly after running
mvn clean install -DskipTests(skips tests) andmvn clean install(runs all tests). - Please properly squash your pull requests before submitting them.
Commit SignOff
Commits should be atomic and semantic. We use Conventional Commits.
Please make sure you have added the Signed-off-by: footer in your git commit. In order to do it automatically, use the --signoff flag:
git commit --signoffWith this command, git would automatically add a footer by reading your name and email from git config.
Documentation
Documentation for Maven/Gradle plugins is available at Eclipse JKube Website .
- Documentation for JKube core is present in jkube-kit/doc
- Maven Plugins related documentation is present in kubernetes-maven-plugin/doc
- Gradle Plugins related documentation is present in gradle-plugin/doc
We convert AsciiDoc to HTML using AsciiDoc Maven Plugin.
In order to generate documentation for a single module, run this command:
mvn -Phtml package# Check Generated Documentation (Open in Browser)ls target/generated-docs/index.htmltarget/generated-docs/index.htmlWe also have a bash script to generate documentation for all plugins together. You can use it like this:
sh scripts/generateDoc.sh# Check Generated Documentation (Open in Browser)ls docs-generated/index.htmlFrequently Asked Questions
- Not able to compile project on Windows. Is there any workaround for this?
Our existing test suite is not fully compatible with Windows. Check the issue for test failures on Windows.
In order to work around this, you can use -DskipTests flag to skip running tests while compiling project using mvn clean install. With this workaround, you should
be able to load the project in your IDE.


