ARCH=arm-linux-musleabihf

DEPS=tinyxml

CMAKE_BUILD_TYPE=Debug
FORTE_LOGLEVEL=LOGDEBUG

COM=ETH,FBDK,LOCAL

//RT_Events,,RECONFIGURATION
MODULE=CONVERT,IEC61131,UTILS,UTILS_ADDON,CUSTOM_FBS

// address sanitizer doesn't work with static linking
TOOLCHAIN_EXTRA_C_FLAGS=-fno-sanitize=address -fno-lto
TOOLCHAIN_EXTRA_LINKER_FLAGS=-fno-sanitize=address -fno-lto

FORTE_IO=ON
IO=REVOLUTIONPI

// no local additions
FORTE_EXTERNAL_MODULES_DIRECTORY=/nonexistant
Revolution Pi
The Revolution Pi by KUNBUS GmbH has been implemented by the IO_CONFIG based I/O concept. Revolution Pi is a modular PLC, where you always have at least one core module and maybe one or more expansion modules for I/Os.
Setup your hardware
Put the several modules together by connecting them through the PiBridge. Also wire each of your modules with +24V and 0V through the primary power supply X4 and the secondary (in case your module has one) power supply X2. All power supply connections need to be connected that the devices work properly and all LEDs are green.
When you use the Revolution Pi core module for the first time, it has to be configured by Pictory. To connect any analog I/O consider the corresponding tutorial. The data sheet of your analog sensor determines the settings within Pictory. In case you get too less values, you might have to increase the ADC frequency within the AIO settings of Pictory.
Compile 4diac for Revolution Pi
To compile 4diac FORTE for Revolution Pi best use 4diac FORTE’s build environment. Follow the instructions of 4diac FORTE’s build environment to install and setup a configuration. Your configuration file for Revolution Pi for this build environment could be like the following:
After successful compilation the runtime can be found within the folder build/yourConfigurationFileName/output/bin of 4diac FORTE’s build environment. Copy this executable to your Revolution Pi core module by e.g. WinSCP, possibly within a folder /home/pi/forte. You should set execution rights for your copied executable to run it. Login to your Revolution Pi core module by e.g. Putty, navigate to the folder where you put your executable and run it by ./forte. Now you can deploy the desired IEC 61499 resources on your Revolution Pi.
Configure your hardware in 4diac
Within 4diac IDE create a new IEC 61499 device with one IEC 61499 resource. Maybe call it IO_CONFIG_RES. This IO_CONFIG_RES contains your hardware setup in terms of function blocks. In case you have one Revolution Pi core module, two DIO and one AIO module, it could be like in the following image.
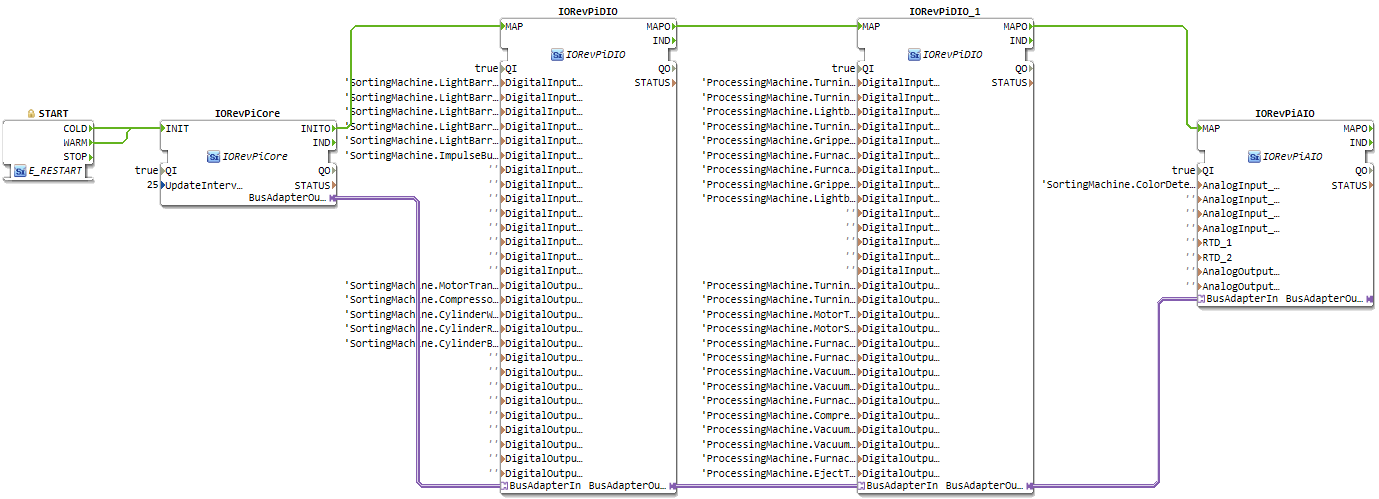
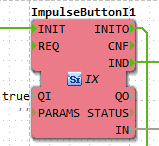
Within your IEC 61499 application you might have a function block like shown within the following image. Take it’s IEC 61499 application name and it’s instance name separated by a dot and add it as input for the desired input of the corresponding IO_CONFIG function block.
When all I/Os are wired and named within your IO_CONFIG function block network correspondingly, your IEC 61499 application is ready to be deployed and to access the hardware.
Where to go from here?
You can see the supported protocols:
You can see the examples:
If you want to go back to the Where to Start page, we leave you here a fast access
Or Go to top