Getting Started with FreeRTOS
To start with an operating system the steps are almost the same.
- create the Dave™ project and add the FreeRTOS APP and all other required components
- run the "New Set of eTrice models* wizard and select the appropriate runtime library
- model your application (or make a copy from the ST-Tutorial)
- adapt the thread deployment to your needs
Step 1:
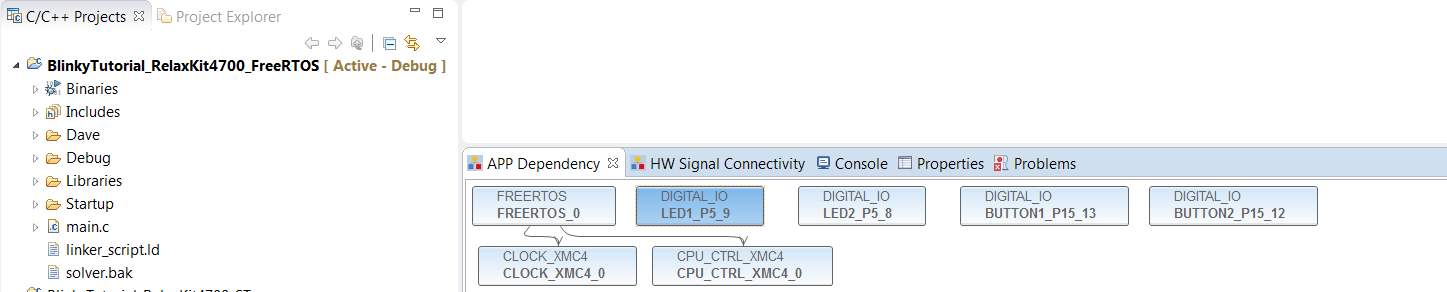
Create the Dave™ project and add the necessary components. For the BlinkyTutorial we need again two LEDs, two buttons and the FreeRTOS APP.
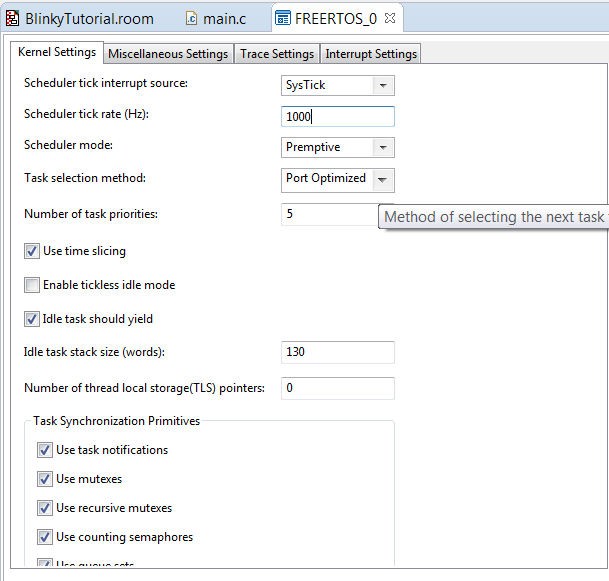
Configure the FreeRTOS APP. Set the Tick rate to 1000.
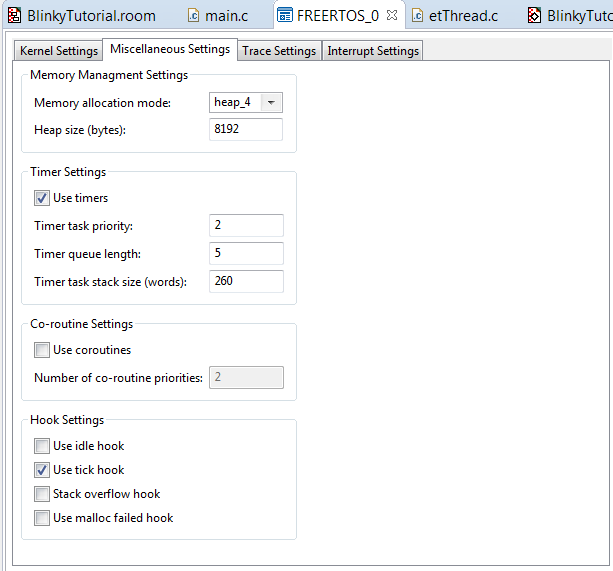
Increase the heap size to 8192 bytes and enable Use tick hook
Start the Dave™ code generator, compile and debug the application. Make sure that the Dave™ settings are complete. Hint: The vApplicationTickHook is implemented in the eTrice runtime system. For this test you need to stub this function.
Step 2:
Create a new folder called model, right click on the folder New -> Other select Other/eTrice/C/New Set of eTrice Models
Name the model BlinkyTutorial, enable Copy C-runtime into project, select MT_XMC_Dave_FreeRTOS and rename main to etStart.
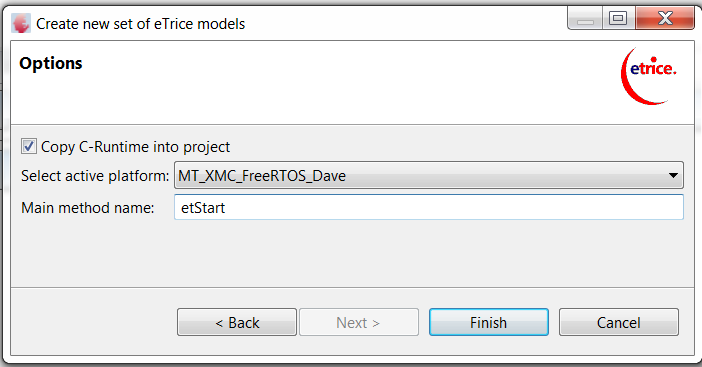
Click Finish
Run the code generator as you did it in the ST-Tutorial. Compile your project. Hint: Remove the vApplicationTickHook stub from step 1.
Open main.c and call etStart as you did it in the ST-Tutorial.
Step 3:
From now on you can create your model or you can copy the BlinkyTutorial.room file from the ST-Tutorial to the new project.
Generate the code, compile and debug.
Step 4:
In the ST-Tutorial you have created an application that runs without operating system. That means, everything runs in a single main loop. Now we have an underlying preemtive operating system and we can deploy SW-Components to different threads. With eTrice 3 simple steps are necessary:
- create physical threads
- create logical threads and map actors to logical threads
- map logical threads to physical threads
Physical thread creation must be done in BlinkyTutorial.etphys. Open the file, create 2 additional physical threads:
PhysicalModel BlinkyTutorial {

    PhysicalSystem PhysSys1 {
        NodeRef nodeRef1 : NodeClass1
    }

    NodeClass NodeClass1 {
        runtime = RuntimeClass1
        priomin = -10
        priomax = 10
        DefaultThread PhysicalThread1 {
            execmode = mixed
            interval = 100ms
            prio = 2
            stacksize = 128
            msgblocksize = 32
            msgpoolsize = 10
        }
        Thread HighPrioThread {
            execmode = mixed
            interval = 10ms
            prio = 3
            stacksize = 128
            msgblocksize = 32
            msgpoolsize = 10
        }

        Thread LowPrioThread {
            execmode = mixed
            interval = 200ms
            prio = 3
            stacksize = 128
            msgblocksize = 32
            msgpoolsize = 10
        }
    }

    RuntimeClass RuntimeClass1 {
        model = multiThreaded
    }
}
Adapt priorities and stack sizes to your needs. Keep in mind to reserve memory in the FREERTOS APP configuration.
Logical thread creation must be done in the logical model BlinkyTutorial.room. Open the file and add two threads and map actor instances to the newly created threads.
RoomModel BlinkyTutorial {

    import room.basic.types.* from "etrice_c_modellib/Types.room"

    import room.basic.service.timing.* from "etrice_c_modellib/TimingService.room"

    LogicalSystem BlinkyTutorial {
        SubSystemRef main: MainSubSystem
    }

    SubSystemClass MainSubSystem {
        ActorRef appl: Application
        LogicalThread defaultThread
        LogicalThread highPrioThread
        LogicalThread lowPrioThread
        LayerConnection ref appl satisfied_by timing.timer
        ActorRef timing: ATimingService
        ActorInstanceMapping timing -> highPrioThread
        ActorInstanceMapping appl/blinky1->lowPrioThread
        ActorInstanceMapping appl/button1->lowPrioThread
    }
We created three logical threads and deployed the timing service to the highPrioThread, blinky1 and button1 to the lowPrioThread. All other actors are automatically deployed to the default thread. Please recognize that you deploy actor instances and not actor classes.
The last step is the mapping of the logical threads to physical threads. Open BlinkyTutorial.etmap and do your mapping:
MappingModel BlinkyTutorial {
    import BlinkyTutorial.* from "BlinkyTutorial.room"
    import BlinkyTutorial.* from "BlinkyTutorial.etphys"
    Mapping BlinkyTutorial -> PhysSys1 {
        SubSystemMapping main -> nodeRef1 {
            ThreadMapping defaultThread -> PhysicalThread1
            ThreadMapping highPrioThread -> HighPrioThread
            ThreadMapping lowPrioThread -> LowPrioThread
        }
    }
}
Generate your code, compile and debug the application. Have fun.