Documentation
Introduction
This guide is for compiling FORTE for the Raspberry Pi. For information about the parameters to be used, go to Parameters.
Raspberry Pi (RPI) is one of the most famous low-cost embedded systems. In its third generation, the Raspberry Pi 3 was launched in February 2016. It has a 1.2GHz 64-bit quad-core ARMv8 CPU, 1 GB RAM and several I/O options, among them a 40 pin header. The operating system is loaded from a SD card, so it can support many OS. The most popular one is the Debian-based Raspbian. 4diac FORTE previously used the wiringPi library, but it has changed to use the sysFs virtual file system.
This tutorial explains first how to compile 4diac FORTE in the RPI, or even cross-compile, and how to easily use the I/O Function Blocks in 4diac FORTE to control the 40 pin header.
Getting the RPI ready
This tutorial doesn't show the details of how to make the RPI run, but if you never used before, you should know that beside the RPI board, you need a source power that is connected to the mini-USB port and a mini-SD card. The RPI can be connected to a screen, mouse and keyboard through the HDMI and USB ports, but you also can connect to it headless, meaning that you connect through ssh using the Ethernet or a usb-wifi connector. There are plenty of tutorials on how to access the RPI, so this tutorial assumes that you have access to the command line of the RPI, through ssh or directly on it using the GUI, and that the RPI has Internet access.
Building 4diac FORTE on the RPI
Preparation
- Install the additional software needed on your RPI.
- Git: 4diac FORTE is stored as a Git repository on the Eclipse server.
- The building tools: cmake, make, gcc, g++
$ sudo apt-get install git cmake make gcc g++
Building
- Check out 4diac FORTE from the Git repository in your home directory.
$ cd ~ $ git clone https://github.com/eclipse-4diac/4diac-forte.git
- Prepare the 4diac FORTE project structure for the Posix architecture.
$ cd org.eclipse.4diac.forte $ chmod +x setup_posix.sh
You will need to add the SysFs module to the compilation. In order to that, you will need to change the setup_posix.sh file, using your preferred text editor. In the file you will find a line that starts with cmake -G "Unix Makefiles" -DFORTE_ARCHITECTURE=Posix. At the end of the line, add -DFORTE_MODULE_SysFs=ON. This will enable the interface to the 40 pin header of the RPI. Save the file, exit the editor and execute:
$ ./setup_posix.shWhen no error occurs, the command creates a folder in bin/posix where all the files to compile 4diac FORTE are stored. Access the folder if not already there.
- Execute "make", which will start the compilation.
$ make
Cross-compiling for the RPI
The RPI is a very powerful computer, but when developing a project, one sometimes has to compile 4diac FORTE many times. As the RPI is slow compared to the power of a desktop computer, cross-compiling is useful. It allows to compile on your desktop machine, and then send the executable to the RPI.
You will need the 4diac FORTE source code, and the same additional tools used in the preparation, except CMake because CMake-GUI will be needed in this case.
Cross-compiling using Linux
- Install needed additional tools:
- CMake-GUI
$ sudo apt-get install cmake-qt-gui
- Linaro Cross-compiling Toolchain. You can download it from this link.
Then, you should de-compress this file
$ tar -xvf gcc-linaro-4.8-2015.06-x86_64_arm-linux-gnueabihf.tar.xzYou could avoid downloading and de-compressing the file using the command$ sudo apt-get install gcc-arm-linux-gnueabihf g++-arm-linux-gnueabihfbut this method gave some errors in some cases.
- CMake-GUI
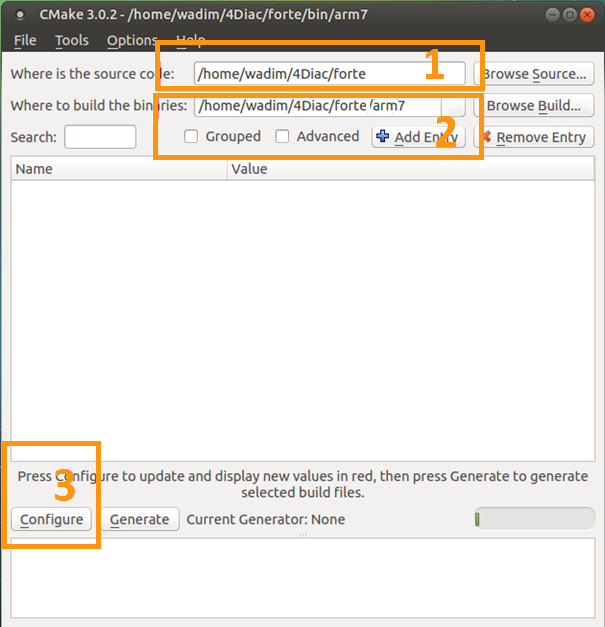
- Open CMake-GUI and complete as shown in the image
- Set the 4diac FORTE source path where you cloned the Git repository.
- Set path for binaries where you want to create the executable. Normally, bin/raspPi is used.
- Press
- CMake Setup
- Select the tool you normally use to compile your programs. This example follows using UNIX Makefiles from the list.
- Select
- Press
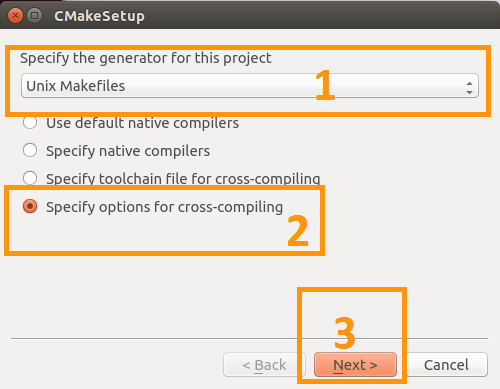
- CMake Setup
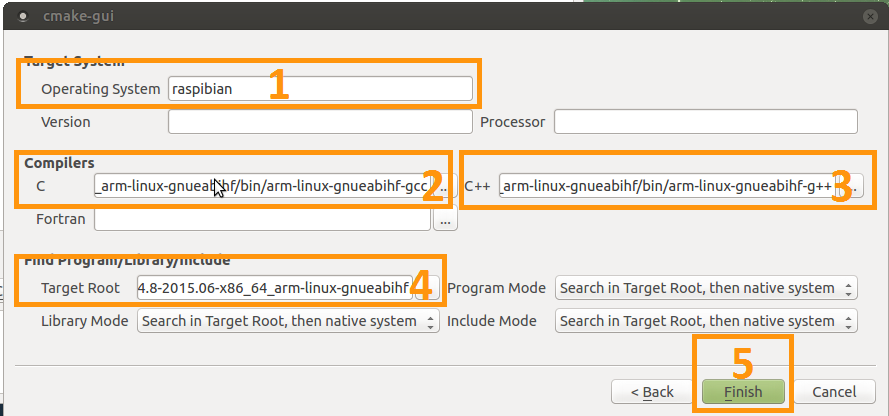
- Write a name for the OS (normally Raspbian, it won't affect the compilation).
- Select the path to the C cross-compiler called arm-linux-gnueabihf-gcc, in the bin folder of the downloaded tools' folder.
If not found, you could execute:
$ which arm-linux-gnueabi-gcc
- Select the path to the C++ cross-compiler called arm-linux-gnueabihf-g++, in the bin folder of the downloaded tools' folder.
If not found, you could execute:
$ which arm-linux-gnueabi-g++
- The target root field can be left empty.
- Click
- Configure the compilation
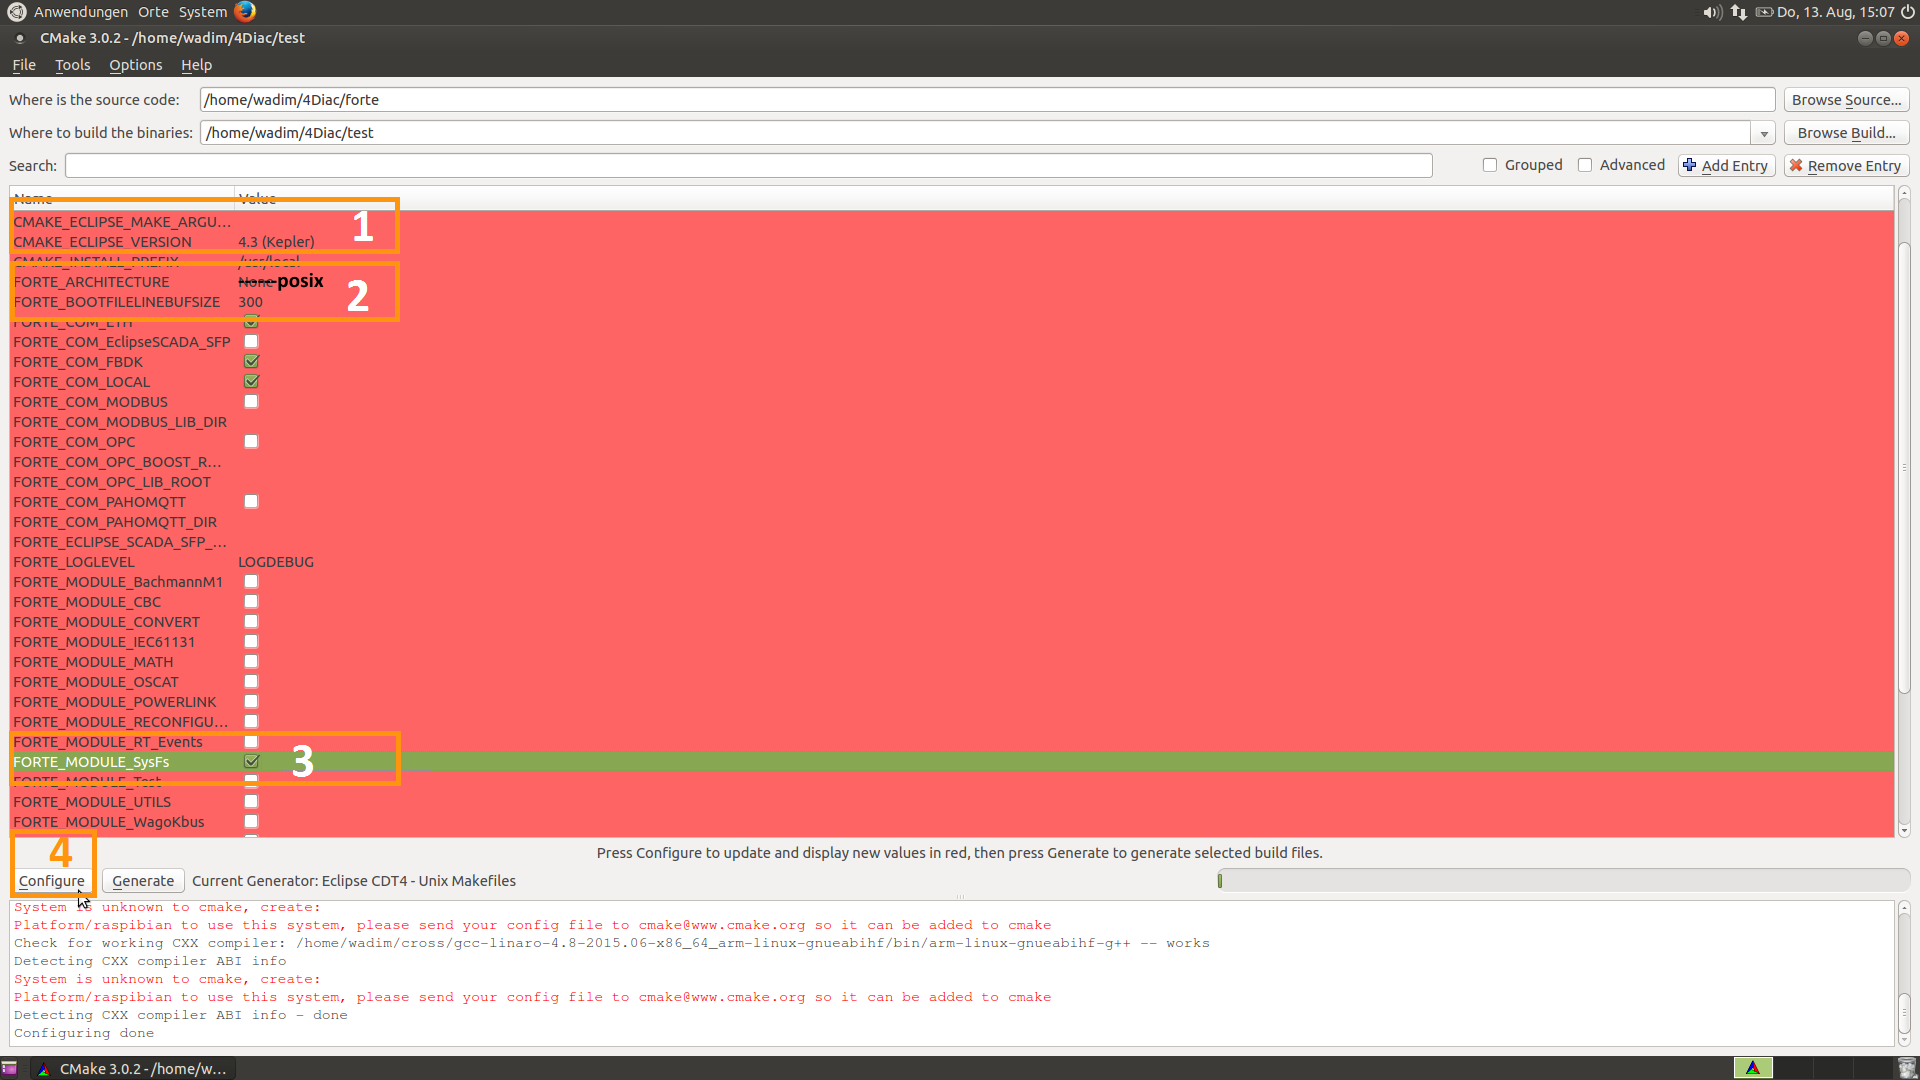
A list with all variables of 4diac FORTE in red should be shown in CMake as the picture below.
- Choose your Eclipse version if you selected it in step 3.1. Otherwise, it can be left as it is.
- Set the FORTE_ARCHITECTURE variable to Posix
- Enable FORTE_MODULE_SysFs and all other modules that you want
- Click and the variables that need revision will appear again in red and the rest in white. Check these variables and press until no variable is shown in red.
- Generate files
- Click
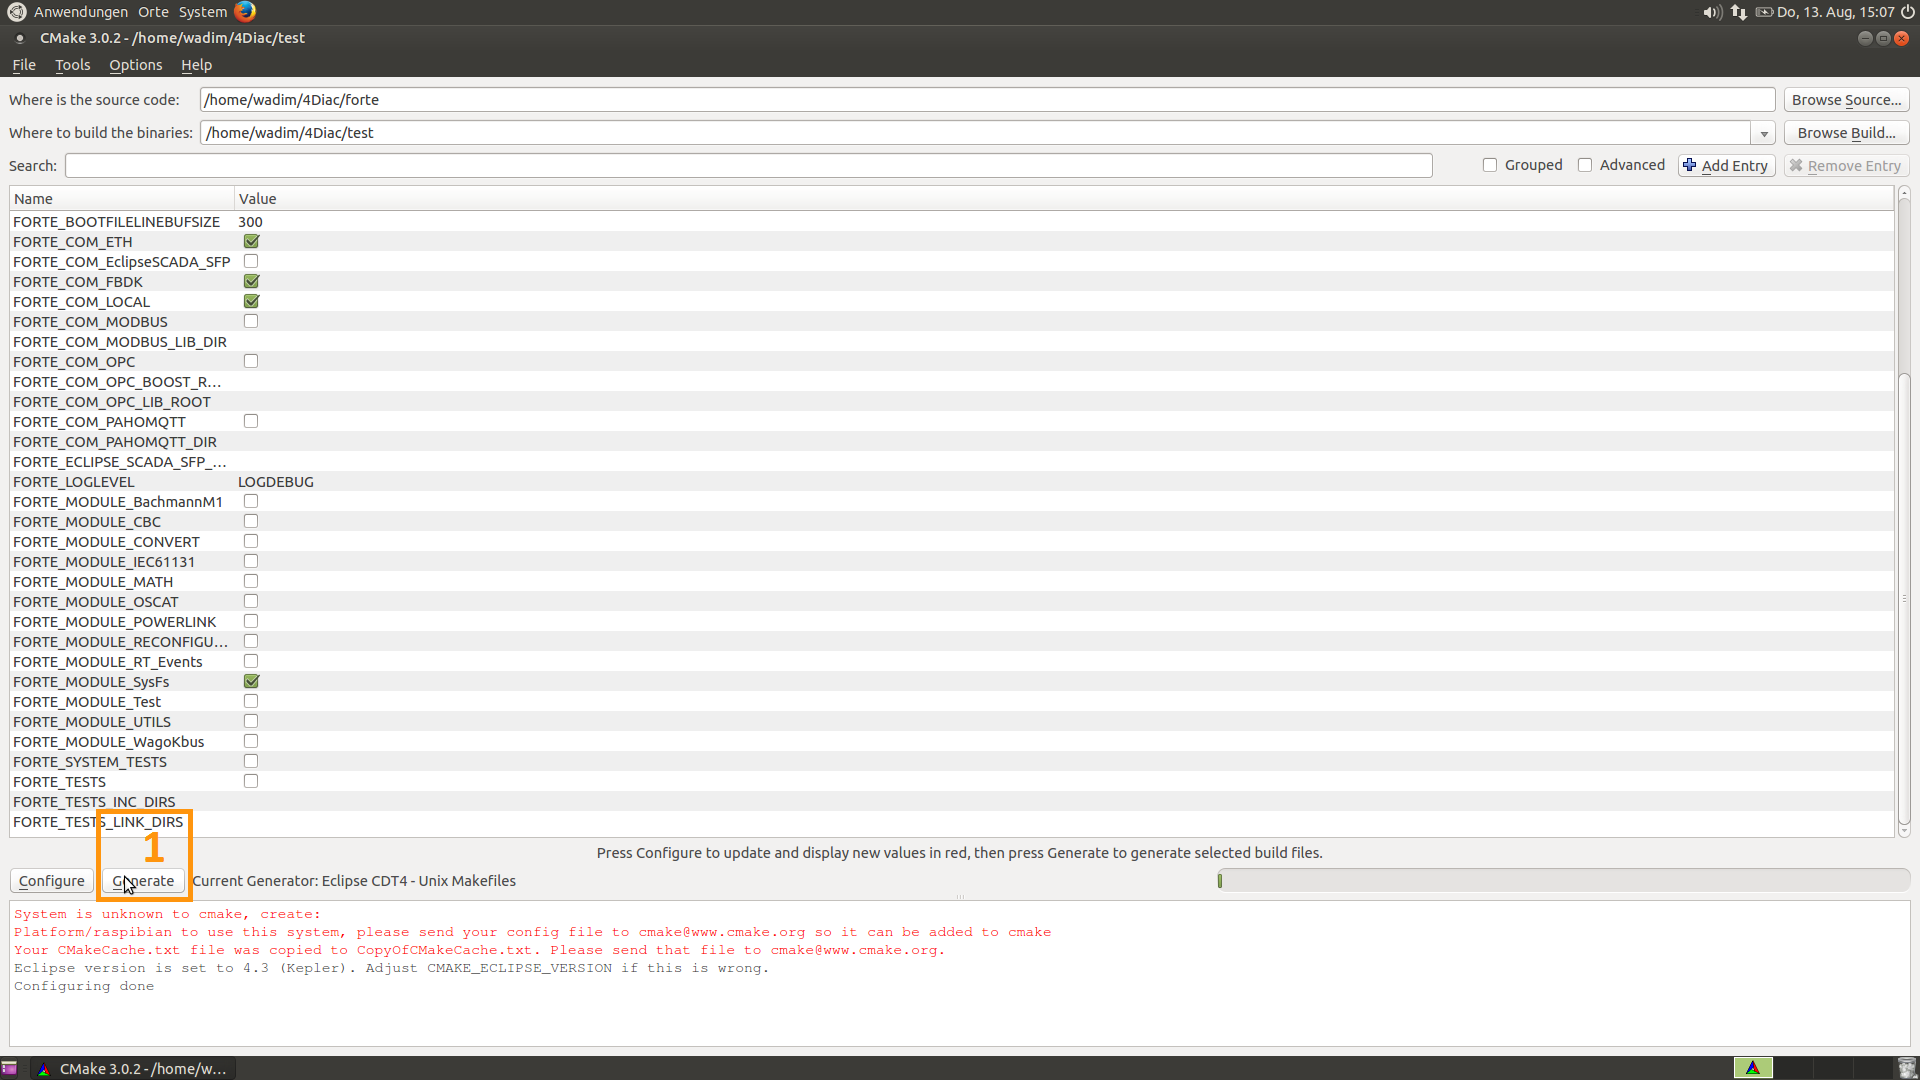
- Build 4diac FORTE
- Go to the recently generated folder and execute make (or build it as you normally do)
$ cd bin/raspPi $ make
- Go to the recently generated folder and execute make (or build it as you normally do)
Cross-compiling using Windows
- Install needed additional tools:
- Follow instructions of cross-compiling in the Linux platform from step 2, taking in account the following:
- In steps 4.2 and 4.3, the C and C++ cross-compilers are in the bin folder where you installed the tool, normally C:\SysGCC\Raspberry\bin
Where to go from here?
Now that you installed the required tools, it's time to start using them. Take a look at the following tutorials:
If you want to compile 4diac FORTE for another platform or want to know more about that, here's a quick link back:
If you want to go back to the Start Here page, we leave you here a fast access
Or Go to top
