In this tutorial, we will provide all the information needed to create a new Eclipse MOSAIC scenario from scratch with the help of the Scenario-Convert tool.
Learning Objectives
With this tutorial you learn…
-
How to create new scenarios.
-
How to use Scenario-Convert and with OSM-files.
-
How to clean map-data before generating the simulation map.
-
How to import routes into your scenario.
- Use the Scenario-Convert tool to create a custom simulation scenario. This scenario includes the road network, vehicles and their routes through the network, locations of road side units, communication properties, and the like.
- Implement application models to be integrated with the Application Simulator. Applications are developed in JAVA and implement pre-defined interface classes allowing them to have access to entity specific functions, e.g. for exchanging V2X messages, influencing the vehicle’s behavior, or controlling road infrastructure.
- Deploy your developed applications onto simulation entities using the Mapping Configuration. Each entity, e.g. vehicle, server, or RSU, is mapped with an application model developed in the previous step.
- Run your simulation and evaluate them with the help of pre-bundled Output Generators.
Scenario-Convert
For creating new scenarios, but also for importing and exporting data from external sources like OpenStreetMap, SUMO, etc. into your existing scenarios, we provide the tool Scenario-Convert.
Scenario-Convert is part of MOSAIC Extended.
However, you can use Scenario-Convert for free to generate scenarios which are executable with Eclipse MOSAIC. Get it here.
- Download the
Scenario-Convert-25.2.zip/tar.gzbundle from the mirror above. - Extract the package to an arbitrary path. It is recommended to extract the package in the very same directory as MOSAIC (
<mosaic-root>). - Use the call
Scenario-Convert.bat/shon the command line to execute the tool.
Scenario-Convert will create a database, which is the basis for all map-related tasks performed by Eclipse MOSAIC (e.g. navigation,
route calculation…).
Based on a MOSAIC database, Scenario-Convert can export the data to SUMO-conform formats.
Furthermore, one can choose whether to use routes generated by Scenario-Convert, use existing
routes or build own routes via route generation tools (e.g., DUAROUTER by SUMO).
This chapter intends to highlight the most common workflows for the work with Scenario-Convert.
We will be using
steglitz.osm OSM-file for most of the
use cases. It is best to save steglitz.osm in the same directory where Scenario-Convert is located.
Feel free to follow along with the steps to get a better understanding on how the Scenario-Convert-script functions.
Here you can find the complete Scenario-Convert reference.

Creating a complete MOSAIC-scenario from an OSM-file with one command
This is the most straightforward approach to create a scenario from your OSM-file.
We will use the command scenario create for doing so.
Let’s start off by showing you what a complete call could look like:
scenario-convert.sh scenario create steglitz.osm
In this section, we use the scenario name steglitz.* as a placeholder for path/to/steglitz.*.
Please be aware that the scenario generated with the call above contains no routes yet, see Import Routes for more details. The complete call achieves a couple of things. First, the script is going to create a SQLite-database, which is used by Eclipse MOSAIC. Furthermore, a directory will be created, which should look like this:
└─ <working-directory>
   └─ steglitz
       ├─ steglitz.osm
       ├─ application
       |  └─ steglitz.db
       ├─ cell
       |  ├─ cell_config.json
       |  ├─ network.json
       |  └─ regions.json
       ├─ environment
       |  └─ environment_config.json
       ├─ mapping
       |  └─ mapping_config.json
       ├─ ns3
       |  ├─ ns3_config.json
       |  └─ ns3_federate_config.xml
       ├─ omnetpp
       |  ├─ omnetpp.ini
       |  └─ omnetpp_config.json
       ├─ output
       |  └─ output_config.xml
       ├─ phabmacs
       |  └─ phabmacs_config.json
       ├─ sns
       |  └─ sns_config.json
       ├─ sumo
       |  ├─ steglitz.net.xml
       |  └─ steglitz.sumocfg
       └─ scenario_config.json .................. General configuration of the simulation scenario
Let’s walk through all these files:
- First the
steglitz.dbwill be created using thesteglitz.osm-file. - The
steglitz.dbwill be used to createsteglitz.con.xml,steglitz.edg.xmlandsteglitz.nod.xml, which are files used by SUMO. -
SUMO Netconvert is used to create
steglitz.net.xml, which is a network representation in SUMO. - Now the SUMO-configuration
steglitz.sumocfgis written. - Afterward, the
mapping_config.jsonandscenario_config.jsonare created and all files are moved to the right place. In thescenario_config.jsonvalues like the center coordinate will automatically be set using data from the SUMO related files.
While this is technically sufficient to start working on your scenario, such as importing routes to it, there are a couple of other things you can do to achieve better results.
Clean the OSM-file using Osmosis
By default, Osmosis will be used to create a new OSM-file with the suffix _cleaned. The created
file will contain much less clutter and usually is better suited for simulation purposes.
Check the images below to see the difference the clean-up process can make.


To avoid removing ways from the OSM-file, please use the option “skip-reduce-ways”.
scenario-convert.sh scenario create steglitz.osm --skip-reduce-ways
Generating Routes
The Scenario-Convert also offers the option --generate-routes, which will generate a large set of routes for the scenario.
With that option, all dead-ends of the scenario will be identified and used to generate routes from each dead-end to all other dead-ends.
For large scenarios, this approach is often too much and should be avoided.
Instead, for a more detailed control over the route generation process, the separate command route generate shall be used, which is explained later.
scenario-convert.sh scenario create --generate-routes
Note: If the scenario already exists the command will fail. You need to delete the previously generated steglitz directory beforehand.
Conclusion
This wraps up one of the main workflows with the Scenario-Convert-script. A quick reminder of what we achieved:
- Cleaned up an OSM-file to only contain relevant data.
- Converted that OSM-file to formats that Eclipse MOSAIC/SUMO can handle.
- Created the project structure for a scenario.
- Calculated a set of initial routes.
With all of this you can now start further developing your scenario. For a more detailed description on the next steps please have a look at Additional Scenario Configuration and Application Development.
You can now move your steglitz directory to /scenarios and test it by running
./mosaic.sh -s steglitz on Linux/macOS or .\mosaic.bat -s steglitz on Windows.
If you’ve reached this part of the tutorial, you finished the main part of this tutorial.
Below we’ll introduce how scenario-convert can be utilized to import routes instead of generating them.
Create a MOSAIC-Scenario With More Control
In the previous steps, we explained how a complete MOSAIC scenario can be generated by using one single command using Scenario-Convert. However, to gain more control over the scenario generation process, this process can be sub-divided in individual steps:
- Create an initial scenario database
- Generate or import routes
- Convert the scenario database to a MOSAIC scenario
Generate an Initial Scenario Database from OSM file
We’ll start off by solely creating the database and applying OSMOSIS with the following command:
scenario-convert.sh database create steglitz.osm
The directory should look like this:
└─ <working-directory>
   ├─ steglitz.db
   ├─ steglitz.osm
   └─ steglitz_cleaned.osm
Generate Additional Routes
In order to generate routes, Scenario-Convert offers the route generate command to calculate routes from one point to another.
scenario-convert.sh route generate steglitz.db --from 52.4551693,13.3193474 --to 52.4643101,13.3206834 --max 3
This will calculate up to three routes between the two given coordinates. Alternatively, instead of coordinates, node IDs can be given:
scenario-convert.sh route generate steglitz.db --from 267350668 --route-end-node-id 313139970 --max 3
All routes are automatically added to the database right after route generation. If the routes should not be added but instead exported to a SUMO route file right after route generation, use the following options:
scenario-convert.sh route generate steglitz.db --from 267350668 --route-end-node-id 313139970 --max 3 --dry-run --export
Importing a Route-file
Often times, your routes won’t be created by the Scenario-Convert tool. Instead, they will have to be imported from another source. As an example for this use case, we generated some routes for the steglitz-scenario using SUMO’s duarouter, which you can find here.
Let’s import these routes into the database.
We achieve this by calling:
Scenario-Convert.sh route import steglitz.db steglitz.rou.xml
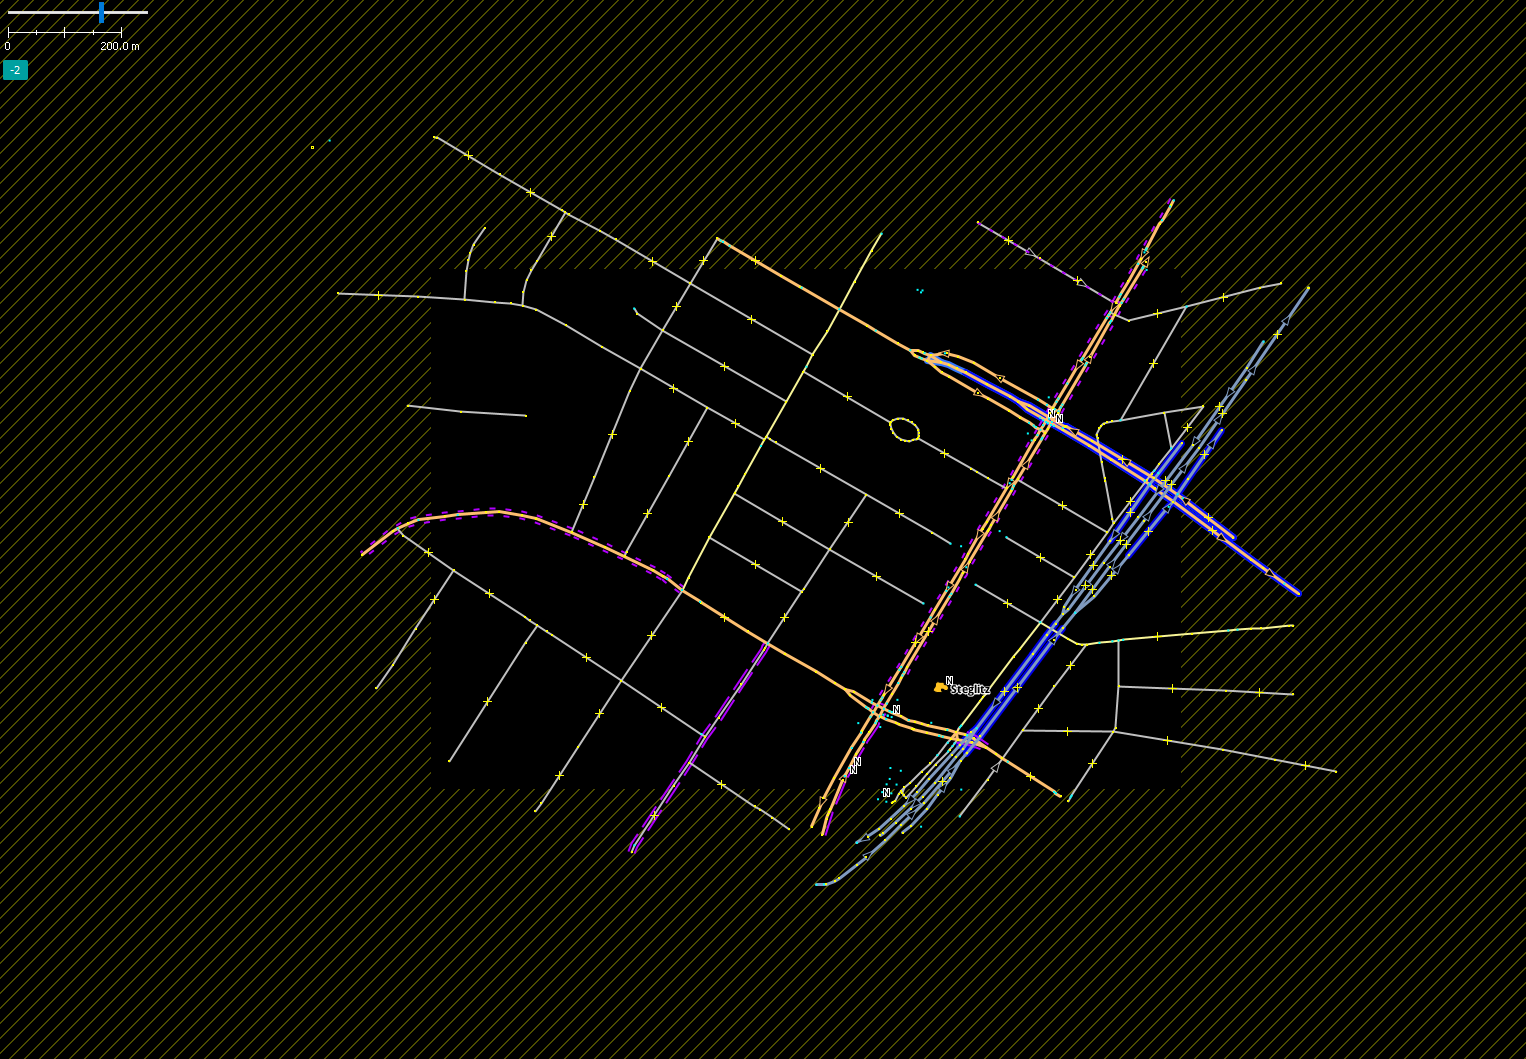
Now all new routes are imported into our database. The following image shows a visualization of one of the created routes.

Creating the scenario
The final step is to create the scenario from the files we created so far.
Scenario-Convert.sh scenario create steglitz.db
Instead of copying the SUMO-files, this will generate all necessary files and move them into an Eclipse MOSAIC-conform folder structure:
└─ <working-directory>
   ├─ steglitz.osm
   └─ steglitz
      ├─ application
      |  └─ steglitz.db
      ├─ mapping
      |  └─ mapping_config.json
      ├─ sumo
      |  ├─ steglitz.net.xml
      |  └─ steglitz.sumocfg
      └─ scenario_config.json
As you can see the resulting folder structure looks just like the final output from the first workflow described.
Conclusion
You should now know how you can manually add routes to your scenario and have a deeper understanding of the way that some of the script parameters work.
For more information, see Scenario-Convert documentation for all commands and options.
Attached Files
A list of all attached files in this chapter: