All files you need for this tutorial are included in the Eclipse MOSAIC zip file:
Download Eclipse MOSAIC
This tutorial aims to provide a general overview of the Eclipse MOSAIC application concept and shows two examples that
involve ad-hoc communication via IEEE 802.11p between different participants and message passing from one application
to another that run on the same vehicle. This scenario mainly focusses on how to use applications and communication.
Note, there is no specific situation which should be explained with the given setup. The scenario is located in “Tiergarten” as an example of a straight road found here.
Learning Objectives
The tutorial is split up into four main parts:
-
How to equip a vehicle with one or more applications. This process is called
mapping. -
An example application that shows how to implement communication between different vehicles via a wireless ad-hoc network.
-
The next part of the tutorial shows how to accomplish message passing between two applications that run on the same vehicle.
-
The last part of the tutorial shows how to retrieve the results of a simulation run.
Overview
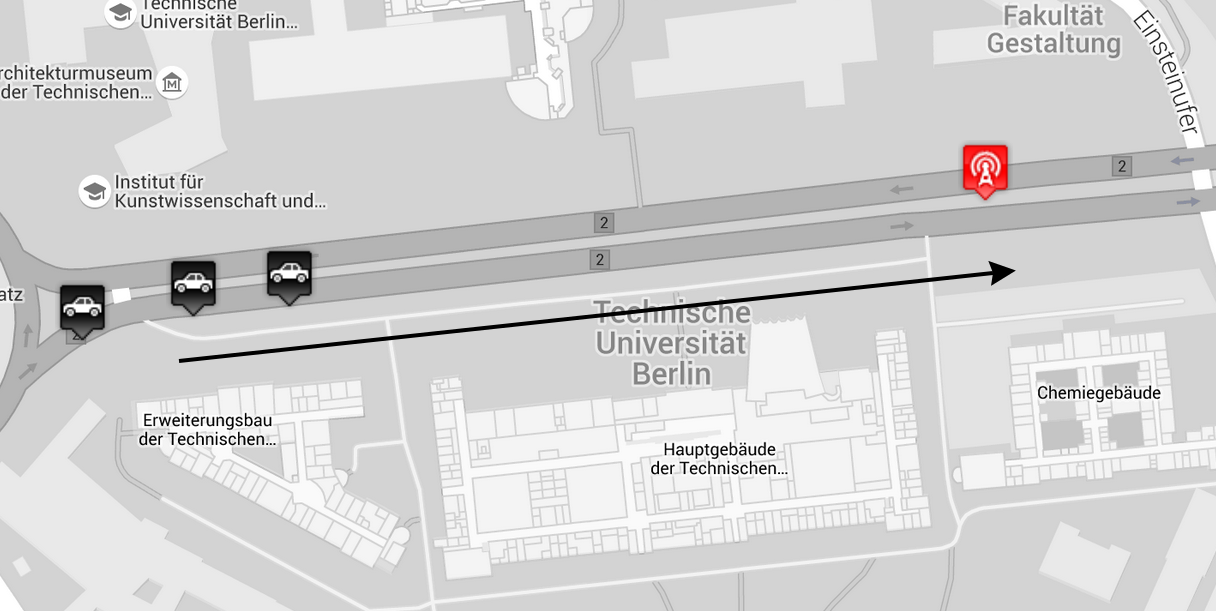
The scenario consists of three vehicles that drive down a road in consecutive order and pass a Road Side Unit (RSU) that emits messages in a fixed interval. The vehicles will receive the messages from the RSU as soon as they are in communication range. Ad-hoc communication is being used to highlight signal range. Furthermore the scenario includes manipulation of traffic lights which will be discussed in the Tiergarten: Traffic Lights tutorial.
After completing this tutorial the reader should be able to deploy own applications according to his needs and make use of ad-hoc communication among vehicles and intra-vehicle communication among applications on the same vehicle. The Eclipse MOSAIC Cell simulator that is used to simulate cellular network communication will be covered in tutorial 2. The source code for all the applications in this tutorial can be found here.
Mapping Configuration
Read the detailed documentation of the Mapping Configuration.
In order to use applications they have to be assigned (mapped in Eclipse MOSAIC terminology) to a simulation entity.
In this tutorial, we will assign applications to an RSU that is placed along the road (the red symbol in the top
picture) and to the vehicles. In order to do this the following steps are necessary:
- Navigate to the
mappingfolder of the Tiergarten tutorial scenario. - Edit the
mapping_config.jsonto let it point to the correct classes for your application, define prototypes and to add entities to the simulation.
The mapping is already configured correctly, so we will continue with a description of the important parts of the mapping configuration.
Prototype Section
This section contains the properties of the simulated entities, including their applications.
You can, for example, configure the maximum speed and the length of a vehicle. Normally, the
default values are fine here. In order to map one or more applications you have to fill in
the complete class identifier including the package in the applications array.
In this tutorial, we have mapped three applications to the vehicles and one application to the RSU.
Mapping for the normal cars:
"applications": [
  "org.eclipse.mosaic.app.tutorial.MessageReceivingApp",
  "org.eclipse.mosaic.app.tutorial.EventSendingApp",
  "org.eclipse.mosaic.app.tutorial.EventProcessingApp",
]
Mapping for the TrafficLightCar:
"applications": [
  "org.eclipse.mosaic.app.tutorial.VehicleToTrafficLightApp"
]
Mapping for the RSU:
"applications": [
  "org.eclipse.mosaic.app.tutorial.RoadSideUnitApp"
]
In order for Eclipse MOSAIC to be able to locate these classes, the resulting .jar archive should be placed
in the application folder of your scenario. For our tutorial we have packaged the needed
classes MessageReceivingApp, EventSendingApp, EventProcessingApp, VehicleToTrafficLightApp and RoadSideUnitApp into one
.jar file. However, this isn’t a strict requirement. What these classes actually do and how they are
implemented will be covered in the next two parts of this tutorial.
Vehicle and RSU sections
This part of the mapping is used to actually bring entities like vehicles and RSUs into the simulation.
For example, we placed the RSU that is equipped with the RoadSideUnitApp application at the
specific geo coordinate with latitude = 52.5130607 and longitude = 13.328910.
Usually, this and the mapping of its application is all that is necessary to make use of an RSU.
For this tutorial we go with just one RSU but analogous to adding multiple vehicles we could also
add more of them if the need arises.
Spawning vehicles is a little bit more complex than adding a RSU. Vehicles are configured as groups from which we have three in this tutorial scenario. Exemplary, we will describe one of these groups in more detail:
"vehicles": [
	{
		"startingTime": "1.0 s",
		"route": "0",
		"maxNumberVehicles": 1,
		"types": [ { "name": "Car" } ]
	},
	...
]
startingTime: Defines at which second the vehicle is spawned, in this case one second after the beginning of the simulation.route: Describes which route these vehicle group should use. For now it is sufficient to know that there is one route with the id 0 that leads the vehicles near the RSU that is already defined in this tutorial scenario.maxNumberVehicles: Used to determine how many vehicles should be in that group. Here, we go with just one single vehicle.types: This array maps to the definedCarprototype from theprototypes-section of the mapping.
Inter-Vehicle Communication
This part describes the RoadSideUnitApp and MessageReceivingApp in more detail,
which are used for inter-vehicle communication.
As a coarse overview, the
RoadSideUnitApp application sends out a defined message at a fixed interval. These messages
are received and written to the log file by the MessageReceivingApp application.
Receiving the V2X messages
First, we start
off with the class definition of the MessageReceivingApp, which is mapped onto the vehicles,
and then we will run through the methods we have to implement in order to get the communication working.
Class definition
public class MessageReceivingApp extends AbstractApplication<VehicleOperatingSystem>
	implements CommunicationApplication {...}
In general, every vehicle application will extend the AbstractApplication abstract class with the
VehicleOperatingSystem type parameter. The VehicleOperatingSystem is the main way to interact with
the underlying vehicle and gives a wide array of functionality to the user. Also, depending on the needs of the
application, several interfaces have to be implemented. For our scenario we implement CommunicationApplication
to be able to receive and handle V2X messages.
Application initialization
During the initialization procedure of communicating applications, the communication modules (WLANModule or CellModule) need to be activated. For example, activating the WLAN module can be achieved with the following code snippet:
@Override
public void onStartup() {
    getLog().infoSimTime(this, "Initialize application");
    getOs().getAdHocModule().enable(new AdHocModuleConfiguration()
            .addRadio()
            .channel(AdHocChannel.CCH)
            .power(50)
            .create());
    getLog().infoSimTime(this, "Activated AdHoc Module");
}
Additional arguments specify the communication properties of the module, such as which ad-hoc channel shall be used
and how strong the Wifi antenna is (50mW in this case).
Note: The honoring of these arguments depends on the underlying network simulator. Currently, ns-3 and
OMNeT++ make use of these arguments. For SNS, the method distance(250) shall be used instead of power(50).
Receiving messages
In order to act upon received messages from other simulation entities, the onMessageReceived from
the CommunicationApplication interface is used. In our tutorial scenario we don’t do something special upon message receiving
and just write the position of the sender RSU into the log file.
@Override
public void onMessageReceived(ReceivedV2xMessage receivedV2xMessage) {
    if (receivedV2xMessage.getMessage() instanceof InterVehicleMsg) {
        getLog().infoSimTime(this, "Received V2X message from RoadSideUnit at [{}]",
                ((InterVehicleMsg) receivedV2xMessage.getMessage()).getSenderPosition()
        );
    }
}
This is basically all it takes to receive messages from another simulation entity. Normally, the application author uses an own message class that derives from V2XMessage and casts it to his specific class in order to handle messages easier.
Sending the V2X messages
Since the receiving application is now set up we move on to the sending side of this tutorial.
The sending takes place from the RSU via a broadcast, so every vehicle in transmission range
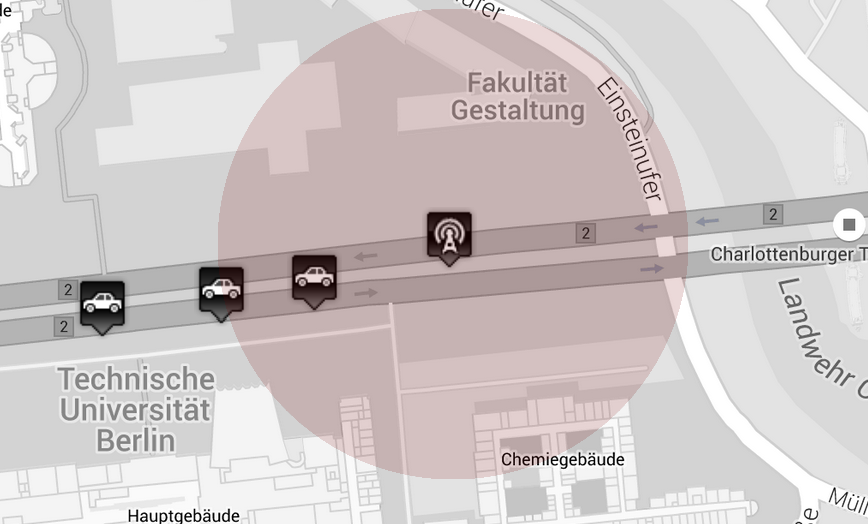
will receive the message sent by it. The picture above shows the communication range of the RSU
which is dependent from the settings in the communication simulator.
The actual sending takes place in the
RoadSideUnitApp application which is equipped to the RSU
via the mapping configuration.
Application simulator event model
In order to send messages at a fixed interval we make use of the event based model of the Eclipse MOSAIC Application Simulator. A high level description in what we need to do in order to send messages at a specific interval can be summarized as follows:
- Line up an event every X seconds. For this tutorial an interval of two seconds was chosen.
- Once the event gets processed in the
processEvent()-method the actual sending of the message will be triggered. - All information necessary for the sending will be assembled in
sendAdHocBroadcast()and the message gets actually sent out.
Application Setup
@Override
public void onStartup() {
    getLog().infoSimTime(this, "Initialize application");
    getOs().getAdHocModule().enable(new AdHocModuleConfiguration()
            .addRadio()
            .channel(AdHocChannel.CCH)
            .power(50)
            .create());
    getLog().infoSimTime(this, "Activated WLAN Module");
    sample();
}
The setup for the RSU is more or less the same as for the vehicle where we activate the Wifi module. Additionally, the sample()
method gets called which is responsible for the events.
Event scheduling
The next step is to line up the event at the interval we desire. The method we use for that, sample(), looks like this:
public void sample() {
    getOs().getEventManager().addEvent(getOs().getSimulationTime() + TIME_INTERVAL, this);
    getLog().infoSimTime(this, "Sending out AdHoc broadcast");
    sendAdHocBroadcast();
}

@Override
public void processEvent(Event event) throws Exception {
    sample();
}
Here, an Event is created which will be received at the current time in simulation plus the defined interval which is
set to two seconds. The second argument for the event creation is a reference to the originating class instance. For our
tutorial, the this reference is sufficient here. After we created the event, it is added to the event queue via
addEvent() which will result in a call to processEvent() at the given interval.
Message sending
After we made sure the method that does the actual sending of the message is called at the specified interval, we take a
closer look at the sendAdHocBroadcast() method we defined in the TiergartenRSU class:
private void sendAdHocBroadcast() {
    final MessageRouting routing = getOs().getAdHocModule().createMessageRouting()
            .channel(AdHocChannel.CCH)
            .broadcast()
            .topological()
            .singlehop()
            .build();
    final InterVehicleMsg message = new InterVehicleMsg(routing, getOs().getPosition());
    getOs().getAdHocModule().sendV2xMessage(message);
}
This method has basically three tasks to solve:
- Firstly, a routing description has to be created, which defines the communication type, the source and destination for
the message, and additional properties like the maximum number of hops and the communication channel. In this specific case,
the
AdHocMessageRoutingBuildercreates a message routing which includes the IP address of the RSU as the source, the broadcast address as the destination (.broadcast()), and a communication path using the present ad-hoc topology (.topological()) with only one hop (.singlehop()). - Secondly, the message to be send is created. The previously created message routing description is passed to this custom V2X message.
- Finally, the message is send using the ad-hoc module of the RSU.
These steps conclude the sending of the message. The procedure is the same for sending messages from a vehicle instead of a RSU.
Intra-Vehicle Communication
This part of the tutorial describes the steps necessary for letting two applications to communicate
with each other on the same vehicle. Here, we use the EventSendingApp application as the sender
and EventProcessingApp as the receiver.
The EventSendingApp will schedule events that reach all other applications on the same vehicle.
In general, the approach is similar to the sending of a V2X message and also makes use of the event system.
Message sending
First, we start off with the sending side. The event code should look familiar:
@Override
public void onVehicleUpdated(@Nullable VehicleData previousVehicleData, @Nonnull VehicleData updatedVehicleData) {
    final List<? extends Application> applications = getOs().getApplications();
    final IntraVehicleMsg message = new IntraVehicleMsg(getOs().getId(), getRandom().nextInt(0, MAX_ID));

    for (Application application : applications) {
        final Event event = new Event(getOs().getSimulationTime() + 10, application, message);
        this.getOs().getEventManager().addEvent(event);
    }
}
One noteworthy thing is that we use the onVehicleUpdated-method to line up a new event.
This method is called automatically if the vehicle data (for example, speed or heading) gets updated, which
usually takes place at every time step of the traffic or vehicle simulation.
The general approach works like this:
- Get a list of all applications that run on the vehicle using
getApplications(). - Create a new message. Here we use our own custom message called
IntraVehicleMsgwhich takes a randomly generated id and the name of the vehicle as payload. Again, this is for tutorial purposes and could be anything. - After that we iterate over every application that runs on the vehicle, in this case two:
EventSendingAppEventProcessingApp
- Then, an event is constructed for each app running on the vehicle and added to the event queue the same way as in the inter-vehicle example.
Receiving the message
The actual receiving of the message takes place in the EventProcessingApp application.
Since the intra vehicle messages are basically treated as an event, the code is straight forward here:
@Override
public void processEvent(Event event) {
    Object resource = event.getResource();
    if (resource instanceof IntraVehicleMsg) {
        final IntraVehicleMsg message = (IntraVehicleMsg) resource;
        // message was passed from another app on the same vehicle
        if (message.getOrigin().equals(getOs().getId())) {
            getLog().infoSimTime(this, "Received message from another application: {}", message.toString());
        }
    }
}
The general concept here is that the payload is wrapped as an object in the actual event. The procedure here is as follows:
- Retrieve the resource from the event using
getResource() - Check if there is actually some kind of payload
- Make sure the payload is of the expected type
- Cast the payload to an actual class and do something with it.
Interpretation of simulation results
The last part of the tutorial describes how to retrieve the actual simulation results. For this tutorial, the results are quite simple and simply show the arrival of the Inter- and IntraVehicle messages. So after executing the simulation using the following command:
./mosaic.sh -s Tiergarten
mosaic.bat -s Tiergarten
Afterwards, in the log directory of Eclipse MOSAIC a new folder should be created containing all log files of
the simulation run. Within, the sub-folder apps contains the log files for each simulation unit and its application.
For example, for the normal vehicles we end up with three log files: MessageReceivingApp.log, EventSendingApp.log
and EventProcessingApp.log.
This following snippet shows the receiving of the V2X messages that were sent by the RSU:
INFO  - Initialize application (at simulation time 6.000,000,000 s)
INFO  - Activated AdHoc Module (at simulation time 6.000,000,000 s)
INFO  - Received V2X Message from rsu_0 (at simulation time 18.000,400,000 s)
INFO  - Received V2X Message from rsu_0 (at simulation time 20.000,400,000 s)
Next, we see the contents of the IntraVehicleMessage that originates from another app on the vehicle:
INFO  - Initialize application (at simulation time 2.000,000,000 s)
INFO  - Received message from another application: IntraVehicleMsg{origin='veh_0', id=631} ...
The following log was generated by the RSU application and logs the sending of each ad-hoc broadcast:
INFO  - Initialize application (at simulation time 0.000,000,000 s)
INFO  - Activated WLAN Module (at simulation time 0.000,000,000 s)
INFO  - Sending out AdHoc broadcast (at simulation time 0.000,000,000 s)
INFO  - Sending out AdHoc broadcast (at simulation time 2.000,000,000 s)
This concludes the first tutorial and hopefully gave an idea on how to use the Eclipse MOSAIC Application Simulator to send out and receiving messages to other simulation entities or inside the same vehicle.
The OperatingSystem.log files do not contain specific application output and is mainly used for debugging purposes and
won’t be discussed in this tutorial.
Conclusion
The Tiergarten tutorial shows detailed the configuration capability and how the communication types can be used. The following list sums up the things we have covered in this tutorial:
- Achieving inter- and intra-application communication via AdHoc networks.
- How to find and process the results of a simulation run with the help of generated log files.
- Integrate of external applications (Traffic Lights).