All files you need for this tutorial are included in the Eclipse MOSAIC zip file:
Download Eclipse MOSAIC
In this brief tutorial we will discuss how to interact with traffic lights via Eclipse MOSAIC. Usually the position and the lanes they control are coming from the OpenStreetmap-data, which we will also assume during this tutorial. Note that this tutorial is intended to be used with the Tiergarten: Communication Scenario, so creating a new scenario is not necessary here and the Traffic Light data is already exported.
At first, we cover the general steps necessary to enable traffic lights and eventually “map” applications onto them. Each step is described in more detail later on.
Learning Objectives
After completing this tutorial you will be able to:
-
Tell
scenario-convertto export the traffic light information into the database -
Determine the node ids of the traffic lights which should have applications on them
-
Adjust the mapping configuration of Eclipse MOSAIC accordingly and assign the desired application(s) onto one or more traffic lights.
-
Control traffic lights inside your applications.
Additional information on how to use traffic lights, how they are modeled within sumo and how their phases work can be found in the sumo wiki under Sumo/Traffic Lights.
Use scenario-convert to export traffic lights
Although the Tiergarten scenario which we are focusing on in this tutorial already has the traffic lights exported from the .osm file, this step is important if you desire to set up an own scenario. For the Tiergarten example, the scenario-convert command line looks like this:
scenario-convert.jar --osm2sumo -d tiergarten.db -i tiergarten.osm
Export of traffic lights using scenario-convert
By default, the command exports the traffic light information from the .osm file to the tiergarten.db database. More information on how traffic lights are handled by Open Streetmap can be found in their wiki OpenStreetMap/Traffic Signals.
Determine the traffic lights that should be equipped with applications
The next step is to decide which traffic lights should have applications on them. Since their ID(s) have to be referenced
in the mapping, we will have to determine them first. There are several ways to do this, e.g. taking them directly from
the database using a tool like sqlitebrowser or extract them directly with a text editor from the .net.xml file that
gets generated by scenario-convert for usage with sumo. However, here we will focus on a graphical approach using
sumo-gui since it is the easiest way to determine the exact traffic lights we want to map to applications.
You already should have installed sumo, so that MOSAIC runs properly, therefore simply try to find the sumo-gui in your startup menu. Open either the *.sumocfg or *.net.xml file, and zoom in long enough to find the junction, like in the next figure.
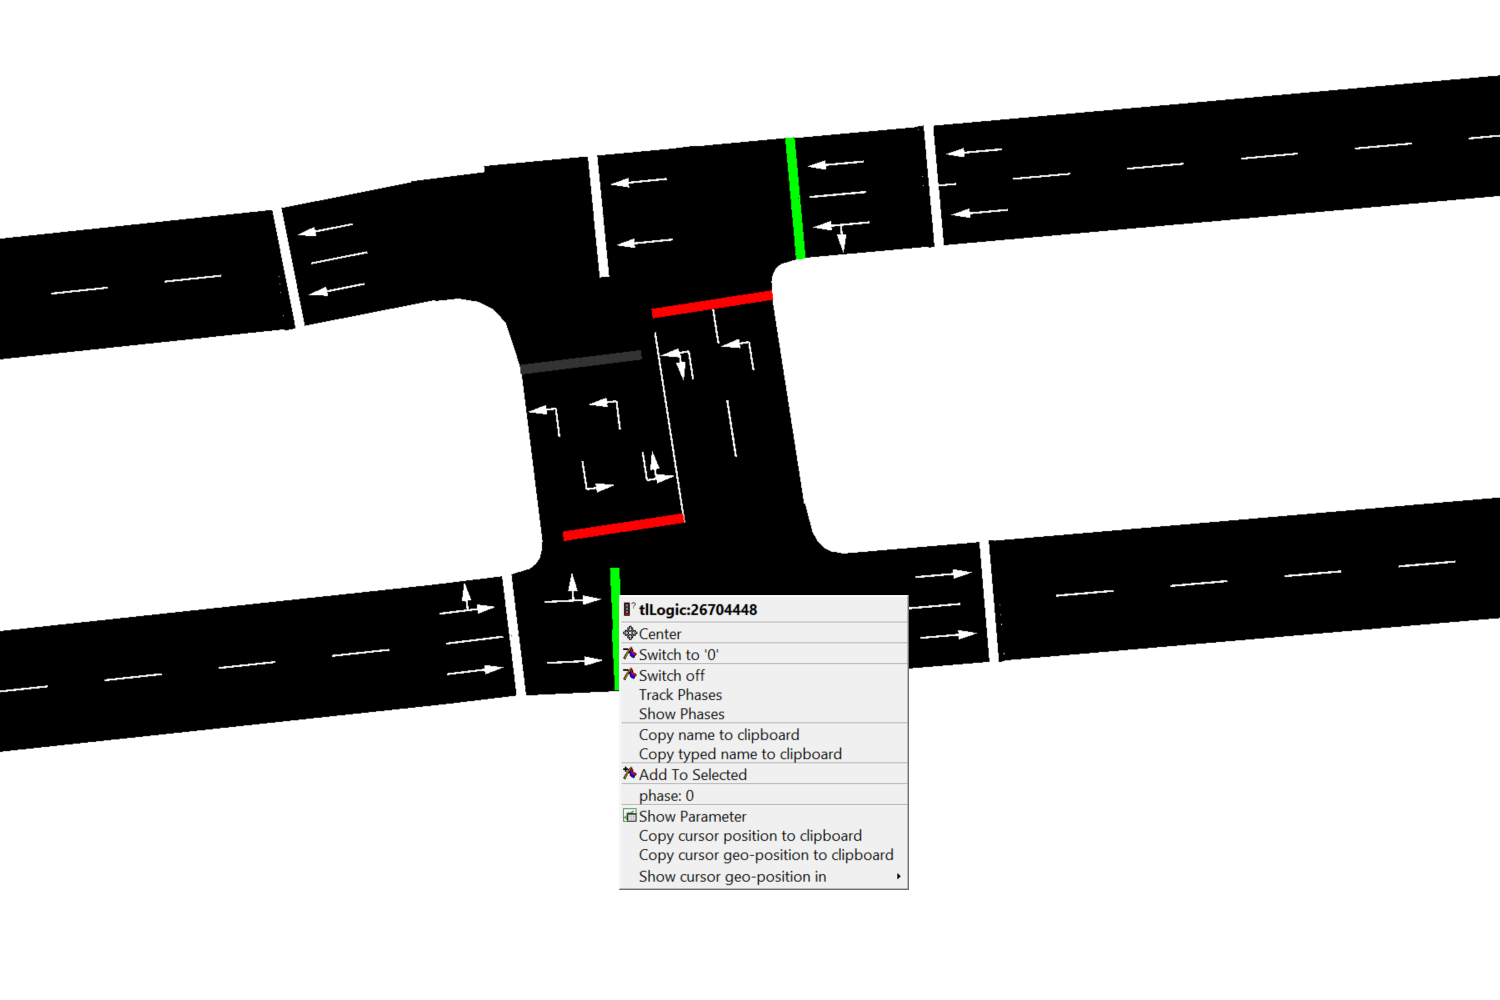
The figure shows how to locate a specific traffic light, or more precise, a traffic light group. The process is as
simple as scrolling to the desired traffic light, right click on it and write down the number behind tlLogic in the drop
down menu or use the copy to clipboard feature of the sumo gui. This id is then used in the next section which explains
how to actually map applications to a traffic light.
Configure the mapping for traffic lights
Read the detailed documentation of the Mapping Configuration.
Now that we have the ids of the traffic lights we can modify the mapping to assign application(s) to them. Note that the tutorial scenario already has applications assigned to three arbitrary traffic lights, so the mapping file bundled with it can also be used as a starting point here. In general, the mapping looks the same as for vehicles or RSUs. First, we define a prototype that is used for all subsequent traffic lights:
    "prototypes": [
        {
            "name": "TrafficLight",
            "applications": ["org.eclipse.mosaic.app.tutorial.TrafficLightApp" ]
        }
    ]
The following listing shows an additional prototype called TrafficLight that gets associated
with the
TrafficLightApp application. Note that the application that should run on the traffic light has to extend
AbstractApplication<TrafficLightOperatingSystem> in order to work. The next step is to use this prototype and assign
it to a traffic light we found in the section before using the sumo gui:
"trafficLights": [
    {
        "name": "TrafficLight",
        "tlGroupId": "26704448"
    },
    {
        "name": "TrafficLight",
        "tlGroupId": "252864801"
    },
    {
        "name": "TrafficLight",
        "tlGroupId": "252864802"
    }
]
The listing above shows as an example how this prototype is assigned via the name attribute to specific traffic lights.
The important aspect here is that tlGroupId refers to the id of the traffic light we found via the sumo gui in section
which must exactly match each other.
The Traffic Light API
In order to access the traffic light functionality from within an application it must extend the
AbstractApplication<TrafficLightOperatingSystem> abstract class. There are two main functionalities provided by it,
reachable from the application operating system that can be acquired by using the getOs() method:
- Change the currently active traffic light program via
switchToProgram() - Adjust the remaining time of the currently active phase via
setRemainingDurationOfCurrentPhase() - Get the lanes controlled by the traffic light via
getOs().getControlledLanes()
public class TrafficLightExampleApp extends AbstractApplication<TrafficLightOperatingSystem> {
    private static final String DEFAULT_PROGRAM = "1";
    private static final long DURATION = 10 * TIME.SECOND;
    @Override
    public void onStartup() {
        getOs().switchToProgram(DEFAULT_PROGRAM);
        getOs().setRemainingDurationOfCurrentPhase(DURATION);
        for (String lane : getOs().getControlledLanes()){
            ...
        }
    }
    ...
Presented above is a snippet from an exemplary traffic light application.
However, adding a new traffic light program from within the application at runtime using the Eclipse MOSAIC application
interface is currently not possible and has to be done beforehand via sumo as described
here. The two main ways of doing this is to use an additional-file
or the tls_csv2SUMO.py tool bundled with sumo. However, it is possible to add a new program by using the TraCI
interface as described
here.
TrafficLightApp
The
TrafficLightApp is being used in the
Tiergarten: Communication scenario. It sets the traffic light it is mapped on to always be red but when it receives a V2X signal with the correct passphrase, it will turn green for a defined duration.
This is an example of simple traffic light manipulation via ad-hoc communication.
        private void setGreen() {
            getOs().switchToProgram(GREEN_PROGRAM);
            getLog().infoSimTime(this, "Setting traffic lights to GREEN");

            getOs().getEventManager().addEvent(
                    getOs().getSimulationTime() + GREEN_DURATION * TIME.SECOND,
                    (e) -> setRed()
            );
        }

        private void setRed() {
            getOs().switchToProgram(DEFAULT_PROGRAM);
            getLog().infoSimTime(this, "Setting traffic lights to RED");
        }
Here we can see how the state of the traffic lights can be changed inside the application. setGreen uses the previously established events to call the function setRed after a defined duration.
After finishing the simulation, the effects on the traffic lights can be seen in the traffic log.
INFO  SumoAmbassador - Receive TrafficLightStateChange request
INFO  SumoAmbassador - Changing program of traffic light group '26704448' to program id '0'
INFO  SumoAmbassador - Receive TrafficLightStateChange request
INFO  SumoAmbassador - Changing program of traffic light group '26704448' to program id '1'