
Export Code Structure#
This guide provides an overview of the code structure of Aidge export modules.
Introduction#
In Aidge, an export module refers to any module that generates a standalone program capable of running a neural network on specific hardware targets.
Several export modules are already available in the framework, such as:
Throughout this guide, we will refer primarily to the C++ Export, since all export modules share a similar structure. We will walk through the complete export process using a small model as an example, explaining each step and mechanism involved.
Core, Export, and Deploy Architecture#
The source-generation workflow is deliberately divided into three layers:
aidge_core                         exporter package                    aidge_deploy
───────────────────────────────    ─────────────────────────────────   ─────────────────────────────
Hardware model                    Kernel/operator registrations       Build and execution backends
Generic graph preparation         TargetExport registrations         Transfer and flashing
Export orchestration              Project composers                  Output/protocol parsing
Shared registries                 Target preprocessors/strategies     DeployResult construction
ExportArtifact + manifest         Templates and BSP integration

         hardware identity                  buildable project
target ─────────────────────────► export ────────────────────────────► deploy
The boundaries are important:
aidge_coreowns the hardware description and the generic orchestration.An exporter owns source generation and produces a complete, buildable project. It may specialize generation for a target, but it does not flash or execute that project.
aidge_deployconsumes the exported project and its manifest. It builds, transfers, flashes, executes, and parses results, but it never regenerates model source code.
This separation makes export() useful without aidge_deploy and lets
deployment consume an export in a later process or on another machine.
Generic Core Export Objects#
ExportConfig#
ExportConfig is the user request. It selects the hardware target, output
directory, precision and optional backend features, and contains an
ExportApplication. It is configuration, not resolved state.
ExportApplication#
ExportApplication describes the entry point that must be generated with
the model. Its kind can request a standalone application, output display,
benchmarking, or validation. It also carries generation-time options such as
warm-up and iteration counts, profiling, TinyML Benchmark protocol support,
and heterogeneous deployment flags.
These values affect generated sources. They are serialized into the manifest so deploy can reconstruct matching runtime defaults, but deploy does not use them to choose or regenerate templates.
ExportContext#
prepare_export() resolves the request into an immutable
ExportContext. The context contains the instantiated Device, adapted
graph, scheduler, input tensors, destination path, data type, optional labels,
and the remaining generation flags. It is the internal contract passed to
project composers, preprocessors, and target strategies.
TargetExport#
TargetExport links exporter-specific assets to an existing hardware-model
target. It contains only information owned by that exporter, for example:
the assets root for that exporter/target pair;
a target-specific
main.cpptemplate;an optional Makefile template.
Construction resolves hardware_target_class through the core hardware
registry. An unknown target therefore fails immediately. The registry key is
(export_backend, target) and is managed by
register_target_export() and get_target_export().
Exporter packages organize these definitions consistently:
aidge_export_<backend>/
└── aidge_export_<backend>/
    └── targets/
        ├── common.py
        ├── host/
        │   └── __init__.py
        └── my_target/
            ├── __init__.py
            └── templates/
targets is intentionally broader than boards: a target may be a
development host, an SBC, a microcontroller board, an accelerator, or a
virtual execution target. common.py owns backend-wide behavior;
targets/<target>/__init__.py registers only target-specific export assets
and hooks.
Export Extension Points#
There are three distinct hooks. Choosing the narrowest hook keeps additions easy to understand:
ProjectComposerRegistered by execution environment with
register_project_composer(environment, callable). It runs after the generic model sources have been emitted and assembles the application around them: entry point, BSP, Makefile, and protocol-specific files. It returns manifest overrides such asexpected_artifactandprotocol.ExportPreprocessorRegistered by hardware target with
register_export_preprocessor(target, callable). It replaces the preparedExportContextbefore normal generation. Use it when a target must partition or transform the graph while the rest of the pipeline remains generic. For example, an NPU integration can partition the graph, emit accelerator regions, reschedule it, and return an updated context.TargetExportStrategyRegistered by hardware target with
register_target_export_strategy(target, callable). It replaces generic source writing and project composition for the target. Use it only when a target needs a fundamentally different or multi-project export, such as a heterogeneous system that emits coordinated programs.
Resolution order is deterministic:
prepare_export()
    │
    ├─ target preprocessor, when required
    │
    ├─ target strategy found? ── yes ─► strategy owns generation
    │
    └─ no
        ├─ write_export() emits model sources
        └─ environment composer found?
            ├─ yes ─► composer assembles the project
            └─ no  ─► generic main.cpp fallback
ExportManifest and ExportArtifact#
Every successful export writes .aidge-export.json and returns an
ExportArtifact. The artifact contains the project path and its parsed
ExportManifest. The manifest is the stable, serializable boundary between
export and deploy; it is not a second hardware database.
The manifest records facts about this particular generated artifact:
target, execution domain, environment, architecture, and build system;
generated application and its configuration;
expected build artifact path and output protocol;
export libraries and input/output descriptions;
export-computed memory and profiling metadata;
a schema version used to reject incompatible formats.
This information lets deploy consume an existing directory without importing
the original graph or repeating export decisions. load_export_artifact()
accepts either an ExportArtifact or a path, loads the manifest, and checks
its schema version.
End-to-End Export Sequence#
The public aidge_core.export_utils.export() function performs the
following sequence:
Select the host inference backend used for preparation and calibration.
Optionally run sanity inference on the input graph.
Quantize the graph and inputs when an int8 export was requested.
Resolve the hardware model and adapt the graph to its supported kernels.
Schedule the prepared graph and build an
ExportContext.Apply the target preprocessor, strategy, or environment composer according to the resolution order above.
Generate a complete project, create the
ExportManifest, write.aidge-export.json, and returnExportArtifact.
The exporter-specific ExportLib and ExportNode objects described later
in this guide operate inside steps 4 to 6. They map scheduled Aidge operators
to kernel implementations and templates; they do not model hardware or
deployment connections.
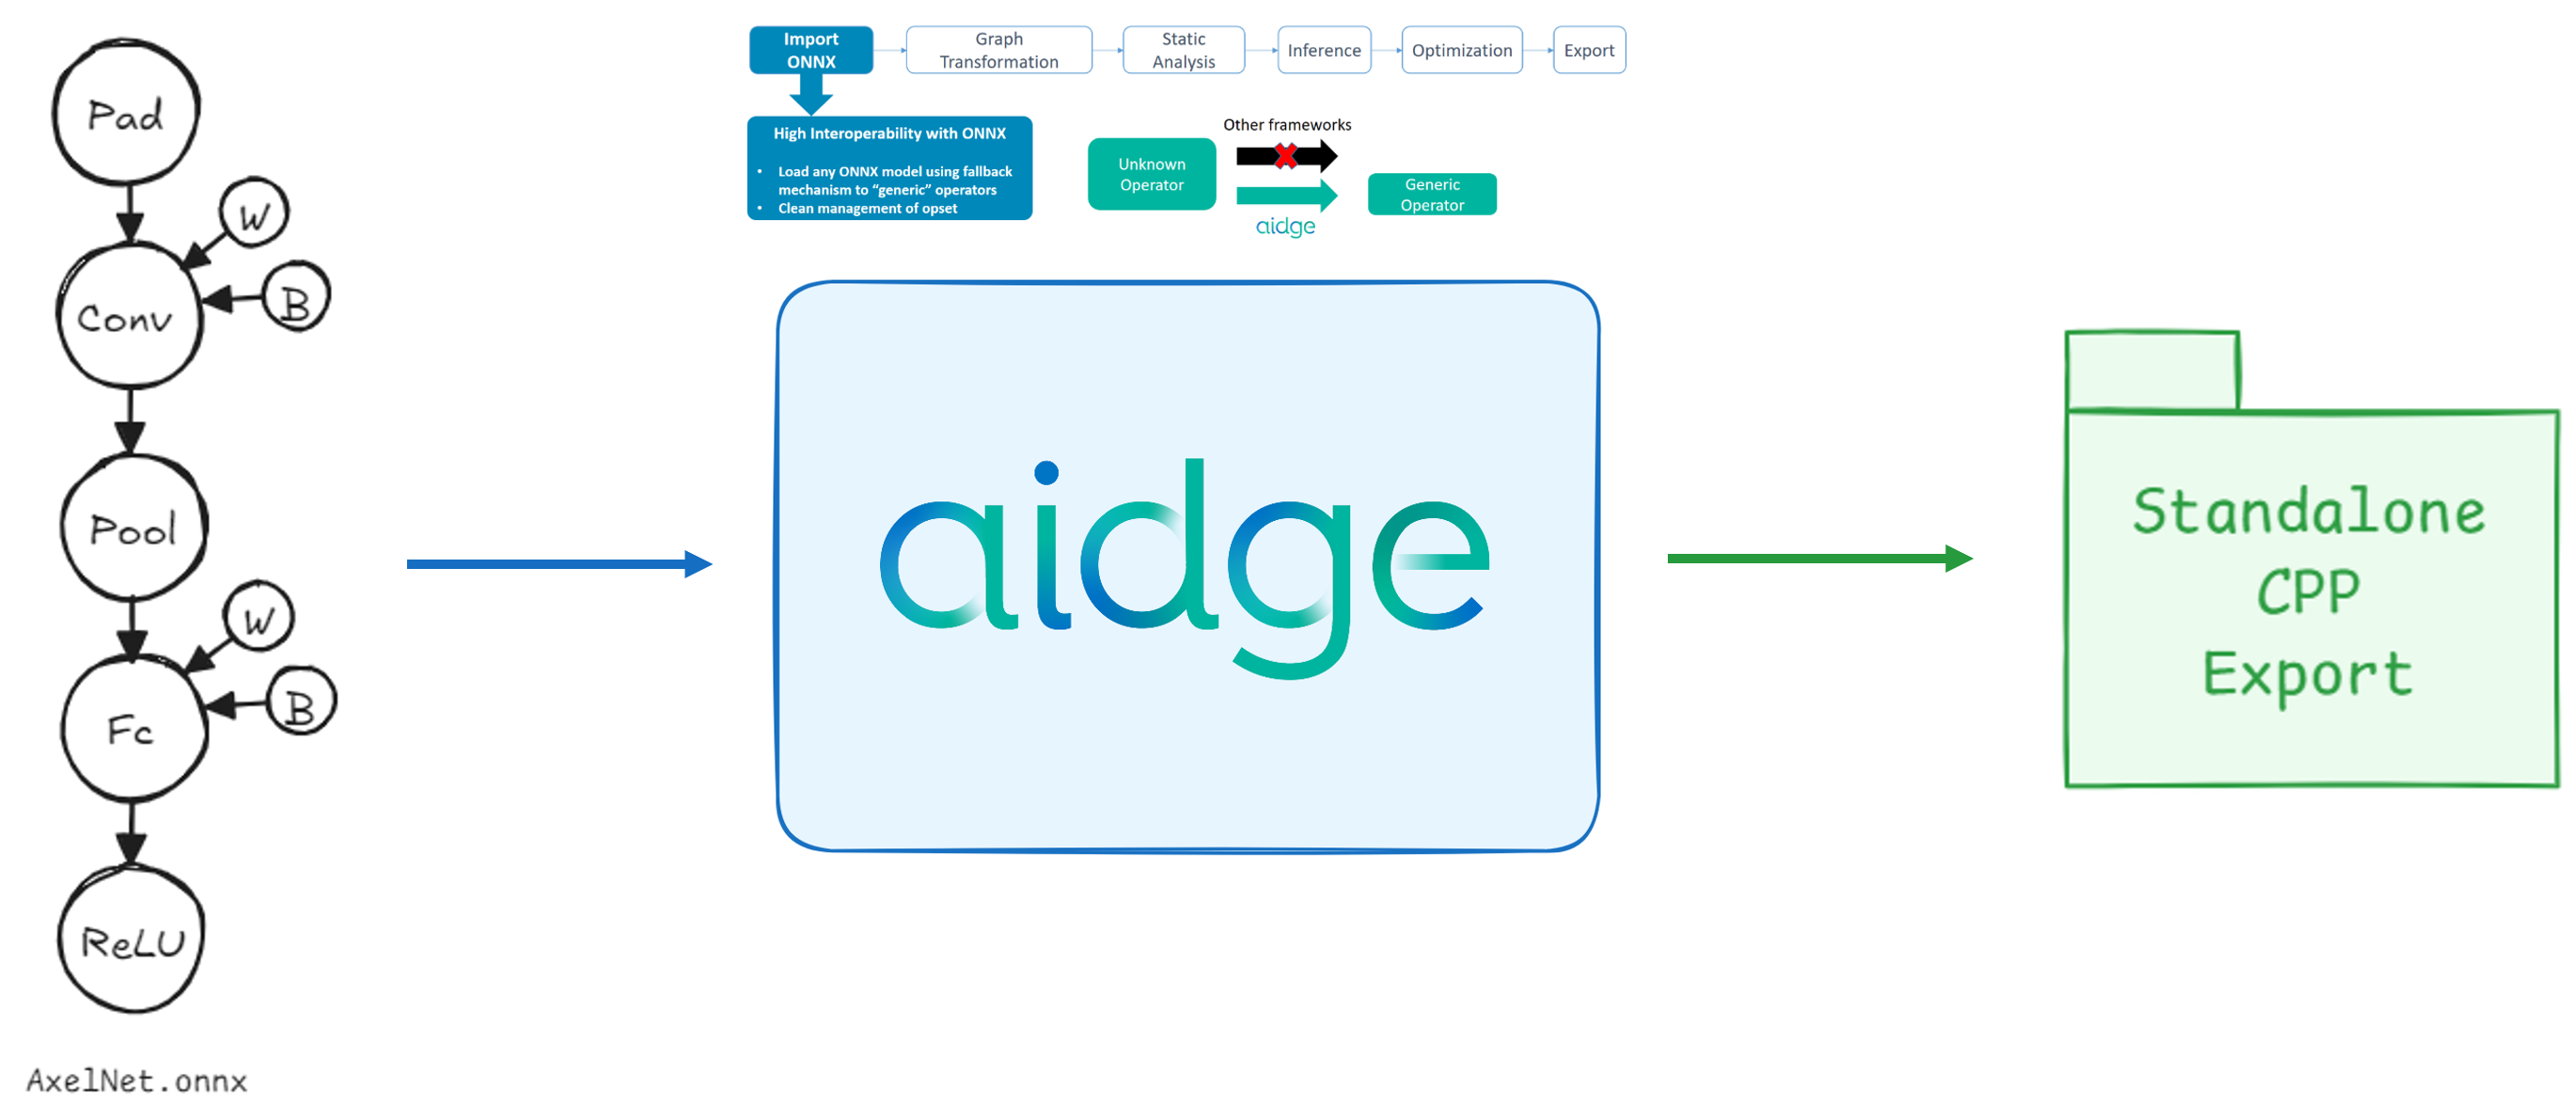
Graph Preparation#
Before generating the standalone export, the Aidge graph undergoes several transformations to fit the targeted export backend.
One key step in this process is the fusion of operators into MetaOperators, groups of operators designed to match specific kernel implementations.
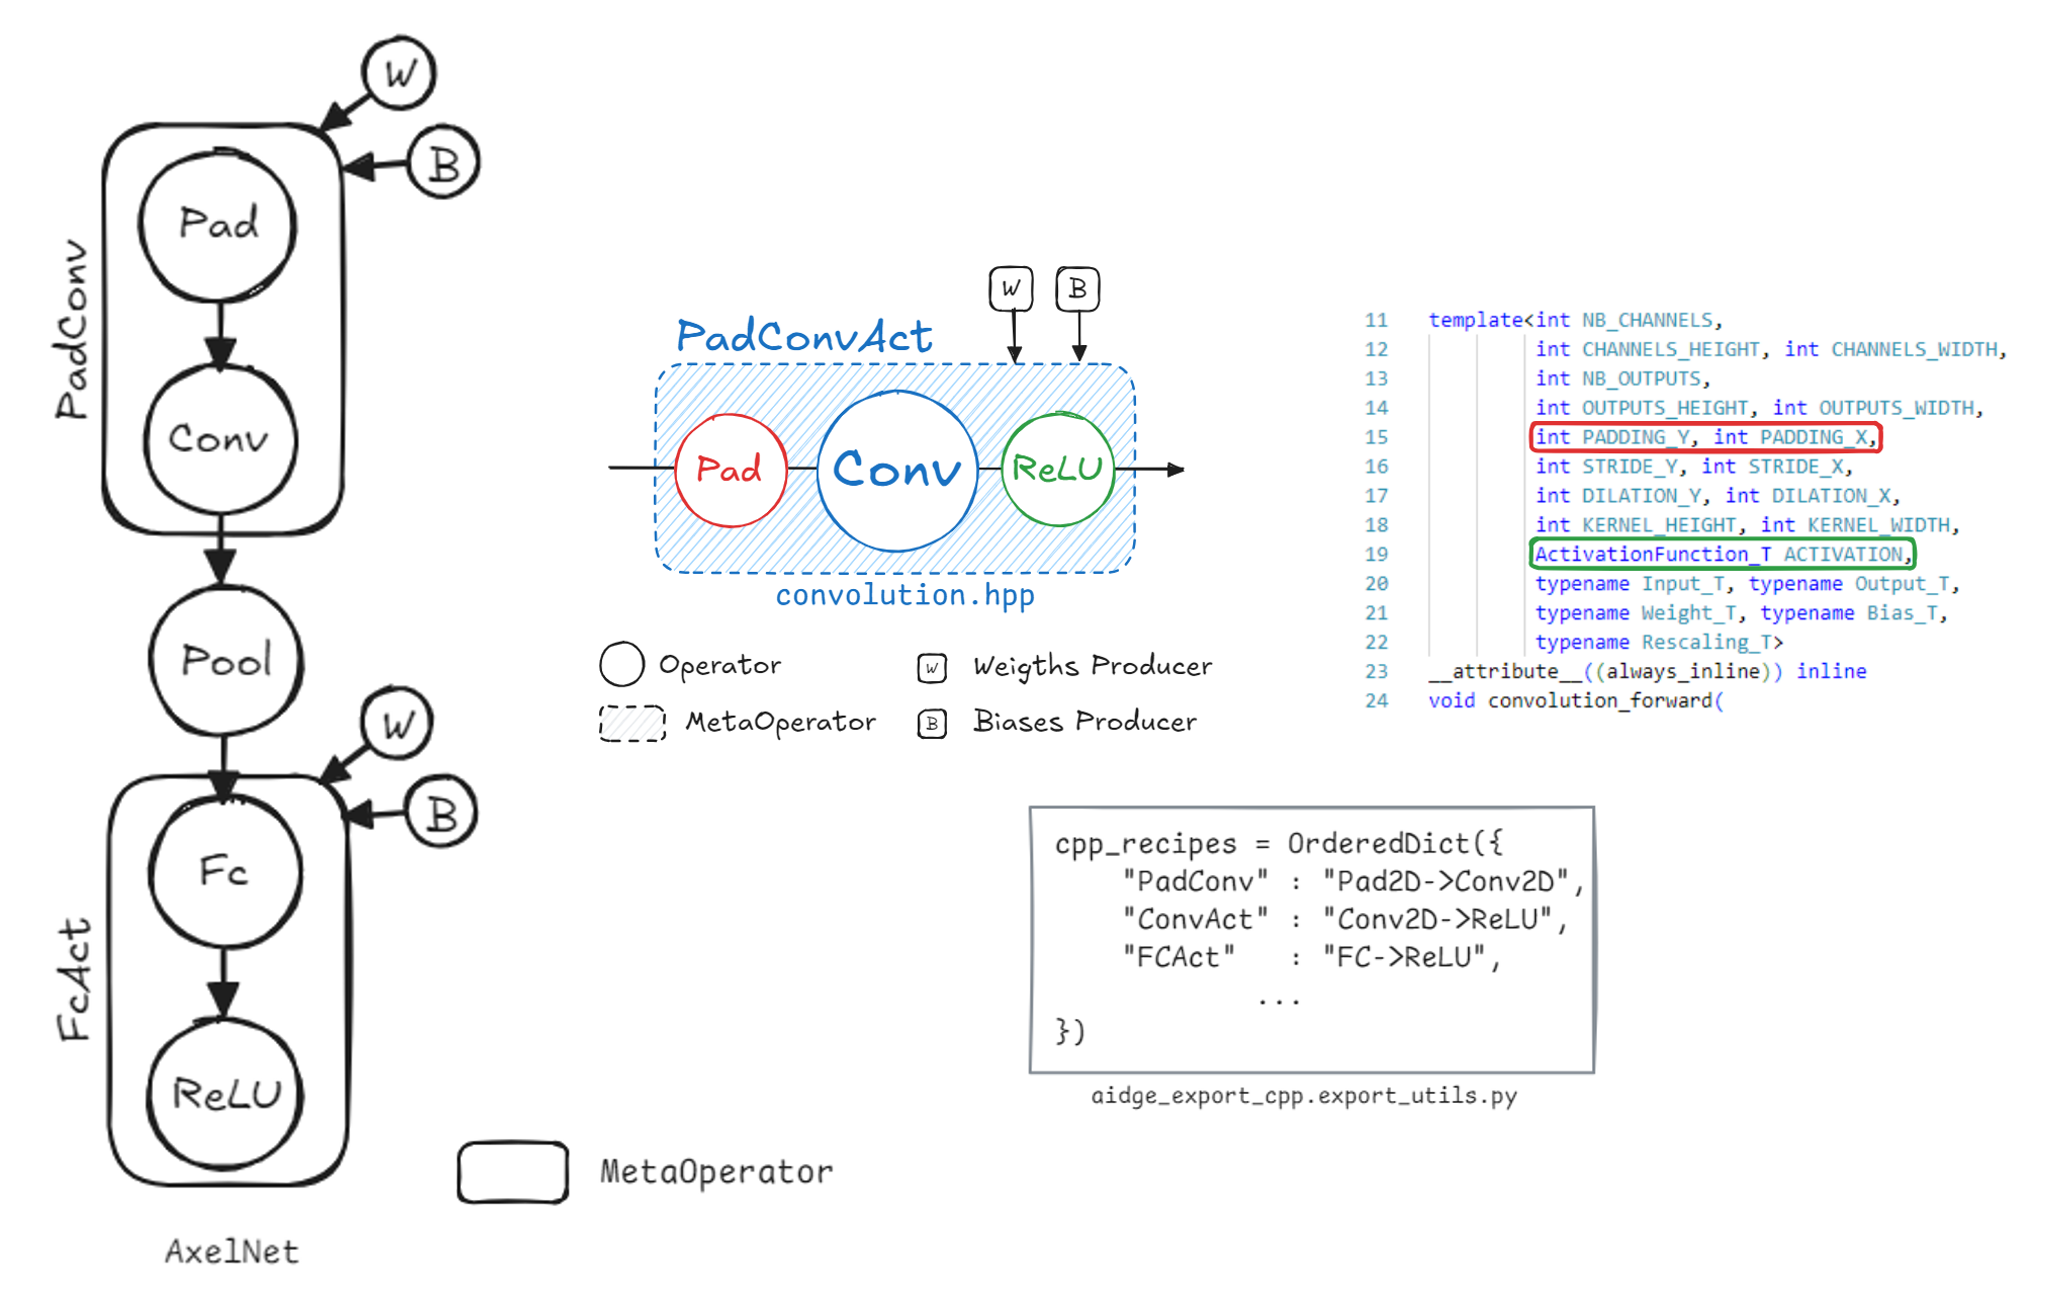
For example, as shown above, the convolution kernel supports both padding and activation (e.g., ReLU), so these operations are fused together into a single convolution operation.
This transformation is achieved by applying a set of regular expression-based recipes to the graph. Each export module provides its own recipe set. For more details, refer to:
Additional transformations, such as setting data formats or data types, are applied within the export() function defined in export.py.
Most helper functions used in this process are implemented in export_utils.py.
For a detailed walkthrough, see the “Quantized LeNet C++ Export” tutorial.
Standalone Export Structure#
The Standalone Export refers to the generated code that runs the exported model independently.
Before exploring the internal structure of the export module itself, let’s first review the structure of the generated export:
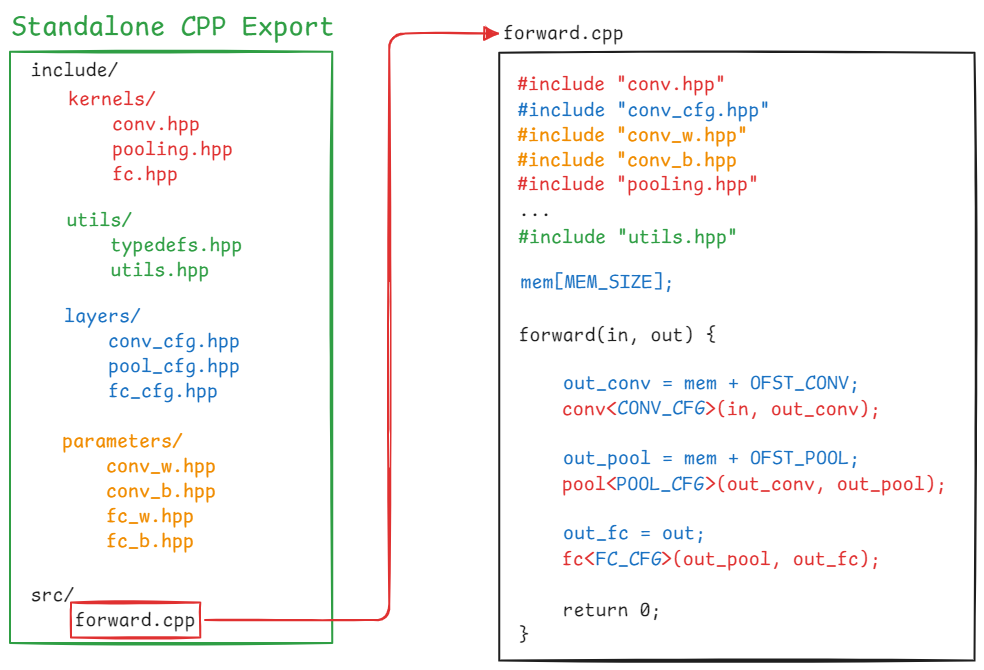
In the generated export:
forward.cppcontains the function responsible for running inference.The generated folders include:
kernels/ (red): Implementation code for each supported kernel.
utils/ (green): Utility source files.
layers/ (blue): Configuration files for each model layer. These define parameters such as kernel size, dilation, and memory offsets for outputs.
parameters/ (yellow): Serialized model parameters, such as weights and biases.
(Note: newer exports may support fallback mechanisms that allow partial reuse of existing export kernels.)
Export Module Structure#
The Export Module is the Aidge component that generates the Standalone Export.
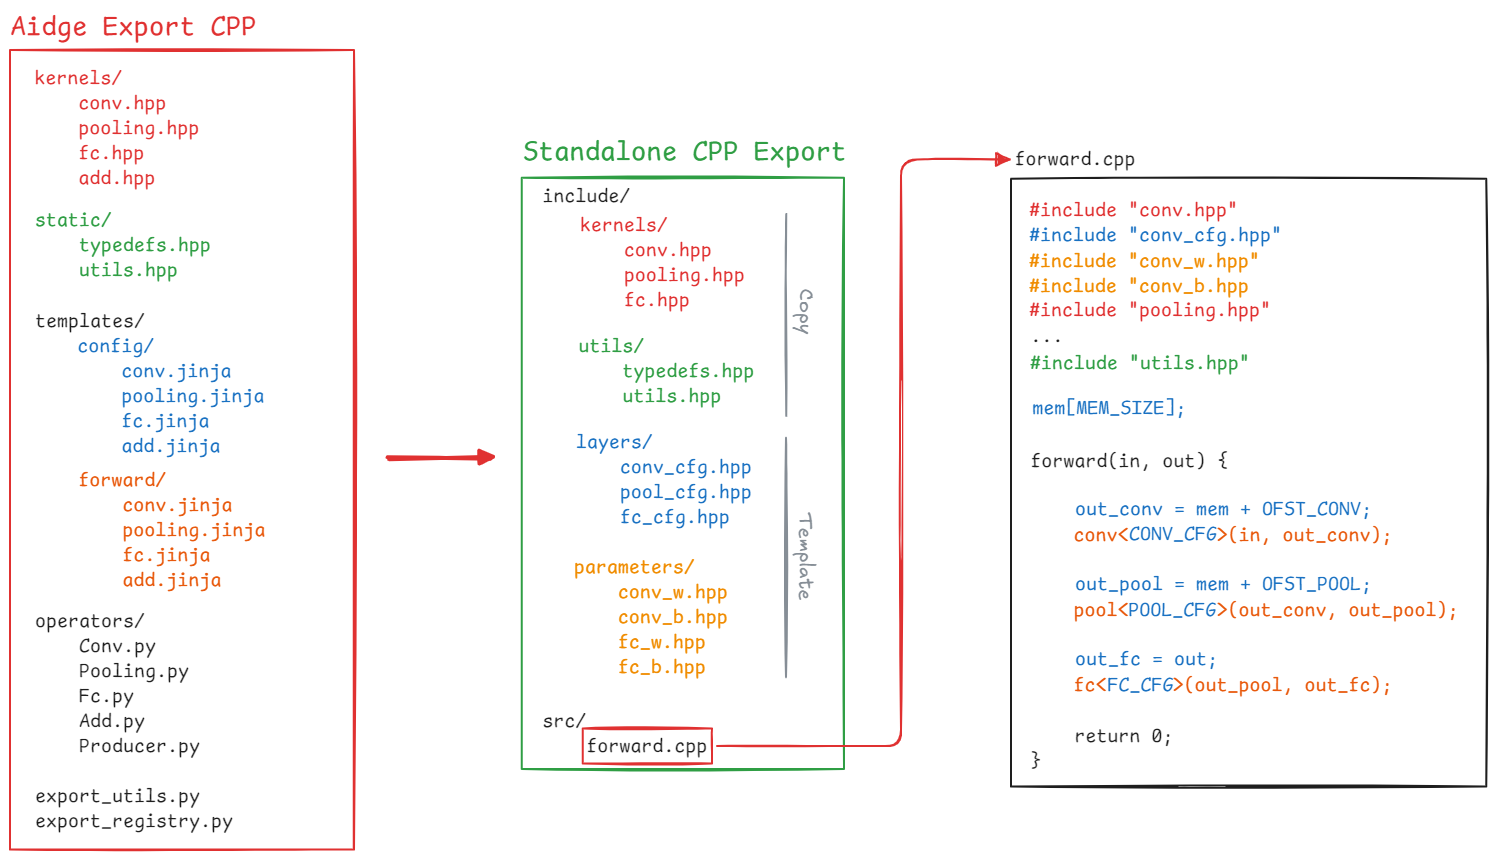
Copied and Generated Files#
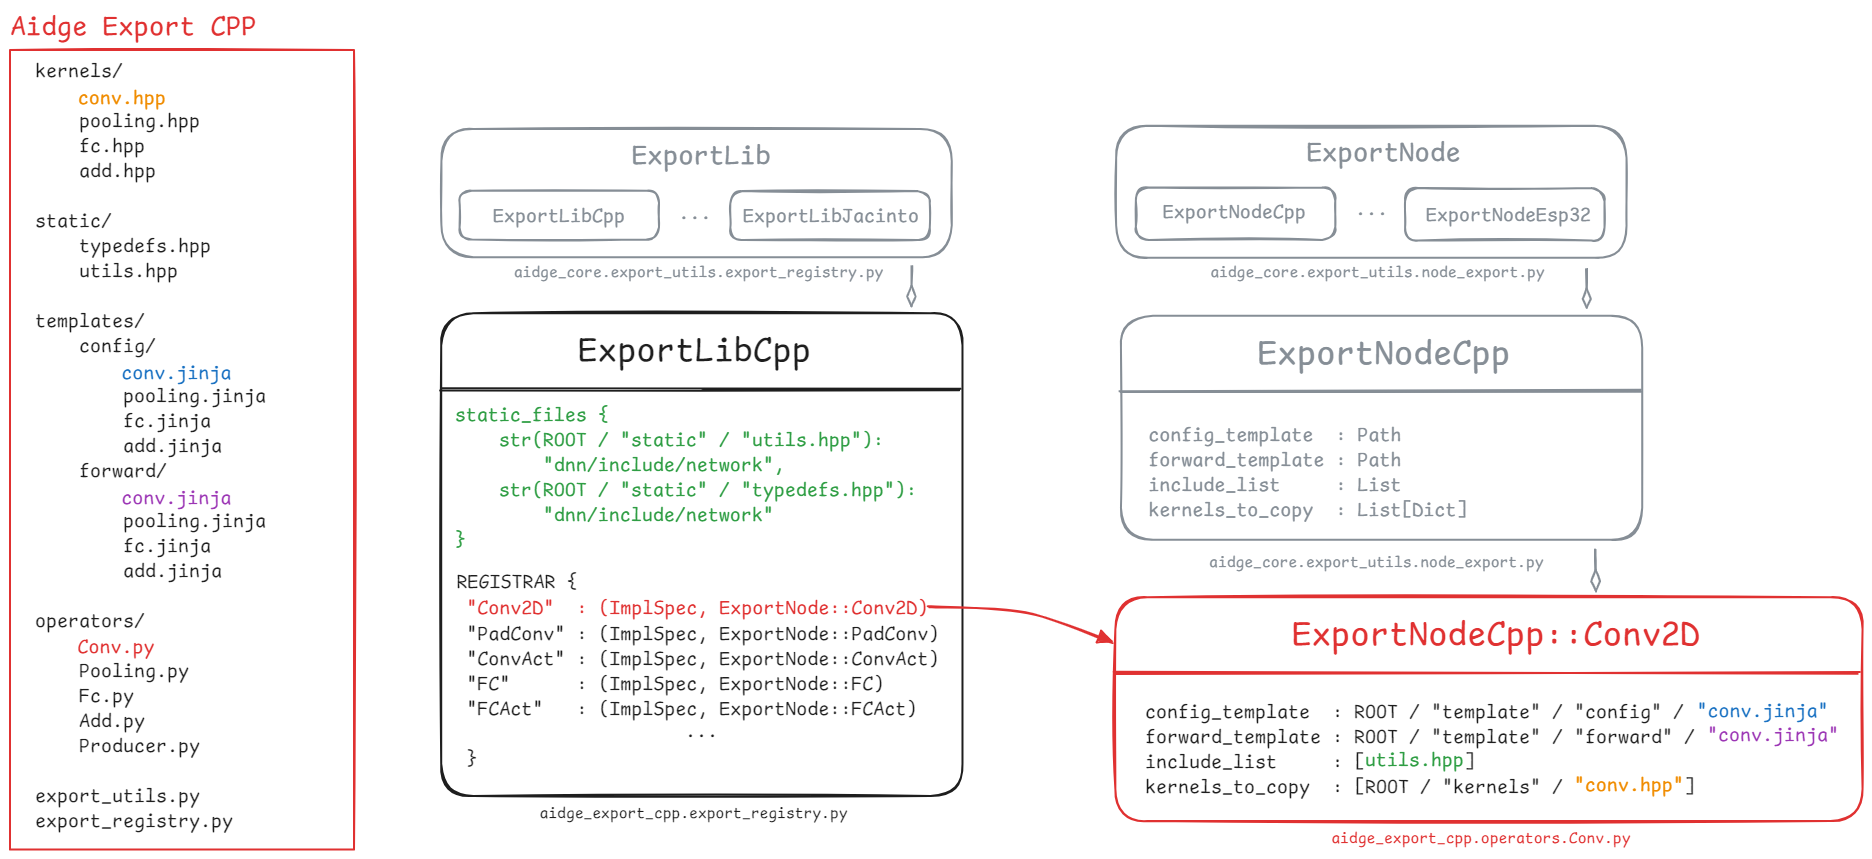
In the diagram above, the export module structure includes two main categories of files:
Copied files: Files in
kernelsandstaticare copied directly into the generated export.Generated files: Configuration and parameter files are dynamically generated based on the model’s layers.
Each kernel type has two template files:
A configuration template (in
layers/)A forward template (used for function calls in
forward.cpp)
Parameters are generated using a third template, parameters.jinja.
Operators#
The operators/ folder is a crucial part of the export module. It contains Python scripts that connect Aidge’s intermediate representation (IR) to the actual implementation used by the export.
The main classes defining export behavior are:
Each export module defines its own ExportLib (in export_registry.py), which maintains a registry mapping Aidge operators to their:
ImplSpec (implementation specification)
ImplSpec defines the constraints and supported configurations for each kernel, for example, the C++ convolution kernel supports only NHWC data formats for inputs and weights.
ExportNode holds all information required to generate files for a specific operator, including:
config_template- Path to the layer configuration templateforward_template- Path to the kernel call template inforward.cppinclude_list- Required includes forforward.cppkernels_to_copy- List of kernel implementation files to include (one or more)
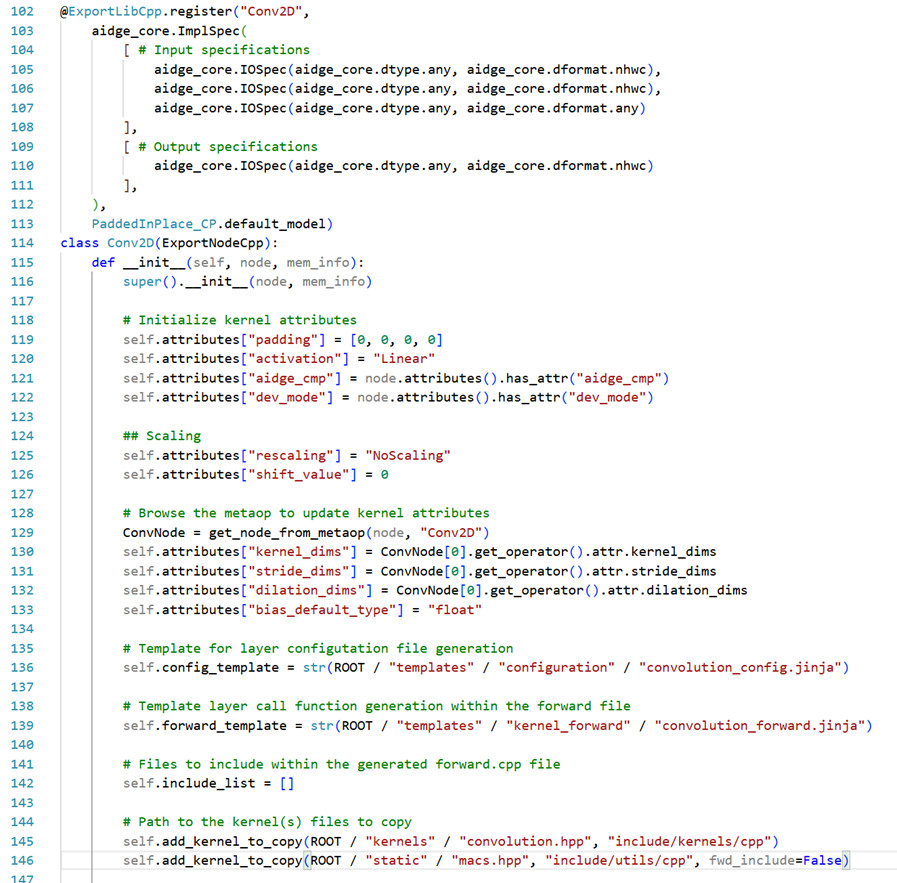
Each operator’s ExportNode is defined in the corresponding file under operators/ (e.g., operators/Conv.py).
In the example above, the Conv2D operator’s ImplSpec specifies that only NHWC input, weight, and output formats are supported.
The attributes dictionary defines the variables available to Jinja templates when generating configuration and forward files.
Because the convolution implementation supports multiple combinations (e.g., padding + activation), several variants such as Conv2D, PadConv, and ConvAct are registered as subclasses of the same base operator.
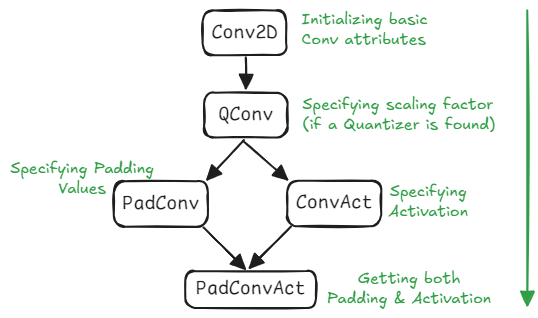
For instance, PadConvAct inherits from previous convolution variants, extending or overriding parameters as needed.
Base classes initialize defaults (e.g., padding = 0, activation = Linear), and derived classes modify them.
Finally, the Producer.py file manages parameter exports (corresponding to producers in the Aidge graph).
Adding a New Kernel#
Now that the export structure has been described, let’s go through the process of adding a new kernel to the export. The procedure is straightforward, simply follow these steps:
Create the kernel implementation and place the file in the
kernelsfolder.Create the configuration template file, defining all the parameters required to execute the kernel function.
Add the forward template file, which generates the kernel call inside the
forward.cppfile.Register the kernel in the
ExportLibby creating a dedicated Python file within the operators folder.(Optional) If your kernel combines multiple operators, you can create a recipe to fuse them into a
MetaOperatorand register it as well. These recipes are typically defined in theexport_utils.pyfile.
And that’s it, your new operator is now supported in the export system !
For more detailed instructions on adding a kernel, refer to the tutorial: “Add a Custom Operator to the CPP Export”.