
Quantized LeNet CPP Export#
![]()
This notebook details the main steps to export a quantized LeNet using the aidge_export_cpp module. To do so, it goes through the following steps :
Import the required modules;
Quantize the model;
Export the model;
Compile the export.
To get examples scripts to export more complex models, please check the aidge_export_cpp module itself.
[ ]:
%pip install aidge-core \
    aidge-backend-cpu \
    aidge-export-cpp \
    aidge-onnx \
    aidge-quantization \
    aidge-model-explorer \
    torchvision
1. Import the ONNX model#
Import the required modules#
aidge_core: Hold the core features of Aidgeaidge_onnx: Import models from ONNX to Aidgeaidge_backend_cpu: CPU kernels implementation (Aidge inferences)aidge_quantization: Quantization featuresaidge_export_cpp: CPP export moduleaidge_model_explorer: Model vizualizer tool
[ ]:
# Utils
import shutil
import numpy as np
from pathlib import Path

# Database
from torchvision import transforms, datasets

# Aidge Modules
import aidge_core
from aidge_core.mem_info import *
from aidge_core.export_utils import *

import aidge_onnx
import aidge_backend_cpu
import aidge_quantization
import aidge_model_explorer

import aidge_export_cpp
from aidge_export_cpp.export_utils import *
from aidge_export_cpp import ExportLibCpp
[ ]:
aidge_core.Log.set_console_level(aidge_core.Level.Error)
Load the model#
aidge_onnx module to load the ONNX LeNet file.[ ]:
# Download the model
file_url = "https://huggingface.co/EclipseAidge/LeNet/resolve/main/lenet_mnist.onnx?download=true"
file_path = "lenet_mnist.onnx"
aidge_core.utils.download_file(file_path, file_url)

# Load the model
model = aidge_onnx.load_onnx(file_path, verbose=False)
Aidge offers a powerful visualization tool derived from the google model explorer, allowing to check the current state of the graph.
[ ]:
aidge_model_explorer.visualize(model, "Imported LeNet")
Modify the graph#
[ ]:
aidge_core.remove_flatten(model)
aidge_model_explorer.visualize(model, "Removed Flatten")
As you can see, the flatten layer is no longer in the graph !
It is common to fuse the batchnorm layers withint the convolution’s biases, to gain inference time and memory space. (However here the LeNet model does not have any batchnorm layer).
[ ]:
aidge_core.fuse_batchnorm(model)
In Aidge, we chose to split the nodes as much as we can into unit nodes, for greater flexibility when handling the graph. For instance, a padded convolution will be considered as a Pad2D node followed with a Conv2D node.
By default, when a model is loaded using the aidge_onnx module, a padded convolution (Pad2D + Conv2D) will be fused into a new node called PaddedConv for better readability. These groups of nodes are called MetaOperators in Aidge.
MetaOperators use later in this tutorial. But for the moment, let’s say that in the context of an export (where we particularly need to manipulate the graph for it to fit the export implementations), we prefer when the MetaOperators are split into unary operators.expand_metaops() function below is used for.(Here again, the imported LeNet does not have any padded convolutions. Then this function won’t change the graph).
[ ]:
aidge_core.expand_metaops(model)
Test the model#
Using the Aidge CPU backend, we can perform inferences to test our model. The Aidge CUDA backend can also be used.
Create the dataset#
First of all, we need to create a dataset which will be used to :
Perform example inferences (
NB_TEST);Calibrate the model during the Quantization step, (
NB_CALIB).
[ ]:
NB_TEST = 10  # Validation dataset
NB_CALIB = 100  # Calibration dataset
[ ]:
transform = transforms.ToTensor()
test_set = datasets.MNIST(
    root="./data", train=False, transform=transform, download=True
)

tensors = []
labels = []
for i, (tensor, label) in enumerate(test_set):
    tensor = np.reshape(tensor.numpy(), (1, 1, 28, 28))
    tensor = aidge_core.Tensor(tensor)
    tensor.to_backend("cpu")
    tensors.append(tensor)
    labels.append(label)
    if i >= max(NB_TEST, NB_CALIB):
        break
Backend & Scheduler#
`aidge_backend_cpu <https://gitlab.eclipse.org/eclipse/aidge/aidge_backend_cpu>`__, we can perform inferences to test our model.[ ]:
model.set_backend("cpu")
[ ]:
scheduler = aidge_core.SequentialScheduler(model)
scheduler.generate_scheduling()
[ ]:
# Display the ordered nodes
for node in scheduler.get_sequential_static_scheduling():
    print(f"{node.name()} ({node.type()})")
The propagate() function below forwards a tensor through the scheduled graph, then returns the output tensor.
Notice that the backend of the output tensor is set back to “cpu” before returning it. This is useful in the case where the backend cuda is used. Indeed, this will bring back the tensor’s data from the cuda node into a readable memory.
[ ]:
def propagate(model, scheduler, tensor):
    # Forward the input tensor
    scheduler.forward(True, [tensor])
    # Get the output tensor
    output_node = model.get_ordered_outputs()[0][0]
    output_tensor = output_node.get_operator().get_output(0).clone()
    output_tensor.to_backend("cpu")
    return output_tensor
Then we can perform inferences over NB_TEST samples.
[ ]:
score = 0
for i in range(NB_TEST):
    output_tensor = propagate(model, scheduler, tensors[i])
    prediction = np.argmax(output_tensor)
    confidence = np.max(output_tensor)
    print(f"Ref vs Pred (Conf) : {labels[i]} vs {prediction} ({confidence:.2f})")
    if prediction == labels[i]:
        score += 1

print(f"\nSCORE : {score}/{NB_TEST} ({round(score / NB_TEST * 100)} %)")
2. Quantize the model#
In our case, we will use the quantize_network() function which will quantize our already trained model (Post Training Quantization).
This function needs the following arguments :
network: The model to quantize;nb_bits: The CPP export only supports 8bits data;target_type: The quantization function will introduce cast nodes into de model, to cast the nodes’ datatype into thetarget_type. It may differ from thenb_bitsargument, as the parameters and activation can effectively be quantized into 8bits elements ([-127, 127]) while the actual elements’ datatype still isfloat32. This is the case here, as we set thetarget_typetoint32, as theaidge cpu backendkernels does not yet supportint8datatype.calibration_set: Calibration images;single_shift: The generated scaling factors will be power of 2 elements, allowing to perform a single shift instead of multiplying the results withfloat32elements.
Please refer to the Quantization Tutorial to get more details about the available quantization features.
[ ]:
NB_BITS = 8
aidge_quantization.auto_assign_node_precision(
    model, aidge_core.dtype.int8, aidge_core.dtype.int8, aidge_core.dtype.int32
)
[ ]:
aidge_quantization.quantize_network(
    network=model,
    calibration_set=tensors[0:NB_CALIB],
    single_shift=True,
)
The quantization process can take a while (especially when dealing with large models or quantization dataset). In these cases, we recommend using the `aidge_backend_cuda <https://gitlab.eclipse.org/eclipse/aidge/aidge_backend_cpu>`__ to speed up the process.
However doing so, make sure that you set back the model backend to “cpu” after the quantization step. Else you may have issues trying to access model tensors (intermediate feature maps) still stored in cuda kernels.
[ ]:
model.set_backend("cpu")
MetaOperators composed of a BitShift (single_shift = True) and a Clip node.[ ]:
aidge_model_explorer.visualize(model, "Quantized LeNet")
Create Quantized Dataset#
TARGET_TYPE.[ ]:
rescaling = 2 ** (NB_BITS - 1) - 1
for i in range(NB_TEST):
    tensors[i].to_backend("cpu")
    array = np.array(tensors[i]) * rescaling
    array = np.round(array).astype(int)
    tensors[i] = aidge_core.Tensor(array)
    tensors[i].to_dtype(aidge_core.dtype.int8)
Test the quantized model#
[ ]:
scheduler.reset_scheduling()
scheduler.generate_scheduling()
Let’s test the model again to make sure the quantization steps went well :
[ ]:
score = 0
for i in range(NB_TEST):
    output_tensor = propagate(model, scheduler, tensors[i])
    prediction = np.argmax(output_tensor)
    confidence = np.max(output_tensor)
    print(f"Ref vs Pred (Conf) : {labels[i]} vs {prediction} ({int(confidence)})")
    if prediction == labels[i]:
        score += 1

print(f"\nSCORE : {score}/{NB_TEST} ({round(score / NB_TEST * 100)} %)")
3. Export the model#
export() function you may find in the export.py file.Fuse the nodes into Meta Operators#
kernels folder.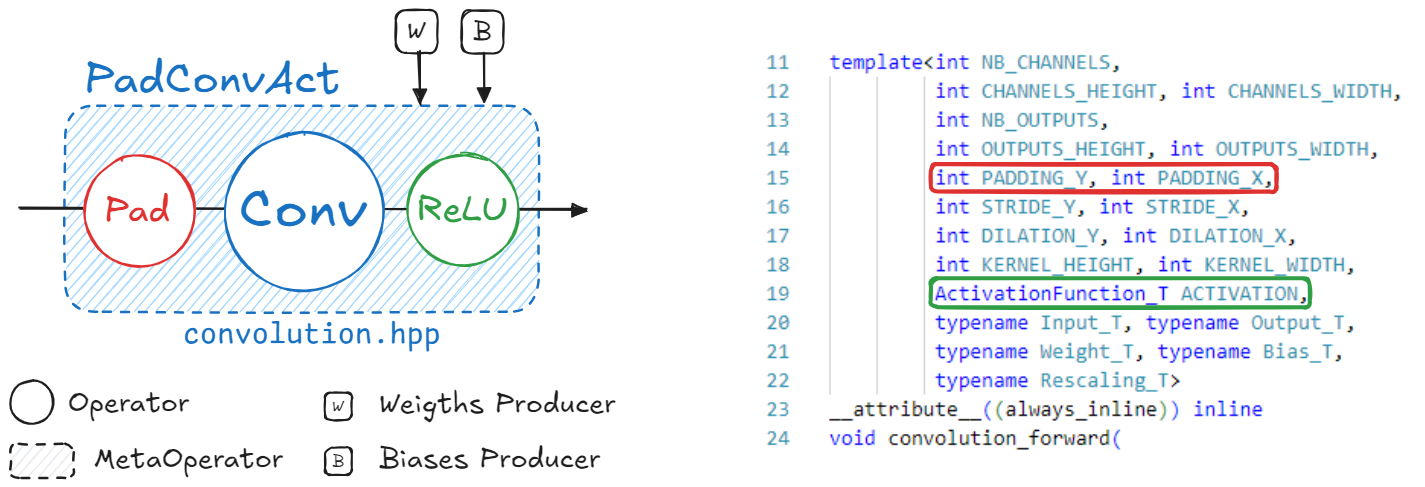
PadConv : “Pad2D->Conv2D”
ConvAct : “Conv2D->ReLU”
PadConvAct : “Pad2D->Conv2D->ReLU”
These are quite simple patterns. The Aidge matching system is designed to match pretty much all possible graph patterns. To get more details about the graph matching in Aidge, please refer to the dedicated tutorial.
Different patterns are defined to match each kernel implementation of the CPP Export. You may find the recipes applied for this specific export within the `cpp_fuse_to_metaops() function <https://gitlab.eclipse.org/eclipse/aidge/aidge_export_cpp/-/blob/main/aidge_export_cpp/export_utils.py?ref_type=heads>`__.
[ ]:
cpp_fuse_to_metaops(model)
Remove Optional Elements#
Some elements of the graph are no more needed in the context of an Export.
The exclude_unwanted_producers() function ignore all the producers containing scaling or clipping coefficients.
[ ]:
exclude_unwanted_producers(model)
Set the nodes names#
To this end, we set the names of all the nodes following this pattern : <layer_id>_<layer_type>_<layer_it>, such as the layer_id is the position of the layer within the scheduler and the layer_it is the occurrence of this specific layer type.
The set_nodes_names() function uses the scheduler to deduce the position of the layer within the graph (”layer_id and layer_it”). As the model was previously changed during the fusing step, the scheduler should be reset then generated again.
[ ]:
# Reset the scheduler after changes
scheduler.reset_scheduling()
scheduler.generate_scheduling()

# Set nodes names
set_nodes_names(scheduler)
[ ]:
# Display the renamed nodes
for node in scheduler.get_sequential_static_scheduling():
    print(f"{node.name()} ({node.type()})")
Last Inference#
A key idea with the graph in Aidge, is that the intermediate tensors (feature maps) can be access at any moment within the graph (assuming they have been previously filled with an inference).
In the exports, we use this mechanism to get the feature maps values and use them as reference, to get the weights values or even the input tensor.
Anyway, here we perform a last inference using the CPU backend in order to fill these intermediate tensors which will later be used for reference (aidge_cmp feature) or to retrieve the input tensor.
[ ]:
output_tensor = propagate(model, scheduler, tensors[0])
prediction = np.argmax(output_tensor)
confidence = np.max(output_tensor)
print(f"Ref vs Pred (Conf) : {labels[0]} vs {prediction} ({int(confidence)})")
Handle data type#
Each tensor has a dedicated datatype.
At this point, each tensor was casted into Int32 by the quantization step, as specified in the TARGET_TYPE variable (the tensors still hold 8bit data, as the NB_BITS parameter was set to 8).
Int32 instead of Int8 ?The CPU backend does not support
Int8data;Some tensors in the graph do not hold
Int8data : Biases areInt32data.
Int8 except for the biases).set_nodes_datatypes() function below do.[ ]:
set_nodes_datatypes(model)
(Optional) Aidge Compare#
The aidge_cmp feature exports the intermediate feature maps and use these tensors as reference during the export inference. If an error is detected, the position is displayed and the program stopped.
Here we export the feature maps into a temporary JSON file and set the aidge_cmp flag on for each node.
[ ]:
aidge_cmp = True

if aidge_cmp:
    # Export feature maps tensors as json
    generate_aidge_ifmaps(model)
    # Set flags on each node
    for node in model.get_nodes():
        node.annotations().aidge_cmp = True
Handle data format#
The data format (NCHW, NHWC, …) matters for some tensors following specific layers (Convolution, Pooling, …).
[ ]:
model.set_dataformat(aidge_core.dformat.nhwc)
set_dataformat() function is effective on the outputs of each node only.default), to NCHW.Notice that it is still possible to export the model if the input is not on the right format, as the adapt_to_backend() function will automatically add a Transpose layer.
[ ]:
# Set model's dataformat (NHWC)
## Inputs
for in_node in model.get_ordered_inputs():
    input = in_node[0].get_operator().get_input(0)
    if input is not None:
        # Transpose the input
        input_cpy = input.clone()
        input_cpy.set_data_format(aidge_core.dformat.nchw)
        input_cpy.set_data_format(aidge_core.dformat.nhwc)
        in_node[0].get_operator().set_input(0, input_cpy)
Adapt to Backend#
Let’s quickly dive into the export code structure.
Each export has its own library (e.g. ExportLibCpp) which includes a dictionary with the list of the supported kernels for the given export.
These kernels can come with some specifications. For instance, the CPP Export supports the convolution kernel, but only if the data format is NCHW and the data type is int8 for the inputs and weights.
In Aidge, these specifications are called the ImplSpec and are specified while registering the kernel into the export library (adding the kernel into the dictionary).
You may find all the registrations for the CPP Export within the operators folder.
The adapt_to_backend() function called below aims to make sure that the graph actually fits the export implementations. For instance, if a convolution input within the graph somehow have a NHWC format, the adapt_to_backend function will add a transpose node to ensure that the results are correct.
In this particular case, there are no mismatches between the graph and what’s supported by the export. Then this step will not modify the graph.
[ ]:
model.set_backend(ExportLibCpp._name)
aidge_core.adapt_to_backend(model)
aidge_core.adapt_fc_params_format(model)
[ ]:
dims = []
for in_node in model.get_ordered_inputs():
    dims.append(in_node[0].get_operator().get_input(0).dims)
model.forward_dims(dims=dims, allow_data_dependency=True)
As usual, as the graph may have been modified, we need to reset and generate again the scheduler.
[ ]:
scheduler.reset_scheduling()
scheduler.generate_scheduling()
(Optional) Aidge Compare (Again)#
aidge_cmp() function call after the kernel call within the export forward file.adapt_to_backend() part to be over so that any new or modified node would get that flag too.[ ]:
# Set the aidge_cmp flags
for node in model.get_nodes():
    node.annotations().aidge_cmp = True
Export the model#
The graph is finally ready to be exported.
[ ]:
export_folder_name = Path("export_lenet_int8")

# Remove existing export
if os.path.isdir(export_folder_name):
    print("Removing existing export directory...")
    shutil.rmtree(export_folder_name)
The main export function is scheduler_export(). This function is located in aidge_core and is mutualized for all exports. It will perform the following steps :
Generate the memory layout for all the tensors;
Iterate over the scheduled model, generating for each node a configuration file as well as the kernel call within the
forward.cppfile;Copy the remaining static files and folders.
dev_mode option allow to make symbolic links between the cpp export module and the generated standalone export folder instead of simple copies.[ ]:
dev_mode = False

scheduler_export(
    scheduler,
    export_folder_name,
    ExportLibCpp,
    memory_manager=generate_optimized_memory_info,
    memory_manager_args={"stats_folder": f"{export_folder_name}/stats"},
    dev_mode=dev_mode,
)
(Optional) Generate Aidge Compare files#
If the aidge_cmp option has previously been enabled, the aidge_cmp() function should be called after each kernel (you can check within the generated forward.cpp file).
However the reference features maps have not yet been copied into the export. This is what the following function do.
[ ]:
if aidge_cmp:
    export_aidge_ifmaps(export_folder_name)
The reference tensors should now be in the data/aidge_outputs folder.
Generate main file#
main.cpp file is generated apart from the scheduler_export() function, as it often depends on each application.[ ]:
# Convert the label from a list to an Aidge Tensor
label = aidge_core.Tensor(labels[0])
[ ]:
# Generate main file
generate_main_cpp(export_folder_name, model, labels=label)
4. Compile and Run the Export#
[ ]:
from subprocess import CalledProcessError

print("\n### Compiling the export ###")
try:
    for std_line in aidge_core.utils.run_command(
        ["make", "AIDGE_CMP=true"], cwd=export_folder_name
    ):
        print(std_line, end="")
except CalledProcessError as e:
    raise RuntimeError(0, f"An error occurred, failed to build export.") from e
print("\n### Running the export ###")
try:
    for std_line in aidge_core.utils.run_command(
        ["./bin/run_export"], cwd=export_folder_name
    ):
        print(std_line, end="")
except CalledProcessError as e:
    raise RuntimeError(0, f"An error occurred, failed to run export.") from e