
LeNet CPP Export#
![]()
This notebook details the main steps to export a LeNet using the aidge_export_cpp module. To do so, it goes through the following steps :
Import the required modules;
Export the model;
Compile the export.
[ ]:
%pip install aidge-core \
    aidge-backend-cpu \
    aidge-export-cpp \
    aidge-onnx
[ ]:
%pip install requests numpy ipywidgets ipycanvas
1. Import the ONNX model#
Import the required modules#
aidge_core: Hold the core features of Aidgeaidge_onnx: Import models from ONNX to Aidgeaidge_backend_cpu: CPU kernels implementation (Aidge inferences)aidge_export_cpp: CPP export moduleaidge_model_explorer: Model vizualizer tool
[ ]:
# Utils
import numpy as np
from pathlib import Path

# Aidge Modules
import aidge_core
from aidge_core.mem_info import *
from aidge_core.export_utils import *

import aidge_onnx
import aidge_backend_cpu
import aidge_model_explorer

import aidge_export_cpp
from aidge_export_cpp.export_utils import *
from aidge_export_cpp import ExportLibCpp
[ ]:
aidge_core.Log.set_console_level(aidge_core.Level.Error)
Load the model#
aidge_onnx module to load the ONNX LeNet file.[ ]:
# Download the model
file_url = "https://huggingface.co/EclipseAidge/LeNet/resolve/main/lenet_mnist.onnx?download=true"
file_path = "lenet_mnist.onnx"
aidge_core.utils.download_file(file_path, file_url)

# Load the model
model = aidge_onnx.load_onnx(file_path)
Aidge offers a powerful visualization tool derived from the google model explorer, allowing to check the current state of the graph.
[ ]:
aidge_model_explorer.visualize(model, "Imported LeNet")
Modify the graph#
[ ]:
aidge_core.remove_flatten(model)
aidge_model_explorer.visualize(model, "Removed Flatten")
As you can see, the flatten layer is no longer in the graph !
It is common to fuse the batchnorm layers withint the convolution’s biases, to gain inference time and memory space. (However here the LeNet model does not have any batchnorm layer).
[ ]:
aidge_core.fuse_batchnorm(model)
In Aidge, we chose to split the nodes as much as we can into unit nodes, for greater flexibility when handling the graph. For instance, a padded convolution will be considered as a Pad2D node followed with a Conv2D node.
By default, when a model is loaded using the aidge_onnx module, a padded convolution (Pad2D + Conv2D) will be fused into a new node called PaddedConv for better readability. These groups of nodes are called MetaOperators in Aidge.
MetaOperators use later in this tutorial. But for the moment, let’s say that in the context of an export (where we particularly need to manipulate the graph for it to fit the export implementations), we prefer when the MetaOperators are split into unary operators.expand_metaops() function below is used for.(Here again, the imported LeNet does not have any padded convolutions. Then this function won’t change the graph).
[ ]:
aidge_core.expand_metaops(model)
3. Export the model#
export() function you may find in the export.py file.Fuse the nodes into Meta Operators#
kernels folder.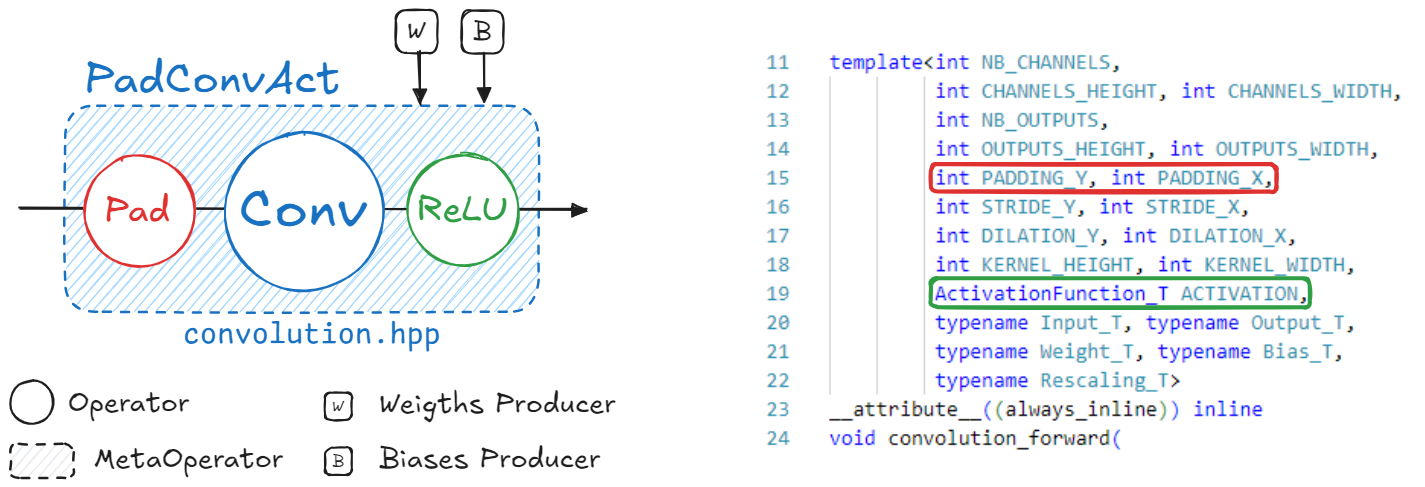
PadConv : “Pad2D->Conv2D”
ConvAct : “Conv2D->ReLU”
PadConvAct : “Pad2D->Conv2D->ReLU”
These are quite simple patterns. The Aidge matching system is designed to match pretty much all possible graph patterns. To get more details about the graph matching in Aidge, please refer to the dedicated tutorial.
Different patterns are defined to match each kernel implementation of the CPP Export. You may find the recipes applied for this specific export within the `cpp_fuse_to_metaops() function <https://gitlab.eclipse.org/eclipse/aidge/aidge_export_cpp/-/blob/main/aidge_export_cpp/export_utils.py?ref_type=heads>`__.
[ ]:
cpp_fuse_to_metaops(model)
aidge_model_explorer.visualize(model, "Fused LeNet")
Set the nodes names#
To this end, we set the names of all the nodes following this pattern : <layer_id>_<layer_type>_<layer_it>, such as the layer_id is the position of the layer within the scheduler and the layer_it is the occurrence of this specific layer type.
The set_nodes_names() function uses the scheduler to deduce the position of the layer within the graph (”layer_id and layer_it”). As the model was previously changed during the fusing step, the scheduler should be reset then generated again.
[ ]:
# Configuration for the model + forward dimensions
model.compile("cpu", aidge_core.dtype.float32, dims=[[1, 1, 28, 28]])

# Generate scheduling of the model
scheduler = aidge_core.SequentialScheduler(model)
scheduler.generate_scheduling()

# Set nodes names
set_nodes_names(scheduler)

# Display the renamed nodes
for node in scheduler.get_sequential_static_scheduling():
    print(f"{node.name()} ({node.type()})")
Handle data format#
The data format (NCHW, NHWC, …) matters for some tensors following specific layers (Convolution, Pooling, …).
[ ]:
model.set_dataformat(aidge_core.dformat.nhwc)
set_dataformat() function is effective on the outputs of each node only.default), to NCHW.Notice that it is still possible to export the model if the input is not on the right format, as the adapt_to_backend() function will automatically add a Transpose layer.
[ ]:
# Set model's dataformat (NHWC)
## Inputs
for in_node in model.get_ordered_inputs():
    input = in_node[0].get_operator().get_input(0)
    if input is not None:
        # Transpose the input
        input_cpy = input.clone()
        input_cpy.set_data_format(aidge_core.dformat.nchw)
        input_cpy.set_data_format(aidge_core.dformat.nhwc)
        in_node[0].get_operator().set_input(0, input_cpy)
Adapt to Backend#
Let’s quickly dive into the export code structure.
Each export has its own library (e.g. ExportLibCpp) which includes a dictionary with the list of the supported kernels for the given export.
These kernels can come with some specifications. For instance, the CPP Export supports the convolution kernel, but only if the data format is NCHW..
In Aidge, these specifications are called the ImplSpec and are specified while registering the kernel into the export library (adding the kernel into the dictionary).
You may find all the registrations for the CPP Export within the operators folder.
The adapt_to_backend() function called below aims to make sure that the graph actually fits the export implementations. For instance, if a convolution input within the graph somehow have a NHWC format, the adapt_to_backend function will add a transpose node to ensure that the results are correct.
In this particular case, there are no mismatches between the graph and what’s supported by the export. Then this step will not modify the graph.
[ ]:
model.set_backend(ExportLibCpp._name)
aidge_core.adapt_to_backend(model)
aidge_core.adapt_fc_params_format(model)
[ ]:
dims = []
for in_node in model.get_ordered_inputs():
    dims.append(in_node[0].get_operator().get_input(0).dims)
model.forward_dims(dims=dims, allow_data_dependency=True)
As the graph may have been modified, we need to reset and generate again the scheduler.
[ ]:
scheduler.reset_scheduling()
scheduler.generate_scheduling()
Export the model#
The graph is finally ready to be exported.
[ ]:
export_folder_name = Path("export_lenet_fp32")

# Remove existing export
if os.path.isdir(export_folder_name):
    print("Removing existing export directory...")
    shutil.rmtree(export_folder_name)
The main export function is scheduler_export(). This function is located in aidge_core and is mutualized for all exports. It will perform the following steps :
Generate the memory layout for all the tensors;
Iterate over the scheduled model, generating for each node a configuration file as well as the kernel call within the
forward.cppfile;Copy the remaining static files and folders.
dev_mode option allow to make symbolic links between the cpp export module and the generated standalone export folder instead of simple copies.[ ]:
dev_mode = False

scheduler_export(
    scheduler,
    export_folder_name,
    ExportLibCpp,
    memory_manager=generate_optimized_memory_info,
    memory_manager_args={"stats_folder": f"{export_folder_name}/stats"},
    dev_mode=dev_mode,
)
Generate main file#
main.cpp file is generated apart from the scheduler_export() function, as it often depends on each application.[ ]:
# Generate main file
generate_main_cpp(export_folder_name, model)
4. Compile and Run the Export#
[ ]:
from subprocess import CalledProcessError

print("\n### Compiling the export ###")
try:
    for std_line in aidge_core.utils.run_command(["make"], cwd=export_folder_name):
        print(std_line, end="")
except CalledProcessError as e:
    raise RuntimeError(0, f"An error occurred, failed to build export.") from e
print("\n### Running the export ###")
try:
    for std_line in aidge_core.utils.run_command(
        ["./bin/run_export"], cwd=export_folder_name
    ):
        print(std_line, end="")
except CalledProcessError as e:
    raise RuntimeError(0, f"An error occurred, failed to run export.") from e
Work In Progress#
Draw your own number#
[ ]:
from ipywidgets import HBox, VBox, Button, Layout
from ipycanvas import Canvas, hold_canvas

img_name = "my_number.png"

canvas = Canvas(width=28, height=28, sync_image_data=True)

button_gen = Button(description="Generate PNG")
button_clear = Button(description="Clear")

drawing = False
position = None
shape = []


def on_erase_button_clicked(b):
    canvas.clear()


def on_generate_button_clicked(b):
    try:
        canvas.to_file(img_name)
        print(f"Image generated to {img_name} !")
    except:
        print("Draw a number before generating the image.")


button_clear.on_click(on_erase_button_clicked)
button_gen.on_click(on_generate_button_clicked)


def on_mouse_down(x, y):
    global drawing
    global position
    global shape

    drawing = True
    position = (x, y)
    shape = [position]


def on_mouse_move(x, y):
    global drawing
    global position
    global shape

    if not drawing:
        return

    with hold_canvas():
        canvas.stroke_line(position[0], position[1], x, y)
        position = (x, y)

    shape.append(position)


def on_mouse_up(x, y):
    global drawing
    global position
    global shape

    drawing = False

    with hold_canvas():
        canvas.stroke_line(position[0], position[1], x, y)

    shape = []


canvas.on_mouse_down(on_mouse_down)
canvas.on_mouse_move(on_mouse_move)
canvas.on_mouse_up(on_mouse_up)

canvas.stroke_style = "#000000"

VBox(
    (canvas, HBox((button_gen, button_clear))),
    layout=Layout(height="auto", width="300px"),
)
Generate inputs for testing the model from your drawing#
[ ]:
aidge_tensor = None
try:
    number_np = canvas.get_image_data()
    # We got a numpy array with the shape of (28,28,4)
    # Transform it to (28,28)
    x = number_np[:, :, 3].astype("float32")
    aidge_tensor = aidge_core.Tensor(x / 255)
except:
    print("Please draw a number in the previous cell before running this one.")
Generate a main that will do an inference on the drawing.
[ ]:
if aidge_tensor:
    aidge_core.export_utils.generate_main_cpp(
        export_folder_name, model, inputs_tensor=aidge_tensor
    )
else:
    print("Please draw a number before generating the export.")
Compile the export and test it#
[ ]:
!cd lenet_export_fp32 && make
[ ]:
!./lenet_export_fp32/bin/run_export