
TensorRT export#
In this tutorial, we’ll walk through the process of performing 8-bit quantization on a simple model using TensorRT and Aidge. The steps include:
Exporting the model
Modifying the test script for quantization
Preparing calibration data
Running the quantization and profile the quantized model
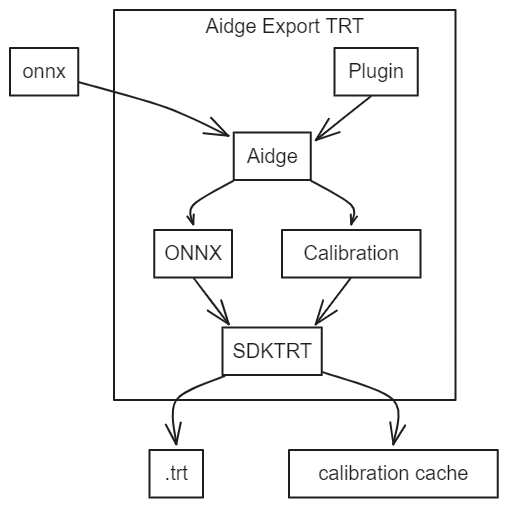
Furthermore, as shown in this image but not demonstrated in this tutorial, Aidge allows the user to:
Add custom operators via the plugin interface
Facilitate the transformation of user data into calibration data
Note: This notebook is not intended to be executed on Binder, as it requires a GPU-enabled environment with compatible CUDA drivers and TensorRT support.
0. Requirements for this tutorial#
Before starting this tutorial, please ensure you have met the following prerequisites:
Prerequisites#
Completed the Aidge 101 tutorial: We highly recommend completing the Aidge 101 tutorial to familiarize yourself with the Aidge framework basics.
Installed required Aidge modules: Make sure you have installed the following Aidge modules:
aidge_coreaidge_backend_cpuaidge_onnxaidge_model_exploreraidge_export_tensorrt
Compilation Requirements#
To compile the TensorRT export on your machine, you need one of the following:
Docker (recommended): Install Docker on your system. The export compilation chain can use Docker, which includes all necessary TensorRT dependencies, eliminating the need for manual TensorRT installation.
TensorRT SDK: If compiling directly on your host machine (without Docker), you must have TensorRT 8.6 or 10.10 installed with the correct packages configured.
1. Exporting the model#
[ ]:
import aidge_core

file_url = "https://huggingface.co/EclipseAidge/mobilenet_v2/resolve/main/mobilenetv2-7.onnx?download=true"
file_path = "mobilenetv2-7.onnx"

aidge_core.utils.download_file(file_path, file_url)
For visualizing the model structure, we recommend using Aidge Model Explorer:
[ ]:
import aidge_onnx
import aidge_model_explorer


model = aidge_onnx.load_onnx("mobilenetv2-7.onnx", verbose=False)

aidge_model_explorer.visualize(model, "mobilenetv2-7", embed=True)
Then let’s export the model using the aidge_export_tensorrt module.
[ ]:
# First, be sure that any previous exports are removed
!rm -rf export_trt
[ ]:
import aidge_export_tensorrt

# Generate export for your model
# This function takes as argument the name of the export folder
# and the onnx file or the graphview of your model
aidge_export_tensorrt.export("export_trt", "mobilenetv2-7.onnx")
The export povides a Makefile with several options to use the export on your machine. You can generate a C++ export or a Python export.
You also have the possibility to compile the export or/and the Python library by using Docker if your host machine doesn’t have the correct packages. In this tutorial, we generate the Python library of the export and use it a Python script.
All of these options are resumed in the helper of the Makefile (run make help in the export folder for more details).
[ ]:
# Compile the export Python library by using docker
# and the Makefile provided in the export
!cd export_trt/ && make build_lib_python_docker
2. Modifying the test script for quantization#
Next, you have to modify test.py by adding nb_bits=8 in the graph constructor and call model.calibrate().
calibrate() can accept three arguments:
calibration_folder_path: to specify the path to your calibration folder
cache_file_path: to use your pre-built calibration cache
batch_size: to specify the batch size for calibration data
[ ]:
%%writefile export_trt/test.py
"""Example test file for the TensorRT Python API."""

import build.lib.aidge_trt as aidge_trt
import numpy as np

if __name__ == '__main__':
    # Load the model
    model = aidge_trt.Graph("model.onnx", nb_bits=8)

    # Calibrate the model
    model.calibrate()

    # Initialize the model
    model.initialize()

    # Profile the model with 10 iterations
    model.profile(10)

    model.save("model")

    # Example of running inference
    # img: numpy.array = np.load("PATH TO NPY file")
    # output: numpy.array = model.run_sync([img])
3. Preparing the calibration dataset#
To ensure accurate calibration, it’s essential to select representative samples. In this example, we will use a 224x224 RGB image from the ImageNet dataset.
However, for practical applications, TensorRT suggests that “The amount of input data required is application-dependent, but experiments indicate that approximately 500 images are adequate for calibrating ImageNet classification networks”.
[ ]:
# Create calibration folder
!cd export_trt/ && mkdir calibration_folder
[ ]:
%matplotlib inline
import matplotlib.pyplot as plt
import matplotlib.image as mpimg

demo_img_path = "./data/0.jpg"

img = mpimg.imread(demo_img_path)
imgplot = plt.imshow(img)
plt.show()
This image has been preprocessed and stored in /data/ as 0.batch file. Information about the image’s shape is stored in the .info file.
[ ]:
import shutil

shutil.copy("data/.info", "export_trt/calibration_folder/.info")
shutil.copy("data/0.batch", "export_trt/calibration_folder/0.batch")
4. Generating the quantized model#
Finally, run the test script to quantize the model with the export python library and profile it.
[ ]:
!cd export_trt/ && make test_lib_python_docker
Following these steps have enabled you to conduct 8-bit quantization on your model. Upon completing the calibration, the calibration data can be reused if a calibration_cache exists, saving computational resources.
[ ]:
!tail -n +0 export_trt/calibration_cache
After quantization, feel free to save the generated TensorRT engine using model.save("name_of_your_model"). The method will save the engine into a .trt file.
To load the engine for further applications, use model.load("name_of_your_model.trt") after instancing a model.