Interactive GUI input mode
In the interactive GUI input mode, the simulator interactively asks the user to choose the transitions to take, etc. Choices are presented using a GUI (Graphical User Interface). The user makes choices via the GUI as well.
Layout
The following is an example of the simulator interactively asking the user to choose a possible transition:
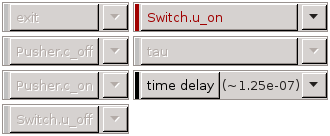
The events of the system are vertically listed, in alphabetical order, with event tau at the end, just before the time delay, reset, and undo. If there are too many elements to fit vertically, more columns are used. If things still don’t fit, a horizontal scroll bar is shown.
Availability
Choices for events are only present if the events are interactively chosen. If they are (semi-)automatically chosen, they are not shown in the GUI. Similarly, choices for time delay are only shown if time transitions or their durations are interactively chosen. For more information, see the Semi-automatic mode section below.
For event tau, the choices are additionally only shown if there is at least one tau edge in the specification.
The choice to reset the simulation is only shown if resetting the simulation is enabled. Similarly, the choice to undo transitions is only shown if undo is enabled.
If none of the choices are to be shown in the GUI, the GUI itself is not shown at all.
Buttons
For each element, there are two buttons. The left button shows the name of the event, or a description of the choice (e.g. time delay, reset), and can be used to quickly choose a transition. The second button shows an arrow, and can be used to show a popup menu, presenting additional choices. What exactly is chosen when clicking the button, and what exactly is shown in the popup menu, differs for the different choices. The sections below provide further details.
If no choice needs to be made at the moment, all buttons are disabled. If a choice needs to be made, only those buttons that represent active choices are enabled.
Styling
For non-urgent events, the label of the left button is italic. For urgent events, as well as for non-event choices, the label uses a normal font.
Before each element a colored box is shown. The box is gray while that particular choice is not available. If choices are available, the box is green for controllable events, red for uncontrollable events, blue for other events, and for everything else (time delay, reset, and undo) it is black when using a light theme and white when using a dark theme. The text of the left button is colored similarly to the box. The colors help to quickly identify elements with possible choices.
Labels
Between the buttons, a label may be shown, to provide more details. When the label is shown, and what text is shown, differs for the different choices. The sections below provide further details.
In the above image, the system has five events, besides the tau event. The simulator asks the user to choose between a transition for event Switch.u_on and a time transition.
Choosing an event transition
For an event, the first button makes it possible to quickly choose a transition for that event. If clicked, the possible transitions are filtered to those for the chosen event, and the automatic input component is asked to make the actual choice, based on its own configuration.
If multiple transitions are possible for a single event, the number of possible transitions is displayed as label between the two buttons for that event. The following image shows an example:
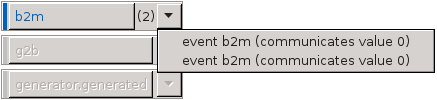
In this example, two transitions are possible for event b2m. By clicking the button labeled with b2m, the automatic input component is asked to choose between the two transitions, based on its own configuration. By clicking the arrow button, a popup menu is shown, showing the two transitions. The popup menu allows manually choosing which transition to take, by clicking the menu item of the transition you wish to take.
Choosing a time transition and duration
The time delay button makes it possible to quickly choose the time transition. By default the maximum allowed delay duration will be used. This duration is displayed as label between the two buttons, in short form with three significant digits. By clicking the arrow button, additional options become available. These options also show the complete durations. The following image shows an example:

At most 0.30000000000000066 units of time can pass (0.300 in short form). The first option is to choose a custom duration. The second option is to choose that maximum duration, similar to clicking the time delay button. The following image shows the dialog that is presented to the user to enter the custom duration:
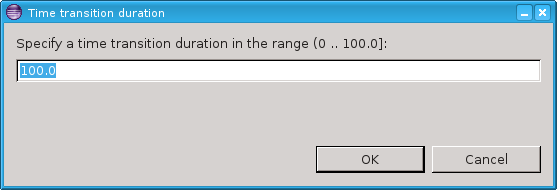
By entering an integer or real number for the duration, that exact amount of time units will pass, after clicking the OK button. If the Cancel button is clicked instead, the choice is canceled, and the user is again free to choose between all available choices.
Choosing to reset the simulation
The reset button makes it possible to reset the simulation to the initial state. The popup menu that can be shown by clicking on the arrow button, has only one option, which the same effect as clicking the button. The following image shows the popup menu:

Choosing to undo some transitions
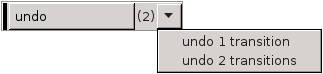
The undo button makes it possible to undo a single transition, and go back to the state just prior to that transition. The number of transitions that can be undone, is displayed as label between the two buttons.
Clicking the arrow button shows a popup menu with additional options. Menu items are present to undo 1 transition, to undo 2 transitions, to undo 3 transitions, etc, for as many transitions as can be undone. The following image shows an example with two transitions that can be undone:
At most 10 such menu items are shown. If more than 10 transitions can be undone, an additional choice is present, that allows entering a custom number of transitions to undo. The following image shows an example with 12 transitions that can be undone:

Selecting that last option will present the user with a dialog, to select the number of transitions to undo:
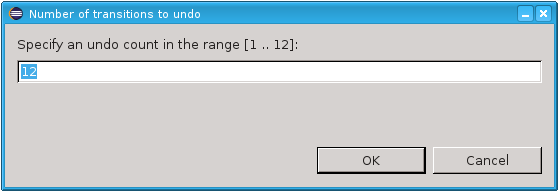
The number of transitions needs to be entered as a positive number, within the given range. Clicking the OK button will undo the requested number of transitions. If the Cancel button is clicked instead, the choice is canceled, and the user is again free to choose between all available choices.
Semi-automatic mode
By default, in the interactive GUI input mode, the user is asked to choose, even if for instance there is only one possible transition. Having to choose for every transition can become tiresome. To reduce the number of situations where a choice is required, the semi-automatic mode is available.
Choices that are no longer available due to them being automatically chosen by enabling semi-automatic mode, are not shown in the GUI of the interactive GUI input mode. See also the Availability section above.
By enabling semi-automatic mode to automatically choose time transitions (option value time), while not automatically choosing the delay durations of time transitions (option value timedur), time transitions are automatically chosen, but the user is still asked to choose the duration of the time transitions. For this choice, all non-time choices are disabled, making only the time related choices available. The effect of the time delay button remains the same, i.e. choosing the maximum allowed or available delay. The popup menu for the time delay also still shows the default options, to choose either a specific custom delay duration, or the maximum duration.
By enabling semi-automatic mode to automatically choose the delay durations of time transitions (option value timedur), while not automatically choosing the time transition themselves (option value time), the effect of the time delay button changes from choosing the time transition with the maximum allowed or available delay, to choosing the time transition and letting the automatic input component choose the actual delay duration, based on its own configuration. The popup menu for the time delay then only shows one option, to let the automatic input component choose, identical to the effect of the time delay button.
Termination
By closing the GUI of the interactive GUI input component, no more interactive choices can be made. The next time an interactive choice is to be made, the simulation terminates.
The simulation can also be terminated by clicking the red stop button of the Eclipse console.