Workstation example
This example shows:
Basing the width of an object on the value of a clock in one location, and setting it to a fixed value in another location.
Changing the fill color of a rectangle based on the current location of an automaton.
Updating multiple attributes of an SVG element, using multiple output mappings.
Specifying colors in SVG.
Improving scalability by making use of the reuse of mappings.
SVG image
The following SVG image is used for this example:
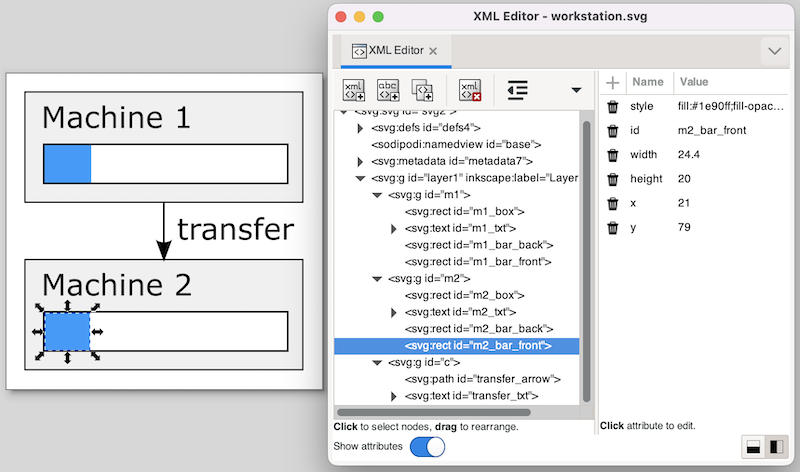
In the image, two machines are clearly visible. Each machine has a bar that shows the progress of the machine. Looking at the XML Editor window, we can see the bar has a background (box), and a foreground (front) rectangle. The width and fill color of the latter will be updated to reflect the machine’s status.
CIF specification
The following CIF specification models the workstation example:
svgfile "workstation.svg";

event generate, transfer, exit;

m1: Machine(1, 1.0, generate, transfer);
m2: Machine(2, 2.5, transfer, exit);

automaton def Machine(alg int nr; alg real ptime; event start, done):
  cont t der 1.0;

  location idle:
    initial;
    edge start do t := 0.0 goto processing;

  location processing:
    edge when t >= ptime goto completed;

  location completed:
    edge done goto idle;

  svgout id "m" + <string>nr + "_bar_front" attr "width"
    value scale(if processing: t else ptime end, 0, ptime, 0, 130);

  svgout id "m" + <string>nr + "_bar_front" attr "fill"
    value if idle : "gray" else "dodgerblue" end;
end
The example models a workstation with two machines. The first machine has a processing time of 1.0 time units and the second machine has a processing time of 2.5 time units. Each machine gets products to start processing, processes them, and sends them out as it is done. The first machine gets its input from an infinite generator (event generate). The second machine sends its finished products to an infinite exit buffer (event exit). Products are transported from the first machine to the second machine via a transport system (event transfer). Note that the Machine automaton definition has three locations. In location idle it is waiting for a product to enter the machine (event start). In location processing it processes the product, which takes ptime time units. Finally, in location completed it has completed processing the product, and waits until it can send it as output. After that, the machine is back in the idle location, where it waits for the next product.
Both machines (m1 and m2) are instantiations of the same automaton definition (Machine). The definition/instantiation mechanism allows us to specify the behavior of a machine only once, and still have multiple machines. This reuse improves scalability, as well as maintainability. The reuse of the behavior applies to the visualization as well. By declaring the output mappings in the automaton definition, we get mappings for each instantiation of an actual machine.
Since each machine has its own graphical representation in the SVG image, the graphical elements for the different machines have different ids as well. However, they only differ in the number that is used. For instance, there is an m1_bar_front rectangle for the first machine, and an m2_bar_front rectangle for the second machine. In order to make sure each machine gets the correct mappings that apply to their own ids, we added an algebraic parameter nr to the definition of Machine, that indicates to the machine which machine it is. We can then use that nr to compute the id. For machine m1, the Machine automaton definition is instantiated with value 1 for the nr parameter. The "m" + <string>nr + "_bar_front" id expression then evaluates to "m1_bar_front", and m1_bar_front is used as the id for the output mapping.
The first mapping updates the width of the m*_bar_front rectangles to show the progress of the machines. If a machine is actually processing, the value of clock t is used, as that clock indicates how much of the processing has been completed.
When a machine is idle (and waiting for a product) or has completed processing (but can not yet push the processed product out of the machine), the progress is either nothing, or everything. In both cases, we choose the full processing time (variable ptime) as the value. The reason to choose this value for the idle location, becomes clear in the next output mapping.
The ptime value is chosen for the completed location to ensure that the rectangle does not get wider than the box (rectangle m*_bar_back). If we would have used the value of clock t in this location as well, then since the value of the clock keeps increasing in that location, the value becomes larger than ptime, and thus the progress bar would be partly outside the box (rectangle m*_bar_back).
The value that is selected for this first mapping, is transformed using the scale standard library function. The function is used to scale the processing time interval [0 .. ptime] to the [0 .. 130] interval, which represents the width of the rectangle in pixels. The upper bound of 130 pixels matches the width of the box (rectangle m*_bar_back).
The second mapping updates the fill color (foreground color) of the same SVG element. In the idle location, the color is gray. Since we used the full width in that location (value ptime in the [0 .. ptime] interval), the entire box is then filled by a gray rectangle, indicating that the machine is idle.
For the other locations, the fill color is set to dodgerblue. Since the width in pixels is a value in the interval [0 .. 30], part of the box will be blue, and part will be the background color of the box, which is white. In the completed location, the full width is used as well, resulting in a completely blue box, indicating that the machine has a completely processed product, waiting to be released as output.
Colors in SVG
In the mappings, as described above, we used names to identify colors. SVG however, provides several ways to specify colors:
Named colors, such as
red,yellow,lightblueorburlywood.Decimal RGB (red-green-blue) colors, such as
rgb(255,0,0)forred, orrgb(255,255,0)foryellow.Hexadecimal RGB (red-green-blue) colors, such as
#f00or#ff0000forred, or#ff0or#ffff00foryellow.RGB (red-green-blue) colors in percentages, such as
rgb(100%,0%,0%)forred, orrgb(100%,100%,0%)foryellow.
Every color can be specified by one of the three RGB color variants. The colors that have a predefined color name, can be specified in four different ways.